添加你自己的 Python 模块
将您自己的 Python 模块添加到 CodeProject.AI
回想一下,在 添加新模块到 CodeProject.AI 中,为将模块(在开发模式下)添加到 CodeProject.AI 服务器共有 6 个主要任务
- 查找或编写您想包含的代码。这可以是您在线找到的项目、您自己编写并希望包含的项目,或者您可以从头开始创建新项目。
- 编写一个适配器,负责处理您编写或包含在模块中的 AI 代码与 CodeProject.AI 服务器之间的通信。
- 提供一个
modulesettings.json文件,该文件描述模块并提供 CodeProject.AI 如何启动模块的说明。 - 创建一个安装脚本(通常很短),用于设置先决条件(下载模型、安装必要的运行时)。
- (可选但推荐)创建一个简单的
explore.html文件,用于测试您的模块,并与 CodeProject.AI Explorer 集成。 - (可选但推荐)创建一个打包器,以便您的模块可以打包并包含在 CodeProject.AI 的主注册表中。
我们将逐步介绍所有这些步骤,但首先让我们介绍模块如何与外界通信。
CodeProject.AI Server 的客户端如何知道如何调用给定的模块?
每个模块都定义一个形式为 category/operation/command 的路由。例如,一个提供物体检测的计算机视觉模块,使用名为“animals”的模型,可能会定义一个路由 vision/detect/animals。此路由在模块的 modulesettings.json 文件中指定。服务器负责路由。一个模块可以拥有任意数量的路由。
客户端如何知道要提供什么输入/输出,以及如何将输入/输出发送到/来自模块?
同样,modulesettings.json 定义了每个模块的每个路由的输入/输出。客户端需要通过模块的路由(如上所述)向 CodeProject.AI Server 发送一个 HTTP POST 请求,请求体包含模块期望的名称/值对。此 HTTP 调用随后被转换为 RequestData 对象并传递给模块,然后模块使用 RequestData 方法从该对象中获取值和文件。
一旦模块获得了输入数据,它就会使用其 process 方法处理该数据,然后将结果作为 JSON 包返回给服务器。返回数据在 modulesettings.json 文件中进行了记录,但对应该返回什么没有严格的规则,除了要求响应必须包含一个 success 标志来指示推理操作是否成功。
服务器本身也会将数据添加到此返回包中,例如计时数据和元数据,如处理请求的模块名称。
这归结为 process 方法应接受一个 RequestData 对象并返回一个 JSON 对象。
对于长时间运行的进程,模块可以简单地返回一个“succeeded”消息作为返回响应,然后服务器可以通过 status 方法提供有关请求进度的进一步更新。这是另一篇文章的主题。
选择要添加为模块的代码
我们想要一个易于集成、自成一体、并且能在 Python 和/或 .NET 的当前生态系统中在 Windows、macOS 和 Ubuntu 上工作的模块。
在此演示中,我们将使用 rembg 模块。rembg 是一个简单而有趣的 AI 模块,它可以接受任何包含主体的照片并移除图像中的背景。它在 Python 3.9 或更高版本下运行。它暴露了一个简单的 API,可以离线运行,并且是完全自包含的。
编写模块
为了使编写模块更简单、更快,我们将使用 CodeProject.AI Server 的 Python SDK,并创建 ModuleRunner 类的子类。此类提供了 5 个可覆盖的方法(尽管只有一个是强制性的),并负责处理与服务器通信的所有管道。
这些方法是
initialise(可选) - 此方法提供模块初始化(如果需要)。process(必需) - 执行 AI 请求的实际处理。status(可选) - 如果您希望向服务器提供状态更新,请覆盖此方法。selftest(可选) - 此方法在安装时调用,并提供测试系统的机会。cleanup(可选) - 提供在模块运行时清理任何正在使用的资源的机会。
对于我们的示例,我们将把一个 rembg_adapter.py 文件添加到我们的项目中,以创建我们的 ModuleRunner 类。此类将仅覆盖 process 和 selftest 方法。然后,我们将放入从原始 rembg 项目获取的代码。为了保持整洁,我们将所有 rembg 代码放入一个 rembg 子文件夹中,并将我们的适配器放在根目录。
Python 包和虚拟环境呢?
如果我们使用 Python,我们应该使用虚拟环境,并在该虚拟环境中安装所有 Python 包。幸运的是,这都是在模块安装过程中自动完成的:我们只需要在 modulesettings.json 文件(下文讨论)中指定我们要使用 Python,并包含一个 `requirements.txt` 文件(下文也讨论)。设置系统将确保 Python 已安装,创建虚拟环境,并为我们安装所有 Python 包。它甚至会检查它们是否已正确安装,并在出现问题时通知我们。
导入虚拟环境中的模块时,应确保首先包含 CodeProject.AI 服务器 SDK 文件。这确保了到已安装模块的路径设置正确。
日志记录
模块中存在可访问的日志记录方法,但所有输出到 stdout(例如控制台输出)的内容都会被服务器捕获并在仪表板中显示,因此如果您的原始代码将内容输出到控制台,那也没关系:最终用户都能看到。
代码
背景去除器的核心在 rembg/bg.py 模块中,因此我们需要将其导入到我们的适配器中,以及 CodeProject.AI Server SDK,以及我们需要的任何其他模块。我们将添加我们要覆盖的方法,并相应地填充这些方法。
在我们的例子中,没有初始化,没有清理,我们也不会传递任何状态信息(实际上没什么可报告的),所以只剩下 process 和 selftest。
这些代码非常简单。对于 process,我们将从传递给我们的 RequestData 对象获取输入数据,并从中提取一个文件和一个值(命名为 use_alphamatting)。这两个参数将在 modulesettings.json 文件中列出,因此我们希望调用者已经包含了这些值。如果他们没有,调用将失败。假设一切正常,我们调用原始 rembg 项目的 remove 方法,并将结果作为 JSON 对象发送回服务器。非常简单。
selftest 方法同样简单。我们创建一个 RequestData 对象,用测试数据填充它,调用 process 方法,并报告成功或失败。必须小心确保,如果需要环境变量,则必须在调用之前设置这些环境变量。
最后,我们需要确保我们的适配器能够启动。这是通过 Module Runner 的 start_loop 方法完成的。
最终的完整代码如下。
# Import our general libraries
import sys
import time

# Import the CodeProject.AI SDK. This will add to the PATH var for future imports
sys.path.append("../../SDK/Python")
from request_data import RequestData
from module_runner import ModuleRunner
from common import JSON

# Import modules we need from our virtual environment
from PIL import Image

# Import the method of the module we're wrapping
from rembg.bg import remove

class rembg_adapter(ModuleRunner):

    def process(self, data: RequestData) -> JSON:
        """ Processes a request from the client and returns the results"""
        try:
            # Get the input data. In this case an image and a bool value for the
            # 'use_alphamatting' param
            img: Image             = data.get_image(0)
            use_alphamatting: bool = data.get_value("use_alphamatting", "false") == "true"

            # Make the call to the AI code we're wrapping (and time it)
            start_time = time.perf_counter()
            (processed_img, inferenceTime) = remove(img, use_alphamatting)
            processMs = int((time.perf_counter() - start_time) * 1000)

            # Return a JSON object
            return {
                "success":      True,
                "imageBase64":  RequestData.encode_image(processed_img),
                "processMs" :   processMs,
                "inferenceMs" : inferenceTime
            }

        except Exception as ex:
            self.report_error(ex, __file__)
            return {"success": False, "error": "unable to process the image"}

    def selftest(self) -> JSON:

        import os
        os.environ["U2NET_HOME"] = os.path.join(self.module_path, "models")
        file_name = os.path.join("test", "chris-hemsworth-2.jpg")

        request_data = RequestData()
        request_data.add_file(file_name)
        request_data.add_value("use_alphamatting", "true")

        result = self.process(request_data)
        print(f"Info: Self-test for {self.module_id}. Success: {result['success']}")
        # print(f"Info: Self-test output for {self.module_id}: {result}")

        return { "success": result['success'], "message": "Remove background test successful" }

if __name__ == "__main__":
    rembg_adapter().start_loop()
关于此代码的几点说明
- 我们使用了 ModuleRunner 的
report_error方法来报告异常。此方法接受异常和当前文件名,并将错误报告给服务器。它处理了提供合理错误报告所需的所有格式化和堆栈跟踪。 -
我们对 rembg 项目中的
remove方法做了一个小的(可选)更改,以便我们能够报告推理时间。这不是必需的:它只是一个不错的补充。在
/rembg/bg.py中,我们将masks = session.predict行包装在一些计时代码中。Python我们将返回一个包含修改后的图像和推理时间的元组start_time = time.perf_counter() masks = session.predict(img) inference_time: int = int((time.perf_counter() - start_time) * 1000)python return (bio.read(), inference_time)。这是我们添加的唯一代码。rembg 模块按原样复制粘贴,我们正在创建一个 CodeProject.AI SDK 模块 module_runner.py 中的 ModuleRunner 类的子类。其他任何(代码方面)都不需要添加。
modulesettings.json 文件
我们需要告诉客户端应用程序它们将如何调用我们的模块,以及 CodeProject.AI 服务器需要监听哪个路由。此路由可以是任何我们想要的,所以让我们选择路由 /v1/image/removebackground。
我们的模块设置文件(modulesettings.json)还允许我们定义对进程本地的环境变量。在这里,我们将让 rembg 知道我们在设置脚本中下载的模型文件存储在哪里。
模块设置向服务器提供用于创建包和包列表的发布信息,这反过来又允许仪表板显示人类可读的信息,例如描述、版本、作者、基于的项目和许可信息。
模块在仪表板的列表下拉菜单中应添加的任何自定义菜单都在模块设置文件的 Menus 对象下定义。
最后,随着模块和服务器本身的演进,模块与服务器之间的版本兼容性很重要。ModuleReleases 对象定义了哪个模块版本与哪个服务器版本兼容。
由于这是一个 Python 模块,我们将运行时设置为 Python3.9,并要求它调用我们的适配器文件来启动进程。
{
  "Modules": {

    "BackgroundRemover": {
      "Name": "Background Remover",
      "Version": "1.1.0",

      "PublishingInfo" : {
        "Description": "Automatically removes the background from a picture",
        "IconURL": null,
        "Category": "Image Processing",
        "Stack": "Python, ONNX",
        "License": "SSPL",
        "LicenseUrl": "https://mongodb.ac.cn/licensing/server-side-public-license",
        "Author": "Chris Maunder",
        "Homepage": "https://codeproject.com/ai",
        "BasedOn": "rembg",
        "BasedOnUrl": "https://github.com/danielgatis/rembg"
      },

      "LaunchSettings": {
        "AutoStart": false,
        "FilePath": "rembg_adapter.py",
        "Runtime": "python3.9",
        "RuntimeLocation": "Local",       // Can be Local or Shared
        "PostStartPauseSecs": 0           // Generally 1 if using GPU, 0 for CPU
      },

      "EnvironmentVariables": {
        "U2NET_HOME": "%CURRENT_MODULE_PATH%/models" // where to store the models
      },

      "GpuOptions" : {
        "InstallGPU": false,              // GPU support not provided
        "EnableGPU": true,                // Will be coerced to false if InstallGPU = false
        "AcceleratorDeviceName": null,    // = default
        "Parallelism": 1,                 // 0 = Default (number of CPUs - 1)
        "HalfPrecision": "enable"         // 'Force', 'Enable', 'Disable': whether to force on, allow, or disable half-precision ops
      },

      "InstallOptions" : {
        "Platforms": [ "all", "!linux", "!raspberrypi", "!orangepi", "!jetson" ], // issues with numpy on linux
        "PreInstalled":   false,          // Is this module pre-installed with the server (eg Docker containers)
        "ModuleReleases": [               // Which server version is compatible with each version of this module.
          { "ModuleVersion": "1.0.0", "ServerVersionRange": [ "1.0",   "2.0.8"  ], "ReleaseDate": "2022-11-01" },
          { "ModuleVersion": "1.0.1", "ServerVersionRange": [ "2.0.9", "2.4.0"  ], "ReleaseDate": "2023-12-06", "ReleaseNotes": "Updated modulesettings schema", "Importance": "Minor" },
          { "ModuleVersion": "1.1.0", "ServerVersionRange": [ "2.4.0", ""       ], "ReleaseDate": "2023-12-09", "ReleaseNotes": "Installer updates" },
        ]
      },

      "RouteMaps": [
        {
           ...
        }
      ]
    }
  }
}
EnvironmentVariables 部分定义了将用于设置模块可能需要的环境变量的键/值对。在这种情况下,是 AI 模型文件的路径。这是 rembg 模块特定且由其定义的值。
CURRENT_MODULE_PATH 是一个宏,将展开到包含当前模块的目录的位置。在本例中是 /src/modules/BackgroundRemover。
“Launch instructions”部分下的设置应该是自 explanatory 的。FilePath 是要执行的文件路径,相对于 MODULES_PATH 目录。AutoStart 设置此模块是否将在启动时启动。
Runtime 定义了将启动文件的运行时。我们目前支持 dotnet (.NET)、python37 (python 3.7) 和 python39 (Python 3.9)。如果省略,CodeProject.AI Server 将尝试根据 FilePath 进行猜测。RuntimeLocation 指的是此模块的运行时(在本例中为 Python3.9 环境)应本地安装到模块,还是安装到共享位置,其中库将在多个模块之间共享。共享可以节省空间,但代价是兼容性问题。
Platforms 数组包含服务可以运行的每个平台的一个条目。目前支持 Windows、Linux、Linux-Arm64、macOS 和 macOS-Arm64。
路由映射
该文件还在 RouteMaps 部分定义了模块的 API 路由。
{
  "Modules": {
    "ModulesConfig": {
      "BackgroundRemoval": {
         "Name": "Background Removal",
         "Version": "1.0",
         "Description": "Removes backgrounds from images.",

         ...

      "RouteMaps": [
        {
          "Name": "Background Remover",
          "Route": "image/removebackground",
          "Method": "POST",
          "Command": "removebackground",
          "Description": "Removes the background from behind the main subjects in images.",
          "Inputs": [
            {
              "Name": "image",
              "Type": "File",
              "Description": "The image to have its background removed."
            },
            {
              "Name": "use_alphamatting",
              "Type": "Boolean",
              "Description": "Whether or not to use alpha matting.",
              "DefaultValue": "false"
            }
          ],
          "Outputs": [
            {
              "Name": "success",
              "Type": "Boolean",
              "Description": "True if successful."
            },
            {
              "Name": "imageBase64",
              "Type": "Base64ImageData",
              "Description": "The base64 encoded image that has had its background removed."
            },
            {
              "Name": "inferenceMs",
              "Type": "Integer",
              "Description": "The time (ms) to perform the AI inference."
            },
            {
              "Name": "processMs",
              "Type": "Integer",
              "Description": "The time (ms) to process the image (includes inference and image manipulation operations)."
            }
          ]
         ]
       }
     }
   }
}
Path 是 API 路径,在本例中是 *localhost:32168/v1/image/removebackground*。请记住,这是我们(任意)选择的 API。它可以是任何名称,只要它当前未在使用中。
Method 是要使用的 HTTP 方法。在本例中是 POST。
Command 是 API 控制器中将被调用的方法,在本例中是 removebackground。Command 会传递给 process 方法,只有当您的 process 方法需要处理多个命令时才需要。
Description、Inputs 和 Outputs 目前仅用于文档。
创建一个安装脚本。或者两个。
rembg 模块包括以下内容:
- Python 代码
- Python 3.9 解释器
- 一些 Python 包
- AI 模型
为了确保这些都在开发环境中就位,我们需要在包含我们项目的文件夹中创建一个 install.bat 安装脚本。在本例中,除了下载模型之外,我们不需要做任何其他事情。Python 运行时已自动设置,包也是如此。没有需要安装的库或驱动程序,因此我们的安装脚本很简单。
适用于 Windows (install.bat)
此脚本将由全局 setup.bat 脚本自动调用。
:: Download the models and store in /models
call "%sdkScriptsPath%\utils.bat" GetFromServer "rembg-models.zip" "models" "Downloading Background Remover models..."
显然,这个脚本除了下载模块的模型之外,不需要做太多事情。
编写安装脚本时,您可以使用以下变量和方法:
可用的变量
| 变量 | 描述 |
|---|---|
| absoluteAppRootDir | 应用程序的根路径(默认值:C:\Program Files\CodeProject\AI) |
| sdkScriptsPath | 安装实用程序脚本的路径(%rootPath%\SDK\Scripts) |
| runtimesPath | 已安装运行时的路径(%rootPath%/src/runtimes) |
| downloadPath | 下载将存储的路径(%sdkScriptsPath%\downloads) |
| modulesPath | 所有 AI 模块的路径(%rootPath%\src\modules) |
| moduleDir | 包含此模块的目录名称(默认:当前目录的名称) |
| os | “windows”对于此脚本。 |
| 架构 | “x86_64”或“arm64”。 |
| platform | “windows”对于此脚本。 |
| verbosity | quiet、info 或 loud。使用此选项确定输出的噪声级别。 |
| forceOverwrite | 如果为 true,则确保强制重新下载和重新复制下载内容。GetFromServer 将遵守此值。对于 DownloadAndExtract,请自行操作。 |
可用方法(通过 `call %sdkScriptsPath%\utils.bat ` 调用)
| 方法 | 描述 |
|---|---|
| WriteLine [foreground [background]] | 使用给定的颜色(例如,调用 %sdkScriptsPath%\utils.bat WriteLine "Hi" "green")写入文本,不带换行符。 |
| WriteLine text [foreground [background]] | 使用给定的颜色写入带换行符的文本。 |
| GetFromServer filename moduleAssetDir message | 从服务器下载文件并将其放置在模块文件夹中指定的目录中。
|
| DownloadAndExtract storageUrl filename downloadPath dirNameToSave message | 从远程服务器下载文件、解压并存储在给定文件夹中。
|
适用于 Linux 和 macOS (install.sh)
该脚本与 Windows 版本基本相同。
Linux / macOS 中可用的变量和方法与 Windows 中的相同,不同之处在于 Linux/macOS 中的方法使用驼峰式命名法。
创建一个简单的 explore.html 文件
为了测试我们在 CodeProject.AI Server 下运行的模块,我们将编写一个简单的网页,通过其 API 调用模块并显示结果。我们通过一个名为 explore.html 的特殊文件来实现这一点,该文件将以一种方式编写,允许 CodeProject.AI Server 的 Explorer 从此 explore.html 文件中提取 UI 并将其集成到服务器的主 explorer.html 文件中。
整个 HTML 文件显示在下方。请注意由以下标记的 3 个部分:
- START/END EXPLORER STYLE
- START/END EXPLORER MARKUP
- START/END EXPLORER SCRIPT
这三个部分将从该文件中提取并插入到主服务器的 explorer.html 文件中。为了无缝工作,最好让您的此模块的 explore.html 测试文件使用相同的脚本并遵循与 explorer.html 相同的命名约定。
具体来说
- 我们包含了 explorer.js 类以访问用于调用服务器 API 的方法。
- 我们包含了
imgPreview和imgMask元素用于显示图像结果。 - 我们包含了一个
results元素用于显示文本结果。 - 我们为可能存在命名冲突的 ID 添加了
_MID_宏作为前缀。在主 explorer.html 文件中,此标记将被模块名称替换,以避免名称冲突。
<html>
<head>
    <meta charset="utf-8" />
    <title>Background Remover Module Test</title>

    <link id="bootstrapCss" rel="stylesheet" type="text/css" href="https://:32168/assets/bootstrap-dark.min.css">
    <link rel="stylesheet" type="text/css" href="https://:32168/assets/dashboard.css?v=2.5.0.0">
    <script type="text/javascript" src="https://:32168/assets/explorer.js"></script>

    <style>
/* START EXPLORER STYLE */
/* END EXPLORER STYLE */
    </style>

</head>
<body class="dark-mode">
<div class="mx-auto" style="max-width: 800px;">

    <h2 class="mb-3">Background Remover Module Test</h2>
    <form method="post" action="" enctype="multipart/form-data" id="myform">

<!-- START EXPLORER MARKUP -->
        <div class="form-group row">
            <label class="col-form-label col-2">Image</label>
            <input class="col form-control btn-light" id="_MID_removeBgInput" type="file" style="width:17rem"
                    onchange="return previewImage(this)" />
            <input class="form-control btn-success" type="button" value="Remove Background"
                    style="width:11rem" id="_MID_removeBackground"
                    onclick="_MID_onRemoveBackground(_MID_removeBgInput, _MID_use_alphamatting.checked)" />
        </div>
        <div class="form-group row mt-1 justify-content-end">
            <div class="checkbox checkbox-primary col-4">
                <input id="_MID_use_alphamatting" class="styled" type="checkbox" checked>
                <label for="_MID_use_alphamatting">Use Alpha matting</label>
            </div>
        </div>
<!-- END EXPLORER MARKUP -->

        <div class="w-100 position-relative form-control my-4 p-0">
            <div id="imgMask" class="position-absolute"
                    style="left:0;top:0;pointer-events:none;z-index:10"></div>
            <img src="" id="imgPreview" class="w-100" style="height:250px;visibility:hidden">
        </div>
        <div>
            <h2>Results</h2>
            <div id="results" name="results" class="bg-light p-3" style="min-height: 100px;"></div>
        </div>

    </form>

    <script type="text/javascript">
// START EXPLORER SCRIPT

        function _MID_onRemoveBackground(fileChooser, use_alphamatting) {

            clearImagePreview();

            if (fileChooser.files.length == 0) {
                alert("No file was selected for background removal");
                return;
            }

            previewImage(fileChooser);
            let images = [fileChooser.files[0]];
            let params = [["use_alphamatting", use_alphamatting]]

            setResultsHtml("Removing background...");
            submitRequest('image', 'removebackground', images, params, function (data) {
                setResultsHtml("Background Removal complete" + getProcessingMetadataHtml(data));
                showResultsImageData(data);
            });
        }
// END EXPLORER SCRIPT
    </script>
</div>
</body>
</html>
一旦服务器运行,并且此模块已启动,在本地启动此 HTML 页面将允许您实时测试模块。
创建一个打包器
最后一步(可选)是创建一个打包器。包创建一个 zip 文件,安装程序可以安装该文件。在本例中,安装程序只是解压模块的包并运行一个命令来下载模型,因此我们的包只需要创建要解压的 zip 文件。
@Echo off
REM Module Packaging script. To be called from create_packages.bat

set moduleId=%~1
set version=%~2

tar -caf %moduleId%-%version%.zip --exclude=__pycache__  --exclude=*.development.* --exclude=*.log ^
    rembg\* *.py modulesettings.* requirements.* install.sh install.bat explore.html test\*
安装和测试
此时,我们有了一个模块、一个安装脚本和一个测试客户端。让我们来运行一下。
-
确保您已下载最新的 CodeProject.AI 仓库。该仓库已包含我们上面讨论过的所有代码。
-
运行开发安装脚本。这将识别您的新脚本,然后运行它以确保 Python 3.9 已安装并设置好,并且必需的 Python 模块已安装。
-
通过在 Visual Studio 或 VS Code 中启动新的调试会话来启动服务器。
-
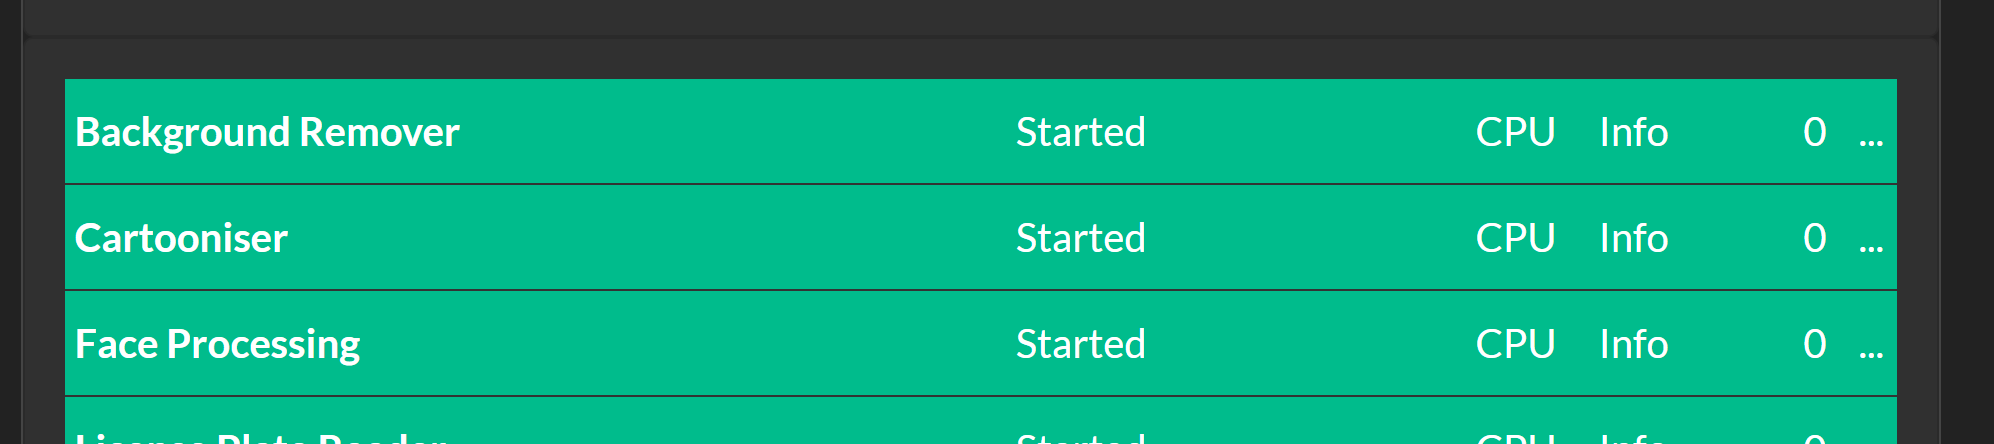
在调试模式下,CodeProject.AI Dashboard 会在运行时自动启动。服务器启动后,所有后端模块,包括背景去除模块,仪表板将显示它已知的模块。
-
在浏览器中启动
explore.html文件,选择一个文件,然后单击“Submit”按钮。结果应该会显示出来。同时也在服务器的 explorer.html 中测试。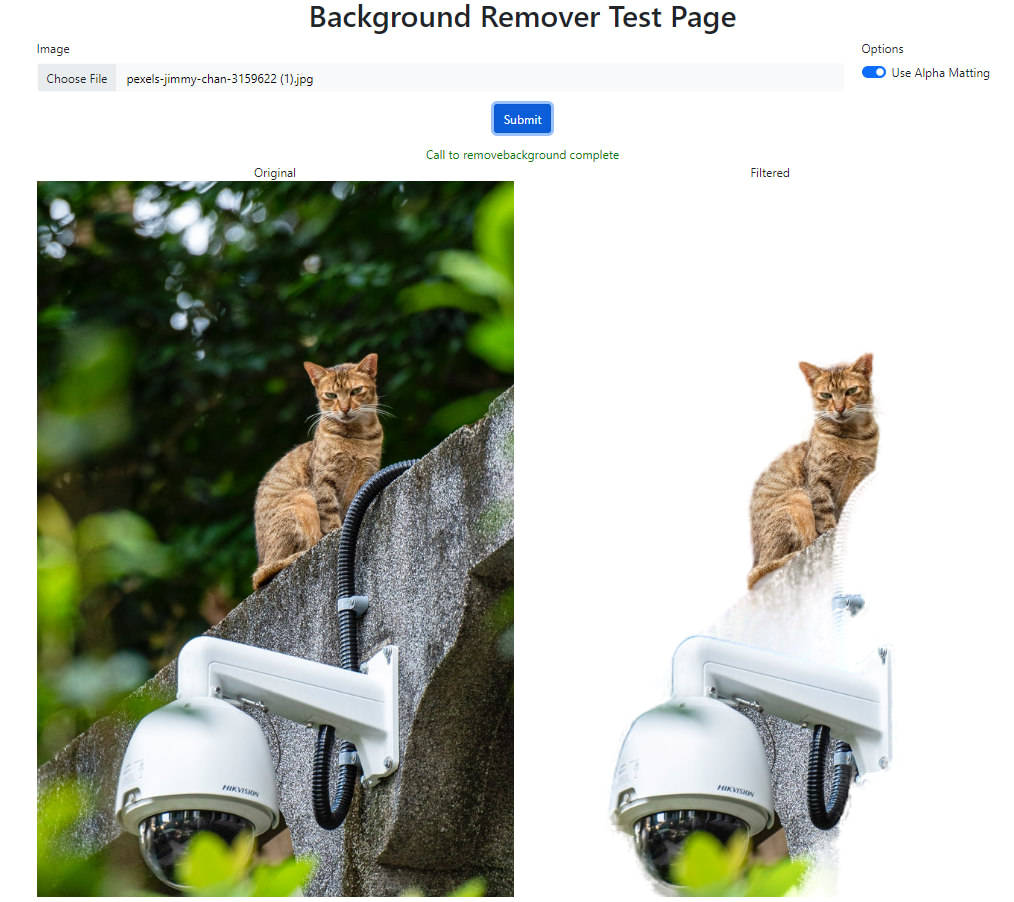
下一步?
这取决于您。我们演示了一个非常简单的 AI 模块,可以从图像中移除背景。主要工作是:
- 确保您在服务器上有可用的资产(例如模型),以便可以下载。
- 更新安装脚本,以便您的资产可以下载并移到位,并确保您拥有必要的运行时和库。
- 放入您的模块代码并编写一个适配器,以便它可以与 CodeProject.AI Server 通信。
- 编写一个描述您的模块 API 的 modulesettings 文件。
- 测试!永远是乐趣所在。
您可以添加的内容几乎是无限的。我们的目标是让您作为开发人员能够轻松地添加自己的 AI 模块,并反过来受益于其他人添加的模块。混合搭配,玩转不同的训练模块集,尝试不同的设置,看看您可以将它带到哪里。
这关乎学习,也关乎乐趣。放手去做。