
使用 Strus 构建搜索引擎(教程)
4.67/5 (8投票s)
本教程基于一个 Docker 镜像,将引导您完成一个基于 Strus(project-strus.net)的简单搜索引擎的开发,Strus 是一系列用于构建搜索引擎的库和命令行工具。
目标
本教程的目的是让您能够从浏览器发出查询,该查询由 Nginx Web 服务器上的 PHP(PHP 7)脚本执行,并理解查询的执行过程。您所需的所有先决条件都通过 Docker 镜像提供。您只需要安装 Docker。本教程大约需要 30 分钟完成。玩得开心!
更新
2017 年 10 月 15 日
本文现已基于 Docker 镜像,使用了 Strus 的较新版本 0.15,其语言绑定基于 Papuga 而非 SWIG。PHP 5 的支持已在重写中被放弃,转而支持 PHP 7。所有示例都已修复并正在运行,但图像和不同步骤的结果尚未更新,除非它们在语法上有所不同。
引言
要执行本教程的步骤,您需要一些关于 Unix shell 编程的中间知识,并且了解 PHP 的基础知识将非常有帮助。对于分析器配置,将使用一种简单的专有定义语言。但对于之前见过其他配置语言的用户来说,这并不会陌生。
在本教程中,您将下载用于构建搜索索引的数据集,使用一些 bash 命令预处理数据,创建索引的存储,定义分析数据的配置,填充搜索索引,最后使用 PHP 脚本发出查询。所有先决条件,如 Nginx Web 服务器、PHP 7 以及 Strus 库和程序,都可通过 Docker 镜像获得。所以您只需要在您的机器上安装 Docker。
本教程中使用的数据集来自 MusicBrainz (musicbrainz.org)。请遵守 此数据集的许可!
背景
本教程的背景是 Strus 项目,托管在 GitHub 上。如果您想看看 Strus 如何处理更大的数据集合,您也可以看看 完整的 Wikipedia 数据集的演示搜索(英文)。您也可以在那里找到关于这个项目的描述。Wikipedia 项目的复杂性将超出教程的极限。本教程仅旨在展示如何基于一个小型集合(282,000 条)和包含约十二个术语的简单结构,用 Strus 轻松构建搜索引擎。
必备组件
您需要一个 Docker 安装。
要运行本教程,您需要互联网连接。
第一步:启动 Docker 容器
要启动 Docker 镜像,请在您的 shell 中键入以下命令
docker run -p 40080:80 -t -i patrickfrey/strus-ub1604-nginx:v0_15 /bin/bash
您将看到类似以下的提示
root@8cbc7f49f3cf:/home/strus#
本教程中所有后续的 shell 命令都将在该 Docker 容器的 shell 中执行。
第二步:下载和准备数据
如果您想跳过此部分,可以直接执行脚本 step_fetchData.sh。此脚本将在方便的开发者机器上花费约一分钟执行此处描述的步骤。
否则,您需要手动从 MusicBrainz 获取数据。我们将转储唱片发行的转储并将其转换为我们将使用的专有 XML。由于有许多项需要处理,我们将把最多 100 条记录放入一个文件中。分析器将被配置为将这 100 条记录中的一项视为一个文档。使用以下命令下载并解压数据
准备数据目录
我们创建一个数据目录,因为 MusicBrainz 文件都解压在当前目录中。
mkdir data
cd data
下载并解压数据转储
wget http://ftp.musicbrainz.org/pub/musicbrainz/data/fullexport/LATEST
LATEST=`cat LATEST`
wget http://ftp.musicbrainz.org/pub/musicbrainz/data/fullexport/$LATEST/mbdump-cdstubs.tar.bz2
bzip2 -d mbdump-cdstubs.tar.bz2
tar -xvf mbdump-cdstubs.tar
创建文档
我们计算将要分配的最大文档标识符,并将 $ndocs 设置为我们将获得的文档的最大数量。每个文档最多包含 100 个要插入的项目。对于每个文档标识符,我们创建一个带有 XML 头的文档。
cat mbdump/release_raw | sed 's/\&/\&/g' | sed 's/</\</g' | sed 's/>/\>/g' > dump.txt
ndocs=`cat dump.txt | awk -F"\t" '{if(min=="")min=max=$1; if($1>max) {max=$1}; if($1< min) {min=$1}; } END {print int((max+1)/100)}'`
mkdir doc
idoc=0
while [ $idoc -le $ndocs ]
do
echo "<?xml version=\"1.0\" encoding=\"UTF-8\" standalone=\"yes\" ?>" > doc/$idoc.xml
echo "<list>" >> doc/$idoc.xml
idoc=`expr $idoc + 1`
done
用转储内容填充文档
对于我们想处理的每一项,我们创建一个自己的 XML 标签。每条记录都用一个 '<item>...</item>' 标签标记。
cat dump.txt \
  | awk -F"\t" '{FNAME=int($1/100); print "<item><id>" $1 "</id><title>" $2 "</title><artist>" $3 "</artist><date>" $4 "</date><upc>" $9 "</upc><note>" $10 "</note></item>" >> "doc/"FNAME".xml" }'
idoc=0
while [ $idoc -le $ndocs ]
do
    echo "</list>" >> doc/$idoc.xml
    idoc=`expr $idoc + 1`
done
离开数据目录并检查结果
我们现在已经预处理了 MusicBrainz 示例集合,其中包含约 282,000 条记录。我们返回上一级目录并检查我们得到的内容。应该有大约 3200 个文件,每个文件应该包含大约 100 项。
ls doc/
你得到
0.xml     1267.xml  1536.xml  1805.xml  2074.xml  2343.xml  2612.xml  2882.xml  3150.xml 461.xml  730.xml
1.xml     1268.xml  1537.xml  1806.xml  2075.xml  2344.xml  2613.xml  2883.xml  3151.xml  462.xml  731.xml
... (more)
这是 Strus 的一个示例输入文件片段。您可以使用以下命令查看前 5 行
head -n 7 doc/999.xml
我们得到:(可能略有不同,因为使用的数据会不时更新)
<?xml version="1.0" encoding="UTF-8" standalone="yes" ?>
<list>
<item><id>99929</id><title>Flutterstrut</title><artist>Hundred Year Flood</artist><date>2009-06-18 01:37:51.35028+00</date><upc>881387000018</upc><note>CD Baby id:hyf2</note></item>
<item><id>99999</id><title>The Hanging Garden</title><artist>Hypnotique</artist><date>2009-06-18 01:37:52.548532+00</date><upc>634479159961</upc><note>CD Baby id:hypnotique</note></item>
<item><id>99994</id><title>Hypnopilot</title><artist>Hypnopilot</artist><date>2009-06-18 01:37:52.49057+00</date><upc>088907200068</upc><note>CD Baby id:hypnopilot</note></item>
<item><id>99995</id><title>The Sphinx of Imagination</title><artist>Hypnotica</artist><date>2009-06-18 01:37:52.503809+00</date><upc>634479143427</upc><note>CD Baby id:hypnotica</note></item>
创建的每个文件包含大约 100 项要作为文档插入。将多个项分组是为了减少创建的文件数量。
第三步:创建存储
初始化存储数据库
我们将使用 Strus 的实用程序来创建存储并将文档插入搜索索引。
我们有两个元数据元素 'date' 和 'doclen',我们希望用它们来进行元数据限制。用于限制的元数据被放入元数据表中。我们可以随时使用 strusAlterMetaData 命令修改元数据表或添加新元素。但我们也可以在 strusCreate 命令中定义一些元数据。
创建存储的命令如下。
strusCreate -s "path=storage; metadata=date UINT32, doclen UINT16"
第一个参数描述了存储的属性,这是一个分号分隔的配置赋值列表。其中 path 参数定义了基于 LevelDB 的键/值存储数据库将其文件写入的目录。存储配置字符串取决于我们使用的存储和键/值存储数据库。本教程后面介绍的所有引用存储的后续命令都将有一个具有相同语法的配置字符串参数,但根据情况参数会有所不同。
通过此调用,存储已在子目录 'storage' 中创建。键入
ls storage
您将看到(LevelDB 文件)
000005.log CURRENT LOCK LOG LOG.old MANIFEST-000004
第四步:配置文档分析器
由于我们将处理 XML 文档,我们将使用标准的文档分段器。分析器配置描述了将从项中提取哪些元素以及如何定义项。它还描述了如何将这些项转换为它们存储的形式。分析器配置定义了不同的部分,描述了创建的元素类型。要创建分析器配置,我们创建一个扩展名为 ".ana" 的文件并开始编辑它
touch tutorial.ana
vi tutorial.ana
以下子节显示了我们在该配置文件中定义的内容。完整的分析器配置定义在 tutorial.ana 中。本教程中使用的分段器定义了 XPath 的缩写语法,有两个例外:
- 标签选择,如 "/list/item/title",不选择子树,只选择标签。
- 内容选择,如 "/list/item/title::text()",被写成 "/list/item/title()"("::text" 被省略)。
定义要索引的项(集合单元,又称文档)
正如我们在文档准备阶段所见,每个文件包含约 100 项。为了将这些项作为文档分隔开来以便插入,我们必须定义一个 document 部分,该部分定义了输入文件中定义文档的选择表达式。
[Document]
	doc = /list/item;
定义搜索索引(可检索项)
[SearchIndex] 部分用于存放可检索的元素。我们决定将 "title"、"artist" 和 "note" 标签中的词语设置为可检索。
我们以相同的方式(作为词语)对所有这些词语进行标记,并使用 Snowball 词干提取器("stem")后跟小写转换("lc")和变音符号转换("convdia")来规范化它们。
我们用英语("en")为词干提取器和变音符号转换仪器化。
我们为生成的搜索索引特征分配的特征类型名称对所有特征都是 "word"。
[SearchIndex]
	word = convdia(en):stem(en):lc  word  /list/item/title();
	word = convdia(en):stem(en):lc  word  /list/item/artist();
	word = convdia(en):stem(en):lc  word  /list/item/note();
如果您从右向左阅读每个特征赋值,可以直观地理解此配置:选择一个元素,从元素选择中选择标记,规范化标记:"lc -> stem -> convdia",并将其分配给一个名为 "word" 的特征类型。
定义用于摘要的正向索引元素
[ForwardIndex] 部分用于存放用于摘要的元素。我们决定也使用 "title"、"artist" 和 "note" 标签中的可检索词语进行摘要,以展示查询特征在文档中的匹配情况。由于摘要应显示文档的原始内容而不带标记,因此我们使用空格分词器("split")且不使用规范化器("orig")进行插入。
[ForwardIndex]
	orig = orig split /list/item/title();
	orig = orig split /list/item/artist();
	orig = orig split /list/item/note();
直观上,此配置的理解方式与搜索索引定义类似,即从右向左阅读处理步骤。
定义属性
现在为每个插入的文档分配一些属性。属性用于结果的表示。有一个保留属性名对我们来说非常重要,那就是 "docid" 属性。在定义它时,strusInsert 程序会将此属性的内容定义为文档标识符。如果未定义,则会使用输入文件路径作为文档标识符。由于文档标识符必须是唯一的,因此当一个输入文件中包含多个文档时,我们必须创建一个(就像我们之前做的那样)。对于所有这四个元素,我们将使用一种记号("content")和规范化("orig")来保持元素的原始状态。
[Attribute]
	docid = orig content /list/item/id();
	title = orig content /list/item/title();
	upc = orig content /list/item/upc();
	note = orig content /list/item/note();
属性部分的定义直观地从右向左阅读,与前面介绍的元素类似,不同之处在于最左边的标识符指定了要分配值的属性名称。
定义元数据
最后一步是分配我们想要用于限制以及在结果表示中使用的元数据元素 'date'。为了将日期转换为可用于元数据表的格式,我们使用 'date2int' 规范化器。我们选择托马斯·爱迪生发明留声机的年份作为日期整数计算的起始日期,并将单位定义为自那以来的天数。我们通过查看输入样本(在此大胆假设所有日期格式相同)来推断输入格式。
2009-06-18 01:37:52.503809+00
标记只是转发标签的内容。这是日期的配置。首先,我们使用正则表达式('regex')标记器去除秒的小数部分。然后,我们将日期转换为数字(自 1877 年以来的天数)。
[MetaData]
	date = date2int("d 1877-01-01", "%Y-%m-%d %H:%M:%s") regex("[0-9\-]{8,10} [0-9:]{6,8}") /list/item/date();
定义直观地从右向左阅读,与前面介绍的元素类似,不同之处在于最左边的标识符指定了要分配值的元数据元素的名称。
一些元数据元素可以通过聚合(例如计数)其他元素在已分析的文档中来定义。聚合的元数据元素在 'Aggregator' 部分定义。
[Aggregator]
	doclen = count(word);
检查配置
为了确保我们一切都做对了,我们现在用一个候选输入文件来测试我们得到的结果。我们可以通过调用 strusAnalyze 程序,并传入我们的配置和输入文件来做到这一点。
strusAnalyze tutorial.ana doc/2333.xml | less
我们查看分析的第一个文档,发现一切顺利(StrusAnalyze 程序的多个部分文档结果由 '-- document ' 后跟其在 [Document] 部分分配的标识符分隔)。
-- document type name doc

search index terms:
1 word 'live'
2 word 'in'
3 word 'milan'
5 word '27'
6 word '9'
7 word '1956'
8 word 'maria'
9 word 'calla'

forward index terms:
1 orig 'Live'
2 orig 'in'
3 orig 'Milan'
4 orig '(27,9,1956)'
8 orig 'Maria'
9 orig 'Callas'

metadata:
date '48527'

attributes:
docid '233372'
title 'Live in Milan (27,9,1956)'
检查分析器配置的单步
当使用 StrusAnalyze 检查文档时出现问题时,我们该怎么办?
假设我们的输出是空的。有工具可以检查文档分析的不同步骤。第一个程序是 strusSegment,它允许我们检查选择表达式是否匹配。以文档标题为例。
strusSegment -e '/list/item/title()' doc/2333.xml | head -n 2
输出看起来如下
Live in Milan (27,9,1956)
Greatest Hits
正如预期的那样,这看起来很好。用于检查分析器步骤的第二个程序是 strusAnalyzePhrase。此程序允许我们检查配置中使用的标记器和规范化器。让我们检查一下词语是否被正确标记和规范化。
strusAnalyzePhrase -n "convdia(en):stem(en):lc" -t "word" 'Live in Milan (27,9,1956)'
这会导致以下输出
'live'
'in'
'milan'
'27'
'9'
'1956'
第五步:将文档插入存储
我们现在已经完成了文档的分析。现在我们想将文档插入已创建的存储中。 strusInsert 程序有助于我们完成此操作。它有几个选项可以提高插入过程的效率。最佳参数在很大程度上取决于集合和使用的硬件。
一个重要的选项是 '-c' ('--commit'),它设置在一个事务中插入的文档数量。由于我们的文档非常小(不到十个词),默认的 1000 并不太合理。50000 更好。对于更大的集合,您也可以考虑 '-t' ('--threads') 选项,它允许您使用多个核心运行插入过程。请注意,提交阶段是并行化的一个同步点,也是一个瓶颈。
这是我们带有为该集合提出的选项的插入命令
strusInsert -c 50000 -f 100 -s "path=storage" tutorial.ana doc
它不使用多线程插入器(默认),在插入 50000 个文档后提交一个打开的事务,预先分配范围内的文档编号,并将存储在 'storage' 文件夹中的 XML 文档与 tutorial.ana 配置一起填充。这应该在大约一分钟到半分钟后输出以下 2 行。
inserted 282291 documents (total 282291), 0 transactions open
done
第六步:检查存储
以下示例使用 2015 年 6 月 29 日的转储。使用另一个转储可能会得到不同的结果。
现在我们已经插入了所有文档,我们很好奇想看看一切是否顺利。有一个程序 strusInspect,它允许我们检查存储的一些属性。我们选择文档 ID 为 '10009' 的文档。首先,我们找出这个 docid 得到了什么内部文档编号。
strusInspect -s "path=storage" docno 10009
我们得到一个数字(可能会变化)
123
然后我们进行一些调用来检查此文档。
strusInspect -s "path=storage" attribute docid 123

strusInspect -s "path=storage" content orig 123
strusInspect -s "path=storage" attribute title 123

strusInspect -s "path=storage" pos word danc 123
strusInspect -s "path=storage" ff word danc 123
strusInspect -s "path=storage" df word danc

strusInspect -s "path=storage" metatable
strusInspect -s "path=storage" metadata date 123
我们得到类似这样的结果:
10009

Absolute Let's dance 13 Various
Absolute Let's dance 13

4
1
1575

date UInt32
doclen Uint32
48253
如果我们想检查存储的所有内容,我们可以使用 strusCheckStorage 和 strusCheckInsert 程序。
第七步:使用 PHP 进行示例查询
在本节中,我们将检查在脚本语言中发出查询的可能性。作为示例,我们将使用 PHP 绑定来查询我们构建的 Strus 存储。PHP 接口的 Strus 文档可以在 此处找到。
在 Web 服务器环境中运行的 PHP 脚本无法直接访问存储文件。发出的 Strus PHP 命令使用 Strus 接口的代理实现,该实现将调用重定向到服务器上执行。该服务器实现为程序 strusRpcServer。由于我们通过 shell 启动了映像,因此被忽略了启动 Strus 服务器的 docker CMD。所以我们必须手动启动它,放在后台。
strusRpcServer -s "path=storage" &
测试执行链
我们从一个简单的 PHP 脚本开始,该脚本查询 Strus 存储以获取插入的文档数量。我们调用脚本 status.php。
<!DOCTYPE html>
<html>
<body>
<?php
try {
	// Create the strus context as proxy redirecting the
	//	commands to the strus server listening on port 7181:
	$context = new StrusContext( "localhost:7181" );
	// Create the storage client:
	$storage = $context->createStorageClient( "" );

	echo '<p>';
	// Print the number of documents inserted:
	echo "Number of documents inserted: " . $storage->nofDocumentsInserted() . "!";
	echo '</p>';
}
catch ( Exception $e) {
	// Handle possible error:
	echo '<p><font color="red">Caught exception: ' . "{$e->getMessage()}</font></p>";
}
?>
</body>
</html>
为了使其对 Nginx 可访问,我们必须将其复制到 Web 服务器的 html 页面根目录并赋予正确的权限。
cp status.php /usr/share/nginx/html/
chown www-data:www-data /usr/share/nginx/html/status.php
chmod +x /usr/share/nginx/html/status.php
现在我们可以通过 HTTP 调用它,例如,我们可以在 Web 浏览器的地址栏中输入以下 URL。我们在启动 Strus Docker 容器时指定了端口 40080,所以这里也指定它。
http://127.0.0.1:40080/status.php
我们得到(一个更大的数字,图像较旧)

发出查询
现在我们尝试创建一个简单的页面,显示按相关性排序的最佳匹配查询结果列表,查询通过 GET 参数传递。我们调用 PHP 源文件 search.php。
<!DOCTYPE html>
<html>
<body>
<?php

// The following helper function will be used to evaluate a query:
function evalQuery( $queryString, $minRank, $maxNofRanks)
{
    // We create the strus context as proxy to the strusRpcServer
    // started in our docker container listening on port 7181:
    $context = new StrusContext( "localhost:7181" );

    // We create the storage proxy interface refering to the storage
    // served by the server by passing an empty storage configuration:
    $storage = $context->createStorageClient( "" );

    // We create the analyzer proxy interface:
    $analyzer = $context->createQueryAnalyzer();

    // We create the query evaluation proxy interface:
    $queryeval = $context->createQueryEval();

    // Here we define how the query is analyzed. In our example we will introduce
    // only one phrase type and call it "qry". The produced feature type "word" matches
    // to the feature type in the search index of the document. The tokenizer used
    // is the same as for the features in the document ("word"). So is the normalizer
    // defined. Note that the execution of the normalizer is read from left to
    // right and not as in the analyzer configuration language from right to left.
    $analyzer->addElement( "word"/*feat type*/, "qry"/*field type*/, "word"/*tokenizer*/,
            ["lc", ["stem", "en"], ["convdia", "en"] ] /*normalizer*/);

    // Now we define our weighting function, that counts the number of query
    // feature matches in the document. Feature references as parameters are
    // passed as dictionaries with a single element with key 'feature'.
    // Others referencing number or string constants are passed as value:
    $queryeval->addWeightingFunction( "tf", ["match" => ["feature" => "word"] ]);

    // Next we define what is presented as attribute of the result.
    // We would like to see the document identifier and the document title:
    $queryeval->addSummarizer( "attribute", [ "name" => "docid" ] );
    $queryeval->addSummarizer( "attribute", [ "name" => "title" ] );
    $queryeval->addSummarizer( "attribute", [ "name" => "note" ] );

    // For the documents to match we have to define a selection expression.
    // The selected features will be addressed by the feature set identifier "sel":
    $queryeval->addSelectionFeature( "sel");

    // Now we have finished the query evaluation scheme definition and we create
    // the query to issue. First we define the query object to instantiate:
    $query = $queryeval->createQuery( $storage);

    // Next we take the query string as phrase and analyze it. In a more complex
    // system we would parse the query language first and the elements of the
    // query language would be the queryphrases to analyze. In our simple example
    // setting, we have just a single phrase query:
    $terms = $analyzer->analyzeTermExpression( ["qry", $queryString ]);

    if (count( $terms) > 0)
    {
        // Now we create the query expressions and define the query features.
        // The selection feature "sel" will be represented as selection of documents,
        // that contain all query features.
        // The weighted features "qry" will be the set of terms in the query.

        // $selexpr will contain the expression that selects the documents to weight.
        // It is represented as array with the identifier of the feature join operator
        // "contains" as first element and the structures representing the arguments as
        // following elements. "contains" means that the expression selects the documents
        // that match all argument expressions.
        $selexpr = [ "contains" ];

        foreach ($terms as &$term)
        {
            // Add the term as argument to the select expression:
            $selexpr[] = $term;

            // Define the features to use for weighting:
            $query->addFeature( "qry", $term );
        }
        // Define the feature to use for document selection:
        $query->addFeature( "sel", $selexpr );
    }

    // At last we define the number of documents to retrieve and the first rank to show:
    $query->setMaxNofRanks( $maxNofRanks);
    $query->setMinRank( $minRank);

    // And we evaluate the query and return it as result:
    return $query->evaluate();
}

// Parse the query parameters:
parse_str( getenv('QUERY_STRING'), $_GET);
$queryString = $_GET['q'];
$nofRanks = 20;
$minRank = 0;
if (array_key_exists( 'n', $_GET))
{
    $nofRanks = intval( $_GET['n']);
}
if (array_key_exists( 'i', $_GET))
{
    $minRank = intval( $_GET['i']);
}

// Call the defined subroutine to evaluate the query:
$results = evalQuery( $queryString, $minRank, $nofRanks);

// Display the result:
echo '<table border=1>';
foreach ($results['ranks'] as $result) {
    $docid = '';
    $title = '';
    $note = '';
    foreach ($result['summary'] as $attribute) {
        if( strcmp( $attribute['name'], 'title' ) == 0 ) {
            $title .= $attribute['value'];
        }
        if( strcmp( $attribute['name'], 'docid' ) == 0 ) {
            $docid .= $attribute['value'];
        }
        if( strcmp( $attribute['name'], 'note' ) == 0 ) {
            $note .= $attribute['value'];
       }
    }
    echo '<tr><td>' . $docid . '</td><td>' . $title . '</td><td>' . $note . '</td></tr>' . "\n";
}
echo '</table>';
?>
</body>
</html>
现在我们将文件复制到 Web 服务器的文档区域并正确设置权限。
cp search.php /usr/share/nginx/html/
chown www-data:www-data /usr/share/nginx/html/search.php
chmod +x /usr/share/nginx/html/search.php
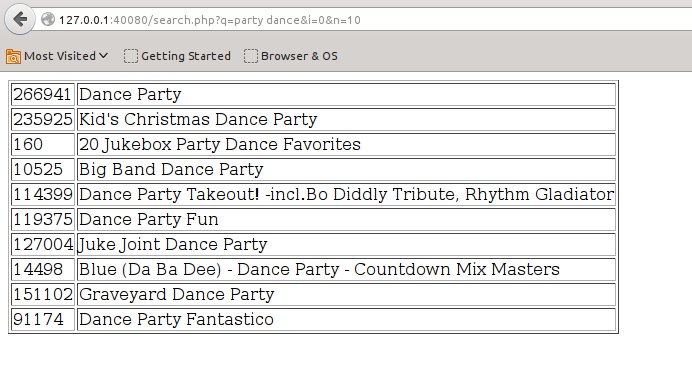
现在我们可以通过 HTTP 调用搜索页面,例如,我们可以像调用 status.php 页面一样在 Web 浏览器的地址栏中输入以下 URL。我们搜索 "party dance",并检索前 10 个排名,从最佳匹配开始。
http://127.0.0.1:40080/search.php?q=party%20dance&i=0&n=10
然后我们将得到:
.