
Grove Starter Kit with Intel Galileo Gen 2 – 入门
让我们看看如何轻松上手物联网,无需担心电子元件和电路,即可使用 Grove 入门套件。
获取新的 Intel® 物联网开发者套件,这是一个完整的软硬件解决方案,使开发者能够使用 Intel® Galileo 和 Intel® Edison 开发板创建令人兴奋的新解决方案。请访问 Intel® 物联网开发者中心。
当我开始接触物联网时,我对电子元件、电阻和电路感到非常困惑,然后我获得了 Seeed Studio 的 Grove 入门套件 Plus。有了它,我们只需插入传感器模块,而无需进行焊接或使用面包板。因此,让我们看看如何轻松上手物联网,无需担心电子元件和电路,即可使用 Grove 入门套件。

Grove 入门套件是一个完整的开发套件,包含一系列传感器、执行器和扩展板。它是一个软硬件解决方案,帮助您探索物联网领域并创建创新的项目。Grove 入门套件是一个更好的选择,因为——
- 它加速了物联网的开发和测试
- Grove 扩展板和传感器具有 4 针连接器,使我们能够轻松插入传感器,而不是通过面包板管理电路和传感器。
- Grove 扩展板已通过 Windows 物联网团队的兼容性测试,与 Windows 兼容。
- Seeed Studio 提供种类繁多的传感器模块。

如果您是物联网新手,Seed Studio Grove 入门套件将帮助您轻松开始开发,因为您无需担心电路和其他电子元件。有了 Grove 扩展板和传感器模块,您可以轻松创建任何东西,而无需过多担心电子元件。无需通过焊接或面包板来管理传感器。本文将指导您如何设置并运行 Grove 入门套件 Plus 和 Intel Galileo。

手册包含有关 Grove 入门套件 Plus 的基本代码的说明。
所需组件
Seeed Studio Grove 入门套件 Plus – Intel 物联网版(适用于 Intel Galileo Gen 2)
设置
下载 Seeed Studio 的 Sketchbook Starter
将 SketchBook 添加到 Arduino IDE
- 解压下载的 Sketchbook Starter
- 打开 Arduino IDE
- 选择“文件 -> 首选项”
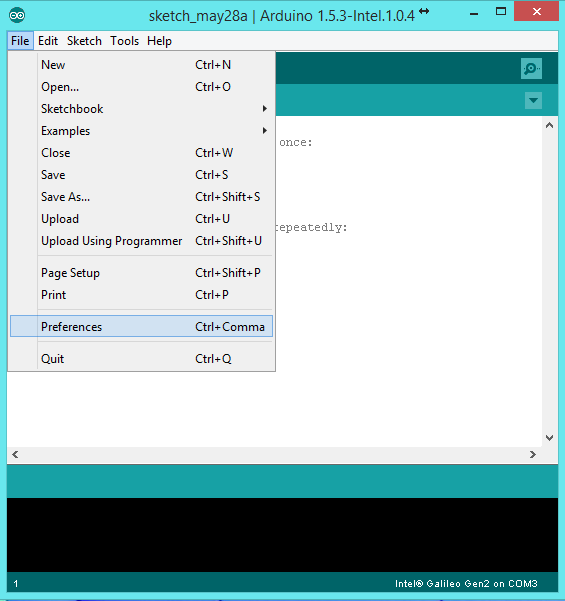
查看“Sketchbook 位置”字段
- 单击“浏览”,然后将您下载的 Seeed Studio Sketches 文件夹复制到出现的文件夹中,并将其重命名为“Sketchbook_Grove”。

- 重新启动您的 Arduino IDE。
建立连接
为 Galileo 供电,您将看到电源 LED 点亮。Galileo 将开始从定制版本的 Linux 启动。请等待几秒钟。注意:与 Galileo Gen 1 开发板不同,Galileo Gen2 开发板使用 12V 电源。请使用 Galileo Gen2 开发板随附的专用电源适配器。现在,我们准备进行其余连接,通过 USB 线将 Galileo 连接到计算机。现在,我们将看到 USB LED 点亮。
添加 Grove Base Shield
在 Grove 套件中,向上提起 LED 屏幕下方的粉红色泡沫,找到 Base Shield。

Base Shield 具有各种 4 针插槽,用于将各种传感器连接到 Intel Galileo。
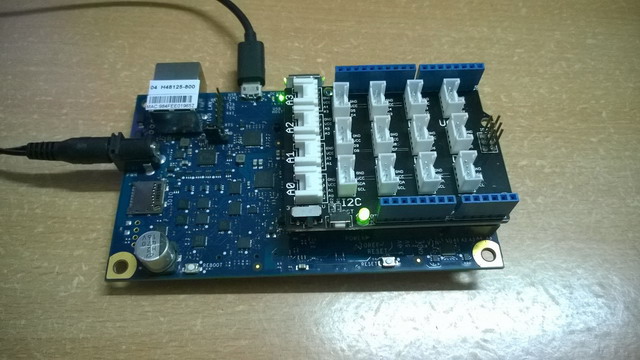
现在将 Base Shield 安装到 Intel Galileo 开发板上,并用力按下。当 Base Shield 通电时,其上的绿色 LED 将亮起。

插入温度传感器模块

在 Grove 入门套件 Plus 中,找到温度传感器模块。在其背面会写着“Temperature Sensor”。使用套件中提供的其中一根电线将其连接到 Base Shield 单元。确保将其插入标有 A0 的端口,因为它是示例代码中的默认端口,但您可以根据需要进行更改。

运行您的第一个代码
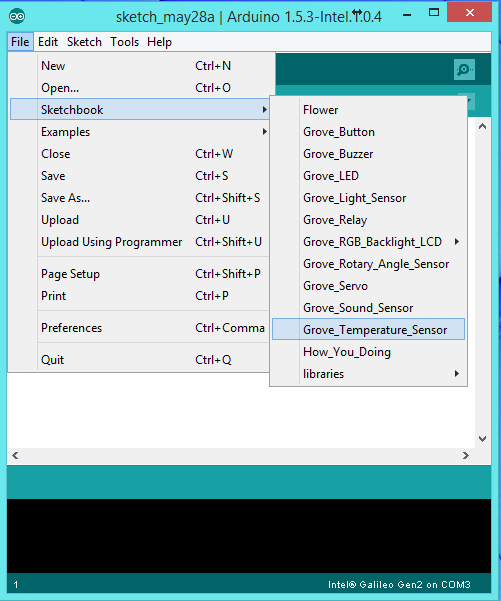
打开 Arduino IDE。
转到“文件 -> Sketchbook -> Sketchbook_Grove -> Grove_Temperature_Sensor”以加载基本的温度代码。
// Define the pin to which the temperature sensor is connected.
const int pinTemp = A0;

// Define the B-value of the thermistor.
// This value is a property of the thermistor used in the Grove - Temperature Sensor,
// and used to convert from the analog value it measures and a temperature value.

const int B = 3975;
void setup()
{
// Configure the serial communication line at 9600 baud (bits per second.)
Serial.begin(9600);
}

void loop()
{
// Get the (raw) value of the temperature sensor.
int val = analogRead(pinTemp);
// Determine the current resistance of the thermistor based on the sensor value.
float resistance = (float)(1023-val)*10000/val;

// Calculate the temperature based on the resistance value.
float temperature = 1/(log(resistance/10000)/B+1/298.15)-273.15;

// Print the temperature to the serial console.
Serial.println(temperature);

// Wait one second between measurements.
delay(1000);
}
单击“上传”按钮。如果成功部署,您应该会看到“传输完成”消息。

查看传感器结果
要查看已部署代码的温度读数,请单击 Arduino IDE 右上角的“串口监视器”按钮。

串口监视器是一个单独的弹出窗口,充当独立的终端,通过接收和发送串行数据进行通信。请参阅下方图片的右侧图标。您可以使用串口监视器来调试 Arduino 软件代码或查看工作代码发送的数据。

您可以在串口监视器中看到输出。现在,您已准备好进行更复杂的项目,并深入探索由 Seeed Studio 提供的众多传感器模块组成的物联网世界。
立即开始创新!Intel® 物联网开发者计划提供知识、工具、套件以及专家社区,助您快速轻松地将您的创新想法转化为物联网解决方案。
用 Intel® Edison 和 Intel® Galileo 平台专用的 Intel® 物联网开发者套件,构想您的创意,动手实现。这些套件功能强大,性能优化,并且是完全集成的端到端物联网解决方案,支持各种编程环境、工具、安全、云连接和硬件。
如需更多资源并了解新的 Intel® 物联网开发者套件 v1.0 如何帮助您简化物联网项目
- 下载 Intel® 物联网开发者套件
- 访问 Intel® 物联网开发者中心
- 参加我们的 Roadshows,获取创建您自己的物联网项目的实践培训