
使用 EF Power Tool 生成 EF POCO 类
一种快速简单的方法,用于为数据库表生成 POCO 类和 EF 映射。
引言
EF Power Tools 可用于在 Visual Studio 中从现有数据库自动生成 POCO 类。该工具还生成 DBContext 和 Code First 映射文件。
背景
为大型数据库编写 POCO 类和 EF Code First 映射可能会非常耗时。在开发阶段,数据库模式可能会定期更改。本文旨在演示一种快速生成初始 POCO 类库以及在架构更改时刷新该库的方法。
安装
下载该工具,然后通过单击 EFPowerTools.vsix 文件进行安装。安装程序窗口显示如下。单击“安装”按钮。

安装完成后,下面的窗口会提示用户关闭所有 Visual Studio 实例以使更改生效。

准备工作
为了演示如何使用该工具,我在 Visual Studio 中创建了一个包含两个项目的解决方案。

Client 项目是一个控制台应用程序,将用于测试自动生成的代码。Models 项目是创建 POCO 类和映射文件的位置。Client 项目引用了 Models 项目。
可以在附加的Zip 文件中下载完成的 VS2013 解决方案。但是,在本例中,我们将按照上面屏幕截图所示创建这两个项目。
将使用以下 SQL Server 数据库,从中派生 POCO 类。架构代表用户、组和权限的列表。

表关系如下
- 一个用户可以属于多个组
- 一个组可以有多个用户
- 一个组可以有多个权限。
- 一个权限可以与多个组关联
简单来说,用户和组之间存在多对多关系,这里通过名为 UserGroup 的链接表来实现。同样,GroupPermisison 表用于建立组和权限表之间的多对多关系。
用于创建此架构及相关示例数据的脚本已附加在Zip 文件中。
运行 EF Power tool
要运行 EF Power tool,请右键单击 Models 项目。选择“Entity Framework”。选择“Reverse Engineer Code First”。

输入已创建数据库的 Sql Server 的名称。然后输入登录信息,并从下拉列表中选择 Users 数据库。单击“Test Connection”按钮。这应该会显示一条消息,确认连接成功。

最后,单击“OK”按钮。这将开始在 Models 项目中生成 POCO 类的过程。完成后,Models 项目应包含以下文件:

POCO 类、DbContext 和 Code First 映射已在项目中创建。Class1.cs 文件不是必需的,可以删除。
Models 项目将因缺少 Entity Framework 的一些关键引用而无法编译。右键单击 Models 项目并选择“Manage NuGet Packages”。这将显示以下窗口。

使用此窗口安装 Entity Framework。如果它未出现在列表中,请使用右侧的搜索文本框查找 NuGet 包,然后单击“Install”。文件安装完成后,右键单击 Models 项目并选择“Build”选项。这应该可以无错误地编译类库。
现在可以在 Client 项目中使用 Models 类库进行测试。
使用代码
在本节中,我们将使用 Client 项目中的 POCO 库来检索、更新和删除用户数据。
为了使用 POCO 库,必须在 Client 项目中安装 Entity Framework。右键单击 Solution Explorer 中的项目并选择“Manage NuGet Packages”。按照 Models 项目中所示安装 Entity Framework。
接下来,返回 Models 项目并打开 App.config 文件,找到下面的 ConnectionString 元素。
<connectionStrings>
	<add name="UsersContext" connectionString="Data Source=KUV-DESKTOP1\DEVSQL1;Initial Catalog=Users;
	Integrated Security=True;MultipleActiveResultSets=True" providerName="System.Data.SqlClient" />
</connectionStrings>
Data Source 应指向您的数据库。将此连接字符串复制到 Client 项目的 App.config 文件中,并将其放在 configSections 元素之后。Client 项目中的 App.config 文件现在应类似于下面的 xml。
<?xml version="1.0" encoding="utf-8"?>

	<configuration>
	<configSections>
	    <!-- For more information on Entity Framework configuration,
	visit http://go.microsoft.com/fwlink/?LinkID=237468 -->
	<section name="entityFramework"
	type="System.Data.Entity.Internal.ConfigFile.EntityFrameworkSection,EntityFramework,
	Version=6.0.0.0, Culture=neutral,
	PublicKeyToken=b77a5c561934e089" requirePermission="false" />
	</configSections>
	<connectionStrings>
	   <add name="UsersContext" connectionString="Data Source=KUV-DESKTOP1\DEVSQL1;Initial
          Catalog=Users;Integrated Security=True;MultipleActiveResultSets=True"providerName="System.Data.SqlClient" />
	</connectionStrings>
	<startup>
	<supportedRuntime version="v4.0" sku=".NETFramework,Version=v4.5" />
	</startup>
	<entityFramework>
	<defaultConnectionFactory type="System.Data.Entity.Infrastructure.SqlConnectionFactory,EntityFramework" />
	<providers>
      <provider invariantName="System.Data.SqlClient"
	type="System.Data.Entity.SqlServer.SqlProviderServices, EntityFramework.SqlServer" />
	</providers>
  </entityFramework>
	</configuration>
为了使用 POCO 库,我们将为每个模型创建存储库。存储库将用于执行 CRUD 操作。
创建存储库
此接口提供了 CRUD 操作的方法,并在 Client 项目中创建。
public interface IUserRepository
{
	bool Add(User user);
	void Delete(int ID);
	IEnumerable<User> GetAll();
	IEnumerable<User> GetAll(int? cuurentPage, int pageSize);
	User GetUser(int ID);
	void Save();
	bool Update(User user);
}
using System;
using System.Collections.Generic;
using System.Linq;
using System.Web;
using Models.Models;

namespace Client
{
    public class UserRepository : IUserRepository
    {
        private UsersContext dbContext = new UsersContext();

        public IEnumerable<User> GetAll()
        {
            var Users = from g in dbContext.Users
                             select g;
            return Users;
        }

        public IEnumerable<User> GetAll(int? currentPage, int pageSize)
        {
            var Users = dbContext.Users
                .OrderBy(u => u.Firstname)
                .Skip(((currentPage.HasValue ? currentPage.Value : 1) - 1) * pageSize)
                .Take(pageSize);
            return Users;
        }

        public User GetUser(int ID)
        {

            return dbContext.Users.FirstOrDefault(f => f.ID == ID);
        }

        public bool Add(User User)
        {
            dbContext.Users.Add(User);
            Save();
            return true;
        }

        public bool Update(User user)
        {
            var ExistingUser = dbContext.Users.FirstOrDefault(g => g.ID == user.ID);
            ExistingUser.Active = user.Active;
            ExistingUser.DateCreated = user.DateCreated;
            ExistingUser.Email = user.Email;
            ExistingUser.Firstname = user.Firstname;
            ExistingUser.Password = user.Password;
            ExistingUser.Surname = user.Surname;
            ExistingUser.Username = user.Username;

            Save();

            return true;
        }

        public void Delete(int ID)
        {
            dbContext.Users.Remove(dbContext.Users.Single(g => g.ID == ID));
            Save();
        }

        public void Save()
        {
            dbContext.SaveChanges();
        }
    }
}
对于其余模型,即 UserGroup、Group、GroupPermisson、Permisson,可以遵循相同的模式来创建存储库类。在附加的代码中,为 Group 和 Permission 存储库添加了一个名为 GetByName 的附加属性。
使用存储库
在 program.cs 文件中编写以下代码 static void Main(string[] args)
{
CreateUserAndAddToGroup_Test();
ShowUserDetails();
CreateGroup_Test();
ShowGroupDetails();
UpdateUser_Test();
ShowUserDetails();
Console.ReadKey();
}
创建一个用户并将其添加到现有组
CreateUserAndAddToGroup_Test 的方法实现如下所示
        private static void CreateUserAndAddToGroup_Test()
        {
            IUserRepository userRep = new UserRepository();
            IGroupRepository groupRep = new GroupRepository();
            IUserGroupRepository userGroupRep = new UserGroupRepository();

            // create a user and add the user to an existing group(s)
            User newUser = new User()
            {
                Firstname = "Samuel",
                Surname = "Beckett",
                Username = "S.Becket",
                Email = "SBecket@hotmail.com",
                Password = "changeme",
                DateCreated = DateTime.Now,
                Active = true
            };
            userRep.Add(newUser);

            Group adminGroup = groupRep.GetByName("Admin");
            UserGroup userGroup1 = new UserGroup()
            {
                UserID = newUser.ID,              // add the ID of the new user here as a FK
                GroupID = adminGroup.ID,          // add the ID of the admin group as FK
                DateCreated = DateTime.Now,
                Active = true
            };
            userGroupRep.Add(userGroup1);

            Group managerGroup = groupRep.GetByName("Manager");
            UserGroup userGroup2 = new UserGroup()
            {
                UserID = newUser.ID,              // add the ID of the new user here as a FK
                GroupID = managerGroup.ID,          // add the ID of the admin group as FK
                DateCreated = DateTime.Now,
                Active = true
            };
            userGroupRep.Add(userGroup2);


        }
我们首先创建所需的存储库的对象实例,即 User、Group 和 UserGroup。
            IUserRepository userRep = new UserRepository();
            IGroupRepository groupRep = new GroupRepository();
            IUserGroupRepository userGroupRep = new UserGroupRepository();
 User newUser = new User()
            {
                Firstname = "Samuel",
                Surname = "Beckett",
                Username = "S.Becket",
                Email = "SBecket@hotmail.com",
                Password = "changeme",
                DateCreated = DateTime.Now,
                Active = true
            };
            userRep.Add(newUser);
对象实例,并将 Admin 组的 ID 和新用户的 ID 应用到外键属性,如下所示。
            Group adminGroup = groupRep.GetByName("Admin");
            UserGroup userGroup1 = new UserGroup()
            {
                UserID = newUser.ID,              // add the ID of the new user here as a FK
                GroupID = adminGroup.ID,          // add the ID of the admin group as FK
                DateCreated = DateTime.Now,
                Active = true
            };
            userGroupRep.Add(userGroup1);
            Group managerGroup = groupRep.GetByName("Manager");
            UserGroup userGroup2 = new UserGroup()
            {
                UserID = newUser.ID,              // add the ID of the new user here as a FK
                GroupID = managerGroup.ID,          // add the ID of the admin group as FK
                DateCreated = DateTime.Now,
                Active = true
            };
            userGroupRep.Add(userGroup2);
获取用户、组和权限
为了检查 Samuel Beckett 是否作为新用户创建并属于 Admin 和 Manager 组,下面编写了 ShowUserDetails 方法来显示所有用户、他们所属的组以及每个组的权限。
        private static void ShowUserDetails()
        {
            IUserRepository userRep = new UserRepository();

            //get a list of users and groups for each user, and for each group get the permissons for that group
            var users = userRep.GetAll();
            foreach (User u in users)
            {
                Console.WriteLine("User: " + u.ID.ToString() + ',' + u.Firstname + ',' + u.Surname + ',' + u.Username + ',' + u.Password + ',' + u.Email);
                foreach (UserGroup ug in u.UserGroups)
                {
                    Console.WriteLine("\tGroup: " + ug.Group.Name);
                    foreach (GroupPermission gp in ug.Group.GroupPermissions)
                    {
                        Console.WriteLine("\t\tPermisson: " + gp.Permission.Name);
                    }
                }
                Console.WriteLine();
            }
            userRep = null;
        }

创建组和权限
CreateGroup_Test 方法创建了一个名为 **HelpDesk** 的新组。然后创建一个名为 **Search Users** 的新权限,并将其应用于 HelpDesk 组。然后代码获取一个名为 **View Users** 的现有权限的 permission 对象。将其应用于 HelpDesk 组。因此,新的 HelpDesk 组预计将有一个新权限和一个现有权限。
        private static void CreateGroup_Test()
        {
           // IGroupRepository groupRep = new GroupRepository();
            IPermissionRepository permRep = new PermissionRepository();

            // create the HelpDesk Group
            IGroupRepository groupRepository = new GroupRepository();
            Group group = new Group()
            {
                Name = "HelpDesk",
                Active = true,
                DateCreated = DateTime.Now
            };
            groupRepository.Add(group);

            // create the Search users permission
            IPermissionRepository permissionRepository = new PermissionRepository();
            Permission perm = new Permission()
            {
                Name = "Search users",
                Active = true,
                DateCreated = DateTime.Now
            };
            permissionRepository.Add(perm);

            // add the Search users permission to the Helpdesk group
            IGroupPermissionRepository groupPermissionRepository = new GroupPermissionRepository();
            GroupPermission groupPerm = new GroupPermission()
            {
                PermissionID = perm.ID,
                GroupID = group.ID,
                Active = true,
                DateCreated = DateTime.Now
            };
            groupPermissionRepository.Add(groupPerm);

            // add the existing View users permission to the HelpDesk
            Permission viewUserPerm = permRep.GetByName("View users");
            GroupPermission viewUserGroupPerm = new GroupPermission()
            {
                PermissionID = viewUserPerm.ID,
                GroupID = group.ID,
                Active = true,
                DateCreated = DateTime.Now
            };
            groupPermissionRepository.Add(viewUserGroupPerm);

        }
获取组和权限详细信息
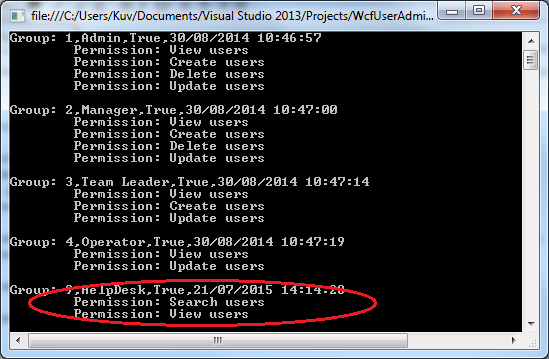
GetGroupDetailsMethod 列出了所有组以及每个组的权限。可用于检查 HelpDesk 组是否已正确创建权限。
        private static void ShowGroupDetails()
        {
            IGroupRepository groupRep = new GroupRepository();

            // get a list of all the groups and their permissions
            IEnumerable<Group> groups = groupRep.GetAll();
            foreach (Group g in groups)
            {
                Console.WriteLine("Group: " + g.ID.ToString() + ',' + g.Name + ',' + g.Active + ',' + g.DateCreated);
                foreach (GroupPermission gp in g.GroupPermissions)
                {
                    Console.WriteLine("\tPermission: " + gp.Permission.Name);
                }
                Console.WriteLine();
            }

        }
架构中所示的关系已按预期映射,即 u.UserGroups 为每个用户提供 UserGroup 对象列表。每个 UserGroup 对象提供 Group 对象
和 User 对象。从 Group 对象我们可以确定组的实际名称。Group 对象还提供 GroupPermissions 列表,从中我们可以确定
每个组的权限详细信息。
更新用户
在本例中,我们将更改现有用户的密码。
        private static void UpdateUser_Test()
        {
            IUserRepository userRep = new UserRepository();
            User user = userRep.GetUser(8);
            user.Password = "iamchanged";
            userRep.Save();
        }
上面的代码获取 ID 为 8 的现有用户(即 Kuv Patel),并将密码从“changeme”更改为“iamchanged”。执行该方法后,输出为

架构更改
在项目开发和后续维护过程中,数据库架构可能会发生变化。可能会添加、删除或重命名更多表。同样,给定的表可能会添加、删除或重命名列。可能会在表之间创建新关系,并删除现有关系。对架构的此类更改将需要重新生成 POCO 库和映射。
可以通过以下步骤实现这一点。
- 右键单击 Models 项目
- 选择 EntityFramework -> Reverse Engineer Code First
- 选择 Users 数据库所在的服务器
的位置 - 选择登录凭据
- 选择 Users 数据库
- 单击“确定”
现有的文件将被**覆盖**,新表的任何新文件也将被添加。这突显了本例中的 Models 项目纯粹用于自动生成代码。如果开发人员对 POCO 类进行了特定更改,这些更改将在下次重新生成库时被覆盖。因此,对 POCO 类的任何自定义更改都应放在 Models 项目 Models 文件夹外部的局部类中。如果客户端项目是 MVC 项目,则可以使用 ViewModel 类继承 POCO 类,
然后根据视图的需求添加其他属性。
关注点
1. 运行工具时可能会显示以下错误
    System.Data.ProviderIncompatibleException: The provider did not return
	a ProviderManifestToken string. --->
	System.InvalidOperationException: This operation requires a connection
	to the 'master' database. Unable to create a connection to the 'master'
	database because the original database connection has been opened and
	credentials have been removed from the connection string. Supply an
	unopened connection. ---> System.Data.SqlClient.SqlException:
	Login failed for user 'sa
可以通过尝试以下方法之一来解决此问题
- 关闭到 Users 数据库的所有打开连接,即关闭 SQL Server Management Studio 中的任何打开窗口。
- 在连接属性窗口中选择“Use Windows Authentication”选项,然后重试。
- 连接到数据库时选择高级选项卡,并将 Perist Security Info 设置为 **True**,如下所示。

2. 未为表创建 POCO 类。
表必须具有主键,否则 EF Power tool 将不会生成 POCO 类。
历史
v 1.0 - 11:44GMT 2015-07-23