
使用 TypeScript 和 Visual Studio Code 构建 AngularJS 应用程序
4.99/5 (32投票s)
本文提供了使用 AngularJS 框架、Visual Studio Code 和 TypeScript 构建功能丰富的 Web 应用程序的指南。从基础知识到构建和测试自动化的分步说明。
我们来构建一些东西
本文的目的是
- 提供使用 TypeScript 构建由 ASP.NET vNext 后端支持的 AngularJS 应用程序的实用指南。
- 尝试使用 Visual Studio Code 提供的功能和所需的思维模式构建 Web 应用程序。
我们要构建什么?
为了展示 AngularJS 可能实现的一些功能以及这些功能如何转换为 TypeScript,我们将构建一个简单但不过于简单的部件管理应用程序。我们的应用程序将展示一个部件列表,用户将能够添加、编辑和删除部件,所有这些都可以在同一页面上完成。该应用程序非常简单,但它包含足够的功能,可以在一个应用程序中展示 AngularJS 的许多部分协同工作,而不是像大多数教程那样只关注一件事。
同时,我们将在 Visual Studio Code 中构建所有这些功能,并将触及许多与此相关的工具问题。
关于示例代码的简要说明
本文附带的示例代码包含本文中描述的完全开发的应用程序。要运行此应用程序,请执行以下操作:
- 确保您已安装 Visual Studio Code 和所有必要的组件。我推荐使用 0-to-code 安装程序快速入门。
- 解压缩附件内容。
- 在命令提示符中,将目录更改为解压缩位置,然后执行 `dnu restore & bower install & npm install`,接着执行 `gulp build`。
- 运行 `code .`,按 `Ctrl-Shift-P` 并键入 `dnx web` 启动服务器。
开发环境配置
从功能齐全的 Visual Studio IDE 转过来,很容易迷失在配置开发环境的多种方法中。没有安装程序包可以让你选择一堆选项,然后看着进度条完成安装过程。你的工具链的每个部分都来自不同的来源,有自己的配置、运行等方式。这种配置只需要完成一次,你就可以一遍又一遍地将其用于其他项目。
我们需要使用的工具
- NodeJS
- NPM 及以下全局安装的模块
- bower
- gulp
- gulp-watch
- gulp-cli
- gulp-typescript
- yo
- generator-aspnet
- typescript
- tsd
- DNX
- Visual Studio Code
您可以手动下载/安装它们,或者——正如我更喜欢的那样——使用 0-to-code 安装程序,它会安装这些工具以及一个更好的控制台和 Git,从而为您使用 Visual Studio Code 进行开发时提供所需的一切。除了安装所有工具,此安装程序还将正确配置您的用户环境,将所有需要的命令放在适当的位置。
如果您除了 NuGet 之外不熟悉包管理,您可能会觉得文章 “包管理器:前端开发新手入门指南” 很有教育意义。
最小的 ASP.NET 应用程序
在普通的 Visual Studio 中,创建一个新项目就像在菜单中选择“文件 -> 新建”命令一样简单。在初始开发环境配置之后,您将能够像这样轻松地完成它,只是使用命令行。
yo aspnet --gulp
上述命令将提示您选择应用程序类型(选择“Web 应用程序基本”)和应用程序位置。完成提示后,您将看到一个 cookie-cutter ASP.NET vNext 应用程序。由于指定了 `--gulp` 参数,我们的项目将使用 Gulp 作为构建系统。
您的下一步
dnu restore & bower install & npm install

dnu build
现在,如果您在命令提示符中键入 `code .`,您应该能够使用 Visual Studio 编辑您的代码。要运行您的应用程序,请按 Ctrl-Shift-P 并键入 `dnx web`。这将启动一个本地 Web 服务器,您将能够导航到 https://:5000 并使用您的应用程序。
模拟不同环境
如果您查看 `Views\Shared\_Layout.cshtml` 文件,您会注意到有些脚本是根据环境类型(开发、暂存或生产)有条件地包含的。为了在开发过程中模拟不同的环境,请按如下方式修改 `project.json` 文件中的命令
  "commands": {
    "kestrel": "Microsoft.AspNet.Hosting --server Kestrel --config hosting.ini /ASPNET_ENV=Production",
    "kestrel-dev": "Microsoft.AspNet.Hosting --server Kestrel --config hosting.ini /ASPNET_ENV=Development",
    "web": "Microsoft.AspNet.Hosting --server Microsoft.AspNet.Server.WebListener --config hosting.ini /ASPNET_ENV=Production",
    "web-dev": "Microsoft.AspNet.Hosting --server Microsoft.AspNet.Server.WebListener --config hosting.ini /ASPNET_ENV=Development"
  }
现在,根据您选择的命令,应用程序将相应地改变其行为。
将 AngularJS 添加到应用程序
当在 Visual Studio IDE 中开发 Web 应用程序时,当您通过 F5 运行它时,所有关于如何提供它的详细信息都由 IDE 隐藏。通常,当您准备部署时,您才会开始处理所有这些问题。当您使用 Visual Studio Code 进行开发时,从项目一开始就提出了资产的获取和部署问题。为了开始使用 AngularJS,我们需要指定从哪里获取它,更重要的是,放在哪里。
- 编辑 `bower.json` 并添加
- "angular": "1.4.0"
- "angular-ui-router": "0.2.15"
- "angular-bootstrap": "0.13.0"
- 运行 `bower install` 命令,并观察它下载了您刚刚添加到 `bower.json` 的三个包。
- 通过在 `Views\Shared\_Layout.cshtml` 中添加指向 Angular 脚本的链接来在您的页面中包含 Angular 代码
<script src="~/lib/angular/angular.min.js"></script>
<script src="~/lib/angular-ui-router/release/angular-ui-router.min.js"></script>
<script src="~/lib/angular-bootstrap/ui-bootstrap-tpls.min.js"></script>
- 启动您的应用程序并观察 Angular 代码正在下载到客户端。
为应用程序添加 TypeScript 支持
我们将在进一步的应用程序开发中专门使用 TypeScript。以下步骤将配置我们的构建管道,以将所有 TypeScript 代码编译到一个输出 JavaScript 文件中,使用 jQuery 和 Angular 等外部库的类型定义文件。构建管道还将生成源映射文件,使我们的调试更容易。
- 创建文件夹 `scripts`。这将是我们的 TypeScript 编译任务的输入文件夹。
- 编辑 `package.json` 并添加
- "gulp-typescript": "2.8.0"
- "gulp-sourcemaps": "1.5.2"
- 运行 `npm install` 并观察新添加的包已本地下载。
-
编辑 `gulpfile.js`
- 在文件开头添加
- tsc = require("gulp-typescript")
- sourcemaps = require("gulp-sourcemaps")
- 找到“paths”结构定义并在其中添加以下文件夹
- appScripts: "./scripts/"
- typings: "./typings/"
- 在“paths”结构下进行以下更改
paths.appOut = paths.webroot + "js/";
paths.appSources = paths.appScripts + "**/*.ts";
paths.js = paths.appOut + "**/*.js";
-
创建新任务“compile-app”
gulp.task("compile-app", function () { var tscResult = gulp.src([paths.appSources, paths.typings + "**/*.d.ts"]) .pipe(sourcemaps.init()) .pipe(tsc({ target: "ES5", removeComments: true, noImplicitAny: true, noEmitOnError: true, noExternalResolve: true, out: "app.js" })); return tscResult.js .pipe(sourcemaps.write("maps/")) // Relative to appOut. .pipe(gulp.dest(paths.appOut)); }); - 创建 `scripts\app.ts`
let hello = "world";
alert(hello);
- 在 `Views\Home\Index.cshtml` 中包含指向 `app.js` 的链接
@section scripts { <script src="~/js/app.js"></script> } - 为了防止 VSCode 同时解释 TypeScript 文件和生成的 JavaScript 文件,请在项目根文件夹中创建 `jsconfig.json`。
{
  "exclude": [
      "wwwroot"
      , "node_modules"
  ]
}
- 在文件开头添加
完成这些操作后,您应该能够从命令提示符成功执行 `gulp compile-app`,然后运行应用程序。
实现骨架 AngularJS 应用程序
现在我们已经具备了所有构建块,我们可以轻松地实现一个什么都不做的骨架 AngularJS 应用程序。
- 在 `scripts` 文件夹下创建 `controllers`、`directives`、`services` 和 `templates` 文件夹。我们应用程序的实现将分布在这些文件夹中。
- 从命令行运行 `tsd install jquery angular angular-ui-bootstrap angular-ui-router`。这将为 jQuery 和 Angular 安装 TypeScript 类型定义。
- 编辑 `gulpfile.js`
- 找到“paths”结构定义并在其中添加以下文件夹
- templates: "./scripts/templates/"
- 在“paths”结构下定义一个新变量
paths.templatesOut = paths.webroot + "templates/"
paths.templateFiles = paths.templates + "**/*.html";
- 创建新任务“copy-templates”
 gulp.task("copy-templates", function () {
   gulp.src(paths.templateFiles)
     .pipe(gulp.dest(paths.templatesOut));
 });
- 找到“paths”结构定义并在其中添加以下文件夹
- 创建 `scripts\appTypes.d.ts`(见下文)。
- 创建 `scripts\app.ts`(见下文)。
- 创建带有占位符文本的 `scripts\Templates\index.html`。
- 在 `Views\Shared\_Layout.cshtml` 中找到 `body-content` 容器,并按如下所示添加我们的应用程序声明
<div class="container body-content" ng-app="widgetRegistryApp"> @RenderBody() </div> - 修改 `Views\Home\Index.cshtml` 以引导应用程序(见下文)。
- 运行 `gulp compile-app` 编译应用程序,然后运行 `gulp copy-templates` 将模板从其原始位置复制到 wwwroot 下的输出文件夹。
- 您应该能够启动您的应用程序并看到网页上显示的占位符文本。
应用程序类型
为了简化起见,我们将所有与应用程序相关的类型定义保存在一个文件中。我们所有的模块都只需要引用这个文件,以及可能只与特定模块相关的其他一些模块。
使用以下内容创建 `scripts\appTypes.d.ts`。
/// <reference path="../typings/angularjs/angular.d.ts" />
/// <reference path="../typings/angular-ui-bootstrap/angular-ui-bootstrap.d.ts" />

declare namespace WidgetRegistry {
    /** Application module name. */
    var appModuleName: string;

    /** Application configuration. */
    interface AppConfig {
        /** API endpoint. */
        apiEndpoint: string;

        /** Directory that contains templates. */
        templateRoot: string;
    }
}

declare module angular {
    interface IScope {
        /**
         * Constructs full path to template.
         * @param fileName Template file name without path.
         */
        pathToTemplate: (fileName: string) => string;
    }
}
我们的类型定义包括通用的 Angular 类型定义,并声明了我们应用程序的模块名称和配置接口。我们还在 Angular 的范围定义上添加了我们的实用方法。
应用程序模块
应用程序模块定义并配置我们的应用程序。路由配置等都在那里发生。
按如下修改 `scripts\app.ts`
/// <reference path="appTypes.d.ts" />
/// <reference path="../typings/angular-ui-router/angular-ui-router.d.ts" />

namespace WidgetRegistry {

    //    Configure application module name.
    appModuleName = "widgetRegistryApp";

    //    Create application module.
    var app = angular.module(appModuleName, ["widgetRegistryData", "ui.router", "ui.bootstrap"]);

    //    Configure application module.
    app.config(["appConfig", "$stateProvider", "$urlRouterProvider", function (appConfig: AppConfig, $stateProvider: ng.ui.IStateProvider, $urlRouterProvider: ng.ui.IUrlRouterProvider) {
        $stateProvider
            .state("root", {
                url: "/",
                templateUrl: getPathToTemplate(appConfig, "index.html")
            });

        $urlRouterProvider.otherwise("/");
    }]);

    //    Initialize application module.
    app.run(["appConfig", "$rootScope", function(appConfig: AppConfig, $rootScope: ng.IRootScopeService) {
        //    Expose global functions on root scope.
        (<ng.IScope>$rootScope).pathToTemplate = (fileName: string) => getPathToTemplate(appConfig, fileName);
    }]);

    /**
     * Constructs full path to template.
     * @param appConfig Application configuration.
     * @param fileName Template file name without path.
     */
    function getPathToTemplate(appConfig: AppConfig, fileName: string): string {
        return appConfig.templateRoot + fileName;
    }

}
请注意,我们的应用程序明确引用了 Angular UI 路由的类型定义。这是因为 UI 路由未在其他任何地方使用,并且将其定义在其他地方可见是没有用的。
该应用程序配置其全局模块名称,声明对我们数据模块(下文)的依赖,并配置路由以显示我们的虚拟模板。
在网页上引导应用程序模块
最后一步是实际引导我们的应用程序。按如下修改 `Views\Home\Index.cshtml`
@{
    ViewBag.Title = "Home Page";
}

@section scripts
{

<script type="text/javascript">

    var appData = angular.module("widgetRegistryData", []);

    var appConfig = {
        apiEndpoint: "/api/widgets/",
        templateRoot: "/templates/"
    };
    appData.constant("appConfig", appConfig);

</script>

<script src="~/js/app.js"></script>

}

<div ui-view></div>
此视图所做的全部工作是声明包含实际应用程序配置的数据模块(您可能希望从模型而不是硬编码中传递当前值),引用应用程序脚本包,并声明应用程序视图的所在位置。
构建块
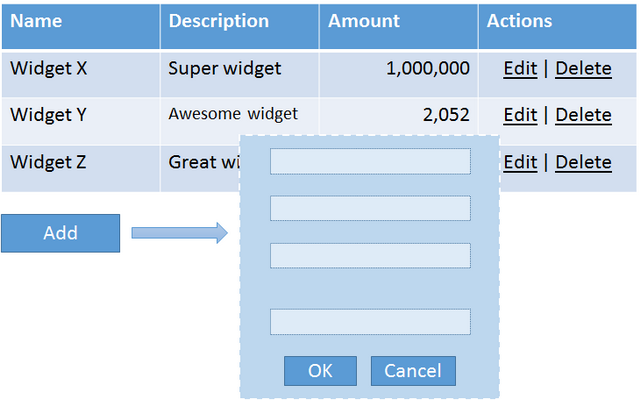
在进入实现之前,让我们大致了解一下我们这个“玩具”应用程序由哪些模块组成。

我们应用程序的主视图列出了所有小部件,允许用户修改列表中的小部件并添加新小部件。此功能将由 `widgetManagerController.ts` 控制器协调,该控制器将驱动 `index.html` 模板。
正如您从图中看到的那样,列表中的每个行项目不仅显示了有关小部件的信息,还允许编辑或删除小部件。将所有这些功能提取到一个单独的类中更有意义,我们将通过引入由 `widgetLineItemDirective.ts` 指令支持的 `widgetLineItem.html` 模板来实现这一点。
最后,无论何时用户单击“添加”按钮或小部件行项目上的“编辑”链接,都会打开一个编辑器。此功能在 `widgetEditorController.ts` 控制器中实现,并通过 `widgetEditor.html` 模板向用户公开。
我们将通过 `widgetService.ts` 服务与后端进行通信。
实现细节
小部件类型
我们所有的功能都将以“小部件”的形式进行。既然我们正在 TypeScript 世界中工作,那么让我们来描述一下小部件类型。
首先,创建 `scripts\widgetState.ts`
namespace WidgetRegistry {

    /** States of the widget. */
    export enum WidgetState {
        existing = 0,
        new = 1,
        deleting = 2,
        deleted = 3,
        undeleting = 4
    }

}
然后修改 `scripts\appTypes.d.ts`
/// <reference path="widgetState.ts" />

/** Widget data. */
interface Widget {
    /** Widget ID. */
    id: string;

    /** Widget name. */
    name: string;

    /** Some amount. */
    amount: number;

    /** Widget description. */
    description?: string;

    /** Private state of widget. */
    $state?: WidgetState;
}

type WidgetList = Array<Widget>;
这些类型是不言自明的。`WidgetState` 是我们跟踪客户端小部件状态的一种方式。`$state` 成员永远不会被服务器端考虑。
服务存根
几乎我们所有的功能都将调用后端来对小部件执行某种操作。AngularJS 通过 `$http` 服务提供 AJAX 功能。您可以选择让所有控制器都依赖此服务并直接执行与后端调用相对应的 HTTP 操作,但是,更优雅的方法是定义我们自己的服务,该服务以对我们应用程序问题领域有意义的方式公开后端功能。这样,您以后可以更改实际的服务实现,或者模拟特定的服务操作,而不是在单元测试中处理通用的 GET/POST 等动词。
首先,让我们定义服务接口(`appTypes.d.ts`)。
/** Backend service operations. */
interface IWidgetService {
    /** Gets list of widgets. */
    getWidgets(): ng.IPromise<WidgetList>;

    /**
     * Creates new widget.
     * @param widget Widget to be created.
     */
    createWidget(widget: Widget): ng.IPromise<any>;

    /**
     * Updates an existing widget.
     * @param widget Widget to be updated.
     */
    updateWidget(widget: Widget): ng.IPromise<any>;

    /**
     * Deletes an existing widget.
     * @param widget Widget to be deleted.
     */
    deleteWidget(widget: Widget): ng.IPromise<any>;

    /**
     * Restores a widget that was deleted earlier.
     * @param widget Widget to be restored.
     */
    undoWidgetDelete(widget: Widget): ng.IPromise<any>;
}
在我们的应用程序开发阶段,现在提供服务的实际实现还为时过早,所以让我们通过在 `scripts\services\widgetService.ts` 中使用 Angular 的 `$q` 服务来模拟它。
/// <reference path="../appTypes.d.ts" />

namespace WidgetRegistry {

    /** Backend service communications. */
    export class WidgetService implements IWidgetService {
        //    Dependencies.
        public static $inject = ["appConfig", "$q"];

        constructor(
            private appConfig: AppConfig,
            private promise: ng.IQService) {
        }

        /** Part of IWidgetService. */
        public getWidgets = (): ng.IPromise<WidgetList> => {
            var operation = this.promise.defer();
            operation.resolve([{
                id: "widget_1",
                name: "Some widget",
                amount: 100,
                description: "This is the best widget ever"
            }]);

            return operation.promise;
        }

        /** Part of IWidgetService. */
        public createWidget = (widget: Widget): ng.IPromise<any> => {
            var operation = this.promise.defer();
            operation.resolve();

            return operation.promise;
        }

        /** Part of IWidgetService. */
        public updateWidget = (widget: Widget): ng.IPromise<any> => {
            var operation = this.promise.defer();
            operation.resolve();

            return operation.promise;
        }

        /** Part of IWidgetService. */
        public deleteWidget = (widget: Widget): ng.IPromise<any> => {
            var operation = this.promise.defer();
            operation.resolve();

            return operation.promise;
        }

        /** Part of IWidgetService. */
        public undoWidgetDelete = (widget: Widget): ng.IPromise<any> => {
            var operation = this.promise.defer();
            operation.resolve();

            return operation.promise;
        }
    }

    //    Register with application module.
    angular.module(appModuleName).service("widgetService", WidgetService);

}
稍后,一旦我们准备好,我们将用对后端的实际调用替换存根。
部件管理器控制器
Angular 中的控制器通过模板向用户提供实际功能。每个控制器都有其作用域。不同的人以不同的方式处理控制器作用域。我更喜欢将作用域成员分为模型和操作,并让控制器明确公开两者,而不是将控制器本身视为视图模型并直接从视图访问它。以下是我定义部件管理器控制器的方式(`appTypes.d.ts`)。
type EventCallback = (e?: ng.IAngularEvent) => void;

/** Scope of the widget manager. */
interface WidgetManagerScope extends ng.IScope {
    /** Widget manager model. */
    model: {
        /** List of widgets. */
        widgets: WidgetList;

        /** Indicates whether the operation is in progress. */
        operationInProgress: boolean;

        /** If operation results in an error, contains a message. */
        errorMessage?: string;
    }

    /** Initiates operation of adding a new widget. */
    addWidget: EventCallback;

    /**
     * Edits widget.
     * @param widget Widget to be edited.
     */
    editWidget(widget: Widget): void;

    /**
     * Deletes widget.
     * @param widget Widget to be deleted.
     */
    deleteWidget(widget: Widget): void;

    /**
     * Restores widget that was deleted.
     * @param widget Widget to be restored.
     */
    undeleteWidget(widget: Widget): void;
}
控制器的实现将位于 `scripts\controllers\widgetManagerController.ts`,看起来像这样。
/// <reference path="../appTypes.d.ts" />

namespace WidgetRegistry {

    /** Widget manager controller. */
    export class WidgetManagerController {
        /** Dependencies. */
        public static $inject = ["appConfig", "$scope", "widgetService"];

        constructor(
            private appConfig: AppConfig,
            private $scope: WidgetManagerScope,
            private widgetService: IWidgetService) {

            $scope.model = {
                widgets: [],
                operationInProgress: false
            };
            $scope.addWidget = this.addWidget;
            $scope.editWidget = this.editWidget;
            $scope.deleteWidget = this.deleteWidget;
            $scope.undeleteWidget = this.undeleteWidget;

            this.performOperation(this.widgetService.getWidgets()
                .then((widgets: WidgetList) => this.$scope.model.widgets = widgets)
                .catch(() => this.$scope.model.errorMessage = "Cannot get list of widgets. Please try again later."));
        }

        /** Wraps an operation with operationInProgress indicator. */
        private performOperation = (operationPromise: ng.IPromise<any>): void => {
            this.$scope.model.operationInProgress = true;
            this.$scope.model.errorMessage = "";

            operationPromise.finally(() => this.$scope.model.operationInProgress = false);
        }

        /** Part of WidgetManagerScope. */
        private addWidget = (): void => {
        }

        /** Part of WidgetManagerScope. */
        private editWidget = (widget: Widget): void => {
        }

        /** Part of WidgetManagerScope. */
        private deleteWidget = (widget: Widget): void => {
        }

        /** Part of WidgetManagerScope. */
        private undeleteWidget = (widget: Widget): void => {
        }
    }

    //    Register with application module.
    angular.module(appModuleName).controller("widgetManagerController", WidgetManagerController);

}
我们的控制器的构造函数用一个空模型初始化作用域,公开用户将通过点击用户界面元素调用的小部件操作,并调度一个操作以从后端检索小部件列表。由于我们的服务实现是存根的,它将立即返回,但由于我们通过 `$q` 服务进行存根,接收小部件列表的控制器逻辑以后在迁移到正确实现时不会改变。
现在我们可以将我们的虚拟 `index.html` 模板替换为如下所示的标记。
<div class="alert alert-danger" ng-if="model.errorMessage">
{{model.errorMessage}}
</div>
<div class="table-responsive">
<table class="table table-striped">
<thead>
<tr>
<th>ID</th>
<th>Name</th>
<th>Amount</th>
<th>Description</th>
<th> </th>
</tr>
</thead>
<tbody>
<tr ng-repeat="widget in model.widgets">
<td>{{widget.id}}</td>
<td>{{widget.name}}</td>
<td>{{widget.amount}}</td>
<td>{{widget.description}}</td>
<td>Edit | Delete</td>
</tr>
</tbody>
</table>
</div>
<div class="row">
<div class="col-xs-12">
<button id="add-widget"
ng-click="addWidget()"
ng-disabled="model.operationInProgress">Add</button>
</div>
</div>
最后,修改 `app.ts` 中的应用程序配置,以便在用户导航到主页时调用构造函数
//    Configure application module.
app.config(["appConfig", "$stateProvider", "$urlRouterProvider", function (appConfig: AppConfig, $stateProvider: ng.ui.IStateProvider, $urlRouterProvider: ng.ui.IUrlRouterProvider) {
    $stateProvider
        .state("root", {
            url: "/",
            controller: "widgetManagerController",
            templateUrl: getPathToTemplate(appConfig, "index.html")
        });

    $urlRouterProvider.otherwise("/");
}]);
现在,如果您运行 `gulp compile-app`,然后运行 `gulp copy-templates`,然后启动应用程序,您应该能够看到由一行组成的小部件列表。
更功能化的小部件列表行项目
我们小部件列表的行项目不是静态的:用户可以通过点击行上的链接来编辑或删除/恢复小部件。同时,链接的显示或隐藏取决于小部件的状态。为了让用户更感兴趣,我们将显示一条消息,传达当前正在对小部件进行的操作,如果小部件已被删除,则以特殊方式显示小部件。
虽然可以在 `widgetManagerController.ts` 中实现所有这些功能,但这样做会使控制器承担不必要的职责,并使代码和模板变得笨拙且不必要地复杂。
相反,我们将小部件行项目提取到其自己的模板中,并通过指令实现业务逻辑。
让我们在 `appTypes.d.ts` 中定义小部件行项目作用域。
/** Scope of the widget line item in the widget manager. */
interface WidgetLineItemScope {
    /** Model. */
    model: Widget;

    /** Indicates whether the widget could be edited or deleted. */
    canEditOrDelete(widget: Widget): boolean;

    /** Indicates whether the widget is being deleted. */
    isDeleting(widget: Widget): boolean;

    /** Indicates whether the widget was deleted. */
    isDeleted(widget: Widget): boolean;

    /** Indicates whether the widget is being restored after it was deleted earlier. */
    isUndoingDelete(widget: Widget): boolean;
}
为了实现这一点,我们将 `
<tr ng-class="{deleted: isDeleted(model) || isUndoingDelete(model) }">
<td>{{model.id}}</td>
<td>{{model.name}}</td>
<td>{{model.amount}}</td>
<td>{{model.description}}</td>
<td>
<span ng-if="canEditOrDelete(model)">
<a href="#" ng-click="onEditWidget({ widget: model })">Edit</a>
|
<a href="#" ng-click="onDeleteWidget({ widget: model })">Delete</a>
</span>
<span ng-if="isDeleting(model)">
deleting...
</span>
<span ng-if="isUndoingDelete(model)">
restoring...
</span>
<span ng-if="isDeleted(model)">
<a href="#" ng-click="onUndeleteWidget({ widget: model })">Undo</a>
</span>
</td>
</tr>
指令代码将放置在 `directives\widgetLineItemDirective.ts` 中。
/// <reference path="../appTypes.d.ts" />

namespace WidgetRegistry {

    /** Widget line item directive. */
    export class WidgetLineItemDirective implements ng.IDirective {
        /** Directive factory. */
        public static Factory = (): ng.IDirectiveFactory => {
            var factory = (...args: any[]): WidgetLineItemDirective => {
                var instance = <WidgetLineItemDirective>{};
                WidgetLineItemDirective.apply(instance, args);
                return instance;
            }
            factory.$inject = ["appConfig"];

            return factory;
        }

        constructor(
            private appConfig: AppConfig) {

            this.templateUrl = appConfig.templateRoot + this.templateUrl;
        }

        /** Part of ng.IDirective. */
        public scope = {
            model: "=widget",
            onEditWidget: "&",
            onDeleteWidget: "&",
            onUndeleteWidget: "&"
        };

        /** Part of ng.IDirective. */
        public templateUrl = "widgetLineItem.html";

        /** Part of ng.IDirective. */
        public restrict = "A";

        /** Part of ng.IDirective. */
        public replace = true;

        /** Part of ng.IDirective. */
        public link = (scope: WidgetLineItemScope, element: ng.IAugmentedJQuery, attrs: ng.IAttributes): void => {
            scope.canEditOrDelete = this.canEditOrDelete;
            scope.isDeleted = this.isDeleted;
            scope.isDeleting = this.isDeleting;
            scope.isUndoingDelete = this.isUndoingDelete;
        }

        /** Part of WidgetLineItemScope. */
        private canEditOrDelete = (widget: Widget): boolean => {
            return !widget.$state || WidgetState.existing == widget.$state || WidgetState.new == widget.$state;
        }

        /** Part of WidgetLineItemScope. */
        private isDeleting = (widget: Widget): boolean => {
            return !!widget.$state && WidgetState.deleting == widget.$state;
        }

        /** Part of WidgetLineItemScope. */
        private isUndoingDelete = (widget: Widget): boolean => {
            return !!widget.$state && WidgetState.undeleting == widget.$state;
        }

        /** Part of WidgetLineItemScope. */
        private isDeleted = (widget: Widget): boolean => {
            return !!widget.$state && WidgetState.deleted == widget.$state;
        }
    }

    //    Register with application module.
    angular.module(appModuleName).directive("widgetLineItem", WidgetLineItemDirective.Factory());

}
请注意静态的 `Factory` 方法以及它如何在文件底部 Angular 的指令声明中使用。在 TypeScript/Angular 世界中,这可能是最奇怪的结构,与任何其他 Angular 概念都不同。
另请注意,此指令使用模型和几个回调创建自己的 `scope`。这将在 `index.html` 中如下所示进行连接。
<tr ng-repeat="widget in model.widgets"
    data-widget-line-item
    data-widget="widget"
    data-on-edit-widget="editWidget(widget)"
    data-on-delete-widget="deleteWidget(widget)"
    data-on-undelete-widget="undeleteWidget(widget)"></tr>
所有这些行项目标记所做的就是,它实例化了 `widgetLineItem` 指令(参见 `data-widget-line-item` 属性),并提供了指令配置其作用域所需的所有数据(`data-widget`)和回调(`data-on-*-widget`)。`widget` 是小部件列表值的当前迭代器。所有回调都指向 `widgetManagerController` 在其构造函数中放置在作用域上的方法。该指令还表明它将替换它所关联的任何 HTML 元素,实际上,正如您在 `widgetLineItem.html` 中看到的那样,我们提供了创建 HTML 表行所需的所有标记。
最后,使用模拟请求活动的代码修改 `widgetManagerController.ts`。我们将在开发周期的后期重新实现真正的逻辑。
/** Part of WidgetManagerScope. */
private addWidget = (): void => {
    alert("add");
}

/** Part of WidgetManagerScope. */
private editWidget = (widget: Widget): void => {
    alert("edit");
}

/** Part of WidgetManagerScope. */
private deleteWidget = (widget: Widget): void => {
    alert("delete");
    widget.$state = WidgetState.deleted;
}

/** Part of WidgetManagerScope. */
private undeleteWidget = (widget: Widget): void => {
    alert("undelete");
    widget.$state = WidgetState.existing;
}
小部件编辑器
唯一剩下的要实现的 UI 部分是小部件编辑器。在这个特定的应用程序中,我决定使用模态弹出编辑器。您也可以选择使用将替换小部件列表视图的 UI 状态。无论出于何种目的,这对于编辑器实现都不重要:变化的是编辑器如何访问它应该编辑的项目。在模态弹出窗口的情况下,我们将让 `widgetManagerController` 提供要编辑的小部件实例。如果您使用 UI 状态,您可以创建“添加”和“编辑”状态:后者将具有 ID 作为参数,编辑器将从共享数据模块中选择一个项目,而前者将意味着编辑器应该创建一个新实例,然后将其添加到共享数据模块供管理器使用。
和往常一样,我们将首先将编辑器类型添加到 `appTypes.d.ts` 中
type WidgetOperationCallback = (widget: Widget) => ng.IPromise<any>;

/** Widget editor model. */
interface WidgetEditorModel {
    /** Widget that is being edited. */
    widget: Widget;

    /** Callback to perform widget operation when user commits changes in the editor. */
    performWidgetOperation: WidgetOperationCallback;

    /** Indicates whether the data is valid. */
    isValid?: boolean;

    /** Indicates whether the operation is in progress. */
    operationInProgress?: boolean;

    /** If operation results in an error, contains a message. */
    errorMessage?: string;
}

/** Scope of the widget editor. */
interface WidgetEditorScope extends ng.IScope{
    /** Widget editor model. */
    model: WidgetEditorModel;

    /** Occurs when user clicks OK button. */
    ok(): void;

    /** Occurs when user clicks Cancel button. */
    cancel(): void;
}
编辑器模板 `templates\widgetEditor.html` 将如下所示。
<div class="alert alert-danger" ng-if="model.errorMessage">
    {{model.errorMessage}}
</div>

<form>

    <div class="modal-header">
        <h3 class="modal-title">Add/edit widget</h3>
    </div>

    <div class="modal-body">

      <div class="form-group" ng-if="!model.isValid">
          <span class="text-danger">Please check your input.</span>
      </div>

      <div class="form-group">
        <label for="widget-name">Name:</label>
        <input type="text" class="form-control" id="widget-name" placeholder="Widget name" ng-model="model.widget.name">
      </div>

      <div class="form-group">
        <label for="widget-amount">Amount:</label>
        <input type="range" class="form-control" id="widget-amount" min="0" max="1000" step="50" ng-model="model.widget.amount">
      </div>

      <div class="form-group">
        <label for="widget-description">Description:</label>
        <textarea class="form-control" id="widget-description" rows="5" ng-model="model.widget.description"></textarea>
      </div>

    </div>

    <div class="modal-footer">
        <button type="submit" class="btn btn-default" ng-click="ok()">OK</button>
        <button class="btn" ng-click="cancel()">Cancel</button>
    </div>

</form>
最后,在 `widgetEditorController.ts` 中实现控制器。
/// <reference path="../appTypes.d.ts" />

namespace WidgetRegistry {

    /** Widget editor controller. */
    export class WidgetEditorController {
        /** Dependencies. */
        public static $inject = ["model", "appConfig", "$scope", "$modalInstance"];

        constructor(
            model: WidgetEditorModel,
            private appConfig: AppConfig,
            private $scope: WidgetEditorScope,
            private $modalInstance: ng.ui.bootstrap.IModalServiceInstance) {

            $scope.model = model;
            $scope.model.isValid = true;
            $scope.model.operationInProgress = false;
            $scope.ok = this.ok;
            $scope.cancel = () => $modalInstance.dismiss();
        }

        /** Part of WidgetEditorScope. */
        private ok = (): void => {
            if (!this.isValid()) {
                this.$scope.model.isValid = false;
                return;
            }
            this.$scope.model.isValid = true;

            this.performOperation(
                this.$scope.model.performWidgetOperation(this.$scope.model.widget)
                    .then(() => this.$modalInstance.close())
                    .catch(() => this.$scope.model.errorMessage = "We cannot save your changes now. Please try again later."));
        }

        /** Part of WidgetEditorScope. */
        private isValid = (): boolean => {
            return !!this.$scope.model.widget.name;
        }

        /** Wraps an operation with operationInProgress indicator. */
        private performOperation = (operationPromise: ng.IPromise<any>): void => {
            this.$scope.model.operationInProgress = true;
            this.$scope.model.errorMessage = "";

            operationPromise.finally(() => this.$scope.model.operationInProgress = false);
        }
    }

    //    Register with application module.
    angular.module(appModuleName).controller("widgetEditorController", WidgetEditorController);
}
请注意,编辑器并没有真正对小部件列表执行任何操作(无论是添加还是修改)。相反,`widgetManagerController` 拥有该列表,并通过它在调用 `widgetEditorController` 时配置的 `performWidgetOperation` 回调来委托操作。
让我们在 `widgetManagerController` 中实现添加/编辑功能。
/** Dependencies. */
public static $inject = ["appConfig", "$scope", "widgetService", "$modal"];

constructor(
    private appConfig: AppConfig,
    private $scope: WidgetManagerScope,
    private widgetService: IWidgetService,
    private $modal: ng.ui.bootstrap.IModalService) {

    ...
}

/** Part of WidgetManagerScope. */
private addWidget = (): void => {
    var widget: Widget = {
        $state: WidgetState.new,
        id: (Math.random() * 100).toFixed(0),
        name: "",
        amount: Math.floor(Math.random() * 1000),
        description: ""
    };

    this.editWidgetImpl(widget, this.widgetService.createWidget).then(() => {
        this.$scope.model.widgets.push(widget);
    });
}

/** Part of WidgetManagerScope. */
private editWidget = (widget: Widget): void => {
    var selectedWidget = angular.copy(widget);

    this.editWidgetImpl(selectedWidget, this.widgetService.updateWidget).then(() => {
        angular.copy(selectedWidget, widget);
    });
}

/** Invokes widget editor. */
private editWidgetImpl = (widget: Widget, callback: WidgetOperationCallback): ng.IPromise<any> => {
    return this.$modal.open({
        resolve: {
            model: (): WidgetEditorModel => {
                return {
                    widget: widget,
                    performWidgetOperation: callback
                };
            }
        },
        templateUrl: this.$scope.pathToTemplate("widgetEditor.html"),
        controller: "widgetEditorController"
    }).result;
}
我们添加了对 `$modal` 的依赖,并通过 `editWidgetImpl` 实现了 `addWidget` 和 `editWidget`。查看对 `$modal.open` 的调用的 `resolve` 成员:它提供了 `widgetEditorController` 所依赖的 `model` 值(参见其 `$inject` 和 `constructor`)。
这里另一个值得关注的点是 `editWidget` 会创建正在编辑的行的副本。如果我们直接传递小部件实例,那么编辑器中的任何更改都会反映在这个实例中,即使用户可能已经取消了编辑操作。通过创建副本,我们确保只有在用户提交更改后,正在编辑的实例才会进入列表。
真实服务实现
我们终于准备好实现我们的后端服务了。
首先,创建 `Models\Widget.cs` 来维护服务器端模型
using System;
using System.Collections.Generic;
using System.Linq;
using System.Threading.Tasks;
using Microsoft.AspNet.Mvc;

namespace WidgetRegistry.Models
{
    public class Widget
    {
        public string id { get; set; }

        public string name { get; set; }

        public double amount { get; set; }

        public string description { get; set; }
    }
}
然后,创建 `Controllers\WidgetsController.cs`,代码如下所示。ASP.NET 的默认路由将无需我们做任何特殊处理即可识别我们的服务。
using System;
using System.Collections.Generic;
using System.Linq;
using System.Threading.Tasks;
using Microsoft.AspNet.Mvc;
using WidgetRegistry.Models;

namespace WidgetRegistry.Controllers
{
    [Route("api/[controller]")]
    public class WidgetsController : Controller
    {
        [Route("all")]
        [HttpGet]
        public IActionResult GetWidgets()
        {
            return new ObjectResult(new[]
            {
                new Widget() { id = "1", name = "qwe", amount = 123, description = "asd" },
                new Widget() { id = "2", name = "asd", amount = 456, description = "zxc" },
                new Widget() { id = "3", name = "zxc", amount = 789, description = "qwe" }
            });
        }

        [HttpPut]
        public IActionResult CreateWidget([FromBody] Widget widget)
        {
            return ResultFromWidget(widget);
        }

        [HttpPost]
        public IActionResult UpdateWidget([FromBody] Widget widget)
        {
            return ResultFromWidget(widget);
        }

        [HttpDelete]
        public IActionResult DeleteWidget(int id)
        {
            return new EmptyResult();
        }

        [HttpPatch]
        public IActionResult UndeleteWidget(int id)
        {
            return new EmptyResult();
        }

        private IActionResult ResultFromWidget(Widget widget)
        {
            if (null == widget || string.IsNullOrEmpty(widget.name) || "error" == widget.name)
            {
                return new HttpStatusCodeResult(500);
            }

            return new EmptyResult();
        }
    }
}
确保运行 `dnu build` 并重新启动您的应用程序。
完成我们服务的后端部分后,让我们确保我们前端的 Angular 服务与后端进行通信。我们现在可以移除对 `$q` 的依赖,并使用 `$http` 重新实现 `IWidgetService`。
/// <reference path="../appTypes.d.ts" />

namespace WidgetRegistry {

    /** Backend service communications. */
    export class WidgetService implements IWidgetService {
        //    Dependencies.
        public static $inject = ["appConfig", "$q", "$http"];

        constructor(
            private appConfig: AppConfig,
            private $q: ng.IQService,
            private $http: ng.IHttpService) {
        }

        /** Part of IWidgetService. */
        public getWidgets = (): ng.IPromise<WidgetList> => {
            return this.httpPromiseAsPromise(this.$http.get(this.appConfig.apiEndpoint + "all"));
        }

        /** Part of IWidgetService. */
        public createWidget = (widget: Widget): ng.IPromise<any> => {
            return this.httpPromiseAsPromise(this.$http.put(this.appConfig.apiEndpoint, widget));
        }

        /** Part of IWidgetService. */
        public updateWidget = (widget: Widget): ng.IPromise<any> => {
            return this.httpPromiseAsPromise(this.$http.post(this.appConfig.apiEndpoint, widget));
        }

        /** Part of IWidgetService. */
        public deleteWidget = (widget: Widget): ng.IPromise<any> => {
            return this.httpPromiseAsPromise(this.$http.delete(this.appConfig.apiEndpoint, { params: widget }));
        }

        /** Part of IWidgetService. */
        public undoWidgetDelete = (widget: Widget): ng.IPromise<any> => {
            return this.httpPromiseAsPromise(this.$http.patch(this.appConfig.apiEndpoint, { params: widget }));
        }

        /**
         * Converts HTTP operation promise to a generic promise.
         * It's not necessary to do. Instead IWidgetService should've used IHttpPromise<T> for return values.
         * @param httpPromise HTTP operation promise to convert.
         */
        private httpPromiseAsPromise = <T>(httpPromise: ng.IHttpPromise<T>): ng.IPromise<T> => {
            var deferred = this.$q.defer();
            httpPromise
                .success(response => deferred.resolve(response))
                .error((data: any, status: number) => deferred.reject(status));

            return deferred.promise;
        }
    }

    //    Register with application module.
    angular.module(appModuleName).service("widgetService", WidgetService);

}
回过头来看我们决定使用服务而不是直接从控制器调用 `$http` 的决定,您可能会明白为什么这是一个好主意:现在我们能够完全用真实的实现替换虚假的功能;将来,我们有可能为每个后端调用添加遥测,例如,再次对调用代码透明。如果此时我们对控制器进行了单元测试,我们就不需要更改任何测试实现,因为我们将存根 `IWidgetService` 实现,而不是 `$q` 或 `$http`。
然而,回想起来,我们应该在结果类型上使用 `IHttpPromise
最后,让我们让 `widgetManagerController.ts` 的删除和恢复功能调用实际服务并更改小部件状态。
/** Part of WidgetManagerScope. */
private deleteWidget = (widget: Widget): void => {
    var widgetWasNew = (widget.$state && WidgetState.new == widget.$state);
    widget.$state = WidgetState.deleting;

    this.performOperation(
        this.widgetService.deleteWidget(widget)
            .then(() => {
                if (widgetWasNew) {
                    //    Delete newly created widgets.
                    var idx = this.$scope.model.widgets.indexOf(widget);
                    if (idx > -1) {
                        this.$scope.model.widgets.splice(idx, 1);
                    }
                }
                else {
                    //    Allow to undo when an existing widget was deleted.
                    widget.$state = WidgetState.deleted;
                }
            })
            .catch(() => {
                widget.$state = (widgetWasNew) ? WidgetState.new : WidgetState.existing;
                this.$scope.model.errorMessage = "Cannot delete widget. Please try again later.";
            }));
}

/** Part of WidgetManagerScope. */
private undeleteWidget = (widget: Widget): void => {
    widget.$state = WidgetState.undeleting;

    this.performOperation(
        this.widgetService.undoWidgetDelete(widget)
            .then(() => {
                widget.$state = WidgetState.existing;
            })
            .catch(() => {
                widget.$state = WidgetState.deleted;
                this.$scope.model.errorMessage = "Cannot restore deleted widget. Please try again later.";
            }));
}
单元测试
后端单元测试
我们将使用 Xunit 进行后端单元测试。
将以下依赖项添加到 `project.json`
"dependencies": {
    ...
    "xunit": "2.1.0-beta4-build3109",
    "xunit.runner.dnx": "2.1.0-beta4-build134"
}
添加运行测试的命令
"commands": {
    ...
    "test": "xunit.runner.dnx"
}
运行 `dnu restore` 以本地下载并安装 Xunit。命令完成后,我们就可以为后端服务创建第一个单元测试了 —— `Tests\Backend\WidgetsControllerTests.cs`
using System;
using Microsoft.AspNet.Mvc;
using WidgetRegistry.Controllers;
using WidgetRegistry.Models;
using Xunit;

namespace WidgetRegistry.Tests
{
    public class WidgetsControllerTests
    {
        private readonly WidgetsController controller = new WidgetsController();

        [Fact]
        public void GetWidgets_CorrectResponse()
        {
            var result = controller.GetWidgets() as ObjectResult;
            Assert.NotNull(result);

            var widgets = result.Value as Widget[];
            Assert.NotNull(widgets);
            Assert.Equal(3, widgets.Length);
        }

        [Fact]
        public void CreateWidget_CorrectResponse()
        {
            var result = controller.CreateWidget(CreateValidWidget()) as EmptyResult;
            Assert.NotNull(result);
        }

        [Fact]
        public void CreateWidget_ErrorResponse()
        {
            var result = controller.CreateWidget(CreateWidgetWithError()) as HttpStatusCodeResult;
            Assert.NotNull(result);
            Assert.Equal(500, result.StatusCode);
        }

        [Fact]
        public void UpdateWidget_CorrectResponse()
        {
            var result = controller.UpdateWidget(CreateValidWidget()) as EmptyResult;
            Assert.NotNull(result);
        }

        [Fact]
        public void UpdateWidget_ErrorResponse()
        {
            var result = controller.UpdateWidget(CreateWidgetWithError()) as HttpStatusCodeResult;
            Assert.NotNull(result);
            Assert.Equal(500, result.StatusCode);
        }

        [Fact]
        public void DeleteWidget_CorrectResponse()
        {
            var result = controller.DeleteWidget(1) as EmptyResult;
            Assert.NotNull(result);
        }

        [Fact]
        public void UndeleteWidget_CorrectResponse()
        {
            var result = controller.UndeleteWidget(1) as EmptyResult;
            Assert.NotNull(result);
        }

        private Widget CreateValidWidget()
        {
            return new Widget()
            {
                id = "1",
                name = "test",
                amount = 123
            };
        }

        private Widget CreateWidgetWithError()
        {
            return new Widget()
            {
                id = "1",
                name = "error",
                amount = 123
            };
        }
    }
}
请注意,这是我们首次模拟和测试服务中的错误处理。
要运行后端测试,请按 `Ctrl-Shift-P` 并输入 `test`,然后选择搜索结果中出现的 DNX 命令。
前端单元测试
对于前端测试,我们还需要一个测试执行引擎和一个测试框架。对于本项目,我们将分别使用 karma 和 jasmine。
将新依赖项添加到 `package.json`
  "devDependencies": {
      ...
    "karma": "0.13.9",
    "karma-jasmine": "0.3.6",
    "karma-phantomjs-launcher": "0.2.1",
    "karma-coverage": "0.5.0",
    "angular-mocks": "1.4.0",
    "jasmine-jquery": "2.1.0"
  }
执行 `npm install` 以本地下载依赖项。请注意,我们正在使用 NPM 获取 angular-mocks,即使 angularjs 本身由 Bower 管理。
我们将用 TypeScript 编写测试,因此我们需要下载 Jasmine 的类型定义,在 gulpfile 中添加几个任务并创建 Karma 配置。
运行 `tsd install jasmine angular-mocks & tsd install jasmine-jquery` 以便下载我们测试基础设施的类型定义。
修改 `gulpfile.js`,添加以下任务
var karma = require("karma").server;

var paths = {
  ...
  appTests: "./tests/frontend/",
};

paths.testsOut = paths.webroot + "/tests/"
paths.testSources = paths.appTests + "**/*.ts";

/* global __dirname */

function runTests(doneCallback) {
  karma.start({
    configFile: __dirname + "/karma.conf.js",
    singleRun: true
  }, doneCallback);
}

//  gulp run-tests
gulp.task("run-tests", ["build-tests"], function (done) {
  runTests(done);
});

gulp.task("build-tests", function () {
  var tscResult = gulp.src([paths.testSources, paths.appSources, paths.typings + "**/*.d.ts"])
                    .pipe(sourcemaps.init())
                    .pipe(tsc({
                      target: "ES5",
                      removeComments: false,
                      noImplicitAny: true,
                      noEmitOnError: true,
                      noExternalResolve: true
                    }));

  return tscResult.js
          .pipe(sourcemaps.write("maps/"))                  //  Relative to testsOut.
          .pipe(gulp.dest(paths.testsOut));
});
请注意,与应用程序编译相反,编译测试的任务不使用单个输出文件,而是 1:1 编译代码。此决定使调试测试变得更加容易。
为了运行 karma,在 `gulpfile.js` 旁边创建 `karma.conf.js`。我们的配置文件将包含执行单元测试所需的所有文件,并将指示 karma 收集覆盖率数据。
module.exports = function(config) {
  config.set({
    frameworks: ["jasmine"],
    browsers: ["PhantomJS"],
    phantomjsLauncher: {
      exitOnResourceError: true
    },

    files: [
      "./wwwroot/lib/angular/angular.min.js",
      "./wwwroot/lib/angular-bootstrap/ui-bootstrap-tpls.min.js",
      "./wwwroot/lib/angular-ui-router/release/angular-ui-router.min.js",
      "./wwwroot/lib/jquery/dist/jquery.min.js",
      "./node_modules/angular-mocks/angular-mocks.js",
      "./node_modules/jasmine-jquery/lib/jasmine-jquery.js",
      "./wwwroot/js/**/*.js",
      "./wwwroot/tests/setup.js",
      "./wwwroot/tests/tests/**/*.js"
    ],
    exclude: [
      "./wwwroot/js/templates.js",
    ],

    reporters: ["progress", "coverage"],

    preprocessors: {
      "./wwwroot/js/**/*.js": ["coverage"]
    },

    coverageReporter: {
      type: "html",
      dir: "./wwwroot/tests/coverage/"
    }
  });
};
完成上面列出的所有更改后,您将能够运行 `gulp run-tests` 来执行单元测试(由于缺少测试,运行显然会失败)。
开发前端单元测试
最简单的单元测试可能看起来像这样
describe("foo", function() {

    it("bar", function() {
        //    Code your expectations here.
    });

});
然而,由于我们正在处理 Angular,我们需要提供足够的基础设施和模拟,以便能够在我们的服务、控制器和指令中执行待测代码。好消息是,如果应用程序架构良好,这样做非常容易,因为 Angular 代码在设计上是可测试的。
我们将这样组织前端测试
- `Tests\Frontend\_references.d.ts` 将包含所有单元测试所需的类型定义引用。
- `Tests\Frontend\setup.ts` 将定义所有单元测试特有的类型以及 Angular 所需的模拟基础设施。
- 所有测试代码将位于 `Tests\Frontend\tests` 文件夹下。
最简单的部分是 `Tests\Frontend\_references.d.ts` —— 此文件应包含您的应用程序和模拟基础设施类型,足以编译您的测试。
/// <reference path="../../scripts/appTypes.d.ts" />
/// <reference path="../../typings/angularjs/angular-mocks.d.ts" />
/// <reference path="../../typings/jasmine/jasmine.d.ts" />
/// <reference path="../../typings/jasmine-jquery/jasmine-jquery.d.ts" />
`Tests\Frontend\setup.ts` 负责处理模拟和伪造 Angular 基础设施所需的所有繁重工作。我们将伪造数据模块 (`widgetRegistryData`),模拟应用程序模块 (`widgetRegistryApp`) 并使用 `mock.inject()` 来访问我们的控制器和服务的依赖项。一旦我们有了这种访问权限,模拟所需的依赖项以模拟我们想要验证的行为就非常容易了。
/// <reference path="_references.d.ts" />

/** Mock application module information. */
interface WidgetRegistryAppMock {
    config: WidgetRegistry.AppConfig;
}

/** Mock controllers for application. */
interface WidgetRegistryControllerMock {
    /** Controller factory. */
    factory: ng.IControllerService;

    /** Root scope. */
    rootScope: ng.IRootScopeService;

    /** Modal service. */
    modal: ng.ui.bootstrap.IModalService;

    /** Q service. */
    promises: ng.IQService;
}

/** Mock widgetService instance and utilities. */
interface WidgetServiceMock {
    /** $httpBackend service instance. */
    httpMock: ng.IHttpBackendService;

    /** Service instance. */
    instance: WidgetRegistry.IWidgetService;
}

/** Starts mock application. */
function startApplication(): WidgetRegistryAppMock {
    var result = {
        config: {
            apiEndpoint: "/api/widgets/",
            templateRoot: "/templates/"
        }
    };

    var appData = angular.module("widgetRegistryData", []);
    appData.constant("appConfig", result.config);

    angular.mock.module("widgetRegistryApp");

    //    Fake successful downloads for templates.
    angular.mock.inject(($httpBackend: ng.IHttpBackendService) => {
        $httpBackend.whenGET(/templates\/.+/).respond(200);
    });

    return result;
}

/** Mocks controller. */
function mockWidgetRegistryController(): WidgetRegistryControllerMock {
    var result = <WidgetRegistryControllerMock>{};

    angular.mock.inject(($controller: ng.IControllerService, $rootScope: ng.IRootScopeService, $modal: ng.ui.bootstrap.IModalService, $q: ng.IQService) => {
        result.factory = $controller;
        result.rootScope = $rootScope;
        result.modal = $modal;
        result.promises = $q;
    });

    return result;
}

/** Mocks widgetService. */
function mockWidgetService(): WidgetServiceMock {
    var result = <WidgetServiceMock>{};

    angular.mock.inject((widgetService: WidgetRegistry.IWidgetService, $httpBackend: ng.IHttpBackendService) => {
        result.httpMock = $httpBackend;
        result.instance = widgetService;
    });

    return result;
}

/** Creates fake widget instance. */
function createFakeWidgetInstance(): WidgetRegistry.Widget {
    return {
        id: "123",
        name: "some widget",
        amount: 5
    };
}

/** Creates regular expression to match any API endpoint URL with query parameters. */
function getEndpointWithQueryStringRegexp(config: WidgetRegistry.AppConfig): RegExp {
    return new RegExp(config.apiEndpoint + "\?.*");
}
请不要对以下限制感到惊讶
- `startApplication()` 每个测试用例执行只能调用一次。
- `mockWidgetRegistryController()`、`mockWidgetService()` 以及通常使用 `angular.mock.inject()` 的任何函数都可以在 Angular 构造控制器、服务或指令实例之前调用。
这里每个函数都返回一个提供对各种依赖项访问的对象。我们可以使用 `WidgetRegistryAppMock` 成员来动态修改应用程序配置或数据,并使用 `WidgetRegistryControllerMock` 或 `WidgetServiceMock` 成员来控制控制器或服务实例。
一旦我们完成了基础设施代码,我们就可以最终编写一个正确的单元测试了。
/// <reference path="../setup.ts" />

describe("widgetManagerController", function() {

    var controllerName = "widgetManagerController";

    var app = <WidgetRegistryAppMock>{};
    var controller = <WidgetRegistryControllerMock>{};
    var service = <WidgetServiceMock>{};

    beforeEach(function() {
        //    1.
        app = startApplication();
        controller = mockWidgetRegistryController();
        service = mockWidgetService();
    });

    afterEach(function() {
        //    4.
        service.httpMock.verifyNoOutstandingExpectation();
        service.httpMock.verifyNoOutstandingRequest();
    });

    it("shows error if get all widgets operation fails", function() {
        //    2.
        service.httpMock.expectGET(app.config.apiEndpoint + "all").respond(500);
        var scope = <WidgetRegistry.WidgetManagerScope>controller.rootScope.$new();

        controller.factory(controllerName, {
            appConfig: app.config,
            $scope: scope,
            widgetService: service.instance,
            $modal: controller.modal
        });

        expect(scope.model).toBeDefined();
        expect(scope.model.errorMessage).toBeFalsy();

        expect(scope.model.operationInProgress).toBe(true);
        service.httpMock.flush();

        expect(scope.model.widgets).toEqual([]);
        expect(scope.model.operationInProgress).toBe(false);
        expect(scope.model.errorMessage).toBeTruthy();
    });

    it("adds a new widget to list if operation completes successfully", function() {
        //    3.
        var data = [
            createFakeWidgetInstance(),
            createFakeWidgetInstance(),
            createFakeWidgetInstance()
        ];
        service.httpMock.expectGET(app.config.apiEndpoint + "all").respond(200, data);

        var scope = <WidgetRegistry.WidgetManagerScope>controller.rootScope.$new();
        controller.factory(controllerName, {
            appConfig: app.config,
            $scope: scope,
            widgetService: service.instance,
            $modal: controller.modal
        });
        service.httpMock.flush();

        var deferred = controller.promises.defer();
        spyOn(controller.modal, "open").and.returnValue({ result: deferred.promise });

        scope.addWidget();
        deferred.resolve();

        deferred.promise.finally(() => {
            expect(scope.model.widgets.length).toBe(data.length + 1);
            expect(scope.model.errorMessage).toBeFalsy();
        });
    });

});
您可以运行 `gulp run-tests` 执行这些测试。生成的测试覆盖率数据将保存在 `wwwroot\tests\coverage` 下。
测试将这样运行
- [1] -> [2] -> [4],然后 [1] -> [3] -> [4]
- [1] 启动应用程序并获取 `widgetManagerController` 和 `widgetService` 的依赖项。
- [2]:
- 将服务的 GET 端点配置为返回 500。
- 创建新的控制器实例。
- 确保没有显示错误,并且总体初始状态符合预期。
- 通过刷新 HTTP 模拟来完成待处理的 GET 请求。
- 确保初始 GET 操作错误的后果。
- [3]:
- 将服务的 GET 端点配置为成功返回虚假数据。
- 创建新的控制器实例并通过刷新 HTTP 模拟完成待处理的 GET 请求。
- 通过将其快捷方式设置为本地控制的承诺来模拟 `$modal.open()` 方法,这样实际上不会执行任何小部件编辑器代码。
- 通过直接调用按钮点击处理程序来模拟用户点击“添加小部件”按钮。请注意,此时没有发生 HTML 或 DOM 操作。
- 成功解决本地承诺。
- 在承诺的 `finally` 子句中,确保成功添加操作的结果。
- [4] 是框架在 [2] 或 [3](实际单元测试)之后将自动执行的代码。在我们的案例中,它是一个保护措施,确保我们没有遗漏任何可能调用我们代码的 HTTP 端点。
改进代码和流程
缓存 Angular 模板
按照目前的实现,您会注意到每次第一次访问某个功能时,应用程序都会下载模板。虽然在开发过程中很方便,但对于常规使用模式来说,这是一个性能损失。我们可以通过预先将所有模板放入缓存中并一次性下载所有模板来解决这个问题。
- 将以下依赖项添加到 `package.json` 中的 `devDependencies`
 "gulp-angular-templatecache": "1.7.0",
 "gulp-minify-html": "1.0.4"
- 运行 `npm install`。
-
将 `gulpfile.js` 中的 `copy-templates` 任务更改为稍微复杂一些
var minifyHtml = require("gulp-minify-html"), templateCache = require("gulp-angular-templatecache"); gulp.task("copy-templates", function () { gulp.src(templateFiles) .pipe(minifyHtml()) .pipe(templateCache("templates.js", { root: "/templates", module: "widgetRegistryData" // Use data module, so app module would wait until templates are initialized. })) .pipe(gulp.dest(paths.appOut)); }); - 在 `Views\Home\Index.cshtml` 中包含指向 `templates.js` 的链接
 <script src="~/app/templates.js"></script>
 <script src="~/app/app.js"></script>
运行 `gulp copy-templates` 并在浏览器中刷新页面后,您应该会看到 `templates.js` 被下载,并且不再需要往返后端获取模板文件。
使用 SASS 进行样式设计
到目前为止,我们一直使用 TypeScript 来提高我们在开发应用程序时的生产力。我们可以通过将样式开发从 CSS 切换到 SASS 来进一步提高我们的生产力。SASS 提供了一种非常出色的方式来维护和共享样式,而无需在所有地方复制粘贴相同的 CSS 代码。
- 在 `package.json` 的 `devDependencies` 中添加一个新条目
"gulp-sass": "2.0.4",
- 运行 `npm install`。
-
在 `gulpfile.js` 中添加一个新任务
 var sass = require("gulp-sass");

 var paths = {
   ...
   appStyles: "./styles/",
 };

 paths.styleSources = paths.appStyles + "**/*.scss";
 paths.stylesOut = project.webroot + "/css/";

 gulp.task("compile-styles", function () {
   gulp.src(styleSources)
     .pipe(sourcemaps.init())
     .pipe(sass({
       includePaths: [],                                     //  Populate with paths to included files.
       outputStyle: "compressed"
     }))
     .pipe(sourcemaps.write("maps/"))                        //  Relative to stylesOut.
     .pipe(gulp.dest(paths.stylesOut));
 });
首先创建 `styles\site.scss` 并运行 `gulp compile-styles` 命令。您已准备好继续使用 SASS。
一项构建任务统治一切
到目前为止,我们一直在创建专注于开发过程特定部分的独立任务。每次我们想要生成一个应用程序时,按特定顺序逐个运行这些任务是非常不方便的。是时候创建一些超级任务,以我们想要的方式协调我们所有现有的任务了。
- 将新依赖项添加到 `package.json` 并运行 `npm install`
 "gulp-start-process": "1.1.1",
 "run-sequence": "1.1.2",
 "del": "1.2.1",
-
在 `gulpfile.js` 中添加新任务:`var del = require("del"),`
   start = require("gulp-start-process"),
   runSequence = require("run-sequence");
 //  gulp clean
 gulp.task("clean", function (cb) {
     del([paths.appOut, paths.testsOut, paths.templatesOut, paths.stylesOut], cb);
 });

 //  gulp build
 gulp.task("build", function (cb) {
     runSequence("clean", ["build-backend", "build-app"], ["run-tests", "run-tests-backend"]);
 });

 //  gulp run-tests
 gulp.task("run-tests", ["build-tests"], function (done) {
     runTests(done);
 });

 //  gulp run-tests-backend
 gulp.task("run-tests-backend", function (cb) {
     start("dnx . test", cb);
 });

 gulp.task("build-app", ["copy-templates", "compile-styles", "compile-app"], function () {
 });

 gulp.task("build-backend", function (cb) {
     start("dnu build", cb);
 });
完成这些更改后,您应该能够
- 运行 `gulp build` 以清理输出文件夹,构建前端和后端,测试,然后运行前端和后端测试。
- 运行 `gulp run-tests` 以重建并运行前端测试。
- 运行 `gulp clean` 以仅清理输出文件夹。
自动编译和单元测试
我们已经能够通过精心编排我们的 gulp 任务来大大改进我们的代码-运行-修复周期,但我们可以做得更好。我们可以指示 gulp 在后台运行并监视文件更改,然后为我们运行构建或测试。
最后添加到 `gulpfile.js`
//  gulp watch-app
gulp.task("watch-app", ["build-app"], function () {
  gulp.watch(appSources, ["compile-app"]);
  gulp.watch(styleSources, ["compile-styles"]);
  gulp.watch(templateFiles, ["copy-templates"]);
});

//  gulp watch-tests
gulp.task("watch-tests", ["run-tests"], function (done) {
  gulp.watch(appSources, ["compile-app-run-tests"]);
  gulp.watch(testSources, ["run-tests"]);
});

gulp.task("compile-app-run-tests", ["compile-app"], function (done) {
  runTests(done);
});
您可以运行 `gulp watch-app`,然后返回到您的 IDE,修改应用程序源代码,然后刷新浏览器中的页面,您将看到您的更改立即生效,而无需手动触发构建。运行 `gulp watch-tests` 后,前端单元测试也一样。
您应该牢记一个注意事项:gulp 只会监视现有文件的更改,而不会监视新文件的添加。
最小化应用程序脚本
目前,我们的应用程序被编译成一个包含所有代码的 JavaScript 文件。我们仍然可以缩小此文件,以节省加载时间和大小。
- 修改 `gulpfile.js` 中的 `min:js` 任务,使其看起来像这样
gulp.task("min:js", function() { gulp.src([paths.appOut + "templates.js", paths.appOut + "app.js"], { base: "." }) .pipe(concat(paths.appOut + "app.min.js")) .pipe(uglify()) .pipe(gulp.dest(".")); }); -
修改 `Index.cshtml` 以包含缩小脚本
@section scripts { <script type="text/javascript"> var appData = angular.module("widgetRegistryData", []); var appConfig = { apiEndpoint: "/api/widgets/", templateRoot: "/templates/" }; appData.constant("appConfig", appConfig); </script> <environment names="Development"> <script src="~/js/templates.js"></script> <script src="~/js/app.js"></script> </environment> <environment names="Staging,Production"> <script src="~/js/app.min.js"></script> </environment> } - 通过在 `karma.conf.js` 中添加新的排除项,将缩小包从单元测试中排除
 exclude: [
   "./wwwroot/js/app.min.js",
   "./wwwroot/js/templates.js",
 ]
应用程序将在开发期间使用未缩小版本,否则使用缩小版本。单元测试将针对未缩小版本运行,因此代码覆盖率结果对我们有用。
键盘快捷键
我们可以做的最后一个改进工作流程的更改是将 `watch-app` 和 `watch-tests` 分配给键盘快捷键。
假设您尚未为项目配置键盘快捷键,在 IDE 中按 `Ctrl-Shift-T` 并在提示时选择编辑 `tasks.json` 文件。将以下配置添加到文件中即可。
{
    "version": "0.1.0",
    "command": "gulp",
    "args": [
        "--gulpfile",
        "gulpfile.js"
    ],
    "isShellCommand": true,
    "tasks": [
        {
            "taskName": "watch-app",
            // Make this the default build command.
            "isBuildCommand": true,
            // Show the output window only if unrecognized errors occur.
            "showOutput": "silent",
            // Task is running in watching mode.
            "isWatching": true,
            // Use the standard less compilation problem matcher.
            "problemMatcher": ["$gulp-tsc", "$tsc"]
        },
        {
            "taskName": "watch-tests",
            // Make this the default test command.
            "isTestCommand": true,
            // Show the output window only if unrecognized errors occur.
            "showOutput": "silent",
            // Task is running in watching mode.
            "isWatching": true,
            // Use the standard less compilation problem matcher.
            "problemMatcher": ["$gulp-tsc", "$tsc"]
        }
    ]
}
进行此更改后,`Ctrl-Shift-B` 将开始连续应用程序编译;`Ctrl-Shift-T` 将同时编译应用程序并运行单元测试。
结束
使用 Visual Studio Code 进行开发有所不同,需要一些时间才能适应。通过本文,您应该为未来的工作奠定良好的基础。
历史
修复了 gulpfile 中应用程序的 TypeScript 输出配置。