
即时创建简单的图标
3.75/5 (9投票s)
仅使用 Java 代码即可动态创建简单的图标图像。
免责声明
请注意,本文中的代码按原样提供,不附带任何保证、支持或担保。代码已测试并通过 JDK1.4 和 JDK1.5。
引言
偶尔需要为图标创建小型图像。大多数时候,您没有时间寻找图标,而使用任何图形程序绘制它们都非常繁琐,尤其是在编写代码更为紧迫的情况下。在过去,对我来说,那是我的 Atari ST 的美好时光,您可以通过着色像素来设计简单的图标,但由于此方法还需要加载一些图形软件,因此比设计图标的最古老的方法要慢。第一个鼠标指针图标和其他操作系统图标(甚至在 Windows 之前)都是使用位图矩阵绘制的,并且将图标数据嵌入到您的代码中从未如此简单。这就是我的 PatternColorFilter 类旨在实现的目标。
背景
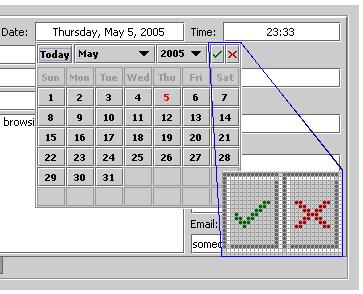
在继续描述代码之前,我将解释位图矩阵是如何定义的。在上图中,我为显示的图标使用了两种模式。
private final static String[] okPattern = {
  "·······••",
  "······••·",
  "·····••··",
  "•···••···",
  "••·••····",
  "·•••·····",
  "··•······"
};
private final static String[] cancelPattern = {
  "••·····••",
  "·••···••·",
  "··••·••··",
  "···•••···",
  "··••·••··",
  "·••···••·",
  "••·····••"
};
而实际以彩色渲染图标所需的附加数据在此处给出。
private final static char[] patternChars = {'•', '·'};
private Color[] okColours = {new Color(0, 100, 0), new Color(0, true)};
private Color[] cancelColours = {new Color(180, 0, 0), new Color(0, true)};
okColours 数组定义了与 okPattern 一起使用的 Color 实例,而 cancelColours 数组与 cancelPattern String 数组一起使用。字符数组 patternChars 告诉 PatternColorFilter 类用给定颜色数组中的哪种颜色绘制哪些像素。
Using the Code
PatternColorFilter 类只有一个有用的方法 createImage(...) ,它正如预期的那样返回一个与数据数组中指定的像素矩阵匹配的图像。下面的代码块演示了如何使用 PatternColorFilter 类来创建顶图中出现的两个图标图像。
private ImageIcon okIcon =
    new ImageIcon(PatternColorFilter.createImage(this, true, okPattern,
                                                      patternChars, okColours));
private ImageIcon cancelIcon =
    new ImageIcon(PatternColorFilter.createImage(this, true, cancelPattern,
                                                      patternChars, cancelColours));
PatternColorFilter.createImage(...) 的方法签名是这样的:
public static synchronized Image createImage
    (java.awt.Component c, boolean transparent, String[] pattern,
          char[] patternChars, Color[] patternColours);
由于图像的创建方式,第一个参数**必须**是 Java AWT 组件,所有这些将在下一节中解释。
代码解释
下面是 PatternColorFilter 类的完整源代码列表,我将逐行解释:
01|  import java.awt.*;
02|  import java.awt.image.*;
03|
04|  public class PatternColorFilter extends RGBImageFilter {
05|    // Data members used by a specific PatternColorFilter instance..
06|    private String[] pattern;
07|    private char[] patternChars;
08|    private Color[] patternColours;
09|    private BufferedImage image;
10|
11|    private PatternColorFilter(String[] pattern, char[] patternChars,
           Color[] patternColours) {
12|      // The constructor is private to prevent anyone from creating
         // unwanted instances..
13|      super();
14|      // Set the private data members..
15|      this.pattern = pattern;
16|      this.patternChars = patternChars;
17|      this.patternColours = patternColours;
18|      canFilterIndexColorModel = true;
19|    }
20|
21|    public static synchronized Image createImage
                       (Component c, boolean transparent, String[] pattern,
                        char[] patternChars, Color[] patternColours) {
22|      // Check the data arrays specified and return null if they are invalid..
23|      if (patternChars == null || patternColours == null || pattern == null) {
24|        // Invalid data arrays..
25|        return null;
26|      } else if (patternChars.length != patternColours.length) {
27|        // Invalid data arrays..
28|        return null;
29|      }
30|      // Obtain the width and height of the pattern array and verify it is even..
31|      int width = 0;
32|      int height = pattern.length;
33|      for (int i = 0; i < pattern.length; i++) {
34|        if (width == 0) {
35|          width = pattern[i].length();
36|        } else if (width != pattern[i].length()) {
37|          // Uneven pattern array..
38|          return null;
39|        }
40|      }
41|      // Create a BufferedImage to work with..
42|      BufferedImage image = new BufferedImage(width, height, transparent ?
                                                 BufferedImage.TYPE_INT_ARGB :
                                                 BufferedImage.TYPE_INT_RGB);
43|      // Create an ImageProducer instance based on a PatternColorFilter instance..
44|      FilteredImageSource fis =
                     new FilteredImageSource(image.getSource(),
                                             new PatternColorFilter(pattern,
                                                                    patternChars,
                                                                    patternColours));
45|      // Produce and return the image..
46|      return c.createImage(fis);
47|    }
48|
49|    public int filterRGB(int x, int y, int rgb) {
50|      // Is there a valid pattern to paint?
51|      if (pattern != null) {
52|        // Get the pattern's character..
53|        char c = pattern[y].charAt(x);
54|        // Loop through the pattern characters..
55|        for (int i = 0; i < patternChars.length; i++) {
56|          if (patternChars[i] == c) {
57|            // Find the matching pixel RGB value and return it..
58|            return patternColours[i].getRGB();
59|          }
60|        }
61|      }
62|      // Return the default RGB value specified by the method's invoker..
63|      return rgb;
64|    }
65|  }
1. 扩展 RGBImageFilter
Java 最基础的图像处理 API 中有一个类,它为我们完成了所有繁琐的图像像素矩阵过滤工作。引用 JavaDoc 中关于 RGBImageFilter 的条目:
"这个类提供了一种简单的方法来创建一个 ImageFilter,该 ImageFilter 会修改默认 RGB ColorModel 中图像的像素。它旨在与 FilteredImageSource 对象结合使用,以生成现有图像的过滤版本。它是一个抽象类,它提供了将所有像素数据通过单个方法进行通道传输所需的调用,该方法将单个像素转换为默认 RGB ColorModel,而不管 ImageProducer 使用的 ColorModel 是什么。要创建可用的图像过滤器,唯一需要定义的方法是 filterRGB 方法。"
通过扩展此类,我们可以利用 Java 的图像处理支持,并且只执行解决从像素矩阵动态创建图像问题的必要任务(第 4、49 行)。
2. 智慧地构建
早期,我曾有过这样的想法,即我必须确保我的代码是线程安全的,并且可以从程序的生命周期的不同阶段运行。因此,PatternColorFilter 的每个实例都必须拥有用于渲染图像的数据数组的副本,并且为了进一步加强这一点,所有数据成员都是 private 的,类构造函数也是如此,因此只有类本身才能按需创建其实例(第 6-19 行)。
3. 分而治之
正如 static 方法 createImage(...) 所示,PatternColorFilter 类的一个实例在用于渲染图像后被创建并丢弃,这有助于保持安全性。该方法首先验证用于渲染图标的数据数组是否有效,甚至在其宽度方面也有效。接下来创建一个空的 BufferedImage 实例,它将与 PatternColorFilter 实例一起成为 FilteredImageSource 实例的基础。该方法的最后一行通过使用提供的 AWT 组件实例的 createImage(..) 方法,根据指定的像素和颜色数据数组用颜色填充空图像,从而完成实际工作(第 21-47 行)。
4. 幕后
最后一个方法 filterRGB(...) 是通过从 RGBImageFilter 类继承的方法间接调用的,并且由于 PatternColorFilter 对用于渲染图像的数据数组具有 private 访问权限,因此每个图像都根据其在通过 static createImage(...) 方法创建 PatternColorFilter 实例时提供的数据进行渲染(第 49-64 行)。
结论
我希望本文能为图像的像素操作和动态创建图像提供一些见解。诚然,这种创建图像的方法可能不是最快或最高效的,尤其是对于非常大的图像。但是,在我看来,其易用性是任何其他方法都无法比拟的,特别是对于忙碌的程序员来说,他们需要赶在截止日期前完成任务。一旦代码稳定下来,并且有时间来装饰您的 GUI,使其拥有专业的图标,那就去做吧。但当事情刚开始,并且正处于激烈的开发周期中时,PatternColorFilter 类的灵活性非常有价值。