
使用 AngularJS 的 Samsung Gear
5.00/5 (3投票s)
使用 AngularJS 为 Samsung Gear 创建 Odd Image Out Game
引言

什么是Gear找不同游戏?
在这款游戏应用中,总共会提出五个问题。在每个问题中,我会展示四组图片,其中一张图片会与其他三张不同。用户必须从四张图片中选出那张不同的图片。如果用户从问题中选对了不同的图片,他将获得10分。如果他选择了错误的答案,他将获得-5分。在用户回答完所有五个问题后,将计算结果,如果用户的分数为50,则他赢得游戏;如果用户的分数低于50,则他输掉游戏。
创建这个适用于三星Gear智能手表的找不同应用需要了解什么?
您需要具备以下基础知识:
- TIZEN IDE Web项目开发
- AngularJS开发
开发三星Gear应用所需的先决条件
要开始开发我们的第一个三星Gear应用,我们需要安装以下软件:
注意:如果您是使用TIZEN IDE开发三星Gear应用的新手,请查看我之前的文章,其中详细解释了如何安装Tizen SDK以及如何使用Tizen IDE创建您的第一个“Hello world”程序。
AngularJS
我们可能熟悉什么是模型-视图-视图模型(MVVM)以及什么是模型-视图-控制器(MVC)。AngularJS是一个纯粹基于HTML、CSS和JavaScript的JavaScript框架。
AngularJS的模型-视图-任意(MVW)模式类似于MVC和MVVM模式。在我们的示例中,我使用了模型、视图和服务。在代码部分,让我们看看如何在我们的MVC应用中安装和创建AngularJS。
如果您对阅读更多关于AngularJS的内容感兴趣,请点击以下链接:
我如何开发这款找不同游戏Gear应用?
首先,收集所有需要用于问题显示的图片。每个问题包含四组图片,其中一张图片应有所不同。所以尽可能多地收集图片,以制作更多的问题。我将从问题集中随机显示问题,以避免重复显示问题。因此,首先,我们需要为用户制作尽可能多的问题,以免他们对游戏感到厌倦。我从Icon Finder下载了所有免费图片,因为我们正在为智能手表创建应用。在这里,我下载了48*48大小的图片。

下载所有图片并为每张图片命名后,我在图片名称本身中将答案标记为O表示正确,N表示错误图片。对于本次演示的示例,我总共创建了15个问题,共有15 * 4张图片。您可以添加更多问题以使应用更有趣。
Using the Code
正如我之前提到的,如果您是Tizen IDE开发的新手,请查阅我的第一篇文章,其中详细解释了如何下载、安装并开始使用Tizen IDE为Samsung Gear创建您的应用程序。
点击 -> 开始程序 -> 点击 Tizen IDE。
首次启动时,它将选择您的工作区。您可以浏览并选择文件夹,以便将所有项目创建在该文件夹下。点击确定以开始您的新项目。

完成后,点击文件 -> 新建 -> Tizen Web项目。

创建我们的第一个可穿戴UI模板:我们可以看到如下窗口。首先,我们从可穿戴UI模板开始。选择模板和可穿戴UI,然后点击基本。为您的项目命名,然后点击完成。

创建完成后,您可以在“项目浏览器”的左侧看到您的项目。在新创建的项目中创建一个新文件夹,用于添加所有AngularJS引用文件。我创建的文件夹名为“MyAngular”。我将所有AngularJS和JQuery相关的引用文件复制到此文件夹,并还创建了一个名为“controller.js”的新JavaScript文件用于AngularJS控制器的创建。

创建AngularJS controller.js文件的步骤
步骤 1
我们所有的业务逻辑都将写在AngularJS Controller.js文件中。正如您在项目“MyAngular”文件夹中看到的那样,我已经创建了“controller.js”文件来编写我们所有的AngularJS代码。
在 Controller.JS JavaScript文件中,我们将像下面这样为AngularJS模型和控制器创建
首先,我们添加引用并为我们的AngularJS控制器创建模型。
/// <reference path="angular.js" />
/// <reference path="angular.min.js" />
/// <reference path="angular-animate.js" />
/// <reference path="angular-animate.min.js" />
var app;

(function () {
    app = angular.module("RESTClientModule", ['ngAnimate']);
})();
在控制器中,我声明了所有需要使用的变量,并在我们的HTML页面中显示结果。
步骤2:在控制器中声明局部变量
在这里,我对每个变量都进行了注释,以便用户能够轻松理解。
app.controller("AngularJs_Controller",
function ($scope, $timeout, $rootScope, $window, $http) {
    //Global Variables

    //Counter to increment the Question nos
    $scope.counterval = 0;
    $scope.questionCount = 0;

    //to store Game Image details. Here for each question I have created the ID,
    //four Image Names as Image1,image2 and etc, and the result for each questions.
    $scope.Images = [

                     {"id": "1", "Image1": "A1_N.png",
                     "Image2": "A2_O.png", "Image3": "A3_O.png",
                     "Image4": "A4_O.png", "Result": "1"}
                     , {"id": "2", "Image1": "AN1_O.png",
                     "Image2": "AN2_O.png", "Image3": "AN3_N.png",
                     "Image4": "AN4_O.png", "Result": "3"}
                     ,{"id": "3", "Image1": "C1_O.png",
                     "Image2": "C2_N.png", "Image3": "C3_O.png",
                     "Image4": "C4_O.png", "Result": "2"}
                     , {"id": "4", "Image1": "F1_O.png",
                     "Image2": "F2_O.png", "Image3": "F3_N.png",
                     "Image4": "F4_O.png", "Result": "3"}
                     ,{"id": "5", "Image1": "G1_N.png",
                     "Image2": "G2_O.png", "Image3": "G3_O.png",
                     "Image4": "G4_O.png", "Result": "1"}
                     , {"id": "6", "Image1": "H1_O.png",
                     "Image2": "H2_N.png", "Image3": "H3_O.png",
                     "Image4": "H4_O.png", "Result": "2"}
                     ,{"id": "7", "Image1": "J1_N.png",
                     "Image2": "J2_O.png", "Image3": "J3_O.png",
                     "Image4": "J4_O.png", "Result": "1"}
                     , {"id": "9", "Image1": "S1_O.png",
                     "Image2": "S2_N.png", "Image3": "S3_O.png",
                     "Image4": "S4_O.png", "Result": "2"}
                     , {"id": "9", "Image1": "N1_N.png",
                     "Image2": "N2_O.png", "Image3": "N3_O.png",
                     "Image4": "N4_O.png", "Result": "1"}
                     ,{"id": "10", "Image1": "NW1_O.png",
                     "Image2": "NW2_N.png", "Image3": "NW3_O.png",
                     "Image4": "NW4_O.png", "Result": "2"}
                     , {"id": "11", "Image1": "O1_O.png",
                     "Image2": "O2_O.png", "Image3": "O3_O.png",
                     "Image4": "O4_N.png", "Result": "4"}
                     ,{"id": "12", "Image1": "P1_O.png",
                     "Image2": "P2_N.png", "Image3": "P3_O.png",
                     "Image4": "P4_O.png", "Result": "2"}
                     , {"id": "13", "Image1": "SC1_O.png",
                     "Image2": "SC2_O.png", "Image3": "SC3_O.png",
                     "Image4": "SC4_N.png", "Result": "4"}
                     , {"id": "14", "Image1": "T1_N.png",
                     "Image2": "T2_O.png", "Image3": "T3_O.png",
                     "Image4": "T4_O.png", "Result": "1"}
                     ,{"id": "15", "Image1": "WA1_O.png",
                     "Image2": "WA2_O.png", "Image3": "WA3_N.png",
                     "Image4": "WA4_O.png", "Result": "3"}
                 ];

    //Show table Row. First, I will display the New Game Table Row by default.
    //When user clicks on new Game, I will display Question Table Row.

    $scope.showGameStart = true;
    $scope.showGame = false;
    $scope.showresult = false;

    //Show and to calculate the Total points and final result.
    $scope.totalPoints=0;
    $scope.Resuts ="";
    $scope.wonImage = "Won.png";
步骤3:显示新游戏消息

当用户点击新游戏按钮时,我将调用FirstQuestion()方法并显示和隐藏用于显示问题的相关表格行。然后调用displayQuestion()方法来显示第一个问题。
控制器方法
$scope.FirstQuestion = function () {
        $scope.showGameStart = false;
     $scope.showGame = true;
     $scope.showresult = false;
     $scope.displayQuestion();
    }
HTML 代码
<table>
          <tr  ng-show="showGameStart">
                     <td align="center">
                         <span style="color:#FFFFFF;font-size:x-large">
                           SHANU - Odd Image Out  </span><br><br>
      <input type="submit" value="New Game"
      style="background-color:#3f9835;color:#FFFFFF;border-color:#f6f803;
      border-style:dashed;" ng-click="FirstQuestion()" />
                           <p style="color:#FFFFFF;font-size:xx-small;">
            Find the Odd Image from the Given four Images.You will be having 5 questions.<br>
                           Answer all the 5 Question .
                           <br>Wrong Answer will get -5 points and
                           correct answer will get 10 Points.<br>
                           If user answer all the 5 Questions correctly then they the winner.
                           </p>
                           </td>
                           </tr>
步骤4:显示新游戏问题

当用户点击新游戏时,我将调用displayQuestion()方法,从我们创建的问题集中随机选择一个问题,并在HTML页面中显示每个问题的图片。
控制器方法
$scope.displayQuestion = function () {
         $scope.questionCount =$scope.questionCount +1;
         $scope.randomQuestion=Math.floor(Math.random() * $scope.Images.length);
         $scope.Image1 = $scope.Images[$scope.randomQuestion].Image1;
         $scope.Image2 = $scope.Images[$scope.randomQuestion].Image2;
         $scope.Image3 = $scope.Images[$scope.randomQuestion].Image3;
         $scope.Image4 = $scope.Images[$scope.randomQuestion].Image4;
         $scope.ImageAnswer = $scope.Images[$scope.randomQuestion].Result;
    }
HTML 代码
<tr ng-show="showGame">
                    <td align="Center">
                            <table>
               <tr style="background-color:#336699 ;
               color:#FFFFFF ;border: solid 1px #659EC7;">
                        <td align="right" colspan="2">
                            <table >
                                <tr>
                                    <td >
                        <span style="color:#FFFFFF;font-size:xx-small;"> Question :</span>
                                   </td>
                                    <td >
                        <span style="color:#FFFFFF;font-size:x-large;">
                         {{questionCount}}</span>
                                    </td>
                                    <td >
                                     <img src="Images/coin.png"
                                     width="28px" height="28px">
                                     </td>

                                    <td >
                                <span style="color:#FFFFFF;font-size:x-large;">
                                {{ totalPoints }}</span></td>
                                </tr>
                           </table>
                        </td>
                    </tr>
                                <tr>
               <td align="center" style="
               background-color:#FFFFFF; border: dashed 2px #e44a10;
               padding:10px;width:50%;">
                 <img src="Images/{{ Image1 }}" width="54px"
                 height="54px" ng-click="findAnswer(1)">
                                     </td>
      <td style=" background-color:#FFFFFF; border: dashed 2px #e44a10;
      padding:10px;width:50%;">
               <img src="Images/{{ Image2 }}" width="54px"
               height="54px" ng-click="findAnswer(2)">
                                              </td>
                                            </tr>
                                            <tr>
 <td style=" background-color:#FFFFFF; border: dashed 2px #e44a10;
 padding:10px;width:50%;">
   <img src="Images/{{ Image3}}" width="54px"
   height="54px" ng-click="findAnswer(3)">
                                                </td>
      <td style=" background-color:#FFFFFF; border: dashed 2px #e44a10;
      padding:10px;width:50%;">
              <img src="Images/{{ Image4 }}" width="54px"
              height="54px" ng-click="findAnswer(4)">
                                                </td>
                                           </tr>
                                        </table>
                    </td>
                    </tr>
步骤5:查找答案
现在我们已经显示了问题,接下来是什么呢?是的,在每次点击问题图片时,我们需要找到正确答案。在每次图片点击事件中,我都会调用`findAnswer(1)`方法来检查每个问题的答案,计算结果并向用户显示分数,然后显示下一个问题。在这个方法中,我将为每个点击的问题按顺序传递参数1,2,3,4,在每个问题的答案中,我将以数字形式存储答案,我将比较用户点击的图片编号与每个问题的答案。如果两者匹配,我将添加10分;如果答案错误,我将从总分中扣除5分。最后,我将向用户显示下一个问题以供游戏。
控制器方法
// to find the Answer
    $scope.findAnswer = function (results) {

         if (results == $scope.ImageAnswer)
         {
        // alert("Wow :) You have enter the correct answer
        // and you have got 10 Points for this Answer")
             $scope.totalPoints = $scope.totalPoints + 10;
         }
         else
         {
             // alert("Sorry :( You have enter the wrong answer and you have got -5 points")
             $scope.totalPoints = $scope.totalPoints-5;
         }
         $scope.counterval=$scope.counterval+1

         if($scope.counterval==5)
         {
            $scope.displayResult();
             return;
         }
         $scope.displayQuestion();
    }
在这里,我们可以看到我将计算答案并向用户显示下一个问题以及他获得的总分。

与此同时,我将检查问题计数器的值。如果用户回答了总共五个问题,那么我将调用displayResult()方法来向用户显示最终结果。
步骤5:显示最终结果
在此方法中,我将检查用户的总分并显示结果。
赢得游戏
如果分数大于或等于50,那么我将显示用户赢得游戏的消息。

输掉游戏
如果分数小于50,那么我将显示用户输掉游戏的消息。

控制器方法
$scope.displayResult = function () {
         if ($scope.totalPoints >= 50)
         {
             $scope.Resuts = "Wow :) You have won the Game.Good Job " ;
           //  alert($scope.Resuts)
             $scope.wonImage = "Won.png";
         }
         else
         {
             $scope.Resuts = "Sorry You lose the game :(.
             Your Total points are " + $scope.totalPoints +" out of 50 points"
             // alert($scope.Resuts);
             $scope.wonImage = "Lose.png";
         }
         $scope.showGameStart = false;
         $scope.showGame = false;
         $scope.showresult = true;
    }
HTML 代码
<tr ng-show="showresult">
                    <td align="Center">
   <table align="center" style="
   background-color:#FFFFFF; border: dashed 3px #6D7B8D;
   padding:10px;" >
                 <tr style=" background-color:#336699 ; color:#3f9835 ;
                 border: solid 1px #659EC7;">
                                    <td>
                                     <img src="Images/{{ wonImage }}"
                                     width="68px" height="68px">
                                    </td>
                                    <td width="60%">
                                    <span style="color:#FFFFFF;font-size:x-small;">
                                        {{Resuts}}</span>
                                        <br />
                                        <br />
              <input type="submit" value="Home"
              style="background-color:#3f9835;color:#FFFFFF;
              border-color:#f6f803;border-style:dashed;"
              ng-click="NewQuestion()" />
                                       </td>
                                </tr>
                            </table>
                    </td>
                    </tr>
步骤5:开始新游戏
显示结果后,用户可以通过点击主页按钮开始新游戏。
控制器方法
$scope.NewQuestion = function () {
         $scope.showGameStart = true;
         $scope.showGame = false;
         $scope.showresult = false;
         $scope.totalPoints=0;
         $scope.counterval=0;
         $scope.questionCount=0;
    }
步骤6:查看输出
使用模拟器查看输出:要使用模拟器查看输出,右键单击Tizen IDE中的项目,选择运行方式,然后点击“Tizen Web模拟器应用程序”

一旦点击,我们就可以在模拟器中看到输出。

使用模拟器查看输出
要在模拟器中查看我们的结果,首先需要运行模拟器。在连接资源管理器中,点击模拟器管理器。
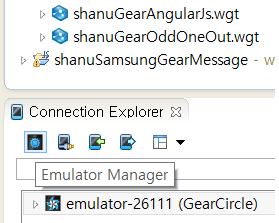
在这里,我选择了模拟器类型为圆形,并点击GearCircle播放以打开模拟器。

模拟器打开后,我们需要选择我们的项目,然后选择运行方式,点击“Tizen Web应用程序”。

在这里,我们可以看到我们的找不同应用将在三星Gear模拟器中运行。

关注点
希望您喜欢这个,现在您可能对开始使用三星Gear应用开发智能手表有了更清晰的了解。玩得开心!
历史
- 2015年10月10日:初始版本