
将 Twiggery 用作 JavaME 游戏脚本语言
将 Twiggery 用作 JavaME 游戏脚本语言
引言
如今 移动开发似乎比以往任何时候都更受欢迎。我一直沉浸其中,并且自从我大学时代起就对此很感兴趣。我发现许多由脚本语言(如 Lua、Python、Ruby 等)驱动的 PC 应用程序展现出极大的灵活性和动态行为,但几乎没有什么能在移动平台上扮演类似脚本的角色,因为移动平台缺乏快速的 CPU、大量的 RAM 甚至足够的电池容量。这就是我的 Twiggery 脚本语言诞生的原因。
Twiggery 并非万能,而是领域特定的。您可以在此处找到更多关于 Twiggery 语法的信息并下载完整包。
本文将介绍如何编写一个带有 Twiggery 脚本接口的宿主应用程序,如何使用这些接口编写和编译 Twiggery 源代码为字节码,如何将字节码嵌入宿主中,最后是如何部署一个由 Twiggery 驱动的解决方案应用程序。我将以一个完整的井字棋游戏为例,包含规则检查和 AI 模拟。
背景
我假设您已经了解了一些 JavaME 编程的基础知识,但即使您不了解也没关系,因为我不会在本文中提及 JavaME 的惯用法。您将直接切入主题。
Twiggery 标准包中提供了基于 Java、C# 和 C++ 的 TVM(Twiggery 虚拟机)。令人难以置信的是,您只需继承一个 TVM 实现,就可以启动您的应用程序,不是吗?用几百行代码用 Objective-C、ActionScript、Python 等其他编程语言编写另一个实现也非常容易。
Using the Code
让我们分四步编写一个完整的井字棋游戏。当然,我们可以不使用任何脚本语言来构建一个游戏,那么我在这里絮絮叨叨是为了什么呢?答案是为了灵活性。我会在这方面轻松一些,如果您正在创建一个更复杂的游戏,具有“可选对话”、“任务”、“开关”等功能,您会发现使用 Twiggery 更加必要。
第一步。构建基本游戏框架
您应该知道脚本的运行速度比其原生的宿主编程语言慢。这意味着脚本语言更适合状态控制而不是密集计算。所以让我们用 Java 构建一个游戏框架,我们首先进行程序初始化、按键输入检查、渲染等。
游戏总是伴随着一个主循环。我会这样做
/**
* Main game loop
*/
public void run() {
    int timeStep = 50;
    while (true) {
        long start = System.currentTimeMillis();
        try {
            if (!canvas.render()) { // Looping until user exits
                destroyApp(true);
            }
        } catch (Exception ex) {
            ex.printStackTrace();
        }
        long end = System.currentTimeMillis();
        int duration = (int) (end - start);
        int d = timeStep - duration;
        if (d > 0) { // Delay?
            try {
                Thread.sleep(d);
            } catch (InterruptedException ex) {
                ex.printStackTrace();
            }
        }
    }
}
我会在 JavaME 中像这样启动那个循环作为线程
private TicTacToe canvas = null;
/**
* Entry point
*/
public void startApp() {
    canvas = new TicTacToe();
    Display.getDisplay(this).setCurrent(canvas);
    Thread thread = new Thread(this);
    thread.start();
}
会自动调用一个按键输入处理回调方法。我们会在其中处理光标移动和棋子放置,像这样
/**
* Process key events
* @param keyCode The key code got here
*/
protected void keyPressed(int keyCode) {
    int keyState = getGameAction(keyCode);
    int winner = logic.getWinner();
    if (Logic.EMPTY == winner) { // Nobody wins
        if (GameCanvas.FIRE == keyState) {
            if (logic.getCell(cursorX, cursorY) == Logic.EMPTY) {
                // Place a chessman of yours
                logic.setCell(cursorX, cursorY, logic.getHolder());
                logic.rule();
                logic.turn();
                // Not win?
                if (Logic.EMPTY == logic.getWinner()) {
                    // Place a chessman of AI automatically
                    logic.ai();
                    logic.rule();
                    logic.turn();
                }
            }
        } else {
            // Process arrow keys
            … // Make cursor movement
        }
    } else { // Somebody wins
        // Press fire key to continue
        if (GameCanvas.FIRE == keyState) {
            logic.reset();
        }
    }
}
请注意,调用 logic.ai() 和 logic.rule() 会执行脚本,它们现在是空的,稍后会填入内容。
核心渲染方法会是这样的
/**
* Render all
* @return Keep on running if true, otherwise exit the game
*/
public boolean render() throws Exception {
    // Clear scene
    graphics.setColor(0xffffffff);
    graphics.fillRect(0, 0, SCREEN_WIDTH, SCREEN_HEIGHT);
    {
        // Render all
        …
        // Render cell grids
        …
        // Render chessmen
        …
        // Render cursor or information
        …
        // Render "Exit" text
        …
    }
    // Flush!
    flushGraphics(0, 0, SCREEN_WIDTH, SCREEN_HEIGHT);
    return running;
}
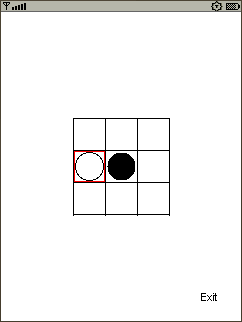
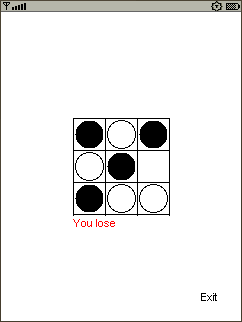
这里有一些最终的游戏屏幕截图,让我们先看看它们
第二步。编写脚本编程接口
游戏框架完成后,我们还需要制作一些脚本编程接口。这部分是用宿主编程语言完成的,并作为将游戏框架和脚本粘合在一起的胶水。
Twiggery 允许在虚拟机上运行编译后的字节码,这有一些优势
- 只需加载和执行,没有编译时间成本
- 内存占用更少
- 脚本源代码保护
- 可移植性
前两点对于移动设备尤其重要。
将有两种接口,一种是从宿主程序访问脚本,另一种是反向访问。
从宿主到脚本
TVM 提供了初始化、加载和执行方法,如果我们想调用一个编译后的脚本,我们所要做的就是将它们组合成一个函数,像这样
/**
* Call a rule script to check current composition
*/
public void rule() {
    try {
        String scriptFile = "/rule.tad"; // Compiled bytecode file
        loadAsm(scriptFile);
        runAsm();
    } catch (Exception ex) {
        ex.printStackTrace();
    }
}
/**
* Call a AI script to make a automatic move
*/
public void ai() {
    try {
        String scriptFile = "/ai.tad"; // Compiled bytecode file
        loadAsm(scriptFile);
        runAsm();
    } catch (Exception ex) {
        ex.printStackTrace();
    }
}
您可以像第一步中出现的那样,调用规则和 AI 脚本执行方法,如 logic.rule()、logic.ai() 。
从脚本到宿主
我们想向 Twiggery 暴露一些编程接口,以便我们可以通过脚本控制游戏框架。
接口列表可能是这样的
/**
* Make a function call
* Overridden from TVM
* @param funName Remote function name
* @param argCount Arguments count
*/
protected void call(String funName, int argCount) throws Exception {
    if (funName.equals("abs")) {
        abs();
    } else if (funName.equals("int")) {
        _int();
    } else if (funName.equals("rnd")) {
        rnd();
    } else if (funName.equals("array_new")) {
        array_new();
    } else if (funName.equals("array_get")) {
        array_get();
    } else if (funName.equals("array_set")) {
        array_set();
    } else if (funName.equals("getCell")) {
        getCell();
    } else if (funName.equals("setCell")) {
        setCell();
    } else if (funName.equals("gameOver")) {
        gameOver();
    } else {
        throw new Exception("Unknown function call");
    }
}
/**
* Initialize a new array
*/
private void array_new() { … }
/**
* Get a value from a array unit
*/
private void array_get() { … }
/**
* Set a value to a array unit
*/
private void array_set() { … }
/**
* Get the absolute value of a number
*/
private void abs() { … }
/**
* Floor
*/
private void _int() { … }
/**
* Get a random number
*/
private void rnd() { … }
/**
* Get the state of a cell
*/
private void getCell() { … }
/**
* Set the state of a cell
*/
private void setCell() { … }
/**
* Set game over
*/
private void gameOver() { … }
请注意,“call”方法是从基类 TVM 覆盖的。当运行来自脚本的函数调用评估时,将调用此方法来决定应该执行哪个接口。
/**
* Get the state of a cell
* Args:
* 1) X index of a cell
* 2) Y index of a cell
* Return:
* A constant among WHITE, BLACK, EMPTY
*/
private void getCell() throws Exception {
    int y = (int) popArgument();
    int x = (int) popArgument();
    int v = cells[x][y];
    returnArgument((float) v);
}
参数是从左到右压栈的,这意味着它们是从右到左弹出的。如上所述,当我们从 Twiggery 调用“getCell”函数时,例如:c = getCell(1, 2),我们将 1 然后 2 推入 TVM 堆栈,我们必须先弹出第二个参数,然后是第一个参数(在这里是 2 给 y,1 给 x)。最后,我们可以通过调用“returnArgument”将某个值返回给“c”。
第三步。编写和编译游戏脚本
在这一部分,我们将编写一些 Twiggery 代码,利用这些脚本接口来构建规则检查和 AI 脚本。实际上,第二步和第三步是循环迭代的,有时在编写任何脚本之前,我们都无法确定需要多少脚本接口。当我们发现需要使用一个尚未创建的接口时,我们可能会回到第二步并创建一个新的。
规则
在这个井字棋游戏中,我将用 Twiggery 脚本来检查谁赢得了游戏,像这样
function rule() { ' Twiggery code
    ' Consts
    WHITE = 1;
    BLACK = -1;
    EMPTY = 0;
    TIE = 2;
    ' Check diagonal lines
    diagonal_0 = getCell(0, 0) + getCell(1, 1) + getCell(2, 2);
    diagonal_1 = getCell(2, 0) + getCell(1, 1) + getCell(0, 2);
    abs_diagonal_0 = abs(diagonal_0);
    abs_diagonal_1 = abs(diagonal_1);
    c = 0;
    if(abs_diagonal_0 == 3) {
        c = diagonal_0;
    } elseif(abs_diagonal_1 == 3) {
        c = diagonal_1;
    }
    if(c > 0) {
        gameOver(WHITE);
        return;
    } elseif(c < 0) {
        gameOver(BLACK);
        return;
    }
    ' Check columns and rows
    for(j = 0 to 2) {
        l = 0;
        r = 0;
        for(i = 0 to 2) {
            l = l + getCell(i, j);
            r = r + getCell(j, i);
        }
        al = abs(l);
        ar = abs(r);
        c = 0;
        if(al == 3) {
            c = l;
        } elseif(ar == 3) {
            c = r;
        }
        if(c > 0) {
            gameOver(WHITE);
            return;
        } elseif(c < 0) {
            gameOver(BLACK);
            return;
        }
    }
    ' Tie
    c = 0;
    for(i = 0 to 2) {
        for(j = 0 to 2) {
            t = getCell(i, j);
            if(t ~= 0) {
                c = c + 1;
            }
        }
    }
    if(c == 9) {
        gameOver(TIE);
    }
}
AI
让我们做一个 AI
function ai() { ' Twiggery code
    ' Consts
    WHITE = 1;
    BLACK = -1;
    EMPTY = 0;
    TIE = 2;
    ' Initialize a array
    array_new(8);
    ' Rows counting
    i = getCell(0, 0) + getCell(1, 0) + getCell(2, 0);
    array_set(0, i);
    i = getCell(0, 1) + getCell(1, 1) + getCell(2, 1);
    array_set(1, i);
    i = getCell(0, 2) + getCell(1, 2) + getCell(2, 2);
    array_set(2, i);
    ' Columns counting
    i = getCell(0, 0) + getCell(0, 1) + getCell(0, 2);
    array_set(3, i);
    i = getCell(1, 0) + getCell(1, 1) + getCell(1, 2);
    array_set(4, i);
    i = getCell(2, 0) + getCell(2, 1) + getCell(2, 2);
    array_set(5, i);
    ' Diagonal lines counting
    i = getCell(0, 0) + getCell(1, 1) + getCell(2, 2);
    array_set(6, i);
    i = getCell(2, 0) + getCell(1, 1) + getCell(0, 2);
    array_set(7, i);
    ' Search
    found = false;
    for(c = 2 to 1 step -1) {
        for(i = 0 to 7) {
            t = array_get(i);
            t = abs(t);
            if(t == c) {
                found = true;
                break;
            }
        }
        if(found) {
            break;
        }
    }
    ' Found a target cell
    if(found) {
        if(i >= 0 and i <= 2) { ' Rows
            for(j = 0 to 2) {
                t = getCell(j, i);
                if(t == 0) {
                    setCell(j, i, BLACK);
                    return;
                }
            }
        } elseif(i >= 3 and i <= 5) { ' Columns
            k = i - 3;
            for(j = 0 to 2) {
                t = getCell(k, j);
                if(t == 0) {
                    setCell(k, j, BLACK);
                    return;
                }
            }
        } elseif(i == 6) { ' Diagonal \
            for(j = 0 to 2) {
                t = getCell(j, j);
                if(t == 0) {
                    setCell(j, j, BLACK);
                    return;
                }
            }
        } elseif(i == 7) { ' Diagonal /
            for(j = 0 to 2) {
                k = 2 - j;
                t = getCell(k, j);
                if(t == 0) {
                    setCell(k, j, BLACK);
                    return;
                }
            }
        }
    }
    ' Did not find any cell, choose one randomly
    c = 0;
    for(i = 0 to 2) {
        for(j = 0 to 2) {
            t = getCell(i, j);
            if(t == 0) {
                k = i + j * 3;
                array_set(c, k);
                c = c + 1;
            }
        }
    }
    r = rnd(0, c);
    k = array_get(r);
    i = k % 3;
    j = k / 3;
    j = int(j);
    setCell(i, j, BLACK);
}
现在我们可以使用 CodeLeaf(在 Twiggery 开发包中提供)将这些脚本源文件编译成字节码,并将它们放在游戏框架可以访问的目录中。
第四步。制作可发布包
您可以像处理其他类型的数据文件一样处理编译后的 Twiggery 脚本。
在开发 JavaME 应用程序时,我总是将所有资源(图像、声音、数据文件)与编译后的 *.class 文件一起打包到单个 *.jar 包中,并且我倾向于对 Twiggery 字节码也这样做,尽管我可以将它们放在与 *.jar 包分开的其他目录中。如果您不是在开发 JavaME 而是其他平台,我建议您在这些平台上按照相应常规方式进行。
结论
我很高兴向您介绍这样一个面向移动开发的脚本语言,希望它能有所帮助。我邀请您在下方提出您的问题、建议和想法。我将尽力使其变得更好!感谢您的阅读!
历史
- 2010 年 8 月 30 日:修复了一些拼写错误
- 2010 年 8 月 27 日:首次发布