
试验企业级总线消息传递
4.98/5 (75投票s)
深入了解使用 NServiceBus 的消息解决方案。
目录
- 引言
- 必备组件
- 关于 NServiceBus 的讨论
- 演示应用程序是什么样的
- 演示应用程序做什么
- 一切如何运作
- NServiceBus 作者对原文内容的评论
- 处理 MVVM 和 WPF/SL 时的重要修正
- 就是这样
引言
如大家所知,我刚刚完成了我关于我的 Cinch MVVM 框架 V2 的一系列文章,并向所有人宣布,在那之后,我将花一些时间远离 WPF/MVVM,去写一些我过去几个月来一直想写但没时间写的、引起我注意的东西。这是第一篇这样的文章,我想,在很多方面,它有些奇怪,因为我并没有像在 Cinch 上那样,呈现我血泪凝结的东西。相反,我是在看一些免费的、很棒的 .NET 工具,看看能用它们做什么。
在这篇文章中,我选择了 NServiceBus,它是一个消息服务总线,利用 Microsoft Message Queue 实现不同进程间的通信。
NServiceBus 宣称与许多不同的技术集成,例如:
- 控制台应用程序
- 网站
- WCF 服务
- Windows Forms
- Windows Presentation Foundation 应用程序
- Silverlight 应用程序
听起来很酷,而且巧合的是,在工作中,我们确实有一个与大量其他应用程序通信的实际需求,目前我们通过一个使用 MSMQBinding 的双工 WCF 服务来实现,我们正在考虑添加大量的额外消息传递,所以我很想看看还有哪些进程间的消息解决方案,以及它们有多容易使用。
正如我所说,在这篇文章中,我选择了 NServiceBus,并着手创建一个小演示应用程序,这是本文的主要内容。到我写完这篇文章时,我希望我已经充分解释了我对 NServiceBus 的发现,这样您就可以决定它是否适合您的项目。
我认为现在是时候稍微介绍一下附带的演示应用程序,以及我想要实现的目标。我选择创建一个协作图(再次使用免费的 .NET 工具 GraphSharp),两个独立的进程可以为此做出贡献,基本上通过 NServiceBus 保持彼此的最新状态。我稍后会详细讨论这一点,但现在,您只需要知道演示应用程序有两个进程,它们使用 NServiceBus 进行通信,目标是保持每个进程都拥有一个副本的图,并使用 NServiceBus 消息使其保持最新。
有一些先决条件,下面将概述;请仔细阅读后再继续阅读本文的其余部分。
必备组件
要运行本文相关的代码,您需要安装以下组件:
- Visual Studio 2010(因为演示应用程序是 VS2010 解决方案)
- .NET 4.0(因为演示应用程序是 .NET 4.0)
- MSMQ - Microsoft Message Queue(因为 NServiceBus 就是关于 MSMQ 的)
关于 NServiceBus 的讨论
我不能自称是 NServiceBus 的专家,但我可以说的,是我仔细研究了文档(虽然文档不多),并且我成功地让演示应用程序按照我想要的方式工作。即便如此,如果这里有 NServiceBus 专家阅读本文并认为我偏离了正轨,我对此表示歉意。
我还应该指出,本文绝非一份全面的指南,我也绝没有使用 NServiceBus 的所有功能;远非如此,有很多我没有触及的内容,例如负载均衡、Saga,或者跨实际网络发送消息(因为我在家没有网络)。
典型安排
通过检查 NServiceBus 附带的示例,它似乎支持以下通信类型:
| 拓扑 | 描述 |
|
|
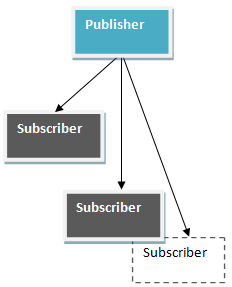
全双工支持双工消息传递;实际上,演示应用程序就是这样做的。但这似乎要求双方通过配置相互了解,以便它们都知道彼此的队列。 我最初认为可能有不止两个全双工进程,但从配置的角度来看,这似乎不可能。我认为 NServiceBus 真正 meant to work in a duplex manner with two parties,即服务器和客户端,其中双方明确知道彼此,并且只知道彼此。 当然,您可以使用发布/订阅模式,它允许一个发布者向多个订阅者广播,并且订阅者可以向发布者发送消息。 但对于本文附带的演示应用程序,我需要全双工;我只是希望有更多的进程来证明这并非某种障眼法的远程处理技巧。 |
|
|
发布者/订阅者这仅仅允许发布者发布给多个订阅者。由于每个订阅者都知道发布者,因此订阅者应该能够将消息发送给发布者。 |

当您下载 NServiceBus 时,有一些很好的示例涵盖了 FullDuplex 和 PubSub。
配置
稍后在“托管”部分,我将讨论 NServiceBus 的大部分配置可以是在代码中完成,也可以是在实际的配置文件中完成。由于演示应用程序使用自托管选项,因此需要处理的配置信息少得多,因为其中大部分是通过代码完成的。
即使采用自托管方式,仍然有一套最基本的要求需要满足;这是演示应用程序的 App.Config 文件:
<?xml version="1.0"?>
<configuration>
  <configSections>
    <section name="MsmqTransportConfig"
             type="NServiceBus.Config.MsmqTransportConfig, NServiceBus.Core"/>
    <section name="UnicastBusConfig"
             type="NServiceBus.Config.UnicastBusConfig, NServiceBus.Core"/>
    <section name="RijndaelEncryptionServiceConfig"
             type="NServiceBus.Config.RijndaelEncryptionServiceConfig, NServiceBus.Core"/>
  </configSections>

  <!-- in order to configure remote endpoints use the format: "queue@machine"
       input queue must be on the same machine as the process feeding off of it.
       error queue can (and often should) be on a different machine.
  -->

  <MsmqTransportConfig InputQueue="WpfPublisherBInputQueue"
                       ErrorQueue="error"
                       NumberOfWorkerThreads="1"
                       MaxRetries="5"/>

  <UnicastBusConfig>
    <MessageEndpointMappings>
      <add Messages="MyMessages"
           Endpoint="WpfPublisherAInputQueue" />
    </MessageEndpointMappings>
  </UnicastBusConfig>

  <RijndaelEncryptionServiceConfig
    Key="gdDbqRpqdRbTs3mhdZh9qCaDaxJXl+e7"/>

  <runtime>
    <loadFromRemoteSources enabled="true"/>
  </runtime>

  <startup>
    <supportedRuntime version="v4.0"
                      sku=".NETFramework,Version=v4.0"/>
  </startup>

</configuration>
让我们逐节来处理。
MsmqTransportConfig
用于配置 MSMQ 参数;我认为参数名称不言自明。
UnicastBusConfig
用于配置总线。这是您需要告诉总线当前进程允许的消息以及您将使用的终结点队列的地方。只要您安装了 MSMQ,NServiceBus 就会为您创建此队列。
RijndaelEncryptionServiceConfig
配置加密服务。坦白说,我不知道这里的密钥值是多少,我从 NServiceBus 的一个示例中偷来了这一部分。
运行时
我在本文开头提到,演示应用程序是 .NET 4.0 / VS2010,并且我似乎无法在 VS2010 中加载任何 NServiceBus DLL,除非使用此部分。此元素指定远程源的程序集是否应获得完全信任。
SupportedRuntime
这对于 NServiceBus 并不是必需的。但正如我在本文开头提到的,演示应用程序是 .NET 4.0 / VS2010,所以我必须添加它,以便 .NET 4.0 框架能够与旧的 NServiceBus DLL 一起工作。
有关更多配置信息,请阅读 NServiceBus 文档,特别是以下页面:
- http://www.nservicebus.com/GenericHost.aspx
- http://www.nservicebus.com/Distributor.aspx
- http://www.nservicebus.com/PubSubApiAndConfiguration.aspx
API
API 起初有些奇怪,因为 NServiceBus 的作者决定以一种非常新颖的方式使用接口,通过链式调用创建流畅的接口描述。事实上,如果您下载并检查一些 NServiceBus 示例,通常会看到这样的代码:
class EndpointConfig : IConfigureThisEndpoint, AsA_Server, IWantCustomInitialization
我认为这看起来确实有点奇怪,但一旦你深入了解,它也没那么糟糕。下面我概述了一些您可能需要使用的更常见的 API 接口和类。我鼓励您在有空时进一步探索 API。
As_A_Client
将 MsmqTransport 设置为非事务性,并在启动时清除其消息队列。这意味着它每次都从头开始,不记得崩溃之前的事情。此外,它使用自己的权限处理消息,而不是消息发送者的权限。
As_A_Server
将 MsmqTransport 设置为事务性,并且在启动时不清除队列中的消息。这使其容错。此外,它在消息发送者的权限下处理消息(称为模拟),这可以防止特权提升攻击。
As_A_Publisher
扩展了 AsA_Server,并向基础结构指示将设置订阅请求的存储。
IConfigureThisEndpoint
在 NServiceBus 中,这是一个空类,仅用于指示您希望如何配置终结点。它可以被视为一个标记类;这是一个典型示例:
using NServiceBus;

namespace WpfPublisherB
{
    public class EndpointConfig : IConfigureThisEndpoint, AsA_Publisher {}
}
IWantCustomInitialization
在 NServiceBus 中,这是一个空类,仅用于指示您需要自定义初始化,据我所知,每个使用 NServiceBus 的项目似乎只需要一次。它可以被视为一个标记类;这是一个典型示例,其中有一个名为 Init() 的方法,我们可以在其中执行操作:
using NServiceBus;

namespace MyClient
{
    public class ClientInit : IWantCustomInitialization
    {
        public void Init()
        {
            //Do something custom here
        }
    }
}
IHandleMessages<T>
NServiceBus 提供了一个名为 IHandleMessages<T> 的接口,您可以使用它来创建消息处理类。此接口有一个名为 Handle(T message) 的方法。
这些消息处理类应将泛型 T 替换为实际的消息类型,消息通常存储在单独的 DLL 中,该 DLL 已在 App.Config 的 UnicastBusConfig 部分进行配置。有关更多信息,请参阅本文的“配置”部分。
这是一个典型的消息处理类:
public class AddEdgeRequestMessageHandler : IHandleMessages<AddEdgeRequestMessage>
{
    public void Handle(AddEdgeRequestMessage message)
    {
        //Do stuff with message here
    }
}
重要的是要注意,在您的用户代码中,绝不会实例化这些类的新实例;这项工作由 NServiceBus 框架完成。我只能假设这是通过某种引导/反射在进程运行时完成的。
消息
正如我刚才提到的,您通常会将所有实际消息放在一个单独的 DLL 中,您也必须在 App.Config 中允许它,请参阅本文的“配置”部分以获取更多信息。
这是一个典型的消息类的样子;您可以看到所有消息类都必须实现标记接口 IMessage:
public class AddVertexRequestMessage : IMessage
{
    public WireEncryptedString ConnectedToVertex { get; set; }
    public bool IsMale { get; set; }
    public WireEncryptedString NewVertexName { get; set; }
}
此类的使用方式应与我们上面看到的类消息处理程序结合使用。
Sagas (长流程)
我在演示应用程序中没有使用 Saga,但本质上,这些是可能包含许多消息的长运行操作。因此,您应该期望它们在这些消息之间是状态化的。
使用 NServiceBus,您可以通过实现 IContainSagaData 接口来显式定义用于此状态的数据 - 所有公共 get/set 属性将默认持久化。
public class MySagaData : IContainSagaData
{
    // the following properties are mandatory
    public virtual Guid Id { get; set; }
    public virtual string Originator { get; set; }
    public virtual string OriginalMessageId { get; set; }

    // all other properties you want persisted - remember to make them virtual
}
NServiceBus 使用 NHibernate transparently 将您的 Saga 数据存储在数据库中。它还可以自动生成用于存储这些类的数据库架构(通过使用 Fluent NHibernate)。您可以像往常一样替换这些技术 - 只需实现 IPersistSagas 接口。
一个典型的 Saga 实现可能看起来像这样,我们可以从中看出它是由某种消息类型启动的,并且它还处理其他类型的消息:
public class MySaga : Saga<MySagaData>,
    IAmStartedByMessages<Message1>,
    IHandleMessages<Message2>
{
    public override void ConfigureHowToFindSaga()
    {
        ConfigureMapping<Message2>(s => s.SomeID, m => m.SomeID);
    }

    public void Handle(Message1 message)
    {
        this.Data.SomeID = message.SomeID;

        RequestTimeout(TimeSpan.FromHours(1), "some state");

        // rest of the code to handle Message1
    }

    public override void Timeout(object state)
    {
        // some business action like:
        if (!Data.Message2Arrived)
            ReplyToOriginator(new TiredOfWaitingForMessage2());
    }

    public void Handle(Message2 message)
    {
        // code to handle Message2

        Data.Message2Arrived = true;

        ReplyToOriginator(new AlmostDoneMessage { SomeID = message.SomeID });
    }
}
您可以看到这个 Saga 由 Message1 类型启动,也处理 Message2 类型。
基类的 RequestTimeout 方法告诉 NServiceBus 向另一个终结点发送一条消息,该终结点将为我们持久保存时间。您需要在 UnicastBusConfig 中添加一个条目,告知 NServiceBus 该终结点在哪里。NServiceBus 附带一个名为 Timeout Manager 的进程,该进程提供了此功能的基本实现。
当时间到了,Timeout Manager 会将一条消息发送回 Saga,导致其 Timeout 方法与最初传递的相同状态对象一起被调用。
重要提示:不要假设其他消息在此期间未到达。
终结点
终结点的配置将根据您的需求而有所不同,正如我前面提到的;这可以被认为是一个 NServiceBus 在运行时使用的标记类。我假设有一些反射在起作用以实现这一目标。但是,需要注意的重要事项是,您必须继承自 NServiceBus 的 IConfigureThisEndPoint 接口,然后弄清楚终结点如何工作。这是一个示例:
using NServiceBus;

namespace WpfPublisherB
{
    public class EndpointConfig : IConfigureThisEndpoint, AsA_Publisher {}
}
正如我在“API”部分提到的,您需要根据您的需求在 AsA_Client/AsA_Server/AsA_Publisher 之间进行选择。
托管
与 WCF 需要托管一样,NServiceBus 也需要托管。有各种选项可以做到这一点;事实上,NServiceBus 自带一个名为 NServiceBus.Host.exe 的通用主机可执行文件,如果您下载 NServiceBus,您会在大多数示例中看到,它们在您尝试运行的 NServiceBus 项目的 Debug 设置中启动 NServiceBus.Host.exe。

但这只是一种方式;还有其他方式;事实上,NServiceBus 还允许您将 NServiceBus.Host.exe 托管为 Windows 服务,您可以使用下面指定的命令行参数来做到这一点:

对于这两种选项,您都需要配置 NServiceBus。演示应用程序不使用这两种方法;它使用下面显示的方法。
您还可以做另一件事,那就是走自托管路线,使用以下流畅的代码可以很容易地做到这一点,它可以用来配置和创建 NServiceBus 的 IBus,这实际上应该只执行一次。
Bus = NServiceBus.Configure.With()
    .DefaultBuilder()
    .XmlSerializer()
    .RijndaelEncryptionService()
    .MsmqTransport()
        .IsTransactional(false)
        .PurgeOnStartup(true)
    .UnicastBus()
        .ImpersonateSender(false)
    .LoadMessageHandlers() // need this to load MessageHandlers
    .CreateBus()
    .Start();
现在,其中一些可能看起来有点奇怪,所以我将尝试解释所有不同的部分,但我也会在稍后单独的部分中涵盖其中一些内容。
- DefaultBuilder(): 告诉 NServiceBus 使用默认的 IOC 容器,在撰写本文时是 Spring .NET(尽管我读到过它将很快改为 Autofac)。
- XmlSerializer(): 告诉 NServiceBus 使用 XML 序列化对象。
- RijndaelEncryptionService(): 告诉 NServiceBus 使用 Rijndael 加密。
- MsmqTransport(): 设置 NServiceBus MSMQ 选项。
- MsmqSubscriptionStorage(): 使用 MSMQ 存储,而不是数据库。
- UnicastBus(): 设置 NServiceBus 总线。
- LoadMessageHandlers(): 指示 NServiceBus 动态加载它可以找到的所有消息处理类(据我所知,这是通过某种反射完成的)。
- CreateBus(): 创建 IBus。
- Start(): 启动 IBus。
您可以在 NServiceBus 网站页面上阅读更多关于此的信息:http://www.nservicebus.com/GenericHost.aspx。
IOC (控制反转)
NServiceBus 内部使用 IOC。事实上,NServiceBus 能够与各种 IOC 容器一起工作。在撰写本文时,NServiceBus 是 v2.0,并使用 Spring .NET 作为其默认 IOC 容器。
它能够使用以下容器:
- Autofac
- StructureMap
- Castle
- Unity
- Spring .NET (NServiceBus 2.0 的默认设置)
事实上,这是一个 Castle WindsorContainer 的 IBus 自托管配置示例,我们在此添加了另一个服务类型,以后可以在消息处理程序中进行解析。
var castleContainer = new WindsorContainer();
castleContainer.AddComponent<IStringStorer, StringStorer>();

NServiceBus.Configure.With().CastleWindsorBuilder(castleContainer)
    .RijndaelEncryptionService()
        .XmlSerializer()
        .MsmqTransport()
            .IsTransactional(true)
                .PurgeOnStartup(true)
        .MsmqSubscriptionStorage()
        .UnicastBus()
        .CreateBus()
        .Start();
正如您所见,我正在创建一个新的 IStringStorer 并将其添加到 WindsorContainer 中,这意味着在任何消息处理程序类中,您可以执行类似的操作:
using System;
using MyMessages;
using NServiceBus;

namespace MyClient
{
    class DataResponseMessageHandler : IHandleMessages<DataResponseMessage>
    {

        public IStringStorer Storer { get; set; }

        public void Handle(DataResponseMessage message)
        {
            //Do something with Storer
        }
    }
}
其中 IStringStorer 将由 NServiceBus 使用 WindsorContainer 进行解析。
如果您不喜欢任何标准的 IOC 容器,您也可以自己编写一个。有关更多信息,请查看 NServiceBus IOC 文档链接:http://www.nservicebus.com/Containers.aspx。
演示应用程序是什么样的
我认为展示演示应用程序外观的最佳方式是通过观看一个小视频,所以请点击下面的图片;请注意:没有音频。

请点击上面的图片观看视频
- 最好全屏观看,您可以在视频页面上选择,右下角
关于此视频要说明的是,一个名为 WpfPublisherB 的进程首先启动,并添加各种图的顶点/边,然后 WpfPublisherA 启动并处理在它未运行时排队的消息。一旦 WpfPublisherA 和 WpfPublisherB 都运行,向其中任何一个添加顶点/边都会导致另一个也执行相同的操作。这当然是通过 NServiceBus 进行消息传递来实现的。
演示应用程序做什么
演示应用程序实际上很简单。可以概括为以下几点:
- 有两个相同的 WPF 项目,称为 WpfPublisherA/WpfPublisherB,它们都使用一个名为 GraphLayoutViewModel 的 ViewModel,该 ViewModel 位于一个名为 WpfCommon 的公共 DLL 中。
- GraphLayoutViewModel 提供了一个 ViewModel,可用于填充一个免费的 WPF 图形库 GraphSharp 中的顶点/边。
- GraphLayoutViewModel 提供 ICommand 来显示两个弹出窗口,允许用户向 GraphSharp 图添加新顶点,或在 GraphSharp 图中创建新边。需要注意的是,虽然两个 WPF 项目 WpfPublisherA/WpfPublisherB 都使用 GraphLayoutViewModel,但这绝不是共享状态。它们是两个完全独立的进程,具有独立的 AppDomains,只是碰巧使用 WpfCommon DLL 来构建它们自己的 GraphLayoutViewModel 实例。实际上发生的是,每当其中一个进程添加新的 GraphSharp 图顶点或边时,NServiceBus 就会被用来将此更改通信到另一个进程。因此,可以将其视为一种同步图。我还尝试同步进程在未运行时可能收到的未处理消息,基本上,即使进程未运行,NServiceBus 也会继续将消息发送到进程队列,直到达到最大重试次数(请参阅 App.Config),前提是您未告知 NServiceBus 在启动时清除消息(对于演示应用程序,不清除消息)。基本上,演示应用程序中的内容按以下顺序发生:
- 进程启动。
- NServiceBus 消息处理程序类被 NServiceBus 调用,此时所有发送到该进程的排队待处理消息都以两种方式之一进行处理:
- 如果进程被认为在线,则消息尝试通过 Cinch Mediator(稍后讨论)路由到 GraphLayoutViewModel。
- 如果进程被认为离线,则所有排队的未处理消息都会添加到 App (Application 类) 中,直到 GraphLayoutViewModel 被实例化,此时 App (Application 类) 将所有排队的未处理消息传递给新实例化的 GraphLayoutViewModel,后者遍历所有这些排队的未处理消息,将请求的顶点/边添加到 GraphSharp 图中。之后,GraphLayoutViewModel 在 App (Application 类) 上设置一个标志,告知进程现在在线,这将告诉任何未来的 NServiceBus 入站消息处理程序调用按此步骤前面的所示方式工作。
- 如果 GraphLayoutViewModel未被实例化,则创建它,并连接一些 Cinch Mediator 消息处理程序,并接受应用程序(Application 类)中排队的未处理消息,然后像上面描述的那样遍历它们。
- 转到 2。
- 由于是 WPF,我当然使用了我自己的 MVVM 框架 Cinch。这是一个次要细节,并非本文的主要内容,尽管我承认它使处理 NServiceBus 更加容易,如下文所述。
简而言之,这就是演示应用程序试图做的事情。当您打开附加的解决方案代码时,它会是这样的:

一切如何运作
所以我们已经涵盖了 NServiceBus 的大量内容,我认为,但现在是时候介绍实际的演示应用程序如何工作了;观看视频应该让您对它的工作原理有所了解,并且我已经展示了整体解决方案结构,所以剩下要做的就是更详细地介绍这些区域,这些区域如下所示。
公共部分
正如我之前提到的,有一个两个其他发布者进程使用的公共 DLL;这个公共 DLL 称为 WpfCommon,它提供了两个其他发布者进程使用的公共类。由于这本质上是一堆 MVVM WPF 窗口/ViewModel 和弹出窗口,因此使用我的 Cinch MVVM 框架似乎很合乎逻辑,但我不会在这上面过多停留;我只是用它来让我的生活更轻松,所以如果您不熟悉 Cinch,请阅读一些关于它的文章。
通用元素如下所述:
辅助函数
有一些辅助函数我将简要提及,但其中一些我们将稍后详细介绍。
NativeCalls:简单地通过使用 DWM API 调用,允许为无边框窗口应用阴影。感谢 Jerimiah Morrill 提供的这个功能。
INonHandledMessages:这是一个简单的接口,两个发布者项目(Application 类)都实现了它,以允许非处理的消息排队在一个全局可用的地方。
CrossThreadTestRunner:这实际上是一个相当重要的类;因为 NServiceBus 运行在 MTA(多线程单元状态)中,而 WPF 运行在 STA(单线程单元)中,我们需要某种方法来运行最终的 NServiceBus 消息处理代码(在 GraphLayoutViewModel 中,它执行顶点/边的添加)在 STA 模式下。这就是这个类的作用;它基本上接受一个工作委托,启动一个新线程来完成这项工作,并在 STA 单元中运行它。这是这个类的完整代码;它非常方便,而且我时不时地使用它。
using System;
using System.Reflection;
using System.Security.Permissions;
using System.Threading;

namespace WpfCommon
{
    public class CrossThreadTestRunner
    {
        private Exception lastException;

        public void RunInMTA(ThreadStart userDelegate)
        {
            Run(userDelegate, ApartmentState.MTA);
        }

        public void RunInSTA(ThreadStart userDelegate)
        {
            Run(userDelegate, ApartmentState.STA);
        }

        private void Run(ThreadStart userDelegate, ApartmentState apartmentState)
        {
            lastException = null;

            Thread thread = new Thread(
              delegate()
              {
                  try
                  {
                      userDelegate.Invoke();
                  }
                  catch (Exception e)
                  {
                      lastException = e;
                  }
              });
            thread.SetApartmentState(apartmentState);

            thread.Start();
            thread.Join();

            if (ExceptionWasThrown())
                ThrowExceptionPreservingStack(lastException);
        }

        private bool ExceptionWasThrown()
        {
            return lastException != null;
        }

        [ReflectionPermission(SecurityAction.Demand)]
        private static void ThrowExceptionPreservingStack(Exception exception)
        {
            FieldInfo remoteStackTraceString = typeof(Exception).GetField(
              "_remoteStackTraceString",
              BindingFlags.Instance | BindingFlags.NonPublic);
            remoteStackTraceString.SetValue(exception,
                    exception.StackTrace + Environment.NewLine);
            throw exception;
        }
    }
}
当谈到 GraphLayoutViewModel 时,我将详细介绍这个类。
弹出窗口
有两个弹出窗口及其关联的 ViewModel,但我不想花太多时间在它们上面,因为所有这些弹出窗口实际上只是让主 GraphLayoutViewModel 中的操作能够工作。为了清晰起见,这是两个弹出窗口的样子。如果您对此感兴趣,只需查看它们的代码,但它们真的不那么有趣。


视图
实际上只有一个视图叫做 GraphLayoutView,它包含 GraphSharp 图;这是该类 XAML 部分所有相关的标记:
<UserControl x:Class="WpfCommon.GraphLayoutView"
    xmlns="http://schemas.microsoft.com/winfx/2006/xaml/presentation"
    xmlns:x="http://schemas.microsoft.com/winfx/2006/xaml"
    xmlns:mc="http://schemas.openxmlformats.org/markup-compatibility/2006"
    xmlns:d="http://schemas.microsoft.com/expression/blend/2008"
    xmlns:graphsharp="clr-namespace:GraphSharp.Controls;assembly=GraphSharp.Controls"
    xmlns:local="clr-namespace:WpfCommon"
    xmlns:zoom="clr-namespace:WPFExtensions.Controls;assembly=WPFExtensions"
    mc:Ignorable="d" >

    <Grid>
        <Grid.Resources>
            <DataTemplate x:Key="demoTemplate"
                      DataType="{x:Type local:PocVertex}">
                <StackPanel Orientation="Horizontal" Margin="5">
                    <Image x:Name="img" Source="../Images/boy.ico"
                            Width="20" Height="20" />
                    <TextBlock Text="{Binding Path=ID, Mode=OneWay}"
                              Foreground="White" />
                </StackPanel>
                <DataTemplate.Triggers>
                    <DataTrigger Binding="{Binding IsMale}" Value="false">
                        <Setter TargetName="img" Property="Source"
                                Value="../Images/girl.ico" />
                    </DataTrigger>
                </DataTemplate.Triggers>
            </DataTemplate>

            <Style TargetType="{x:Type graphsharp:VertexControl}">
                <Setter Property="Template">
                    <Setter.Value>
                        <ControlTemplate
                               TargetType="{x:Type graphsharp:VertexControl}">
                            <Border BorderBrush="White"
                                    Background="Black"
                    BorderThickness="2"
                    CornerRadius="10,10,10,10"
                    Padding="{TemplateBinding Padding}">
                                <ContentPresenter Content="{TemplateBinding Vertex}"
                                    ContentTemplate="{StaticResource demoTemplate}"/>

                                 <Border.Effect>
                                    <DropShadowEffect BlurRadius="2" Color="LightGray"
                                                      Opacity="0.3" Direction="315"/>
                                </Border.Effect>
                            </Border>
                        </ControlTemplate>
                    </Setter.Value>
                </Setter>
            </Style>

            <Style TargetType="{x:Type graphsharp:EdgeControl}">
                <Style.Resources>
                    <ToolTip x:Key="ToolTipContent">
                        <StackPanel>
                            <TextBlock FontWeight="Bold" Text="Edge.ID"/>
                            <TextBlock Text="{Binding ID}"/>
                        </StackPanel>
                    </ToolTip>
                </Style.Resources>
                <Setter Property="ToolTip"
                         Value="{StaticResource ToolTipContent}"/>
            </Style>

        </Grid.Resources>

        <Grid>
        .....
            .....
            .....
            .....
            .....
            .....

            <zoom:ZoomControl  Grid.Row="1"
                    Zoom="0.2" ZoomBoxOpacity="0.5">
                <zoom:ZoomControl.Background>
                    <LinearGradientBrush EndPoint="0.5,1" StartPoint="0.5,0">
                        <GradientStop Color="Black" Offset="0"/>
                        <GradientStop Color="#FF3F3F3F" Offset="1"/>
                    </LinearGradientBrush>
                </zoom:ZoomControl.Background>

                <local:PocGraphLayout x:Name="graphLayout" Margin="10"
                Graph="{Binding Path=Graph}"
                LayoutAlgorithmType="{Binding Path=LayoutAlgorithmType, Mode=OneWay}"
                OverlapRemovalAlgorithmType="FSA"
                HighlightAlgorithmType="Simple" />
            </zoom:ZoomControl>
        </Grid>
    </Grid>
</UserControl>
这是代码隐藏。可以看出,它实现了一个 IGraphFunctions 接口,GraphLayoutViewModel 通过 Cinch IViewAwareStatus UI 服务使用它来执行需要调度到 UI 线程的跨线程操作。NServiceBus 不与 UI 线程在同一线程上,因此需要进行封送。这绝对是我的首选模式,因为您可以创建一个 Mock IGraphFunctions,它可以在您的测试中使用,而且我认为 ViewModel永远不应该直接使用 Dispatcher;这个责任属于 View。
using System;
using System.Collections.Generic;
using System.Linq;
using System.Text;
using System.Windows;
using System.Windows.Controls;
using System.Windows.Data;
using System.Windows.Documents;
using System.Windows.Input;
using System.Windows.Media;
using System.Windows.Media.Imaging;
using System.Windows.Navigation;
using System.Windows.Shapes;
using System.Windows.Threading;

using Cinch;

namespace WpfCommon
{
    /// <summary>
    /// Interaction logic for GraphLayoutView.xaml
    /// </summary>
    public partial class GraphLayoutView : UserControl, IGraphFunctions
    {
        public GraphLayoutView()
        {
            InitializeComponent();
            Mediator.Instance.Register(this);
        }


        /// <summary>
        /// These methods will be called by the
        ///    <c>GraphLayoutViewModel</c> by using the Cinch
        /// IViewAwareStatus UI service in the ViewModel
        /// </summary>
        #region IGraphFunctions Members

        public void LayoutGraph()
        {
            //As NServiceBus calls may come from
            //a different thread, may need to marshall
            //to UI thread. We do get some call
            //(internal ones) not from NServiceBus which may
            //not need marshalling, so only Marshall those
            //that need it using Cinch.Dispatcher extensions
            Dispatcher.InvokeIfRequired(() =>
            {
                try
                {
                    graphLayout.Relayout();
                }
                catch
                {
                }
            }, DispatcherPriority.Send);
        }


        public void AddNewVertex(PocVertex newVertex)
        {
            //As Graph is bound to UI, we need
            //to marshall calls to update it, on Views Dispatcher
            Dispatcher.Invoke((Action)(() =>
            {
                try
                {
                    graphLayout.Graph.AddVertex(newVertex);
                }
                catch
                {
                }
            }));

        }

        public void AddNewEdge(PocEdge newEdge)
        {
            //As Graph is bound to UI, we need
            //to marshall calls to update it, on Views Dispatcher
            Dispatcher.Invoke((Action)(() =>
            {
                try
                {
                    graphLayout.Graph.AddEdge(newEdge);
                }
                catch
                {
                }
            }));
        }

        #endregion
    }
}
ViewModels
正如我在本文的许多地方提到的,有一个名为 GraphLayoutViewModel 的 ViewModel,它负责实际的图的创建,并负责向图添加顶点/边。其中大部分代码相当直接,并不那么有趣。但是,有几个领域值得关注(主要是命令处理程序和 Mediator 消息接收器),如下所示:
命令处理程序:本地添加新顶点并通过 NServiceBus 广播该更改
此代码首先向本地进程的 GraphLayoutViewModel 图添加一个新的 Graph Vertex。有趣的是新顶点添加到本地进程图之后发生的事情。基本上,NServiceBus 总线用于向另一个进程发送 AddVertexRequestMessage 消息,该消息将在我将在“发布者”部分讨论的 NServiceBus 消息处理程序类中进行处理。这是 GraphLayoutViewModel 的相关代码:
private void ExecuteAddNodeCommand(Object args)
{
    AddNewVertexPopupWindowViewModel addNewVertexPopupWindowViewModel=
        new AddNewVertexPopupWindowViewModel(messageBoxService, this.Vertices);
    bool? result = uiVisualizerService.ShowDialog("AddNewVertexPopupWindow",
        addNewVertexPopupWindowViewModel);

    if (result.HasValue && result.Value)
    {
        PocVertex newVertex =
          new PocVertex(addNewVertexPopupWindowViewModel.NewVertexName.DataValue,
          addNewVertexPopupWindowViewModel.IsMale);
        graph.AddVertex(newVertex);

        string edgeid = string.Format("{0}-{1}",
            addNewVertexPopupWindowViewModel.ConnectedToVertex.DataValue.ID,
            addNewVertexPopupWindowViewModel.NewVertexName.DataValue);
        PocEdge newEdge = new PocEdge(edgeid,
            addNewVertexPopupWindowViewModel.ConnectedToVertex.DataValue, newVertex);
        graph.AddEdge(newEdge);
        ((IGraphFunctions)viewAwareStatusService.View).LayoutGraph();

        //now tell other processes to Add new Node using NServiceBus
        Bus.Send<AddVertexRequestMessage>(m =>
        {
            m.ConnectedToVertex =
               addNewVertexPopupWindowViewModel.ConnectedToVertex.DataValue.ID;
            m.IsMale = addNewVertexPopupWindowViewModel.IsMale;
            m.NewVertexName = addNewVertexPopupWindowViewModel.NewVertexName.DataValue;
        });

    }
}
命令处理程序:本地添加新边并通过 NServiceBus 广播该更改
此代码首先向本地进程的 GraphLayoutViewModel 图添加一个新的 Graph 边。有趣的是新边添加到本地进程图之后发生的事情。基本上,NServiceBus 总线用于向另一个进程发送 AddEdgeRequestMessage 消息,该消息将在我将在“发布者”部分讨论的 NServiceBus 消息处理程序类中进行处理。这是 GraphLayoutViewModel 的相关代码:
private void ExecuteAddEdgeCommand(Object args)
{
    AddNewEdgePopupWindowViewModel addNewEdgePopupWindowViewModel =
        new AddNewEdgePopupWindowViewModel(messageBoxService, this.Vertices);
    bool? result = uiVisualizerService.ShowDialog("AddNewEdgePopupWindow",
        addNewEdgePopupWindowViewModel);

    if (result.HasValue && result.Value)
    {
        PocVertex vertex1 =
          addNewEdgePopupWindowViewModel.ConnectedToVertex1.DataValue;
        PocVertex vertex2 =
          addNewEdgePopupWindowViewModel.ConnectedToVertex2.DataValue;
        string edgeid = string.Format("{0}-{1}", vertex1.ID,vertex2.ID);
        PocEdge newEdge = new PocEdge(edgeid, vertex1, vertex2);
        graph.AddEdge(newEdge);
        ((IGraphFunctions)viewAwareStatusService.View).LayoutGraph();

        //now tell other processes to Add new Node using NServiceBus
        Bus.Send<AddEdgeRequestMessage>(m =>
        {
            m.ConnectedFromVertex = vertex1.ID;
            m.ConnectedToVertex = vertex2.ID;
        });


        Bus.Send<AddEdgeRequestMessage>(m =>
        {
            m.ConnectedFromVertex = vertex1.ID;
            m.ConnectedToVertex = vertex2.ID;
        });
    }
}
Mediator 消息接收器:在新顶点/边添加时响应 NServiceBus 消息
您可能还记得本文前面提到的,NServiceBus 消息处理程序类是您无法真正控制其生命周期的奇怪事物。当您使用 NServiceBus 时,它们会在合适的时机突然出现。这有点奇怪,而且我个人觉得有点奇怪的是,这些 NServiceBus 消息处理程序类与您应用程序的其他部分集成得不是很好;如果您只想在消息处理程序中将某些内容持久化到数据库,它们是可以的,但我不想那样。我想让我的其他代码知道当新消息进来时。嗯,思考一下,所以这似乎不仅需要一个企业级总线,即 NServiceBus,还需要某种内部消息传递来将这些 NServiceBus 消息广播到我应用程序的其余部分。听起来很像 Mediator Pattern。更重要的是,我的 Cinch MVVM 框架有一个这样的 Mediator。
那么,猜猜怎么着,演示应用程序的 NServiceBus 消息处理程序发送内部 Cinch Mediator 消息,GraphLayoutViewModel 已经连接了 Mediator 消息接收器来监听它们。一个用于监听顶点添加,一个用于监听边添加;这两个 Mediator 消息处理程序接收器显示如下:
我将在本文的“发布者”部分展示这些 Mediator 消息是如何生成的;现在,您只需要知道消息是从一个进程广播出来的,然后在另一个进程中通过 NServiceBus 消息处理程序进行处理,并通过我的 Cinch MVVM 框架 Mediator 中继到 GraphLayoutViewModel(如果应用程序被认为是在线的,(基本上,GraphLayoutViewModel 是否已被实例化?)。如果接收 NServiceBus 消息的进程未被认为在线,则消息将被排队在进程的 App (Application 类) 中,直到它实例化 GraphLayoutViewModel,此时 App 将非处理消息交给它,然后它遍历这些非处理消息,但稍后会详细介绍。现在,只看如果两个演示进程正在运行,它们会表现出的正常行为,那就是处理 Cinch MVVM 框架 Mediator 消息以响应入站 NServiceBus 消息。
[MediatorMessageSink("AddVertexRequestMessage")]
public void OnAddVertexRequestMessage(AddVertexRequestMessage message)
{
    //NServicebus is MTA (MultiThreadingAppartment),
    //so we need to make sure we run our code that
    //affects UI in STA (SingleThreadingAppartment
    CrossThreadTestRunner runner = new CrossThreadTestRunner();
    AutoResetEvent ar = new AutoResetEvent(false);
    runner.RunInSTA(()=>
        {
            PocVertex existingVertex =
              graph.Vertices.Where(v => v.ID ==
                     message.ConnectedToVertex.Value).First();
            PocVertex newVertex =
              new PocVertex(message.NewVertexName, message.IsMale);

            //As Graph is bound to UI, we need
            //to marshall calls to update it, on Views Dispatcher
            //do this using IGraphFunctions which View implements
            ((IGraphFunctions)viewAwareStatusService.View).AddNewVertex(newVertex);

            PocEdge newEdge = new PocEdge(string.Format("{0}-{1}",
                                          existingVertex.ID, newVertex.ID),
                existingVertex, newVertex);

            //As Graph is bound to UI, we need to marshall
            //calls to update it, on Views Dispatcher
            //do this using IGraphFunctions which View implements
            ((IGraphFunctions)viewAwareStatusService.View).AddNewEdge(newEdge);

            ar.Set();
        });

    //Wait for STAThread operation to complete
    ar.WaitOne();

    //ask view to use Dispatcher to marshall stuff to UI thread
    ((IGraphFunctions)viewAwareStatusService.View).LayoutGraph();
}

[MediatorMessageSink("AddEdgeRequestMessage")]
public void OnAddEdgeRequestMessage(AddEdgeRequestMessage message)
{

    //NServicebus is MTA (MultiThreadingAppartment),
    //so we need to make sure we run our code that
    //affects UI in STA (SingleThreadingAppartment
    CrossThreadTestRunner runner = new CrossThreadTestRunner();
    AutoResetEvent ar = new AutoResetEvent(false);
    runner.RunInSTA(() =>
    {
        PocVertex existingFromVertex =
          graph.Vertices.Where(v => v.ID ==
              message.ConnectedFromVertex.Value).First();
        PocVertex existingToVertex =
          graph.Vertices.Where(v => v.ID ==
              message.ConnectedToVertex.Value).First();

        PocEdge newEdge = new PocEdge(string.Format("{0}-{1}",
                              existingFromVertex.ID, existingToVertex.ID),
            existingFromVertex, existingToVertex);

        //As Graph is bound to UI, we need
        //to marshall calls to update it, on Views Dispatcher
        //do this using IGraphFunctions which View implements
        ((IGraphFunctions)viewAwareStatusService.View).AddNewEdge(newEdge);

        ar.Set();
    });

    //Wait for STAThread operation to complete
    ar.WaitOne();

    //ask view to use Dispatcher to marshall stuff to UI thread
    ((IGraphFunctions)viewAwareStatusService.View).LayoutGraph();
}
其中有几点需要注意,这些是我已经提到的,例如 NServiceBus 是一种 MTA(多线程单元状态)线程,我们可以在使用 WPF 时处理它。所以我们使用方便的 CrossThreadTestRunner 类来创建一个新的 STA 线程来完成工作。但由于我们创建了一个新线程,我们需要等待它完成,这很容易做到;我们只需要使用 Thread.AutoResetEvent 来完成。然后,之后,我们遇到了不在 UI 线程上的问题;是的,NServiceBus 是多线程的(这在 App.Config 中配置),所以为了解决这个问题,我们需要使用视图的 Dispatcher,我们可以通过视图来做到这一点,通过它实现的 IGraphFunctions 接口,如果您还记得,对于 GraphLayoutView 来说,它是这样的。
public partial class GraphLayoutView : UserControl, IGraphFunctions
{
    public GraphLayoutView()
    {
        InitializeComponent();
        Mediator.Instance.Register(this);
    }

    /// <summary>
    /// These methods will be called by the
    ///   <c>GraphLayoutViewModel</c> by using the Cinch
    /// IViewAwareStatus UI service in the ViewModel
    /// </summary>
    #region IGraphFunctions Members

    public void LayoutGraph()
    {
        //As NServiceBus calls may come from
        //a different thread, may need to marshall
        //to UI thread. We do get some call (internal ones)
        //not from NServiceBus which may
        //not need marshalling, so only Marshall those
        //that need it using Cinch.Dispatcher extensions
        Dispatcher.InvokeIfRequired(() =>
        {
            try
            {
                graphLayout.Relayout();
            }
            catch
            {
            }
        }, DispatcherPriority.Send);
    }


    public void AddNewVertex(PocVertex newVertex)
    {
        //As Graph is bound to UI, we need to marshall
        //calls to update it, on Views Dispatcher
        Dispatcher.Invoke((Action)(() =>
        {
            try
            {
                graphLayout.Graph.AddVertex(newVertex);
            }
            catch
            {
            }
        }));

    }

    public void AddNewEdge(PocEdge newEdge)
    {
        //As Graph is bound to UI, we need to marshall
        //calls to update it, on Views Dispatcher
        Dispatcher.Invoke((Action)(() =>
        {
            try
            {
                graphLayout.Graph.AddEdge(newEdge);
            }
            catch
            {
            }
        }));
    }


    #endregion
}
正如我之前所说,我更喜欢使用视图来进行 Dispatcher 操作;对我来说,这是最合乎逻辑的地方;我认为 ViewModel 不应该关心一个控件是在哪个线程上创建的。
发布者
正如我在整篇文章中所说,有两个几乎相同的 WPF 进程,称为 WpfPublisherA 和 WpfPublisherB,它们几乎完全相同。唯一真正的区别是 App.Config,其中 NServiceBus 使用的队列不同,以及进程的实际名称。因此,我将只解释其中一个进程,而您应该能很好地理解另一个。
项目结构
其中一个 WPF 发布者项目的整体结构如下所示,我认为它非常具有描述性:

配置
在每个发布者进程的唯一配置方面,实际上只有 App.Config,它看起来像这样:
<?xml version="1.0"?>
<configuration>
  <configSections>
    <section name="MsmqTransportConfig"
          type="NServiceBus.Config.MsmqTransportConfig, NServiceBus.Core"/>
    <section name="UnicastBusConfig"
          type="NServiceBus.Config.UnicastBusConfig, NServiceBus.Core"/>
    <section name="RijndaelEncryptionServiceConfig"
          type="NServiceBus.Config.RijndaelEncryptionServiceConfig, NServiceBus.Core"/>
  </configSections>

  <!-- in order to configure remote endpoints use the format: "queue@machine"
       input queue must be on the same machine as the process feeding off of it.
       error queue can (and often should) be on a different machine.
  -->

  <MsmqTransportConfig InputQueue="WpfPublisherBInputQueue"
                       ErrorQueue="error"
                       NumberOfWorkerThreads="1"
                       MaxRetries="5"/>

  <UnicastBusConfig>
    <MessageEndpointMappings>
      <add Messages="MyMessages"
           Endpoint="WpfPublisherAInputQueue" />
    </MessageEndpointMappings>
  </UnicastBusConfig>

  <RijndaelEncryptionServiceConfig
    Key="gdDbqRpqdRbTs3mhdZh9qCaDaxJXl+e7"/>

  <runtime>
    <loadFromRemoteSources enabled="true"/>
  </runtime>

  <startup>
    <supportedRuntime version="v4.0"
                      sku=".NETFramework,Version=v4.0"/>
  </startup>

</configuration>
但也有一些关于整个进程终结点的配置,这是通过创建一个 EndpointConfig.cs 文件来实现的(这对于 WpfPublisherA 和 WpfPublisherB 几乎相同,除了 WpfPublisherA 配置为 AsA_Server,而 WpfPublisherB 配置为 AsA_Client)。我最初将它们都设置为 AsA_Publisher,但 NServiceBus 的作者看到了这篇文章并纠正了我,所以我根据他的说法修改了文章;毕竟,他应该知道,这是他的框架。
using NServiceBus;

namespace WpfPublisherB
{
    public class EndpointConfig : IConfigureThisEndpoint, AsA_Server  {}
}
应用程序类
您可能还记得,早些时候我们讨论了 GraphLayoutViewModel 如何接收在它未运行时发送到进程的未处理消息,这些消息来自 App (Application 类);这就是这个机制的运作方式。
消息处理程序将检查一个“在线”标志,该标志仅在 GraphLayoutViewModel 被实例化时设置为 true,如果未找到“在线”标志为 true,则所有消息都将被路由到 App (Application 类) 中的两个队列,此时,当 GraphLayoutViewModel 被实例化时,这些未处理的消息将通过我选择的一个接口推送到它,以便它可以遍历它们并显示未处理的 NServiceBus 所代表的相关新顶点/边。
这是 App (Application 类) 的完整代码,它还展示了 NServiceBus 如何被自托管,并且还展示了 Cinch 引导程序的调用(正如我所说,如果您不熟悉 Cinch,请参考我写过的许多关于它的文章)。
using System;
using System.Collections.Generic;
using System.Configuration;
using System.Data;
using System.Linq;
using System.Windows;
using System.Reflection;

using NServiceBus;
using Cinch;
using WpfCommon;
using MyMessages;

namespace WpfPublisherB
{
    /// <summary>
    /// Interaction logic for App.xaml
    /// </summary>
    public partial class App : Application, INonHandledMessages
    {

        public App()
        {
            IsOnline = false;
            VertexNonHandledMessagesReceived =
                 new Queue<AddVertexRequestMessage>();
            EdgeNonHandledMessagesReceived =
                 new Queue<AddEdgeRequestMessage>();
        }

        public static IBus Bus { get; private set; }


        protected override void OnStartup(StartupEventArgs e)
        {
            base.OnStartup(e);

            CinchBootStrapper.Initialise(
              new List<Assembly> { typeof(AddNewVertexPopupWindow).Assembly });

            Bus = NServiceBus.Configure.With()
                .DefaultBuilder()
                .XmlSerializer()
                .RijndaelEncryptionService()
                .MsmqTransport()
                    .IsTransactional(false)
                    .PurgeOnStartup(false)
                .MsmqSubscriptionStorage()
                .UnicastBus()
                    .ImpersonateSender(false)
                .LoadMessageHandlers() // need this to load MessageHandlers
                .CreateBus()
                .Start();
        }

        #region INonHandledMessages Members

        public Queue<AddVertexRequestMessage>
                   VertexNonHandledMessagesReceived { get; set; }
        public Queue<AddEdgeRequestMessage>
                   EdgeNonHandledMessagesReceived { get; set; }
        public bool IsOnline { get; set; }

        #endregion
    }
}
窗口代码隐藏
好的,现在我们有一些排队的未处理消息,等待 GraphLayoutViewModel 处理。但是,在 GraphLayoutViewModel 被实例化之前,我们无法处理它们,而且,一旦处理了这些消息,我们就希望恢复到进程被视为运行时消息的处理方式,那就是通过 Cinch Mediator 将入站消息直接中继到 GraphLayoutViewModel。那么,这一切是如何发生的呢?好吧,如果我们一步步来看。
在窗口代码隐藏中,有一些代码如下:
using System;
using System.Collections.Generic;
using System.Linq;
using System.Text;
using System.Windows;
using System.Windows.Controls;
using System.Windows.Data;
using System.Windows.Documents;
using System.Windows.Input;
using System.Windows.Media;
using System.Windows.Media.Imaging;
using System.Windows.Navigation;
using System.Windows.Shapes;
using System.Windows.Interop;

using MyMessages;
using WpfCommon;

namespace WpfPublisherB
{
    /// <summary>
    /// Interaction logic for Window1.xaml
    /// </summary>
    public partial class Window1 : Window, IGraphFunctions
    {
        public Window1()
        {
            InitializeComponent();
            this.SourceInitialized += OnSourceInitialized;
        }

        private void OnSourceInitialized(object sender, EventArgs e)
        {
            //make sure ViewModel can use NServiceBus
            GraphLayoutViewModel vm = (GraphLayoutViewModel)this.DataContext;
            vm.Bus = App.Bus;

            //tell ViewModel about App so it can process
            //received offline messages via nice interface
            vm.NonHandledMessageSource =
                  (INonHandledMessages)(App)App.Current;

            ......
            ......
            ......
        }

        #region IGraphFunctions Members

        public void LayoutGraph()
        {
            ((IGraphFunctions)graphControl).LayoutGraph();
        }

        public void AddNewVertex(PocVertex newVertex)
        {
            ((IGraphFunctions)graphControl).AddNewVertex(newVertex);
        }

        public void AddNewEdge(PocEdge newEdge)
        {
            ((IGraphFunctions)graphControl).AddNewEdge(newEdge);
        }

        #endregion
    }
}
这里重要的部分是,当 GraphLayoutViewModel 被实例化时,它的 NonHandledMessageSource 属性被设置为 App (Application 类) 实例,使用 INonHandledMessages 接口。那么,让我们继续看看 GraphLayoutViewModel.NonHandledMessageSource 属性是什么样的,好吗?
using System;
using System.Collections.Generic;
using System.Linq;
using System.Text;
using System.ComponentModel;
using GraphSharp.Controls;
using MEFedMVVM.ViewModelLocator;
using System.ComponentModel.Composition;
using Cinch;
using MyMessages;
using NServiceBus;
using System.Threading;

namespace WpfCommon
{
    public class PocGraphLayout : GraphLayout<PocVertex, PocEdge, PocGraph> { }

    [ExportViewModel("GraphLayoutViewModel")]
    [PartCreationPolicy(CreationPolicy.NonShared)]
    public class GraphLayoutViewModel : ViewModelBase
    {

        [ImportingConstructor]
        public GraphLayoutViewModel(
            IMessageBoxService messageBoxService,
            IViewAwareStatus viewAwareStatusService,
            IUIVisualizerService uiVisualizerService)
        {
            ......
            ......
            ......
            ......
            ......
        }

        private void AddNonHandledOffLineMessagesReceived(
                INonHandledMessages localNonHandledMessageSource)
        {
            try
            {
                //go through all missing Vertex messages and add them in
                foreach (AddVertexRequestMessage vertexNonHandled in
                    localNonHandledMessageSource.VertexNonHandledMessagesReceived)
                {


                    PocVertex newVertex = new PocVertex(
                vertexNonHandled.NewVertexName.Value, vertexNonHandled.IsMale);
                    PocVertex existingVertex = Graph.Vertices.Where(
                v => v.ID == vertexNonHandled.ConnectedToVertex.Value).Single();
                    Graph.AddVertex(newVertex);

                    PocEdge newEdge = new PocEdge(string.Format("{0}-{1}",
                vertexNonHandled.ConnectedToVertex.Value,
                        newVertex.ID), existingVertex, newVertex);
                    Graph.AddEdge(newEdge);
                }


                //go through all missing Edge messages and add them in
                foreach (AddEdgeRequestMessage edgeNonHandled in
                    localNonHandledMessageSource.EdgeNonHandledMessagesReceived)
                {

                    PocVertex existingVertex1 = Graph.Vertices.Where(
                v => v.ID == edgeNonHandled.ConnectedFromVertex.Value).Single();
                    PocVertex existingVertex2 = Graph.Vertices.Where(
                v => v.ID == edgeNonHandled.ConnectedToVertex.Value).Single();

                    PocEdge newEdge =
                        new PocEdge(string.Format("{0}-{1}", existingVertex1.ID,
                        existingVertex2.ID), existingVertex1, existingVertex2);
                    Graph.AddEdge(newEdge);
                }

                ((IGraphFunctions)viewAwareStatusService.View).LayoutGraph();

                //Tell message handlers to relay messages
                //directly to GraphLayoutViewModel using
                //Cinch Mediator from now on
                localNonHandledMessageSource.IsOnline = true;

            }
            catch
            {
                //user might have picked a Vertex that we dont have yet
            }
        }

        public INonHandledMessages NonHandledMessageSource
        {
            set
            {
                //get handle to INonHandledMessages (current App)
                AddNonHandledOffLineMessagesReceived(value);
            }
        }
    }
}
可以看出,这个 GraphLayoutViewModel.NonHandledMessageSource 属性只是将任务委托给 AddNonHandledOffLineMessagesReceived() 方法,该方法会认真处理未处理的消息,它做的最后一件事是将“OnLine”标志设置为 true,这样任何新的 NServiceBus 都不会像这样处理。它们将直接从 NServiceBus 消息处理程序类路由到 GraphLayoutViewModel,方法是使用 Cinch Mediator。
消息处理程序
拼图的最后一块是实际的 NServiceBus 消息处理程序类,现在我已经讨论了一些内容,您应该可以理解。我将只概述一对请求/响应消息,因为另一对工作方式相同。
请求
请求是所有真正工作发生的地方。在这里,消息处理程序应该完成所有工作。现在,正如我在这篇文章中一直所说,这些消息处理程序类是由 NServiceBus 框架自动召唤出来的,我们的应用程序代码无法控制。因此,将额外的有用类放入这些处理程序的唯一选择是使用 IOC,我已经在本文前面讨论过。另一件让我困惑一段时间的事情是如何将东西从这些 NServiceBus 消息处理程序类传递到我的应用程序的其他部分(例如,传递到演示进程都使用的 GraphLayoutViewModel 来绑定它们的状态)。最后,我所做的就是通过一个企业级断开连接的消息系统,即 NServiceBus,与一个内部断开连接的消息系统,即 Cinch Mediator,来解决这个问题,而且它似乎效果很好。
总之,这是其中一个 NServiceBus 消息处理程序类的完整代码;看看它是如何根据我们之前讨论的“在线”标志执行不同操作的:
using System;
using System.Windows;

using MyMessages;
using Cinch;
using NServiceBus;
using WpfCommon;

namespace WpfPublisherB
{
    public class AddEdgeRequestMessageHandler :
                   IHandleMessages<AddEdgeRequestMessage>
    {
        public void Handle(AddEdgeRequestMessage message)
        {

           INonHandledMessages NonHandledMessageSource =
                        (INonHandledMessages)(App)App.Current;

           if (!NonHandledMessageSource.IsOnline)
           {
               ((INonHandledMessages)(App)
                   App.Current).EdgeNonHandledMessagesReceived.Enqueue(message);
           }
           else
           {
               AddEdgeResponseMessage response = null;
               try
               {
                   Mediator.Instance.NotifyColleagues<AddEdgeRequestMessage>(
                                 "AddEdgeRequestMessage", message);

                   response = App.Bus.CreateInstance<AddEdgeResponseMessage>(m =>
                   {
                       m.ResponseMessageStatus =
                          "New Edge added to WpfPublisherB correctly";
                   });
               }
               catch
               {
                   response = App.Bus.CreateInstance<AddEdgeResponseMessage>(m =>
                   {
                       m.ResponseMessageStatus =
                          "Failed to add new Edge to WpfPublisherB";
                   });
               }


               if (response != null)
                   App.Bus.Reply(response);
           }
        }
    }
}
其中实际的 AddEdgeRequestMessage 消息类(请参阅 MyMesages 项目)如下所示:
[TimeToBeReceived("00:00:20")] // twenty seconds
public class AddEdgeRequestMessage : IMessage
{
    public WireEncryptedString ConnectedFromVertex { get; set; }
    public WireEncryptedString ConnectedToVertex { get; set; }
}
请注意 WireEncryptedString 的使用,它将使用标准的 NServiceBus RijndaelEncryptionService 进行加密,我们在 App.Config 和 App.xaml.cs 中的自托管设置中都启用了它。
响应
响应非常简单,只是显示一个 MessageBox 来表示请求成功;这是消息处理程序类的完整内容:
using System;
using System.Windows;

using MyMessages;
using NServiceBus;

namespace WpfPublisherB
{
    class AddEdgeResponseMessageHandler :
           IHandleMessages<AddEdgeResponseMessage>
    {
        public void Handle(AddEdgeResponseMessage message)
        {
            MessageBox.Show(message.ResponseMessageStatus);
        }
    }
}
其中实际的 AddEdgeResponseMessage 消息类(请参阅 MyMesages 项目)如下所示:
[TimeToBeReceived("00:00:20")] // twenty seconds
public class AddEdgeResponseMessage : IMessage
{
    public WireEncryptedString ResponseMessageStatus { get; set; }
}
最后的定论
在结束本文之前,我想简单谈谈总线式框架(NServiceBus/MassTransit/Rhino Service Bus)与 RPC 技术(如 Remoting 和 WCF)的开发方式。现在,它们可能非常适合某些人,但它们并不太适合我的编码风格。我发现这三个总线框架(我研究过)都有一个特别痛苦的地方(经过大量分析,我认为 NServiceBus 是最好的),那就是处理入站消息的点,在那一点上你做不了太多事情,因为框架要么自动创建消息处理类(正如我所说 NServiceBus 的情况),要么你根本无法轻易地访问应用程序的其他部分来响应入站消息。
好吧,正如我在文章其余部分所说,我通过使用我自己的内部消息系统(我 Cinch MVVM 框架中的 Mediator)来解决这个问题,将消息从中继系统(在本例中是 NServiceBus)传递给我应用程序中想要了解入站消息的其他部分。
但它真的有那么难吗?我不知道。我在搜索这些三个总线框架的示例时,确实没有看到有人做比基本功能更多的事情。当然,人们在消息处理程序中使用 NHibernate 将数据持久化到数据库,但这对我来说并没有那么令人兴奋。我知道如何使用 ORM 将数据存储到数据库。我想看到数据与我的应用程序的其余部分进行交互。
在我看来,这些总线框架的作者打算让它们以一种消息被处理并在消息处理程序中持久化到数据库的方式工作,干净且自成一体,我同意,但它有多大用处?对我来说,用处不大,我想要的是一个利用 MSMQ 的消息系统,它易于使用,并且我可以用它来在不同进程/应用程序和技术之间发送消息。NServiceBus 确实承诺了这一点。我承认,经过一些技巧,我得到了我想要的,但并非没有 resorting to using an internal messenger(我 Cinch MVVM 框架中的 Mediator)来在消息通过 MSMQ 通过 NServiceBus 进入消息处理程序后,在应用程序的内部传递消息。
也许我完全错了,然后会有某个聪明人读了这篇文章告诉我,是的,你不应该那样使用服务总线方法,我会问为什么不行?
不过说实话,NServiceBus 的作者确实声称 NServiceBus应该与 WCF 等不同技术结合使用,所以我认为我的最终解决方案是相当可行的。NServiceBus 的另一个优点是,我对它来说是新手,我不是一个经验丰富的 NServiceBus 黑客,我也不想花好几个月来写这一个文章,所以我可能错过了一些东西。
NServiceBus 作者对原文内容的评论
我非常高兴看到我的小文章引起了 NServiceBus 作者的注意,这是他所说的:
- 在客户端和服务器之间的全双工通信中,服务器不需要配置客户端队列。文章中描述的场景实际上有点不寻常——一方面,进程被配置为发布者,但它们实际上并不发布。更常见的是看到每个客户端发送消息到一个服务器,该服务器会将更改的事件发布回所有订阅的客户端,这些客户端(反过来)会更新它们的 UI。此外,安全设置是可选的,对于文章中显示的场景可能不需要。
- TimeToBeReceived 属性仅与消息类型相关,而不是与处理程序相关。它表示消息在所有队列中最多可以花费多长时间,如果在此时间内无法将其传递到目标队列,则会被丢弃。
关于将 NServiceBus 集成到多线程客户端应用程序中 - 在处理更深层次的业务域时,有更多的复杂性需要处理。我在一篇为 MSDN 杂志撰写的文章中描述了这些挑战:优化大型软件+服务应用程序。
当然,我已经注意到了 Udi 的这些评论,并修改了文章的代码和文本。
处理 MVVM 和 WPF/SL 时的重要修正
当我第一次发布这篇文章时,我找不到多少关于使用 WPF/SL 并结合当前最佳实践来使用 NServiceBus 的信息,并且我在文章中提到,我觉得处理消息处理程序有点噩梦,并且不喜欢 NServiceBus 框架自动创建这些类的事实,而且由于我无法控制消息处理程序类的实例化,所以我无法控制这些类中放入的内容。
幸运的是,这篇文章引起了 NServiceBus 作者的注意,我与他进行了大量的电子邮件交流/聊天,他向我介绍了他是如何处理 WPF 的。用他的话说,他在一封发给我的电子邮件中这样说道:
"我倾向于在控制器对象中编写逻辑,这些对象确实是单例的,因此很容易注入到处理程序中。这些控制器将引用打开的 ViewModel 的当前状态并进行管理。"
- Udi Dahan,Sacha Barber 的电子邮件,日期为 2010 年 9 月 2 日
这很好,但如何将其转化为代码呢?好吧,我马上就会向您展示,但我只需要提一件事。我已经调整了附加的代码,并概述了自发布文章以来对代码所做的所有更改,以支持 Udi 在他的电子邮件中建议的单例控制器概念,但我仍然使用 Cinch Mediator 作为将内容从 NServiceBus 消息处理程序类中导出的主要方式,并添加了单例控制器概念,但当消息处理程序指示单例控制器有新消息到达时,所有发生的事情是单例控制器将调用已注册 ViewModel 的空方法存根。我认为这仍然足以说明单例控制器应该做什么,如果您使用该方法。
总之,本节将列出自发布文章以来我对代码库所做的修改列表,以支持 Udi 在他的电子邮件中建议的单例控制器概念。
从控制器类开始
所以我们知道我们需要一个控制器单例,现在就看您如何设计它了。对我来说,我发现最好为每种 ViewModel 类型都有一个控制器单例,所以我提出了一个 GraphLayoutControllerSingleton,它是 GraphLayoutViewModel 类型的控制器。我当然使用了控制器接口,以便可以对其进行模拟。无论如何,这是代码:
using System;
using System.Collections.Generic;
using System.Linq;
using System.Text;
using MyMessages;

namespace WpfCommon
{
    public interface IGraphLayoutController
    {
        void AddViewModel(GraphLayoutViewModel viewModelToNotifyWhenMessagesArrive);
        void NotifyViewModelsOfNewVertexMessage(AddVertexRequestMessage message);
        void NotifyViewModelsOfNewEdgeMessage(AddEdgeRequestMessage message);
    }

    /// <summary>
    /// After some discussions with NServiceBus author
    /// he suggested that the way he gets things from
    /// his MessageHandler classes when using WPF
    /// is using a controller that knows about other objects
    /// where the controller is a singleton, that broadcasts
    /// the message to the internal objects
    /// that wish to be notified. There could be one
    /// controller per  message type of per ViewModel type
    /// that is interested in the messages. The controller
    /// singleton is registered in the App.Xaml.cs
    /// </summary>
    public sealed  class GraphLayoutControllerSingleton : IGraphLayoutController
    {
        #region Data
        private List<GraphLayoutViewModel>
                viewModelsToNotify = new List<GraphLayoutViewModel>();
        private static readonly GraphLayoutControllerSingleton
                instance = new GraphLayoutControllerSingleton();
        #endregion

        #region Ctor
        // Explicit static constructor to tell C# compiler
        // not to mark type as beforefieldinit
        static GraphLayoutControllerSingleton()
        {
        }

        private GraphLayoutControllerSingleton()
        {
        }
        #endregion

        #region Public Properties
        public static GraphLayoutControllerSingleton Instance
        {
            get
            {
                return instance;
            }
        }
        #endregion

        #region IGraphLayoutController Members

        public void AddViewModel(GraphLayoutViewModel
                    viewModelToNotifyWhenMessagesArrive)
        {
            viewModelsToNotify.Add(viewModelToNotifyWhenMessagesArrive);
        }

        public void NotifyViewModelsOfNewVertexMessage(AddVertexRequestMessage message)
        {
            foreach (GraphLayoutViewModel vm in viewModelsToNotify)
            {
                vm.AddVertexFromMessage(message);
            }
        }

        public void NotifyViewModelsOfNewEdgeMessage(AddEdgeRequestMessage message)
        {
            foreach (GraphLayoutViewModel vm in viewModelsToNotify)
            {
                vm.AddEdgeFromMessage(message);
            }
        }
        #endregion
    }
}
在 IOC 容器中注册控制器
既然我们有了单例控制器,我们就需要将其注册到 NServiceBus 将使用的 IOC 容器中;对我来说,这很容易在 App.xaml.cs 中进行 Bus 自托管代码之后进行,因为这是一个 WPF 项目。下面是 App.xaml.cs 的新代码部分:
protected override void OnStartup(StartupEventArgs e)
{
    base.OnStartup(e);

    CinchBootStrapper.Initialise(
       new List<Assembly> { typeof(AddNewVertexPopupWindow).Assembly });

    Bus = NServiceBus.Configure.With()
        .DefaultBuilder()
            .RunCustomAction(() =>
              Configure.Instance.Configurer.RegisterSingleton(
                                 typeof(IGraphLayoutController),
        GraphLayoutControllerSingleton.Instance))
        .XmlSerializer()
        .RijndaelEncryptionService()
        .MsmqTransport()
            .IsTransactional(false)
            .PurgeOnStartup(false)
        .MsmqSubscriptionStorage()
        .UnicastBus()
            .ImpersonateSender(false)
        .LoadMessageHandlers() // need this to load MessageHandlers
        .CreateBus()
        .Start();
}
这是 App.xaml.cs 中我必须更改的唯一方法;App.xaml.cs 中的所有其他代码都与原文内容相同。从代码片段中应该可以清楚地看出,我们所做的只是将 GraphLayoutControllerInstance 注册到 NServiceBus 当前使用的 IOC 容器中。
将 ViewModel 注册到控制器/提供消息方法
下一步是实际将 ViewModel 实例添加到 GraphLayoutControllerInstance,以便在 NServiceBus 消息处理程序中收到新消息时可以使用它们。这很简单地在 ViewModel 的构造函数中完成(正如我所说,我选择了每个 ViewModel 类型一个单例控制器,但这实际上是由您的应用程序需求驱动的;这适合演示应用程序的要求)。
public GraphLayoutViewModel(IMessageBoxService messageBoxService,
    IViewAwareStatus viewAwareStatusService,
    IUIVisualizerService uiVisualizerService)
{
    ......
    ......
    ......
    ......

    //this is not used in the demo app as I am using the Mediator to get messages from
    //the NServiceBus message handlers into my ViewModels, but this shows an alternative
    //which I discuss near the bottom of the article. This is for demo purposes only
    GraphLayoutControllerSingleton.Instance.AddViewModel(this);
}
接下来,我们需要为 GraphLayoutControllerInstance 期望调用的每个已注册 ViewModel 提供消息处理方法。对我来说,对于演示应用程序的 GraphLayoutViewModel,它看起来只是这样:
using System;
using System.Collections.Generic;
using System.Linq;
using System.Text;
using System.ComponentModel;
using GraphSharp.Controls;
using MEFedMVVM.ViewModelLocator;
using System.ComponentModel.Composition;
using Cinch;
using MyMessages;
using NServiceBus;
using System.Threading;

namespace WpfCommon
{
    public class PocGraphLayout : GraphLayout<PocVertex,
                                  PocEdge, PocGraph> { }

    [ExportViewModel("GraphLayoutViewModel")]
    [PartCreationPolicy(CreationPolicy.NonShared)]
    public class GraphLayoutViewModel : ViewModelBase
    {
        ......
        ......
        ......
        ......

        #region Public Methods To Show How Singleton Controller Works
        //this is not used in the demo app as I
        //am using the Mediator to get messages from
        //the NServiceBus message handlers into
        //my ViewModels, but this shows an alternative
        //which I discuss near the bottom of the article.
        //This is for demo purposes only
        public void AddVertexFromMessage(AddVertexRequestMessage message)
        {
            //do stuff here
        }

        //this is not used in the demo app as I
        //am using the Mediator to get messages from
        //the NServiceBus message handlers into
        //my ViewModels, but this shows an alternative
        //which I discuss near the bottom of the article.
        //This is for demo purposes only
        public void AddEdgeFromMessage(AddEdgeRequestMessage message)
        {
            //do stuff here
        }
        #endregion
    }
}
在消息处理程序中使用控制器
最后一步是将 GraphLayoutControllerInstance 注入到 NServiceBus 消息处理程序中并使用它。下面显示了演示应用程序中一个已修改的 AddVertexRequestMessageHandler。您应该可以看到一个新的 GraphLayoutControllerInstance 属性,它将由 NServiceBus 当前使用的 IOC 容器设置。您还应该可以看到这个 GraphLayoutControllerInstance 在代码中是如何使用的,我们只是将入站消息传递给控制器,它将把这些消息传递给它已注册的所有已注册 ViewModel。
using System;
using System.Windows;

using MyMessages;
using Cinch;
using NServiceBus;
using WpfCommon;


namespace WpfPublisherA
{
    public class AddVertexRequestMessageHandler :
                    IHandleMessages<AddVertexRequestMessage>
    {
        //this is not used in the demo app
        //as I am using the Mediator to get messages from
        //the NServiceBus message handlers into
        //my ViewModels, but this shows an alternative
        //which I discuss near the bottom
        //of the article. This is for demo purposes only
        public IGraphLayoutController GraphLayoutController { get; set; }


        public void Handle(AddVertexRequestMessage message)
        {
            INonHandledMessages NonHandledMessageSource =
                               (INonHandledMessages)(App)App.Current;

            if (!NonHandledMessageSource.IsOnline)
            {
                ((INonHandledMessages)
                  (App)App.Current).VertexNonHandledMessagesReceived.Enqueue(message);
            }
            else
            {
                AddVertexResponseMessage response = null;
                try
                {
                    Mediator.Instance.NotifyColleagues<AddVertexRequestMessage>(
                               "AddVertexRequestMessage", message);

                    //this is not used in the demo app as
                    //I am using the Mediator to get messages from
                    //the NServiceBus message handlers
                    //into my ViewModels, but this shows an alternative
                    //which I discuss near the bottom
                    //of the article. This is for demo purposes only
                    GraphLayoutController.NotifyViewModelsOfNewVertexMessage(message);

                    response = App.Bus.CreateInstance<AddVertexResponseMessage>(m =>
                    {
                        m.ResponseMessageStatus =
                           "New Node added to WpfPublisherA correctly";
                    });
                }
                catch
                {
                    response = App.Bus.CreateInstance<AddVertexResponseMessage>(m =>
                    {
                        m.ResponseMessageStatus =
                           "Failed to add new Node to WpfPublisherA";
                    });
                }

                if (response != null)
                    App.Bus.Reply(response);
            }
        }
    }
}
从控制器中注销实例
我没有允许 ViewModel 实例从控制器中注销,但这很容易做到,而且是您在创建实际生产系统时应该考虑的事情。
就是这样
实际上,这就是我真正想说的关于 NServiceBus 的全部内容,我希望您喜欢它,并且也许能看到它在您自己的项目中可能有用之处。如果喜欢这篇文章,能否请您留下投票/评论以示赞赏?谢谢。下次见。