
使用新的 ASP.NET 5 配合 EF 和 IdentityUser 在 OSX 中构建你自己的 WebAPI
使用新的 ASP.NET 5 配合 EF 和 IdentityUser 在 OSX 中构建你自己的 web-api
您好,本文是我上一篇文章的续篇 文章 。我建议您先阅读这篇文章,因为所有配置和其他项目设置都在那里得到了详细描述。我的目的是在 asp.net 5 中开发一个完全授权的 web-api。如果您能通读这篇文章,我希望您将能够开发出自己的 web api。您可以 在这里 下载整个项目
- 项目创建
- 列出软件包并下载必要的软件包
- 什么是 Identity User
- 通过 EF 进行 SQLite 数据库迁移
- 在 EF 中配置 Application DB Context 并将示例模型添加到数据库
- 添加 CompanyController
- 添加授权
- 添加 AuthController 和 View
- 测试应用程序
项目创建
创建您的项目目录并打开终端。我们将使用 Yomen 来创建我们的项目模板。在终端中转到项目目录并运行
yo aspnet
命令,并使用一个基本的 Web 应用程序类型的模板并命名。
列出软件包并下载必要的软件包
现在,我们的目的是创建一个 web api,对吧?为此,我需要包含一些软件包。让我们将其添加到我们的 project.json 文件中,如下所示

下面列出了一些重要的软件包及其描述
    "Microsoft.AspNet.Identity": "3.0.0-rc1-final",
    "EntityFramework.Core": "7.0.0-rc1-final",
    "EntityFramework.MicrosoftSqlServer": "7.0.0-rc1-final",
    "EntityFramework.SQLite": "7.0.0-rc1-final",
    "EntityFramework.Commands": "7.0.0-rc1-final",
    "Microsoft.AspNet.Identity.EntityFramework": "3.0.0-rc1-final"
"Microsoft.AspNet.Identity"
我们希望使用已定义的 IdentityUser 模型类来存储其中的用户凭据。它包含我们管理用户/向系统进行身份验证所需的基本操作。
"Microsoft.AspNet.Identity.EntityFramework"
这将为我们提供 IdentityUser 的模型类以及与数据库操作相关的任务。
"EntityFramework.Core": "7.0.0-rc1-final", "EntityFramework.MicrosoftSqlServer": "7.0.0-rc1-final", "EntityFramework.SQLite": "7.0.0-rc1-final", "EntityFramework.Commands": "7.0.0-rc1-final",
这对于使用 Entity Framework 是必需的。重要的一点是,我们正在使用 EntityFramework.SQLite 在 Mac 中处理 SQLite 数据库。现在我们需要更新/下载我们在这里写的所有软件包。转到终端,键入“dnu restore”,它将恢复/下载所有必需的软件包。
什么是 Identity User
"IdentityUser" 代表了一个默认的 EntityFramework IUser 实现。非常简单。如果我们使用它,我们真的不需要单独创建任何用户表。所有东西都在那里。我们只需要与必要的软件包一起使用它。还有一些其他辅助类与此相关。"UserManager"、"SignInManager"
通过 EF 进行 SQLite 数据库迁移
首先,右键单击项目根目录并“创建新文件”。将文件命名为:“AuthDb.db”。接下来的部分是,我们将配置连接字符串并创建我们的应用程序数据库上下文,以便我们可以通过它来管理所有数据库操作/查询。我们开始吧
在 EF 中配置 Application DB Context 并将示例模型添加到数据库
在根目录下创建几个文件夹。它们是“Models”、“ViewModels”和“Migrations”。
模型
此文件夹将包含所有映射到我们数据库表的模型类,包括一个演示数据生成器。
ViewModels
我们将在控制器以及视图中使用的类将在此处。
Migrations
每次我们对模型/表/数据库进行任何更改时,我们将向 EF 发送一个命令来执行必要的迁移。然后 EF 将以类的形式创建迁移脚本,并将其存储在此目录中。右键单击“Models”目录并创建一个名为“AppDbContext.cs”的类,如下所示
using Microsoft.AspNet.Identity.EntityFramework;
using Microsoft.Data.Entity;
using Microsoft.Extensions.Configuration;
using Microsoft.Extensions.PlatformAbstractions;

namespace ServiceAuth
{
    public class AppDbContext:IdentityDbContext{

        public DbSet Companies{get;set;}

        //public IApplicationEnvironment appEnv {get;set;}

         //public IConfigurationRoot Configuration { get; set; }
        protected override void OnConfiguring(DbContextOptionsBuilder optionBuilder){
            optionBuilder.UseSqlite(@"Data Source = /Volumes/Development/Aspnet/FormAuthTest/ServiceAuth/AuthDb.db");
            base.OnConfiguring(optionBuilder);
        }
    }
}
还需要像下面一样定义我们的 Company 实体
using System.ComponentModel.DataAnnotations;

namespace ServiceAuth
{
    public class Company{

        [Key]
        public int Id{get;set;}
        public string Name{get;set;}
        public string Address{get;set;}

        public string WebAddress{get;set;}
    }
}
我还想创建一个 Helper 类,用于生成我们的示例数据。
using System.Collections.Generic;
using System.Linq;
using System.Threading.Tasks;
using Microsoft.AspNet.Identity;
using Microsoft.AspNet.Identity.EntityFramework;

namespace ServiceAuth
{
    public class Seeder{

        private readonly AppDbContext _context;
        private readonly UserManager _userManager;

        public Seeder(AppDbContext context, UserManager userManager){
            this._userManager = userManager;
            this._context = context;
        }

        public async Task GenerateSeedData(){
            if(!this._context.Users.Any()){
                for(int i=0; i < 2; i++){
                    var user = new IdentityUser{
                        UserName = $"user{i}",
                        Email = $"user{i}@gmail.com"
                    };

                    await this._userManager.CreateAsync(user, "Qwerty123!");
                }
            }

            if(!this._context.Companies.Any()){
                var companies = new List{
                    new Company{
                        Id = 1,
                        Name = "Selise",
                        Address = "Dhaka",
                        WebAddress = "www.selise.ch"
                    },
                    new Company{
                        Id = 2,
                        Name = "Company 2",
                        Address = "Dhaka",
                        WebAddress = "www.company2.com"
                    }
                };
                this._context.Companies.AddRange(companies);
                await this._context.SaveChangesAsync();
            }

        }
    }
}
添加 CompanyController
现在,如果您看到上面的数据生成脚本,您会发现我们向“Company”实体添加了一些虚拟数据。因此,我们现在将创建一个“Company Controller”,以便我们可以通过 GET 方法查看此数据。这非常简单。
   using System.Collections.Generic;
using System.Linq;
using Microsoft.AspNet.Authorization;
using Microsoft.AspNet.Mvc;

namespace ServiceAuth.Controllers
{
    [Route("api/[controller]")]
    //[Authorize]
    public class CompanyController:Controller{

        public CompanyController(AppDbContext context){
            this._context = context;
        }
        private readonly AppDbContext _context;

        [HttpGet]
        public IEnumerable GetCompany(){
            return this._context.Companies.ToList();
        }
    }
}
如果您看到此控制器,您会发现我故意注释掉了 //[Authorize]。好的,我们几乎准备好执行此“GetCompany”方法来查看此数据。在此之前,我们需要对“Startup.cs”进行一些更改。请回想一下,“Startup.cs”是 asp.net 5 类型应用程序中使用的唯一配置类。所有配置/模块/中间件都在这里配置,以便它使用 asp.net 5 执行管道。代码几乎是自解释的。请参阅下面的代码
using System;
using System.Collections.Generic;
using System.Linq;
using System.Threading.Tasks;
using Microsoft.AspNet.Builder;
using Microsoft.AspNet.Hosting;
using Microsoft.AspNet.Http;
using Microsoft.AspNet.Identity.EntityFramework;
using Microsoft.Data.Entity;
using Microsoft.Extensions.Configuration;
using Microsoft.Extensions.DependencyInjection;
using Microsoft.Extensions.Logging;
using Microsoft.Extensions.PlatformAbstractions;
using Newtonsoft.Json.Serialization;

namespace ServiceAuth
{
    public class Startup
    {
        public Startup(IHostingEnvironment env, IApplicationEnvironment appEnv)
        {
            // Set up configuration sources.
            var builder = new ConfigurationBuilder()
                .AddJsonFile("appsettings.json")
                .AddJsonFile("config.json")
                .AddEnvironmentVariables();
            Configuration = builder.Build();
            Configuration["Data:DefaultConnection:ConnectionString"] = @"Data Source = /Volumes/Development/Aspnet/FormAuthTest/ServiceAuth/AuthDb.db";
        }

        public IConfigurationRoot Configuration { get; set; }

        // This method gets called by the runtime. Use this method to add services to the container.
        public void ConfigureServices(IServiceCollection services)
        {
            // Add framework services.
            services.AddEntityFramework().AddSqlite().AddDbContext(options => {
                options.UseSqlite(Configuration["Data:DefaultConnection:ConnectionString"]);
            });

            services.AddIdentity(config => {
                config.Cookies.ApplicationCookie.LoginPath = "/Auth/Login";
            }).AddEntityFrameworkStores();

            services.AddMvc().AddJsonOptions( options => {
                options.SerializerSettings.ContractResolver = new CamelCasePropertyNamesContractResolver();
            });


            services.AddTransient();
        }

        // This method gets called by the runtime. Use this method to configure the HTTP request pipeline.
        public void Configure(IApplicationBuilder app, Seeder seeder)
        {


            app.UseIISPlatformHandler();
            app.UseDefaultFiles();
            app.UseStaticFiles();
            app.UseIdentity();


            app.UseMvc(routes =>
            {
                routes.MapRoute(
                    name: "default",
                    template: "{controller}/{action}/{id?}");
            });

            seeder.GenerateSeedData().Wait();
            /*app.Run( async context => {
                await context.Response.WriteAsync(Configuration["Data:DefaultConnection:ConnectionString"]);
            })
            */                           ;
        }

        // Entry point for the application.
        public static void Main(string[] args) => Microsoft.AspNet.Hosting.WebApplication.Run(args);
    }
}
到目前为止,我们还没有真正创建任何表。让我们使用一个 EF 命令来生成我们的数据库/表。这称为数据库迁移。这也很简单。使用下面的命令。
dnx ef migrations add "initscript"
接着
dnx ef database update
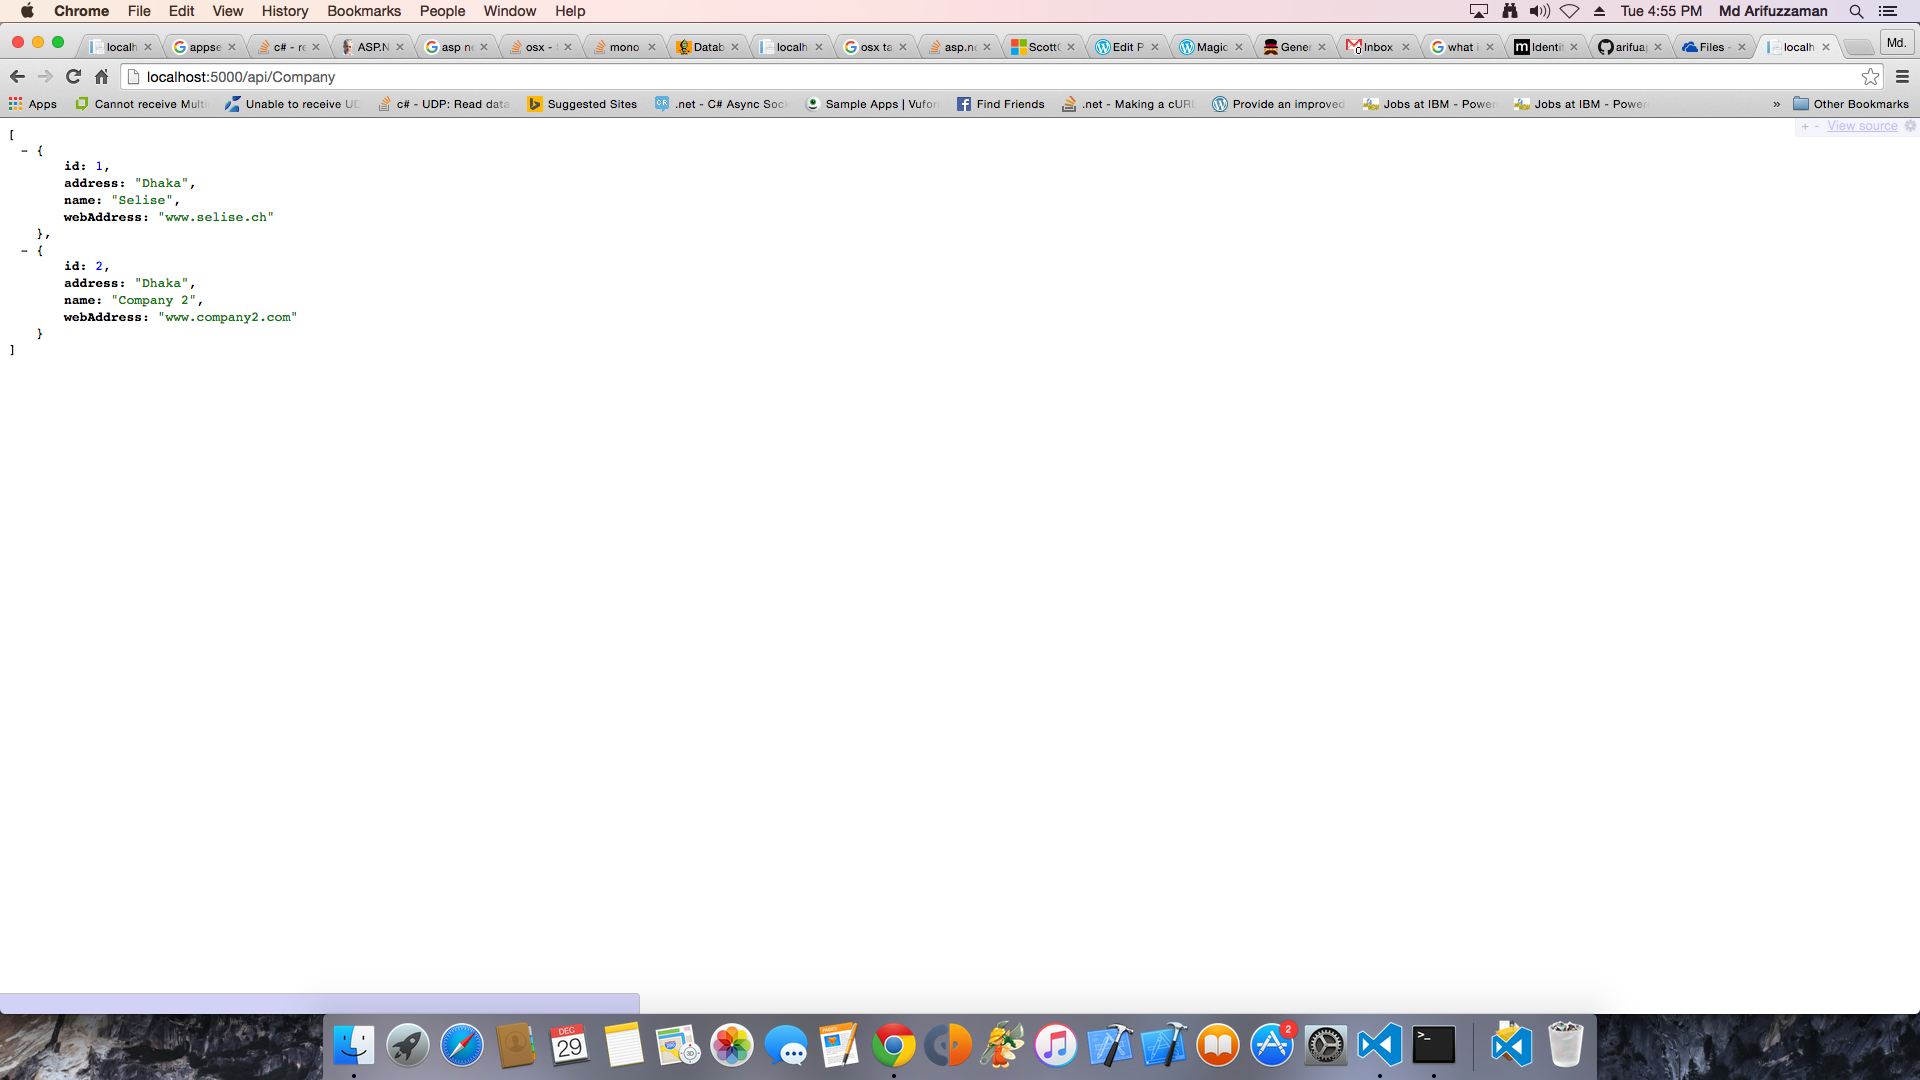
太棒了,完成此命令后,您会在“Migrations”目录中看到一些类已添加。Entity Framework 使我们能够轻松地管理这些迁移。希望我们已成功完成迁移,并且我们的应用程序已准备好提供我们的第一个 web-api,该 web-api 将返回所有公司信息。转到终端并键入“dnx web”。它将运行 Web 服务器并通过“https://:5000”托管我们的应用程序。打开浏览器并键入“https://:5000/api/company”。就这样。希望您会看到下面的页面
添加授权
我们的第一个 web api 正在运行,而没有应用任何授权。由于我们没有提供任何凭据,因此它完全匿名运行。让我们取消注释“CommanyController”中的 //[Authorize] 属性,看看会发生什么?什么鬼,它现在正在跳转到“https://:5000/Auth/Login”位置进行身份验证。等等,它从哪里获得这个路径?嗯,它在我们的“Startup.cs”服务中定义了 services.AddIdentity(config => { config.Cookies.ApplicationCookie.LoginPath = "/Auth/Login"; }).AddEntityFrameworkStores(); 但我们仍然没有实现任何这些。所以请这样做。
添加 AuthController 和 View
在“Controllers”目录中创建一个名为“AuthController”的控制器,并在其中添加以下方法
using System.Linq;
using System.Threading.Tasks;
using Microsoft.AspNet.Identity;
using Microsoft.AspNet.Identity.EntityFramework;
using Microsoft.AspNet.Mvc;
using ServiceAuth.ViewModels;

namespace ServiceAuth.Controllers
{
    public class AuthController:Controller{

        private readonly SignInManager _signInManager;
        private readonly AppDbContext _context;

        public AuthController(SignInManager signInManger, AppDbContext context){
            this._context = context;
            this._signInManager = signInManger;
        }

        [HttpGet]
        public IActionResult Login(){
            return View();
        }


        [HttpPost]
        public async Task Login(UserViewModel viewModel){


            if(ModelState.IsValid){
                var result = await this._signInManager.PasswordSignInAsync(viewModel.Username, viewModel.Password, true, false);

                if(result.Succeeded){
                    return Redirect("/api/Company");
                }
            }

            return View();
        }


        public async Task Logout(){
            if(User.Identity.IsAuthenticated){
                await this._signInManager.SignOutAsync();
            }
            return Redirect("/");
        }
    }
}
这里我们有 Login (get 和 post) 方法以及一个 Logout 方法。让我们创建 AuthController 的 View。右键单击我们的 Views 目录并创建另一个名为“Auth”的目录。在此目录中创建一个“Login.cshtml”并放入以下 html 代码
@model ServiceAuth.ViewModels.UserViewModel

<h1>Login</h1>

<div>@Html.LabelFor(m => m.Username) @Html.TextBoxFor(m => m.Username) @Html.LabelFor(m => m.Password) @Html.TextBoxFor(m => m.Password)</div>
测试应用程序
很简单,对吧?再次使用“dnx web”运行应用程序,这次尝试访问“https://:5000/api/company”。它现在将重定向到“https://:5000/Auth/Login”。输入用户名/密码(我们作为示例数据生成器的一部分创建的),然后按登录。哇!您现在将看到公司列表。它现在完全处于正确的授权之下。尝试访问 Logout 方法“https://:5000/Auth/Logout”,然后再次尝试访问“https://:5000/api/company”并查看后果。太棒了,我们刚刚完成了带有正确授权的完整 web-api 开发。希望您能在自己的 api 开发中使用这些知识。尽情享受吧 注意:我必须承认,我的灵感来自于 这个 asp.net 5 教程。我才写了这篇博文。