
使用客户端框架 Durandal 实现单页应用程序
这是一个单页应用程序。本文使用的技术和版本是 MVC 5.0 和 Durandal 2.1(客户端框架)。
引言
SPA(单页应用程序),顾名思义,就是应用程序中的所有相关页面都加载在单个网页上。换句话说,任何应用程序的整个必要资源,如 HTML 页面、样式表、JavaScript 文件,在第一次请求后加载到浏览器中,并在请求时渲染。
市面上有许多框架可以用来构建 SPA,但在本文中,我们将介绍 Durandal SPA 框架。
Durandal
简单来说,它结合了不同的标准 JavaScript 库,如 Knockout、RequireJS、jQuery,这有助于我们构建耗时更少、响应式 UI,以获得更好的用户体验。
背景
在实现客户端框架时,我在视图与视图模型、knockout.js、require.js、CSS 等配置方面遇到了许多问题。然后我发现了 Durandal,一个提供了启动新项目所需的所有必要配置的框架,无需在配置方面付出太多努力。
实现
通常,单页应用程序的客户端数据模型会通过 Ajax 调用连接到服务层,用于发送和接收 JSON 数据。
在此演示中,我们不会触及任何服务器端组件;相反,我们将完全专注于客户端组件。
实现总结
将创建一个简单的菜单控件,带有子菜单选项;每次单击子菜单时,它将动态加载视图。
将要学习
- 将 Durandal 框架导入 Web 应用程序
- 创建视图和视图模型
- 将视图绑定到相应的视图模型
- 将视图和视图模型与动态数据绑定
- 在需要时动态加载视图
- 在单个页面中交互不同的视图
设置解决方案
步骤 1
创建一个名为 Demo.SPA.Solution 的解决方案。
第二步
添加一个名为 ASP.NET Web 应用程序的新项目,并选择空白 - MVC 模板。
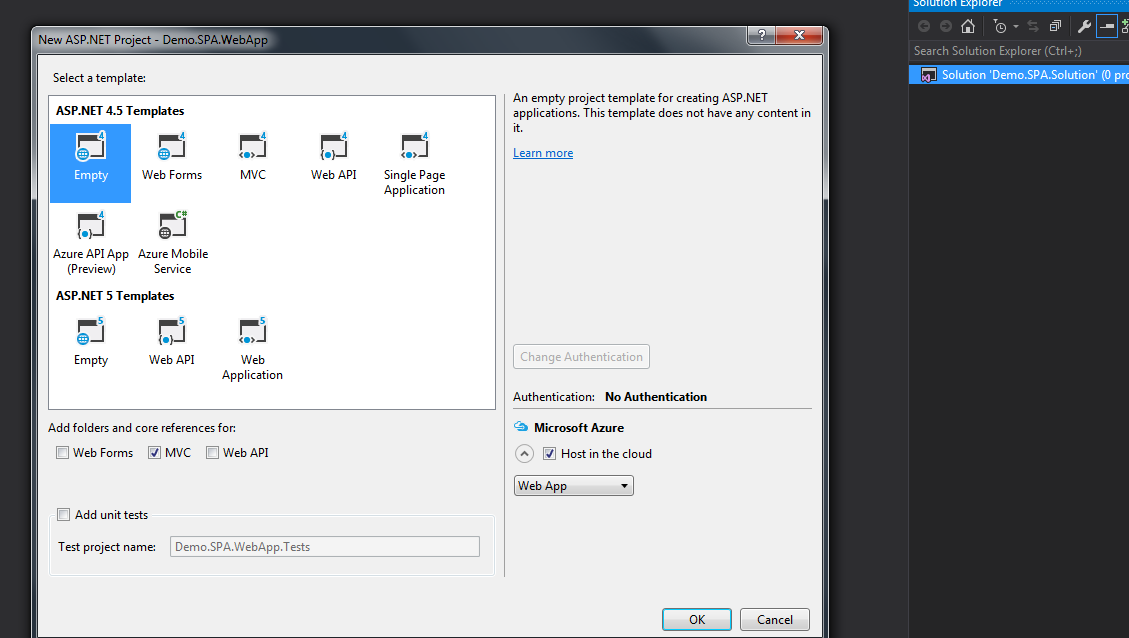
解决方案的外观如下:

步骤 3
将 Durandal 入门套件添加到 Web 应用程序

它将添加一些额外的文件夹,如 App、App\Views、App\ViewModels 和依赖文件,durandalconfid.cs、durandalBundle.config、DurandalController。
我的解决方案外观如下:


注意:App\ViewModels 下的 shell.js 将用于定义路由。
步骤 4
生成并运行解决方案。
由于 durandalController 是默认控制器,请按以下方式浏览 URL:
网页将显示如下:

欢迎和闪烁标签是 Durandal 框架自带的。
要删除此标签,您需要注释掉 shell.js 中的以下行。
          { route: '', title:'Welcome', moduleId: 'viewmodels/welcome', nav: true },

          { route: 'flickr', moduleId: 'viewmodels/flickr', nav: true }
Using the Code
继续我们的示例应用程序。
步骤 5
在 App/views 文件夹中添加视图(home.html、menu.html、productlist.html、productdetails.html、addnewproduct.html)。
步骤 6
在 app/viewmodels 文件夹中添加与 HTML 同名的 viewmodel(例如:home.js、menu.js..)。
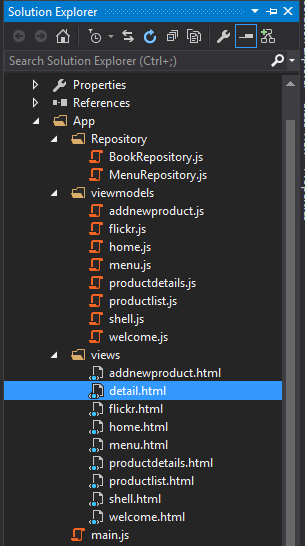
我创建了一个名为 Repository 的文件夹,它将处理数据部分,因为在此演示中我们不包含任何服务器端实现。
在 Repository 文件夹中,我创建了两个 JS 文件,名为 BookRepository.js 和 MenuRepository.js。
在 script 文件夹中,我创建了 globaldata.js 文件,我将在其中声明全局作用域变量。
并通过以下行将其捆绑到 DurandalBundle.config.cs 文件中
Include("~/Scripts/globaldata.js")
因此,我的解决方案现在显示如下:
Using the Code
获取数据
在 BookRepository.js 和 MenuRepository.js 中,我定义了一些变量和方法,我们将在应用程序的后续部分使用它们。
BookRepository.js
define(function (require) {
    return {
        _books: [
                    { id: 0, title: 'The Low Land', writter: 'Jumpa Lahiri',
                    price: '12', description: 'Test low land description' },
                    { id: 1, title: 'The Story of time being', writter: 'Ruth Ozeki',
                    price: '13', description: 'Test Story of time being description' },
                    { id: 2, title: 'Alchemist', writter: 'Paulo',
                    price: '14', description: 'Test Story of time being description' },
                    { id: 3, title: 'The Narrow Road to the Deep North',
                    writter: 'Richard Flanagan', price: '10',
                    description: 'Test Narrow Road to the Deep North description' },
                    { id: 4, title: 'Luminaries', writter: 'Eleanor Catton',
                    price: '11', description: 'Test Luminaries description' },
                    { id: 5, title: 'Sense of an Ending', writter: 'Julian Barnes',
                    price: '12', description: 'Test Sense of an Ending description' } ],

        listBooks: function () { return this._books; },
        getBooksById: function (id) {
            for (var i = 0; i < this._books.length; i++) {
                if (this._books[i].id == id) {
                    return this._books[i];
                    break;
                }
            }
        }
    };
});
MenuRepository.js
define(function () {
    return {
        _menusItems: {
            menu: [
                    { name: 'Home', link: '0', sub: null },
                    {
                        name: 'Products', link: '1',
                                          sub: [{ name: 'List of Products', sub: null },
                                          { name: 'Register New Product', sub: null },
                                          { name: 'Enquiry Product', sub: null }]
                    },
                    {
                        name: 'About US', link: '2', sub: [{ name: '', sub: null },
                                                         { name: '', sub: null }]
                    },
                    {
                        name: 'Contact', link: '3',
                                          sub: [{ name: 'Corporate Office', sub: null },
                                          { name: 'Home Office', sub: null }]
                    }
            ]
        },
        menuItems: function () { return this._menusItems; }
    }
})
步骤 7
现在我们将处理菜单视图模型。
由于我们从 MenuRepository.js 获取菜单数据,因此要获取菜单视图模型中的菜单数据,首先需要加载 MenuRepository,我们通过将其声明在 define 框内来做到这一点,例如:
define(['Repository/MenuRepository'], function (mRepository)
通过这样做,我们可以访问 MenuRepository.js 的变量和函数到此页面。
我们将菜单数据存储在此可观察数组中,并将其绑定到视图。
因此,相应的数据将显示在网页上。
Menu.js
define(['Repository/MenuRepository'], function (mRepository) {
    var menuConstructor = function () {
        var self = this;
        g_menuItemObservable = ko.observable("");
        self.menuItems = ko.observableArray([]);
        self._menus = [];
        self.getMenu = function () {
            self._menus = mRepository.menuItems();
        }
        self.attached = function (view) {
            self.getMenu();
            self.menuItems(self._menus.menu);
        }
    }
    return new menuConstructor();
})
Menu.html
<div class="menu-style" style=" height:80%; width:70%; margin-left:10%; margin-top:2%;">
    <nav class="navbar navbar-inverse">
        <div class="container-fluid">
            <div>
                <ul class="nav navbar-nav" data-bind="foreach:menuItems">
                    <li class="dropdown">
                        <a class="dropdown-toggle"
                        data-toggle="dropdown" data-bind="text:name"></a>
                        <ul class="dropdown-menu" data-bind="foreach: sub">
                            <li data-bind="text:name"></li>
                        </ul></li>
                </ul>
            </div></div>
    </nav>
</div>
视图模型遵循一些生命周期。在这里,我根据需要使用组合生命周期(activate\attach)。
有关生命周期,请参阅 Durandal docs.link(http://durandaljs.com/documentation/Hooking-Lifecycle-Callbacks.html)。
同样,我们将创建 productlist 视图和视图模型。
Productlist.js
define(['Repository/BookRepository'], function (repository) {
   var productConstructorViewModel;
   var productConstructor = function () {
       var self = this;
       productDetailObservable = ko.observable("");
        self.products = ko.observableArray([]);
        self._products = []
        self.getProducts = function () {
            self._products = repository.listBooks();
            self.products(self._products);
        };
        self.activate = function (data) {
            self.getProducts();
        }
        self.removeProfile = function (list) {
            if (confirm("Are you sure you want to delete this profile?")) {
                self.products.remove(list);
            }
        }
        self.editProfile = function (list) {
            // Implement your logic
        }
        self.getList = function (data, event) {
            g_productID = data.id;
            $('#divProductdetails').css("display", "block");
        }
     }
    return new productConstructor();
})
Productlist.html
<div><div>
        <table class="table table-striped table-bordered table-condensed" >
            <tr><th>Title</th><th>Author</th></tr>
            <tbody data-bind="foreach:products">
                <tr><td><a data-bind="text:title"></a></td>
                    <td data-bind="text:writter"></td>
                    <td><button class="btn btn-mini btn-danger"
                    data-bind="click: function(data, event) {$root.getList(data, event);
                    return true;}">Details</button></td>
                    <td><button class="btn btn-mini btn-danger"
                    data-bind="click: $parent.removeProfile">Remove</button></td>
                    <td><button class="btn btn-mini btn-danger"
                    data-bind="click: $parent.editProfile">Edit</button></td></tr>
            </tbody>
        </table>
    </div>
现在,我将把菜单与 home 绑定,并将 productlist 与菜单绑定。
在这里,我们使用了一个重要的 knockout 绑定概念,称为 compose。
Home.js
define([], function () {
    var homeconstructorViewModel;
    homeconstructorViewModel = function () {
        self = this;
        self.menuItemObservable = ko.observable("");
        self.categories = ["Product List"];
        self.productListObservable = ko.observable("");
        self.loadProductList = function (data, event) {
            self.productListObservable({ view: 'views/productlist.html',
                                         model: 'viewmodels/productlist' });
            $('#divProducts').css("display", "block")
        }
        $(document).on("click", ".dropdown-menu li", function (e) {
            var ctrl = $(this).text();
            if (ctrl == "List of Products") {
                self.menuItemObservable({ view: 'views/productlist.html',
                                          model: 'viewmodels/productlist' })
            }
            if (ctrl == "Register New Product") {
                self.menuItemObservable({ view: 'views/addnewproduct.html',
                                          model: 'viewmodels/addnewproduct' })
            }
        })
    }
    return homeconstructorViewModel;
});
Home.html
<div>
    <div style="height:80%; width:70%"><div>
            <div data-bind="compose:
                         { model:'viewmodels/menu', view:'views/menu.html'}">
            </div> </div>    </div>
    <div>
        <div id="divMenuItemBody" style="margin-left:10%;
                                  margin-top:2%; width:70%; height:40%">
            <div data-bind="compose: menuItemObservable" style="height:100%;"></div>
        </div> </div>
</div>
在这里,在 HTML 中,您可以看到我使用了两个 data-bind。在第一种情况下,compose 使用 静态 定义的视图和视图模型,而在第二种情况下,它是一个可观察对象,每当可观察变量值更改时,它会动态加载视图/视图模型(请在 home.js 中查看)。
我还通过使用相同的逻辑设计了其余页面,您可以下载示例进行查看。
步骤 8
现在让我们转向路由部分。
我希望在页面加载时浏览主页,因此将在 shell.js 文件中定义路由如下:
{ route: 'home', title: 'Demo', moduleId: 'viewmodels/home', nav: true }
关注点
在本文中,我们讨论了如何在 Web 应用程序中使用 Durandal。
我写这篇文章时考虑到了初学者。
希望本文对您有所帮助。
源代码
我已将此示例项目与本文一起上传,其中包含更多功能。您可以下载此示例代码,以便更好地理解这些概念和进一步的实现。
使用以下 URL 运行应用程序。
XXXX 是您本地系统上应用程序运行的端口号。
历史
- 2016 年 1 月 7 日:初始版本