
使用 Scaffolding 和 Entity Framework 进行 CRUD
4.96/5 (16投票s)
在本文中,我们将详细介绍如何使用脚手架创建一个简单的学生主数据 CRUD(创建/读取/更新和删除)操作。
引言

什么是脚手架?
使用脚手架进行 CRUD 操作非常简单。是的,脚手架会自动为控制器和视图生成代码,用于执行我们的 CRUD 操作,只需选择我们的 MVC 模型和 DBContext。它通过消除编写创建 CRUD 页面的单行代码的需要,为开发人员节省了时间。脚手架将使用模型和我们的 DBContext 为我们的 CRUD 操作生成自动代码。在本文中,我们将详细介绍如何在我们的项目中为我们的学生主数据 CRUD 添加脚手架。
参考
必备组件
- Visual Studio 2015:您可以从这里下载。
- ASP.NET 5 /Core 1.0:从该链接下载 ASP.NET 5 RC https://get.asp.net/
Using the Code
安装完 Visual Studio 2015 和 ASP.NET 5 后,单击“开始”,然后单击“程序”,选择“Visual Studio 2015” -- 单击“Visual Studio 2015”。单击“新建”,然后单击“项目”,选择“Web”,然后选择“ASP.NET Web Application”。输入您的项目名称,然后单击“确定”。

在 ASP.NET 5 模板下选择 Web 应用程序,然后单击“确定”。

创建数据库
我们将使用我们的 SQL Server 数据库进行 CRUD 操作。首先,我们创建一个名为 StudentsDB 的数据库和一个名为 StudentMaster 的表。这是创建数据库表和在表中插入样本记录的 SQL 脚本。
USE MASTER

GO

-- 1) Check for the Database Exists .If the database is exist then drop and create new DB

IF EXISTS (SELECT [name] FROM sys.databases WHERE [name] = 'StudentsDB' )

DROP DATABASE StudentsDB
GO

CREATE DATABASE StudentsDB
GO

USE StudentsDB

GO

-- 1) //////////// StudentMasters

IF EXISTS ( SELECT [name] FROM sys.tables WHERE [name] = 'StudentMasters' )

DROP TABLE StudentMasters
GO

CREATE TABLE [dbo].[StudentMasters](
        [StdID] INT IDENTITY PRIMARY KEY,
        [StdName] [varchar](100) NOT NULL,
        [Email]  [varchar](100) NOT NULL,
        [Phone]  [varchar](20) NOT NULL,
        [Address]  [varchar](200) NOT NULL
)

-- insert sample data to Student Master table
INSERT INTO [StudentMasters]   ([StdName],[Email],[Phone],[Address])
     VALUES ('Shanu','syedshanumcain@gmail.com','01030550007','Madurai,India')

INSERT INTO [StudentMasters]   ([StdName],[Email],[Phone],[Address])
     VALUES ('Afraz','Afraz@afrazmail.com','01030550006','Madurai,India')


INSERT INTO [StudentMasters]   ([StdName],[Email],[Phone],[Address])
     VALUES ('Afreen','Afreen@afreenmail.com','01030550005','Madurai,India')

       select * from [StudentMasters]

要将默认连接字符串更改为我们的 SQL 连接,请打开“appsettings.json”文件。是的,这是一个 JSON 文件,默认情况下此文件看起来像下面的图片。

现在,默认连接字符串将类似于此
"ConnectionString": "Server=(localdb)\\mssqllocaldb;Database=aspnet5-MYASP.NET5DemoTest-afb3aac0-d181-4278-8436-cafeeb5a8dbf;
Trusted_Connection=True;MultipleActiveResultSets=true"
现在,我们将它更改为我们的 SQL 连接,如下所示
"ConnectionString":  "Server=YourSQLSERVERNAME;Database=StudentsDB;user id=SQLID;password=SQLPWD;
Trusted_Connection=True;MultipleActiveResultSets=true;"
在这里,您可以根据您的 SQL 连接进行更改并保存“appsettings.json”文件。更新后的 JSON 文件将如下所示

创建我们的模型
我们可以通过在我们的 Model 文件夹中添加一个新的类文件来创建一个模型。

右键单击 Models 文件夹,然后单击“添加新项”。选择“类”,并将类名输入为“StudentMasters.cs”。

在这里,我们的类将看起来像下面的图片。在这里,我们将添加我们的模型字段属性。

使用 System.ComponentModel.DataAnnotations 添加头文件;并将所有表字段名作为属性添加到此 model 类中,如下所示
using System;
using System.Collections.Generic;
using System.Linq;
using System.Threading.Tasks;
using System.ComponentModel.DataAnnotations;

namespace MYASP.NET5DemoTest.Models
{
    public class StudentMasters
    {
               [Key]
               public int StdID { get; set; }

               [Required]
               [Display(Name = "Name")]
               public string StdName { get; set; }

               [Required]
               [Display(Name = "Email")]
               public string Email { get; set; }

               [Required]
               [Display(Name = "Phone")]
               public string Phone { get; set; }

               public string Address { get; set; }
       }
}
现在,我们已经创建了我们的模型;下一步是为我们的模型添加 DBContext。
创建 DbContext
现在,我们需要为我们的 Entity Framework 创建一个 DBContext。与 Model Class 相同;向我们的 Models 文件夹添加一个新类。
右键单击 Models 文件夹,然后单击“添加新项”。选择“类”,并将类名输入为“StudentMastersAppContext.cs”。

在这里,我们的类将看起来像下面的屏幕截图

现在,我们首先需要使用 Microsoft.Data.Entity 添加 Entity Framework 的头文件;
接下来,将 DbContext 继承到我们的类中,然后像下面的代码一样创建 DBContext 的对象。
using System.Collections.Generic;
using System.Linq;
using System.Threading.Tasks;
using Microsoft.Data.Entity;

namespace MYASP.NET5DemoTest.Models
{
    public class StudentMastersAppContext : DbContext
       {
               public DbSet<StudentMasters> Students { get; set; }
       }
}
现在,我们可以创建我们的 DB context,下一步是为我们的 Entity Framework 添加一个 Service。
在 Startup.cs 中添加 Entity Framework Service
接下来,我们需要在 Startup.cs 中添加我们的 Entity Framework service。我们可以在解决方案资源管理器中找到 Startup.cs 文件。

打开 Startup.cs 文件,我们可以看到默认情况下 ApplicationDBContext 将在 ConfigureServices 方法中添加。
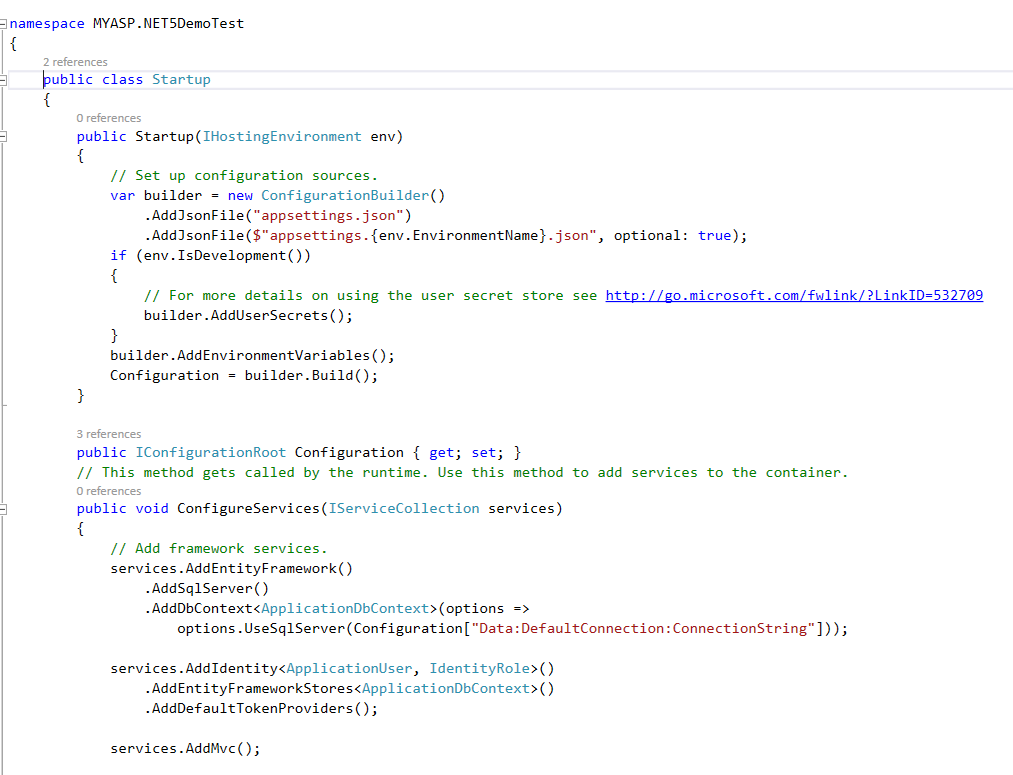
现在,我们可以像下面的代码一样为我们的 StudentMastersAppContext 添加另一个 DBContext
// Add Entity Framework
                      services.AddEntityFramework()
                     .AddSqlServer()
                     .AddDbContext<StudentMastersAppContext>(options =>
                       options.UseSqlServer
                       (Configuration["Data:DefaultConnection:ConnectionString"]));
在 ConfigureServices 方法中,我们添加如下代码
public void ConfigureServices(IServiceCollection services)
        {
            // Add framework services.
            services.AddEntityFramework()
                .AddSqlServer()
                .AddDbContext<ApplicationDbContext>(options =>
                    options.UseSqlServer
                    (Configuration["Data:DefaultConnection:ConnectionString"]));

            services.AddIdentity<ApplicationUser, IdentityRole>()
                .AddEntityFrameworkStores<ApplicationDbContext>()
                .AddDefaultTokenProviders();

            services.AddMvc();

                      // Add Entity Framework
                      services.AddEntityFramework()
                                 .AddSqlServer()
                                 .AddDbContext<StudentMastersAppContext>(options =>
                        options.UseSqlServer
                        (Configuration["Data:DefaultConnection:ConnectionString"]));

                      // Add application services.
                      services.AddTransient<IEmailSender, AuthMessageSender>();
            services.AddTransient<ISmsSender, AuthMessageSender>();
        }
下一步是添加脚手架。
添加脚手架
要添加脚手架,请右键单击 Controller 文件夹,然后单击“添加”->“新建脚手架项”。

选择带有视图的 MVC 6 控制器,使用 Entity Framework,然后单击“添加”。

现在,我们需要选择我们新创建的模型类和我们的数据上下文类。
模型类:在 Model Class 中,选择我们创建的 Model Class,名为“StudentMasters”。
数据上下文类:在 Data Context 中,选择我们创建的 DBContext class,名为“StudentMastersAppContext”。

是的,我们现在已经完成了。我们将在 Controllers 文件夹中看到一个名为“StudentMastersController.cs”的新 Controller 类。

我们可以看到这个“StudentMastersController.cs”控制器类将包含我们 Student Master CRUD 操作的自动生成代码。

在 Views 文件夹中,我们可以看到为我们的 CRUD 操作自动生成的 StudentMasters 视图。在这里,我们无需为 CRUD 操作编写任何代码。但是,如果需要,我们可以自定义此控制器和视图。

是的,现在一切都完成了,我们只需要运行我们的应用程序,就可以创建/编辑/删除和查看学生主数据。
添加学生菜单
在此之前,我们必须创建一个新菜单来查看我们的 Students 页面。
要添加菜单,请单击 Views Folder -> 打开 Shared Folder 并打开 layout.cshtml 页面。

在 layout.cshtml 文件中,我们可以找到以下代码
<div class="navbar-collapse collapse">
      <ul class="nav navbar-nav">
          <li><a asp-controller="Home"
          asp-action="Index">Home</a></li>
          <li><a asp-controller="Home"
          asp-action="About">About</a></li>
          <li><a asp-controller="Home"
          asp-action="Contact">Contact</a></li>
       </ul>
                    @await Html.PartialAsync("_LoginPartial")

 </div>
我们可以删除 About 和 Contact 菜单,并添加我们的 Student 菜单,如以下代码所示,其中包含控制器名称
<div class="navbar-collapse collapse">
        <ul class="nav navbar-nav">
             <li><a asp-controller="Home"
             asp-action="Index">Home</a></li>
             <li><a asp-controller="StudentMasters"
             asp-action="Index">Student</a></li>
        </ul>
             @await Html.PartialAsync("_LoginPartial")
 </div>
运行程序
是的,现在一切都完成了,您简单的使用 ASP.NET 5 的 Student CRUD 操作已完成。现在按 F5 并运行项目 -- 您可以看到输出如下面的图片

在这里,我们将添加一个新的测试 student 详细信息,我们还可以看到 SQL Server 中更新的更改。

历史
- 2016/03/01:初始版本