
如何设置调试器以在进程启动时自动附加
4.95/5 (32投票s)
轻松设置调试器以在启动时附加到进程
引言
本文档介绍如何使用一个工具来设置正确的设置,以便在进程启动后、执行入口方法的第一行代码之前自动附加到该进程。
该信息仅适用于 Windows 操作系统,适用于 C、C++ 和 .NET 进程,也可能适用于任何其他技术,只要它具有允许从 Visual Studio 进行调试的扩展,并且它在进程的上下文中运行而不是作为脚本运行。
背景
在日常工作中,有时需要调试进程启动时最先运行的代码,而等到进程启动后再附加就太晚了。
实际的设置是通过注册表项来完成的,有关更多信息可以在 Microsoft 网站上找到,但每次为每个进程设置它是一项繁琐而常规的操作,所以我写了一个工具来自动化这个过程,使事情变得容易得多(https://msdn.microsoft.com/en-us/library/a329t4ed(v=vs.90).aspx)。
手动配置以在进程启动时自动启动调试器
根据上面的 Microsoft 链接,为了在您想要调试的进程启动时自动启动调试器,您需要在 HKEY_LOCAL_MACHINE\Software\Microsoft\Windows NT\currentversion\image 文件执行选项下创建一个以进程名称(包括扩展名)命名的注册表项。
在该项下,您需要创建一个名为“debugger”的字符串值,其值应为 vsjitdebugger.exe(用于 Visual Studio)或指向另一个可用的调试器(如 Windbg)的路径。
例如,为了在 AppForTest.exe 进程启动时启动调试器,您需要如下所示的注册表项:

使用工具
与手动为每个需要调试的进程启动时配置上述项和值不同,附件中的工具正是执行上述操作,使您无需手动打开和编辑注册表设置。
下载附件的 SetAutoAttachToProcess.zip 后,解压缩并运行 SetAutoAttachToProcess.exe。
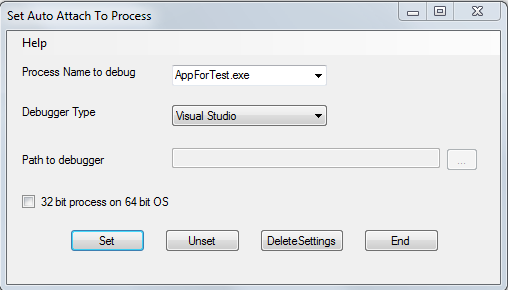
将显示如下对话框:

要使调试器在进程启动时附加,您应该键入进程名称,可以带或不带扩展名。
在 Debugger Type(调试器类型)中,您可以选择 Visual Studio 或 Windbg。如果选择 Windbg,则需要浏览到 windbg.exe 的路径并选择它。(对于 VS,无需输入路径。)
如果使用的 Windows 操作系统是 64 位,而被调试的进程是 32 位,则选中“32 bit process on 64 bit OS”(64 位操作系统上的 32 位进程)复选框。
单击 Set(设置)以应用所需的注册表设置,这样下次启动进程时,将发生以下情况:
- 如果选择了 Visual Studio,将弹出一个对话框,让您选择正确的调试器来调试进程代码。为了在进程的主函数处调试代码,最好打开一个带有要调试代码的 Visual Studio 实例,并在启动进程时被提示时选择该实例。
- 如果您选择了 Windbg,那么当进程启动时,Windbg 将打开并运行该进程,在调用主函数之前停止,以便您可以调试它。
要清除设置,使进程能正常启动,您有 2 种选择:
- 单击 Unset(取消设置),它不会删除进程的注册表项,只会删除 Debugger 条目。
- 单击 Delete Settings(删除设置),它将删除进程的注册表项(最推荐的选项)。
此外,该工具还将使用的进程历史记录保存在一个名为 ProcessAutoAttachList.xml 的文件中,该文件位于进程的同一文件夹下,这样下次打开工具时,您就可以从历史记录中选择条目。
要清除历史记录,可以删除该文件。
用于设置/取消设置注册表项的代码
下面 `RegUpdater` 类中有三个方法,用于设置/取消设置和删除注册表项。
setDebugRegKey- 用于创建所需的注册表项,并根据用户选择添加具有 Visual Studio 或 Windbg 正确值的调试器string值。unSetDebugRegKey- 用于取消设置调试器以自动附加到进程。这是通过删除调试器string值来实现的。deleteKey- 用于删除在单击 Set 按钮时创建的项。
class RegUpdater
    {
        private const string regDebugParentKey64BitOS =
        @"SOFTWARE\Wow6432Node\Microsoft\Windows NT\CurrentVersion\Image File Execution Options";
        private const string regDebugParentKey32BitOS =
        @"SOFTWARE\Microsoft\Windows NT\CurrentVersion\Image File Execution Options";
        private readonly string regDebugParentKey = regDebugParentKey32BitOS;
        private const string debuggerValue = "Debugger";
        private const string moduleExtension = ".exe";

        private const string VSDebugger = "Visual Studio";

        private const string vsJITpath = @"%windir%\system32\vsjitdebugger.exe" ;

        public RegUpdater(bool is64BitOS)
        {
            if (is64BitOS)
                regDebugParentKey = regDebugParentKey64BitOS;
        }

        public string ProcessName
        {
            get { return processName; }
            set
            {
                if (value.EndsWith(moduleExtension, StringComparison.CurrentCultureIgnoreCase))
                    processName = value;
                else
                {
                    processName = value + moduleExtension;
                }
            }
        }

        public string DebuggerPath
        {
           get { return debuggerPath; }
            set
            {
                if (debuggerType == VSDebugger)
                {
                    debuggerPath = Environment.ExpandEnvironmentVariables(vsJITpath);
                }
                else
                {
                    if (!String.IsNullOrEmpty(value))
                    {
                        if (!File.Exists(value))
                        {
                            throw new Exception("Please enter a valid path to windbg");
                        }
                        debuggerPath = value;
                    }
                    else
                    {
                        throw new Exception("Please enter a valid path to windbg");
                    }
                }
            }
        }

        private string processName;
        private string debuggerPath;
        private string debuggerType = VSDebugger;

        public string DebuggerType
        {
            get { return debuggerType; }
            set { debuggerType = value; }
        }


        public bool setDebugRegKey()
        {
            bool retVal = false;
            if(string.IsNullOrEmpty(processName) || string.IsNullOrEmpty(debuggerPath))
            {
                throw new Exception("Please enter the process name and debugger path");
            }
            RegistryKey key = null;
            try
            {
                key = Registry.LocalMachine.OpenSubKey(regDebugParentKey, true);
                if (key != null)
                {
                    RegistryKey SubKey = key.CreateSubKey(processName);
                    if(SubKey != null)
                    {
                        SubKey.SetValue(debuggerValue, debuggerPath);
                        retVal = true;
                    }
                }

            }
            catch (Exception ex)
            {
                throw new Exception
                (string.Format("Failed to set registry value. Reason = {0}", ex.Message));
            }
            return retVal;
        }


        public bool unSetDebugRegKey()
        {
            bool retVal = false;
            if (string.IsNullOrEmpty(processName))
            {
                throw new Exception("Please enter the process name");
            }
            RegistryKey key = null;
            try
            {
                key = Registry.LocalMachine.OpenSubKey
                (regDebugParentKey + @"\" + processName, true);
                if (key != null)
                {
                    key.DeleteValue(debuggerValue);
                    retVal = true;
                }
            }
            catch (Exception ex)
            {
                throw new Exception(string.Format
                ("Failed to unset registry value. Reason = {0}", ex.Message));
            }
            return retVal;
        }

        public bool deleteKey()
        {
            bool retVal = false;
            if (string.IsNullOrEmpty(processName))
            {
                throw new Exception("Please enter the process name");
            }
            RegistryKey key = null;
            try
            {
                key = Registry.LocalMachine.OpenSubKey(regDebugParentKey, true);
                if (key != null)
                {
                    key.DeleteSubKey(processName);
                    retVal = true;
                }
            }
            catch (Exception ex)
            {
                throw new Exception(string.Format
                ("Failed to delete registry key. Reason = {0}", ex.Message));
            }
            return retVal;
        }
    }
使用示例
在本例中,我将演示如何为 AppForTest.exe 进程设置自动调试器启动。
- 将“Process Name to debug”(要调试的进程名称)的值设置为 AppForTest.exe,如下所示:
- 单击 Set 按钮,您将看到下面的对话框,显示成功状态:

如果您使用 regedit 打开注册表,您将看到创建了 AppForTest.exe 注册表项,并带有相关的调试器 string 值设置:

从那时起,如果您启动 AppForTest.exe,您将被提示选择一个调试器来使用,如下所示:

选择要使用的实例后,假设您已在所选调试器中打开了需要调试的代码,并在其中设置了断点,那么进程将继续执行,并在调试器中的断点处停止。
请注意,此设置仅适用于在交互用户会话下运行的进程。
如果您设置启动会话 0 下运行的进程/会话的调试器,您将无法看到调试器提示,除非“Interactive Services Detection”(交互式服务检测)Windows 服务正在运行。
要恢复为不带调试器运行进程,请单击“Delete Settings”(删除设置),成功后将删除上面创建的注册表项。
您将收到提示接受删除,如下所示:

单击 Yes(是)后,将打开下面的对话框,显示删除成功的状态:

成功后,AppForText.exe 项将从 HKEY_LOCAL_MACHINE\Software\Microsoft\Windows NT\currentversion\image 文件执行选项中删除。
故障排除
如果您将调试器设置为自动附加到进程,但在进程启动时看到下面的对话框,您的进程被卡住而不是看到附加调试器的提示,如下所示:
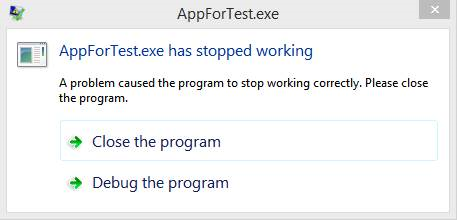
使用 regedit 打开注册表,然后转到 HKEY_LOCAL_MACHINE\SOFTWARE\Microsoft\Windows NT\CurrentVersion\AeDebug 键。
- 如果存在名为“
Auto”的字符串值且其值为0,请将其设置为1。 - 如果不存在“
Auto”值,请添加新的字符串值,将其命名为Auto,值为1。
再次运行进程,这次您应该会收到附加调试器到进程的提示。
对于 64 位操作系统上的 32 位进程,遵循相同的设置,但在 HKEY_LOCAL_MACHINE\SOFTWARE\Wow6432Node\Microsoft\Windows NT\CurrentVersion\AeDebug 键下。
有关 AeDebug 配置的更多信息:https://technet.microsoft.com/en-us/library/cc939483.aspx
历史
- 2016 年 4 月 6 日:初始版本