
WPF 向导的另一种方式
任何足够先进的技术通常都会被视为“魔法”。
引言
本文介绍了我对 WPF 向导控件的实现。我知道已经有其他一些尝试来创建(其中一些就在 CodeProject 上),但在我看来,有更多选择并没有什么坏处。
背景
这是我似乎永无止境的真实编程示例系列中的又一篇,在这里,我不是讲解理论和对新功能或新范式的华丽赞美,而是展示了对旧知识的实际应用。这段代码唯一的新颖之处在于,它以前可能从未以这种形式组合在一起。如果命运真的存在,微软很快就会完全放弃对 WPF 的支持。他们总是对我不情愿采纳的技术这样做,尤其是当我等待了必要的 5-8 年才让该技术成熟之后。
源代码中有几个扩展类与向导无关,但它们在我工作中编写的实际应用程序中存在。我把它们留在了那里,以防有人觉得它们有用。
最后,我知道我做事的方式可能与你做事的方式完全不同。关于风格或代码中移动位置的评论,因为“那是你做事的方式或地点”,将不予理睬(如果我读到你的评论时心情特别糟糕,则会遭到嘲笑),除非它能提供代码功能的实际改进。
假设
本文不适合新手阅读。它假定读者对 .NET 和 C# 有透彻的了解,并且对 WPF 有相当完整的实践知识。如上所述,我不是来讨论理论或最佳实践的。我是来分享我为实际应用程序编写的一些代码的。如果你想了解深奥的原理,Google 是你的朋友。毕竟,我是这样学会这些东西的(嗯,还有我明显的疯狂开发技能)。
代码
一些友好的提示
- 在撰写本文时,我决定重构代码的一些次要方面,这些重构可能没有进入本文的最终版本(但它们对文章本身没有实际影响)。
- 为了减少混乱,本文文本中删除了实际源代码中的注释。
- 本节中的讨论不包括强制代码支持演示模式的编译器指令。
该向导包含以下主要组件
CtrlWizard- 表示向导的用户控件WizardConfig- 向导的配置对象WizardPageBase- 所有向导页面的抽象基类WizardWindowBase- 包含CtrlWizard对象的向导窗体的抽象基类WizardSharedData/WizardSharedDataItem- 可用于存储在向导页面、父窗体和向导控件之间共享的数据的对象WizardConfig- 包含向导的配置选项
WizardConfig
为了有效地配置向导控件,我觉得一个包含适当设置属性的配置对象是个好主意。这个类继承自另一个派生自 INotifyPropertyChanged 的类。我考虑到这是一个 WPF 程序集,即使它在本质上不是必需的,因为它只在创建向导窗体时配置一次,所以使其可通知实际上有点多余(但看看你还能使用哪些巧妙的附加代码)。由于这个类只是一个属性包,我只列出属性、它们的用途和默认值。
| 属性名称 | 默认值 | 描述 |
ShowNavPanel | true | bool - 获取/设置导航面板(包含列表框)的显示状态(开/关)。 |
ShowContentBanner | true | bool - 获取/设置标题横幅的显示状态(开/关)。 |
ShowReset | true | bool - 获取/设置重置按钮的显示状态(开/关)。 |
ShowPrev | true | bool - 获取/设置上一个按钮的显示状态(开/关)。 |
ShowNext | true | bool - 获取/设置下一个按钮的显示状态(开/关)。 |
ShowFinish | true | bool - 获取/设置完成按钮的显示状态(开/关)。 |
ShowCancel | true | bool - 获取/设置取消按钮的显示状态(开/关)。 |
ShowBannerImage | false | bool - 获取/设置横幅图像的显示状态(开/关)。 |
ShowPage1OfN | false | bool - 获取/设置“第 N 页共 N 页”标题文本的显示状态(开/关)。 |
NavListWidth | 150 | double - 获取/设置导航 ListBox 的宽度。 |
ContentBannerHeight | 40 | double - 获取/设置标题横幅的高度。 |
BannerBackgroundColor | Colors.LightSteelBlue | Color - 获取/设置横幅/按钮面板背景的颜色。 |
BannerBorderColor | Colors.SteelBlue | Color - 获取/设置横幅/按钮面板边框的颜色。 |
BannerTiitleColor | Colors.Black | Color - 获取/设置横幅/按钮面板标题文本的颜色。 |
BannerSubtitleColor | Colors.Black | Color - 获取/设置横幅/按钮面板副标题文本的颜色。 |
ColorBannerBackground | N/A | SolidColorBrush - 获取横幅/按钮面板背景的画刷(基于 BannerBackgroundColor)。 |
ColorBannerBorder | 不适用 | SolidColorBrush - 获取横幅/按钮面板边框的画刷(基于 BannerBorderColor)。 |
ColorBannerTitle | N/A | SolidColorBrush - 获取横幅标题的画刷(基于 BannerTitleColor)。 |
ColorBannerSubtitle | N/A | SolidColorBrush - 获取横幅副标题的画刷(基于 BannerSubtitleColor)。 |
BannerBorderThicknessValue | 2 | double - 设置横幅/按钮面板边框的厚度。 |
BannerTextAlignment | HorizontalAlignment.Left | HorizontalAlignment - 设置横幅中文本的对齐方式。 |
BannerImageAlignment | HorizontalAlignment.Right | HorizontalAlignment - 设置横幅中使用的图像的对齐方式。 |
页数 | null | ObservableCollection<WizardPageBase> - 包含向导页面。 |
BannerImageFilePath** | string.Empty | string - 设置横幅中使用的图像的路径。这是在代码中完成的,以便可以从所需的程序集资源加载图像。 |
- (** 未在向导控件本身中绑定。)
WizardSharedData/SharedDataItem
实例化向导时,会创建一个对象,允许程序员存储可由其他页面、控件本身和父窗口访问的数据。我添加这个是因为在我迄今为止所有的向导中,页面都被设计用来修改单个视图模型项的不同方面。
它是一个简单的 ObservableCollection 项,程序员可以将对象添加到其中。它没什么特别的,除了你可以把它看作是一种 Session 变量,就像你在 Web 应用程序中拥有的那样,没有太多值得讨论的地方。

WizardPageBase
这个类是一个抽象基类,你所有的向导页面都必须从它派生。WizardPageBase 派生自 UserControl,因为它总是由一个 CtrlWizard 对象(它本身是一个 UserControl 派生对象)包含。它也派生自 INotityPropertyChanged(并实现了所需的接口组件),以便绑定在 SharedData 集合中包含的对象上。
你可能已经猜到,构造函数只是执行一些基本的初始化,以及一些合理性检查。由于我们可能尚未创建父向导控件,因此我们将该值设置为 null。然后我们为控件的 IsVisibleChanged 事件创建一个处理程序。因为我是手动创建这个事件处理程序的,所以我使用析构函数在页面被处置时将其解除挂钩。我不知道 .NET 是否已更新为我完成此操作,但旧习惯难以改变,而且,你永远不可能太安全。对吗?
public WizardPageBase(string pageName, string shortName, string subtitle)
{
    if (string.IsNullOrEmpty(pageName.Trim()))
    {
        throw new ArgumentNullException("The pageName must be specified.");
    }
    if (string.IsNullOrEmpty(shortName.Trim()))
    {
        throw new ArgumentNullException("The shortName must be specified.");
    }
    this.PageName  = pageName;
    this.ShortName = shortName;
    this.Subtitle  = subtitle;
    this.IsVisibleChanged += UserControl_IsVisibleChanged;
}

~WizardPageBase()
{
	this.IsVisibleChanged -= UserControl_IsVisibleChanged;
}
这让我们来到了该类中唯一的抽象方法。我们拥有这个方法的原因是所有页面都在创建向导控件时实例化,并且因为所有向导页面实际上都是 UserControl 对象,所以可能在页面实际可见之前不执行某些特定于应用程序的处理。此方法允许程序员执行所述处理。由于该方法是抽象的,因此它必须在继承类中实现。
protected abstract void OnVisibleChanged();
其他方法
以下所有方法都是虚拟的,因为它们在您自己的向导页面中不是必需的,但仍可以在特定时间调用以执行处理。
UpdateButtons()- 此方法旨在根据查看页面时发生的某些情况(通常由用户与向导页面中的控件交互引起)更新父向导控件中的按钮。这是向导页面中最常重写的方法。Reset()- 当用户单击重置按钮时,向导控件会调用此方法。
public virtual void UpdateButtons()
{
	if (this.ParentWiz == null)
	{
		throw new Exception("Parent wizard control has not been specified.");
	}
}

public virtual void Reset()
{
}
还有几个事件处理程序。
ButtonClick()- 此事件处理程序处理控件向导控件按钮面板中按钮的所有点击。基类中此方法的主体包含您自己派生类中的用法示例。UserControl_IsVisibleChanged- 此事件处理程序仅调用派生类中重写的OnVisiblityChange方法。
public virtual void ButtonClick(object sender, ref RoutedEventArgs e)
{
}

protected virtual void UserControl_IsVisibleChanged
    (object sender, DependencyPropertyChangedEventArgs e)
{
	this.OnVisibleChanged();
}
属性
| 属性名称 | 描述 |
ParentWiz | CtrlWizard - 包含此页面的向导控件 |
PageName | string - 页面的名称(显示在向导标题横幅中) |
ShortName | string - 简称。这旨在成为一个唯一的名称(不区分大小写),以便在使用下一个/上一个按钮进行条件处理时轻松识别页面。 |
ParentWizardWindow | Window - 包含父向导控件的父窗口。 |
Subtitle | string - 显示在标题横幅中的(可选)副标题。如果未为页面指定副标题文本,则向导上的 UI 元素将折叠,以允许主标题的正确放置。 |
PrevPage | virtual string - 用户导航到当前页面的页面的 ShortName。这由向导控件作为下一个按钮的正常处理的一部分进行设置。向导页面本身不应设置此属性。 |
NextPage | virtual string - 用户点击“下一步”按钮时将导航到的页面的 ShortName。仅当程序员希望根据当前页面中满足的某些条件导航到特定页面时才需要设置此属性。 |
SharedData | WizardSharedData - 从父向导控件获取当前共享数据对象。 |
WizardWindowBase
这个类是一个抽象基类,你的向导窗体必须从它派生。WizardWindowBase 派生自 Window。除非另有说明,否则此类的所有方法和事件处理程序都是 virtual。
初始化
此类的构造函数实例化页面集合和 WizardConfig 对象。
public WizardWindowBase()
{
	this.Pages     = new ObservableCollection<wizardpagebase>();
	this.WizConfig = new WizardConfig();
}
方法
InitWizard()- (abstract)方法,在此方法中应实例化页面并进行向导配置。此方法必须在派生类中重写。ConfigureWizard()- 此方法实例化向导,从向导中检索按钮(以便以后简化输入),设置事件处理程序,并调用将向导控件添加到窗体的方法。AddToUI()- 将指定的页面添加到向导控件,并将控件添加到窗体。SetupEvents()- 为“完成”、“取消”和“重置”按钮添加事件处理程序。
protected abstract void InitWizard();

protected virtual void ConfigureWizard(Grid grid)
{
	this.WizConfig.Pages = this.Pages;

	this.Wizard          = new CtrlWizard(this.WizConfig);

	this.wizBtnFinish    = (Button)(this.Wizard.finishButtonPanel.Children[0]);
	this.wizBtnCancel    = (Button)(this.Wizard.cancelButtonPanel.Children[0]);
	this.wizBtnReset     = (Button)(this.Wizard.resetButtonPanel.Children[0]);
	this.wizBtnNext      = (Button)(this.Wizard.nextButtonPanel.Children[0]);
	this.wizBtnPrevious  = (Button)(this.Wizard.prevButtonPanel.Children[0]);

	this.SetupEvents();
	this.AddToUI(grid);

	this.isInitialized = true;
}

protected virtual void AddToUI(Grid grid)
{
	foreach(WizardPageBase page in this.Wizard.Pages)
	{
		page.ParentWiz = this.Wizard;
	}
	grid.Children.Add(this.Wizard);
}

protected virtual void SetupEvents()
{
	this.wizBtnFinish.Click += this.WizFinish_Click;
	this.wizBtnCancel.Click += this.WizCancel_Click;
	this.wizBtnReset.Click  += this.WizReset_Click;
}
事件处理程序
这些事件处理程序不言自明,但 Window_Closing 处理程序值得简要讨论。我最初打算将此代码放入类析构函数中,但由于按钮位于已销毁的子控件(向导)中,我不得不改用 Window_Closing 事件。
protected virtual void WizReset_Click(object sender, RoutedEventArgs e)
{
}

protected virtual void WizFinish_Click(object sender, RoutedEventArgs e)
{
	this.DialogResult = true;
}

protected virtual void WizCancel_Click(object sender, RoutedEventArgs e)
{
	this.DialogResult = false;
}

protected virtual void Window_Closing(object sender, System.ComponentModel.CancelEventArgs e)
{
	this.wizBtnFinish.Click -= this.WizFinish_Click;
	this.wizBtnCancel.Click -= this.WizCancel_Click;
	this.wizBtnReset.Click  -= this.WizReset_Click;
}
字段
| 字段名 | 描述 |
wizBtnFinish | Button - 完成按钮 |
wizBtnCancel | Button - 取消按钮 |
wizBtnReset | Button - 重置按钮 |
wizBtnNext | Button - 下一个按钮 |
wizBtnPrevious | Button - 上一个按钮 |
属性
| 属性名称 | 描述 |
IsValid | bool - 由向导控件初始化后设置。它只是让程序员知道一切是否正常,而不是具体哪里出了问题。通常,如果没有指定页面,或者一个或多个页面具有相同的 ShortName,则此属性将为 false。 |
页数 | ObservableCollection<wizardpagebase> - 这是在派生窗口中创建的页面列表。 |
Wizard | CtrlWizard - 这是控件向导,当派生窗口调用 ConfigureWizard 方法时实例化。 |
WizConfig | WizardConfig - 这是向导配置对象,当派生窗口调用 ConfigureWizard 方法时实例化。 |

CtrlWizard
这篇博文中的“大拿”就是它,也是我们在此的主要原因。在向导窗体的初始开发期间,我的建议是在异常的 if 语句中设置断点,这样调试器就不会在代码中其他看似奇怪的地方停止,因为此对象未正确初始化。
初始化
构造函数- 对 WizardConfig 对象和页面集合执行一些健全性检查,创建SharedData对象,并从WizardConfig对象初始化自身。InitWithConfig()- 将指定向导页面的可见性设置为Collapsed,将它们添加到向导控件的主体,并激活第一个页面。
public CtrlWizard(WizardConfig config)
{
    if (config == null)
    {
        throw new ArgumentNullException("config");
    }
    if (config.Pages == null || config.Pages.Count == 0)
    {
        throw new InvalidOperationException
            ("The WizardConfig.Pages collection cannot be null or empty.");
    }

    this.ActivePageIndex = -1;
    this.ActivePage      = null;

    this.WizConfig       = config;
    this.SharedData      = new WizardSharedData();

    this.InitializeComponent();
    this.DataContext     = this;

    this.InitWithConfig(config);
}

private void InitWithConfig(WizardConfig config)
{
    this.CanEnableFinishButton = config.ShowNavPanel;
    if (this.Pages == null)
    {
        this.Pages = new ObservableCollection<WizardPageBase>();
        foreach(WizardPageBase page in config.Pages)
        {
            this.Pages.Add(page);
            ((UserControl)(page)).Visibility = Visibility.Collapsed;
            page.ParentWiz = this;
            this.gridContentBody.Children.Add(((UserControl)(page)));
        }
        this.PageCount = this.Pages.Count;
        this.SharedData.AddUpdateItem("WizardPages", this.Pages);
    }
    this.UpdateForm(0);
}
方法
UpdatedConfig()- 使用新的配置设置更新控件UpdateForm(int newPageIndex)- 将由newPageIndex指定的页面选择为活动页面UpdateForm(string shortName)- 将由shortName指定的页面选择为活动页面UpdateButtons()- 标准按钮更新(按钮状态可根据需要在每个页面内部重写)IsLastPage()- 确定当前页面是否为最后一页(控制“完成”和“下一步”按钮的状态)IsFirstPage()- 确定当前页面是否为最后一页(控制“上一步”按钮的状态)GetCurrentPage()- 获取当前活动的WizardPage对象PagesAreDistinct()- 执行唯一页面名称的健全性检查 - 在此检查期间不考虑大小写敏感性,因为此代码旨在促进真正唯一名称的使用
public void UpdatedConfig()
{
    this.InitWithConfig(this.WizConfig);
    this.NotifyPropertyChanged("WizConfig");
}

public void UpdateForm(int newPageIndex)
{
    if (this.ActivePageIndex != newPageIndex)
    {
        if (this.ActivePage != null )
        {
            ((UserControl)(this.ActivePage)).Visibility = Visibility.Collapsed;
        }

        this.ActivePageIndex = newPageIndex;
        this.ActivePage      = this.GetCurrentPage();
        this.ActivePageName  = this.ActivePage.PageName;

        ((UserControl)(this.ActivePage)).Visibility = Visibility.Visible;
        this.lbNavigation.SelectedIndex             = this.ActivePageIndex;
        this.NotifyPropertyChanged("PageSubtitle");
        this.NotifyPropertyChanged("PageSubtitleVisibility");
        this.UpdateButtons();
    }
}

public void UpdateForm(string shortName)
{
    if (string.IsNullOrEmpty(shortName))
    {
        throw new ArgumentNullException
          ("A shortName was not returned by the current page. Navigation aborted" );
    }

    WizardPageBase newPage = this.Pages.Where(x=>x.ShortName == shortName).FirstOrDefault();
    if (newPage == null)
    {
        throw new Exception(string.Format("Could not find page '{0}'. Navigation aborted."));
    }

    WizardPageBase currentPage = this.GetCurrentPage();
    int index = this.Pages.IndexOf(newPage);
    this.UpdateForm(index);
}

public void UpdateButtons()
{
    bool isFirstPage  = this.IsFirstPage(this.ActivePage);
    bool isLastPage   = this.IsLastPage(this.ActivePage);
    bool enableFinish = ((this.WizConfig.ShowFinishButton) &&
                         (isLastPage || this.CanEnableFinishButton));

    this.btnReset.IsEnabled  = this.WizConfig.ShowResetButton  ? true : false;
    this.btnPrev.IsEnabled   = isFirstPage      ? false : true;
    this.btnNext.IsEnabled   = isLastPage       ? false : true;
    this.btnFinish.IsEnabled = enableFinish;
    this.btnCancel.IsEnabled = this.WizConfig.ShowCancelButton ? true : false;

    this.ActivePage.UpdateButtons();
}

public bool IsLastPage(WizardPageBase page)
{
    bool result = false;
    WizardPageBase last = this.Pages.Last<wizardpagebase>();
    result = (last.PageName == page.PageName && last.GetType().Name == page.GetType().Name);
    return result;
}

public bool IsFirstPage(WizardPageBase page)
{
    bool result = false;
    WizardPageBase first = this.Pages.First<wizardpagebase>();
    result = (first.PageName == page.PageName);
    return result;
}

private WizardPageBase GetCurrentPage()
{
    WizardPageBase currentPage = null;
    if (this.ActivePageIndex >= 0)
    {
        currentPage = (WizardPageBase)(this.gridContentBody.Children[ActivePageIndex]);
    }
    return currentPage;
}

private bool PagesAreDistinct()
{
    int distinct = this.Pages.DistinctBy(x=>x.ShortName).Count();
    bool result = (this.Pages.Count > 0 && distinct == this.Pages.Count);
    return result;
}

事件处理程序
lbNavigation_SelectionChanged()- 处理导航面板列表框中的选择更改。btnReset_Click()- 激活向导的第一页(父窗体负责重置与向导实例相关的应用程序数据btnPrev_Click()- 激活向导中的上一页。如果当前页面是条件导致显示的,则将选择相应的上一页。btnNext_Click()- 激活向导中的下一页。当前页面通过page.ButtonClick方法确定序列中的下一页。btnFinish_Click()- 在最后一页完成其处理(大概是通过page.ButtonClick方法保存数据)后关闭向导。btnCancel_Click()- 关闭向导。
private void lbNavigation_SelectionChanged(object sender, SelectionChangedEventArgs e)
{
    if (!e.Handled)
    {
        ListBox listbox = sender as ListBox;
        this.UpdateForm(listbox.SelectedIndex);
        e.Handled = true;
    }
}

private void btnReset_Click(object sender, RoutedEventArgs e)
{
    this.UpdateForm(0);
}

private void btnPrev_Click(object sender, RoutedEventArgs e)
{
    if (this.HasChildren)
    {
        WizardPageBase currentPage = this.GetCurrentPage();
        currentPage.ButtonClick(sender, ref e);

        if (!e.Handled)
        {
            string prevPage = currentPage.PrevPage;
            if (string.IsNullOrEmpty(prevPage))
            {
                this.UpdateForm(this.ActivePageIndex - 1);
            }
            else
            {
                this.UpdateForm(prevPage);
            }
            e.Handled = true;
        }
    }
    else
    {
        e.Handled = true;
    }
}

private void btnNext_Click(object sender, RoutedEventArgs e)
{
    if (this.HasChildren)
    {
        WizardPageBase currentPage = this.GetCurrentPage();
        currentPage.ButtonClick(sender, ref e);

        if (!e.Handled)
        {
            string nextPage = currentPage.NextPage;
            if (string.IsNullOrEmpty(nextPage))
            {
                this.UpdateForm(this.ActivePageIndex + 1);
                currentPage = this.GetCurrentPage();
                currentPage.PrevPage = string.Empty;
            }
            else
            {
                string prevPage = currentPage.ShortName;
                this.UpdateForm(nextPage);
                currentPage = this.GetCurrentPage();
                // so we can find our way back if they hit the "Prev" button
                currentPage.PrevPage = prevPage;
            }
            e.Handled = true;
        }
        else
        {
            // do we need to add any processing here?
        }
    }
    else
    {
        e.Handled = true;
    }
}

private void btnFinish_Click(object sender, RoutedEventArgs e)
{
    if (this.HasChildren)
    {
        this.GetCurrentPage().ButtonClick(sender, ref e);
        if (this.Parent is Window)
        {
            ((Window)(this.Parent)).Close();
            e.Handled = true;
        }
    }
    else
    {
        e.Handled = true;
    }
}

private void btnCancel_Click(object sender, RoutedEventArgs e)
{
    if (this.HasChildren)
    {
        this.GetCurrentPage().ButtonClick(sender, ref e);

        if (this.Parent is Window)
        {
            ((Window)(this.Parent)).Close();
            e.Handled = true;
        }
    }
    else
    {
        e.Handled = true;
    }
}
属性
| 属性名称 | 描述 |
IsValid | bool - 获取向导控件的有效状态。如果以下任何条件为 true,则返回 false
|
PageCount | int - 获取/设置向导页面集合中的页面数量。(*) |
ActivePageIndex | int - 获取/设置活动向导页面索引,用于显示和导航。 |
ActivePageNumber | int - 获取/设置活动页码,用于显示。 |
ActivePageName | string - 获取/设置活动页面的标题。 |
ActivePage | WizardPageBase - 获取/设置活动向导页面对象 |
CanEnableFinishButton | bool - 获取/设置一个值,该值指示“完成”按钮的默认启用状态是否为 enabled (*)。 |
HasChildren | bool - 获取一个值,该值指示向导控件是否具有子页面(检查集合中计数的简写)。 |
页数 | ObservableCollection<WizardPageBase> - 获取/设置向导页面集合。 |
SharedData | WizardSharedData - 获取/设置 SharedData 对象。 |
WizConfig | WizardConfig - 获取/设置 WizardConfig 对象。 |
PageSubtitle | string - 获取/设置页面副标题文本。 |
PageSubtitleVisibility | Visibility - 获取副标题文本的可见性,根据 WizardConfig.ShowSubtitle 标志的值以及副标题文本是否为 null/空。 |
ParentWindow | Window - 获取控件的父窗口。 |
(*) 这样标记的属性可以通过一些重构来改进。
使用代码 - 示例应用程序
请提前了解,为了创建一个合理的示例应用程序,我对实际的向导配置对象进行了一些更改,解决了我在 WPF Colors 对象上遇到的一些绑定问题。我在示例应用程序和 WpfControls 项目中使用了编译器指令 __DEMO__ 来控制代码是否处于“演示”模式。当您实际使用此代码时,只需从 WPFControls 中删除编译器指令即可更改绑定的画刷属性实例化返回的 SolidColorBrush 对象的方式。
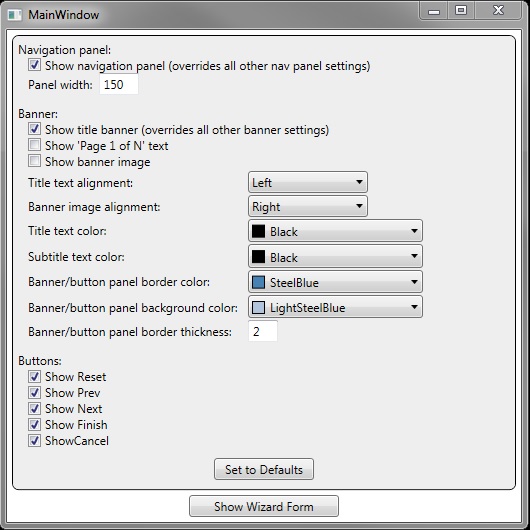
主窗口
主窗口是一个简单的 WPF 窗体,允许您更改向导的视觉方面。我承认隐藏所有按钮和标题横幅绝对没有意义,但为了完整性,我允许这样做。我想讨论有关此窗体的几件事,但这只是因为它们呈现了有趣的问题。
绑定到枚举器
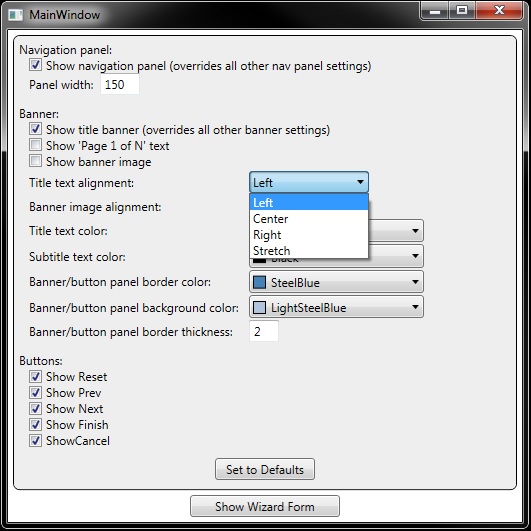
我遇到的问题之一是需要将几个 ComboBox 控件绑定到 HorizontalAlignment 枚举器。
第一步是定义一个 ObjectDataProvider。如果你是为你自己创建的枚举器执行此操作,请不要忘记必须添加/使用指向你的项目代码的命名空间声明。
<ObjectDataProvider MethodName="GetValues" ObjectType="{x:Type sys:Enum}" x:Key="HorzAlign">
    <ObjectDataProvider.MethodParameters>
        <x:Type TypeName="HorizontalAlignment" />
    </ObjectDataProvider.MethodParameters>
</ObjectDataProvider>
接下来,我在 Window.Resources 中创建了一个 DataTemplate,以便能够正确显示枚举器项名称。
<DataTemplate x:Key="alignComboItem" >
    <StackPanel Orientation="Horizontal" Margin="0,1.5,0,0" >
        <TextBlock Text="{Binding Path=Value}" Margin="5,0,0,0" />
    </StackPanel>
</DataTemplate>
最后,对于 ComboBox 本身,我设置了适当的绑定。请注意 ItemsSource 属性的绑定 - 它是 Binding Source=,而不是通常的 Binding Path=。
<ComboBox ... ItemsSource="{Binding Source={StaticResource HorzAlign}}"
             SelectedValue="{Binding Path=Config.BannerImageAlignment}" />
选择颜色
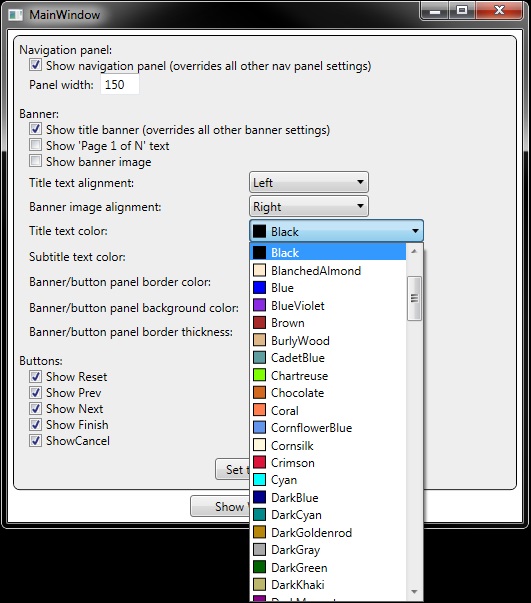
我想尽可能保持表格简单,所以我想我会设置一些组合框,允许您按名称选择所需的颜色,而不是设计一些花哨的颜色选择器控件。坦率地说,这在肛门孔中是一个巨大的痛苦,因为 WPF 的 Colors 对象不适合快速/轻松地绑定到控件。事实上,支持这个想法是“演示模式”代码的唯一原因(请注意,“demonic”一词以“demo”开头)。经过多次尝试,我决定采用以下方法。
首先,我在 WizardConfig 类中添加了适当的 string 属性来保存所需颜色的名称,并添加了使用这些名称的 SolidColorBrush 属性(为了示例目的,每种只显示一个)。我还添加了一个辅助函数,仅用于简化输入任务。
#if __DEMO__
string bannerBackgroundColorName = "LightSteelBlue";
#else
...
#endif

public SolidColorBrush BannerBackgroundBrush
{
#if __DEMO__
    get { return new SolidColorBrush(this.NameToColor(this.bannerBackgroundColorName)); }
#else
...
#endif
}

#if __DEMO__
private Color NameToColor(string name)
{
    Color color = (Color)(ColorConverter.ConvertFromString(name));
    return color;
}
#endif
接下来,我创建了一个类来表示命名的 WPF 颜色,并使用反射,在窗口的构造函数中初始化了颜色的集合。为了使其更高效,我为每个 WpfColor 项添加了一个 SolidColorBrush 对象,以满足相关 XAML 数据模板的要求。
public class WpfColor
{
    public string          Name  { get; set; }
    public SolidColorBrush Brush { get; set; }
}

public MainWindow()
{
	this.WpfColors = new List<WpfColor>();
	PropertyInfo[] properties = typeof(Colors).GetProperties(BindingFlags.Public |
                                BindingFlags.Static);
	foreach(PropertyInfo prop in properties)
	{
		this.WpfColors.Add(new WpfColor()
        {
            Name = prop.Name,
            Brush = new SolidColorBrush
                    ((Color)(ColorConverter.ConvertFromString(prop.Name))) });
	}
	...
}
接下来,我在 windows XAML 中创建了一个数据模板。
<DataTemplate x:Key="colorComboItem2" >
    <StackPanel Orientation="Horizontal" Margin="0,1.5,0,0" >
        <Rectangle Width="13" Height="13"
        Stroke="Black" Fill="{Binding Path=Brush}" />
        <TextBlock Text="{Binding Path=Name}" Margin="5,0,0,0" />
    </StackPanel>
</DataTemplate>
最后,我添加了一个带有适当绑定的 Combobox 到 XAML。
<ComboBox ItemsSource="{Binding Path=WpfColors}"
          ItemTemplate="{StaticResource colorComboItem2}"
          SelectedValuePath="Name"
          SelectedValue="{Binding Path=Config.BannerTitleColorName}" />
向导窗体 - 向导页面
要创建向导页面,请执行以下步骤
- 创建一个新的
UserControl,并为其命名。 - 在 XAML 中,添加对
WpfControls.Controls命名空间的命名空间引用(我使用了“wiz”) - 在 XAML 中,将类名从
UserControl更改为wiz:WizardPageBase。此时,您的 XAML 应该看起来像这样
<wiz:WizardPageBase x:Class="WpfWizard.WizPgIntro" xmlns="http://schemas.microsoft.com/winfx/2006/xaml/presentation" xmlns:x="http://schemas.microsoft.com/winfx/2006/xaml" xmlns:mc="http://schemas.openxmlformats.org/markup-compatibility/2006" xmlns:d="http://schemas.microsoft.com/expression/blend/2008" xmlns:wiz="clr-namespace:WpfCommon.Controls;assembly=WpfCommon" mc:Ignorable="d" d:DesignHeight="300" d:DesignWidth="600" > <Grid> </Grid> </wiz:WizardPageBase> - 在 _XAML.CS_中,添加
WpfCommon.Controls的using语句。 - 在 _XAML.CS_中,将继承的对象类型从
UserControl更改为WizardBasePage。 - 在 _XAML.CS_中,添加以下构造函数重载
public PageObject(string pageName, string shortName, string subtitle) :base(pageName, shortName, subtitle) { this.InitializeComponent(); } - 在 _XAML.CS_中,添加对
abstract方法OnVisibleChanged的覆盖。这是当页面变为可见时您将初始化页面的方法。protected override void OnVisibleChanged() { // TO-DO: add initialization code here, such as loading data, // and/or setting button state. }
恭喜!你已经拥有一个完全实现的向导页面(当然,没有实际功能)。
向导窗体本身
要创建向导窗体,请执行以下步骤
- 创建一个新窗口,并为其命名。
- 在 XAML 中,添加对
WpfControls.Controls命名空间的命名空间引用(我使用了“wiz”) - 在 XAML 中,将类名从
Window更改为wiz:WizardWindowBase。 - 我喜欢将表单的背景设置为白色以外的颜色,所以当我在 XAML 中时,我趁此机会进行所需的颜色更改(以及其他更改,如字体大小、表单大小等)。此时,您应该会看到类似这样的内容
<wiz:WizardWindowBase x:Class="WpfWizard.WndWizard" xmlns="http://schemas.microsoft.com/winfx/2006/xaml/presentation" xmlns:x="http://schemas.microsoft.com/winfx/2006/xaml" xmlns:wiz="clr-namespace:WpfCommon.Controls;assembly=WpfCommon" Title="Wizard Form" Height="400" Width="800" Background="#eaeaea" WindowStartupLocation="CenterOwner"> <Grid x:Name="gridMain" > </Grid> </wiz:WizardWindowBase> - 在 _XAML.CS_中,添加
WpfCommon.Controls的using语句。 - 在 _XAML.CS_中,将继承的对象类型从
Window更改为WizardWindowPage。 - 在 _XAML.CS_中,将以下行添加到构造函数中
this.DataContext = this;
this.InitWizard();
2019.09.18 添加 - 如果您的向导窗体也是应用程序的主窗口,请将以下行添加到构造函数中
this.IsAppWindow = true;
此行控制当您单击完成或取消按钮时窗口如何关闭。
- 在 _XAML.CS_中,添加以下方法。请注意以下代码块中各处的注释,当然,请将所有示例替换为您自己的代码。请记住,基本向导所需的所有对象(如
WizConfig、SharedData和Pages对象)都在基类中创建,并可立即使用。protected override void InitWizard(WizardConfig config=null) { if (!this.isInitialized) { // TO-DO: create pages here. Example: WizPgIntro pg0 = new WizPgIntro("Introduction", "page0", string.Empty ); // TO-DO: Add pages to the page collection (defined and instantiated // in the base WizardWindowBase class). Example: this.Pages.Add(pg0); // Add the pages to the wizard control, and setup event hooks (see // WpfCommon.Controls.WndWizardBase.cs). This method can be overridden, // but MUST be called. this.ConfigureWizard(this.gridMain); // TO-DO: If you want to change the config settings from their default // values, this is where you do it. if (this.Wizard != null) { // Examples: this.WizConfig.ShowResetButton = false; this.WizConfig.ShowNavPanel = true; this.WizConfig.ShowPage1OfN = false; this.WizConfig.ContentBannerHeight = 80; this.WizConfig.NavListWidth = 250; this.WizConfig.ShowBannerImage = false; this.WizConfig.BannerTextAlignment = HorizontalAlignment.Left; } // You only have to call this method if you changed the config defaults. this.Wizard.UpdatedConfig(); // TO-DO: Add shared data if applicable. Example: this.Wizard.SharedData.Add(new WizardSharedDataItem("SampleData", sample)); } }
示例应用程序中的向导
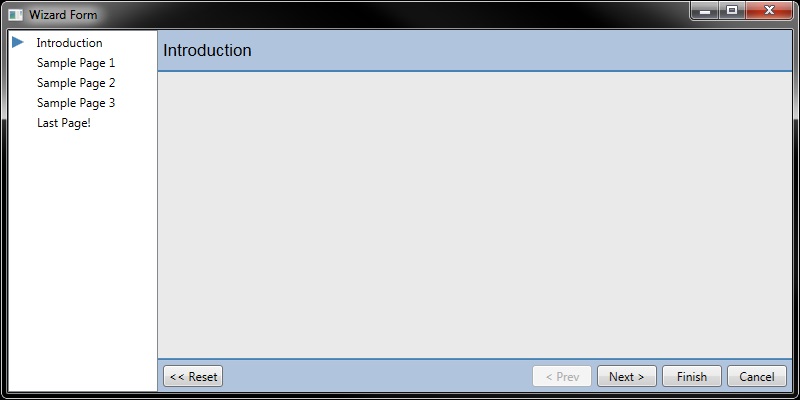
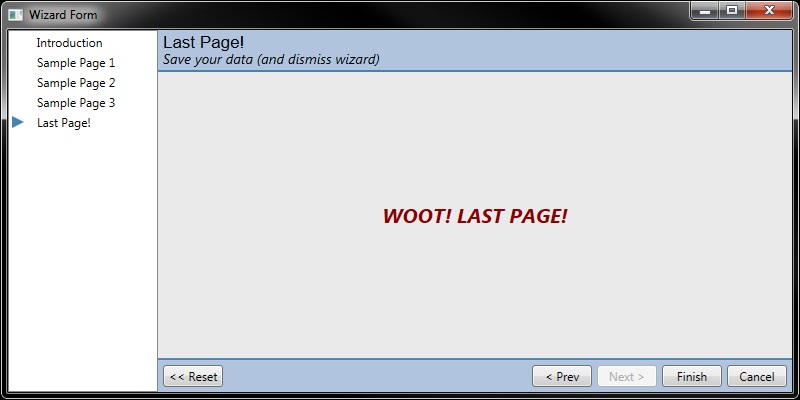
示例应用程序的功能非常有限。有五个示例向导页面。介绍页和完成页除了显示私有静态数据外什么都不做。中间的页面是我们练习条件页面序列和页面之间共享数据的地方。
示例页面 1

此页面显示一个 CheckBox,当在单击“下一步”按钮时选中时,会导致向导控件显示“示例页面 3”而不是“示例页面 2”。如果您还显示导航列表框,您将看到列表框根据 checkbox 状态进行更新。这通过设置 NextPage 属性来确定
public override string NextPage
{
    get
    {
        return (this.cbNextPage.IsChecked == true) ? "page3" : "page2";
    }
    set
    {
        base.NextPage = "";
    }
}
示例页面 2
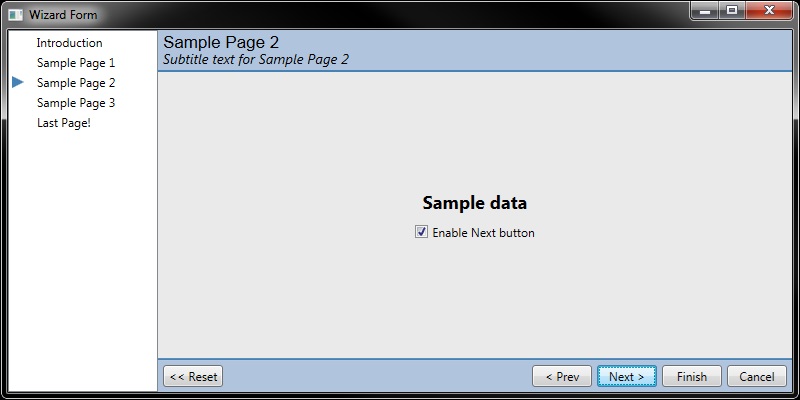
此页面显示 SharedData 项的值,以及一个启用/禁用下一个按钮的 checkbox。这锻炼了虚拟的 UpdateButtons 方法。如果 checkbox 未选中,则“下一步”按钮被禁用(但您仍然可以在导航列表框中选择页面)。在这种情况下,UpdateButtons() 交互由 Checked 和 Unchecked 处理程序调用触发。
请注意,我们在处理事件之前检查 IsReady 属性。原因在于,如果您在 XAML 中设置默认值,事件将在页面添加到父向导控件之前触发,这可能会导致抛出异常。
public override void UpdateButtons()
{
    this.ParentWiz.nextButtonPanel.IsEnabled = (this.cbEnableNext.IsChecked == true);
}

private void CheckBox_Checked(object sender, RoutedEventArgs e)
{
    if (this.IsReady)
    {
        this.UpdateButtons();
    }
}
此外,点击**下一步**按钮会导致添加一个新的 SharedData 项以在示例页面 3 中显示。如果您使用导航列表框来显示示例页面 3,则此新项不会被添加(有意)。
public override void ButtonClick(object sender, ref RoutedEventArgs e)
{
    if (sender is Button )
    {
        Button button = sender as Button;
        switch (button.Name)
        {
            case "btnNext" :
                this.SharedData.AddUpdateItem("SampleDataChanged",
                                               string.Format("{0} for a different page",
                                                             this.SampleData));
                break;
        }
        e.Handled = false;
    }
    else
    {
    }
}
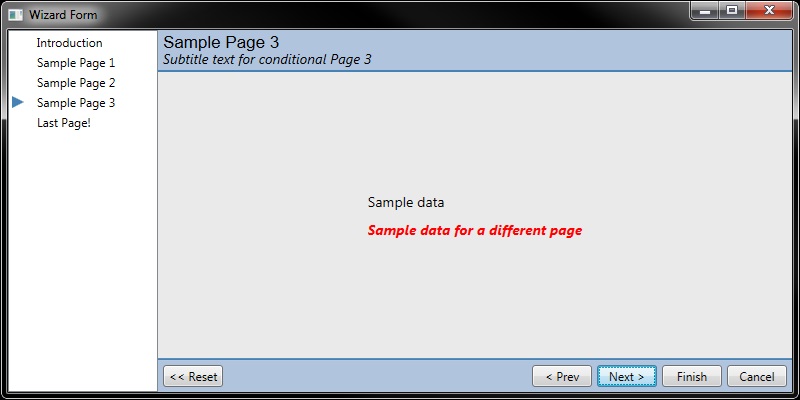
示例页面 3
此页面显示两个共享数据项(如果都存在),并在用户单击 **上一步** 按钮时移除这些数据。

public string SampleData
{
    get
    {
        return this.GetValue("SampleData");
    }
}

public string SampleDataChanged
{
    get
    {
        string data = this.GetValue("SampleDataChanged");
        return string.IsNullOrEmpty(data) ? "SharedData item not present" : data;
    }
}

public override void ButtonClick(object sender, ref RoutedEventArgs e)
{
    if (sender is Button)
    {
        Button button = sender as Button;
        switch (button.Name)
        {
            case "btnPrev" :
                this.SharedData.DeleteItem("SampleDataChanged");
                break;
        }
        e.Handled = false;
    }
    else
    {
    }
}
附加代码(2019.09.16)未包含在下载中
在使用此代码时,我发现需要能够根据给定页面中的其他用户操作点击向导控件按钮。将此代码添加到 _CtrlWizard.cs_
using System.Windows.Controls.Primitives;

public void ClickResetButton()
{
    this.ClickWizardButton(this.resetButtonPanel);
}

public void ClickNextButton()
{
    this.ClickWizardButton(this.nextButtonPanel);
}

public void ClickPrevButton()
{
    this.ClickWizardButton(this.prevButtonPanel);
}

public void ClickCancelButton()
{
    this.ClickWizardButton(this.cancelButtonPanel);
}

public void ClickFinishButton()
{
    this.ClickWizardButton(this.finishButtonPanel);
}

public void ClickWizardButton(StackPanel panel)
{
    Button btn = ((Button)(panel.Children[0]));
    if (btn.Visibility == Visibility.Visible && btn.IsEnabled)
    {
        btn.RaiseEvent(new RoutedEventArgs(ButtonBase.ClickEvent);
    }
}
用法(从向导页面内部)
this.ParentWiz.ClickNextButton();
更新!2020.04.11 新代码(未下载)
在使用本文中的代码时,我需要更改按钮的控件模板以匹配我在应用程序中使用的按钮样式。处理此问题的最佳方法是在 CtrlWizard.xaml.cs 文件(在 WPFCommon 程序集中)中添加一个方法。如果您未在代码中实现自定义按钮模板,则可以安全地忽略此部分。但是,如果您将来需要此类功能,您可能仍然希望实施这些更改。
我使用的自定义样式 - 添加到我的 App.xaml 文件中
我定义了一个自定义按钮样式,我希望在应用程序中的所有按钮上都使用它。因为我希望所有按钮看起来都一样,所以我懒得指定 x:Key 属性。
<Style TargetType="{x:Type Button}">
    <Setter Property="Foreground" Value="White" />
    <Setter Property="Background" Value="SteelBlue" />
    <Setter Property="BorderBrush" Value="Black" />
    <Style.Triggers>
        <Trigger Property="Control.IsMouseOver" Value="True">
            <Setter Property="Background" Value="LightSteelBlue" />
            <Setter Property="Foreground" Value="Black" />
        </Trigger>
    </Style.Triggers>
</Style>
因为我指定了非系统颜色和外观,与 WPF 的按钮触发行为不符,所以我还必须创建一个自定义模板来使颜色适当更改
<ControlTemplate x:Key="AppButtonTemplate" TargetType="{x:Type ButtonBase}">
    <Border x:Name="border" CornerRadius="4"  BorderBrush="{TemplateBinding BorderBrush}" BorderThickness="{TemplateBinding BorderThickness}" Background="{TemplateBinding Background}" SnapsToDevicePixels="True">
        <ContentPresenter x:Name="contentPresenter" ContentTemplate="{TemplateBinding ContentTemplate}" Content="{TemplateBinding Content}" ContentStringFormat="{TemplateBinding ContentStringFormat}" Focusable="False" HorizontalAlignment="{TemplateBinding HorizontalContentAlignment}" Margin="{TemplateBinding Padding}" RecognizesAccessKey="True" SnapsToDevicePixels="{TemplateBinding SnapsToDevicePixels}" VerticalAlignment="{TemplateBinding VerticalContentAlignment}"/>
    </Border>
    <ControlTemplate.Triggers>
        <Trigger Property="Button.IsDefaulted" Value="True">
            <Setter Property="BorderBrush" TargetName="border" Value="{DynamicResource {x:Static SystemColors.HighlightBrushKey}}"/>
        </Trigger>
        <Trigger Property="IsMouseOver" Value="True">
            <Setter Property="Background" TargetName="border" Value="#FFBEE6FD"/>
            <Setter Property="BorderBrush" TargetName="border" Value="#FF3C7FB1"/>
        </Trigger>
        <Trigger Property="IsPressed" Value="True">
            <Setter Property="Background" TargetName="border" Value="#FFC4E5F6"/>
            <Setter Property="BorderBrush" TargetName="border" Value="#FF2C628B"/>
        </Trigger>
        <Trigger Property="ToggleButton.IsChecked" Value="True">
            <Setter Property="Background" TargetName="border" Value="#FFBCDDEE"/>
            <Setter Property="BorderBrush" TargetName="border" Value="#FF245A83"/>
        </Trigger>
        <Trigger Property="IsEnabled" Value="False">
            <Setter Property="Background" TargetName="border" Value="#FFF4F4F4"/>
            <Setter Property="BorderBrush" TargetName="border" Value="#FFADB2B5"/>
            <Setter Property="Foreground" Value="#FF838383"/>
        </Trigger>
    </ControlTemplate.Triggers>
</ControlTemplate>
注意,模板必须具有 ButtonBase 的目标类型
模板资源很可能在您的 App.XAML 文件中定义,这意味着当您在应用程序中的表单上使用它时,您会做类似这样的事情
<Button Template="{DynamicResource AppButtonTemplate}" />
请注意,您必须使用 DynamicResource,因为它定义在一个外部文件 (App.xaml.cs) 中,这也是您可以在应用程序中的任何表单中引用新模板的原因。
修改 CtrlWizard.xaml 和 CtrlWizard.xaml.cs
首先,我必须实现一个方法(在 CtrlWizard.xaml.cs 中),我可以在应用程序中调用它。WPF 提供了一种查找资源,然后为给定控件设置动态资源的方法。
/// <summary>
/// Sets the control template for all of the wizard control's buttons
/// </summary>
/// <param name="xaml">The name of a dynamic resource defined in the app's App.XAML file.</param>
/// <exception cref="ResourceReferenceKeyNotFoundException"></exception>
public void SetButtonTemplates(string resourceName)
{
    // make sure the specified resource exists in the application
    if (Application.Current.FindResource(resourceName) != null)
    {
        // you must use the control's SetResourceReference method if you're using a DynamicrESOURCE.
        this.btnCancel.SetResourceReference(Control.TemplateProperty, resourceName);
        this.btnFinish.SetResourceReference(Control.TemplateProperty, resourceName);
        this.btnNext.SetResourceReference(Control.TemplateProperty, resourceName);
        this.btnPrev.SetResourceReference(Control.TemplateProperty, resourceName);
        this.btnReset.SetResourceReference(Control.TemplateProperty, resourceName);
    }
    else
    {
        throw new ResourceReferenceKeyNotFoundException("Specified button template not found", resourceName);
    }
}
当我添加/测试该代码时,我意识到在 CtrlWizard.xaml 中使用特定的按钮宽度是一个坏主意,所以我添加了以下属性。我希望所有按钮都具有相同的宽度,但我也希望所有按钮都足够宽以包含所有文本。显而易见的解决方案是找到其中最宽的按钮(使用 ActualWidth),并将每个按钮的 Width 属性绑定到该值。
	public double LargestButton
{
    get
    {
        double value = 0;
        value = Math.Max(value, this.btnCancel.ActualWidth);
        value = Math.Max(value, this.btnFinish.ActualWidth);
        value = Math.Max(value, this.btnNext.ActualWidth);
        value = Math.Max(value, this.btnPrev.ActualWidth);
        value = Math.Max(value, this.btnReset.ActualWidth);
        return value;
    }
}
...我修改了 CtrlWizard.xaml 中的按钮标记。现在我们将按钮的 Width 属性绑定到新的 LargestButton 类属性。这使得所有按钮的宽度相同,并且所有按钮都足够宽以包含其标签文本。为了完整性,我包含了包含所有按钮的元素
<Border x:Name="gridContentNavigation" Grid.Row="2"
        Background="{Binding Path=WizConfig.BannerBackgroundBrush, Mode=OneWay}"
        BorderBrush="{Binding Path=WizConfig.BannerBorderBrush, Mode=OneWay}"
        BorderThickness="{Binding Path=WizConfig.NavPanelBorderThickness, Mode=OneWay}" >
    <Grid >
        <!-- 0) set button panel visibility so you also hide the spacer grid associated with that button -->
        <!-- 1) always do a stackpanel containing the button as the FRIST child element -->
        <StackPanel x:Name="stackNaveLeftSide" Orientation="Horizontal" HorizontalAlignment="Left" Margin="0,5,0,5"
                    Visibility="{Binding Path=WizConfig.ShowResetButton, Mode=OneWay, Converter={StaticResource visibilityConverter}}">
            <StackPanel x:Name="resetButtonPanel" x:FieldModifier="public" Orientation="Horizontal" >
                <Button Content="  << Reset  " Width="{Binding Path=LargestButton}" x:Name="btnReset" Click="btnReset_Click" Margin="5,0,0,0"/>
                <Grid Width="5" />
            </StackPanel>
        </StackPanel>
        <StackPanel x:Name="stackNaveRightSide"  Orientation="Horizontal" HorizontalAlignment="Right" Margin="0,5,0,5">
            <StackPanel x:Name="prevButtonPanel" x:FieldModifier="public" Orientation="Horizontal"
                        Visibility="{Binding Path=WizConfig.ShowPrevButton, Mode=OneWay, Converter={StaticResource visibilityConverter}}" >
                <Button Content="  < Prev  " Width="{Binding Path=LargestButton}" x:Name="btnPrev" Click="btnPrev_Click" />
                <Grid Width="5" />
            </StackPanel>
            <StackPanel x:Name="nextButtonPanel" x:FieldModifier="public" Orientation="Horizontal" Visibility="{Binding Path=WizConfig.ShowNextButton,Mode=OneWay,Converter={StaticResource visibilityConverter}}" >
                <Button Content="  Next >  " Width="{Binding Path=LargestButton}" x:Name="btnNext" Click="btnNext_Click" />
                <Grid Width="5" />
            </StackPanel>
            <StackPanel x:Name="finishButtonPanel" x:FieldModifier="public" Orientation="Horizontal" Visibility="{Binding Path=WizConfig.ShowFinishButton,Mode=OneWay,Converter={StaticResource visibilityConverter}}" >
                <Button Content="  Finish  " Width="{Binding Path=LargestButton}" x:Name="btnFinish" Click="btnFinish_Click" />
                <Grid Width="5" />
            </StackPanel>
            <StackPanel x:Name="cancelButtonPanel" x:FieldModifier="public" Orientation="Horizontal" Visibility="{Binding Path=WizConfig.ShowCancelButton,Mode=OneWay,Converter={StaticResource visibilityConverter}}" >
                <Button Content="  Cancel  " Width="{Binding Path=LargestButton}" x:Name="btnCancel" Click="btnCancel_Click" />
                <Grid Width="5" />
            </StackPanel>
        </StackPanel>
    </Grid>
</Border>
最后,为了让类有机会设置 LargestButton 属性值,我不得不为窗体的 Loaded 事件添加一个处理程序。这是一个两步过程。首先,您更改 CtrlWizard.xaml.cs 文件以添加事件处理程序方法
private void UserControl_Loaded(object sender, RoutedEventArgs e)
{
    this.NotifyPropertyChanged("LargestButton");
}
...然后将事件添加到 CtrlWizard.xaml 文件中<UserControl x:Class="WpfCommon.Controls.CtrlWizard"
[... other attributes...]
Loaded="UserControl_Loaded">
使用新代码
现在我们已经设置了模板设置功能,并假设您已经在 App.XAML 文件中添加了自定义模板,让我们在应用程序代码中使用它。
您的应用程序中应该有一个 InitWizard() 方法。在该方法的底部,添加此行
this.Wizard.SetButtonTemplates("AppButtonTemplate");
运行应用程序时,所有按钮的外观和功能都应一致。
兴趣点、注意事项和买方自负
今天的兴趣点是德克萨斯州斯托克顿堡——世界上最大的走鹃的故乡。谷歌一下,准备好惊叹吧。
历史
- 2020.04.11 - 添加了一个新的更新部分,以说明对 CtrlWizard.xaml(在 WPFCoommon 程序集中)的更改,以更改按钮的模板,并使按钮大小调整更具流动性。
- 2019.09.18 - 在“向导窗体本身”一节的第 6 步中添加了信息,纠正了一些拼写错误,并在相应的 <pre> 块中添加了缺失的语言标签
- 2019.09.16 - 添加了允许向导页面点击向导按钮的功能
- 2016.04.14 - 首次发布