
使用 MQTT 连接到 Amazon Web Services (AWS) IoT
本文提供了一个分步指南,介绍如何使用 MQTT 设置与 Amazon Web Services (AWS) IoT 的连接,以及用于额外设置和方便使用的命令和代码示例。
获取新的 Intel® IoT Developer Kit,这是一个完整的硬件和软件解决方案,使开发人员能够使用 Intel® Galileo 和 Intel® Edison 板创建令人兴奋的新解决方案。请访问 Intel® Developer Zone for IoT。
本文提供了一个分步指南,介绍如何使用 MQTT 设置与 Amazon* Web Services* (AWS*) IoT 的连接,以及用于额外设置和方便使用的命令和代码示例。
AWS* IoT 初始设置
-
如果您还没有账户,请在 https://aws.amazon.com 上创建一个账户。

-
按照 http://docs.aws.amazon.com/cli/latest/userguide/installing.html 上的说明安装 AWS* CLI。
将 AWS* CLI 路径添加到 Windows* 上的环境变量
-
转到控制面板,然后单击系统。

-
单击高级系统设置。

-
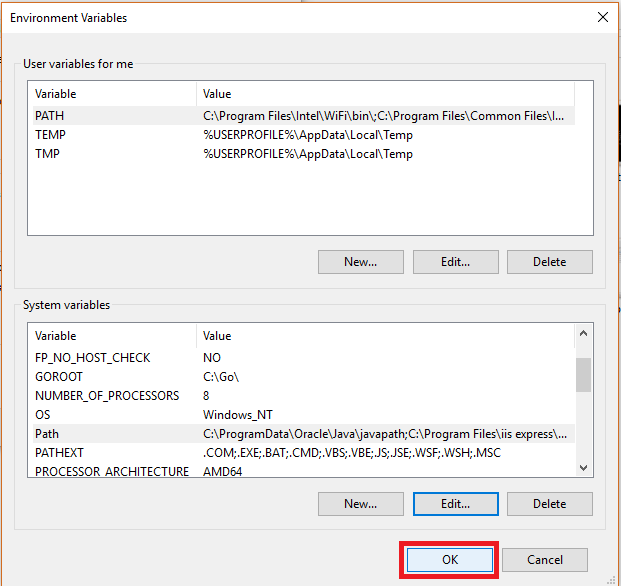
在高级选项卡上,单击环境变量。

-
在我的用户变量框中,双击PATH。

-
单击新建,添加 AWS* CLI 安装目录的完整路径,然后单击确定。

-
在系统变量框中,双击Path。

-
如果未列出 AWS* CLI 安装目录,请重复步骤 5 的操作。

-
在环境变量窗口中,单击确定。
-
在系统属性窗口中,单击确定。

注意:为了在使用 AWS* CLI 时在 Windows* 上方便操作,请在您克隆此存储库的目录中(例如,C:\Users\me\Documents\GitHub\intel-iot-examples-mqtt\support\aws)遵循本教程的后续步骤。
通过运行此命令验证设置
aws iot help
您应该会看到类似以下的输出

创建新设备
要创建新设备,请使用 create-thing 命令,如下所示
aws iot create-thing --thing-name "edison1"
您应该会看到类似以下的输出

获取设备列表
要列出您的设备,请使用 list-things 命令,如下所示
aws iot list-things
您应该会看到类似以下的输出

获取并配置用于设备使用的证书
-
配置证书
aws iot create-keys-and-certificate --set-as-active --certificate-pem-outfile cert.pem --public-key-outfile publicKey.pem --private-key-outfile privateKey.pem
您应该会看到类似以下的输出:

-
创建/附加策略
aws iot create-policy --policy-name "PubSubToAnyTopic" --policy-document file:///intel/how-to-code-samples/docs/mqtt/aws-device-policy.json
您应该会看到类似以下的输出:

-
将证书附加到设备(您需要步骤 1 中的 certificate-arn)
aws iot attach-principal-policy --principal "certificate-arn" --policy-name "PubSubToAnyTopic"
确定 AWS* 端点
您可以通过运行以下命令获取要使用的主机
aws iot describe-endpoint
您应该会看到类似以下的输出

将证书安装到 Intel® Edison 板
从您的计算机运行以下命令
scp -r cert.pem USERNAME@xxx.xxx.x.xxx:/home/root/.ssh
scp -r publicKey.pem USERNAME@xxx.xxx.x.xxx:/home/root/.ssh
scp -r privateKey.pem USERNAME@xxx.xxx.x.xxx:/home/root/.ssh
其中 USERNAME@xxx.xxx.x.xxx 是您为板设置的用户名和 IP 地址。
将证书安装到 Intel® Edison 板(仅限 Windows*)
我们将在接下来的步骤中使用 WinSCP*。有关安装说明,请参阅 https://github.com/intel-iot-devkit/how-to-code-samples/blob/master/docs/cpp/using-winscp.md。
-
使用 WinSCP* 登录到您的设备。

-
确保您的主机在您运行了之前的 AWS* CLI 命令的目录中。

-
将 cert.pem、privateKey.pem 和 publicKey.pem 复制到 Intel® Edison 板上的 /home/root 目录。

摘要
如果您已按照以上所有步骤操作,您应该已获得程序连接到 MQTT* 服务器所需的所有信息
MQTT_SERVER - 使用通过运行 aws iot describe-endpoint 命令获取的主机值,以及 ssl://(适用于 C++)或 mqtts:// 协议(适用于 JavaScript*)
MQTT_CLIENTID - 使用 <您的设备名称>
MQTT_TOPIC - 使用 devices/<您的设备名称>
MQTT_CERT - 使用上面描述的设备证书的文件名
MQTT_KEY - 使用设备密钥的文件名,如上所述
MQTT_CA - 使用 CA 证书的文件名(/etc/ssl/certs/VeriSign_Class_3_Public_Primary_Certification_Authority_-_G5.pem)
C++ 的其他设置
在 Intel® Edison 板上运行 C++ 代码时,您需要在 Eclipse* 中设置 MQTT* 客户端参数。要做到这一点
-
转到 Run configurations,并在 Commands to execute before application 字段中键入以下内容
chmod 755 /tmp/<Your app name>; export MQTT_SERVER="ssl://<Your host name>:8883"; export MQTT_CLIENTID="<Your device ID>"; export MQTT_CERT="/home/root/.ssh/cert.pem"; export MQTT_KEY="/home/root/.ssh/privateKey.pem"; export MQTT_CA="/etc/ssl/certs/VeriSign_Class_3_Public_Primary_Certification_Authority_-_G5.pem"; export MQTT_TOPIC="devices/<Your device ID>"
-
单击 Apply 按钮以保存这些设置。
-
单击 Run 按钮以在您的板上运行代码。
JavaScript* 的其他设置
在 Intel® Edison 板上运行 JavaScript* 代码时,您需要在 Intel® XDK IDE 中设置 MQTT* 客户端参数。将以下条目添加到 config.json 文件
    {
    "MQTT_SERVER": "mqtts://<Your host name>:8883",
    "MQTT_CLIENTID": "<Your device ID>",
    "MQTT_CERT": "/home/root/.ssh/cert.pem",
    "MQTT_KEY": "/home/root/.ssh/privateKey.pem",
    "MQTT_TOPIC": "devices/<Your device ID>"
    }