
在 SharePoint 2013 站点中创建显示用户个人资料图片的 User Control
让我们来讨论如何在 SharePoint 站点中显示登录用户的个人资料图片。
引言
在本文中,我们将讨论如何在 SharePoint 2013 网站主页的页眉部分显示用户个人资料图片,以及如何使用 C# 代码从用户个人资料服务应用程序中获取其他用户信息,例如姓名、职位、部门等。
概述
如果用户个人资料图片在 Active Directory 中不存在,我们将显示“未找到图片”的图片。您也可以添加您想要显示为“未找到图片”的图片。

Senthil Gopal
如果用户个人资料图片存在于 Active Directory 中,则图片将显示在主页的页眉部分,如下图所示。您可以通过编写自定义 CSS 文件来修改图片的样式。

请按照以下几个步骤来实现设计,
- 配置中央管理中的用户个人资料服务应用程序
- 创建自定义 Web 部件以显示用户个人资料图片
配置用户个人资料服务应用程序
此服务应用程序将用户信息从 Active Directory 同步到 SharePoint 网站。它会将用户个人资料信息存储在用户个人资料服务应用程序数据库中。许多人可能知道配置用户个人资料服务应用程序的步骤。如果您不知道,请按照以下步骤配置服务应用程序,
- 导航到中央 管理 -> 应用程序管理 -> 管理服务 应用程序

- 从功能区菜单中单击 新建 -> 用户个人资料服务应用程序

-
在 创建新的用户个人资料服务应用程序 页面中,输入服务应用程序的名称,并选择现有的应用程序池来运行此服务应用程序,或创建一个新的应用程序池。“此服务应用程序选定的安全帐户必须有权访问 Active Directory 服务”。
-
输入要存储用户信息的配置文件数据库服务器和数据库名称。在数据库身份验证部分,提供有权访问现有数据库服务器的用户名和密码。同样,为同步数据库和社会标签数据库提供数据库详细信息。最后按“创建”按钮。

-
创建配置文件服务应用程序后,打开 用户个人资料服务应用程序

-
单击 同步 组下的 配置同步连接 ,以设置从 Active Directory、LDAP Directory 和业务连接获取数据的连接字符串。如果尚未创建。
-
填写配置详细信息,

-
然后单击填充容器按钮并选择用户复选框

-
最后按“确定”。
管理用户个人资料属性
在此页面中,我们可以将 Active Directory 属性映射到 SharePoint 属性,
配置同步计时器作业
在此部分,我们可以配置同步时间作业计划。选择 配置同步计时器作业

为计时器作业提供配置详细信息
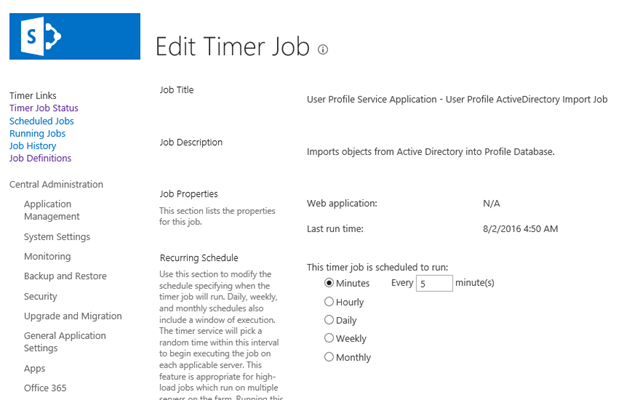
首次,单击 开始配置文件同步 以立即运行计时器作业。 下次作业将根据作业计划的间隔运行。

计时器作业完成后,查看从 Active Directory 导入的配置文件计数,

创建用户控件以显示用户个人资料图片
- 打开 Visual Studio 并创建一个新的 空项目,并为其命名为“用户个人资料图片”

-
将解决方案部署为 场解决方案,因为代码需要在服务器端执行以从 UPS 应用程序检索配置文件信息。

-
创建项目后,添加新项并选择“用户控件”,然后按“确定” “之所以选择用户控件项目,是因为我们可能在更多项目中使用此控件,并且它将作为委托控件出现在母版页中”

-
创建控件后,解决方案资源管理器如下所示

窗体代码 - Usercontrol1.ascx
此部分将在母版页中呈现
<div class="username">
     <asp:Literal  ID="ltUserName" runat="server"></asp:Literal>
</div>
代码隐藏 - Usercontrol1.ascx.cs
为了公开 UserProfileManager 类来获取用户个人资料属性,我们需要添加以下程序集,
Microsoft.Office.ServerMicrosoft.Office.Server.UserProfiles
在代码隐藏中,获取用户个人资料图片 URL 并将其呈现为 HTML
<div class="username">
    <div style="text-align: center">
        <img style="border-radius: 50%; width: 50px;" src="http/server/my/User Photos/Profile Pictures/sgopal_MThumb.jpg"></div>
    <div style="text-align: center">Senthil Gopal</div>
</div>
getUserProfilePictureUrl()
由于用户没有 UPA 应用程序的权限,我们需要为所有用户显示用户个人资料图片。因此,我们使用 RunWithElevatedPrivileges 方法来使用管理员权限执行代码以读取用户个人资料属性。
private string getUserProfilePictureUrl(SPUser currentUser)
        {
            string pictureURL = string.Empty;
            SPSecurity.RunWithElevatedPrivileges(delegate() {
            using (SPSite mySitesCollection = new SPSite(SPContext.Current.Site.Url))
            {
                using (SPWeb myweb = mySitesCollection.OpenWeb())
                {
                    string currentUserlogin = currentUser.LoginName;
                    //Get the user profile manager
                    SPServiceContext context = SPServiceContext.GetContext(mySitesCollection);
                    UserProfileManager profileManager = new UserProfileManager(context);
                    UserProfile currentProfile = profileManager.GetUserProfile(currentUserlogin);
                    //PicutreURL - property name
                    ProfileValueCollectionBase profileValueCollection = currentProfile.GetProfileValueCollection("PictureURL");
                    //Only display something if the user has set their picture.
                    if ((profileValueCollection != null) && (profileValueCollection.Value != null))
                    {
                        //There is a picture so display it
                        pictureURL = profileValueCollection.Value.ToString();
                    }
                    else
                    {
                        //no image found url
                        pictureURL = "/Style library/AH/Images/user.png";
                    }
                }
            }
            });
            return pictureURL;
        }
您也可以通过调试代码来查看可用的属性名称
创建委托控件
通过使用此委托控件,我们可以调用 usercontrol1.ascx 页面
- 添加新项并选择空元素,为“UserProfilePic”赋予适当的名称

- 打开 Element.xml 并粘贴以下代码
<?xml version="1.0" encoding="utf-8"?>
<Elements xmlns="http://schemas.microsoft.com/sharepoint/">
  <Control Id="UserProfilePic" Sequence="11" ControlSrc="~/_controltemplates/15/UserProfilePicture/UserControl1.ascx" xmlns="http://schemas.microsoft.com/sharepoint/" />
</Elements>
3. 将 element.xml 功能的作用域更改为站点级别

通过使用以下标签,我们可以将此控件放置在母版页中我们想要显示个人资料照片的位置
<!--SPM:<SharePoint:DelegateControl runat="server" ControlId="UserProfilePic "/>-->
历史
2016 年 8 月 3 日 - 创建初始版本。