
Master Chef (第 2 部分) ASP.NET Core MVC 结合 Fluent NHibernate 和 AngularJS
5.00/5 (7投票s)
在本文中,我将介绍如何使用 ASP.NET Core MVC、Fluent NHibernate 和 Angular JS 来实现一个 CRUD SPA (单页应用程序)。
在 Master Chef 第一部分中,我介绍了如何将 ASP.NET Core MVC 与 Fluent NHibernate 和 Angular JS 集成。在本文中,我将介绍如何使用 ASP.NET Core MVC、Fluent NHibernate 和 Angular JS 来实现一个 CRUD SPA (单页应用程序)。
在 Repository 中使用泛型
创建、读取、更新和删除 (CRUD) 是持久化存储的四个基本功能。
我们首先需要在 Repository 类中实现数据库级别的 CRUD。我想使用泛型来实现查询、添加、更新、删除方法,以避免冗余编码。为什么使用泛型?简而言之,它类型安全、编译时检查、速度快,并且适用于具有相同底层行为的多种类型。
在之前的数据模型类中,所有成员的名称都与数据库字段相同。实际上,数据模型类的成员不必与数据库字段相同。例如,Recipe 类的 Id 不必是 RecipeId,它可以是任何名称,如 Id。我们需要做的是在映射过程中告知 Fluent NHibernate,如下所示。
Id(x => x.Id, "RecipeId");
这样,Fluent NHibernate 就知道它正在将“Id”映射到“RecipeId”。
由于我们不必使用与数据库字段相同的名称,现在我们有机会更改不同的数据模型类以包含一些通用成员。
因此,我们创建一个基类 Entity。
    public class Entity
    {
        public virtual Guid Id { get; set; }
        public virtual Guid? ParentId { get; set; }
        public virtual Type ParentType => null;
}
然后,我们让 Recipe、RecipeStep 和 RecipeItem 继承 Entity,并将 Recipe 的 RecipeId 替换为 Id,将 RecipeStep 的 RecipeStepId 替换为 Id,将 RecipeItem 的 ItemId 替换为 Id。还将 RecipeStep 的 RecipeId 替换为 ParentId,将 RecipeItem 的 RecipeStepId 替换为 ParentId。
 public class Recipe : Entity
    {
        public virtual string Name { get; set; }
        public virtual string Comments { get; set; }
        public virtual DateTime ModifyDate { get; set; }
        public virtual IList<RecipeStep> Steps { get; set; }
}

public class RecipeStep : Entity
    {
        public virtual int StepNo { get; set; }
        public virtual string Instructions { get; set; }
        public virtual IList<RecipeItem> RecipeItems { get; set; }
        public override Type ParentType => typeof(Recipe);
    }
public class RecipeItem : Entity
    {
        public virtual string Name { get; set; }
        public virtual decimal Quantity { get; set; }
        public virtual string MeasurementUnit { get; set; }
        public override Type ParentType => typeof(RecipeStep);
    }
现在我们还需要更改映射类。请注意不同名称的映射。
public class RecipeMap : ClassMap<Recipe>
    {
        public RecipeMap()
        {
            Id(x => x.Id, "RecipeId");
            Map(x => x.Name);
            Map(x => x.Comments);
            Map(x => x.ModifyDate);
            HasMany(x => x.Steps).KeyColumn("RecipeId").Inverse().Cascade.DeleteOrphan().OrderBy("StepNo Asc");
            Table("Recipes");
        }
}
public class RecipeStepMap : ClassMap<RecipeStep>
    {
        public RecipeStepMap()
        {
            Id(x => x.Id, "RecipeStepId");
            Map(x => x.ParentId, "RecipeId");
            Map(x => x.StepNo);
            Map(x => x.Instructions);
            HasMany(x => x.RecipeItems).KeyColumn("RecipeStepId").Inverse().Cascade.DeleteOrphan();
            Table("RecipeSteps");
        }
    }
public class RecipeItemMap : ClassMap<RecipeItem>
    {
        public RecipeItemMap()
        {
            Id(x => x.Id, "ItemId");
            Map(x => x.Name);
            Map(x => x.Quantity);
            Map(x => x.MeasurementUnit);
            Map(x => x.ParentId, "RecipeStepId");
            Table("RecipeItems");
        }
    }
“Cascade.DeleteOrphan”是什么意思?此选项会在删除父对象时删除子对象。对我们而言,删除一个配方将删除该配方的所有步骤和配方项,删除一个步骤将删除该步骤的所有项。
然后,我们将 Repository 的方法更改为泛型方法,并添加泛型约束,即 T 必须是 Entity 的子类。
public T GetEntity<T>(Guid id) where T : Entity
        {
            try
            {
                return _session.Get<T>(id);
            }
            catch (Exception ex)
            {
                throw ex;
            }
        }

        public T AddEntity<T>(T entity) where T : Entity
        {
            T newOne = null;
            using (var transaction = _session.BeginTransaction())
            {
                try
                {
                    _session.SaveOrUpdate(entity);
                    Commit(transaction, entity);
                    RefreshParentObject(entity);
                    newOne = _session.Get<T>(entity.Id) as T;
                }
                catch (Exception ex)
                {
                    throw ex;
                }

                return newOne;
            }
        }

        public void UpdateEntity<T>(T entity) where T : Entity
        {
            using (var transaction = _session.BeginTransaction())
            {
                try
                {
                    _session.Update(entity);
                    Commit(transaction, entity);
                    RefreshParentObject(entity);
                }
                catch (Exception ex)
                {
                    throw ex;
                }

            }
        }

        public void DeleteEntity<T>(Guid id) where T : Entity
        {
            using (var transaction = _session.BeginTransaction())
            {
                var entity = _session.Get<T>(id);
                if (entity != null)
                {
                    try
                    {
                        _session.Delete(entity);
                        Commit(transaction, entity);
                        RefreshParentObject(entity);
                    }
                    catch (Exception ex)
                    {
                        throw ex;
                    }
                }
            }
        }
对于 add、update 和 delete 方法,所有都调用 RefreshParentObject()。这是什么意思?当我们更改 RecipeStep 或 RecipeItem 时,其父对象的缓存不知道此更改。我们需要刷新父对象的缓存。
    void RefreshParentObject(Entity entity)
        {
            if (!entity.ParentId.HasValue)
                return;
            var parentObj = _session.Get(entity.ParentType, entity.ParentId.Value);
            if (parentObj != null)
                _session.Refresh(parentObj);
        }
现在我们更新 Web API 控制器。
        [HttpGet("{id}")]
        public IActionResult Get(Guid id)
        {
            var recipe = _repository.GetEntity<Recipe>(id);
            if (recipe != null)
                return new ObjectResult(recipe);
            else
                return new NotFoundResult();

        }
        [HttpPost]
        public IActionResult Post([FromBody]Recipe recipe)
        {
            if (recipe.Id == Guid.Empty)
            {
                recipe.ModifyDate = DateTime.Now;
                return new ObjectResult(_repository.AddEntity<Recipe>(recipe));
            }
            else
            {
                var existingOne = _repository.GetEntity<Recipe>(recipe.Id);
                existingOne.Name = recipe.Name;
                existingOne.Comments = recipe.Comments;
                existingOne.ModifyDate = DateTime.Now;
                _repository.UpdateEntity<Recipe>(existingOne);
                return new ObjectResult(existingOne);
            }
        }
        [HttpPut("{id}")]
        public IActionResult Put(Guid id, [FromBody]Recipe recipe)
        {
            var existingOne = _repository.GetEntity<Recipe>(recipe.Id);
            existingOne.Name = recipe.Name;
            existingOne.Comments = recipe.Comments;
            _repository.UpdateEntity<Recipe>(recipe);
            return new ObjectResult(existingOne);
        }

        [HttpDelete("{id}")]
        public IActionResult Delete(Guid id)
        {
            _repository.DeleteEntity<Recipe>(id);
            return new StatusCodeResult(200);
        }
Angular 客户端路由
现在我们需要为我们的 Master Chef 应用程序设置客户端路由,以便能够根据客户端提供的 URL 动态替换视图。我们可以从 angular-route 模块获取 Angular 路由功能。
使用 ngRoute 模块,您可以在单页应用程序中导航到不同的页面,而无需重新加载页面。$route 用于将深度链接 URL 映射到控制器和视图 (HTML 部分)。它会监视 $location.url() 并尝试将路径映射到现有的路由定义。
$route 中有两个依赖项:$location 和 $routeParams。
1) 注入 ngRoute
打开 app.js,在我们的 masterChefApp 模块中注入 ngroute。
(function () {
    'use strict';

    angular.module('masterChefApp', [
        // Angular modules
        'ngRoute',

        // Custom modules
        'recipesService'
        // 3rd Party Modules

    ]);
})();
2) 配置 Angular 路由
为我们的 Angular 应用模块 – masterChefApp – 定义一个配置函数。在该配置函数中,使用来自 ngRoute 模块的路由提供程序服务来定义客户端路由。
angular.module('masterChefApp').config(['$routeProvider', '$locationProvider', function ($routeProvider, $locationProvider) {
        $routeProvider
        .when('/', {
            templateUrl: 'partials/recipes.html',
            controller: 'recipesController'
        })
        .when('/recipes/add', {
            templateUrl: 'partials/add.html',
            controller: 'recipesAddController'
        })
        .when('/recipes/edit/:id', {
            templateUrl: 'partials/edit.html',
            controller: 'recipesEditController'
        })
        .when('/recipes/delete/:id', {
            templateUrl: 'partials/delete.html',
            controller: 'recipesDeleteController'
        });

        $locationProvider.html5Mode(true);

}]);
第一个是默认路由 – 正斜杠。第二个是 /recipes/add。第三个是 /recipes/edit/ 并将 :id 作为路由参数传递,这允许我们获取一个动态 ID,以便匹配一个配方。最后一个路由 /recipes/delete/:id 也需要一个动态 ID 参数。这个默认路由将列出所有配方。“Add”路由将处理添加,“Edit”路由将处理编辑或更新,“Delete”路由将处理删除或移除。CRUD 功能由这四个客户端路由表示。对于每个路由,我们需要同时定义模板 URL – 指示要为此路由呈现的 HTML – 以及一个独立的控制器来处理该路由。
在最底部,使用 $locationProvider 的 html5Mode 函数,将其设置为 true,以确保我能够使用友好自然的 URL,并避免使用 hash bangs 进行客户端路由。
Angular JS 客户端控制器
我们已经配置了默认路由、添加路由、编辑路由和删除路由。然后我们需要对应的控制器:recipesController、recipesAddController、recipesEditController 和 recipesDeleteController。我们在 recipesController.js 中定义所有这些控制器。
1) 注入“Add”、“Edit”和“Delete”控制器
angular
        .module('masterChefApp')
        .controller('recipesController', recipesController)
        .controller('recipesAddController', recipesAddController)
        .controller('recipesEditController', recipesEditController)
        .controller('recipesDeleteController', recipesDeleteController);
2) 实现 Recipes Add Controller
recipesAddController.$inject = ['$scope', 'Recipe', '$location'];
    function recipesAddController($scope, Recipe, $location) {
        $scope.recipe = new Recipe();
        $scope.addRecipe = function () {
            $scope.recipe.$save(function () {
                $location.path('/');
            });
        }
    }
因此,recipesAddController 需要 $scope、Recipe 服务和 $location 服务。recipesAddController 创建或提供允许用户将配方添加到应用程序的功能。为此,它使用 Recipe 服务创建一个新的 $scope 变量 recipe。它还在这里创建一个 $scope 函数 – addRecipe – 该函数将通过使用 Recipe 服务的 save 方法将配方提交到服务器。在其回调函数中,当配方提交后,我们将应用程序重定向到其主页。
3) 实现 Recipes Edit Controller
recipesEditController.$inject = ['$scope', 'Recipe', '$location', '$routeParams'];
    function recipesEditController($scope, Recipe, $location, $routeParams) {
        $scope.recipe = Recipe.get({ id: $routeParams.id });
        $scope.editRecipe = function () {
            $scope.recipe.$save(function () {
                $location.path('/');
           });
        }
}
recipesEditController 需要 $scope、Recipe 服务、$location 服务。它还需要 $routeParameter 来传递 id。recipesEditController 创建或提供允许用户更新配方到应用程序的功能。我们将使用 &routeParams 服务来获取要更新的配方。通过从路由参数获取 ID 来获取配方 ID。然后,我们将通过调用 recipe 服务 get 函数来访问服务器并获取相应的配方——这次是提供该 ID 的 get 方法。这将提供给前端。用户将能够进行任何操作。
最后,我们将更新后的配方记录提交到服务器。
4) 实现 Recipes Delete Controller
recipesDeleteController.$inject = ['$scope', 'Recipe', '$location', '$routeParams'];
    function recipesDeleteController($scope, Recipe, $location, $routeParams) {
        $scope.recipe = Recipe.get({ id: $routeParams.id });
        $scope.deleteRecipe = function () {
            $scope.recipe.$remove({ id: $scope.recipe.id }, function () {
                $location.path('/');
            });
        };
}
recipesDeleteController 使用 $routeParams 获取 ID 并检索特定配方。然后提供 deleteRecipe 函数,我们可以在其中使用 Recipe 服务的 $remove 方法来告诉服务器我们想删除特定配方。
部分视图模板
1) 修改 Index.html 以使用 ng-view
修改 index.html 以使用部分视图。首先,添加一个“base”标签及其 href 属性为 /。这对于 $locationProvider 正常工作是必需的,因为它需要一个基础。现在转到 body 内容。删除所有内容,只使用 ng-view 指令。
<!DOCTYPE html>
<html ng-app="masterChefApp">
<head>
    <base href="/">
    <meta charset="utf-8" />
    <title>Master Chef Recipes</title>
    <script src="lib/angular/angular.min.js"></script>
    <script src="lib/angular-resource/angular-resource.min.js"></script>
    <script src="lib/angular-route/angular-route.min.js"></script>
    <script src="app.js"></script>
    </head>
<body ng-cloak>
    <div>
        <ng-view></ng-view>
    </div>
</body>
</html>
基于此 ng-view 指令和我们已经设置好的路由,ng-view 将能够根据客户端路由在 $routeProvider 上呈现正确的局部视图和正确的控制器。
我们在 app.js 文件中指定了四个控制器。这些控制器提供了 CRUD 操作。路由 URL / 将从服务器检索所有配方。/recipes/add 将创建新配方。带变量 id 的 recipes/edit 将更新现有配方,带变量 id 的 /recipes/delete 将从服务器删除或移除特定配方。
现在我们在 wwwroot 文件夹下创建一个“partials”文件夹。然后可以逐个添加模板。
2) 检索模板 – Recipes.html
右键单击 wwwroot 下的“partials”文件夹。添加一个新项。在客户端模板部分,选择 HTML Page。我们将它命名为“recipes.html”。

recipes.html 将检索并显示配方列表。
<div>
    <h2>Master Chief Recipes</h2>
    <ul>
        <li ng-repeat="recipe in recipes">
            <div>
               <h5>{{recipe.name}} - {{recipe.comments}}</h5>
            </div>
            <div>
                <a href="recipes/edit/{{recipe.id}}">edit</a>
            </div>
            <div>
                <a href="recipes/delete/{{recipe.id}}">delete</a>
            </div>
            <ul>
                <li ng-repeat="step in recipe.steps">
                    <p> step {{step.stepNo}} : {{step.instructions}}</p>
                    <ul>
                        <li ng-repeat="item in step.recipeItems">
                            <p> {{item.name}}  {{item.quantity}} {{item.measurementUnit}}</p>
                        </li>
                    </ul>
                </li>
            </ul>
        </li>
    </ul>
    <p><a href="recipes/add"> Add a new recipe </a></p>
</div>
请注意,这不是完整的 html。我们只是定义了一个将要在 AngularJS 应用程序中替换的部分视图。
现在如果我们运行它,应该能看到所有配方。

3) Bootstrap 样式
虽然它能工作,但它是一个完全朴素的 html。所以我们需要应用一些 CSS 样式。
Bootstrap 是一个非常流行的前端框架,它包含了基于 HTML 和 CSS 的设计模板,用于排版、表单、按钮、表格、导航、模态框、图片轮播等,以及可选的 JavaScript 插件。应用 Bootstrap 样式可以让我们的 Master Chef Web 应用程序更漂亮。
我们已经在 bower 配置中添加了 bootstrap 包。
 {
	"name": "asp.net",
	"private": true,
  "dependencies": {
    "jquery": "3.1.0",
    "bootstrap": "3.1.0",
    "angular": "1.5.8",
    "angular-route": "1.5.8",
    "angular-resource": "1.5.8"
  }
}
因此,Bootstrap 已经安装在 wwwroot\lib 文件夹中。现在我们将其包含在 index.html 中。
<link href="lib/bootstrap/dist/css/bootstrap.min.css" rel="stylesheet" media="screen">
我们将应用以下 Bootstrap 样式。
我们将 index.html 中的主 div 应用 .container-fluid (全宽度) 类以实现正确的对齐和内边距。
我们在 recipes.html 中的 li 中应用了所有的 .list-group 来实现 UI,.list-group-item。我们还为添加链接应用了“btn-primary”,为编辑链接应用了“btn-default”,为删除链接应用了“btn-delete”。我还想将配方显示为徽章,所以也应用了 .badge 样式。
再次运行 Master Chef,看看它现在是什么样子。

Bootstrap 包含一个强大的移动优先的网格系统,用于构建各种形状和大小的布局。它基于 12 列布局,并有多个层级,每个层级对应一个媒体查询范围。它有三个主要组件——容器、行和列。容器——.container 用于固定宽度或 .container-fluid 用于全宽度——居中你的网站内容并帮助对齐你的网格内容。行是列的水平分组,确保你的列正确对齐。列类表示你希望在一行中使用的总共 12 列中的多少列。所以如果你想要三列等宽,你会使用 .col-xs-4。
我们在 Master Chef 模板中使用了 Bootstrap 网格系统。
4) 使用 Angular JS 实现展开/折叠
我知道有很多方法可以用 jQuery 来实现展开/折叠并修改 DOM。但请记住,我们使用 AngularJS 的 MVVM 模式。所以我热衷于通过在控制器 (ViewModel) 中更改模型来实现展开/折叠。
在 recipesController 中添加 expand() 函数。在 expand() 函数中,我们设置了 recipe 对象的 show 属性。
recipesController.$inject = ['$scope', 'Recipe'];

    function recipesController($scope, Recipe) {
        $scope.recipes = Recipe.query();
        $scope.expand = function (recipe) {
            recipe.show = !recipe.show;
        }
}
我们添加了一个 ng-click 来调用 recipesController 中的 expand() 函数。
  <div class="btn-group">
                <button class="btn badge pull-left" ng-click="expand(recipe)"><h5>{{recipe.name}} - {{recipe.comments}}</h5></button>
 </div>
然后我们使用 ng-show 来控制是否显示配方的详细信息。
<ul class="list-group" ng-show="recipe.show">
                <li ng-repeat="step in recipe.steps" class="list-group-item">

只需点击配方徽章即可展开您想查看的内容。

5) 创建模板 – add.html
右键单击 wwwroot 下的“partials”文件夹。添加一个新项。在客户端模板部分,选择 HTML Page。我们将它命名为“add.html”。
在 add.html 中,使用 ng-submit 将数据发布到服务器。我们将用户输入的信息通过 ng-model 指令绑定到作用域变量 recipe。当用户通过按下“保存”按钮提交表单时,我们将调用一个作用域函数 addRecipe,该函数在我们控制器内部会将此 recipe 对象提交到服务器。
<h1>Add a new recipe</h1>
<div class="container-fluid">
    <form ng-submit="addRecipe()">
        <div class="row">
            <div class="form-group col-xs-4">
                <label for="name">Name</label>
                <input ng-model="recipe.name" name="name" type="text" class="form-control" />
            </div>
        </div>
        <div class="row">
            <div class="form-group col-md-4 col-xs-8">
                <label for="comments">Comments</label>
                <input ng-model="recipe.comments" name="comments" type="text" class="form-control" />
            </div>
        </div>
        <div class="row">
            <button type="submit" class="btn btn-primary">Save</button>
            <a href="/" class="btn btn-default">Cancel</a>
        </div>
    </form>
</div>

6) 编辑模板 – edit.html
右键单击 wwwroot 下的“partials”文件夹。添加一个新项。在客户端模板部分,选择 HTML Page。我们将它命名为“edit.html”。
现在我们要更新一个配方。我们将在 edit.html 局部模板中处理此问题。edit.html 的外观类似于 add.html,因为我们需要为最终用户提供所有必要字段来实际更新现有配方。我们有 recipe.name 和 recipe.comments 的输入。它们通过 ng-model 指令绑定到一个作用域变量——一个对象 recipe。此外,在 edit 控制器中,有一个作用域函数 – editRecipe。因此,当用户在 edit.html 中按下“保存”按钮时,该函数将被调用,其任务是将更新后的配方信息提交到服务器以进行持久化存储。
<h1>Edit recipe</h1>
<div class="container-fluid">
    <form ng-submit="editRecipe()">
        <div class="row">
            <div class="form-group col-xs-4">
                <label for="name">Name</label>
                <input ng-model="recipe.name" name="name" type="text" class="form-control" />
            </div>
        </div>
        <div class="row">
            <div class="form-group col-md-4 col-xs-8">
                <label for="comments">Comments</label>
                <input ng-model="recipe.comments" name="comments" type="text" class="form-control" />
            </div>
        </div>
        <div class="row">
            <button type="submit" class="btn btn-primary">Save</button>
            <a href="/" class="btn btn-default">Cancel</a>
        </div>
    </form>
</div>

7) 删除模板
右键单击 wwwroot 下的“partials”文件夹。添加一个新项。在客户端模板部分,选择 HTML Page。我们将它命名为“delete.html”。
在 delete.html 中,我们将提供一段确认信息。您真的要删除这个配方吗?我们将绑定到待删除的配方信息。我们将提供一个按钮,该按钮调用一个作用域函数 – deleteRecipe。它将向服务器提交一个请求以移除特定配方。
<div class="alert alert-warning">
    <p>Do you really want to delete this recipe?</p>
    <p> {{recipe.name}} - {{recipe.comments}}</p>
</div>
<button ng-click="deleteRecipe()" class="btn btn-danger">Yes</button>
<a href="/" class="btn btn-default">No</a>

多个 URL 映射到同一个 Web API 控制器
那配方步骤和配方项呢?一般而言,我们可以创建单独的 API 控制器来处理配方步骤和配方项。但这太繁琐了。我更希望将所有与配方相关的 RESTful 服务包装在 RecipesController 中。但这肯定需要为配方步骤操作和配方项操作使用不同的 URL。幸运的是,ASP.NET Core Web API 支持不同的路由。路由是 Web API 如何将 URI 匹配到操作。Web API 支持一种新的路由类型,称为属性路由。顾名思义,属性路由使用属性来定义路由。属性路由让您对 Web API 中的 URI 有更多的控制权。例如,您可以轻松创建描述资源层次结构的 URI。
Web 控制器类的 Route 属性是基础 URI。
[Route("api/[controller]")]
    public class RecipesController : Controller
{
….
}
对于 RecipesController,基础 URL 是 /api/recipes。
[HttpGet("{id}")]
        public IActionResult Get(Guid id)
        {
            var recipe = _repository.GetEntity<Recipe>(id);
            if (recipe != null)
                return new ObjectResult(recipe);
            else
                return new NotFoundResult();

        }
上述方法没有路由属性,这意味着此方法被映射到 /api/recipes/:id。
但看起来我们需要为 get step 方法和 get item 方法提供不同的 URL。我希望获取步骤的 URL 是 /api/recipes/step/:id,获取项的 URL 是 /api/recipes/item/:id。因此,我们为 get step 方法添加 [Route("step/{id}")],为 get item 方法添加 [Route("item/{id}")]。
[HttpGet]
        [Route("step/{id}")]
        public IActionResult GetStep(Guid id)
        {
            var recipeStep = _repository.GetEntity<RecipeStep>(id);
            if (recipeStep != null)
                return new ObjectResult(recipeStep);
            else
                return new NotFoundResult();

        }
[HttpGet]
        [Route("item/{id}")]
        public IActionResult GetItem(Guid id)
        {
            var recipeItem = _repository.GetEntity<RecipeItem>(id);
            if (recipeItem != null)
                return new ObjectResult(recipeItem);
            else
                return new NotFoundResult();

        }
让我们看看 API 路由是否有效。单击 IIS Express 启动我们的 Web 应用程序。首先,我们检查 URL:api/recipes/step/AEE9602B-03EF-4A5F-A380-2962134ADB7E。

如预期般工作。
然后我们检查 api/recipes/item/862B91D5-FB60-4004-8179-0415AB900795。
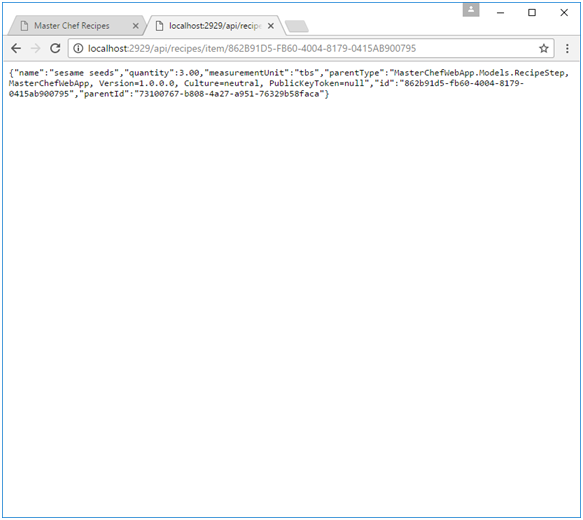
也工作正常。
我们还需要为 post 和 delete 添加 Route 属性。
//GET api/recipes/step/:id
        [HttpGet]
        [Route("step/{id}")]
        public IActionResult GetStep(Guid id)
        {
            var recipeStep = _repository.GetEntity<RecipeStep>(id);
            if (recipeStep != null)
                return new ObjectResult(recipeStep);
            else
                return new NotFoundResult();

        }

        //POST api/recipes/step
        [HttpPost]
        [Route("step")]
        public IActionResult UpdateStep([FromBody]RecipeStep recipeStep)
        {
            if (recipeStep.Id == Guid.Empty)
            {
                return new ObjectResult(_repository.AddEntity<RecipeStep>(recipeStep));
            }
            else
            {
                var existingOne = _repository.GetEntity<RecipeStep>(recipeStep.Id);
                existingOne.StepNo = recipeStep.StepNo;
                existingOne.Instructions = recipeStep.Instructions;
                _repository.UpdateEntity<RecipeStep>(existingOne);
                return new ObjectResult(existingOne);
            }
        }

        //DELETE api/recipes/step/:id
        [HttpDelete]
        [Route("step/{id}")]
        public IActionResult DeleteStep(Guid id)
        {
            _repository.DeleteEntity<RecipeStep>(id);
            return new StatusCodeResult(200);
        }

        // GET api/recipes/item/:id
        [HttpGet]
        [Route("item/{id}")]
        public IActionResult GetItem(Guid id)
        {
            var recipeItem = _repository.GetEntity<RecipeItem>(id);
            if (recipeItem != null)
                return new ObjectResult(recipeItem);
            else
                return new NotFoundResult();

        }

        //POST api/recipes/item
        [HttpPost]
        [Route("item")]
        public IActionResult UpdateItem([FromBody]RecipeItem recipeItem)
        {
            if (recipeItem.Id == Guid.Empty)
            {
                if (recipeItem.MeasurementUnit == null)
                    recipeItem.MeasurementUnit = "";
                return new ObjectResult(_repository.AddEntity<RecipeItem>(recipeItem));
            }
            else
            {
                var existingOne = _repository.GetEntity<RecipeItem>(recipeItem.Id);
                existingOne.Name = recipeItem.Name;
                existingOne.Quantity = recipeItem.Quantity;
                existingOne.MeasurementUnit = recipeItem.MeasurementUnit;
                _repository.UpdateEntity<RecipeItem>(existingOne);
                return new ObjectResult(existingOne);
            }
        }

        //DELETE api/recipes/item/:id
        [HttpDelete]
        [Route("item/{id}")]
        public IActionResult DeleteItem(Guid id)
        {
            _repository.DeleteEntity<RecipeItem>(id);
            return new StatusCodeResult(200);
        }
单个 Angular 资源服务有多个路由 URL
Angular 资源服务也支持多个 URL。到目前为止,我们只使用了默认操作。
{
  get: {method: 'GET'},
  save: {method: 'POST'},
  query: {method: 'GET', isArray: true},
  remove: {method: 'DELETE'},
  delete: {method: 'DELETE'}
}
上述操作是 ng resource 内置的,我们可以直接使用。
  recipesService.factory('Recipe', ['$resource', function ($resource) {
        return $resource('/api/recipes/:id');
    }]);
但我们现在需要定义自己的自定义操作,并为该操作指定与默认 URL 不同的 URL。
recipesService.factory('Recipe', ['$resource', function ($resource) {
        return $resource('/api/recipes/:id', {}, {
            getRecipeStep: { method: 'GET', url: '/api/recipes/step/:id' },
            saveRecipeStep: { method: 'POST', url: '/api/recipes/step' },
            removeRecipeStep: { method: 'DELETE', url: '/api/recipes/step/:id' },
            getRecipeItem: { method: 'GET', url: '/api/recipes/item/:id' },
            saveRecipeItem: { method: 'POST', url: '/api/recipes/item' },
            removeRecipeItem: { method: 'DELETE', url: '/api/recipes/item/:id' }
        });
}]);
我们仍然使用配方 (recipe) 的默认操作,并添加新的自定义操作 getRecipeStep、saveRecipeStep、removeRecipeStep、getRecipeItem、saveRecipeItem 和 removeRecipeItem。
所有 URL 都匹配配方步骤和配方项的 Web API URL。
为配方步骤和配方项添加新的 Angular 路由
现在我们需要在 app.js 中为配方步骤的创建、更新、删除以及配方项的创建、更新、删除添加新的客户端路由。
     $routeProvider
       .when('/', {
           templateUrl: 'partials/recipes.html',
           controller: 'recipesController'
       })
       .when('/recipes/add', {
           templateUrl: 'partials/add.html',
           controller: 'recipesAddController'
       })
       .when('/recipes/edit/:id', {
           templateUrl: 'partials/edit.html',
           controller: 'recipesEditController'
       })
       .when('/recipes/delete/:id', {
           templateUrl: 'partials/delete.html',
           controller: 'recipesDeleteController'
       })
       .when('/recipes/addStep/:id', {
           templateUrl: 'partials/addStep.html',
           controller: 'recipesAddStepController'
       })
       .when('/recipes/editStep/:id', {
           templateUrl: 'partials/editStep.html',
           controller: 'recipesEditStepController'
       })
       .when('/recipes/deleteStep/:id', {
           templateUrl: 'partials/deleteStep.html',
           controller: 'recipesDeleteStepController'
       })
       .when('/recipes/addItem/:id', {
           templateUrl: 'partials/addItem.html',
           controller: 'recipesAddItemController'
       })
       .when('/recipes/editItem/:id', {
           templateUrl: 'partials/editItem.html',
           controller: 'recipesEditItemController'
       })
       .when('/recipes/deleteItem/:id', {
           templateUrl: 'partials/deleteItem.html',
           controller: 'recipesDeleteItemController'
       });
为配方步骤和配方项添加新的 Angular 控制器
在 recipesController.js 中注入 step 和 item 控制器。
     angular
        .module('masterChefApp')
        .controller('recipesController', recipesController)
        .controller('recipesAddController', recipesAddController)
        .controller('recipesEditController', recipesEditController)
        .controller('recipesDeleteController', recipesDeleteController)
        .controller('recipesAddStepController', recipesAddStepController)
        .controller('recipesEditStepController', recipesEditStepController)
        .controller('recipesDeleteStepController', recipesDeleteStepController)
        .controller('recipesAddItemController', recipesAddItemController)
        .controller('recipesEditItemController', recipesEditItemController)
        .controller('recipesDeleteItemController', recipesDeleteItemController);
recipesAddStepController 创建或提供允许用户将配方步骤添加到应用程序的功能。当我们添加配方步骤时,我们需要父配方 ID。我们将使用 &routeParams 服务来获取要创建的配方步骤。通过从路由参数获取 ID 来获取配方 ID。
recipesAddStepController.$inject = ['$scope', 'Recipe', '$location', '$routeParams'];
    function recipesAddStepController($scope, Recipe, $location, $routeParams) {
        $scope.recipeStep = new Recipe();
        $scope.recipeStep.parentId = $routeParams.id;
        $scope.addRecipeStep = function () {
            $scope.recipeStep.$saveRecipeStep(function () {
                $location.path('/');
            });
        };
    }
recipesEditStepController 创建或提供允许用户更新配方步骤到应用程序的功能。我们将使用 &routeParams 服务来获取要更新的配方步骤。通过从路由参数获取 ID 来获取配方步骤 ID。
    recipesEditStepController.$inject = ['$scope', 'Recipe', '$location', '$routeParams'];
    function recipesEditStepController($scope, Recipe, $location, $routeParams) {
        $scope.recipeStep = Recipe.getRecipeStep({ id: $routeParams.id });
        $scope.editRecipeStep = function () {
            $scope.recipeStep.$saveRecipeStep(function () {
                $location.path('/');
            });
        };
    }
recipesDeleteStepController 使用 $routeParams 获取 ID 并检索特定配方步骤。然后提供删除配方步骤到应用程序的功能。
    recipesDeleteStepController.$inject = ['$scope', 'Recipe', '$location', '$routeParams'];
    function recipesDeleteStepController($scope, Recipe, $location, $routeParams) {
        $scope.recipeStep = Recipe.getRecipeStep({ id: $routeParams.id });
        $scope.deleteRecipeStep = function () {
            $scope.recipeStep.$removeRecipeStep({ id: $scope.recipeStep.id }, function () {
                $location.path('/');
            });
        };
}
recipesAddItemController 创建或提供允许用户将配方项添加到应用程序的功能。当我们添加配方项时,我们需要父配方步骤 ID。我们将使用 &routeParams 服务来获取要创建的配方项。通过从路由参数获取 ID 来获取配方步骤 ID。
recipesAddItemController.$inject = ['$scope', 'Recipe', '$location', '$routeParams'];
    function recipesAddItemController($scope, Recipe, $location, $routeParams) {
        $scope.recipeItem = new Recipe();
        $scope.recipeItem.parentId = $routeParams.id;
        $scope.addRecipeItem = function () {
            $scope.recipeItem.$saveRecipeItem(function () {
                $location.path('/');
            });
        };
}
recipesEditItemController 创建或提供允许用户更新配方项到应用程序的功能。我们将使用 &routeParams 服务来获取要更新的配方项。通过从路由参数获取 ID 来获取配方项 ID。
    recipesEditItemController.$inject = ['$scope', 'Recipe', '$location', '$routeParams'];
    function recipesEditItemController($scope, Recipe, $location, $routeParams) {
        $scope.recipeItem = Recipe.getRecipeItem({ id: $routeParams.id });
        $scope.editRecipeItem = function () {
            $scope.recipeItem.$saveRecipeItem(function () {
                $location.path('/');
            });
        };
    }
recipesDeleteItemController 使用 $routeParams 获取 ID 并检索特定配方项。然后提供删除配方项到应用程序的功能。
    recipesDeleteItemController.$inject = ['$scope', 'Recipe', '$location', '$routeParams'];
    function recipesDeleteItemController($scope, Recipe, $location, $routeParams) {
        $scope.recipeItem = Recipe.getRecipeItem({ id: $routeParams.id });
        $scope.deleteRecipeItem = function () {
            $scope.recipeItem.$removeRecipeItem({ id: $scope.recipeItem.id }, function () {
                $location.path('/');
            });
        };
}
添加配方步骤和配方项的所有模板
现在我们需要创建配方步骤和配方项的所有模板。在 partials 文件夹中创建“addStep.html”、“editStep.html”、“deleteStep.html”、“addItem.html”、“editItem.html”和“deleteItem.html”。
1) 配方步骤模板
在 addStep.html 中,使用 ng-submit 将数据发布到服务器。当用户按下“保存”按钮时,调用作用域函数 addRecipeStep,该函数在我们控制器内部会将此配方步骤对象提交到服务器。
<h1>Add a new recipe step</h1>
<div class="container-fluid">
    <form ng-submit="addRecipeStep()">
        <div class="row">
            <div class="form-group col-xs-1">
                <label for="stepNo">Step No.</label>
                <input ng-model="recipeStep.stepNo" name="stepNo" type="text" class="form-control" />
            </div>
        </div>

        <div class="row">
            <div class="form-group col-md-4 col-xs-8">
                <label for="instructions">Instructions</label>
                <input ng-model="recipeStep.instructions" name="instructions" type="text" class="form-control" />
            </div>
        </div>
        <div class="row">
            <button type="submit" class="btn btn-primary">Save</button>
            <a href="/" class="btn btn-default">Cancel</a>
        </div>
    </form>
</div>

editStep.html 更新现有的配方步骤。输入字段通过 ng-model 指令绑定到一个作用域变量——一个对象 recipeStep。此外,在 step 编辑控制器中,有一个作用域函数 – editRecipeStep。
<h1>Edit Recipe Step</h1>
<div class="container-fluid">
    <form ng-submit="editRecipeStep()">
        <div class="row">
            <div class="form-group col-xs-1">
                <label for="stepNo">Step No.</label>
                <input ng-model="recipeStep.stepNo" name="stepNo" type="text" class="form-control" />
            </div>
        </div>

        <div class="row">
            <div class="form-group col-md-4 col-xs-8">
                <label for="instructions">Instructions</label>
                <input ng-model="recipeStep.instructions" name="instructions" type="text" class="form-control" />
            </div>
        </div>
        <div class="row">
            <button type="submit" class="btn btn-primary">Save</button>
            <a href="/" class="btn btn-default">Cancel</a>
        </div>
    </form>
</div>

在 deleteStep.html 中,我们将提供一段确认信息。我们将提供一个按钮,该按钮调用一个作用域函数 – deleteRecipeStep。它将向服务器提交一个请求以移除特定配方步骤。
<div class="alert alert-warning">
    <p>Do you really want to delete this recipe step?</p>
    <p> {{recipeStep.stepNo}} - {{recipeStep.instructions}}</p>
</div>
<button ng-click="deleteRecipeStep()" class="btn btn-danger">Yes</button>
<a href="/" class="btn btn-default">No</a>

2) 配方项模板
在 addItem.html 中,使用 ng-submit 将数据发布到服务器。当用户按下“保存”按钮时,调用作用域函数 addRecipeItem,该函数在我们控制器内部会将此配方项对象提交到服务器。
<h1>Add a new recipe item</h1>
<div class="container-fluid">
    <form ng-submit="addRecipeItem()">
        <div class="row">
            <div class="form-group col-xs-4">
                <label for="name">Name</label>
                <input ng-model="recipeItem.name" name="name" type="text" class="form-control" />
            </div>
        </div>
        <div class="row">
            <div class="form-group col-md-4 col-xs-4">
                <label for="quantity">Quantity</label>
                <input ng-model="recipeItem.quantity" name="quantity" type="text" class="form-control" />
            </div>
        </div>
        <div class="row">
            <div class="form-group col-md-4 col-xs-4">
                <label for="measurementUnit">Measurement Unit</label>
                <input ng-model="recipeItem.measurementUnit" name="measurementUnit" type="text" class="form-control" />
            </div>
        </div>
        <div class="row">
            <button type="submit" class="btn btn-primary">Save</button>
            <a href="/" class="btn btn-default">Cancel</a>
        </div>
    </form>
</div>

editItem.html 更新现有的配方项。输入字段通过 ng-model 指令绑定到一个作用域变量——一个对象 recipeItem。此外,在 item 编辑控制器中,有一个作用域函数 – editRecipeItem。
<h1>Edit Recipe Item</h1>
<div class="container-fluid">
    <form ng-submit="editRecipeItem()">
        <div class="row">
            <div class="form-group col-xs-4">
                <label for="name">Name</label>
                <input ng-model="recipeItem.name" name="name" type="text" class="form-control" />
            </div>
        </div>
        <div class="row">
            <div class="form-group col-md-4 col-xs-4">
                <label for="quantity"></label>
                <input ng-model="recipeItem.quantity" name="quantity" type="text" class="form-control" />
            </div>
        </div>
        <div class="row">
            <div class="form-group col-md-4 col-xs-4">
                <label for="measurementUnit"></label>
                <input ng-model="recipeItem.measurementUnit" name="measurementUnit" type="text" class="form-control" />
            </div>
        </div>
        <div class="row">
            <button type="submit" class="btn btn-primary">Save</button>
            <a href="/" class="btn btn-default">Cancel</a>
        </div>
    </form>
</div>

在 deleteItem.html 中,我们将提供一段确认信息。我们将提供一个按钮,该按钮调用一个作用域函数 – deleteRecipeItem。它将向服务器提交一个请求以移除特定配方项。
<div class="alert alert-warning">
    <p>Do you really want to delete this recipe item?</p>
    <p> {{recipeItem.name}}  {{recipeItem.quantity}} {{recipeItem.measurementUnit}}</p>
</div>
<button ng-click="deleteRecipeItem()" class="btn btn-danger">Yes</button>
<a href="/" class="btn btn-default">No</a>

一切都完成了。现在您可以创建、更新或删除配方了。您将成为一名真正的烹饪大师,而不仅仅是只遵循他人食谱的厨师。
IE 缓存问题
最后,我想谈谈发生在 IE 中的一个缓存问题。如果我们使用 IE 调试 IIS Express,在我添加一个新配方“Roasting Duck”之后,您无法立即看到我刚刚添加的新配方。它没有正确插入吗?去数据库检查,新配方在那里。看起来当返回列表时,AngularJS 根本没有发送 httpget 请求到服务器,而是直接从缓存中获取结果。这就是为什么新更新没有立即显示的原因。我们可以通过 httpProvider 来解决这个问题。在 AngularJS 应用程序的配置函数中注入 httpProvider。然后将 http 默认缓存设置为 false,并在 http get 请求头中将 If-Modified-Since 设置为 0。
angular.module('masterChefApp').config(['$routeProvider', '$httpProvider', '$locationProvider', function ($routeProvider, $httpProvider, $locationProvider) {
        //disable http cache
        $httpProvider.defaults.cache = false;
        if (!$httpProvider.defaults.headers.get) {
            $httpProvider.defaults.headers.get = {};
        }

        $httpProvider.defaults.headers.get['If-Modified-Since'] = '0';
        //////////////////////////////////////////////////////////////////

        $routeProvider
        .when('/', {
            templateUrl: 'partials/recipes.html',
            controller: 'recipesController'
        })
        .when('/recipes/add', {
            templateUrl: 'partials/add.html',
            controller: 'recipesAddController'
        })
        .when('/recipes/edit/:id', {
            templateUrl: 'partials/edit.html',
            controller: 'recipesEditController'
        })
        .when('/recipes/delete/:id', {
            templateUrl: 'partials/delete.html',
            controller: 'recipesDeleteController'
        })
        .when('/recipes/addStep/:id', {
            templateUrl: 'partials/addStep.html',
            controller: 'recipesAddStepController'
        })
        .when('/recipes/editStep/:id', {
            templateUrl: 'partials/editStep.html',
            controller: 'recipesEditStepController'
        })
        .when('/recipes/deleteStep/:id', {
            templateUrl: 'partials/deleteStep.html',
            controller: 'recipesDeleteStepController'
        })
        .when('/recipes/addItem/:id', {
            templateUrl: 'partials/addItem.html',
            controller: 'recipesAddItemController'
        })
        .when('/recipes/editItem/:id', {
            templateUrl: 'partials/editItem.html',
            controller: 'recipesEditItemController'
        })
        .when('/recipes/deleteItem/:id', {
            templateUrl: 'partials/deleteItem.html',
            controller: 'recipesDeleteItemController'
        });

        $locationProvider.html5Mode(true);

    }]);
然后我们再试一次。它效果很好。尽管我在 Google Chrome 中没有遇到这个缓存问题,但我们仍然需要在 IE 中修复这个问题,因为 Web 应用程序应该能在所有浏览器上工作。
结论
在本文中,我介绍了如何使用 Angular 路由来创建 SPA CRUD 应用程序。我们还讨论了如何在单个服务器端 Web API 控制器中映射多个 URL。相应地,如何在单个客户端 Angular 资源服务中映射不同的路由。从 Master Chef 第 3 部分开始,我们将开始一段关于 Angular2 和 EntityFramework Core 的新冒险。