
保护供其他 .NET 应用程序使用的 ASP.NET Web API
4.93/5 (13投票s)
本文将探讨如何保护 WEBAPI。
- 下载 AllDatabaseScripts.rar - 2 KB
- 下载 SecureWEBAPI.rar - 9.7 MB
- 下载 bin.zip - 1.9 MB
- 下载 APIConsumer.rar - 9.4 MB
- 下载 bin.rar - 1.7 MB
本文将探讨如何保护 WEBAPI。如今,每个开发者都可以创建 API,但很少有开发者会考虑保护它。API 是基于 URI 的,很容易被滥用,因为任何知道 URI 的人都可以利用它,因为我们没有对其进行任何身份验证,也没有检查发送请求的用户是否有效。
大多数支付网关公司都有自己的 API 工具包,用于保护其 API。在其中,他们会注册将要实现支付网关的客户端 [个人/公司]。之后,他们会提供加密密钥,以便以加密格式发送请求,这样即使有人拦截,也无法读取传输的实际数据。

进程
在此过程中,我们将创建 2 个 MVC Web 应用程序,一个 Web 应用程序将托管 Web API,另一个 Web 应用程序将使用 Web API [客户端]。
之后,我们将探讨如何使用自定义基于令牌的身份验证来保护 Web API,同时使用 TripleDES 算法对将要传输的令牌和数据进行加密和解密。
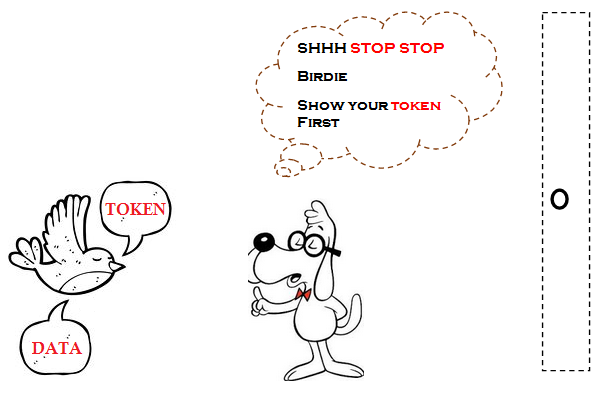
在此过程中,我们将在末端 [主机] 注册客户端,然后向 [客户端] 提供密钥(加密、解密)。同时,我们还将向客户端提供 [唯一 ID、令牌],因为令牌生成逻辑已提供给客户端,他们需要使用这些密钥和令牌来生成令牌并将其发送到主机 [主机应用程序] 进行身份验证。
如果您查看了上面的图片,您一定对令牌的工作机制有了清晰的了解。
客户端应用程序具有生成令牌(加密形式)的逻辑,它将把该令牌发送到主机应用程序。主机应用程序将验证从客户端应用程序发送的令牌,如果有效,则进一步访问,否则将发送错误消息作为响应。
所需工具
- Visual Studio 2012 Express
- SQL Server 2008 Express
结构
我们将创建两个 Web 应用程序
- SecureWEBAPI [主机]
- APIConsumer [客户端]
让我们首先创建数据库,然后再创建项目。
数据库
我们将创建一个名为 AccountDB 的数据库
在该数据库中,我们将有 2 个表
- AccountDetails
此表中包含客户银行账户的数据。
 图 2. AccountDetails 表
 - ClientRegistration
此表中将存储所有将访问 WEB API 的已注册客户端的数据。
此外,此表还包含 [Token、EncryKey、IVKey 和 UniqueID],我们将与客户端共享这些数据。
 图 3. ClientRegistration 表
完成对表的理解后,接下来我们将创建一个新项目。

创建 MVC 项目
要创建 MVC 项目,请打开 Visual Studio IDE,然后从菜单中选择“文件”-> 然后选择“新建”-> 在其中选择“项目”。选择后,将弹出一个名为“新建项目”的对话框,在此对话框的左侧面板中,您将看到“模板”-> 然后是“Visual C#”-> 在其中选择“Web”模板,因为我们将创建一个 MVC 应用程序。然后在中心面板中,您将看到所有 Web 项目,从中选择“ASP.NET MVC 4 Web 应用程序”,并将解决方案命名为“SecureWEBAPI”,最后单击“确定”按钮。


之后,将弹出一个名为“新建 ASP.NET MVC 4 项目”的对话框,其中包含各种项目模板可供选择。我们将选择基本项目模板,然后最终单击“确定”按钮。
单击“确定”按钮后,它将生成一个名为 SecureWEBAPI 的解决方案和项目。
下面是创建后的项目结构快照

创建项目并查看项目结构后,接下来我们将向项目添加 ADO.NET 实体框架。
您可能会想,“为什么我们需要在这个项目中添加 ADO.NET 实体框架?” 对吧?哈!这个问题的答案是,我们将在本应用程序中注册客户端并将其密钥和值存储在数据库中,当客户端发出 WEB API 请求(以及令牌和加密数据)时,我们将根据数据库验证令牌和密钥,以便任何有效的人都可以访问数据。
向项目添加 ADO.NET 实体框架
要将 ADO.NET 实体框架添加到项目,只需右键单击“Model”文件夹,然后选择“添加”-> 在其中选择“ADO.NET 实体数据模型”。选择后,将弹出一个名为“指定项名称”的新对话框。在此对话框中,我们需要为实体框架提供一个名称,我们将将其命名为 AccountData。

然后单击“确定”按钮。之后,它将引导您进入下一步,即“选择模型内容”。
在此对话框中,我们有两个选项可供选择
- 从数据库生成
- 空模型
出于此项目目的,我们将选择“从数据库生成”,因为我们已经创建了数据库和表。

选择“从数据库生成”后,只需单击“下一步”按钮即可在此过程中继续。

然后将弹出另一个名为“选择您的数据连接”的对话框。在此对话框中,我们将选择我们已创建的数据库,然后选择“是”以允许它在 Web.config 文件中的连接字符串中添加敏感数据。

然后在“选择您的数据连接”之后,接下来我们将单击“下一步”按钮以在此过程中继续。

之后,将弹出一个名为“选择您的数据库对象和设置”的新对话框。在此对话框中,我们将选择我们已创建的表,然后最终单击“完成”按钮。
最后,单击“完成”按钮后,将创建所选实体的图表。
下面是生成实体后的快照

同时查看添加实体框架后项目结构的变化。

在下一步中,我们将创建一个简单的控制器和视图,用于注册客户端并将其存储在数据库中。
为此,我使用脚手架添加了一个名为“ClientRegistrationController”的简单控制器。

点击“添加”按钮后,它将创建 ClientRegistrationController。与此同时,它还将在控制器中创建带有给定名称 [Create、Delete、Details、Edit 和 Index] 的操作方法,并以同样的方式将所有视图添加到相应的操作方法中。
同时,我还将 bootstrap 文件夹添加到解决方案中并进行了一些设计更改,以便视图设计看起来更好。
下面是 Client Registration Controller 及其视图以及新添加的 bootstrap 文件夹的快照。

下面是 Client Registration Create View 的快照。

在 ClientRegistration 控制器及其视图之后,下一步是在项目中添加一个 repository 文件夹,以便以松散耦合的方式执行一些数据库操作。
添加 Repository 文件夹和 Repository 模式
您可能会想,“我们要在该文件夹中添加什么?” 对吧?在这个 repository 文件夹中,我们将添加接口和具体类。
接口
IRegistrationIAccount
让我们首先添加 IRegistration 接口。
添加 IRegistration 接口
IRegistration 接口包含两个方法,其中第一个方法名为 [AccountDetailsByAccountNo]。它将令牌作为输入参数。
第二个方法将 UniqueID 作为输入参数,此令牌和唯一 ID 在注册后仅提供给客户端以访问主机应用程序。
代码片段
using SecureWEBAPI.Models;
using System;
using System.Collections.Generic;
using System.Linq;
using System.Web;

namespace SecureWEBAPI.Repository
{
    public interface IRegistration
    {
        ClientRegistration ValidateToken(string Token);
        KeysValues GetEncryptionDecryptionKeys(string UniqueID);
    }
}
最后,此接口将由一个具体类继承,该类将实现这些方法。
接下来,我们将看一下 IAccount 接口
添加 IAccount 接口
IAccount 接口包含两个方法,其中第一个方法名为 [ListAccountDetail]。它获取所有账户详细信息的列表。
第二个方法将 AccountNo 作为输入参数。此 AccountNo 将由客户端应用程序传递,以根据 AccountNo 获取账户详细信息。
代码片段
using SecureWEBAPI.Models;
using System;
using System.Collections.Generic;
using System.Linq;
using System.Web;

namespace SecureWEBAPI.Repository
{
    public interface IAccount
    {
        List<AccountDetail> ListAccountDetail();
        AccountDetail AccountDetailsByAccountNo(string AccountNo);
    }
}
我们已完成接口的添加,下一步我们将添加将实现这些接口的具体类。
添加 RegistrationRepository 类
RegistrationRepository 类将继承 IRegistration 接口并实现其中的所有方法。
我们将实现两个方法
ValidateTokenGetEncryptionDecryptionKeys
验证令牌
在此方法中,我们将根据客户端传入的令牌从数据库中验证令牌,并作为响应获取 ClientRegistration 模型。
GetEncryptionDecryptionKeys
在此方法中,我们将验证客户端传入的数据库中的 UniqueID,并作为响应根据传入的 UniqueID 获取 KeysValues 模型。
代码片段
using SecureWEBAPI.Models;
using System;
using System.Collections.Generic;
using System.Linq;
using System.Web;

namespace SecureWEBAPI.Repository
{
    public class RegistrationRepository : IRegistration
    {
        AccountDBEntities _AccountDBEntities;
        public RegistrationRepository(AccountDBEntities AccountDBEntities)
        {
            _AccountDBEntities = AccountDBEntities;
        }


        public ClientRegistration ValidateToken(string Token)
        {
            ClientRegistration objcr = new ClientRegistration();

            var accountDetail = from ad in _AccountDBEntities.ClientRegistrations
                                where ad.Token == Token
                                select ad;

            if (accountDetail == null)
            {
                objcr = null;
                return objcr;
            }
            else
            {
                return accountDetail.FirstOrDefault();
            }

        }

        public KeysValues GetEncryptionDecryptionKeys(string UniqueID)
        {
            KeysValues objkv = new KeysValues ();

            var KeyDetail = (from ad in _AccountDBEntities.ClientRegistrations
                                where ad.UniqueID == UniqueID
                               select new
                                {
                                   ad.IVKey,
                                   ad.EncryKey
                                }).FirstOrDefault();

            if (KeyDetail == null)
            {
                objkv = null;
            }
            else
            {
                objkv.EncryKey = KeyDetail.EncryKey;
                objkv.IVKey = KeyDetail.IVKey;
            }
            return objkv;
        }


    }
}

添加 AccountRepository 类
Account Repository 类将继承 IAccount 接口并实现其中的所有方法。
我们将实现两个方法
ListAccountDetailAccountDetailsByAccountNo
ListAccountDetail
在此方法中,我们将从数据库中获取所有账户详细信息的列表。
AccountDetailsByAccountNo
在此方法中,我们将通过传入客户端发送的 AccountNo 获取账户详细信息,并返回 AccountDetail 模型。
代码片段
using System;
using System.Collections.Generic;
using System.Linq;
using System.Web;
using SecureWEBAPI.Models;
namespace SecureWEBAPI.Repository
{
    public class AccountRepository : IAccount
    {
        AccountDBEntities _AccountDBEntities;
        public AccountRepository(AccountDBEntities AccountDBEntities)
        {
            _AccountDBEntities = AccountDBEntities;
        }

        public List<AccountDetail> ListAccountDetail()
        {
            return _AccountDBEntities.AccountDetails.ToList();
        }

        public AccountDetail AccountDetailsByAccountNo(string AccountNo)
        {
            var accountDetail = from ad in _AccountDBEntities.AccountDetails
                                where ad.AccountNo ==AccountNo
                                select ad;
            return accountDetail.SingleOrDefault();
        }
    }
}
完成添加 Concrete 类后,接下来我们将继续添加名为 CryptoLibrary 的文件夹,然后在该文件夹中添加包含加密和解密方法的类。

添加 CryptoLibrary 文件夹和 TripleDESAlgorithm 类
为了保护我们的 Web API,我们将使用 TripleDES 算法。
为了将其添加到项目中,我们将添加一个名为 CryptoLibrary 的新文件夹,并在该文件夹中添加一个名为 TripleDESAlgorithm 的类。
TripleDESAlgorithm 类包含三个方法:CreateDES、Encryption 和 Decryption。
代码片段
using System;
using System.Collections.Generic;
using System.IO;
using System.Linq;
using System.Security.Cryptography;
using System.Text;

namespace SecureWEBAPI.CryptoLibrary
{
    public static class TripleDESAlgorithm
    {

        private static TripleDES CreateDES(string key, string IV)
        {
            MD5 md5 = new MD5CryptoServiceProvider();
            TripleDES des = new TripleDESCryptoServiceProvider();
            des.Key = md5.ComputeHash(Encoding.Unicode.GetBytes(key));
            des.IV = Encoding.ASCII.GetBytes(IV);
            return des;
        }

        public static byte[] Encryption(string PlainText, string key, string IV)
        {
            TripleDES des = CreateDES(key, IV);
            ICryptoTransform ct = des.CreateEncryptor();
            byte[] input = Encoding.Unicode.GetBytes(PlainText);
            return ct.TransformFinalBlock(input, 0, input.Length);
        }

        public static string Decryption(string CypherText, string key, string IV)
        {
            byte[] b = Convert.FromBase64String(CypherText);
            TripleDES des = CreateDES(key, IV);
            ICryptoTransform ct = des.CreateDecryptor();
            byte[] output = ct.TransformFinalBlock(b, 0, b.Length);
            return Encoding.Unicode.GetString(output);
        }
    }
}
添加 TripleDES 算法以保护 WEB API 后,接下来我们将添加 ApiController。

添加 ApiController
我们将添加名为 PersonalAccount 的 ApiController。
PersonalAccount Web API 将由客户端应用程序使用,用于插入、更新和删除人员详细信息。
添加 ApiController 类似于添加控制器,只需右键单击控制器,然后选择“添加”-> 在其中选择“控制器”,选择控制器后,将弹出一个名为“添加控制器”的新对话框,在此对话框中,我们将 ApiController 命名为 PersonalAccountController,并在模板中选择“带空读/写操作的 API 控制器”,最后单击“添加”按钮。

添加 PersonalAccountController 后的视图
这是添加带“空读/写操作的 API 控制器”的 ApiController 时出现的默认代码片段,我们需要对此 ApiController 进行更改,使其只能由授权人员访问。

接下来,我们将在此 ApiController 中进行更改。
下面是 ApiController 的完整代码片段。
代码片段
using Newtonsoft.Json;
using SecureWEBAPI.CryptoLibrary;
using SecureWEBAPI.Filters;
using SecureWEBAPI.Models;
using SecureWEBAPI.Repository;
using System;
using System.Collections.Generic;
using System.Configuration;
using System.Net;
using System.Net.Http;
using System.Web.Http;
using System.Web.Script.Serialization;

namespace SecureWEBAPI.Controllers
{

    public class PersonalAccountController : ApiController
    {
        // GET api/personalaccount
        AccountRepository AccountRepository;

        public PersonalAccountController()
        {
            AccountRepository = new AccountRepository(new AccountDBEntities());
        }

        [HttpGet]
        public IEnumerable<AccountDetail> Get()
        {
            return AccountRepository.ListAccountDetail();
        }

        // GET api/personalaccount/5
        [HttpGet]
        public HttpResponseMessage Get(string id)
        {
            if (null != id)
            {
                var Response = AccountRepository.AccountDetailsByAccountNo(id);
                string SerializeData = JsonConvert.SerializeObject(Response);
                byte[] buffer = TripleDESAlgorithm.Encryption(SerializeData, ShareKeys.keyValue, ShareKeys.IVValue);
                return Request.CreateResponse(HttpStatusCode.OK, Convert.ToBase64String(buffer));
            }
            else
            {
                return Request.CreateErrorResponse(HttpStatusCode.NotFound, "AccountID not found");
            }
        }

        // POST api/personalaccount
        [HttpPost]
        public HttpResponseMessage Post(HttpRequestMessage Request)
        {
            if (null != Request)
            {
                var Responsedata = Request.Content.ReadAsStringAsync().Result;
                string data = TripleDESAlgorithm.Decryption(Responsedata, ShareKeys.keyValue, ShareKeys.IVValue);
                AccountDetail objVM = new JavaScriptSerializer().Deserialize
让我们逐步理解代码片段
第一步,我们将添加类的构造函数,并在其中创建 AccountRepository 类的对象,以便访问该类中的所有方法。
代码片段
public class PersonalAccountController : ApiController
{

    AccountRepository AccountRepository;

    public PersonalAccountController()
    {
        AccountRepository = new AccountRepository(new AccountDBEntities());
    }
}
HTTP GET 方法
此方法用于获取数据列表。
Http GET 方法将返回所有账户详细信息 [IEnumerable <AccountDetail>],要访问此 API,我们需要共享 URI 作为 [“api/personalaccount”]
在此方法中,我们调用 AccountRepository 类中的 ListAccountDetail 方法以从数据库中获取记录。
代码片段
// GET api/personalaccount
[HttpGet]
public IEnumerable<AccountDetail> Get()
{
    //Getting All AccountDetail Data from Database.
    return AccountRepository.ListAccountDetail();
}
按 ID 的 HTTP GET 方法
此方法用于通过传入 ID 检索记录。
我们需要向此方法传入 ID [AccountID] 以从数据库中检索记录,并且仅返回与该特定 ID 相关的数据作为响应。
要访问此 API,我们需要共享 URI 为 ["api/personalaccount/5"]
在此方法中,我们从 AccountRepository 类调用 AccountDetailsByAccountNo 方法以从数据库中获取与传入的 ID [AccountID] 相关的记录,然后我们使用 TripleDESAlgorithm 加密从数据库中检索到的数据,最后我们将响应发送给使用 WEB API 的客户端。
代码片段
// GET api/personalaccount/5
[HttpGet]
public HttpResponseMessage Get(string id)
{
    if (null != id)
    {
        //Getting AccountDetail Data from Database According to AccountID Passed.
        var Response = AccountRepository.AccountDetailsByAccountNo(id);

        //Serializing Object which we have got from Database.
        string SerializeData = JsonConvert.SerializeObject(Response);

        //Encrypting Serialized Object.
        byte[] buffer = TripleDESAlgorithm.Encryption(SerializeData, ShareKeys.keyValue, ShareKeys.IVValue);

        //Sending Response.
        return Request.CreateResponse(HttpStatusCode.OK, Convert.ToBase64String(buffer));
    }
    else
    {
        return Request.CreateErrorResponse(HttpStatusCode.NotFound, "AccountID not found");
    }
}
完成通过传入 ID 获取账户详细信息后,接下来我们将处理 PersonalAccount Controller 的 HttpPost 方法。
PersonalAccount 控制器的 HTTP POST 方法
此方法将以加密字符串格式接收 AccountDetail,为此我们使用了 HttpRequestMessage 参数,接收数据后,我们将使用密钥和 IV 对其进行解密,然后我们将反序列化该数据并将其转换为 AccountDetail 模型,再次为了发送数据响应,我们将使用密钥和 IV 加密数据,然后将其转换为 ToBase64String 并将其作为响应发送。
代码片段
// POST api/personalaccount
[HttpPost]
public HttpResponseMessage Post(HttpRequestMessage Request)
{
    if (null != Request)
    {
        // Receiving Object
        var Responsedata = Request.Content.ReadAsStringAsync().Result;

        // Decrypting received Object with Key and IV
        string data = TripleDESAlgorithm.Decryption(Responsedata, ShareKeys.keyValue, ShareKeys.IVValue);

        // Deserialize Decrypted data and casting to AccountDetail Model
        AccountDetail objVM = new JavaScriptSerializer().Deserialize<AccountDetail>(data);

        // For sending Response again SerializeObject Object
        string SerializeData = JsonConvert.SerializeObject(objVM);

        // Encrypting
        byte[] buffer = TripleDESAlgorithm.Encryption(SerializeData, ShareKeys.keyValue, ShareKeys.IVValue);

        // Sending Response
        return Request.CreateResponse(HttpStatusCode.OK, Convert.ToBase64String(buffer));
    }
    else
    {
        return Request.CreateErrorResponse(HttpStatusCode.NotFound, "AccountDetail not found");
    }
}
PersonalAccount 控制器的 HTTP PUT 方法
PUT 方法主要用于更新数据,为此客户端需要传递 ID 和数据来更新数据。
我们将接收的数据是加密字符串格式的,为此我们使用了 HttpRequestMessage 参数,接收数据后,我们将使用密钥和 IV 对其进行解密,然后我们将反序列化该数据并将其转换为 AccountDetail 模型。然后可以将此模型发送到数据库以更新数据和 ID。
代码片段
// PUT api/personalaccount/5
[HttpPut]
public HttpResponseMessage Put(string id, HttpRequestMessage Request)
{
    if (null != Request && !string.IsNullOrEmpty(id))
    {
        // Receiving Object
        var Responsedata = Request.Content.ReadAsStringAsync().Result;
        // Decrypting received Object with Key and IV
        string data = TripleDESAlgorithm.Decryption(Responsedata, ShareKeys.keyValue, ShareKeys.IVValue);
        // Deserialize Decrypted data and casting to AccountDetail Model
        AccountDetail objVM = new JavaScriptSerializer().Deserialize<AccountDetail>(data);
        // Sending Response
        return Request.CreateResponse(HttpStatusCode.OK, id);
    }
    else
    {
        return Request.CreateErrorResponse(HttpStatusCode.NotFound, "Error While Updating AccountDetail");
    }
}
PersonalAccount 控制器的 HTTP Delete 方法
Delete 方法只接受一个参数作为输入,即 ID,并根据该 ID 从数据库中删除数据。
代码片段
// DELETE api/personalaccount/5

[HttpPost]
public HttpResponseMessage Delete(string id)
{
    if (!string.IsNullOrEmpty(id))
    {
        return Request.CreateResponse(HttpStatusCode.OK, id);
    }
    else
    {
        return Request.CreateErrorResponse(HttpStatusCode.NotFound, "AccountID not found");
    }
}
完成添加和理解 WEB API 后,下一步我们将添加 AuthorizeAttribute。

向 WEB API 添加安全性的主要部分是使用 Authorize Attribute。
在此部分中,我们将创建一个新的 Authorize 属性,并编写逻辑以保护 WEB API。
代码片段
using SecureWEBAPI.CryptoLibrary;
using SecureWEBAPI.Models;
using SecureWEBAPI.Repository;
using System;
using System.Collections.Generic;
using System.Configuration;
using System.Linq;
using System.Net.Http;
using System.Text;
using System.Web;
using System.Web.Http;
using System.Web.Http.Controllers;

namespace SecureWEBAPI.Filters
{
    public class AuthoriseAPI : AuthorizeAttribute
    {
        IRegistration _IRegistration;

        public AuthoriseAPI()
        {
            _IRegistration = new RegistrationRepository(new AccountDBEntities());
        }


        protected override bool IsAuthorized(HttpActionContext actionContext)
        {
            try
            {
                IEnumerable<string> tokenHeaders;
                if (actionContext.Request.Headers.TryGetValues("APIKEY", out tokenHeaders))
                {
                    string tokens = tokenHeaders.First();
                    string key1 = Encoding.UTF8.GetString(Convert.FromBase64String(tokens));
                    string[] Data = key1.Split(new char[] { ':' });

                    if (tokens != null && Data != null)
                    {
                        string encry1 = Data[0]; //UniqueID
                        string encry2 = Data[1]; //DateTime with Ticks
                        string encry3 = Data[2]; //ClientToken + IPAddress +Ticks

                        if (_IRegistration.GetEncryptionDecryptionKeys(encry1) == null)
                        {
                            return false;
                        }
                        else
                        {
                            var KeysValues = _IRegistration.GetEncryptionDecryptionKeys(encry1);
                            //Hash Decryption
                            string DecryHash2 = TripleDESAlgorithm.Decryption(encry3, KeysValues.EncryKey, KeysValues.IVKey);
                            string[] Key2 = DecryHash2.Split(new char[] { ':' });

                            // 1)ClientToken
                            string ClientToken = Key2[0];

                            // 2)IPAddress
                            string IPAddress = Key2[1];

                            // 3)Ticks
                            long ticks = long.Parse(Key2[2]);

                            //ReValidating token Exists in Database or not
                            if (_IRegistration.ValidateToken(ClientToken.ToLower()) == null)
                            {
                                return false;
                            }
                            else
                            {
                                var Returndata = _IRegistration.ValidateToken(ClientToken.ToLower());

                                ShareKeys.IVValue = Returndata.IVKey;
                                ShareKeys.keyValue = Returndata.EncryKey;
                                DateTime currentdate = new DateTime(ticks);

                                //Comparing Current Date with date sent
                                bool timeExpired = Math.Abs((DateTime.UtcNow - currentdate).TotalMinutes) > 10;

                                if (!timeExpired)
                                {
                                    if (string.Equals(ClientToken.ToLower(), Returndata.Token.ToLower(), comparisonType: StringComparison.InvariantCulture) == true)
                                    {
                                        return true;
                                    }
                                    else
                                    {
                                        return false;
                                    }
                                }
                                else
                                {
                                    return false;
                                }
                            }
                        }
                    }
                    else
                    {
                        return false;
                    }
                }
                else
                {
                    return false;
                }
            }
            catch (Exception)
            {
                throw;
            }
        }

        protected override void HandleUnauthorizedRequest(HttpActionContext actionContext)
        {
            actionContext.Response = new System.Net.Http.HttpResponseMessage()
            {
                StatusCode = System.Net.HttpStatusCode.Unauthorized,
                Content = new StringContent("Not Valid Client!")
            };
        }
    }
}

AuthorizeAPI 属性的过程始于我们收到客户端的请求,该请求附带加密标头 [令牌 (APIKEY)],我们已告知将其与请求一起发送,此令牌为加密格式。
- 当我们收到客户端的请求时,我们也会在此请求中收到标头,之后我们将查找我们要用于身份验证的标头,即客户端将发送的 ["APIKEY"] 标头。
- 接下来,收到令牌后,我们将令牌转换为 Base64String,然后我们将从中获取字节作为输出。现在我们希望最终输出为字符串,为此我们将使用 get string 方法并将字节传递给它 [Encoding.UTF8.GetString (bytes)],最后我们得到字符串形式的输出值。
- 我们作为最终产品获得的字符串,我们将使用 [':'] 分割该字符串,因为从客户端发送的字符串是这种格式 [
CLientIDToken : IPAddress : ticks + UniqueID : ticks]。为了获取值,我们需要将其分割,分割值后,接下来我们将检查我们分割的值是否为 null - 然后将分割值分配给变量,并从该变量中取出第一个值 [
encry1],即UniqueID,然后我们将此值传递给GetEncryptionDecryptionKeys方法以从数据库中获取密钥。如果此UniqueID不正确,则它将无法从数据库中获取任何密钥,条件将为 false,并且此属性将抛出消息“Not Valid Client!”。 - 如果为 true,则我们将在 [
EncryKey, IVKey] 数据库中进一步调用相同的方法并将其存储在变量中。 - 然后我们有加密字符串 [
encry3],我们需要使用从数据库中获得的 [EncryKey, IVKey] 对其进行解密。 - 解密后,我们得到一个需要使用冒号 ['
:'] [CLientIDToken: IPAddress: ticks] 分割的字符串,分割后我们得到三个值 [CLientIDToken, IPAddress, ticks]。 - 从我们获得的值中,我们将使用
CLientIDToken并将其传递给 Validate Token 方法。此方法将检查此令牌是否存在于数据库中。如果存在,则返回 true 值,否则返回 false 值,同时它将从数据库中获取令牌和其他值。 - 接下来,我们收到的值中也包含了时间戳,现在我们将最终检查我们收到的时间戳是否已过期 [请求仅在 10 分钟内有效]
- 如果时间有效,则我们将进一步将客户端令牌与数据库中的令牌进行比较,如果有效,则返回 true,否则返回 false。
- 如果为 true,则允许它访问操作方法,否则如果为 false,则无法访问操作方法。
完成创建授权属性后,下一步我们将将此属性应用于 PersonalAccount ApiController,以便只有具有有效令牌的客户端才能访问此 ApiController。
下面的快照显示了创建属性后如何在控制器上应用。

完成主机应用程序部分后,接下来我们将处理客户端应用程序部分。

在此部分中,我们将创建一个名为 APIconsumer 的新 MVC 应用程序,此应用程序将使用我们创建的 WEB API。
要创建这些应用程序,请按照我在创建主机应用程序 [SecureWEBAPI] 中所示的相同步骤进行操作。
创建新应用程序后此解决方案的外观

应用程序的消费者或客户端要做的第一步是创建一个模型,他将发布到 Web API。
添加 AccountDetail
要添加模型,只需右键单击 Model 文件夹并选择“添加”-> 在其中选择“类”,将弹出一个新的“添加新项”对话框,其中默认选中“类”,只需输入类名 AccountDetail,然后单击“添加”按钮。
之后,我们将在其中添加与主机应用程序 AccountDetail 模型类似的属性。
代码片段
using System;
using System.Collections.Generic;
using System.Linq;
using System.Web;

namespace APIConsumer.Models
{
    public partial class AccountDetail
    {
        public int AccountID { get; set; }
        public string AccountNo { get; set; }
        public string Username { get; set; }
        public decimal? AccountBalance { get; set; }
        public string Mobilenumber { get; set; }
        public string PANNumber { get; set; }
        public string Aadhaarnumber { get; set; }
        public string EmailID { get; set; }
        public string CommunicationAddress { get; set; }
    }
}
代码片段

在下一步中添加模型后,我们将添加一个名为 CryptoLibrary 的文件夹,并在该文件夹中添加一个名为 EncryptionDecryptorTripleDES 的类。

添加 CryptoLibrary 文件夹和 TripleDESAlgorithm 类
为了保护我们的 Web API,我们将使用 TripleDES 算法。
为了将其添加到项目中,我们将添加一个名为 CryptoLibrary 的新文件夹,并在该文件夹中添加一个名为 TripleDESAlgorithm 的类。
TripleDESAlgorithm 类包含三个方法:CreateDES、Encryption 和 Decryption。
代码片段
using System;
using System.Collections.Generic;
using System.IO;
using System.Linq;
using System.Security.Cryptography;
using System.Text;

namespace APIConsumer.CryptoLibrary
{
    public static class TripleDESAlgorithm
    {

        private static TripleDES CreateDES(string key, string IV)
        {
            MD5 md5 = new MD5CryptoServiceProvider();
            TripleDES des = new TripleDESCryptoServiceProvider();
            des.Key = md5.ComputeHash(Encoding.Unicode.GetBytes(key));
            des.IV = Encoding.ASCII.GetBytes(IV);
            return des;
        }

        public static byte[] Encryption(string PlainText, string key, string IV)
        {
            TripleDES des = CreateDES(key, IV);
            ICryptoTransform ct = des.CreateEncryptor();
            byte[] input = Encoding.Unicode.GetBytes(PlainText);
            return ct.TransformFinalBlock(input, 0, input.Length);
        }

        public static string Decryption(string CypherText, string key, string IV)
        {
            byte[] b = Convert.FromBase64String(CypherText);
            TripleDES des = CreateDES(key, IV);
            ICryptoTransform ct = des.CreateDecryptor();
            byte[] output = ct.TransformFinalBlock(b, 0, b.Length);
            return Encoding.Unicode.GetString(output);
        }
    }
}
在下一步中添加 TripleDESAlgorithm 后,我们将添加一个名为 GenerateToken 的类,该类将包含生成我们将发送到主机应用程序的令牌的逻辑。

第一步,我们将创建 GenerateToken 类,并在其中添加一个名为 CreateToken 的静态方法。此方法接受三个参数作为输入 [string IPAddress, string Token, long ticks]

接收到三个参数后,接下来我们需要获取(keyValue、IVValue、UniqueID)以创建令牌,这些值由主机应用程序在我们将客户端注册到 [主机应用程序] 时提供,这些值存储在 Web.config 文件的 appSettings 中,因为如果将来任何值发生变化,我们无需更改整个应用程序,只需更改 Web.config 文件即可。


using APIConsumer.CryptoLibrary;
using System;
using System.Configuration;
using System.Text;

namespace APIConsumer.APIToken
{
    public class GenerateToken
    {
        public static string CreateToken(string IPAddress, string Token, long ticks)
        {
            string hashLeft = string.Empty;
            string hashRight = string.Empty;
            string encry1 = string.Empty;
            string encry2 = string.Empty;

            try
            {
                string key = Convert.ToString(ConfigurationManager.AppSettings["keyValue"]);
                string IV = Convert.ToString(ConfigurationManager.AppSettings["IVValue"]);
                string UniqueID = Convert.ToString(ConfigurationManager.AppSettings["UniqueID"]);

                // [encry1] CLientIDToken : IPAddress : ticks
                encry1 = string.Join(":", new string[] { Token, IPAddress, ticks.ToString() });

                // [encry2] UniqueID + ticks
                hashLeft = Convert.ToBase64String(TripleDESAlgorithm.Encryption(encry1, key, IV));
                hashRight = string.Join(":", new string[] { UniqueID, ticks.ToString() });

                // [CLientIDToken : IPAddress : ticks + UniqueID + ticks]

    var basestring =  Convert.ToBase64String(Encoding.UTF8.GetBytes(string.Join(":", hashRight, hashLeft)));

   return basestring;

            }
            catch (Exception)
            {
                throw;
            }
        }
    }
}
获取(keyValue、IVValue、UniqueID)后,接下来我们将连接字符串。首先我们将连接字符串与 [Token、IPAddress 和 ticks] 对连接,第二个字符串我们将与 [UniqueID、ticks] 对连接,最后我们将两个独立的字符串连接成一个字符串并将其转换为字节,然后将此字节转换为 ToBase64String,并将此字符串发送到主机应用程序。


添加 GenerateToken 后,接下来我们将添加一个控制器。

在控制器文件夹中添加名为 HomeController 的新控制器,此控制器中包含名为 Index 的默认操作方法。

完成控制器添加后,接下来我们将数据发布到主机应用程序。

在这里,我们将使用 index Action 方法将数据发布到主机应用程序,为此我们将使用 WebClient。
同时,当我们发布数据时,我们还需要发送一个令牌。发送令牌意味着我们需要生成它。为了生成令牌,我们创建了一个类,我们将调用该类并分配所需的参数,以便它生成令牌,并且我们还需要一些来自 appSettings 的密钥 [keyValue、IVValue、UniqueID、IPAddress 和 Token],传递所有这些参数将生成一个 base64 字符串,我们将将其作为令牌发送。
如果您查看操作结果,您会发现一个不同的结果,它是我们将在此部分中使用的异步操作结果,因为此 API 可能需要时间响应,并且如果您查看操作方法的代码片段,您会看到其中的 await 关键字,因为它将等待服务器响应
下面是我们将要发布 Account 对象的代码片段
[NonAction]
public AccountDetail AccountObject()
{
    AccountDetail objad = new AccountDetail();
    objad.AccountNo = "A000007";
    objad.Username = "DotnetSai";
    objad.AccountBalance = 15000;
    objad.Mobilenumber = "9999999999";
    objad.PANNumber = "ASDSD12356";
    objad.Aadhaarnumber = "XXXX-XXXX-XXXX";
    objad.EmailID = "XXX@gmail.com";
    objad.CommunicationAddress = "Mumbai";
    return objad;
}
Post 方法的代码片段
public class HomeController : Controller
{
    string Token = ConfigurationManager.AppSettings["Token"].ToString();
    string keyValue = ConfigurationManager.AppSettings["keyValue"].ToString();
    string IVValue = ConfigurationManager.AppSettings["IVValue"].ToString();
    string IPAddress = ConfigurationManager.AppSettings["IPAddress"].ToString();


[HttpGet]
public async Task<ActionResult> Index()
{
    // we are using async task
    await Task.Run(() => PostAccountDetails());
    return View();
}

[NonAction]
public void PostAccountDetails()
{
    using (var client = new WebClient())
    {
        // Generating token
        var Tokentemp = GenerateToken.CreateToken(IPAddress, Token, DateTime.UtcNow.Ticks);
        // URI where we are going to post data
        Uri URI = new Uri(ConfigurationManager.AppSettings["AuthURI"].ToString());
        // Content-Type
        client.Headers.Add("Content-Type:application/json");
        // Setting Token For sending from header
        client.Headers.Add("APIKEY", Tokentemp);
        client.Headers.Add("Accept:application/json");
        //Setting Callback
        client.UploadStringCompleted += new UploadStringCompletedEventHandler(Callback);
        //Serializing Object
        string SerializeData = JsonConvert.SerializeObject(AccountObject());
        // Encryption of object which is going to be sent
        byte[] buffer = TripleDESAlgorithm.Encryption(SerializeData, keyValue, IVValue);
        //return URI
        client.UploadStringAsync(URI, Convert.ToBase64String(buffer));
    }
}

}
现在,在操作结果中调用 PostAccountDetails 方法后,我们将了解 PostAccountDetails 方法的工作原理。我们已经生成了令牌,现在我们将把此密钥发送到标头 [client.Headers.Add("APIKEY", Tokentemp);], Content-Type 为 application/json,然后我们调用 UploadStringAsync 方法将此数据发布到主机应用程序。同时,为了接收响应,我们需要设置 Callback 方法,它将同时接收错误和响应。
在此过程中,我们还将序列化要发送的对象,然后将该对象加密并转换为 ToBase64String 并发送到主机应用程序。
下面是回调方法的代码片段
此方法用于接收主机应用程序返回的错误和响应。
如果发生错误 [Error],则进入 if 块 [if],如果发生结果 [Result],则进入 else if [else if] 块。
[NonAction]
void Callback(object sender, UploadStringCompletedEventArgs e)
{
    if (e.Error != null)
    {

    }
    else if (e.Result != null || !string.IsNullOrEmpty(e.Result))
    {
        string finalData = JToken.Parse(e.Result).ToString();
        string data = TripleDESAlgorithm.Decryption(finalData, keyValue, IVValue);
        AccountDetail AccountDetail = JsonConvert.DeserializeObject<AccountDetail>(data);
    }
}
下面是向主机应用程序发送令牌和加密数据的快照
向主机应用程序发送令牌和对象的实时调试。
我们将发送的 AccountDetails 对象


下面是主机应用程序接收令牌并验证时的快照
从客户端应用程序接收令牌时 AuthoriseAPI 属性的实时调试。


下面是主机应用程序接收请求并解密数据时的快照
从客户端应用程序接收请求时 HTTP Post 请求的实时调试

到目前为止,我们只看到了 post 方法,现在让我们看看如何以安全的方式获取数据。

通过将 AccountID 传递给主机应用程序来获取数据
在此部分中,我们将通过调用 Get 方法从主机应用程序获取 AccountDetail 详细信息,在此方法中,我们将传递 Account ID 以获取 AccountDetail。
下面是调用 GetAllAccountDetails 方法时的代码片段
在此部分中,我们将调用 GetAllAccountDetails 方法。
[HttpGet]
public async Task<ActionResult> IndexAsync()
{
    // We are using async task
    await Task.Run(() => GetAllAccountDetails());
    return View();
}
下面是回调方法的代码片段
在此代码片段中,我们首先需要设置 URI,该 URI 用于从主机应用程序获取数据。与此同时,我们传递了 Account ID,因为我们需要获取我们传递的该 Account ID 的数据。同样,我们将传递 APIKEY 令牌进行身份验证,该令牌将识别请求来自有效客户端,最后我们需要设置回调方法,该方法将接收从主机应用程序发送的响应 [AccountDetails 对象]。
[NonAction]
public void GetAllAccountDetails()
{
    using (var client = new WebClient()) //WebClient
    {
        // URI
        Uri URI = new Uri("https://:1505/api/personalaccount/" + "A000005");
        client.Headers.Add("Content-Type:application/json");
        // Generating token
        client.Headers.Add("APIKEY", GenerateToken.CreateToken(IPAddress, Token, DateTime.U
        client.Headers.Add("Accept:application/json");
        //Setting Callback
        client.DownloadStringCompleted += new DownloadStringCompletedEventHandler(DownloadS
        client.DownloadStringAsync(URI);
    }
}
下面是回调方法的代码片段
此回调方法将接收响应,该响应可能是错误或结果。如果是错误,则进入 if 块,在那里我们可以记录从主机应用程序收到的错误;如果进入 else 块,则我们将收到 [AccountDetails],我们需要通过传递 Key 和 Value 对以及 DeserializeObject 来解密它,并将其转换为 AccountDetails 对象以供使用。
[NonAction]
void DownloadString_Callback(object sender, DownloadStringCompletedEventArgs e)
{
    if (e.Error != null)
    {
        object objException = e.Error.GetBaseException();

        Type _type = typeof(WebException);
        if (_type != null)
        {
            WebException objErr = (WebException)e.Error.GetBaseException();
            WebResponse rsp = objErr.Response;
            using (Stream respStream = rsp.GetResponseStream())
            {
                StreamReader reader = new StreamReader(respStream);
                string text = reader.ReadToEnd();
            }
        }
        else
        {
            Exception objErr = (Exception)e.Error.GetBaseException();
        }
    }
    else if (e.Result != null || !string.IsNullOrEmpty(e.Result))
    {
        string finalData = JToken.Parse(e.Result).ToString();
        string data = TripleDESAlgorithm.Decryption(finalData, keyValue, IVValue);
        AccountDetail AccountDetail = JsonConvert.DeserializeObject<AccountDetail>(data);
    }
}

通过 AccountID 从主机应用程序以安全方式获取数据


Home 控制器 [客户端应用程序] 的完整代码片段


结论
通过这种方式,我们将在 Web API 被其他 .NET 应用程序使用时对其进行保护。
注意:本文中提供给客户端的逻辑生成过程是为了理解,实际上它将是 [. DLL],我们将与客户端共享它以隐藏其逻辑以确保安全性。