
使用 ARM API 和新的 Azure 门户访问 Azure 资源管理器虚拟机资源
4.50/5 (4投票s)
如何通过 Azure 资源管理器 (ARM) API 以编程方式访问 Azure 中的资源
在这篇文章中,我将解释如何使用 **Azure 资源管理器 (ARM) API** 以编程方式访问 **Azure** 中的 **资源**。为了说明这一点,我们将逐步完成一些步骤,在这些步骤中,我们将尝试使用注册到 **Azure Active Directory (AAD)** 的 **原生** 应用程序来访问托管在 **Azure** 中的 **虚拟机** 的详细信息。
为了本次演练,我在 Azure 订阅中创建了一个新的 VM。

接下来,我们将在 Azure Active Directory 中创建一个 **原生应用程序**。
步骤 1:在 AAD 中创建原生应用程序
在 Azure 门户中,导航到 Azure Active Directory,然后单击 应用注册 部分。
接下来,单击顶部的 添加 选项。

这将在右侧打开一个新窗格。
如下图所示,为应用程序提供一个 **名称**,在 **应用程序类型** 下拉菜单中选择 **原生** 应用程序选项,并在第三个输入选项中提供一个 **重定向 URI**。此 URL 不需要是实际的终结点,它只需要是一个有效的 URI。
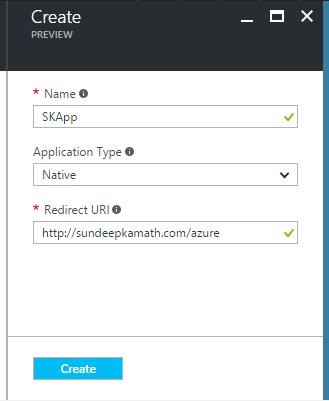
单击底部的 **创建** 按钮,这样新的原生应用程序就会被创建。

接下来,我们将授权此应用程序访问 **Windows Azure 服务管理 API**。这将帮助我们稍后访问 ARM API。
步骤 2:授权原生应用程序访问 Azure 服务管理 API
单击新创建的应用程序(在此例中为 SKApp),然后单击 设置 选项。
这将在右侧打开一个窗格。单击 所需权限 选项,然后单击顶部的 添加 选项。

现在,对于 **选择 API** 选项,请在右侧选择 **Windows Azure 服务管理 API** 选项。

选择后,按如下方式为应用程序授予访问此 API 的 **委托权限**:

授予权限后,分配的权限列表将如下所示...

步骤 3:为该原生应用程序创建密钥
现在我们将创建一个 **密钥** 并将其与此应用程序关联。
单击 **设置** 窗格中的 **密钥** 部分。

添加 **密钥描述** 并根据您的需要选择 **到期** 时间。
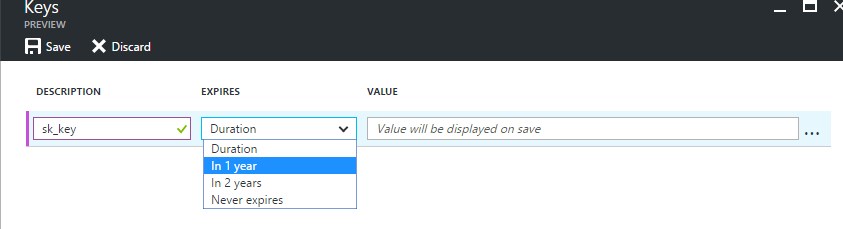
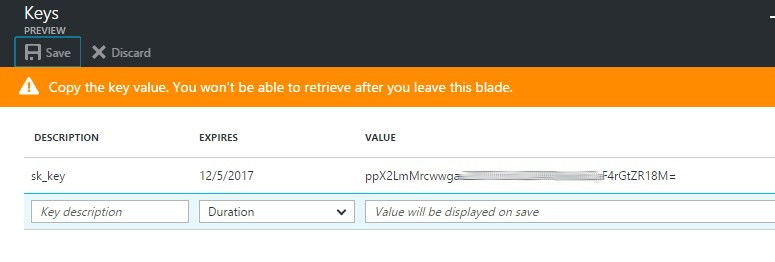
现在单击顶部的 **保存** 选项,就会生成一个密钥。
请 **安全地** 妥善保管此密钥,因为稍后我们尝试访问 ARM API 时将需要它。
步骤 4:保存应用程序 ID 和目录 ID
现在我们已经生成并保存了一个 **密钥**,我们还需要保存 **原生应用程序** 的 **应用程序 ID** 和 Active Directory 实例的 **目录 ID**。
您将在原生应用程序详细信息窗格中找到 **应用程序 ID**。

**目录 ID**,也称为 **租户 ID**,是 **AAD** 实例的 **唯一 ID**。
您可以在以下位置找到它:

除了这些之外,我们还需要以下附加参数:
服务资源 ID
此 ID 的值为 https://management.core.windows.net/。
OAuth 终结点
此 URL 用于授权,其值为 https://login.microsoftonline.com/<Directory ID>/oauth2/authorize。
如上所示,授权 URL 需要 **目录 ID**。
至此,我们已经拥有了实现 **REST 客户端** 来消耗 **ARM API** 的所有详细信息。
但是,在执行此操作之前,我们需要执行一个额外的步骤,即在订阅上为我们的原生应用程序授予权限。
注意:这些权限可以在 **订阅**、**资源组** 或 **资源** 级别(在此例中为虚拟机级别)授予。
在 **订阅** 或 **资源组** 级别授予权限将 **继承** 给它们之下的所有资源。
步骤 5:在订阅级别授予原生应用程序权限
要授予权限,请钻取到我们要为此应用程序分配权限的相关订阅。

单击如上所示的 添加 选项,然后选择 读者 角色选项。

完成后,通过在 添加用户 输入框中输入名称来选择我们之前创建的原生应用程序。
一旦应用程序显示出来,请选择它,然后单击下面的 选择 按钮。

就是这样!我们完成了。
现在我们可以继续使用 **REST 客户端** 来消耗 **ARM REST API**。
步骤 6:使用 REST 客户端和依赖参数消耗 ARM API
让我们创建一个简单的 **C#.NET 控制台** 应用程序来实现这一点。
您需要安装 Microsoft.IdentityModel.Clients.ActiveDirectory 的 NuGet 包。在撰写本文时,我使用的是 v3.13.8。
我们将创建一个名为 AzureAD.cs 的类来对我们的用户进行身份验证并获取一个 **访问令牌**,该令牌稍后可用于调用基于 ARM 的 REST API。
using Microsoft.IdentityModel.Clients.ActiveDirectory;
using System;

namespace AzureNewPortalResourceVMIntegration
{
    public class AzureAD
    {
        internal static string Authenticate(string authority,
            string serviceResourceId, string clientId, string secretKey)
        {
            AuthenticationContext authContext = new AuthenticationContext(authority, true);
            AuthenticationResult authResult = null;

            try
            {
                authResult = authContext
                    .AcquireTokenAsync(serviceResourceId,
                                new ClientCredential(clientId, secretKey)).Result;

                if (authResult != null)
                    Console.WriteLine("Auth Token: {0}", authResult.AccessToken);
                else
                    throw new Exception("Azure AD authentication failed.");

            }
            catch (AdalException adEx)
            {
                Console.WriteLine("Exception: {0}", adEx);
            }

            return authResult.AccessToken;
        }
    }
}
我们还需要一个类来使用此访问令牌发出 REST API 调用。我们将为此创建一个名为 AzureRestClient.cs 的类。
using System.Net.Http;
using System.Net.Http.Headers;
using System.Threading.Tasks;

namespace AzureNewPortalResourceVMIntegration
{
    internal class AzureRestClient
    {
        internal static async Task<string> ExecuteRequest(string accessToken, string url)
        {
            string serviceBaseAddress = url;
            string responseMessage = null;

            HttpClient httpClient = new HttpClient();

            httpClient.DefaultRequestHeaders.Authorization =
                new AuthenticationHeaderValue("Bearer", accessToken);

            HttpResponseMessage response =
                await httpClient.GetAsync(serviceBaseAddress);

            if (response.IsSuccessStatusCode)
            {
                responseMessage = await response.Content.ReadAsStringAsync();
                return responseMessage;
            }
            else
            {
                responseMessage = await response.Content.ReadAsStringAsync();

                if (response.StatusCode == System.Net.HttpStatusCode.Unauthorized)
                {
                    return "Access denied.";
                }
                return responseMessage;
            }
        }
    }
}
这样,我们就可以像这样获取我们的 VM SK-Lin-1 的详细信息了:
using System;

namespace AzureNewPortalResourceVMIntegration
{
    class Program
    {
        static void Main(string[] args)
        {
            string tenantId = "<Enter Directory Id>";
            string clientId = "<Enter Application Id>";
            string secretKey = "<Enter Secret Key>";
            string subscriptionId = "<Enter Subscription Id>";
            string resourceGroupName = "<Enter Resource group name>";
            string virtualMachineName = "<Enter Virtual Machine name>";

            string oauthUrl = "https://login.microsoftonline.com/{0}/oauth2/authorize";
            string serviceResourceId = "https://management.core.windows.net/";

            string authority = string.Format(oauthUrl, tenantId);

            string vmDetailsURL =
            $"https://management.azure.com/subscriptions/{subscriptionId}/resourceGroups/
            {resourceGroupName}/providers/Microsoft.Compute/virtualMachines/{virtualMachineName}?
            api-version=2015-06-15";

            string accessToken = AzureAD.Authenticate
                    (authority, serviceResourceId, clientId, secretKey);

            if (accessToken != null)
            {
                AzureRestClient.ExecuteRequest(accessToken, vmDetailsURL)
                     .ContinueWith((task) =>
                     {
                         Console.WriteLine(task.Result);
                     });

            }
            Console.ReadLine();
        }
    }
}
有关用于获取 VM 详细信息的 **REST API** 的更多信息,请参阅 Azure 参考指南。
获得响应后,您可以解析 **JSON 结果** 并从中提取相关数据。
您还可以从我的 github 仓库 下载源代码。
请探索 **Azure 参考文档**,其中列出了许多其他可用的 API。在所有情况下,代码都保持不变,只有 REST API URL 及其依赖参数会发生变化。
希望这对您有所帮助!
参考
文章 使用 ARM API 和新的 Azure 门户访问 Azure 资源管理器虚拟机资源 最初发布于 Sundeep Kamath 的博客。