
MTC.Host. 一个托管和管理 Windows 服务的基础设施
在本文中,我将以一种实用且互动的方式解释托管和管理 Windows 服务的基础设施的实现。作为解决方案的实际示例,将实现一个 DucDNS 的动态 IP 更新客户端。
引言
管理 Windows 服务,同时还有一个与之交互的客户端,并在 Windows 状态栏中有一个图标,允许——如今——它不仅被特定服务使用,还可以被一个人可以实现的各种解决方案使用,这项任务可以节省大量工作。
在本文中,我们将使用开发的框架实现一个动态 DNS 更新客户端,用于 DucDNS,该客户端可以作为 Windows 服务/应用程序运行。
在 github 上关注或 fork 我。
背景
多年来,我一直在为我的客户使用动态 DNS。
我们的软件(MTCGestion)允许公司分支机构以分布式方式部署,并通过(例如)使用虚拟专用网络进行互连。
对于后者,我们使用了出色的 openvpn,它效果非常好。
然而,VPN 客户端需要知道服务器的地址,而这个地址会随着普通互联网运营商而不断变化。这就是动态 DNS 发挥作用的地方。
有几个提供商(non-ip、DynDNS 等)提供免费和付费服务。
至于免费的,总是有限制的。其中之一是每隔一定时间必须重新确认服务正在被使用,否则账户将被注销。
我大多数客户都没有 IT 部门或负责管理网络和基础设施的人员,所以大多数时候他们都不会阅读“警告邮件”,账户被删除,提供商的 IP 地址发生变化,VPN 停止工作,最终商店失去通信。这时,客户开始打电话,说软件不能工作,因为网络不能工作。
几周前,我开始寻找替代方案,因为我的业务不是基础设施而是软件开发。要不就是我实现了自己的动态 IP 管理器——我拥有所有的 IT 管理员知识来做这件事……:(——要不就是我在寻找另一个替代方案……
我就是这样找到了 duckdns 这个网站。
这些人提供了一项我需要的服务,但是……经过一些研究,他们没有(也许我没看到……)一个可以作为 Windows 服务运行的更新客户端(这对我们来说是必不可少的要求,因为我的客户的服务器几乎没有人登录!!
好吧,更新规范很简单,所以……动手干吧。
是什么?
一个通用的 Windows 服务管理容器。
想法是有一个容器或“中转站或容器应用程序”,它允许加载任何服务,遵循一个定义良好标准配置的基本指南。
<?xml version="1.0" encoding="utf-8" ?>
<configuration>
  <configSections>
    <section name="ConfigNucleo" type="MTC.Host.IComun.ConfiguracionNucleo, MTC.Host.IComun"/>
    <section name="ConfigServicio" type="MTC.Host.IComun.ConfiguracionServicio, MTC.Host.IComun"/>
  </configSections>

  <ConfigNucleo tipoProveedor="MTC.Nucleo.DucDNS.NucleoDucDNS, MTC.Nucleo.DucDNS" />

  <ConfigServicio nombre="MTCDucDNS" descripcion="Servidor de actualizaciones de DucDNS"
                  serviciosDependientes="Winmgmt" segundosEsperaInicio="5" cuentaServicio="LocalSystem" />

</configuration>
上面的配置文件定义了 2 个部分:
ConfigService:为任何类型的服务设置值。
- nombre:指示服务的名称(它将显示在 Windows 服务中)。
- descripcion:服务描述。
- serviciosDependientes:此服务启动所需的依赖服务(例如,当启动顺序是高优先级时非常有用,例如服务必须等待 MSSQLServer 服务启动后才能启动)。
- segundosEsperaInicio:指示启动过程中的延迟(可选值)。
- cuentaServicio:指示 Windows 服务帐户。这里的值可以是:LocalService、NetworkService、LocalSystem(我们应该默认使用的帐户),最后是 User。
ConfigNucleo:包含当前实现服务功能的类的值。
- tipoProveedor:指示包含服务本身的程序集(类库)的名称。
好了。启动服务的容器或主机应用程序是一个没有主窗口的 Windows 应用程序。
 static void Main(string[] args)
        {
            if (!path.EndsWith(Path.DirectorySeparatorChar.ToString()))
                path += Path.DirectorySeparatorChar;

            ...
            var queHace = QueHaceConLosArgumentos.Nada;
            try
            {
                queHace = analizarArgumentos(args);

                if (queHace != QueHaceConLosArgumentos.Nada)
                    procesarArgumentoSobreServicio(queHace, args);
                else
                    ejecutarComoServicio();
            }
            catch (Exception ex)
            {
               ...
            }
        }
应用程序启动时执行的操作之一是验证调用它的参数。
这些是定义为的枚举类型:
private enum QueHaceConLosArgumentos { Nada = 0, Instala = 1, Desinstala = 2, EjecutaComoConsola = 3, EjecutaComoVentana = 4 }
- Instala:应用程序被调用来安装服务。
- Desinstala:应用程序被调用来卸载服务。
- ExecuteConsola:应用程序被调用以作为 Windows 控制台(shell)运行。
- EjecutaComoVentana:应用程序被调用以作为 Windows 应用程序(带窗口)执行。
因此,通过分析它被调用的参数,我们就可以采取行动。
private static void procesarArgumentoSobreServicio(QueHaceConLosArgumentos queHace, string[] args)
        {
            switch (queHace)
            {
                case QueHaceConLosArgumentos.Instala:
                    try
                    {
                        args[0] = Assembly.GetExecutingAssembly().Location;
                        ManagedInstallerClass.InstallHelper(args);
                    }
                    catch (Exception ex)
                    {
                      ...
                    }
                    break;

                case QueHaceConLosArgumentos.Desinstala:

                    string binpath = Assembly.GetExecutingAssembly().Location;
                    var toBeRemoved = ServiceController.GetServices().Where(s => GetImagePath(s.ServiceName) == binpath).Select(x => x.ServiceName);
                    var installer = new ProjectInstaller();
                    installer.Context = new InstallContext();
                    foreach (var sname in toBeRemoved)
                        try
                        {
                            installer.Uninstall(sname);
                        }
                        catch { }
                    break;

                case QueHaceConLosArgumentos.EjecutaComoConsola:
                    ejecutarComoConsola();
                    break;

                case QueHaceConLosArgumentos.EjecutaComoVentana:
                    ejecutarComoVentana();
                    break;

            }
        }
安装
在安装服务的情况下(QueHaceConLosArgumentos.Instala :),我们调用 ManagedInstallerClass 类中的 InstallHelper 方法。
现在,可能会出现应用程序被调用来安装,并传递额外的参数,例如服务应该安装的帐户和密钥。
例如
MTC.Host.exe / i / account = guillermo / key = 11111
在这种情况下,我们需要进行一个小修改,以便调用方法正常工作,将位置零的值替换为:
Assembly.GetExecutingAssembly().
Uninstall
在卸载服务的情况下(QueHaceConLosArgumentos.Desinstala :),我们需要做几件事:
- 获取当前运行的程序集的当前位置。
- 从服务控制器中获取所有映像(二进制文件)与当前程序集(容器主机)对应的服务。
- 借助 ProjectInstaller 类(稍后描述),可以卸载依赖服务。
                    string binpath = Assembly.GetExecutingAssembly().Location;
                    var toBeRemoved = ServiceController.GetServices().Where(s => GetImagePath(s.ServiceName) == binpath).Select(x => x.ServiceName);
                    var installer = new ProjectInstaller();
                    installer.Context = new InstallContext();
                    foreach (var sname in toBeRemoved)
                        try
                        {
                            installer.Uninstall(sname);
                        }
                        catch { }
                    break;
ProjectInstaller 允许(除其他外)在安装服务之前执行操作。例如,执行帐户审计、配置文件、在服务已存在的情况下删除服务等。
此外,它的目的是能够按名称卸载服务。
[RunInstaller(true)]
    public class ProjectInstaller : Installer
    {
        private ServiceProcessInstaller process;
        private ServiceInstaller service;

        public ProjectInstaller()
        {
            process = new ServiceProcessInstaller();
            service = new ServiceInstaller();
            Installers.Add(process);
            Installers.Add(service);
        }
....
 public void Uninstall(string serviceName)
        {
            service.ServiceName = serviceName;
            base.Uninstall(null);
        }
}
作为服务运行。
下一个选项是作为服务运行应用程序。
        private static void ejecutarComoServicio()
        {
            var ServicesToRun = new System.ServiceProcess.ServiceBase[] { new MTCHost() };
            System.ServiceProcess.ServiceBase.Run(ServicesToRun);
        }
在这种情况下,我们通过调用 ServiceBase 类的 Run 方法来执行,指示要运行的服务是容器本身(MTCHost 类的新实例)。
作为窗口运行(交互模式)。
正如我们在文章开头提到的,有必要有一种方法可以以交互方式配置和访问服务参数。为此,我们将使用 ApplicationContext 类的一个实例。
private static void ejecutarComoVentana()
        {
            string nombreApp = configServicio.nombre + "-App";
            if (SingleInstanceClass.CheckForOtherApp(nombreApp))
            {
                MessageBox.Show(Properties.Resources.aplicacionEnEjecucion + nombreApp, "Error", MessageBoxButtons.OK, MessageBoxIcon.Exclamation);
                return;
            }

            INucleo _instance = crearInstancia(false);

            Application.EnableVisualStyles();
            Application.SetCompatibleTextRenderingDefault(false);

            Dictionary<string, object> parametros = new Dictionary<string, object>(){
            {"nucleo", _instance},
            {"nombreApp", nombreApp},
                {"nombreServicio", configServicio.nombre},
                {"appHost", appHost}};

            Application.Run(_instance.contextoAplicacion(new object[1] { parametros }));
        }
好了,为了确保应用程序与正在运行的服务交互的实例不超过一个,我们通过调用 SingleInstanceClass 辅助静态类的方法 CheckForOtherApp 来执行此检查。
如果没有其他应用程序正在运行,我们将通过调用 createInstance 方法来创建服务实例。
需要注意的是,此方法返回一个接口(定义明确)到一个基类 NucleoBase (参见附加代码)的对象引用。
如果一切顺利,我们将继续执行 ApplicationObject 类(在服务本身内部定义)的实例,并将字典作为参数传递给它,其中包含其正常运行所需的必要值。
所有这些将在下面更详细地解释。
作为 shell 运行。
也有可能将解决方案以 Windows 控制台模式(shell)运行,例如用于调试目的。
在这种情况下,我们有主机应用程序的最后一种调用选项。
private static void ejecutarComoConsola()
        {
            //http://stackoverflow.com/questions/29947305/how-to-be-dynamically-either-console-application-or-windows-application
            bool madeConsole = false;
            if (!AttachToConsole())
            {
                AllocConsole();
                madeConsole = true;
            }

            try
            {
                INucleo _instance = crearInstancia(true);
                string error = "";
                if (_instance.iniciar(out error))
                {
                    Console.WriteLine(Properties.Resources.presioneTeclaParaDetenerServicio);
                    Console.ReadLine();
                    _instance.detener();
                }
                else
                {
                    Console.WriteLine(Properties.Resources.erroresInicioServicio + error);
                    Console.ReadLine();
                }
                if (madeConsole)
                    FreeConsole();
            }
            catch (Exception ex)
            {
                Console.WriteLine(ex.Message);
                Console.ReadLine();
            }
        }
这样,我们就可以将解决方案作为控制台运行,并具有调试等优势。
INucleo. 框架所有服务的接口。
此接口定义了我们需要对服务执行的所有操作的基本行为,以及我们可以访问应用程序上下文(ApplicationContext )的机制,该机制将允许通过 Windows 控件(例如 Windows Forms、状态栏中的上下文菜单等)来管理服务。
public interface INucleo : IDisposable
    {
        bool iniciar(out string error);
        void detener();
        ApplicationContext contextoAplicacion(object[] args);
        string path { get; }
        void buscarInfoEnsamblado(System.Reflection.Assembly ensamblado);
        string productVersion { get; }
        string productVersionHostContenedor { get; }
        string nombre { get; }
        void configurar();
        void cambioDeSesion(SessionChangeDescription changeDescription);
        Dictionary<string, string> infoEnsamblado { get; }
        ConfiguracionServicio configServicioHost { get; }
        bool iniciado { get; }
        string cultura { get; }
    }
方法和属性的说明
方法
- iniciar/detener: 启动/停止服务
- contextoAplicacion: 返回当前应用程序上下文的实例,该实例将用于交互式管理服务。
- buscarInfoEnsamblado: 强制类的每个实例实现此方法,该方法允许获取程序集的通用信息。
- configurar: 强制类的每个实例实现此方法以确保服务配置。
- cambioDeSesion: 可能需要知道 Windows 中是否有用户登录,以及何时有其他用户会话更改。
属性
- path: 当前服务的执行路径。
- productVersion: 核心当前库的版本。
- productVersionHostContenedor: 主机版本(MTC.Host.exe),包含服务。
- nombre: 服务的名称。
- infoEnsamblado: 所有程序集信息(通过调用 InstallInsection 方法强制获取)。
- configServicioHost: 返回实现服务之类库的所有配置。
- iniciado: 指示服务是否已启动。
- cultura: 返回有关区域性(区域配置)的信息。
好了,让我们看看这些零碎的拼图,以获得对基本思想更详细的了解。
首先要考虑的是,每个服务都可以(也应该)有自己的配置。
为此,我们通过实现 INucleo 接口的类的实例的配置文件来看看如何解决第一个主题。
NucleoDucDNS.
一个允许动态 DNS 服务从 DucDNS 接口更新的类。
查看 DucDNS 的规范,我们发现以下信息是更新我们的 IP 地址所必需且必需的。
我们将实现一个类来允许动态 DNS 服务的更新。
更新机制的规范在以下地址:
tttps://www.duckdns.org/spec.jsp
基本上,该服务允许通过简单的 HTTP GET 来更新网站子域的 IP 地址。
https://www.duckdns.org/update?domains={YOURVALUE}&token={YOURVALUE}[&ip={YOURVALUE}][&ipv6={YOURVALUE}][&verbose=true][&clear=true]
还有一个简化的调用形式定义如下:
https://duckdns.org/update/{YOURDOMAIN}/{YOURTOKEN}[/{YOURIPADDRESS}]
根据网站文档,有一些基本路由器不允许通过使用参数进行调用。在这种情况下,上述定义的调用很有用。
因此,结合以上所有信息,我们可以定义以下参数:
- Domains:一个或多个,用逗号分隔。
- Token:服务在我们创建帐户时提供的访问密钥。
- IP(可选):我们希望服务放置在我们 DNS 中的 IP 地址(如果留空,服务将使用调用方法的地址)。
- Verbose:指示我们是否希望在服务更新时获得额外信息。
- Simple:指示调用是否会带参数或不带参数。
- 间隔(分钟):每次对网站进行更新的时间间隔。例如:5/10/15/30/60 分钟。
注释:
- ipv6 参数也可以填写,但在此示例中我们将省略。
- 该服务允许使用 https 和 http。虽然 https 是首选和推荐的方式,但在某些情况下不允许 https 调用。
作为初步的近似,我们服务的配置可能如下所示:
 public class ConfiguracionServidorDucDNS : ConfigurationSection
    {
        [ConfigurationProperty("token")]
        public string token
        {
            get { return (string)base["token"]; }
            set { base["token"] = value; }
        }

        [ConfigurationProperty("simple")]
        public bool simple
        {
            get { return (bool)base["simple"]; }
            set { base["simple"] = value; }
        }

        [ConfigurationProperty("verbose")]
        public bool verbose
        {
            get { return (bool)base["verbose"]; }
            set { base["verbose"] = value; }
        }

        [ConfigurationProperty("https")]
        public bool https
        {
            get { return (bool)base["https"]; }
            set { base["https"] = value; }
        }

        [ConfigurationProperty("minutosActualizacion")]
        public int minutosActualizacion
        {
            get { return (int)base["minutosActualizacion"]; }
            set { base["minutosActualizacion"] = value; }
        }

        [ConfigurationProperty("dominios")]
        public string dominios
        {
            get { return (string)base["dominios"]; }
            set { base["dominios"] = value; }
        }
好了,可以在核心(实现接口的服务)的配置文件中看到相应的类,如下所示:
<?xml version="1.0" encoding="utf-8" ?>
<configuration>
  <configSections>
    <section name="ConfiguracionServidorDucDNS" type="MTC.Nucleo.DucDNS.ConfiguracionServidorDucDNS, MTC.Nucleo.DucDNS"/>
  </configSections>
<ConfiguracionServidorDucDNS token="" simple="false" verbose="false" https="true" dominios="" modoDebug="0" minutosActualizacion="5"/>
</configuration>
正如你所见,定义了一个名为 ServerDucDNSServer 的部分,其程序集位于同一库中,“MTC.Nucleo.DucDNS.ServerDucDNS Configuration, MTC.Nucleo.DucDNS”。
好了,让我们看看我们如何将这个配置转换成服务本身有用的类实例。
        public NucleoDucDNS(Dictionary<string, object> parametros)
            : base(parametros)
        {
            buscarInfoEnsamblado(System.Reflection.Assembly.GetExecutingAssembly());
            _nombre = this.GetType().Name;
            var archivoConfig = Path.GetFileName(System.Reflection.Assembly.GetExecutingAssembly().Location)+".config";
            inicializar(archivoConfig);
            configuracionServidorDucDNS = (ConfiguracionServidorDucDNS)config.GetSection(seccionConfiguracionServicio);
            if (configuracionServidorDucDNS == null)
                throw new Exception(string.Format(Properties.Resources.seccionNoEncontrada, seccionConfiguracionServicio));
...
...
}
首先,我们需要能够定位类的实例的配置文件。
为此,行:
var archivoConfig = Path.GetFileName(System.Reflection.Assembly.GetExecutingAssembly().Location)+".config";
允许执行此功能。
一旦获得了文件,我们就必须将其转换为 Configuration 类的实例。
为此,调用方法:
inicializar(archivoConfig);
将转换为:
protected void inicializar(string archivoConfig)
        {
            config = ConfigurationManager.OpenExeConfiguration(ConfigurationUserLevel.None);
            ExeConfigurationFileMap fileMap = new ExeConfigurationFileMap();
            fileMap.ExeConfigFilename = Path.Combine(_path, archivoConfig);
            if (!File.Exists(fileMap.ExeConfigFilename))
                throw new Exception(string.Format(Properties.Resources.archivoConfiguracionNoExiste, fileMap.ExeConfigFilename));
            config = ConfigurationManager.OpenMappedExeConfiguration(fileMap, ConfigurationUserLevel.None);
        }
如果一切顺利,当离开此方法时,config 类变量中将有一个 Configuration 实例。
回到构造函数,现在我们可以轻松地将配置文件部分实例化为 ServerDucDNS 类的实例。
configuracionServidorDucDNS = (ConfiguracionServidorDucDNS)config.GetSection(seccionConfiguracionServicio);
if (configuracionServidorDucDNS == null)
throw new Exception(string.Format(Properties.Resources.seccionNoEncontrada, seccionConfiguracionServicio));
Iniciar(启动服务所做任何事情的方法)。
有了服务的类实例,然后就可以实现它所做的任何事情了。
为此,我们必须实现接口中定义的 iniciar 方法。
public bool iniciar(out string error)
        {
            bool result = false;
            error = "";
            log.Info(string.Format(Properties.Resources.iniciandoNucleo, _nombre, productVersion, productVersionHostContenedor));
            iniciarTimerActualizacion();
            _iniciado = result = true;
          ....
            log.Info(Properties.Resources.nucleoIniciado);
            return result;
        }
这里,iniciarTimerActualization 方法启动了一个内部时钟,该时钟将运行服务的计算机的 IP 地址更新到 https://www.duckdns.org 网站。
 private void iniciarTimerActualizacion()
        {
            if (timerMinuto == null)
            {
                timerMinuto = new System.Timers.Timer();
                timerMinuto.Elapsed += timerMinuto_Elapsed;
                timerMinuto.Interval = 2000;//para que inicie rapido
            }
            timerMinuto.Enabled = true;
            cantMinutos = 0;
        }

        private void timerMinuto_Elapsed(object sender, System.Timers.ElapsedEventArgs e)
        {
            timerMinuto.Enabled = false;
            if (timerMinuto.Interval == 2000)
                timerMinuto.Interval = 60000;//ajusto a un minuto
            procesar();
            timerMinuto.Enabled = true;
        }
内部时钟每分钟执行一次,届时将调用该方法,该方法除其他外,执行 IP 地址更新。
private void procesar()
        {
            try
            {
...

                if ((cantMinutos % configuracionServidorDucDNS.minutosActualizacion) == 0)
                    actualizarDominios();
cantMinutos++;
...
}
            catch(Exception ex)
            {
                log.Error(Utils.armarMensajeErrorExcepcion("procesar: ", ex));
            }
很简单,不是吗?如果您花费了您想要更新的分钟数,将调用该方法来调用这些人的服务。这是通过调用 actualizarDominios 方法完成的。
private void actualizarDominios()
        {
            string token = configuracionServidorDucDNS.token;
                string html = string.Empty, protocolo = configuracionServidorDucDNS.https ? "https" : "http",
                    verbose = configuracionServidorDucDNS.verbose ? "true" : "false";
                var dominios = new Dictionary<string, bool>();
                var sdominios = configuracionServidorDucDNS.dominios;
                if (!string.IsNullOrEmpty(sdominios))
                {
                    foreach (var d in sdominios.Split(';').Where(x => !string.IsNullOrEmpty(x)))
                    {
                        string[] entradaDominio = d.Split('|');
                        string dominio = entradaDominio[0];
                        bool actualiza = Int32.Parse(entradaDominio[1]) > 0;
                        if (actualiza)
                        {
                            if (!dominios.ContainsKey(dominio))
                            {
                                dominios.Add(dominio, actualiza);
                                actualizarDominio(dominio, token, protocolo, verbose);
                            }
                        }
                        else { }
                    }
                }
                else
                    log.Error(Properties.Resources.sinDominiosQueActualizar);
            }
            catch (Exception ex)
            {
               ..
            }
        }
上面的简化代码基本上会解析域名链(来自表单:
dominioA|1,dominioB|1,dominioC|0。
这是域名的名称,后面跟着一个管道符,后面跟着一个值 1/0,表示是否更新,然后是下一个用逗号分隔的域名。
因此,对于每个需要更新的域名,都会调用 actualizarDominio 方法,并传入执行该过程所需的参数。
 private void actualizarDominio(string dominio, string token, string protocolo, string verbose)
        {
            string html = string.Empty;
            string url =
           configuracionServidorDucDNS.simple ?
               string.Format(@"{0}://duckdns.org/update/{1}/{2}/{3}",
               protocolo, dominio, token, dominio) :
               string.Format(@"{0}://www.duckdns.org/update?domains={1}&token={2}&verbose={3}",
              protocolo, dominio, token, verbose);

            var request = (HttpWebRequest)WebRequest.Create(url);
            request.AutomaticDecompression = DecompressionMethods.GZip;
            using (var response = (HttpWebResponse)request.GetResponse())
            using (var stream = response.GetResponseStream())
            using (var reader = new StreamReader(stream))
                html = reader.ReadToEnd();
...
}
好了,到目前为止,我们基本上有了服务应该做什么(无论它是什么)的功能。
正如我们开始时所说,我们如何与之交互,以便例如:配置它、查看其错误日志等?
好了,让我们看看如何通过实例化 ApplicationContext 类来完成。
TaskTrayApplicationContextBase 和 TaskTrayApplicationContext。
一个不太为人所知的类的子类:ApplicationContext。
好吧,它们不是那么为人所知的类,但它们基本上允许访问应用程序进程的上下文信息。
但是,这个类有基本的构造函数,还有一些我们可以定义的,例如允许传递经典形式 object [] args 的参数。
正如开头所见,在容器应用程序中,会在核心(INucleo )——包含服务的类库——的一个实例上调用 contextoAplicacion 方法。
在核心中,这可以这样看:
public ApplicationContext contextoAplicacion(object[] args)
        {
            if (_contextoAplicacion == null)
                _contextoAplicacion = new TaskTrayApplicationContext(args);
            return _contextoAplicacion;
        }
好了,这个类的优点是我们能生成多个类的实例,例如一个允许在状态栏(托盘图标)中包含图标的类。
因此,例如我们有:
 public class TaskTrayApplicationContextBase : ApplicationContext
    {
        protected MenuItem itemModoServicio, itemModoServicio_iniciarDetener, itemModoServicio_reiniciar, itemModoServicio_instalarDesinstalar,
           itemModoServicio_iniciarDetenerYSalir, itemModoAplicacion, itemModoAplicacion_iniciarDetener, itemModoAplicacion_iniciarDetenerYSalir,
           itemLogDeEventos, itemConfigurador, itemAbrirCarpetaContenedora,
           exitMenuItem;
protected NotifyIcon notifyIcon = new NotifyIcon();
..
 public TaskTrayApplicationContextBase(object[] args)
        {
            try
            {
                parametros = args[0] as Dictionary<string, object>;
                m_ponerEstadoServicio = new delegate_ponerEstadoServicio(ponerEstadoServicio);
                inicializar();
                ponerEstadoServicio();
                iniciarMonitoreoServicio();
            }
....
        }

protected void inicializar()
        {
            try
            {
                itemModoServicio_iniciarDetener = new MenuItem(Properties.Resources.servicioIniciar, new EventHandler(itemIniciarDetenerServicio_Click));
                itemModoServicio_reiniciar = new MenuItem(Properties.Resources.servicioReiniciar, new EventHandler(itemReiniciar_Click));
                ...
...
exitMenuItem = new MenuItem(Properties.Resources.itemSalir , new EventHandler(Exit));

                notifyIcon.ContextMenu = new ContextMenu(new MenuItem[] {
                    itemModoServicio,
                    new MenuItem("-"),
                    itemModoAplicacion,

                    new MenuItem("-"),  itemConfigurador, itemAbrirCarpetaContenedora, new MenuItem("-"), exitMenuItem
                    });

                notifyIcon.ContextMenu.Popup += new EventHandler(ContextMenu_Popup);
                notifyIcon.Visible = true;
            }
基本上,我们初始化一些变量,创建一些上下文菜单项,定义点击它们时要调用的事件。
此外,调用 ponerEstadoServicio 方法允许我们在栏(更确切地说是托盘图标)上显示信息。
  public void ponerEstadoServicio()
        {
            string texto = "";
            if (MTCServiceInstaller.ServiceIsInstalled(nombreServicio))
                switch (estadoServicio)
                {
                    case System.ServiceProcess.ServiceControllerStatus.Running:
                        notifyIcon.Icon = Properties.Resources.Ejecutando;
                        texto = string.Format("{0} {1} {2}", nombreServicio, nucleo.productVersion, descripcionEstadoServicio);
                        itemModoAplicacion.Enabled = false;
                        break;

                    case System.ServiceProcess.ServiceControllerStatus.Stopped:
                        notifyIcon.Icon = Properties.Resources.Detenido;
                        texto = string.Format("{0} {1} {2}", nombreServicio, nucleo.productVersion, descripcionEstadoServicio);
                        itemModoAplicacion.Enabled = true;
                        itemModoAplicacion_iniciarDetenerYSalir.Enabled = false;
                        break;
...
...
更多……
基本上,主要概念已经定义好了。
还有很多事情要做。
例如,服务状态更改的状态栏图标是如何找到的?
例如,服务正在运行,通过控制面板我停止了它。
报告此事件以便在状态栏中反映出来很有用。
MonitorEstadoServicio. 一个允许监控服务状态的类。
好了,这个类不是完全属于我的。
在互联网上搜索,什么都能找到。
总有人已经做了或解决了几乎所有事情,而且最好的是分享它。
想法是创建一个类,通过 ManagementEventWatcher (另一个很棒的类……)的一个实例,可以在服务状态发生变化时触发一个事件。
当这种情况发生时,“某人”可能会被通知。
 /// <summary>
    /// Idea tomada de aca
    /// http://dotnetcodr.com/2014/12/02/getting-notified-by-a-windows-service-status-change-in-c-net/
    /// </summary>
    public class MonitorEstadoServicio : IDisposable
    {
        bool _disposed = false;
        ManagementEventWatcher watcher = null;
        string nombreServicio;
        public event EventHandler<EventoCambioEstadoServicioParamArgs> eventoCambioEstadoServicio;
        public MonitorEstadoServicio(string nombreServicio)
        {
            this.nombreServicio = nombreServicio;
            var eventQuery = new EventQuery();
            eventQuery.QueryString = "SELECT * FROM __InstanceModificationEvent within 2 WHERE targetinstance isa 'Win32_Service'";
            watcher = new ManagementEventWatcher(eventQuery);
            watcher.EventArrived += watcher_EventArrived;
        }

        public void iniciar()
        {
            watcher.Start();
        }

        void watcher_EventArrived(object sender, EventArrivedEventArgs e)
        {
            ManagementBaseObject evento = e.NewEvent;
            ManagementBaseObject targetInstance = ((ManagementBaseObject)evento["targetinstance"]);
            PropertyDataCollection props = targetInstance.Properties;
            foreach (PropertyData prop in props)
                if (string.Compare(prop.Name, "Name", true) == 0 && string.Compare((string)prop.Value, nombreServicio, true) == 0)
                {
                    OnCambioEstadoServicio(new EventoCambioEstadoServicioParamArgs(nombreServicio));
                    break;
                }
        }

        protected void OnCambioEstadoServicio(EventoCambioEstadoServicioParamArgs e)
        {
            EventHandler<EventoCambioEstadoServicioParamArgs> handler = eventoCambioEstadoServicio;
            if (handler != null)
                handler(this, e);
        }


好了,有了这个想法,在 TaskTrayApplicationContextBase 类中,我们有:
 MonitorEstadoServicio monitorEstadoServicio = null;

 protected void iniciarMonitoreoServicio()
        {
            monitorEstadoServicio = new MonitorEstadoServicio(nombreServicio);
            monitorEstadoServicio.eventoCambioEstadoServicio += monitorEstadoServicio_eventoCambioEstadoServicio;
            monitorEstadoServicio.iniciar();
        }

void monitorEstadoServicio_eventoCambioEstadoServicio(object sender, EventoCambioEstadoServicioParamArgs e)
        {
            ponerEstadoServicio();
        }

 public void ponerEstadoServicio()
        {
            string texto = "";
            if (MTCServiceInstaller.ServiceIsInstalled(nombreServicio))
                switch (estadoServicio)
                {
                    case System.ServiceProcess.ServiceControllerStatus.Running:
                        notifyIcon.Icon = Properties.Resources.Ejecutando;
                        texto = string.Format("{0} {1} {2}", nombreServicio, nucleo.productVersion, descripcionEstadoServicio);
                        itemModoAplicacion.Enabled = false;
                        break;

                    case System.ServiceProcess.ServiceControllerStatus.Stopped:
                        notifyIcon.Icon = Properties.Resources.Detenido;
                        texto = string.Format("{0} {1} {2}", nombreServicio, nucleo.productVersion, descripcionEstadoServicio);
                        itemModoAplicacion.Enabled = true;
                        itemModoAplicacion_iniciarDetenerYSalir.Enabled = false;
                        break;

                    default:
                        notifyIcon.Icon = Properties.Resources.SinConfigurar;
                        texto = string.Format("{0} {1} {2}", nombreServicio, nucleo.productVersion, descripcionEstadoServicio);
                        itemModoAplicacion.Enabled = true;
                        break;
                }
            else
            {
                notifyIcon.Icon = Properties.Resources.SinConfigurar;
                texto = string.Format("{0} {1}", nombreServicio, Properties.Resources.servicioNoInstalado);
                itemModoAplicacion.Enabled = true;
            }

            ponerHint(texto);
        }

        private void ponerHint(string texto)
        {
            if (texto.Length > 63)
                NotifyIconFix.SetNotifyIconText(notifyIcon, texto);
            else
                notifyIcon.Text = texto;
        }
很简单,不是吗?
好了,其余的代码还有更多内容(例如,通过调用辅助类来启动/停止服务,调用允许服务配置的窗口等)。
一点安全?

好了,我们已经有了允许访问配置窗口并输入我们所需值的定义好的块。
现在,正如我在开头提到的,这个解决方案的想法是将其部署到拥有我们软件解决方案的客户那里。虽然应用程序(现在从应用程序模式的服务来看)大部分时间将在用户不会访问(也不会嗅探)的服务器上运行,但也不能排除在有用户并且他们想双击图标并且有人想移动值的情况下运行。
也不会缺少那些想嗅探“配置数据所在位置”(.config)并且想移动它们的人。
好了,既然“我了解情况”,我设置了一个简单的安全和加密机制,允许“稍等一下”这些尝试。很明显,该机制不是为我们这个领域的专业人士设计的,而是为普通用户设计的,因此解决方案并非无懈可击,但可以缓解这些尝试。
让我们看一点。
 private bool guardarConfiguracion()
        {
            bool result = false;
            try
            {
                string sdominios = "";
                foreach (ListViewItem item in lDominios.Items)
                    sdominios += item.Text + "|" + (item.Checked ? "1" : "0") + ";";
                nucleo.configuracionServidorDucDNS.dominios = sdominios.Length > 0 ? encriptar(sdominios.Substring(0, sdominios.Length - 1)) : "";
nucleo.configuracionServidorDucDNS.token = encriptar(editToken.Text.Trim());
.....
nucleo.configuracionServidorDucDNS.passwordAdmin = editClave.Text.Length > 0 ? Encriptacion.getMd5Hash(editClave.Text) : "";
.....
好了,想法是有些东西我们想加密,然后检索解密。这些东西的例子是:域名列表、令牌等。
另一方面,正如我们之前提到的,我们需要能够参数化访问配置窗口是否需要密码。这个密码是加密存储的,但不是像其他那些加密和解密但只“单向”的值那样。对于这种情况,我们使用 MD5 ,对于其他情况,我们使用 Rijandel 的某个变体。
我不会详细介绍这些加密问题,因为它们远远超出了我的能力范围,但我可以提供我多年来一直在使用的代码(从网络上的任何地方获取),并且它工作得很好。
为了不延长文章,加密代码将不在此列出,但可以在附件中看到。
因此,经过加密保存的配置文件看起来大致如下:
<?xml version="1.0" encoding="utf-8" ?>
<configuration>
  <configSections>
    <section name="ConfiguracionServidorDucDNS" type="MTC.Nucleo.DucDNS.ConfiguracionServidorDucDNS, MTC.Nucleo.DucDNS"/>
  </configSections>
  <ConfiguracionServidorDucDNS token="sE5K6EpEgUKf+r3GydB7yU8YHXr6TGCswd7P+6Dj9H8="
    simple="true" verbose="true" https="true" minutosActualizacion="5"
    dominios="cPajnkIRFZe7YY2ap+urQA==" modoDebug="1" adminRequierePassword="true"
    passwordAdmin="b0baee9d279d34fa1dfd71aadb908c3f" servidorSMTP="+7RpbvWCB9G/VfV8YjJPPA=="
    puertoSMTP="587" usuarioSMTP="ZVlO5GOmoGrLUZLxitbNUOKxSP23/bd56DsDh+Ot2+A="
    claveUsuarioSMTP="sgdabeKATYdXLs8KQINkMg==" emailEnvio="ZVlO5GOmoGrLUZLxitbNUOKxSP23/bd56DsDh+Ot2+A="
    SMTPSSL="false" emailsNotificaciones="ZVlO5GOmoGrLUZLxitbNUKIVSP9KIWgkOicoONVKxY3zxhPQD9A2f5K4GvbWwMpM"
    mascaraNotificaciones="21" descripcionEquipo="GUILLERMO-HP" />
</configuration>
关于通知?

为了完成,再加上一些功能。
了解更新出现问题等情况对我很有用。
虽然解决方案几乎审计了所有内容,但我了解出现问题很有用。
最简单的方法是给我发邮件(事实上也确实如此,我们也使用它),但我们假设,该过程将更新 IP 地址并失败,因为它没有互联网,很明显它将无法给我发送邮件……
好了,为了解决这个问题,我创建了一个队列,我们在其中粘贴所有通知,然后稍后以某种方式处理这些项目,发送邮件。
public enum TipoNotificacion : byte
    {
        Varios=0,
        OtrosErrores = 1,
        CambioIP = 2,
        ErrorIntentoCambioIP = 3,
        PerdidaConexionInternet = 4,
        ReestablecimientoConexionInternet = 5,
        ActualizacionCorrectaDireccionIP = 6
    }

    [Serializable]
    public class Notificacion
    {
        public TipoNotificacion tipoNotificacion { get; set; }
        public DateTime fecha { get; set; }
        public string asunto { get; set; }
        public string detalles { get; set; }
    }

public partial class NucleoDucDNS : NucleoBase, INucleo
    {
        ColaProcesamiento<Notificacion> colaNotificaciones = null;

 public NucleoDucDNS(Dictionary<string, object> parametros): base(parametros)
        {
...
colaNotificaciones = new ColaProcesamiento<Notificacion>();
            colaNotificaciones.nuevaTarea += Cola_nuevaTarea;
}
...
private void Cola_nuevaTarea(object sender, EventoNuevaTareaParamArgs e)
        {
            var notificacion = e.param as Notificacion;
...
//send email with notification
}

private void actualizarDominio(string dominio, string token, string protocolo, string verbose)
        {
....
 using (var response = (HttpWebResponse)request.GetResponse())
            using (var stream = response.GetResponseStream())
            using (var reader = new StreamReader(stream))
                html = reader.ReadToEnd();
...
if (html.StartsWith("KO", StringComparison.OrdinalIgnoreCase))
                    {
                        colaNotificaciones.encolar(new Notificacion()
                        {
                            tipoNotificacion = TipoNotificacion.ErrorIntentoCambioIP,
                            fecha = DateTime.Now,
                            asunto = Properties.Resources.errorIntentoActualizarDominio,
                            detalles = html
                        });

                    }
...
}
在上面的代码中,您可以看到一个通知队列,它生成了它的创建和参数化,以了解当添加新元素时该做什么。
然后,您会看到一段代码,该代码尝试执行 IP 更新。如果一切顺利,DucDNS 返回 OK,如果出现问题则返回 KO。
在后一种情况(KO)下,我们创建一个 Notification 类型的对象并将其粘贴。
然后 Cola_nuevaTarea 方法——它接收一个 Notification 类型的参数——接收此参数并尝试通过邮件发送它(在上面的代码中标记为:
// 发送带有通知的电子邮件
如果发送邮件尝试成功,队列中的项目将被标记为已处理,以便可以从队列中删除。但是(例如没有互联网)它不会被删除,这样当它重置时就可以发送。
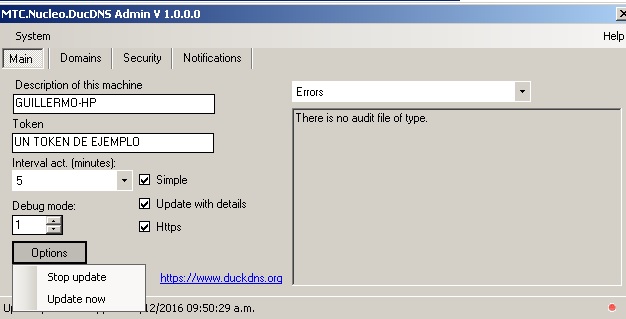
我们还有一个过滤机制来通知(可以在图像中看到)。
结束。
当然还有很多事情要做,但基本上已经具备了在托管代码的世界中对任何服务几乎做任何事情所需的一切。
这个框架(及其变体)我已经使用了很多年,并且一直表现稳定。
还有其他更简单、更复杂的替代方案,但对我自己和我的客户来说,这是最令人满意的结果。
历史
2016 年 12 月 10 日。
版本 1.0.0.0
初次发布