
使用 Intel® Edison 模块控制机器人
在本文中,我们将创建一个 HTML 页面,允许用户通过 MQTT 发送命令来控制其机器人运动,同时还能远程查看安装在机器人上的网络摄像头所拍摄的周围环境。
获取新的 Intel® IoT Developer Kit,这是一个完整的硬件和软件解决方案,开发者可以利用 Intel® Galileo 和 Intel® Edison 板卡来创建令人兴奋的新解决方案。请访问 Intel® IoT 开发者中心。
引言
未来的世界正逐渐变为现实。机器人也许有一天会统治世界,但现在,我们仍然需要通过互联网连接来远程控制它们。在本文中,我们将创建一个 HTML 页面,允许用户通过 MQTT 发送命令来控制其机器人运动,同时还能远程查看安装在机器人上的网络摄像头所拍摄的周围环境。这种远程控制将为将来添加功能奠定基础。
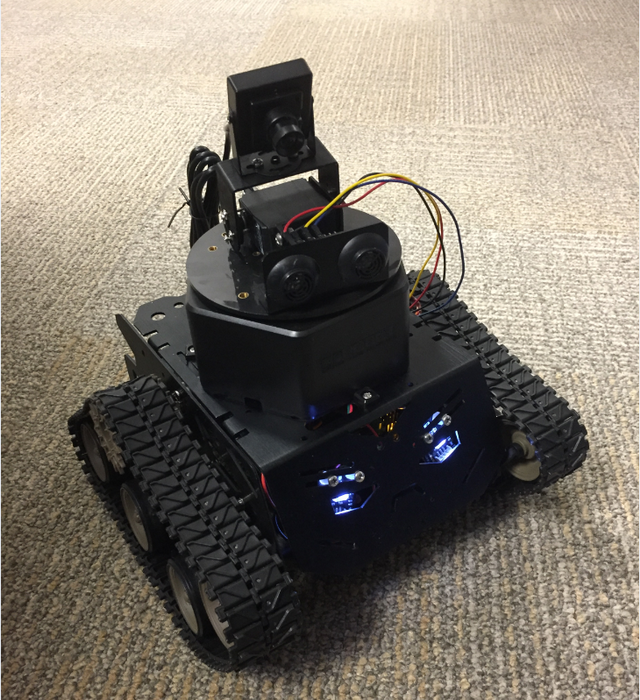
在本文中,我们使用了 DFRobot* Devastator 机器人。您可以在此处找到它: https://www.dfrobot.com/index.php?route=product/product&search=edison&description=true&product_id=1379。它是一款坦克式机器人,带有两个电机,还附带了许多传感器和一个摄像头。然而,本文档和代码也可以轻松用于其他类似的微控制器机器人,甚至可以改编用于其他项目。
如果您想了解更多关于 DFRobot Devastator 机器人的信息,请参阅我同事的文章: https://software.intel.com/en-us/articles/overview-of-intel-edison-based-robotics-platform
注意:Devastator 的电池组仅为 9V,需要 6 节 AA 电池,在安装所有电机和摄像头以完成本项目后,这还不够。必须将额外的 2 节 AA 电池组串联连接到 9V 电池组,为机器人提供本项目所需的 12V 电压。
设置摄像头
Devastator 机器人套件附带一个 USB 摄像头和一个云台套件,需要进行组装并安装到底座上。如果您使用 Intel® Edison 模块和 USB 摄像头制作自己的 DIY 机器人,请注意,摄像头必须符合 UVC 标准,以确保其与模块的 USB 驱动程序兼容。有关 UVC 兼容设备的列表,请参阅此网页: http://www.ideasonboard.org/uvc/#devices。
在 Devastator 机器人上,使用 OTG USB 适配器将 USB 网络摄像头插入 micro OTG USB 端口,并将另一根线缆从您的计算机插入另一个 micro USB 端口。
为了确保 USB 网络摄像头正常工作,请在串行连接中键入以下命令。(使用 PuTTY)
ls -l /dev/video0
应该会出现类似以下的行
crw-rw---- 1 root video 81, 0 May 6 22:36 /dev/video0
否则,会出现以下行,表示未找到摄像头。
ls: cannot access /dev/video0: No such file or directory
接下来,在 Intel® Edison 模块上安装 mjpeg-streamer 库。
通过将以下行添加到 base-feeds.conf 来完成此操作
echo "src/gz all http://repo.opkg.net/edison/repo/all
src/gz edison http://repo.opkg.net/edison/repo/edison
src/gz core2-32 http://repo.opkg.net/edison/repo/core2-32" >> /etc/opkg/base-feeds.conf
更新存储库索引
opkg update
并安装
opkg install mjpg-streamer
启动流
mjpg_streamer -i "input_uvc.so -n -f 10 -r 400x400" -o "output_http.so -p 8080 -w ./www"
请注意,帧率 (-f 10) 和大小 (400x400) 已限制,以降低功耗和计算需求,并有助于确保图像实时更新,防止流冻结。
要在同一 Wi-Fi* 网络上查看流,请将以下 URL 中的“localhost”替换为 Intel® Edison 模块的 IP 地址: https://:8080/?action=stream
还可以通过将以下 URL 中的“localhost”替换为 Intel® Edison 模块的 IP 地址来查看流的静态图像: https://:8080/?action=snapshot。
要使摄像头流在 Wi-Fi 网络之外可见,您需要正确配置路由器。详细说明可以在此处找到: https://ipcamnetwork.wordpress.com/2010/09/23/acessing-your-camera-from-the-internet/
我们还需要让摄像头在启动时启动,以便随时可用。首先,在 /home/root/ 目录中创建一个脚本。
vi cameraScript.sh
将以下内容添加到脚本中。
#!/bin/sh
mjpg_streamer -i "input_uvc.so -n -f 10 -r 400x400" -o "output_http.so -p 8080 -w ./www"
使脚本可执行。
chmod +x /home/root/ cameraScript.sh
chmod +x cameraScript.sh
并使其在启动时启动
update-rc.d cameraScript.sh defaults
为确保其正常工作,请重启 Intel® Edison 模块。(此步骤假设它也已配置为连接到 Wi-Fi)。
reboot
HTML 网页
为了远程控制机器人,创建了一个简单的 HTML 网页,因为它很容易与摄像头流集成,并且兼容多种平台。在您的计算机上,将在同一位置有一个 index.html 文件和一个 script.js 文件。双击 index.html 文件将启动网页。

index.html 文件代码如下。由于机器人使用 MQTT,并且我们需要一些自定义方法,因此我们包含了 mqttws31.js 和我们自己的 script.js。我们还需要一个对象来包含网页流和一个用于控制机器人的按钮。
<!DOCTYPE html>
<html>

  <head>
    <title>NodeJS Starter Application</title>
    <meta charset="utf-8">
    <meta http-equiv="X-UA-Compatible" content="IE=edge">
    <meta name="viewport" content="width=device-width, initial-scale=1">
    <link rel="stylesheet" href="stylesheets/style.css">
 <script src="https://cdnjs.cloudflare.com/ajax/libs/paho-mqtt/1.0.1/mqttws31.js" type="text/javascript"></script>
 <script src="script.js"></script>
  </head>

<body>
  <div>
    <object type="text/html" data="http://192.168.1.104:8080/?action=stream" width="640px" height="480px" style="overflow:auto;border:5px ridge blue">
    </object>
 </div>
  <div>
  <input onclick="client.connect(options);" type="button" value="Connect" id="connect"></input>
  <input onclick="publish('forward','dfrobotControl',2);moveForward();" type="button" value="Forward" id="forwardButton"></input>
  <input onclick="publish('reverse','dfrobotControl',2);moveReverse();" type="button" value="Reverse" id="reverseButton"></input>
  <input onclick="publish('left','dfrobotControl',2);moveLeft();" type="button" value="Left" id="leftButton"></input>
  <input onclick="publish('right','dfrobotControl',2);moveRight();" type="button" value="Right" id="rightButton"></input>
  <input onclick="publish('stop','dfrobotControl',2);moveStop();" type="button" value="Stop" id="stopButton"></input>
  <input onclick="client.disconnect();" type="button" value="Disconnect" id="disconnect"></input>
<div id="messages"></div>
  </div>
</body>


</html>
script.js 将突出显示当前命令按钮,并处理 MQTT 连接和订阅逻辑。
请注意 script.js 中的客户端实例行
var client = new Paho.MQTT.Client("broker.hivemq.com", 8000, "clientId");
我们使用 broker.hivemq.com 作为我们的 MQTT 服务器。它是免费使用的,并且允许您在需要时使用他们的服务设置自己的代理。clientId 对每个客户端都必须是唯一的,所以请务必将其更改为其他内容,甚至可以添加一些随机字符和数字。此外,机器人用于订阅和发布的 topic 是 dfrobotControl,但您可以根据自己的需要进行更改。
function moveForward()
{
 clearButtons();
 document.getElementById("forwardButton").style.color = "red";
};
function moveReverse()
{
 clearButtons();
 document.getElementById("reverseButton").style.color = "red";
};
function moveLeft()
{
 clearButtons();
 document.getElementById("leftButton").style.color = "red";
};
function moveRight()
{
 clearButtons();
 document.getElementById("rightButton").style.color = "red";
};
function moveStop()
{
 clearButtons();
 document.getElementById("stopButton").style.color = "red";
};
function clearButtons()
{
 document.getElementById("forwardButton").style.color = "black";
 document.getElementById("reverseButton").style.color = "black";
 document.getElementById("leftButton").style.color = "black";
 document.getElementById("rightButton").style.color = "black";
 document.getElementById("stopButton").style.color = "black";
};


// Create a client instance
 var client = new Paho.MQTT.Client("broker.hivemq.com", 8000, "clientId");

// called when the client loses its connection
 client.onConnectionLost = function (responseObject) {
     alert("connection lost: " + responseObject.errorMessage);
 };

 //Connect Options
 var options = {
     timeout: 3,
     //Gets Called if the connection has sucessfully been established
     onSuccess: function () {
         alert("Connected");
   //and subscribe to the topic
   client.subscribe('dfrobotControl/#', {qos: 2});
   alert('Subscribed');
     },
     //Gets Called if the connection could not be established
     onFailure: function (message) {
         alert("Connection failed: " + message.errorMessage);
     }
 };

 //Publish the message to the topic
 var publish = function (payload, topic, qos) {
     var message = new Paho.MQTT.Message(payload);
     message.destinationName = topic;
     message.qos = qos;
     client.send(message);

}
Arduino 草图
Devastator 使用 Intel® Edison 模块的 Romeo 板,该板默认可通过 Arduino* IDE 进行编程。在 Arduino 草图中,我们需要订阅 MQTT topic 以接收命令,然后根据命令执行操作。摄像头已处理完毕,但我们将为 Intel® Edison 模块设置静态 IP 地址,并将其连接到 Wi-Fi* 网络。这样设置后,网页的摄像头 IP 将始终保持不变。
前面两个 LED 用作状态指示灯。成功连接 Wi-Fi 后,机器人右侧的 LED 将亮起。成功连接 MQTT 并订阅后,机器人左侧的 LED 将亮起。
#include <SPI.h>
#include <WiFi.h>
#include <PubSubClient.h>
#include <DFRobot.h>
#include <IIC1.h>

// WiFi Login
IPAddress ip(192, 168, 1, 104);
char ssid[] = "wifiname";      //  your network SSID (name)
char pass[] = "wifipassword";             // your network password
const char* server = "broker.mqttdashboard.com";

// WiFi connection
WiFiClient wifiClient;
int status = WL_IDLE_STATUS;          // the Wifi radio's status

#define leftLEDPin 7
#define rightLEDPin 10

DFrobotEdison MotorLeft;
DFrobotEdison MotorRight;
代码的下一步是当消息发布到 MQTT topic 时的回调方法。草图会主动监听消息的到来,一旦消息到达,就可以调用相应的命令。
void callback(char* topic, byte* payload, unsigned int length) {
  Serial.print("Message arrived [");
  Serial.print(topic);
  Serial.print("] ");
  String message= "";
  for (int i=0;i<length;i++) {
    Serial.print((char)payload[i]);
    message= message + (char)payload[i];
  }
  Serial.println();
 String forward= "forward";
  if (message.equals("forward") == 1) {
    Serial.println("Forward!!!");
    motorForward();
  }
  if (message.equals("reverse") == 1) {
    motorBackward();
    Serial.println("reverse!!!");
  }
  if (message.equals("left") == 1) {
    motorLeft();
    Serial.println("left!!!");
  }
  if (message.equals("right") == 1) {
    motorRight();
    Serial.println("right!!!");
  }
  if (message.equals("stop") == 1) {
    motorStop();
  }
}

// PubSub Client.
PubSubClient client(server, 1883, callback , wifiClient);
连接到 MQTT 服务器时,请记住为 Intel® Edison 模块选择一个唯一的 clientID,并在必要时更改 topic。通过更新 client.connect("clientID ")) 和 client.subscribe("dfrobotControl") 行来实现。
void reconnectMQTT() {
  // Loop until we're reconnected
  digitalWrite(leftLEDPin, LOW);
  motorStop();
  while (!client.connected()) {
    Serial.print("Attempting MQTT connection...");
    // Attempt to connect
    if (client.connect("clientID ")) {
      Serial.println("connected");
      // ... and resubscribe
      client.subscribe("dfrobotControl");
      digitalWrite(leftLEDPin, HIGH);
    } else {
      Serial.print("failed, rc=");
      Serial.print(client.state());
      Serial.println(" try again in 5 seconds");
      // Wait 5 seconds before retrying
      delay(5000);
    }
  }
}

void reconnectWiFi() {
  // Loop until we're reconnected
  digitalWrite(rightLEDPin, LOW);
  digitalWrite(leftLEDPin, LOW);
  motorStop();
  status = WiFi.begin(ssid, pass);
  while(!(status == WL_CONNECTED)){
     Serial.println("WiFi Failed!");
     status = WiFi.begin(ssid, pass);
     delay(5000);
  }
  Serial.println("WiFi Connected!");
   digitalWrite(rightLEDPin, HIGH);
}

void setup()
{
  Serial.begin(9600);

  Serial.println("Init the sensor");

  //Initilize Pin Mode
  pinMode(rightLEDPin, OUTPUT);
  pinMode(leftLEDPin,OUTPUT);
  digitalWrite(rightLEDPin, LOW);
  digitalWrite(leftLEDPin, LOW);

  //Initilize Motor Drivers
  MotorLeft.begin(M2);
  MotorRight.begin(M1);

  WiFi.config(ip);
  status = WiFi.begin(ssid, pass);
  while(!(status == WL_CONNECTED)){
     Serial.println("WiFi Failed!");
     status = WiFi.begin(ssid, pass);
     delay(5000);
  }
  Serial.println("WiFi Connected!");
   digitalWrite(rightLEDPin, HIGH);
}
void loop()
{
 client.loop();
if (!client.connected()) {
    reconnectMQTT();
 }
 if(WiFi.status()!= WL_CONNECTED){
   reconnectWiFi();
 }
 delay(1000);

}
最后是控制机器人运动的方法。
void motorBackward()
{
  motorStop();
  MotorLeft.setDirection(ANTICLOCKWISE);
  MotorRight.setDirection(ANTICLOCKWISE);
  for(int i=0;i<150;i+=10)
  {
    MotorLeft.setSpeed(i);
    MotorRight.setSpeed(i);
    delay(20);
  }
}


void motorForward()
{
  motorStop();
  MotorLeft.setDirection(CLOCKWISE);
  MotorRight.setDirection(CLOCKWISE);
  for(int i=0;i<150;i+=10)
  {
    MotorLeft.setSpeed(i);
    MotorRight.setSpeed(i);
    delay(20);
  }
}

inline void motorLeft()
{
  motorStop();
  MotorLeft.setDirection(ANTICLOCKWISE);
  MotorRight.setDirection(CLOCKWISE);
  for(int i=0;i<150;i+=10)
  {
    MotorLeft.setSpeed(i);
    MotorRight.setSpeed(i);
    delay(20);
  }
}

inline void motorRight()
{
  motorStop();
  MotorLeft.setDirection(CLOCKWISE);
  MotorRight.setDirection(ANTICLOCKWISE);
  for(int i=0;i<150;i+=10)
  {
    MotorLeft.setSpeed(i);
    MotorRight.setSpeed(i);
    delay(20);
  }
}


inline void motorStop()
{
  MotorLeft.setSpeed(0);
  MotorRight.setSpeed(0);
  delay(50);
}
摘要
现在,我们的机器人可以通过一个简单的网页,使用 MQTT 通过互联网进行远程控制,并且通过摄像头,我们可以看到它的去向。从这里开始,我们可以将其作为基础,为我们的机器人添加更多功能,例如区域映射或摄像头平移和倾斜。
更多机器人项目
使用 Intel® XDK、Node.js 和 MRAA 库编程机器人
作者简介
Whitney Foster 是 Intel 软件解决方案组的一名软件工程师,致力于物联网的规模化赋能项目。
注意事项
本文档不授予任何知识产权的许可(明示或暗示,禁止反言或以其他方式)。
Intel 否认所有明示和暗示的保证,包括但不限于适销性、特定用途的适用性和非侵权性的暗示保证,以及由履行过程、交易过程或贸易惯例产生的任何保证。
本文档包含有关正在开发的产品、服务和/或流程的信息。此处提供的所有信息如有更改,恕不另行通知。请联系您的 Intel 代表以获取最新的预测、计划、规格和路线图。
所描述的产品和服务可能包含称为勘误的缺陷或错误,这可能导致与公布的规格不符。当前的已特性化勘误可应要求提供。
可以通过致电 1-800-548-4725 或访问 www.intel.com/design/literature.htm 获取包含订单号且本文档中引用的文件的副本。
Intel、Intel 标识和 Intel RealSense 是英特尔公司在美国和/或其他国家的商标。
*其他名称和品牌可能被声明为他方财产
**此示例源代码根据 Intel 示例源代码许可协议发布点赞 订阅 添加新评论标记为垃圾邮件 。
© 2016 英特尔公司。