
从零开始开发 Angular 2 和 .NET Core Web 应用程序 第 1 部分:实现 Restful Web 服务器
一篇很棒的文章,教你如何使用 Angular2 和 .NET Core Web API 从头开始创建 Web 应用程序
目录
引言
撰写本系列文章的主要目的是探索更多关于 Angular2 和 .NET CORE Framework 的功能,例如
- 使用 WebApi v2 创建一个 RestFul 服务器
- 使用 Entity Framework for .NET Core 对现有数据库进行逆向工程
- 使用 Angular2 Material Design 构建 HTML 模板
- 使用 Angular2 创建单页面 Web 应用程序
- 在 Angular2 中创建组件、服务和类
- 在 Angular2 中使用路由系统
- 在 Angular2 中使用 Cookie
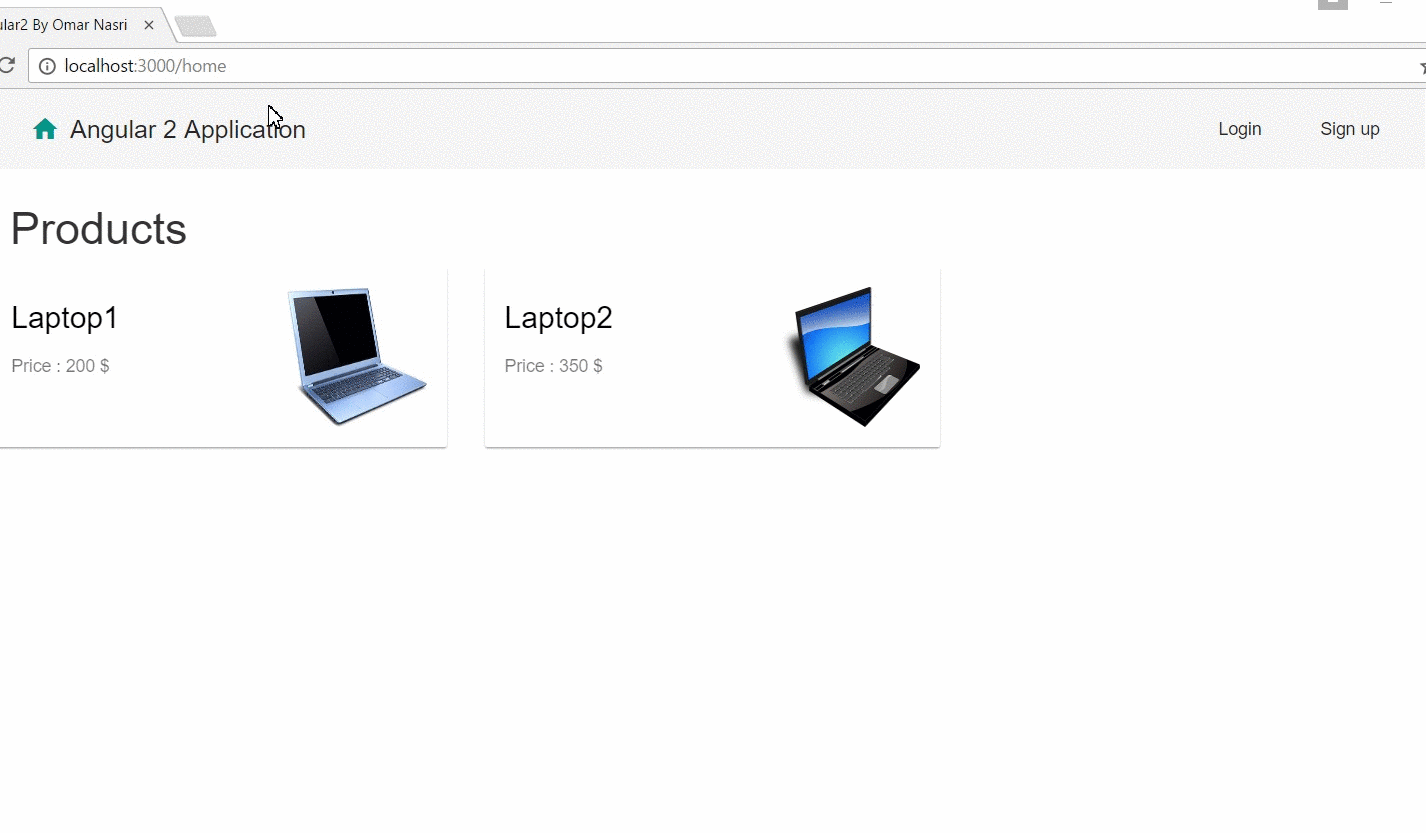
在本文的最后,你将拥有一个用于管理产品的 Web 应用程序,它将由一个后台界面(你可以在其中管理产品)和前台界面(用于:展示可用产品、登录和注册)组成,你可以在下面看到最终的演示
此应用程序可以在未来的版本中通过以下方式改进
- 添加搜索过滤器
- 添加分页系统
- 改进输入验证
- 添加购物车系统
以及更多功能。
在本文中,我依赖于以下链接
背景
为了更好地理解本文,建议对以下内容有良好的了解
- 用 C# 编程
- SQL 语言
- 实体框架
- Visual Studio Code
必备组件
Using the Code
A) 设置 ASP.NETCore MVC 项目
你可以通过此链接找到更多关于如何设置 ASP.NET Core 应用程序的信息
B) 设置数据库
1) 创建数据库
我使用 SQL Server 2014 在本地托管我的数据库。
我们的数据库将包含以下实体
- p_users:用于保存关于注册用户的信息,例如
email:用于存储电子邮件地址pwd:用于存储密码
仅使用 email 字段作为主键。
- p_product:
id(自动递增,用作主键):产品的唯一标识符price(数字)title(文本):产品名称fulldescription(文本):产品的完整描述picture(文本):图像存储为 Base64 格式
以下步骤将帮助你准备你的数据库
- 创建一个名为 ‘
ProductsDataBase’ 的数据库 - 执行以下 SQL 脚本
create table p_users(
email varchar(250) primary key,
pwd varchar(250),
);
create table p_product(
id int identity(1,1) primary key,
price int,
title varchar(250),
fulldescription varchar(max),
picture varchar(max),
)

set IDENTITY_INSERT p_product on
2) 使用 Entity Framework 数据库方法
在本节中,你需要进行逆向工程以导入现有数据库的模型。 为确保这一点,你应该按照以下步骤操作
- 导航到你的应用程序的根文件夹,
- 导入所需的依赖项和工具:为此,你应该配置 project.json,通过
- 添加以下依赖项
"Microsoft.EntityFrameworkCore":"1.0.0", "Microsoft.EntityFrameworkCore.SqlServer": "1.0.0", "Microsoft.EntityFrameworkCore.SqlServer.Design": "1.0.0", "Microsoft.EntityFrameworkCore.Tools": { "version": "1.0.0-preview2-final", "type": "build" }, - 添加工具
"Microsoft.EntityFrameworkCore.Tools": { "version": "1.0.0-preview2-final", "imports": [ "portable-net45+win8+dnxcore50", "portable-net45+win8" ] } - 使用 cmd.exe,导航到项目根目录并
dotnet -restore
- 启动逆向工程,以加载现有数据库的模型
dotnet ef dbcontext scaffold  "Data Source=LFRUL-013;
Initial Catalog=ProductsDataBase;Integrated Security=True"
Microsoft.EntityFrameworkCore.SqlServer -o Models/DataBase
C) 设置 Restful WebApi
在 controller 文件夹中创建一个名为 ‘ServicesController’ 的控制器,它将包含以下端点
api/Services/Login:- 验证用户是否已注册。
api/Services/Subscription:- 在
p_users实体中创建一个新用户。
- 在
api/Services/GetProducts:- 从
p_product实体返回可用产品的列表。
- 从
api/Services/AddProduct:- 将新产品添加到
p_product实体
- 将新产品添加到
在当前服务完成的操作中,我们有图像转换过程,它将给定的图像数据转换为 base64 格式,该格式将存储在数据库中。
api/Services/DeleteProduct:
使用 URL 参数 (id) 从数据库中删除现有产品。
 [EnableCors("AllowOrigin")]
    [Route("api/Services/")]
    public class ServiceController : Controller
    {
        private ProductsDataBaseContext _context;

        public ServiceController(ProductsDataBaseContext context)
        {
            UserModel userModel = new UserModel();
            _context = context;
        }
      [HttpGet]
      [Route("Hello")]
       public string Hello(){
           return "Hello";
       }

      [HttpPost]
      [Route("Login")]
       public HttpResponseMessage Login([FromBody]UserModel model){
           //create session
           var elem = _context.PUsers.Where(p=> p.Email == model.login &&
                      p.Pwd == model.pwd).FirstOrDefault();

           if((elem != null)){
                return new HttpResponseMessage(HttpStatusCode.OK);
           }else{
                return new HttpResponseMessage(HttpStatusCode.InternalServerError);
            }
       }

      [HttpGet]
      [Route("LogOut")]
       public HttpResponseMessage LogOut(){
           //destroy session.

         return new HttpResponseMessage(HttpStatusCode.OK);
       }

      [HttpPost]
      [Route("Subscription")]
       public HttpResponseMessage Subscription([FromBody]UserModel model){
            var newUser =  new  PUsers(){Email = model.login, Pwd = model.pwd };

            _context.PUsers.Add(newUser);

            _context.SaveChanges();

            return new HttpResponseMessage(HttpStatusCode.OK);
       }

       [HttpGet]
       [Route("GetProduct")]
       public IEnumerable<ProductModel>  GetProduct(){
            return _context.PProduct.Select(p=> new ProductModel(){

                id = p.Id,
                title = p.Title,
                fullDescription = p.Fulldescription,
                price = p.Price,
                picture = p.Picture
            }).ToList();
       }

      [HttpPost]
      [Route("AddProduct")]
       public HttpResponseMessage  AddProduct(){

           string  pictureInBase64 = "";
          if (Request.Form.Files.Count > 0)
          {
                    var formFile = Request.Form.Files[0];
                    var stream = formFile.OpenReadStream();
                    byte[] oFileBytes = new byte[stream.Length];
                    stream.Read(oFileBytes, 0, oFileBytes.Length);
                    string result = Convert.ToBase64String(oFileBytes);

                    pictureInBase64 = "data:image/jpg;base64,"+ result;
          }
           var newProduct =  new  PProduct(){
               Title = Request.Form["title"],
               Fulldescription = Request.Form["fullDescription"],
               Price = Convert.ToInt32(Request.Form["price"]),
               Picture = pictureInBase64,
           };

            _context.PProduct.Add(newProduct);
             _context.SaveChanges();
            return new HttpResponseMessage(HttpStatusCode.OK);
       }

      [HttpDelete]
      [Route("DeleteProduct")]
       public void DeleteProduct(int id){
           var product = new PProduct(){Id = id};
           _context.Attach(product);
           _context.Entry(product).State = EntityState.Deleted;
           _context.SaveChanges();
       }
    }
要运行服务器,你应该在 CMD 控制台中写入以下命令
dotnet run

如果编译成功完成,你可以尝试访问任何端点以检查服务器是否运行良好

在下一篇文章中,你将学习如何从头开始构建一个 完整的 Angular 2 应用程序。
参考文献
历史
- v1 2017 年 1 月 29 日:初始版本