
ASP.NET Core, Angular2 购物篮 使用 Web API 和 EF 1.0.1
4.52/5 (21投票s)
在本文中,我们将了解如何使用 ASP.NET Core、Angular 2、Entity Framework 1.0.1 和 Web API 以及模板包创建一个购物篮。
引言

在本文中,我们将了解如何使用 ASP.NET Core、Angular 2、Entity Framework 1.0.1 和 Web API 以及模板包创建一个购物篮。
注意
请阅读我们上一篇文章,其中深入介绍了 ASP.NET Core 模板包入门。
- ASP.NET Core Angular 2 EF 1.0.1 Web API 使用模板包.
- https://codeproject.org.cn/Articles/1164078/ASP-NET-Core-Angular-Master-Detail-HTML-Grid-using
在本文中,我们将看到:
- 创建示例数据库和 SQL Server 中的 ItemDetails 表,以在我们的 Web 应用程序中显示。
- 使用模板包创建 ASP.NET Core Angular 2 入门应用程序(.NET Core)。
- 创建 EF、DBContext 类和 Model 类。
- 创建 WEB API
- 创建我们的组件 TypeScript 文件,使用 Http 模块获取 WEB API JSON 结果。
- 按商品名称过滤商品。从商品文本框的 keyup 事件显示按搜索名称过滤的商品。
- 选择商品并添加到购物篮。
- 在购物篮中显示总价、总数量和总计。
- 显示购物篮详细信息。
本文将详细介绍如何使用 ASP.NET Core、Angular2、Web API 和 EF 以及模板包创建一个简单的购物篮。
在此购物篮演示应用程序中,我们有 3 个部分:
- 使用 Angular2 和 WEB API 在 HTML 表格中显示所有商品并过滤商品。
- 在添加到购物篮之前,显示所选商品的详细信息。
- 将所选商品添加到购物篮。显示购物篮中所有商品的价格、数量和总计。
显示所有商品并过滤商品

首先,我们使用 Angular2 在购物页面中显示所有商品详细信息。所有商品详细信息将从 WEB API 加载。用户还可以按商品名称过滤商品。当用户在商品名称过滤器文本框中输入任何字符时,相关的商品详细信息将从数据库动态加载到购物页面。
显示所选商品的详细信息

当用户点击商品图片名称时,我们在顶部显示详细的商品信息,以便添加到购物篮。当用户点击“添加到购物车”按钮时,所选商品将被添加到购物篮。
购物篮详细信息

当用户点击“添加商品到购物车”按钮时,所选商品将被添加到购物篮。在添加之前,我们会检查该商品是否已添加到购物车。如果商品已添加到购物车,我们将增加购物篮中的数量。如果商品未添加,则新选择的商品将被添加到购物篮。在购物篮中,我们还显示已添加到购物篮的商品数量。在购物篮中,我们还计算购物篮中所有商品的总数量、总价和总计,这些将在购物篮商品详细信息末尾显示。
必备组件
请确保您已在计算机上安装了所有先决条件。如果没有,请逐一下载并安装所有软件。
- 首先,从这个链接下载并安装 Visual Studio 2015 及更新 3:链接。
- 如果您有 Visual Studio 2015 但尚未更新到更新 3,请从这个链接下载并安装 Visual Studio 2015 更新 3:链接。
- 下载并安装 .NET Core 1.0.1。
- 下载并安装 TypeScript 2.0。
- 下载并安装 Node.js v4.0 或更高版本。我已安装 V6.9.1(下载链接)。
- 从这个链接下载并安装 ASP.NET Core 模板包 visz 文件:链接。
使用代码
步骤 1:创建数据库和表
我们将创建一个 ItemDetails 表,用于购物篮网格数据绑定。
以下是创建数据库、表和示例插入查询的脚本。
在您的 SQL Server 中运行此脚本。我使用了 SQL Server 2014。
-- =============================================
-- Author : Shanu
-- Create date : 2017-02-03
-- Description : To Create Database,Table and Sample Insert Query
-- Latest
-- Modifier : Shanu
-- Modify date : 2017-02-03
-- =============================================
--Script to create DB,Table and sample Insert data
USE MASTER
GO
-- 1) Check for the Database Exists .If the database is exist then drop and create new DB
IF EXISTS (SELECT [name] FROM sys.databases WHERE [name] = 'ShoppingDB' )
DROP DATABASE ShoppingDB
GO

CREATE DATABASE ShoppingDB
GO

USE ShoppingDB
GO

-- 1) //////////// ItemDetails table
-- Create Table ItemDetails,This table will be used to store the details like Item Information

IF EXISTS ( SELECT [name] FROM sys.tables WHERE [name] = 'ItemDetails' )
DROP TABLE ItemDetails
GO

CREATE TABLE ItemDetails
(
Item_ID int identity(1,1),
Item_Name VARCHAR(100) NOT NULL,
Item_Price int NOT NULL,
Image_Name VARCHAR(100) NOT NULL,
Description VARCHAR(100) NOT NULL,
AddedBy VARCHAR(100) NOT NULL,
CONSTRAINT [PK_ItemDetails] PRIMARY KEY CLUSTERED
(
[Item_ID] ASC
)WITH (PAD_INDEX = OFF, STATISTICS_NORECOMPUTE = OFF, IGNORE_DUP_KEY = OFF, ALLOW_ROW_LOCKS = ON, ALLOW_PAGE_LOCKS = ON) ON [PRIMARY]
) ON [PRIMARY]

GO

-- Insert the sample records to the ItemDetails Table
Insert into ItemDetails(Item_Name,Item_Price,Image_Name,Description,AddedBy) values('Access Point',950,'AccessPoint.png','Access Point for Wifi use','Shanu')
Insert into ItemDetails(Item_Name,Item_Price,Image_Name,Description,AddedBy) values('CD',350,'CD.png','Compact Disk','Afraz')
Insert into ItemDetails(Item_Name,Item_Price,Image_Name,Description,AddedBy) values('Desktop Computer',1400,'DesktopComputer.png','Desktop Computer','Shanu')
Insert into ItemDetails(Item_Name,Item_Price,Image_Name,Description,AddedBy) values('DVD',1390,'DVD.png','Digital Versatile Disc','Raj')
Insert into ItemDetails(Item_Name,Item_Price,Image_Name,Description,AddedBy) values('DVD Player',450,'DVDPlayer.png','DVD Player','Afraz')
Insert into ItemDetails(Item_Name,Item_Price,Image_Name,Description,AddedBy) values('Floppy',1250,'Floppy.png','Floppy','Mak')
Insert into ItemDetails(Item_Name,Item_Price,Image_Name,Description,AddedBy) values('HDD',950,'HDD.png','Hard Disk','Albert')
Insert into ItemDetails(Item_Name,Item_Price,Image_Name,Description,AddedBy) values('MobilePhone',1150,'MobilePhone.png','Mobile Phone','Gowri')
Insert into ItemDetails(Item_Name,Item_Price,Image_Name,Description,AddedBy) values('Mouse',399,'Mouse.png','Mouse','Afraz')
Insert into ItemDetails(Item_Name,Item_Price,Image_Name,Description,AddedBy) values('MP3 Player ',897,'MultimediaPlayer.png','Multi MediaPlayer','Shanu')
Insert into ItemDetails(Item_Name,Item_Price,Image_Name,Description,AddedBy) values('Notebook',750,'Notebook.png','Notebook','Shanu')
Insert into ItemDetails(Item_Name,Item_Price,Image_Name,Description,AddedBy) values('Printer',675,'Printer.png','Printer','Kim')
Insert into ItemDetails(Item_Name,Item_Price,Image_Name,Description,AddedBy) values('RAM',1950,'RAM.png','Random Access Memory','Jack')
Insert into ItemDetails(Item_Name,Item_Price,Image_Name,Description,AddedBy) values('Smart Phone',679,'SmartPhone.png','Smart Phone','Lee')
Insert into ItemDetails(Item_Name,Item_Price,Image_Name,Description,AddedBy) values('USB',950,'USB.png','USB','Shanu')

select * from ItemDetails
步骤 2 - 创建 ASP.NET Core Angular 2 应用程序
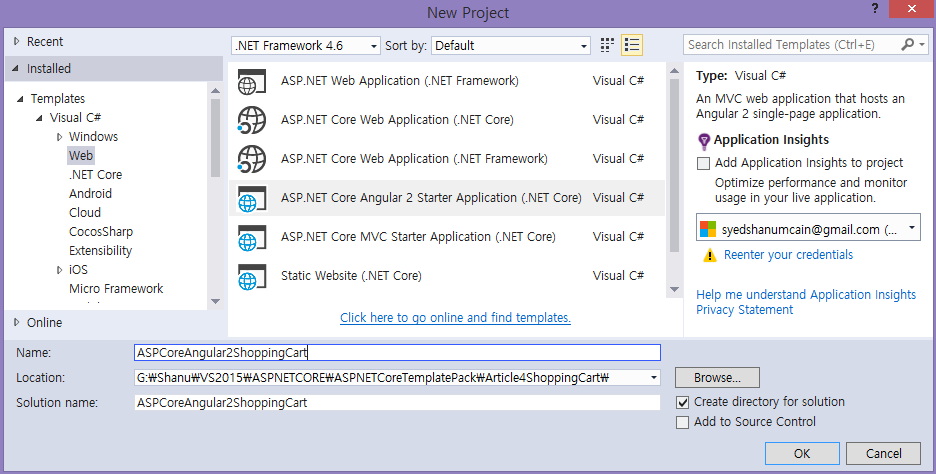
安装完上述所有先决条件和 ASP.NET Core 模板后,在桌面上点击开始 >> 程序 >> Visual Studio 2015 >> Visual Studio 2015。点击新建 >> 项目。选择 Web >> ASP.NET Core Angular 2 Starter。输入您的项目名称,然后点击确定。
创建 ASP.NET Core Angular 2 应用程序后,等待几秒钟。您将看到所有依赖项都已自动恢复。

我们将使用以上所有内容来创建、构建和运行我们的 Angular 2 应用程序,该应用程序使用 ASP.NET Core 模板包、WEB API 和 EF 1.0.1。
步骤 3 创建 Entity Framework
添加 Entity Framework 包
要将我们的 Entity Framework 包添加到 ASP.NET Core 应用程序中。打开 Project.JSON 文件,然后在 dependencies 下添加以下行。
注意
这里我们使用了 EF 版本 1.0.1。
"Microsoft.EntityFrameworkCore.SqlServer": "1.0.1",
"Microsoft.EntityFrameworkCore.Tools": "1.0.0-preview2-final"

当我们保存 project.json 文件时,可以看到 Reference 正在被还原。

几秒钟后,我们将看到 Entity Framework 包已恢复,并且所有引用都已添加。

添加连接字符串
要将连接字符串添加到我们的 SQL 连接,请打开“appsettings.json”文件。是的,这是一个 JSON 文件,并且默认情况下该文件看起来像下面的图片。

在此 appsettings.json 文件中添加我们的连接字符串。
"ConnectionStrings": {
    "DefaultConnection": "Server=YOURDBSERVER;Database=ShoppingDB;user id=SQLID;password=SQLPWD;Trusted_Connection=True;MultipleActiveResultSets=true;"
  },
注意:请根据您的本地连接修改 SQL 连接字符串。

下一步是创建一个名为“Data”的文件夹来创建我们的模型和 DBContext 类。

创建 Item Details 的 Model 类
我们可以通过在 Data 文件夹中添加一个新类文件来创建模型。右键单击 Data 文件夹,然后点击 Add > Click Class。将类名输入为 itemDetails,然后点击 Add。

现在在这个类中,我们首先创建一个属性变量,添加 ItemDetails。我们将在 WEB API 控制器中使用它。
using System;
using System.Collections.Generic;
using System.Linq;
using System.Threading.Tasks;
using System.ComponentModel.DataAnnotations;

namespace Angular2ASPCORE.Data
{
public class ItemDetails
    {
        [Key]
        public int Item_ID { get; set; }

        [Required]
        [Display(Name = "Item_Name")]
        public string Item_Name { get; set; }

        [Required]
        [Display(Name = "Item_Price")]
        public int Item_Price { get; set; }

        [Required]
        [Display(Name = "Image_Name")]
        public string Image_Name { get; set; }

        [Required]
        [Display(Name = "Description")]
        public string Description { get; set; }

        [Required]
        [Display(Name = "AddedBy")]
        public string AddedBy { get; set; }
    }
}
创建数据库上下文
DBContext 是 Entity Framework 类,用于建立与数据库的连接。
我们可以通过在 Data 文件夹中添加一个新类文件来创建一个 DBContext 类。右键单击 Data 文件夹,然后点击 Add > Click Class。将类名输入为 ItemContext,然后点击 Add。

在这个类中,我们继承 DbContext 并为我们的 ItemDetails 表创建了 DbSet。
using System;
using System.Collections.Generic;
using System.Linq;
using System.Threading.Tasks;
using Microsoft.EntityFrameworkCore;

namespace Angular2ASPCORE.Data
{
    public class ItemContext : DbContext
    {
        public ItemContext(DbContextOptions<ItemContext> options)
            : base(options) { }
        public ItemContext() { }
        public DbSet<ItemDetails> ItemDetails { get; set; }
    }
}
Startup.CS
现在我们需要在 Startup.cs 文件中 ConfigureServices 方法下添加我们的数据库连接字符串和提供程序(SQL SERVER)。为此,我们添加以下代码。
// Add Entity framework .
            services.AddDbContext<ItemContext>(options =>
             options.UseSqlServer(Configuration.GetConnectionString("DefaultConnection")));
步骤 4 创建 Web API
要创建我们的 WEB API 控制器,请右键单击 Controllers 文件夹。点击 Add,然后点击 New Item。

在右侧点击 ASP.NET > 点击 Web API Controller Class。将名称输入为“itemDetailsAPI.cs”,然后点击 Add。

在这里,我们只使用 Get 方法从数据库获取所有 ItemDetails 结果,并使用 Angular2 将最终结果绑定到 html 文件。
在此 Web API 中,我们获取所有 ItemDetails,并通过 ItemName 条件加载 ItemDetails。
[Produces("application/json")]
    [Route("api/ItemDetailsAPI")]
    public class ItemDetailsAPI : Controller
    {
        private readonly ItemContext _context;

        public ItemDetailsAPI(ItemContext context)
        {
            _context = context;
        }

        // GET: api/values

        [HttpGet]
        [Route("Details")]
        public IEnumerable<ItemDetails> GetItemDetails()
        {
            return _context.ItemDetails;

        }


        // GET api/values/5
        [HttpGet]
        [Route("Details/{ItemName}")]
        public IEnumerable<ItemDetails> GetItemDetails(string ItemName)
        {
            //return _context.ItemDetails.Where(i => i.Item_Name == ItemName).ToList(); ;
            return _cont
      }
要进行测试,我们可以运行我们的项目并复制 get 方法的 API 路径。在这里,我们可以看到 get 的 API 路径是 /api/ItemDetailsAPI/Details。
运行程序并粘贴上述 API 路径以测试我们的输出。

通过 ItemName 获取 Item Details。在这里,我们可以看到所有 ItemName 以“DVD”开头的 ItemDetails 都已加载。
/api/ItemDetailsAPI/Details/DVD

使用 Angular2
我们在 ClientApp/App 文件夹下创建所有与 Angular2 相关的应用程序、模块、服务、组件和 html 模板。
我们在 app 文件夹下创建“model”文件夹来存放模型,并创建“shopping”文件夹来存放我们的 typescript 和 html 文件,用于显示商品详细信息。

注意 - Images 文件夹
首先在 shopping 文件夹内创建一个名为“Images”的文件夹。我使用此文件夹来显示所有购物篮图片。如果您在代码中的其他路径存储购物图片,请相应更改。

步骤 5 创建我们的第一个组件 TypeScript
右键单击 shopping 文件夹,然后点击 Add New Item。从左侧选择 Client-side,然后选择 TypeScript File,并将文件名命名为“shopping.component.ts”,然后点击 Add。

首先,我们创建 ItemDetails.ts 和 CartItemDetails.ts 作为 typescript 模型文件。
ItemDetails.ts
//// For ItemDetails
export interface ItemDetails {
    Item_ID: number;
    Item_Name: string;
    Item_Price: number;
    Image_Name: string;
    Description: string;
    AddedBy: string;
}
CartItemDetails.ts
export class CartItemDetails {
    constructor(
        public CItem_ID: number,
        public CItem_Name: string,
        public CImage_Name: string,
        public CDescription: string,
        public CAddedBy: string,
        public CItem_Price: number,
        public CQty: number,
        public CTotalPrice: number
    ) { }
}
我们将此类导入到我们的 Shopping.component 中,用于绑定 JSon 结果。
在 students.component.ts 文件中,我们有三个部分:首先是
- import 部分
- 接下来是 component 部分
- 接下来是我们编写业务逻辑的类。
首先,我们导入要在组件中使用的 angular 文件;在这里,我们导入 http 以在我们的 Angular2 组件中使用 http 客户端。
在组件中,我们有 selector 和 template。Selector 用于为此应用程序命名,在我们的 html 文件中,我们使用此 selector 名称在我们的 html 页面上显示。
在 template 中,我们提供输出 html 文件名。这里我们将创建一个名为“students.component.html”的 html 文件。
Export Class 是主类,我们在这里执行所有业务逻辑和变量声明,供组件模板使用。在这个类中,我们获取 API 方法的结果并将结果绑定到 student 数组。
这里的代码部分,我已注释掉每个部分,以便于理解。
import { Component, Injectable, Inject, EventEmitter, Input, OnInit, Output, NgModule  } from <a href="mailto:'@angular/core'">'@angular/core'</a>;
import { FormsModule  } from <a href="mailto:'@angular/forms'">'@angular/forms'</a>;
import { ActivatedRoute, Router } from <a href="mailto:'@angular/router'">'@angular/router'</a>;
import { BrowserModule } from <a href="mailto:'@angular/platform-browser'">'@angular/platform-browser'</a>;
import { Http,Headers, Response, Request, RequestMethod, URLSearchParams, RequestOptions } from "@angular/http";
import { ItemDetails } from '../model/ItemDetails';
import { CartItemDetails } from '../model/CartItemDetails';


@Component({
    selector: 'shopping',
    template: require('./shopping.component.html')
})


export class shoppingComponent {
    //Declare Variables to be used

    //To get the WEb api Item details to be displayed for shopping
    public ShoppingDetails: ItemDetails[] = [];
    myName: string;

    //Show the Table row for Items,Cart  and Cart Items.
    showDetailsTable: Boolean = true;
    AddItemsTable: Boolean = false;
    CartDetailsTable: Boolean = false;
    public cartDetails: CartItemDetails[] = [];

    public ImageUrl = require("./Images/CD.png");
    public cartImageUrl = require("./Images/shopping_cart64.png");


    //For display Item details and Cart Detail items
    public ItemID: number;
    public ItemName: string = "";
    public ItemPrice: number = 0;
    public Imagename: string = "";
    public ImagePath: string = "";
    public Descrip: string =  "";
    public txtAddedBy: string = "";
    public Qty: number = 0;

    //For calculate Total Price,Qty and Grand Total price
    public totalPrice: number = 0;
    public totalQty: number = 0;
    public GrandtotalPrice: number = 0;

    public totalItem: number = 0;


    //Inital Load
    constructor(public http: Http) {
        this.myName = "Shanu";
        this.showDetailsTable = true;
        this.AddItemsTable = false;
        this.CartDetailsTable = false;
        this.getShoppingDetails('');
    }

    //Get all the Item Details and Item Details by Item name
    getShoppingDetails(newItemName) {

        if (newItemName == "") {
            this.http.get('/api/ItemDetailsAPI/Details').subscribe(result => {
                this.ShoppingDetails = result.json();
            });
        }
        else {
            this.http.get('/api/ItemDetailsAPI/Details/' + newItemName).subscribe(result => {
                this.ShoppingDetails = result.json();
            });
        }
    }

    //Get Image Name to bind
    getImagename(newImage) {
        this.ImageUrl = require("./Images/" + newImage);
    }

    // Show the Selected Item to Cart for add to my cart Items.
    showToCart(Id, Name, Price, IMGNM, Desc,user)
    {
        this.showDetailsTable = true;
        this.AddItemsTable = true;
        this.CartDetailsTable = false;
        this.ItemID = Id;
        this.ItemName = Name;
        this.ItemPrice = Price;
        this.Imagename = require("./Images/" + IMGNM);
        this.ImagePath = IMGNM
        this.Descrip = Desc;
        this.txtAddedBy = user;
    }

    // to Show Items to be added in cart
    showCart() {
        this.showDetailsTable = false;
        this.AddItemsTable = true;
        this.CartDetailsTable = true;
        this.addItemstoCart();
    }
    // to show all item details
    showItems() {
        this.showDetailsTable = true;
        this.AddItemsTable = false;
        this.CartDetailsTable = false;
    }

    //to Show our Shopping Items details

    showShoppingItems() {
        if (this.cartDetails.length <= 0)
        {
            alert("Ther is no Items In your Cart.Add Items to view your Cart Details !")
            return;
        }
        this.showDetailsTable = false;
        this.AddItemsTable = false;
        this.CartDetailsTable = true;
    }

    //Check the Item already exists in Cart,If the Item is exist then add only the quantity else add selected item to cart.
    addItemstoCart() {

        var count: number = 0;
        var ItemCountExist: number = 0;
        this.totalItem = this.cartDetails.length;
      if (this.cartDetails.length > 0) {
          for (count = 0; count < this.cartDetails.length; count++) {
              if (this.cartDetails[count].CItem_Name == this.ItemName) {
                  ItemCountExist = this.cartDetails[count].CQty + 1;
                  this.cartDetails[count].CQty = ItemCountExist;
              }
          }
      }
            if (ItemCountExist <= 0)
            {
                this.cartDetails.push(
                    new CartItemDetails(this.ItemID, this.ItemName, this.ImagePath, this.Descrip, this.txtAddedBy, this.ItemPrice, 1, this.ItemPrice));

            }
            this.getItemTotalresult();
    }

    //to calculate and display the total price information in Shopping cart.
     getItemTotalresult() {
    this.totalPrice = 0;
    this.totalQty = 0;
    this.GrandtotalPrice = 0;
    var count: number = 0;
    this.totalItem = this.cartDetails.length;
    for (count = 0; count < this.cartDetails.length; count++) {
        this.totalPrice += this.cartDetails[count].CItem_Price;
        this.totalQty += (this.cartDetails[count].CQty);
        this.GrandtotalPrice += this.cartDetails[count].CItem_Price * this.cartDetails[count].CQty;
    }

}

    //remove the selected item from the cart.
    removeFromCart(removeIndex) {
        alert(removeIndex);
        this.cartDetails.splice(removeIndex, 1);

        this.getItemTotalresult();
    }
}
步骤 6 创建我们的第一个组件 HTML 文件
右键单击 shopping 文件夹,然后点击 Add New Item。从左侧选择 Client-side,然后选择 html File,并将文件名命名为“shopping.component.html”,然后点击 Add。

编写以下 html 代码,将结果绑定到我们的 html 页面,以显示所有购物商品和购物篮详细信息。
<h1>{{myName}} ASP.NET Core , Angular2 Shopping Cart using Web API and EF 1.0.1 </h1>
<hr style="height: 1px;color: #123455;background-color: #d55500;border: none;color: #d55500;" />
<p *ngIf="!ShoppingDetails"><em>Loading Student Details please Wait ! ...</em></p>
<!--<pre>{{ ShoppingDetails | json }}</pre>-->
<table id="tblContainer" style='width: 99%;table-layout:fixed;'>
<tr *ngIf="AddItemsTable">
<td>
<table style="background-color:#FFFFFF; border: dashed 3px #6D7B8D; padding: 5px;width: 99%;table-layout:fixed;" cellpadding="2"
cellspacing="2">
<tr style="height: 30px; color:#ff0000 ;border: solid 1px #659EC7;">
<td width="40px"> </td>
<td>
<h2> <strong>Add Items to Cart</strong></h2>
</td>
</tr>
<tr>
<td width="40px"> </td>
<td>
<table>
<tr>
<td>
<img src="{{Imagename}}" width="150" height="150" />
</td>
<td width="30"></td>
<td valign="top">
<table style="color:#9F000F;font-size:large" cellpadding="4" cellspacing="6">
<tr>
<td>
<b>Item code </b>
</td>
<td>
: {{ItemID}}
</td>
</tr>
<tr>
<td>
<b> Item Name</b>
</td>
<td>
: {{ItemName}}
</td>
</tr>
<tr>
<td>
<b> Price </b>
</td>
<td>
: {{ItemPrice}}
</td>
</tr>
<tr>
<td>
<b> Description </b>
</td>
<td>
: {{Descrip}}
</td>
</tr>
<tr>
<td align="center" colspan="2">
<table>
<tr>
<td>
<button (click)=showCart() style="background-color:#4c792d;color:#FFFFFF;font-size:large;width:200px">
Add to Cart
</button>
</td>
<td rowspan="2"><img src="{{cartImageUrl}}" /></td>
</tr>
</table>
</td>
</tr>
</table>
</td>
</tr>
</table>
</td>
</tr>
</table>
</td>
</tr>
<tr>
<td><hr style="height: 1px;color: #123455;background-color: #d55500;border: none;color: #d55500;" /></td>
</tr>
<tr *ngIf="CartDetailsTable">
<td>
<table width="100%">
<tr>
<td>
<table style="background-color:#FFFFFF; border: dashed 3px #6D7B8D; padding: 5px;width: 100%;table-layout:fixed;" cellpadding="2"
cellspacing="2">
<tr style="height: 30px; color:#123455 ;border: solid 1px #659EC7;">
<td width="40px"> </td>
<td width="60%">
<h1> My Recent Orders Items <strong style="color:#0094ff"> ({{totalItem}})</strong></h1>
</td>
<td align="right">
<button (click)=showItems() style="background-color:#0094ff;color:#FFFFFF;font-size:large;width:300px;height:50px;
border-color:#a2aabe;border-style:dashed;border-width:2px;">
Add More Items
</button>
</td>
</tr>
</table>
</td>
</tr>
<tr>
<td>
<table style="background-color:#FFFFFF; border:solid 2px #6D7B8D;padding: 5px;width: 100%;table-layout:fixed;" cellpadding="2" cellspacing="2">
<tr style="height: 30px; background-color:#336699 ; color:#FFFFFF ;border: solid 1px #659EC7;">
<td width="30" align="center">No</td>
<td width="80" align="center">
<b>Image</b>
</td>
<td width="90" align="center" style="border: solid 1px #FFFFFF; padding: 5px;table-layout:fixed;cursor: pointer;">
<b>Item Code</b>
</td>
<td width="140" align="center" style="border: solid 1px #FFFFFF; padding: 5px;table-layout:fixed;cursor: pointer;">
<b>Item Name</b>
</td>
<td width="160" align="center" style="border: solid 1px #FFFFFF; padding: 5px;table-layout:fixed;cursor: pointer;">
<b>Decription</b>
</td>
<td width="90" align="center" style="border: solid 1px #FFFFFF; padding: 5px;table-layout:fixed;cursor: pointer;">
<b>Price</b>
</td>
<td width="90" align="center" style="border: solid 1px #FFFFFF; padding: 5px;table-layout:fixed;cursor: pointer;">
<b>Quantity</b>
</td>
<td width="90" align="center" style="border: solid 1px #FFFFFF; padding: 5px;table-layout:fixed;cursor: pointer;">
<b>Total Price</b>
</td>
<td></td>
</tr>
<tbody *ngFor="let detail of cartDetails ; let i = index">
<tr>
<td style="border: solid 1px #659EC7; padding: 5px;table-layout:fixed;" align="center">
{{i+1}}
</td>
<td align="center" style="border: solid 1px #659EC7; padding: 5px;table-layout:fixed;">
<span style="color:#9F000F" *ngIf!="getImagename(detail.CImage_Name)">
<img src="{{ImageUrl}}" style="height:56px;width:56px">
</span>
</td>
<td style="border: solid 1px #659EC7; padding: 5px;table-layout:fixed;">
<span style="color:#9F000F">
{{detail.CItem_ID}}
</span>
</td>
<td style="border: solid 1px #659EC7; padding: 5px;table-layout:fixed;">
<span style="color:#9F000F">
{{detail.CItem_Name}}
</span>
</td>
<td style="border: solid 1px #659EC7; padding: 5px;table-layout:fixed;">
<span style="color:#9F000F">
{{detail.CDescription}}
</span>
</td>
<td align="right" style="border: solid 1px #659EC7; padding: 5px;table-layout:fixed;">
<span style="color:#9F000F">
{{detail.CItem_Price | number}}
</span>
</td>
<td style="border: solid 1px #659EC7; padding: 5px;table-layout:fixed;" align="right">
<span style="color:#9F000F">
{{detail.CQty}}
</span>
</td>
<td style="border: solid 1px #659EC7; padding: 5px;table-layout:fixed;" align="right">
<span style="color:#9F000F">
{{detail.CTotalPrice*detail.CQty | number}}
</span>
</td>
<td align="center" style="border: solid 1px #659EC7; padding: 5px;table-layout:fixed;">
<button (click)=removeFromCart(i) style="background-color:#e11919;color:#FFFFFF;font-size:large;width:220px;height:40px;">
Remove Item from Cart
</button>
</td>
</tr>
</tbody>
<tr>
<td colspan="5" height="40" align="right" > <strong>Total </strong></td>
<td align="right" height="40"><strong>Price: {{ totalPrice | number}}</strong></td>
<td align="right" height="40"><strong>Qty : {{ totalQty | number}}</strong></td>
<td align="right" height="40"><strong>Sum: {{ GrandtotalPrice | number}}</strong></td>
<td></td>
</tr>
</table>
</td>
</tr>
</table>
</td>
</tr>
<tr *ngIf="showDetailsTable">
<td>
<table width="100%" style="background-color:#FFFFFF; border: dashed 3px #6D7B8D; padding: 5px;width: 100%;table-layout:fixed;" cellpadding="2"
cellspacing="2">
<tr>
<td>
<table style="background-color:#FFFFFF; border: dashed 3px #6D7B8D; padding: 5px;width: 100%;table-layout:fixed;" cellpadding="2"
cellspacing="2">
<tr style="height: 30px; color:#134018 ;border: solid 1px #659EC7;">
<td width="40px"> </td>
<td width="60%">
<h2> <strong>Item Details</strong></h2>
</td>
<td align="right">
<button (click)=showShoppingItems() style="background-color:#d55500;color:#FFFFFF;font-size:large;width:300px;height:50px;
border-color:#a2aabe;border-style:dashed;border-width:2px;">
Show My Cart Items
</button>
</td>
</tr>
</table>
</td>
</tr>
<tr>
<td>
<table style="background-color:#FFFFFF; border: solid 2px #6D7B8D; padding: 5px;width: 100%;table-layout:fixed;" cellpadding="2" cellspacing="2" *ngIf="ShoppingDetails">
<tr style="height: 30px; background-color:#336699 ; color:#FFFFFF ;border: solid 1px #659EC7;">
<td width="40" align="center">
<b>Image</b>
</td>
<td width="40" align="center" style="border: solid 1px #FFFFFF; padding: 5px;table-layout:fixed;cursor: pointer;">
<b>Item Code</b>
</td>
<td width="120" align="center" style="border: solid 1px #FFFFFF; padding: 5px;table-layout:fixed;cursor: pointer;">
<b>Item Name</b>
</td>
<td width="120" align="center" style="border: solid 1px #FFFFFF; padding: 5px;table-layout:fixed;cursor: pointer;">
<b>Decription</b>
</td>
<td width="40" align="center" style="border: solid 1px #FFFFFF; padding: 5px;table-layout:fixed;cursor: pointer;">
<b>Price</b>
</td>
<td width="90" align="center" style="border: solid 1px #FFFFFF; padding: 5px;table-layout:fixed;cursor: pointer;">
<b>User Name</b>
</td>
</tr>
<tr style="height: 30px; background-color:#336699 ; color:#FFFFFF ;border: solid 1px #659EC7;">
<td width="40" align="center">
Filter By ->
</td>
<td width="200" colspan="5" style="border: solid 1px #FFFFFF; padding: 5px;table-layout:fixed;">
Item Name :
<input type="text" (ngModel)="ItemName" (keyup)="getShoppingDetails(myInput.value)" #myInput style="background-color:#fefcfc;color:#334668;font-size:large;
border-color:#a2aabe;border-style:dashed;border-width:2px;" />
</td>
</tr>
<tbody *ngFor="let detail of ShoppingDetails">
<tr>
<td align="center" style="border: solid 1px #659EC7; padding: 5px;table-layout:fixed;">
<span style="color:#9F000F" *ngIf!="getImagename(detail.image_Name)">
<img src="{{ImageUrl}}" style="height:56px;width:56px" (click)=showToCart(detail.item_ID,detail.item_Name,detail.item_Price,detail.image_Name,detail.description,detail.addedBy)>
</span>
</td>
<td style="border: solid 1px #659EC7; padding: 5px;table-layout:fixed;">
<span style="color:#9F000F">
{{detail.item_ID}}
</span>
</td>
<td style="border: solid 1px #659EC7; padding: 5px;table-layout:fixed;">
<span style="color:#9F000F">
{{detail.item_Name}}
</span>
</td>
<td style="border: solid 1px #659EC7; padding: 5px;table-layout:fixed;">
<span style="color:#9F000F">
{{detail.description}}
</span>
</td>
<td align="right" style="border: solid 1px #659EC7; padding: 5px;table-layout:fixed;">
<span style="color:#9F000F">
{{detail.item_Price}}
</span>
</td>
<td style="border: solid 1px #659EC7; padding: 5px;table-layout:fixed;">
<span style="color:#9F000F">
{{detail.addedBy}}
</span>
</td>
</tr>
</table>
</td>
</tr>
</table>
</td>
</tr>
</table>
构建并运行应用程序
关注点
首先在您的 SQL Server 中创建数据库和表。您可以运行本文中的 SQL 脚本来创建 ShoppingDB 数据库和 ItemDetails 表,并且不要忘记从“appsettings.json”中更改连接字符串。
历史
ASPCoreAngular2Shopping.zip - 2017/02/03