
SPA^2 使用 ASP.Net Core 1.1 + Angular 4.0 - 第 8 部分
5.00/5 (6投票s)
涵盖从 Angular 2.40 升级到 Angular 4.0 + 使用 VS2017 将 ASP.Net Core / Angular 4 SPA 发布到 IIS
如果上面的链接损坏,请在此处 从 GitHub 获取主源代码 或在此处获取 part8 分支。
引言
这是描述如何使用 ASP.Net Core 和 Angular 2(现为 Angular 4)创建 SPA 系列的第 8 部分。
在之前的系列文章中,我们已经探讨了如何使用标签助手动态创建 Angular、HTML 和 CSS 标记,这些标记是从数据模型中的设置以及数据模型的元数据/属性中提取的。
像这样生成代码的概念并不新鲜,其他人之前已经使用过,我自己在过去几年中也曾在商业项目中使用过相同的技术,结合 ASP.Net MVC 和 Angular 1.x。
因此,为了查看 ASP.Net Core 和 Angular 4 版本是否适用于两个客户,我开始了这一系列文章——距离我上次的进度并不太远。该技术(到目前为止)是有效的,尽管比我预期的花费了更多通勤时间。
扩展、更改和重构更容易,因为其中许多只是对数据模型或标签助手的更改。这些更改要么自动传播,要么通过 NSwag 轻松传播。代码生成比手动创建所有内容容易得多,开发人员剪切/粘贴和创建代码分支的诱惑要小得多,并且出现拼写错误或错误的几率也更低。
在上一部分,即第 7 部分,我介绍了使用 VS 2015 进行发布。在发现许多开发和部署问题后,这篇文章变得有点长,因此 VS 2017 的发布被推迟到本部分,即第 8 部分。
首先,我们将介绍对 VS 2017 解决方案的更新,使其与 VS 2015 版本保持一致,并将代码从 Angular 2 升级到 Angular 4。然后,我将介绍发布,特别是针对 VS 2017。
设置 IIS Express 中的 SSL
要设置我们的 SPA 以强制在生产模式下使用 SSL,请将 startup.cs 编辑为如下(完整的代码将在下面显示)。有关详细说明,请参阅第 7 部分。以下是新的 startup.cs 代码。
using A2SPA.Data;
using A2SPA.Models;
using AspNet.Security.OpenIdConnect.Primitives;
using Microsoft.AspNetCore.Builder;
using Microsoft.AspNetCore.Hosting;
using Microsoft.AspNetCore.Identity.EntityFrameworkCore;
using Microsoft.EntityFrameworkCore;
using Microsoft.Extensions.Configuration;
using Microsoft.Extensions.DependencyInjection;
using Microsoft.Extensions.FileProviders;
using Microsoft.Extensions.Logging;
using NJsonSchema;
using NSwag;
using NSwag.AspNetCore;
using NSwag.SwaggerGeneration.WebApi.Processors.Security;
using System.IO;
using System.Reflection;

namespace A2SPA
{
    public class Startup
    {
        private IHostingEnvironment CurrentEnvironment { get; set; }
        public IConfigurationRoot Configuration { get; }

        public Startup(IHostingEnvironment env)
        {
            CurrentEnvironment = env;

            var builder = new ConfigurationBuilder()
                .SetBasePath(CurrentEnvironment.ContentRootPath)
                .AddJsonFile("appsettings.json", optional: true, reloadOnChange: true)
                .AddJsonFile($"appsettings.{CurrentEnvironment.EnvironmentName}.json", optional: true)
                .AddEnvironmentVariables();
            Configuration = builder.Build();
        }

        // This method gets called by the runtime. Use this method to add services to the container.
        public void ConfigureServices(IServiceCollection services)
        {
            // Add framework services.
            services.AddMvc();

            services.AddDbContext<A2spaContext>(options =>
            {
                options.UseSqlServer(Configuration.GetConnectionString("DefaultConnection"));

                // Register the entity sets needed by OpenIddict.
                // Note: use the generic overload if you need
                // to replace the default OpenIddict entities.
                options.UseOpenIddict();
            });
            // Register the Identity services.
            services.AddIdentity<ApplicationUser, IdentityRole>()
                .AddEntityFrameworkStores<A2spaContext>()
                .AddDefaultTokenProviders();

            // Configure Identity to use the same JWT claims as OpenIddict instead
            // of the legacy WS-Federation claims it uses by default (ClaimTypes),
            // which saves you from doing the mapping in your authorization controller.
            services.Configure<IdentityOptions>(options =>
            {
                options.ClaimsIdentity.UserNameClaimType = OpenIdConnectConstants.Claims.Name;
                options.ClaimsIdentity.UserIdClaimType = OpenIdConnectConstants.Claims.Subject;
                //options.ClaimsIdentity.RoleClaimType = OpenIdConnectConstants.Claims.Role;
            });

            // Register the OpenIddict services.
            services.AddOpenIddict(options =>
            {
                // Register the Entity Framework stores.
                options.AddEntityFrameworkCoreStores<A2spaContext>();

                // Register the ASP.NET Core MVC binder used by OpenIddict.
                // Note: if you don't call this method, you won't be able to
                // bind OpenIdConnectRequest or OpenIdConnectResponse parameters.
                options.AddMvcBinders();

                // Enable the authorization, logout, token and userinfo endpoints.
                options.EnableAuthorizationEndpoint("/connect/authorize")
                       .EnableLogoutEndpoint("/connect/logout")
                       .EnableTokenEndpoint("/connect/token")
                       .EnableUserinfoEndpoint("/api/userinfo");

                // Note: the Mvc.Client sample only uses the authorization code flow but you can enable
                // the other flows if you need to support implicit, password or client credentials.
                options.AllowPasswordFlow();

                // When request caching is enabled, authorization and logout requests
                // are stored in the distributed cache by OpenIddict and the user agent
                // is redirected to the same page with a single parameter (request_id).
                // This allows flowing large OpenID Connect requests even when using
                // an external authentication provider like Google, Facebook or Twitter.
                // options.EnableRequestCaching();

                // During development, you can disable the HTTPS requirement.
                if (CurrentEnvironment.IsDevelopment())
                {
                    options.DisableHttpsRequirement();
                }
            });
        }

        // This method gets called by the runtime. Use this method to configure the HTTP request pipeline.
        public void Configure(IApplicationBuilder app, ILoggerFactory loggerFactory, A2spaContext context)
        {
            loggerFactory.AddConsole(Configuration.GetSection("Logging"));
            loggerFactory.AddDebug();

            if (CurrentEnvironment.IsDevelopment())
            {
                app.UseDeveloperExceptionPage();
                // app.UseBrowserLink();
            }
            else
            {
                app.UseExceptionHandler("/Home/Error");
            }

            // Add a middleware used to validate access
            // tokens and protect the API endpoints.
            app.UseOAuthValidation();

            // Alternatively, you can also use the introspection middleware.
            // Using it is recommended if your resource server is in a
            // different application/separated from the authorization server.
            //
            // app.UseOAuthIntrospection(options =>
            // {
            //     options.AutomaticAuthenticate = true;
            //     options.AutomaticChallenge = true;
            //     options.Authority = "https://:58795/";
            //     options.Audiences.Add("resource_server");
            //     options.ClientId = "resource_server";
            //     options.ClientSecret = "875sqd4s5d748z78z7ds1ff8zz8814ff88ed8ea4z4zzd";
            // });

            app.UseOpenIddict();
            app.UseDefaultFiles();
            app.UseStaticFiles();
            app.UseStaticFiles(new StaticFileOptions
            {
                FileProvider = new PhysicalFileProvider(Path.Combine(CurrentEnvironment.ContentRootPath, "node_modules")),
                RequestPath = "/node_modules"
            });

            app.UseSwaggerUi(typeof(Startup).GetTypeInfo().Assembly, new SwaggerUiOwinSettings()
            {
                OperationProcessors =
                {
                    new OperationSecurityScopeProcessor("apikey")
                },
                DocumentProcessors =
                {
                    new SecurityDefinitionAppender("apikey", new SwaggerSecurityScheme
                    {
                        Type = SwaggerSecuritySchemeType.ApiKey,
                        Name = "Authorization",
                        In = SwaggerSecurityApiKeyLocation.Header
                    })
                },
                DefaultPropertyNameHandling = PropertyNameHandling.CamelCase
            });

            app.UseMvc(routes =>
            {
                routes.MapRoute(
                    name: "default",
                    template: "{controller=Home}/{action=Index}/{id?}");

                // in case multiple SPAs required.
                routes.MapSpaFallbackRoute("spa-fallback", new { controller = "home", action = "index" });

            });

            //if (CurrentEnvironment.IsDevelopment())
            {
                DbInitializer.Initialize(context);
            }
        }
    }
}
同样,有关更详细的信息,请参阅 此处的第 7 部分。
从 Angular 2.40 升级到 Angular 4.0
接下来,如果您还没有更新 package.json,请立即进行。按照以下更改,我们将迁移到 Angular 4 并在此过程中引入一些更近期的库。将您的 package.json 文件编辑为以下内容:
{
  "name": "a2spa",
  "version": "1.0.0",
  "description": "ASP.Net Core and Angular 4 Single Page Applicaiton",
  "keywords": [],
  "author": "",
  "license": "MIT",
  "dependencies": {
    "@angular/animations": "~4.0.0",
    "@angular/common": "~4.0.0",
    "@angular/compiler": "~4.0.0",
    "@angular/core": "~4.0.0",
    "@angular/forms": "~4.0.0",
    "@angular/http": "~4.0.0",
    "@angular/platform-browser": "~4.0.0",
    "@angular/platform-browser-dynamic": "~4.0.0",
    "@angular/router": "~4.0.0",
    "angular-in-memory-web-api": "^0.3.1",
    "core-js": "^2.4.1",
    "ngx-toastr": "5.0.6",
    "rxjs": "^5.3.0",
    "systemjs": "^0.20.11",
    "typescript": "^2.2.2",
    "zone.js": "^0.8.5"
  },
  "devDependencies": {
    "typescript": "^2.2.2",
    "tslint": "^5.0.0"
  },
  "repository": {}
}
接下来,为了防止在部署网站时丢失对 Angular 和其他 NPM 库的访问权限,我们需要编辑 /views/shared/_Layout.cshtml 文件中的共享模板,并将链接从 /node_modules 更改为 ~/node_modules ——这将创建相对链接(指向站点根目录)而不是绝对链接。
此外,为确保我们的视图能够正确加载,请编辑 /views/shared/_loginPartial.cshtml 以删除路由链接前面的 /。换句话说,这段代码:
<li><a class="nav-link" (click)="setTitle('Register - A2SPA')" routerLink="/register">Register</a></li>
<li><a class="nav-link" (click)="setTitle('Login - A2SPA')" routerLink="/login">Login</a></li>
应该更改为:
<li><a class="nav-link" (click)="setTitle('Register - A2SPA')" routerLink="register">Register</a></li>
<li><a class="nav-link" (click)="setTitle('Login - A2SPA')" routerLink="login">Login</a></li>
接下来,更新 /views/partial/AppComponent.cshtml 中的这些附加链接:
<ul class="nav navbar-nav">
    <li>
        <a class="nav-link" (click)="setTitle('Home - A2SPA')" routerLink="/home" routerLinkActive="active">Home</a>
    </li>
    <li [hidden]="!isLoggedIn()">
        <a class="nav-link" (click)="setTitle('About - A2SPA')" routerLink="/about">About</a>
    </li>
    <li [hidden]="!isLoggedIn()">
        <a class="nav-link" href="/swagger">NSwag</a>
    </li>
    <li>
        <a class="nav-link" (click)="setTitle('Contact - A2SPA')" routerLink="/contact">Contact</a>
    </li>
</ul>
删除前面的斜杠,变成:
<ul class="nav navbar-nav">
    <li>
        <a class="nav-link" (click)="setTitle('Home - A2SPA')" routerLink="home" routerLinkActive="active">Home</a>
    </li>
    <li [hidden]="!isLoggedIn()">
        <a class="nav-link" (click)="setTitle('About - A2SPA')" routerLink="about">About</a>
    </li>
    <li [hidden]="!isLoggedIn()">
        <a class="nav-link" href="swagger">NSwag</a>
    </li>
    <li>
        <a class="nav-link" (click)="setTitle('Contact - A2SPA')" routerLink="contact">Contact</a>
    </li>
</ul>
接下来,以同样的方式编辑 /Views/Partial/LoginComponent.ts,以删除前面的斜杠:
<span class="small">Not registered? <a [routerLink]="['/register']"> Click here to Register</a></span>
改为
<span class="small">Not registered? <a [routerLink]="['register']"> Click here to Register</a></span>
最后,在 RegisterComponent.cshtml 文件中,将对应的链接从这个更改为:
<span class="small">Already registered? <a [routerLink]="['/login']"> Click here to Login</a></span>
改为
<span class="small">Already registered? <a [routerLink]="['login']"> Click here to Login</a></span>
接下来,我们将对 Angular 4 代码进行更改,主要是 Typescript 组件和服务。首先,转到 /wwwroot/app/app.module.ts,并将 APP_BASE_HREF 从 "/" 更改为 "/a2spa"。
AuthGuard, Title, { provide: APP_BASE_HREF, useValue: '/a2spa' }],
在 /wwwroot/app 中更新我们的登录/安全组件以使用相对路径。首先,编辑 login.component.ts,并将加载我们 HTML 视图的行从这个更改为:
templateUrl: '/partial/loginComponent'
再次删除前面的斜杠,以防止将路径加载为绝对链接,变成:
templateUrl: 'partial/loginComponent'
仍在同一个文件 login.component.ts 中,将表单提交删除前面的斜杠,从这个更改为:
this.http.post('/connect/token', body, { headers: this.authService.contentHeaders() })
变为这样:
this.http.post('connect/token', body, { headers: this.authService.contentHeaders() })
最后,在同一个文件中,将路由链接从:
this.router.navigate(['/about']);
改为
this.router.navigate(['about']);
我们需要在 register.component.ts 中重复这些更改,将这个从:
templateUrl: '/partial/registerComponent'
改为这样。
templateUrl: 'partial/registerComponent'
到负责表单提交的行,设置为绝对引用,从这个更改为:
this.http.post('/Account/Register', JSON.stringify(body), { headers: this.authService.jsonHeaders() })
变成这样,带有相对链接:
this.http.post('Account/Register', JSON.stringify(body), { headers: this.authService.jsonHeaders() })
以及这个绝对链接从:
this.router.navigate(['login']);
变成这样:
this.router.navigate(['login']);
接下来,以与上面相同的方式更新每个组件 about.component.ts、app.component.ts、contact.component.ts、index.component.ts,使指向我们视图的链接变成相对链接而不是绝对链接。例如,对于 about.component.ts,将是:
templateUrl: '/partial/aboutComponent' ---> 更改为: templateUrl: 'partial/aboutComponent'
最后,在 /wwwroot/app/security 中,将 auth-guard.service.ts 从这个更改为:
this.router.navigate(['/login']); ----> 更改为 this.router.navigate(['login']);
我们的 app.component.ts 还有一个额外的链接需要更改,从这个:
this.http.get('/connect/logout', { headers: this.authService.authJsonHeaders() })
变为这样:
this.http.get('connect/logout', { headers: this.authService.authJsonHeaders() })
现在重新构建并按 Ctrl+F5 测试网站。

接下来,我们将测试我们的 SSL 在 IIS Express 下的运行情况。
要获取 URL,请在解决方案中找到项目,右键单击,然后单击属性。
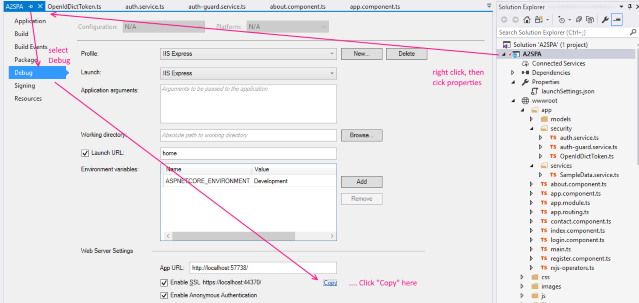
或者,VS 2015 和 VS 2017 用户可以在此处从 launchSettings.json 文件中获取 URL。

如果您已启用 SSL(如果尚未启用,请参阅第 7 部分了解详情),则 .json 文件中将有一个节点显示 SSL 端口和 HTTPS URL。
"iisSettings": {
  "windowsAuthentication": false,
  "anonymousAuthentication": true,
  "iisExpress": {
    "applicationUrl": "https://:57149/",
    "sslPort": 44312
  }
注意:这些 URL 将因项目而异,端口是随机选择的。
如果您从下载或 GitHub 克隆了源代码,那么您将获得预设的 URL。
另一方面,如果您是从头开始创建此项目,或者按照步骤操作,那么端口分配将是随机的。同样,如果您关闭 SSL 选项然后重新启用它,您的端口将再次改变以用于 SSL。注意:您也可以编辑 launchSettings.json 文件将其设置为您自己选择的端口(只要它是有效、可用且不与其他正在使用的端口冲突)。
无论如何,将 URL 复制到浏览器的新标签页中,您应该会看到它正在使用 SSL 和 VS 2017 提供的测试证书运行。(如第 7 部分前面所述,您会在大多数浏览器中收到一个警告,表明您没有使用“真实”证书)。

为 ASP.Net Core 设置 IIS
请按照 第 7 部分 中“为 ASP.Net Core 设置 IIS”部分概述的步骤进行操作;使用 VS 2015 设置 IIS 的这些步骤与我们在此处从 VS 2017 发布到 IIS 时所需的步骤是相同的。
注意:下面的示例将假定在本地创建了一个名为 c:\publish\a2spa 的文件夹,并且该文件夹与开发在同一台 PC 上。稍后在文章中,我们将介绍发布到外部服务器以及发布到 Azure。
发布到 IIS
再次,与第 7 部分中的 VS 2015 一样,我们将开始使用更简单的“文件系统”发布方法。
在 Visual Studio 2017 中,右键单击您的项目,然后选择“发布”。
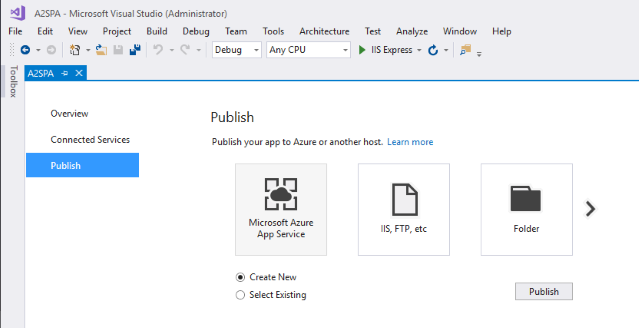
选择“创建新的”,然后单击“文件夹”以选择基于文件夹的发布。

接下来,您将有机会选择要发布到的文件夹。
注意:请注意不要将发布文件夹指向源;默认的 bin 文件夹是可以的,但我建议使用项目范围之外的完全不同的文件夹。在这些示例中,我们使用 c:\publish\a2spa 作为文件夹。

选择正确的文件夹后,单击“发布”。
发布将立即进行,暂时无法进一步修改设置。不用担心,我们稍后可以修复这些,而且我们确实需要!
首先,有些东西是好的,好吧,差不多。默认的 VS 2017 项目中没有 web.config。

然而,检查目标文件夹,一个 web.config 文件会被创建,并且它会被填充成基本正确的信息。

让我们看看是否可以编辑发布设置来更正连接字符串。目前的这个是不正确的。
在发布窗口中,单击“设置”。

第一个屏幕是目标位置,这是可以的,单击“下一步”。

展开“文件发布选项”和“数据库”选项。

勾选两个框,并像我们在 VS 2015 中那样修改 SQL 连接字符串,然后单击“保存”。
现在再次单击“发布”。
注意:您的“发布”按钮是否处于灰色状态?

使用左上角的“X”关闭窗口,然后重新发布。希望 VS 团队会在将来的错误修复/版本中修复这个问题。
那么,让我们看看接下来会发生什么。

遗憾的是,每个 typescript 文件(嗯,可能吧,我没数过)都会生成一个错误,说该文件不在正常的 wwwroot 文件空间之外。一个典型的错误是:
错误 TS6059 File 'C:/temp/A2SPA/VS2017/A2SPA/obj/Release/netcoreapp1.1/PubTmp/Out/wwwroot/app/app.component.ts' is not under 'rootDir' 'C:/temp/A2SPA/VS2017/A2SPA/wwwroot'. 'rootDir' is expected to contain all source files. A2SPA (tsconfig project) 1 Active
我们非常清楚这些文件在,但我们不必担心,我们需要清理它们或以某种方式忽略它们。最简单的方法是在发布前进行清理。
要解决此问题,请在解决方案资源管理器右侧的项目上右键单击,然后单击“属性”。
在“预生成”部分添加此内容:
@echo "---------- Cleaning up .ts files from obj folder (start) ---------"
if exist "C:\projects\A2SPA\VS2017\A2SPA\obj\" (
  del C:\projects\A2SPA\VS2017\A2SPA\obj\*.ts /s /q
)
@echo "---------- Cleaning up .ts files from obj folder (end) ---------"
同样,这应该在顶部的预生成部分。

关闭此窗口。
接下来,为了进一步清理我们的 .ts 文件,并防止 IIS 阻止更新 a2spa.dll 的问题,我们将设置几个预发布和后发布命令在我们的项目文件中。最安全的方法是卸载项目,然后编辑项目文件。
在解决方案资源管理器中右键单击项目,单击“卸载项目”,然后单击“编辑项目”。

现在回想一下,我们将看到一个 XML 文件,而不是之前的 VS 2015 program.json 文件。项目文件的顶部基本是标准格式;
<Project Sdk="Microsoft.NET.Sdk.Web">

  <PropertyGroup>
    <TargetFramework>netcoreapp1.1</TargetFramework>
  </PropertyGroup>

  <PropertyGroup>
    <PackageTargetFallback>$(PackageTargetFallback);portable-net45+win8+wp8+wpa81;</PackageTargetFallback>
    <PreBuildEvent>@echo "---------- Cleaning up .ts files from obj folder (start) ---------"
if exist "C:\projects\A2SPA\VS2017\A2SPA\obj\" (
  del C:\projects\A2SPA\VS2017\A2SPA\obj\*.ts /s /q
)
@echo "---------- Cleaning up .ts files from obj folder (end) ---------"</PreBuildEvent>
  </PropertyGroup>

  <PropertyGroup Condition="'$(Configuration)|$(Platform)'=='Debug|AnyCPU'">
    <DocumentationFile>bin\Debug\netcoreapp1.1\A2SPA.xml</DocumentationFile>
  </PropertyGroup>

  <ItemGroup>
    <Content Include="wwwroot\app\about.component.js" />
您会注意到预生成命令是如何存储在 XML 中的。我们以前使用的文档 XML 文件在没有添加如下代码的情况下不会被复制。如果需要,请修改此文件,但仅限于调试模式之外。
将此顶部部分更改为以下内容:
<Project Sdk="Microsoft.NET.Sdk.Web">

  <PropertyGroup>
    <TargetFramework>netcoreapp1.1</TargetFramework>
    <GenerateDocumentationFile>true</GenerateDocumentationFile>
    <PreserveCompilationContext>true</PreserveCompilationContext>
    <AssemblyName>A2SPA</AssemblyName>
    <OutputType>Exe</OutputType>
    <PackageId>A2SPA</PackageId>
    <RuntimeFrameworkVersion>1.1.1</RuntimeFrameworkVersion>
    <PackageTargetFallback>$(PackageTargetFallback);dotnet5.6;portable-net45+win8</PackageTargetFallback>
    <PreBuildEvent>@echo "---------- Cleaning up .ts files from obj folder (start) ---------"
if exist "$(SolutionDir)$(SolutionName)\$(BaseIntermediateOutputPath)" (
  del $(SolutionDir)$(SolutionName)\$(BaseIntermediateOutputPath)*.ts /s /q
)
@echo "---------- Cleaning up .ts files from obj folder (end) ---------"</PreBuildEvent>
    <!--<PackageTargetFallback>$(PackageTargetFallback);portable-net45+win8+wp8+wpa81;</PackageTargetFallback>-->
  </PropertyGroup>

  <ItemGroup>
    <None Update="wwwroot\**\*;node_modules\**\*">
      <CopyToPublishDirectory>PreserveNewest</CopyToPublishDirectory>
    </None>
    <Content Include="node_modules\**\*">
      <CopyToPublishDirectory>PreserveNewest</CopyToPublishDirectory>
    </Content>
  </ItemGroup>

  <PropertyGroup Condition="'$(Configuration)|$(Platform)'=='Debug|AnyCPU'">
    <DocumentationFile>bin\Debug\netcoreapp1.1\A2SPA.xml</DocumentationFile>
  </PropertyGroup>

  <PropertyGroup Condition="'$(Configuration)|$(Platform)'=='PublishRelease|AnyCPU'">
    <DocumentationFile>bin\Debug\netcoreapp1.1\A2SPA.xml</DocumentationFile>
  </PropertyGroup>

  <ItemGroup>
    <Content Include="wwwroot\app\about.component.js" />


.... etc
在编辑文件时,滚动到底部,找到如下内容:
... etc

  <ItemGroup>
    <DotNetCliToolReference Include="Microsoft.VisualStudio.Web.CodeGeneration.Tools" Version="1.0.0" />
  </ItemGroup>

</Project>
并将其更改为:
 ... etc


<ItemGroup>
    <DotNetCliToolReference Include="Microsoft.VisualStudio.Web.CodeGeneration.Tools" Version="1.0.0" />
  </ItemGroup>
  <ItemGroup>
    <Content Update="web.config">
      <CopyToOutputDirectory>PreserveNewest</CopyToOutputDirectory>
    </Content>
  </ItemGroup>

  <Target Name="CleanupTypescriptFromObjFolder" BeforeTargets="Build">
    <RemoveDir Directories="$(ProjectDir)$(BaseIntermediateOutputPath)" />
  </Target>

  <Target Name="AfterBuild">
    <TransformXml Source="Web.config" Transform="Web.$(Configuration).config" Destination="Web.config" />
  </Target>

  <Target Name="PrepublishScript" BeforeTargets="PrepareForPublish" Condition=" '$(IsCrossTargetingBuild)' != 'true' ">
    <Exec Command="c:\windows\system32\inetsrv\appcmd stop apppool a2spa" />
  </Target>

  <Target Name="PostpublishScript" AfterTargets="Publish" Condition=" '$(IsCrossTargetingBuild)' != 'true' ">
    <Exec Command="c:\windows\system32\inetsrv\appcmd start apppool a2spa" />
  </Target>

</Project>
为清晰起见,我在此处硬编码了名称 a2spa ,但是,后面更改的关键在于命令:
c:\windows\system32\inetsrv\appcmd stop apppool a2spa
和
c:\windows\system32\inetsrv\appcmd start apppool a2spa
分别停止和启动应用程序池。我们也可以停止和启动网站本身,但分隔和引用名称会变得混乱,像这样简单的名称更容易添加并且效果一样好。
通过停止然后启动网站,我们可以复制文件而不会出现第 7 部分中提到的错误。
接下来,保存更改,重新加载项目(右键单击解决方案并重新加载)。
如果出现错误,您可以选择卸载并编辑项目文件,仔细再次编辑,或者在 GIT 中撤销更改然后重试。重新加载后,如果您对更改有效感到满意,请在项目根目录中创建一个 web.config 文件。右键单击项目,单击“添加新”,键入“config”进行搜索,然后选择“Web Configuration File”,它将默认命名为 web.config,如下所示,然后单击“添加”。

从默认值更改为如下所示:
<?xml version="1.0" encoding="utf-8"?>
<configuration>

  <!-- To customize the asp.net core module uncomment and edit the following section.
  For more info see https://go.microsoft.com/fwlink/?linkid=838655 -->
  <!--
  <system.webServer>
    <handlers>
      <remove name="aspNetCore"/>
      <add name="aspNetCore" path="*" verb="*" modules="AspNetCoreModule" resourceType="Unspecified"/>
    </handlers>
    <aspNetCore processPath="%LAUNCHER_PATH%" arguments="%LAUNCHER_ARGS%" stdoutLogEnabled="false" stdoutLogFile=".\logs\stdout" />
  </system.webServer>
  -->

</configuration>
保存并尝试发布网站,您应该能够登录(假设您已经创建了数据库,正如我们在第 7 部分中所做的那样)。登录有效,插入(post)和获取以及获取所有方法(如下所示)也有效:
然而,编辑失败了(这恰好是一个 HTTP PUT 操作)。

同样,删除(使用 HTTP Delete)也失败了。

为了节省您的悬念,问题在于 WebDav。如果启用了它,它将干扰 put 和 delete 操作。尽管它对 post 或 get 操作没有明显影响。
要解决此问题,我们将创建一个 web.config 转换。编辑 web.config 文件,添加 Webdav 模块和处理程序部分,使其如下所示:
<?xml version="1.0" encoding="utf-8"?>
<configuration>
  <system.webServer>
    <modules>
      <remove name="WebDAVModule" />
    </modules>
    <handlers>
      <remove name="WebDAV" />
      <add name="aspNetCore" path="*" verb="*" modules="AspNetCoreModule" resourceType="Unspecified" />
    </handlers>
    <aspNetCore processPath="%LAUNCHER_PATH%" arguments="%LAUNCHER_ARGS%" stdoutLogEnabled="false" stdoutLogFile=".\logs\stdout" forwardWindowsAuthToken="false" />
  </system.webServer>
</configuration>
(我们将使用这些 webdav 部分来解决影响 delete 和 put 命令的进一步问题)。
接下来,展开属性部分,然后展开发布配置文件,最后单击“添加 Config Transform”,如下所示:
![]()
单击“添加 Config Transform”后,会在 web.config 下方创建一个新文件:
![]()
其中包含此默认值:
<?xml version="1.0" encoding="utf-8"?>

<!-- For more information on using web.config transformation visit https://go.microsoft.com/fwlink/?LinkId=125889 -->

<configuration xmlns:xdt="http://schemas.microsoft.com/XML-Document-Transform">
  <!--
    In the example below, the "SetAttributes" transform will change the value of
    "connectionString" to use "ReleaseSQLServer" only when the "Match" locator
    finds an attribute "name" that has a value of "MyDB".

    <connectionStrings>
      <add name="MyDB"
        connectionString="Data Source=ReleaseSQLServer;Initial Catalog=MyReleaseDB;Integrated Security=True"
        xdt:Transform="SetAttributes" xdt:Locator="Match(name)"/>
    </connectionStrings>
  -->
  <system.web>
    <compilation xdt:Transform="RemoveAttributes(debug)" />
    <!--
      In the example below, the "Replace" transform will replace the entire
      <customErrors> section of your web.config file.
      Note that because there is only one customErrors section under the
      <system.web> node, there is no need to use the "xdt:Locator" attribute.

      <customErrors defaultRedirect="GenericError.htm"
        mode="RemoteOnly" xdt:Transform="Replace">
        <error statusCode="500" redirect="InternalError.htm"/>
      </customErrors>
    -->
  </system.web>
</configuration>
应更改为:
<?xml version="1.0" encoding="utf-8"?>
<!-- For more information on using web.config transformation visit https://go.microsoft.com/fwlink/?LinkId=125889 -->
<configuration xmlns:xdt="http://schemas.microsoft.com/XML-Document-Transform">
   <system.webServer xdt:Transform="Replace">
      <modules>
        <remove name="WebDAVModule" />
      </modules>
      <handlers>
        <remove name="WebDAV" />
        <add name="aspNetCore" path="*" verb="*" modules="AspNetCoreModule" resourceType="Unspecified" />
      </handlers>
      <aspNetCore processPath="dotnet" arguments=".\a2spa.dll" stdoutLogEnabled="false" stdoutLogFile=".\logs\stdout" forwardWindowsAuthToken="false" />
    </system.webServer>
</configuration>
保存文件。
最后,再次发布。这次您应该会看到生成开始,清理任何旧的 .ts 文件,然后应用程序池停止和启动,然后开始部署。一旦发布的文件完成。
如果您右键单击自动命名的较低文件(在本例中为 web.FolderProfile.config),然后选择“预览转换”,您将看到更改的外观预览。
![]()
左侧将是原始的,具有 processPath="%LAUNCHER_PATH%",而右侧将是 processPath="dotnet",同样,左侧将是 arguments="%LAUNCHER_ARGS%",而右侧应该是 arguments=".\a2spa.dll",显示它将被转换成什么。
再次发布并测试,这次您应该会得到一套工作的 CRUD(创建/读取/更新/删除)操作,所有 4 项——包括 delete 和 put(编辑),现在 WebDav 已经“修复”。
还有什么可能出错?
如果您破坏了项目文件 XML,请从 github 获取 part 8 分支的副本,或从本部分下载。否则,我相信这应该允许您反复发布到 IIS 并清理自身,使其开始变得相当有用。
一个不寻常的情况是,在我的台式机和笔记本电脑之间,我遇到了一个不寻常的情况,有 7 套 .dll 文件和许多其他文件,因为它们都被设置为使用同一个文件历史备份文件夹。似乎一个备份了,另一个认为它是一个新文件,这种来回的弹跳影响了我的 Nuget 包缓存文件夹以及许多其他文件夹。
这传播到了我的解决方案,然后传播到了我的部署,再到已发布的文件夹。

关闭文件历史记录后(我将在稍后使用不同的文件共享来重置,每个 PC 一个,即我的台式机 vs 我的笔记本电脑),然后清除 NuGet 缓存,一切恢复正常。
历史
到目前为止这是第 8 部分,本系列之前的各部分是:
第 1 部分 - 如何集成 ASP.Net Core 和 Angular 2
第 2 部分 - 如何使用标签助手显示数据
第 3 部分 - 如何将标签助手用于数据输入,添加使用 EF Core 的 SQL 后端。
第 4 部分 - 使用 OpenIdDict 添加 JWT 令牌身份验证。
第 5 部分 - 添加异步服务、服务器端验证、一个简单的 Angular 2 数据网格和更多标签助手。
第 6 部分 - 使用 NSwag 创建 Swagger 文档并生成 Angular 2 / Typescript 数据模型 + 数据服务。
第 7 部分 - 为 VS2015 用户发布到 IIS
这是第 8 部分,为 VS 2017 用户发布到 IIS。
即将到来的第 9 部分可能是最后一篇,希望如果我能全部包含进去,它将涵盖:最终的代码清理和优化、部署到 Azure 或文件服务器/Web 主机,以及关于整体架构的一些通用评论,包括 WebPack 的优缺点。