
使用 Angular 2、ASP.NET Core 1.1 和 Entity Framework Core 构建 SPA(第二部分)
5.00/5 (5投票s)
.NET Core 与 Angular2 的设置方法(第二部分)
引言
这是本系列的第二部分。如果您还没有阅读前一篇文章,可以在此处阅读。
在本系列的第一部分中,我们涵盖了以下主题
- 设置 Angular 2 的开发环境
- 了解应用程序的结构
- 在项目中添加 Entity Framework
- 创建新页面以查看员工列表
- 执行 Angular 2 路由
- 添加 Service
在本系列的第二部分,也是最后一部分,我们将涵盖以下主题
- 添加添加新员工的功能
- 显示现有员工的详细信息
- 编辑现有员工的详细信息
- 删除现有员工
- 为员工列表页面添加搜索功能
让我们逐一介绍以上所有要点。
添加新员工
我们应用程序的主页在侧边菜单中包含“新员工”选项。点击此菜单项,将打开一个新屏幕,我们可以在其中添加新员工记录。我们将创建以下屏幕来添加新员工的详细信息。

您可以看到,在添加员工页面中,我们有一个项目列表的下拉菜单,因此,首先,我们需要创建任何 API 来获取项目列表。为此,右键单击Controller文件夹,然后添加一个新的 API Controller,并将其命名为ProjectsController,然后将以下代码粘贴到此 Controller 中。
using System;
using System.Collections.Generic;
using System.Linq;
using System.Threading.Tasks;
using Microsoft.AspNetCore.Http;
using Microsoft.AspNetCore.Mvc;
using EMS.Model;
using Microsoft.EntityFrameworkCore;

namespace EMS.Controllers
{
    [Produces("application/json")]
    [Route("api/Projects")]
    public class ProjectsController : Controller
    {
        private readonly EmployeeContext _context;

        public ProjectsController(EmployeeContext context)
        {
            _context = context;
        }
        // GET: api/Projects
        [HttpGet]
        public async Task<IActionResult> Get()
        {
            List<Project> project_ = new List<Project>();
            var Project = await (from data in _context.Project
                                 select new
                                 {
                                     ProjectId = data.ProjectId,
                                     ProjectName = data.ProjectName
                                 }).ToListAsync();
            Project.ForEach(x =>
            {
                Project pro = new Project();
                pro.ProjectId = x.ProjectId;
                pro.ProjectName = x.ProjectName;
                project_.Add(pro);
            });

            return Json(project_);
        }
    }
}
在上面的代码中,我们创建了一个异步方法Get,类型为“GET”,在此方法中,我们获取所有项目的列表,并将此列表以 JSON 格式返回。
现在打开您的services.ts文件,并将以下代码粘贴到此文件中
getProjectList() {
        return this.http.get('https://:54273/api/projects');
    }
在上面的代码中,我们创建了getProjectList方法,在此方法中,我们执行http类的get方法来获取项目列表。
现在打开newEmployee.component.ts文件,并将以下代码粘贴到此文件中
import { Component } from '@angular/core';
import { EmployeeServcies } from '../../Services/services';
import { Response } from '@angular/http';
import { FormGroup, FormControl, Validators } from '@angular/forms';

@Component({
    selector: 'new-employee',
    templateUrl: './newEmployee.component.html',

})
export class newEmployeeComponent {
    public ProjectList = [];
    public formData: FormGroup;
    public constructor(private empService: EmployeeServcies) {
        this.empService.getProjectList()
            .subscribe(
            (data: Response) => (this.ProjectList = data.json())
            );

        this.formData = new FormGroup({
            'EmployeeName': new FormControl('', [Validators.required]),
            'Designation': new FormControl('',Validators.required),
            'Skills': new FormControl('', Validators.required),
            'Project': new FormControl(0, [Validators.required, this.customValidator])
        });
    }

    customValidator(control: FormControl): { [s: string]: boolean } {
        if (control.value == "0") {
            return { data: true };
        }
        else {
            return null;
        }
    }

    submitData() {
        if (this.formData.valid) {
            var Obj = {
                Designation: this.formData.value.Designation,
                EmployeeName: this.formData.value.EmployeeName,
                ProjectId: this.formData.value.Project,
                Skills: this.formData.value.Skills,
            };
            this.empService.postData(Obj).subscribe();
            alert("Employee Inserted Successfully");
        }
    }
}
在构造函数中,我们创建了EmployeeServcies类的实例,并调用getProjectList方法来获取所有项目的列表。在响应部分,我们将检索到的项目列表插入到数组类型的ProjectList对象中,之后,我们将此列表绑定到显示项目列表的下拉菜单。
this.formData = new FormGroup({
            'EmployeeName': new FormControl('', [Validators.required]),
            'Designation': new FormControl('',Validators.required),
            'Skills': new FormControl('', Validators.required),
            'Project': new FormControl(0, [Validators.required, this.customValidator])
        });
在上面的代码行中,我们创建了一个FormGroup,并在该FormGroup中,我们创建了四个表单控件(EmployeeName、Designation、Skills和Project),并将formGroup绑定到我们将在“html”部分创建的表单部分。使用formGroup的原因是我们希望使用数据(模型)驱动的方法而不是模板驱动的方法来创建表单部分,因为使用数据(模型)驱动的方法,我们可以轻松地创建和应用自定义验证。您可以看到,在“Project”FormControl中,我们实现了两个验证 - 第一个是必需的,这是内置验证,第二个验证是customValidator - 这是一个自定义验证。以下是此验证的代码
customValidator(control: FormControl): { [s: string]: boolean } {
        if (control.value == "0") {
            return { data: true };
        }
        else {
            return null;
        }
    }
在customValidator自定义验证器中,我们确认控件的选定值不应为 0。如果控件的值为0,则返回“true”作为返回值,此返回值表示验证已失效。
现在打开您的newEmployee.component.html文件,并将以下代码粘贴到此文件中
<style>
    .hidedata {
        padding-top:50px;
    }
</style>
<div class="row">

    <div class="col-md-12">
        <div class="col-md-8 col-lg-offset-4">
            <h3>Enter Employee Details</h3>
        </div>

                <div class="row hidedata" id="hidDiv">
                    <div class="col-md-6 ">
                        <form class="form-horizontal" [formGroup]="formData"
                              (ngSubmit)="submitData()">
                            <div class="form-group">
                                <label for="EmployeeName" class="col-sm-4
                                 control-label">Employee Name</label>
                                <div class="col-sm-8">
                                    <input type="text" class="form-control"
                                     name="EmployeeName" placeholder="Employee Name"
                                          formControlName="EmployeeName" >
                                </div>
                                <div *ngIf="!formData.get('EmployeeName').valid &&
                                 formData.get('EmployeeName').dirty"
                                     class="col-sm-8 col-sm-offset-4"
                                     style="color:red">
                                  Add Employee Name
                                </div>
                            </div>
                            <div class="form-group">
                                <label for="Designation" class="col-sm-4
                                 control-label">Designation</label>
                                <div class="col-sm-8">
                                    <input type="text" class="form-control"
                                           name="Designation" placeholder="Designation"
                                           formControlName="Designation">
                                </div>
                                <div *ngIf="!formData.get('Designation').valid &&
                                     formData.get('Designation').dirty"
                                     class="col-sm-8 col-sm-offset-4" style="color:red">
                                    Add Employee Designation
                                </div>
                            </div>
                            <div class="form-group">
                                <label for="Skills" class="col-sm-4 control-label">
                                 Skills</label>
                                <div class="col-sm-8">
                                    <input type="text" class="form-control"
                                           name="Skills" placeholder="Employee Skills"
                                           formControlName="Skills">

                                </div>
                                <div *ngIf="!formData.get('Skills').valid &&
                                     formData.get('Skills').dirty"
                                     class="col-sm-8 col-sm-offset-4"
                                     style="color:red">
                                    Add Skills of Employee
                                </div>
                            </div>
                            <div class="form-group">
                                <label for="ProjectId" class="col-sm-4
                                 control-label">Project</label>
                                <div class="col-sm-8">
                                   <select class="form-control" name="Project"
                                          formControlName="Project" >
                                       <option value="0">---Select---</option>
                                       <option *ngFor="let data of ProjectList"
                                        value={{data.projectId}}>
                                           {{data.projectName}}
                                       </option>
                                   </select>

                                </div>
                                <div *ngIf="!formData.get('Project').valid &&
                                 formData.get('Project').dirty"
                                     class="col-sm-8 col-sm-offset-4"
                                     style="color:red">
                                    Select a Project for Employee
                                </div>
                            </div>

                            <div class="form-group">
                                <div class="col-sm-offset-4 col-sm-8">
                                    <button type="submit"
                                    [disabled]="!formData.valid"
                                     class="btn btn-info">Submit</button>
                                </div>
                            </div>
                        </form>
                    </div>
                </div>
    </div>
</div>
在上面的代码中,我们创建了一个form部分,并在该form部分添加了总共四个控件(三个textbox和一个dropdown)。
<form class="form-horizontal" [formGroup]="formData" (ngSubmit)="submitData()">
当您检查上面的代码时,您将在form标签中看到[formGroup]="formData"行。formGroup属性用于将表单与我们在组件部分创建的formGroup对象绑定。此方法的优点是,当我们提交此表单时,我们将在单个formGroup对象中以键值对的形式获取所有控件的值。
<input type="text" class="form-control"
                   name="EmployeeName" placeholder="Employee Name"
                   formControlName="EmployeeName" >
fromControlName指令通过名称将现有FormGroup中的“FormControl”同步到form控件元素。换句话说,此指令确保以编程方式写入FormControl实例的任何值都将写入 DOM 元素(模型 -> 视图)。反之,通过用户输入写入 DOM 元素的值也将反映在FormControl实例中(视图 -> 模型)。在上面的代码中,我们将EmployeeNameform控件同步到EmployeeName元素。同样,我们将所有三个现有元素绑定到FormGroup的“form control”。
<form class="form-horizontal" [formGroup]="formData" (ngSubmit)="submitData()">
在form标签中,我们实现了ngSubmit表单事件,当form提交时,它将调用组件部分的submitData方法。在submitData方法中,我们实现了以下代码
submitData() {
        if (this.formData.valid) {
            var Obj = {
                Designation: this.formData.value.Designation,
                EmployeeName: this.formData.value.EmployeeName,
                ProjectId: this.formData.value.Project,
                Skills: this.formData.value.Skills,
            };
            this.empService.postData(Obj).subscribe();
            alert("Employee Inserted Successfully");
        }
    }
在上面的代码中,首先,我们检查表单是否处于有效状态,如果表单处于有效状态,那么我们从formDataFormGroup获取值,将其插入到 JSON 对象中,并调用EmployeeService的postData方法,并将创建的object(Obj)作为参数传递。
现在打开您的Service.ts文件,并将以下代码粘贴到此文件中
postData(empObj: any) {
        let headers = new Headers({
            'Content-Type':
            'application/json; charset=utf-8'
        });
        let options = new RequestOptions({ headers: headers });
        return this.http.post('https://:54273/api/employee',
                               JSON.stringify(empObj), options);
    }
在此代码中,我们调用 http 内置服务的post方法。我们创建一个 header 并将此 header 传递给 http 服务的 post 方法。我们对empObj进行字符串化,并将其与POST请求一起传递。我们正在调用Employee API Controller 的POST方法。现在我们需要在我们的Employee API Controller 中添加一个POST方法。
将以下代码添加到Employee Controller 中
[HttpPost]
        public IActionResult AddEmployee([FromBody]Employee empObj)
        {
            _context.Employee.Add(empObj);
            _context.SaveChanges();
            return Json("OK");
        }
在上面的代码行中,我们创建了一个 http post方法,该方法接受一个employee类型的参数。我们从请求的FormBody中获取参数值,并将该employee对象添加到employee dbcontext中,然后保存更改。
现在所有设置都已准备好添加新的employee记录,让我们尝试添加一个新的employee。

上面的屏幕显示了验证消息,如果我们违反了任何验证条件,我们将收到相应的错误消息。

如果我们不违反任何验证并按下“提交”按钮,我们将收到“员工插入成功”的警报消息。现在,如果您转到主屏幕,您将会在列表中找到新员工的记录。

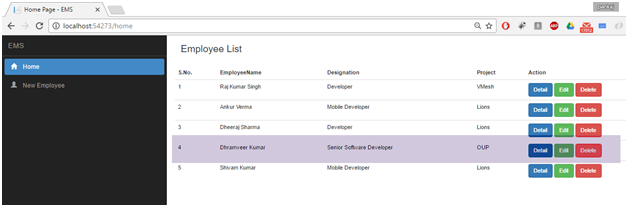
显示员工详细信息
在索引视图中,我们显示了所有员工的列表,并且每个员工记录也包含“详细信息”按钮。

使用此按钮,我们可以获取员工的所有信息。实际上,此按钮是一个锚标签,在该锚标签中,我们使用routerLink指令,并将details和employee id作为 URL 参数传递。例如,如果我们点击Raj Kumar员工(EmployeeID为4)的“详细信息”按钮,则将生成“https://:54273/details/4”URL。
<a [routerLink]="['/details/',empData.employeeId]"
                           class="btn btn-primary">
                            Detail
                        </a>
我们可以根据Employee id检索Employee详细信息。现在打开details.component.ts文件,并将以下代码添加到此文件中
import { Component } from '@angular/core';
import { EmployeeServcies } from '../../Services/services';
import { Response } from '@angular/http';
import { Router, ActivatedRoute, Params } from '@angular/router';

@Component({
    selector: 'employee-detail',
    templateUrl: './details.component.html'
})
export class DetailsComponent {
    private EmpId: number;
    public EmployeeDetails = {};
    public constructor(private empService: EmployeeServcies,
                       private activatedRoute: ActivatedRoute) {
        this.activatedRoute.params.subscribe((params: Params) => {
            this.EmpId = params['id'];
        });

        this.empService.getEmployeeDetails(this.EmpId)
            .subscribe((data: Response) =>
             (this.EmployeeDetails["employeeName"] = data.json().employeeName,
                this.EmployeeDetails["Designation"] = data.json().designation,
                this.EmployeeDetails["ProjectName"] = data.json().projectName,
                this.EmployeeDetails["Skills"] = data.json().skills,
                this.EmployeeDetails["StartDate"] = data.json().startDate,
                this.EmployeeDetails["EndDate"] = data.json().endDate
                ));
    }
 }
在上面的代码中,我们在构造函数中创建了EmployeeServcies服务对象。我们还创建了ActivatedRoute类的实例,ActivateRoute是此路由匹配的 URL 段的可观察对象。在这里,我们订阅此可观察对象,并获取我们在路由时定义的 id 参数的值。
在下一行代码中,我们订阅了EmployeeService的getEmployeeDetails方法,并将要获取详细信息的员工的 id 作为参数传递。以下是getEmployeeDetails方法的代码,并将此代码粘贴到您的service.ts文件中。
getEmployeeDetails(empId: any) {
        return this.http.get('https://:54273/api/employee/' + empId);
    }
在上面的代码中,我们调用Employee API 的get方法,并将员工的 id 参数传递。如果成功,我们将从Response对象中提取员工的详细信息,并将这些详细信息插入到EmployeeDetails对象中,并将此对象绑定到 html 模板。
现在打开details.component.html文件,并将以下代码粘贴到此文件中。
<h2>This is Detail Component</h2>

<div class="row">
    <div class="col-md-3"><b>Employee Name</b></div>
    <div class="col-md-3">{{EmployeeDetails.employeeName}}</div>
</div>
<div class="row">
    <div class="col-md-3"><b>Designation</b></div>
    <div class="col-md-3">{{EmployeeDetails.Designation}}</div>
</div>

<div class="row">
    <div class="col-md-3"><b>Skills</b></div><div class="col-md-3">
    {{EmployeeDetails.Skills}}</div>
</div>
<div class="row">
    <div class="col-md-3"><b>ProjectName:</b></div><div class="col-md-3">
    {{EmployeeDetails.ProjectName}}</div>
</div>
<div class="row">
    <div class="col-md-3"><b>Start Date</b></div><div class="col-md-3">
    {{EmployeeDetails.StartDate|date: 'yMMMMd'}}</div>
</div>
<div class="row">
    <div class="col-md-3"><b>End Date</b></div><div class="col-md-3">
    {{EmployeeDetails.EndDate|date: 'yMMMMd'}}</div>
</div>
将以下代码添加到“EmployeeController.cs”文件中。
[HttpGet("{Empid}")]
        public async Task<IActionResult> EmployeeDetails(int Empid)
        {
            var EmpDeatils = await(from emp in _context.Employee
                                   join pro in _context.Project on
                                   emp.ProjectId equals pro.ProjectId
                                   where emp.EmployeeId==Empid
                                   select new
                                   {
                                       emp.EmployeeId,
                                       emp.EmployeeName,
                                       emp.Designation,
                                       pro.ProjectName,
                                       emp.Skills,
                                       pro.ProjectId,
                                       pro.StartDate,
                                       pro.EndDate
                                   }
                          ).FirstAsync();

            return Json(EmpDeatils);
        }
在这里,我们创建了一个GET类型的get方法,该方法接受一个整数类型的参数。此参数保存员工的 id,使用此员工 id,我们可以获取任何员工的详细信息,并将这些详细信息作为 JSON 数据传递。以下是员工详细信息页面的输出。

删除员工记录
在员工列表页面,我们为每个员工记录都有一个删除该员工记录的选项。我们在该锚按钮上添加了一个click事件监听器,并在点击事件时调用DeleteEmployee方法,该方法以员工的 Id 作为参数。
<a
                           class="btn btn-danger" (click)="deleteEmployee
                           (empData.employeeId)">
                            Delete
                        </a>
将以下代码行添加到您的home.components.ts文件中。
deleteEmployee(empId: number) {

        var status = confirm("Are You want to delete this employee ?");
        if (status == true) {
            this.empService.removeEmployeeDetails(empId)
                .subscribe((data: Response) =>
                 (alert("Employee Deleted Successfully")));

            //Get new list of employee
            this.empService.getEmployeeList()
                .subscribe(
                (data: Response) => (this.EmployeeList = data.json())
                );
        }
    }
当我们点击“删除”按钮时,会弹出一个确认框,确认删除员工的详细信息。如果确认框的状态为true,那么我们将调用EmployeeService类的removeEmployeeDetails方法,并将employeeId作为参数传递。将以下代码粘贴到您的service.ts文件中
removeEmployeeDetails(empId: any) {
        let headers = new Headers({
            'Content-Type':
            'application/json; charset=utf-8'
        });
        return this.http.delete('https://:54273/api/employee',
                                 new RequestOptions({
            headers: headers,
            body: empId
        }));
    }
在上面的代码中,我们调用employee API 的delete方法,因此我们需要在我们的 API 中添加一个Delete方法,该方法以员工的 id 作为参数。现在打开您的EmployeeControler.cs文件,并将以下代码行粘贴
[HttpDelete]
        public IActionResult RemoveEmployeeDetails([FromBody]int empId)
        {
            Employee Emp;
            Emp = _context.Employee.Where(x => x.EmployeeId == empId).First();
            _context.Employee.Remove(Emp);
            _context.SaveChanges();
            return Json("OK");
        }
在上面的代码中,我们创建了一个http delete类型的Delete方法,该方法接受一个员工的 id 作为参数,我们从FormBody中获取该 id,并使用此员工 id 删除该特定员工的记录,并发送**OK**作为确认消息。
让我们尝试删除“Sandeep kumar Jangid”员工的记录。当我们点击“删除”按钮时,会弹出一个确认框。

如果您点击“确定”按钮,您将收到“员工已成功删除”的消息。

在此确认消息之后,您将发现员工列表已刷新,并且已删除的员工不存在于此列表中。

更新员工详细信息
在员工列表页面,我们为每个员工添加了一个“编辑”按钮。当我们点击此按钮时,它将重定向到“编辑员工”页面,并且我们将EmployeeId作为参数传递。
<a [routerLink]="['/edit/',empData.employeeId]"
                           class="btn btn-success">
                            Edit
                        </a>
现在打开editEmployee.component.ts文件,并将以下代码粘贴到此文件中
import { Component } from '@angular/core';
import { EmployeeServcies } from '../../Services/services';
import { Response } from '@angular/http';
import { Router, ActivatedRoute, Params } from '@angular/router';
import { FormGroup, FormControl, Validators } from '@angular/forms';

@Component({
    selector: 'edit-employee',
    templateUrl: './editEmployee.component.html'
})
export class editEmployeeComponent {
    private EmpId: number;
    public EmployeeDetails = {};
    public employeeName: string;
    public ProjectList = [];
    public formData: FormGroup;

    public constructor(private empService: EmployeeServcies,
                       private activatedRoute: ActivatedRoute) {
        this.activatedRoute.params.subscribe((params: Params) => {
            this.EmpId = params['id'];
        });

        this.empService.getProjectList()
            .subscribe(
            (data: Response) => (this.ProjectList = data.json())
            );

        this.formData = new FormGroup({
            'EmployeeId': new FormControl('', [Validators.required]),
            'EmployeeName': new FormControl('', [Validators.required]),
            'Designation': new FormControl('', Validators.required),
            'Skills': new FormControl('', Validators.required),
            'Project': new FormControl(0, [Validators.required, this.customValidator])
        });
this.empService.getEmployeeDetails(this.EmpId)
            .subscribe((data: Response) => (
                this.formData.patchValue({ EmployeeId: data.json().employeeId }),
                this.formData.patchValue({ EmployeeName: data.json().employeeName }),
                this.formData.patchValue({ Designation: data.json().designation }),
                this.formData.patchValue({ Skills: data.json().skills }),
                this.formData.patchValue({ Project: data.json().projectId })
            ));
    }

    customValidator(control: FormControl): { [s: string]: boolean } {
        if (control.value == "0") {
            return { data: true };
        }
        else {
            return null;
        }
    }

    submitData() {
        if (this.formData.valid) {
            var Obj = {
                EmployeeId: this.formData.value.EmployeeId,
                Designation: this.formData.value.Designation,
                EmployeeName: this.formData.value.EmployeeName,
                ProjectId: this.formData.value.Project,
                Skills: this.formData.value.Skills,
            };
            this.empService.editEmployeeData(Obj)
                .subscribe((data: Response) =>
                 (alert("Employee Updated Successfully")));;
        }
    }
}
在构造函数中,我们创建了EmployeeServcies的实例以访问我们创建的 HTTP 方法。我们还创建了ActivatedRoute的实例以获取 URL 参数值。
this.activatedRoute.params.subscribe((params: Params) => {
            this.EmpId = params['id'];
        });
在上面的代码行中,我们提取了id参数的值,并将该值保存到EmpId变量中。
this.empService.getProjectList()
            .subscribe(
            (data: Response) => (this.ProjectList = data.json())
            );
我们调用EmployeeService类的getProjectList方法来获取项目列表,并使用这些值来绑定项目下拉列表。
this.formData = new FormGroup({
            'EmployeeId': new FormControl('', [Validators.required]),
            'EmployeeName': new FormControl('', [Validators.required]),
            'Designation': new FormControl('', Validators.required),
            'Skills': new FormControl('', Validators.required),
            'Project': new FormControl(0, [Validators.required, this.customValidator])
        });
在上面的代码中,我们创建了一个FormGroup,并在FormGroup中创建了总共五个FormControl。在这里,我们将执行数据(模型)绑定方法来绑定 HTML 表单,这与添加新员工部分类似。
this.empService.getEmployeeDetails(this.EmpId)
            .subscribe((data: Response) => (
                this.formData.patchValue({ EmployeeId: data.json().employeeId }),
                this.formData.patchValue({ EmployeeName: data.json().employeeName }),
                this.formData.patchValue({ Designation: data.json().designation }),
                this.formData.patchValue({ Skills: data.json().skills }),
                this.formData.patchValue({ Project: data.json().projectId })

            ));
在上面的代码行中,我们调用EmployeeService类的getEmployeeDetails方法来获取已插入的employee的详细信息,并将这些详细信息插入到formData的formControl中。formGroup的patchValue方法用于填充formGroup的FormControl的值,换句话说,patheValue方法用于匹配FormControl的值。在这里,我们从getEmployeeDetails方法中获取数据,并使用patchValue方法将此数据插入到formGroup的FormControl中。
customValidator(control: FormControl): { [s: string]: boolean } {
        if (control.value == "0") {
            return { data: true };
        }
        else {
            return null;
        }
    }
在上面的代码行中,我们创建了一个自定义验证器来验证任何控件的值。如果控件的值为 0,它将设置formGroup和formControl的无效状态。现在打开editEmployee.component.html文件,并将以下代码粘贴
<style>
    .hidedata {
        padding-top: 50px;
    }
</style>
<div class="row">

    <div class="col-md-12">
        <div class="col-md-8 col-lg-offset-4">
            <h3>Edit Employee Details</h3>
        </div>

        <div class="row hidedata" id="hidDiv">
            <div class="col-md-6 ">
                <form class="form-horizontal" [formGroup]="formData"
                 (ngSubmit)="submitData()">
                    <div class="form-group">
                        <label for="EmployeeName"
                         class="col-sm-4 control-label">Employee Name</label>
                        <div class="col-sm-8">
                            <input type="text" class="form-control"
                                   name="EmployeeName" placeholder="Employee Name"
                                   formControlName="EmployeeName">
                        </div>
                        <div *ngIf="!formData.get('EmployeeName').valid &&
                         formData.get('EmployeeName').dirty"
                             class="col-sm-8 col-sm-offset-4" style="color:red">
                            Add Employee Name
                        </div>
                    </div>
                    <div class="form-group">
                        <label for="Designation" class="col-sm-4 control-label">
                         Designation</label>
                        <div class="col-sm-8">
                            <input type="text" class="form-control"
                                   name="Designation" placeholder="Designation"
                                   formControlName="Designation">
                        </div>
                        <div *ngIf="!formData.get('Designation').valid &&
                             formData.get('Designation').dirty"
                             class="col-sm-8 col-sm-offset-4" style="color:red">
                            Add Employee Designation
                        </div>
                    </div>
                    <div class="form-group">
                        <label for="Skills" class="col-sm-4 control-label">
                         Skills</label>
                        <div class="col-sm-8">
                            <input type="text" class="form-control"
                                   name="Skills" placeholder="Employee Skills"
                                   formControlName="Skills">

                        </div>
                        <div *ngIf="!formData.get('Skills').valid &&
                         formData.get('Skills').dirty"
                             class="col-sm-8 col-sm-offset-4" style="color:red">
                            Add Skills of Employee
                        </div>
                    </div>
                    <div class="form-group">
                        <label for="ProjectId" class="col-sm-4 control-label">
                         Project</label>
                        <div class="col-sm-8">
                            <select class="form-control" name="Project"
                                    formControlName="Project">
                                <option value="0">---Select---</option>
                                <option *ngFor="let data of ProjectList"
                                 value={{data.projectId}}>
                                    {{data.projectName}}
                                </option>
                            </select>
                        </div>
                        <div *ngIf="!formData.get('Project').valid &&
                         formData.get('Project').dirty"
                             class="col-sm-8 col-sm-offset-4" style="color:red">
                            Select a Project for Employee
                        </div>
                    </div>
                    <div>
                        <input type="hidden" id="empId" name="empId"
                         formControlName="EmployeeId" />
                    </div>
                    <div class="form-group">
                        <div class="col-sm-offset-4 col-sm-8">
                            <button type="submit" [disabled]="!formData.valid"
                             class="btn btn-info">Submit</button>
                        </div>
                    </div>
                </form>
            </div>
        </div>
    </div>
</div>
在这里,我们创建了一个 html 表单,并将其绑定到我们在组件部分创建的formGroup(formData)。此页面的功能与newEmployee.component.html页面类似,所以我认为我不需要解释该页面的代码。在表单提交操作时,我们调用submitData方法,以下是该方法的代码
submitData() {
        if (this.formData.valid) {
            var Obj = {
                EmployeeId: this.formData.value.EmployeeId,
                Designation: this.formData.value.Designation,
                EmployeeName: this.formData.value.EmployeeName,
                ProjectId: this.formData.value.Project,
                Skills: this.formData.value.Skills,
            };
            this.empService.editEmployeeData(Obj)
                .subscribe((data: Response) =>
                 (alert("Employee Updated Successfully")));;
        }
    }
在上面的代码行中,我们从formData(即FormGroup对象)获取值,并将其插入到新的object(Obj)中。之后,我们调用EmployeeService类的editEmployeeDatamethod,并将之前创建的对象作为参数传递。
现在打开您的service.ts文件,并将以下代码粘贴到此文件中
editEmployeeData(empObj: any) {
        let headers = new Headers({
            'Content-Type':
            'application/json; charset=utf-8'
        });
        let options = new RequestOptions({ headers: headers });
        return this.http.put('https://:54273/api/employee',
                              JSON.stringify(empObj), options);
    }
在此方法中,我们调用Employee API 的put方法来更新employee的详细信息,并传递employee的更新信息。现在我们需要在我们的 API 类中创建一个PUT类型的Put方法,该方法可以获取此更新信息并将其保存到数据库中,因此打开EmployeeController.cs文件并粘贴以下代码。
[HttpPut]
        public IActionResult EditEmployee([FromBody]Employee empData)
        {
            _context.Entry(empData).State = EntityState.Modified;
            _context.SaveChanges();
            return Json("ok");
        }
在上面的代码中,我们创建了一个 HTTP PUT类型的Put方法,在该方法中,我们从请求的 body 中获取数据,并将这些更改永久保存到数据库。让我们尝试编辑Dhramveer员工的信息,当您单击编辑按钮时,将打开以下屏幕。

现在对现有信息进行一些更改,如下所示

当您点击“提交”按钮时,您将收到一个“员工已成功更新”的警报框,这意味着员工的详细信息已更新。

当您转到主页时,您会发现员工的详细信息已更新。
添加搜索框
现在我们在项目中添加搜索功能,为此,我们将添加一个textbox。实际上,我们将对Employee列表进行过滤。当我们在此文本框中键入任何值时,它将该文本与员工的EmployeeName、Designation和Project字段进行匹配,并返回至少一个字段与输入的文本数据匹配的员工的详细信息。在 Angular 1.x 中,我们有用于此类任务的 filter,但在 Angular 2 和 4 中,我们没有这样的 filter。为此,Angular 2 引入了一个新概念,即 Pipe。使用 Pipe,我们可以创建自定义过滤器并在任何需要的地方实现它。让我们使用 Pipe 创建自定义过滤器。
为此,请转到App目录并创建一个新文件夹,将其命名为pipes。现在在此文件夹中添加一个名为search.ts的新 TypeScript 文件,并将以下代码粘贴到该文件中。
import {  Pipe,PipeTransform } from '@angular/core';

@Pipe({
    name: 'searchFilter'
})

export class filterSearch implements PipeTransform {
    transform(value: any, args: string): any {
        if (args == null || args == undefined) {
            return value;
        }
        else {
            let filter = args.toLocaleLowerCase();
            return filter ? value.filter(employee =>
            (employee.employeeName.toLocaleLowerCase().indexOf(filter) != -1)
                || (employee.designation.toLocaleLowerCase().indexOf(filter) != -1)
                || (employee.project.toLocaleLowerCase().indexOf(filter) != -1)
                ) : value;
        }
    }
}
在上面的代码行中,我们定义了@Pipe元数据,该元数据将此类转换为 pipe 对象。filterSearch类继承了PipeTransform接口,我们在filterSearch类中实现了该接口的transform方法。该方法实际上接受两个参数。第一个参数包含我们要对其进行过滤的数据列表,第二个参数包含过滤条件。在上面的代码中,如果任何employee字段(employeeName、designation和project)包含过滤条件的文本,我们则返回Employee详细信息。
创建 Pipe 后,现在我们需要在App.modules.ts文件中注册此 Pipe,因此请在app.modules.ts中注册此 Pipe。

现在我们的 Pipe 已准备就绪,我们必须在app.modules.ts中注册此 Pipe。最后一步是使用此 Pipe。打开您的home.component.html文件,并用以下内容替换该页面的内容。
<div class="row">
    <div class="col-md-12">
        <h3>Employee List</h3>
        <br />

    </div>
    <div class="col-md-12">

            <div class="form-actions no-color">

                <div>
                    <span style="font-weight:bold;font-size:20px">Search:</span>
                    <input type="text" name="searchdata"  #search (keyup)="0"/>

                </div>
            </div>
       <br />
    </div>
</div>
<div class="row">
    <div class="table-responsive">
        <table class="table">
            <thead>
                <tr>
                    <th>

                        S.No.
                    </th>
                    <th>
                        EmployeeName
                    </th>
                    <th>
                        Designation
                    </th>
                    <th>
                        Project
                    </th>
                    <th>
                        Action
                    </th>
                </tr>
            </thead>
            <tbody>

                <tr *ngFor="let empData of EmployeeList |
                 searchFilter:search.value  ; let i = index; trackBy: employeeId">
                    <td>
                        {{i+1}}
                    </td>
                    <td>
                        {{empData.employeeName}}
                    </td>
                    <td>
                       {{empData.designation}}
                    </td>
                    <td>
                       {{empData.project}}
                    </td>
                    <td>

                        <a [routerLink]="['/details/',empData.employeeId]"
                           class="btn btn-primary">
                            Detail
                        </a>
                        <a [routerLink]="['/edit/',empData.employeeId]"
                           class="btn btn-success">
                            Edit
                        </a>
                        <a
                           class="btn btn-danger"
                           (click)="deleteEmployee(empData.employeeId)">
                            Delete
                        </a>
                    </td>
                </tr>

        </table>
    </div>
</div>
在上面的代码中,我只做了两个更改,第一个是将一个文本框添加进去,并将本地模板变量绑定到该文本框(#search)。
<div class="col-md-12">

            <div class="form-actions no-color">

                <div>
                    <span style="font-weight:bold;font-size:20px">Search:</span>
                    <input type="text" name="searchdata"  #search (keyup)="0"/>


                </div>
            </div>
       <br />
    </div>
第二个更改是我们在员工列表上实现了我们创建的 Pipe,并将本地模板变量(search)的值作为过滤条件传递。
<tr *ngFor="let empData of EmployeeList | searchFilter:search.value  ;
     let i = index; trackBy: employeeId">
进行所有更改后,我们的屏幕将如下所示

现在,如果我们在此文本框中输入任何文本,它将过滤员工列表,并且仅显示与过滤条件匹配的员工详细信息。

摘要
这是本系列的第二部分,也是最后一部分。我希望您喜欢本系列。在此系列中,我们学习了如何使用 .NET Core 设置 Angular 2。我们实现了 Entity Framework 的 Code First 方法,并设置了数据库连接。我们执行了 CRUD 操作,这是任何技术的学习基础步骤。我们学习了如何在 Angular2 中创建和实现服务,我们还学习了 Pipe 并创建了自定义 Pipe 来在我们的项目中实现过滤功能。如果您对此系列或 Angular 2 和 .NET Core 有任何疑问,请在评论区留言。如果您想下载此项目,可以访问此 Github 存储库。
历史
- 2017 年 4 月 19 日:初始版本