
创建一个 Docker 化 Python Fiddle Web 应用程序。
5.00/5 (13投票s)
使用 C#、一个简单的 Web 服务器和 Docker,我将向您展示如何创建一个“Fiddle”网站来运行 Python(或其他脚本语言)。
目录
引言

首先,免责声明 -- 我是 Docker 新手,这可能不是最简单/最好的方法。有几种实现此概念的方法,而我选择了一种方法。一种更典型的方法可能是使用 Nginx 和反向代理直接在 Docker 容器中实现整个站点,但我选择不这样做,因为我不了解 Nginx,而且这需要完全在 *nix 世界中工作,我也不想这样做。我一次只能承受这么多学习曲线!
所以在这个实现中
- 网站本身是用 C# 实现的
- Docker 系统在 Windows 上运行
- 一个 Docker 化的 HTTP 服务器在容器中运行
- C# Web 服务器与 Docker 容器通信,以
- 上传您想在容器中运行的 Python 脚本从浏览器
- 执行脚本
- 将脚本的 STDOUT 和 STDERR 返回到浏览器
- 公开一些您实际上不会在真正的 Fiddle 网站上公开的行为,但有助于演示本文中的某些功能。
除了下载之外,最新的代码可以在 GitHub 上找到。
我学到的东西
- 关于让 Docker 容器启动并运行的痛点
- 在 C# 中创建一个简单的 Web 服务器
- 在 Python 中创建一个 HTTP 服务器
- 重定向 STDOUT 和 STDERR
- 处理启动 Docker 容器所需的环境变量。
- Docker 镜像的基本配置
- Docker 镜像的基本构建
- Windows 7 和 Windows 10 中 Python 脚本的细微差别
为什么要使用 Docker?
两个主要原因,特别是当暴露像允许用户在您的服务器上运行代码这样危险的东西时
- 安全
- 与其他用户隔离
安全
Docker 创建了一个隔离的容器,除非您显式创建桥接(共享文件或暴露端口),否则它无法访问您的宿主环境。这可以保护 Web 应用程序免受恶意攻击。如果用户决定浏览文件系统、删除文件或以其他方式修改它们,他们只会影响容器,而不是您的 Web 服务器!
例如,如果我使用 Web 应用中实现的“在宿主上运行”功能运行一个 Python 应用程序,您会看到我可以使用我的 Python 应用列出任何目录的内容。

显然,我们不希望用户这样做。另一方面,如果我使用“在 Docker 上运行”功能运行完全相同的代码,我们可以看到我正在一个完全不同的操作系统中执行 Python 代码。

这里的代码在一个容器中运行,该容器是从基线 Docker 镜像动态创建的。启动容器需要几秒钟,但一旦容器运行起来,与之交互就非常快。
我忽略的重要事项
- 并发容器的数量 -- 您永远不会将其部署为真正的 Web 应用程序,因为服务器很容易被每个创建自己容器的会话压垮。
- 内存和 CPU 使用率 -- Docker 中有一些方法可以限制内存和 CPU 使用率,这样恶意应用程序就不会占用服务器的所有资源。
- 允许的应用程序执行时间 -- 这在“在宿主上运行”功能中实现得很差,而在“在 Docker 上运行”功能中根本没有实现。
- 正如我在文章开头提到的,可能有很多更好的方法可以做到这一点,并且不应该忽略 Amazon EC2 Container Service 等服务。
- 甚至在容器本身内部进一步提高安全性 -- 读/写权限,一个单独的用户,在其中执行 Python 脚本的进程运行,等等。
- 进一步限制到外部世界 -- 从我的例子中可以看到,在容器中运行的代码可以访问互联网上的任何内容。您最不想发现的是有人通过您的 Fiddle Web 应用发起 DoS 攻击。
开始使用 Docker
安装 Docker
我在开发此演示应用程序时使用的操作系统是 Windows 7 Professional 和 Windows 10 Home 版本。这些操作系统都不支持 Hyper-V(在运行 Windows 的 X86-64 系统上创建虚拟机的能力),因此,我不得不安装 Docker Toolbox,它使用 Oracle 的 Virtual Box 作为虚拟机。如果您的操作系统支持 Hyper-V,那么您可以下载 Docker Community Edition。请注意,本文的内容可能存在一些细微差别。
使用 Docker Quickstart Terminal
如前所述,我安装了 Docker Toolbox,它会在开始菜单中创建这些快捷方式。

当您启动 Docker Quickstart Terminal 时,它会执行一些启动操作,然后显示 Docker 的 ASCII 艺术标志。您可以通过输入 docker --version 来检查版本信息,或者输入 docker version 来获得更详细的响应,以确保一切正常。

这里有几件重要的事情需要注意!
- 正如标题栏所示,Docker 正在您的用户文件夹中运行。
- 注意 Docker 机器运行的 IP 地址。稍后我们将使用这些信息。
第一个非常重要,因为 Virtual Box 已设置为在您的宿主(Windows)操作系统和 Docker VM 之间共享此文件夹。您可以使用“ls”命令验证这一点,该命令列出了文件夹的内容,例如

Docker 镜像是根据您创建的规范(通常在子文件夹中)从该目录(在本例中为 c:\Users\Marc)构建的。
创建您的第一个镜像 - 基础知识
在您的宿主(Windows)中,在您的 c:\Users\[您的用户名] 文件夹下,创建一个名为“test”的文件夹,并包含以下文件(我使用 Sublime 编辑器处理这些文件)。
- 创建 Dockerfile(无扩展名!)
在此文件中,告诉 Docker 该镜像将使用最新版本的 Python。
FROM python:latest
WORKDIR /app
ADD . /app
我们还使用环境变量 WORKDIR 和命令 ADD 告诉 Docker“应用程序”文件的位置。在这里可以阅读更多信息:此处。
第一条指令必须是 FROM,因为它指定了基础镜像。Docker 关于“基础镜像”的词汇表相当无用:“没有父镜像的镜像是基础镜像”,而且我不会深入探讨镜像的细节,因为 1) 我还在学习这些东西,无法充分解释,2) 其他人已经写了很多关于镜像和容器的好东西。您可以在 Docker 网站上此处阅读更多内容。
- 创建 hello.py
在此文件中,创建一个单行“hello world”应用程序。
print("Hello World!")
确保该行末尾有一个回车符,否则什么都不会发生(这是 Python 的一个特性)。
我们看到这些文件,位于我放置它们的“test”文件夹中,在终端中可见。

构建镜像
在终端中,使用命令 docker build -t test ./test 构建镜像。

这告诉 Docker 创建一个名为“test”的镜像,并且镜像的定义,包括我们希望镜像拥有的文件,都位于 ./test 文件夹中。“-t”告诉 Docker 为镜像命名,这很有用,因为否则您将使用一个长十六进制的镜像 ID 字符串。在这里可以阅读更多关于 Docker build 选项的信息:此处。
从终端内部在容器中运行镜像
我们现在可以使用 docker run test python hello.py 运行镜像。

![]() 成功!在这里,我们告诉 Docker 运行“test”镜像,并传递一个容器将执行的命令行。
成功!在这里,我们告诉 Docker 运行“test”镜像,并传递一个容器将执行的命令行。
列出 Docker 镜像
要查看您创建的镜像,可以使用 docker image ls 命令。

请注意名为“test”的镜像!
从 Windows Shell 在容器中运行镜像
这变得更复杂了。Docker 使用命名管道在宿主(Windows)Shell 和 Docker VirtualBox VM 之间进行通信。
![]() 当您安装 Docker Toolbox 时,不会自动为您配置宿主环境。您可以使用
当您安装 Docker Toolbox 时,不会自动为您配置宿主环境。您可以使用 docker-machine env default 来确定需要设置哪些宿主环境变量:(注意,这是从 Windows Shell 运行的)
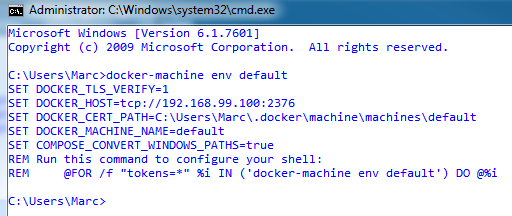
为了在宿主 Shell 和 Docker VM 之间进行通信,您必须设置这些环境变量!
完成这些操作后,打开一个新的 Shell,然后输入与在 Docker 终端中运行测试应用程序相同的命令。

![]() 再次成功!我们现在已经证明了一个 Docker 镜像可以直接从 Windows 的容器中运行。
再次成功!我们现在已经证明了一个 Docker 镜像可以直接从 Windows 的容器中运行。
但容器真的隔离吗?
毕竟,这就是 Docker 的前提 -- 镜像在隔离的容器中运行。我们可以通过编写一个创建唯一文件的简单 Python 应用程序来证明这一点,并验证每个容器只看到它自己的文件。我们将编写一个简单的 Python 应用,它会根据文件名创建一个文件,然后列出文件夹的内容。我将这段代码放入了“containerTest.py”文件中,并在运行镜像之前重新构建了镜像。
import os
import sys

print("Before:")
print(os.listdir())

fn = sys.argv[1]
f = open(fn, "w")
f.close()

print("After:")
print(os.listdir())
当我们运行镜像时,我们看到每个容器只包含从我们的测试文件夹复制过来的文件,创建我们告诉它创建的文件,并且容器看不到我们在其他容器中创建的任何其他文件。

这表明 Docker 容器只包含镜像创建时存在的文件,并且每个容器都是隔离的。当然,有方法可以在 Docker 容器之间共享数据(在这里可以阅读更多信息:此处),但这并不是我们感兴趣的。
构建 FiddleDock Web 应用
现在我们已经掌握了创建 Docker 镜像和运行容器的基础知识,下一步是构建一些有用的东西。总体计划如下:

- 一个用 C# 实现的简单 Web 服务器用于提供主页面。
- 我们利用了以下三个“框架”:
- jQuery(因为一切都使用 jQuery)
- Bootstrap(因为它使布局更轻松)
- Ace 编辑器(一个很棒的语法高亮编辑器)
- 一个用 Python 实现的 HTTP 服务器应用程序,允许我们的 Web 服务器与 Docker 容器中运行的代码通信。
Python HTTP 服务器
让我们从 Python HTTP 服务器开始,因为我们可以测试很多东西而无需 Web 服务器。
第三方软件包
我们依赖两个第三方软件包:
Flask - Flask 是一个 Python 微框架,本身基于几个其他包,它肯定比我们在此处使用的功能更多,即作为 Web 服务器路由器。
DotMap - DotMap 允许我们使用“点”表示法来处理字典。
DotMap 值得简单解释一下。它与(在 Python 中)编写
a = {}
a["foo"] = 1
print(a["foo"])
与使用“点”表示法创建和访问字典项的区别。
from dotmap import DotMap
m = DotMap()
m.foo = 1
print(m.foo)
我不喜欢代码中硬编码的字面值,而 DotMap 隐藏了这一点。
让 Docker 导入我们的 Python 依赖项
让我们在 Dockerfile 中添加一行:
RUN pip install -r requirements.txt
并创建文件 requirements.txt:
Flask
DotMap
lxml
cssselect
requests
我还添加了 3 个其他依赖项,我将在演示中使用它们 -- 一个简单的页面抓取器,它从网站 onthisday.com 返回“人物专访”内容。我们稍后会介绍。
在更改了 Dockerfile 并创建了 requirements.txt 之后,当我们构建镜像时,Docker 的构建过程将运行 pip install 命令,我们的依赖项将被下载并安装!
Python HTTP 服务器
这是 Python HTTP 服务器的完整代码。
#pylint: disable=I0011, C0103, C0111, W0702, line-too-long
""" HTTP Server """

from dotmap import DotMap # pip install DotMap
from flask import Flask, request # pip install Flask
import ast
import argparse # https://docs.pythonlang.cn/2/howto/argparse.html
import base64
import json # https://docs.pythonlang.cn/2/library/json.html
import subprocess
import sys
import threading
import time

class StdoutWatcher:
  """ Watches stdout and concatenates lines """
  def __init__(self, p):
    self.p = p
    self.stopWatcher = False
    self.responseLines = []

  def startStdoutThread(self):
    commThread = threading.Thread(target=self.stdoutWatcher)
    commThread.daemon = True # stop if the program exits.
    commThread.start()

  def stdoutWatcher(self):
    while not self.stopWatcher:
      try:
        for line in iter(self.p.stdout.readline, ''):
          if line != b'':
            self.responseLines.append(line.decode('utf-8'))
            time.sleep(0.010)
      except:
        print("stdoutWatcher Exception: " + str(sys.exc_info()[0]))
        self.stopWatcher = True

app = Flask(__name__)

def getPacket():
  js = str(request.get_json())
  js = ast.literal_eval(js)
  return DotMap(js)

@app.route("/")
def hello():
  return "Hello World!"

"""
Example (the base64 string encodes "Test String"):
{
"Filename": "foo.txt",
"Content": "VGVzdCBTdHJpbmc=",
"Encoding": "base64"
}
"""
@app.route("/uploadfile", methods=['POST'])
def uploadFile():
  fileInfo = getPacket()
  content = fileInfo.Content

  if fileInfo.Encoding == "base64":
  # the "decode" method call converts the byte array to a UTF8 string.
    content = base64.b64decode(content).decode('utf-8')

  f = open(fileInfo.Filename, "w")
  f.write(content)
  f.close()

  return "ok"

"""
Example:
{"Filename": "foo.py"}
"""
@app.route("/run", methods=['POST'])
def run():
  runInfo = getPacket()
  # The -u trick comes from http://stackoverflow.com/questions/2804543/read-subprocess-stdout-line-by-line
  p = subprocess.Popen(['python', '-u', runInfo.Filename], stdout=subprocess.PIPE, stderr=subprocess.STDOUT)
  sw = StdoutWatcher(p)
  sw.startStdoutThread()

  # Wait for process to exit. We should add a watchdog to prevent hanging the server.
  while p.poll() == None:
    time.sleep(0.010)

  return str(sw.responseLines)

@app.route("/exit", methods=['POST'])
def exit():
  sys.exit()

if __name__ == "__main__":
  parser = argparse.ArgumentParser()
  parser.add_argument("-p", "--port", help="Specifies the port number on which the server listens.")
  args = parser.parse_args()
  port = 1000

  if args.port:
    port = args.port

  # host cannot be 127.0.0.1!
  # Binding to 0.0.0.0 will bind your app in any interface available, localhost (127.0.0.1) does not.
  app.run(host='0.0.0.0', port=port)
这有三个部分:
应用程序初始化
这主要在文件底部完成(除了第 38 行 app = Flask(__name__)),基本上发生的是:
- 确保正在运行的模块是主应用程序模块(而不是某个导入的模块)-- 这是一个常见的 Python 实践,使用
if __name__ == "__main__":。 - 如果在启动参数中指定了端口号,则使用该端口。
- 启动 Flask HTTP 服务器。
路由
有四个路由:
@app.route("/")- C# 服务器使用它来等待(并验证)服务器是否在启动容器时正在运行。@app.route("/uploadfile", methods=['POST'])- 一个 POST 方法,用于上传 base64 编码的 UTF-8 字符串,表示用户希望运行的代码。@app.route("/run", methods=['POST'])- 一个 POST 方法,用于运行用户代码。@app.route("/exit", methods=['POST'])- 一个 POST 方法,用于退出服务器。
进程启动器和 STDOUT/STDERR 监视器
启动进程很简单。
p = subprocess.Popen(['python', '-u', runInfo.Filename], stdout=subprocess.PIPE, stderr=subprocess.STDOUT)
捕获进程的 STDOUT 和 STDERR 输出并不容易,这正是 StdoutWatcher 类所做的。虽然这只有 21 行代码,但它代表了好几个小时的研究!
启动容器
这是有趣的部分。我们必须启动容器,暴露 Python HTTP 服务器的端口,以便我们的 Windows 宿主可以看到它。我们使用 -p Docker 命令行选项将 VM 中的端口映射到宿主上的端口。基本语法是 [宿主端口]:[docker 端口],并且还有几种这种语法的变体。
所以让我们启动 Python HTTP 服务器,使用端口 4001。
docker run -p 4001:4001 fiddlepy python -u server.py -p 4001
![]() 我们到处看到的“-u”是什么意思?基本上,它告诉 Python STDOUT 和 STDERR 是无缓冲的,这意味着每一行输出都会立即被任何 STDOUT/STDERR 侦听器接收。如果我们不这样做,子系统(而不是 Python)可能会缓冲输出一段时间。这个小功能本身就花了几个小时才弄清楚!
我们到处看到的“-u”是什么意思?基本上,它告诉 Python STDOUT 和 STDERR 是无缓冲的,这意味着每一行输出都会立即被任何 STDOUT/STDERR 侦听器接收。如果我们不这样做,子系统(而不是 Python)可能会缓冲输出一段时间。这个小功能本身就花了几个小时才弄清楚!
另请注意,“fiddlepy”是我的镜像名称。
当我们启动容器时,几秒钟后,我们看到:

测试 Python HTTP 服务器
(什么,你期待单元测试???)
我们现在可以浏览到Docker 的 IP 和暴露的端口,然后我们得到:

![]() 耶!
耶!
请注意 Flask 输出发送给它的请求。

我们可以通过发布 exit 方法来退出服务器。对于 Chrome 插件,我更喜欢使用 Postman,因为我发现 Advanced Rest Client 在 JSON 内容类型方面存在 bug。

观察到 Python HTTP 服务器已退出,我们回到了控制台窗口的命令行提示符。
上传一个简单的 Python 脚本
让我们上传一个简单的 Python 脚本在容器中执行。首先,我们需要使用 www.base64encode.org 将一些文本转换为 base64(网络太棒了)。

现在我们将它发布到服务器(如果已退出,则需要再次“docker run...”)。

很酷,我们得到了“OK”响应。
运行我们的测试脚本
现在让我们在 Docker 容器中运行我们的 Python 脚本。

很棒!
我们有
- 将脚本上传到容器
- 执行该脚本
- 脚本的结果作为响应返回!
这(希望)相对顺利。
宿主 Windows Web 服务器
现在我们已经编写并测试了 Python HTTP 服务器,是时候编写暴露给浏览器用户的前端了。
HTTP 服务器
如果您从原生 .NET 框架编写 HTTP 服务器(我在这里就是这样做的),它需要多少行代码会有点吓人(当然,Python 中的 Flask 也需要很多行代码),而且我发誓我不会使用像 ASP.NET 这样庞大的东西。我本可以使用 Nancy,但虽然它看起来很简单,但我真的不想再经历一次学习曲线。
using System;
using System.Collections.Generic;
using System.Linq;
using System.IO;
using System.Net;
using System.Net.Sockets;
using System.Text;
using System.Threading;

using Clifton.Core.ExtensionMethods;

using FiddleDock.RouteHandlers;

namespace FiddleDock
{
  public class LogEventArgs : EventArgs
  {
    public string Message { get; set; }
  }

  public class WebServer
  {
    public event EventHandler<LogEventArgs> Logger;

    protected int maxSimultaneousConnections = 20;
    protected int httpPort = 80;
    protected Semaphore sem;
    protected Dictionary<Route, Func<HttpListenerContext, Response>> routeHandlers;

    public WebServer()
    {
      routeHandlers = new Dictionary<Route, Func<HttpListenerContext, Response>>();
    }

    public void AddRoute(string verb, string path, Func<HttpListenerContext, Response> handler)
    {
      routeHandlers.Add(new Route(verb, path), handler);
    }

    public void StartWebServer()
    {
      sem = new Semaphore(maxSimultaneousConnections, maxSimultaneousConnections);
      List<IPAddress> localHostIPs = GetLocalHostIPs();
      HttpListener listener = InitializeListener(localHostIPs);
      Start(listener);
    }

    protected void Start(HttpListener listener)
    {
      listener.Start();
      Thread th = new Thread(RunServer);
      th.IsBackground = true;
      th.Start(listener);
    }

    protected void RunServer(object l)
    {
      HttpListener listener = (HttpListener)l;
      while (true)
      {
        try
        {
          sem.WaitOne();
          StartConnectionListener(listener);
        }
        catch (Exception ex)
        {
          Logger.Fire(this, new LogEventArgs() { Message = ex.Message });
        }
      }
    }

    protected List<IPAddress> GetLocalHostIPs()
    {
      IPHostEntry host;
      host = Dns.GetHostEntry(Dns.GetHostName());
      List<IPAddress> ret = host.AddressList.Where(ip => ip.AddressFamily == AddressFamily.InterNetwork).ToList();

      return ret;
    }

    protected HttpListener InitializeListener(List<IPAddress> localhostIPs)
    {
      HttpListener listener = new HttpListener();
      Logger.Fire(this, new LogEventArgs() { Message = "Listening on IP " + "http://locahost:" + httpPort + "/" });
      listener.Prefixes.Add("https://:" + httpPort + "/");

      // Listen to IP address as well.
      localhostIPs.ForEach(ip =>
      {
        Logger.Fire(this, new LogEventArgs() { Message = "Listening on IP " + "http://" + ip.ToString() + ":" + httpPort + "/" });
        listener.Prefixes.Add("http://" + ip.ToString() + ":" + httpPort + "/");
      });

      return listener;
    }

    protected void StartConnectionListener(HttpListener listener)
    {
      // Wait for a connection. Return to caller while we wait.
      HttpListenerContext context = listener.GetContext();

      // Release the semaphore so that another listener can be immediately started up.
      sem.Release();

      Logger.Fire(this, new LogEventArgs() { Message = context.Request.Url.LocalPath });

      string verb = context.Request.HttpMethod;
      string path = context.Request.Url.LocalPath;
      string requestData = new StreamReader(context.Request.InputStream, context.Request.ContentEncoding).ReadToEnd();

      var routes = routeHandlers.Where(kvp => kvp.Key.IsMatch(verb, path));
      int numRoutes = routes.Count();

      if (numRoutes == 0)
      {
        Console.WriteLine("Route not found!");
        Respond(context, "<p>Route not found!</p>", "text/html");
      }
      else if (numRoutes > 1)
      {
        Console.WriteLine("Multiple handlers match the given route!");
        Respond(context, "<p>Multiple handlers match the given route!</p>", "text/html");
      }
      else
      {
        try
        {
          Response response = routes.First().Value(context);
          response.Execute(requestData);
          Respond(context, response);
        }
        catch (Exception ex)
        {
          Console.WriteLine(ex.Message);
          Respond(context, "error", "text/html");
        }
      }
    }

    protected void Respond(HttpListenerContext context, Response response)
    {
      context.Response.ContentType = response.ContentType;
      var data = response.GetResponseData(context);
      context.Response.ContentLength64 = data.Length;
      context.Response.OutputStream.Write(data, 0, data.Length);
    }

    protected void Respond(HttpListenerContext context, string msg, string contentType)
    {
      byte[] utf8data = Encoding.UTF8.GetBytes(msg);
      context.Response.ContentType = contentType;
      context.Response.ContentEncoding = Encoding.UTF8;
      context.Response.ContentLength64 = utf8data.Length;
      context.Response.OutputStream.Write(utf8data, 0, utf8data.Length);
    }
  }
}
呼!
初始化宿主服务器
我实现了一个相当愚蠢的路由机制,您将在下面看到。
using System;
using System.IO;

using Clifton.Core.ExtensionMethods;

using FiddleDock.RouteHandlers;

namespace FiddleDock
{
  class Program
  {
    static void Main(string[] args)
    {
      WebServer ws = new WebServer();
      ws.Logger += Logger;
      InitializeRoutes(ws);
      ws.StartWebServer();
      Console.WriteLine("Web server ready.");
      Console.ReadLine();
    }

    private static void Logger(object sender, LogEventArgs e)
    {
      Console.WriteLine(e.Message);
    }

    private static string GetPath()
    {
      return @"c:\projects\FiddleDock\Website";
    }

    private static void InitializeRoutes(WebServer ws)
    {
      ws.AddRoute("GET", "/",
         (context, _) => new StringResponse() { Data = File.ReadAllText(Path.Combine(GetPath(), "index.html")),
         ContentType = "text/html" });
      ws.AddRoute("GET", "/index",
         (context, _) => new StringResponse() { Data = File.ReadAllText(Path.Combine(GetPath(), "index.html")),
         ContentType = "text/html" });
      ws.AddRoute("GET", "/index.html",
         (context, _) => new StringResponse() { Data = File.ReadAllText(Path.Combine(GetPath(), "index.html")),
         ContentType = "text/html" });
      ws.AddRoute("GET", "*.js",
         (context, _) => new StringResponse() { Data = File.ReadAllText(
            Path.Combine(GetPath(), context.Request.Url.LocalPath.WindowsDelimiters().Substring(1))),
         ContentType = "text/javascript" });
      ws.AddRoute("GET", "*.css",
         (context, _) => new StringResponse() { Data = File.ReadAllText(
            Path.Combine(GetPath(), context.Request.Url.LocalPath.WindowsDelimiters().Substring(1))),
         ContentType = "text/css" });
      ws.AddRoute("GET", "*.jpg",
         (context, _) => new BinaryResponse() { ByteData = File.ReadAllBytes(
            Path.Combine(GetPath(), context.Request.Url.LocalPath.WindowsDelimiters().Substring(1))),
         ContentType = "image/jpg" });
      ws.AddRoute("GET", "*.png",
         (context, _) => new BinaryResponse() { ByteData = File.ReadAllBytes(
            Path.Combine(GetPath(), context.Request.Url.LocalPath.WindowsDelimiters().Substring(1))),
         ContentType = "image/png" });
      ws.AddRoute("GET", "*.bmp",
         (context, _) => new BinaryResponse() { ByteData = File.ReadAllBytes(
            Path.Combine(GetPath(), context.Request.Url.LocalPath.WindowsDelimiters().Substring(1))),
         ContentType = "image/bmp" });
      ws.AddRoute("GET", "*.ico",
         (context, _) => new BinaryResponse() { ByteData = File.ReadAllBytes(
            Path.Combine(GetPath(), context.Request.Url.LocalPath.WindowsDelimiters().Substring(1))),
         ContentType = "image/x-icon" });

      ws.AddRoute("POST", "/runOnHost", (context, _) => new RunOnHost() { ContentType = "text/json" });
      ws.AddRoute("POST", "/runOnDocker", (context, session) => new RunOnDocker(session) { ContentType = "text/json" });
      ws.AddRoute("POST", "/createNewInstance", (context, session) => new CreateNewInstance(session) { ContentType = "text/json" });
      ws.AddRoute("POST", "/deleteInstance", (context, session) => new DeleteInstance(session) { ContentType = "text/json" });
    }
  }
}

最后四个 POST 命令是重要的部分,这是我们感兴趣的部分。
用户界面

这是我们正在构建的用户界面。[trump-mode]非常简单,非常棒。[/trump-mode]
我们在 index.html 的 header 中导入了三个依赖项。
<head>
<meta charset="utf-8" />
<title>FiddleDock</title>
<link type="text/css" rel="stylesheet" href="/css/bootstrap.min.css" />
<link type="text/css" rel="stylesheet" href="/css/bootstrap-custom.css" />
<link type="text/css" rel="stylesheet" href="/css/fiddledock.css" />
<script type="text/javascript" src="/js/ace/ace.js" charset="utf-8"></script>
<script type="text/javascript" src="/js/jquery-1.11.2.min.js"></script>
<script type="text/javascript" src="/js/bootstrap.min.js"></script>
</head>
body 利用了 Bootstrap 的网格系统。
<body>
  <div class="container-fluid" style="height:90vh">
    <div class="row top-margin-20" style="height:45%">
      <div class="col-xs-1 col-sm-1 col-md-1 col-lg-1"></div>
      <div class="col-xs-8 col-sm-8 col-md-8 col-lg-8" style="height:100%">
        <div class="bottom-margin-10" id="editor" style="width:100%; height:100%"></div>
      </div>
      <div class="col-xs-3 col-sm-3 col-md-3 col-lg-3">
        <div>
          <button id="runOnDocker">Run on Docker</button>
          <button id="runOnHost">Run on Host</button>
        </div>
        <div class="top-margin-10">
           Select Instance:
           <select id="instanceList">
             <option>1</option>
           </select>
        </div>
        <div class="top-margin-10">
          <button id="deleteInstance">Delete Instance</button>
        </div>
        <div class="top-margin-10">
          <button id="createInstance">Create New Instance</button>
        </div>
      </div>
    </div>

    <div class="row" style="padding-top:10px">
      <div class="col-xs-1 col-sm-1 col-md-1 col-lg-1"></div>
      <div class="col-xs-8 col-sm-8 col-md-8 col-lg-8">
        <span style="color:black; font-family:Tahoma; font-size:1em; vertical-align:bottom;">Output:</span>
      </div>
    </div>

    <div class="row" style="height:45%">
      <div class="col-xs-1 col-sm-1 col-md-1 col-lg-1"></div>
      <div class="col-xs-8 col-sm-8 col-md-8 col-lg-8" style="height:100%">
        <textarea id="output" style="width:100%; border:1px solid black; height:100%; padding-left:5px; padding-right:5px"></textarea>
      </div>
    </div>
  </div>
</body>
好的,这里有嵌入式样式,它们应该放在 fiddledock.css 文件中。我还需要再请出尤达吗?
JavaScript
我喜欢干净的 Javascript(如果我必须写脏代码,我倾向于尝试使代码格外整洁)。
$(document).ready(function () {
  editor = ace.edit("editor");
  editor.setTheme("ace/theme/twilight");
  editor.getSession().setMode("ace/mode/python");
  editor.focus();

  $("#runOnDocker").on("click", runCodeOnDocker);
  $("#runOnHost").on("click", runCodeOnHost);
  $("#createInstance").on("click", createInstance);
  $("#deleteInstance").on("click", deleteLastInstance);
});

function runCodeOnDocker() {
  var code = editor.getValue();
  var instanceNumber = $("#instanceList").val();
  postJson("/runOnDocker", { "code": btoa(code), "instanceNumber": instanceNumber }, runResponse, ajaxError)
}

function runCodeOnHost() {
  var code = editor.getValue();
  postJson("/runOnHost", { "code": btoa(code) }, runResponse, ajaxError)
}

function runResponse(resp) {
  $("#output").html(atob(resp["resp"]))
}

function createInstance() {
  // Gotta love how $("#instanceList).size() and .length simply don't work.
  var numOptions = $("#instanceList > option").length;
  var newOption = numOptions + 1;
  $("#instanceList").append($('<option>', { value: newOption, text: newOption }));
  postJson("/createNewInstance", { "instanceNumber": newOption }, instanceCreated, ajaxError)
}

function instanceCreated(resp) {
  alert("Instance created.");
}

function deleteLastInstance() {
  if (moreThanOneInstance()) {
    var numOptions = $("#instanceList > option").length;
    $("#instanceList option[value='" + numOptions + "']").remove();
    postJson("/deleteInstance", { "instanceNumber": numOptions }, instanceDeleted, ajaxError)
  }
  else {
    alert("At least one instance must exist.");
  }
}

function instanceDeleted(resp) {
  alert("Instance deleted.");
}

function moreThanOneInstance() {
  return $("#instanceList > option").length > 1
}

function postJson(url, data, onSuccess, onFail) {
  $.post(url, JSON.stringify(data),
    function (data) {
      onSuccess(data);
    }
    ).fail(function (data) {
      onFail(data)
    })
}

function ajaxError(data) {
  alert(data.statusText);
}
启动进程
从低级细节开始,这是我们需要做的来启动执行“docker run...”命令的进程。请注意,我们必须显式设置环境变量(嗯,我之前在说什么关于不喜欢硬编码字符串???)。
using System;
using System.Diagnostics;

using Clifton.Core.ExtensionMethods;

namespace FiddleDock
{
  public static class Runner
  {
    public static Process LaunchProcess(string processName, string arguments, Action<string> onOutput, Action<string> onError = null)
    {
      Process p = new Process();
      p.StartInfo.UseShellExecute = false;
      p.StartInfo.RedirectStandardOutput = true;
      p.StartInfo.RedirectStandardError = true;
      p.StartInfo.RedirectStandardInput = true;
      p.StartInfo.FileName = processName;
      p.StartInfo.Arguments = arguments;
      p.StartInfo.CreateNoWindow = true;

      string username = System.Security.Principal.WindowsIdentity.GetCurrent().Name.RightOf("\\");

      p.StartInfo.EnvironmentVariables["DOCKER_CERT_PATH"] = @"c:\users\" + username + @"\.docker\machine\machines\default";
      p.StartInfo.EnvironmentVariables["DOCKER_HOST"] = "tcp://192.168.99.100:2376";
      p.StartInfo.EnvironmentVariables["DOCKER_MACHINE_NAME"] = "default";
      p.StartInfo.EnvironmentVariables["DOCKER_TLS_VERIFY"] = "1";

      p.OutputDataReceived += (sndr, args) => { if (args.Data != null) onOutput(args.Data); };

      if (onError != null)
      {
        p.ErrorDataReceived += (sndr, args) => { if (args.Data != null) onError(args.Data); };
      }

      p.Start();

      // Interestingly, this has to be called after Start().
      p.BeginOutputReadLine();
      p.BeginErrorReadLine();

      return p;
    }
  }
}
这是使用 .NET 的 Process 类进行的相当标准的配置,但您可能不经常需要重定向 STDOUT 和 STDERR 并设置侦听器。
简单的事情 -- 在宿主上运行脚本
作为比较,您可以在 Windows 宿主机器上运行脚本(显然,您不会在广阔的网络上公开此功能)。
using System;
using System.Collections.Generic;
using System.IO;
using System.Net;
using System.Text;
using System.Threading;

using Newtonsoft.Json;

namespace FiddleDock.RouteHandlers
{
  public class RunOnHost : Response
  {
    protected List<string> stdout = new List<string>();

    public override void Execute(string requestData)
    {
      PythonCode pcode = JsonConvert.DeserializeObject<PythonCode>(requestData);
      string code = Encoding.ASCII.GetString(Convert.FromBase64String(pcode.Code));
      string fnTemp = Path.GetTempFileName();
      File.WriteAllText(fnTemp, code);
      var process = Runner.LaunchProcess("python", "-u " + fnTemp, (s) => stdout.Add(s), (err) => stdout.Add(err));
      var startTime = DateTime.Now;

      while (!process.HasExited && (DateTime.Now - startTime).TotalMilliseconds < Constants.MAX_RUN_TIME_MS)
      {
        Thread.Sleep(0);
      }

      if (!process.HasExited)
      {
        process.Kill();
      }

      File.Delete(fnTemp);
    }

    public override byte[] GetResponseData(HttpListenerContext context)
    {
      string resp = Convert.ToBase64String(Encoding.ASCII.GetBytes(String.Join("\r\n", stdout)));
      return Encoding.UTF8.GetBytes("{\"status\":\"ok\", \"resp\":\"" + resp + "\"}");
    }
  }
}
需要注意的一些事项。
- 脚本代码以 base64 从 Javascript 客户端发送,因此我们必须对其进行解码。
- 我们再次使用“-u”参数,这样子系统就不会缓冲 Python 的 STDOUT 和 STDERR。
- 我们在杀死进程之前等待预定的时间(哦,看,有一个常量。)
- 响应作为 base64 编码的字符串返回给客户端。
这运行起来很不错,我们得到了预期的结果。

所有这些在后台发生的事情是,我们在宿主上启动 python -u [临时文件名] 并捕获输出。
不那么简单 -- 在宿主上运行脚本
在这里,我们将关注一些事情,例如会话,由请求端点 IP 确定,因为作为一个“真正的”Web 应用程序,我们将需要跟踪我们为会话创建的容器,并在容器创建后在会话中重新使用它们。我们还需要为每个容器创建唯一的端口以连接到 Python HTTP 服务器,以便我们可以与特定容器通信!有趣的是,可用端口是全局的,而不是特定于会话的。
处理请求的子类足够简单。
using System;
using System.Collections.Generic;
using System.Net;
using System.Text;

using Newtonsoft.Json;

namespace FiddleDock.RouteHandlers
{
  public class RunOnDocker : DockerManagement
  {
    public RunOnDocker(Session session)
    {
      this.session = session;
    }

    public override void Execute(string requestData)
    {
      PythonCode pcode = JsonConvert.DeserializeObject<PythonCode>(requestData);
      int instanceNumber = pcode.InstanceNumber - 1;
      var sessionPorts = GetSessionDockerInstancePorts();
      instancePort = GetOrCreateContainerPort(ref sessionPorts, instanceNumber);
      SaveSessionDockerInstancePorts(sessionPorts); // Update with any new ports created in this session.
      List<string> stdout = GetStdout();

      string code = pcode.Code; // This is already base64 encoded.
      string resp = String.Empty;

      try
      {
        resp = UploadApp(code);
        VerifyResponse(resp, "ok");
        resp = RunApp();
        ResetStdout(resp);
      }
      catch (Exception ex)
      {
        stdout.Add(ex.Message);
      }
    }

    public override byte[] GetResponseData(HttpListenerContext context)
    {
      List<string> stdout = GetStdout();
      string resp = Convert.ToBase64String(Encoding.ASCII.GetBytes(String.Join("\r\n", stdout)));
      return Encoding.UTF8.GetBytes("{\"status\":\"ok\", \"resp\":\"" + resp + "\"}");
    }
  }
}
真正的工作在基类 DockerManagement 中。
using System;
using System.Collections.Generic;
using System.IO;
using System.Linq;
using System.Net;

using Newtonsoft.Json;
using Newtonsoft.Json.Linq;

using FiddleDock.RouteHandlers;

namespace FiddleDock
{
  public abstract class DockerManagement : Response
  {
    // Remember that these fields are specific to the INSTANCE of RunOnDocker, and a new instance is created for each request.
    // The web router calls, for the request:
    //   Execute
    //   GetResponseData
    // for a specific instance of this class, so we can preserve things like the
    // instancePort within the context of the instance of this class.
    protected Session session;
    protected int instancePort;

    // !!! This however is global to the server, as we need to track all ports used across all sessions.
    private static List<int> globalUsedPorts = new List<int>();

    /// <summary>
    /// Returns null if no ports are in use by this session, otherwise the list of ports.
    /// </summary>
    protected List<int> GetSessionDockerInstancePorts()
    {
      List<int> usedPorts = session.GetObject<List<int>>("usedPorts");

      return usedPorts;
    }

    protected void SaveSessionDockerInstancePorts(List<int> ports)
    {
      session["usedPorts"] = ports;
    }

    protected int GetOrCreateContainerPort(ref List<int> sessionPorts, int instanceNumber)
    {
      int port;

      if (sessionPorts == null)
      {
        port = CreateContainer();
        sessionPorts = new List<int>(new int[instanceNumber + 1]);
        sessionPorts[instanceNumber] = port;
      }
      else
      {
        port = sessionPorts[instanceNumber];

        if (port == 0)
        {
          // Oops, we haven't actually created this container. This occurs when:
          // The user creates a new instance
          // The user selects the new instance
          // The user goes back to instance 1 (index 0) which has not been used yet!
          // Basically, I boxed myself into a corner by not creating the first Docker instance, so we have
          // some crufty code here as a result.

          port = CreateContainer();
          sessionPorts[instanceNumber] = port;
        }
      }

      return port;
    }

    /// <summary>
    /// I boxed myself into a corner by not creating the first Docker instance, so we have
    /// some crufty code here as a result.
    /// </summary>
    protected void UpdateSessionPort(List<int> sessionPorts, int instanceNumber, int port)
    {
      if (sessionPorts.Count == instanceNumber)
      {
        sessionPorts.Add(port);
      }
      else
      {
        sessionPorts[instanceNumber] = port;
      }
    }

    protected void DeleteContainerPort(ref List<int> sessionPorts, int instanceNumber)
    {
      int port = sessionPorts[instanceNumber];
      ExitContainer(port);
      sessionPorts.RemoveAt(instanceNumber);
      globalUsedPorts.RemoveAt(globalUsedPorts.IndexOf(port));
    }

    protected int CreateContainer()
    {
      List<string> stdout = new List<string>();
      int port = GetAvailablePort();
      SaveStdout(stdout, port);
      string parms = String.Format("run -p {0}:{0} fiddlepy python -u server.py -p {0}", port);
      var process = Runner.LaunchProcess("docker", parms, (s) => stdout.Add(s), (err) => stdout.Add(err));
      string resp;

      try
      {
        resp = WaitForDockerImage(port);
        VerifyResponse(resp, "Hello World!");
      }
      catch (Exception ex)
      {
        stdout.Add(ex.Message);
      }

      return port;
    }

    protected List<string> GetStdout()
    {
      return session.GetObject<List<string>>(instancePort.ToString());
    }

    protected void SaveStdout(List<string> stdout, int port)
    {
      session[port.ToString()] = stdout;
    }

    protected int GetAvailablePort()
    {
      int newPort;

      if (globalUsedPorts.Count == 0)
      {
        newPort = 1001;
        globalUsedPorts.Add(newPort);
      }
      else
      {
        newPort = globalUsedPorts.DefaultIfEmpty(0).Max() + 1;
        globalUsedPorts.Add(newPort);
      }

      return newPort;
    }

    protected string WaitForDockerImage(int port)
    {
      string url = GetUrl(port, "/");
      HttpWebRequest request = (HttpWebRequest)WebRequest.Create(url);
      using (HttpWebResponse response = (HttpWebResponse)request.GetResponse())
      {
        using (Stream stream = response.GetResponseStream())
        {
          using (StreamReader reader = new StreamReader(stream))
          {
            string resp = reader.ReadToEnd();

            return resp;
          }
        }
      }
    }

    protected string GetUrl(int port, string cmd)
    {
      return String.Format("{0}:{1}{2}", Constants.DOCKER_IP, port, cmd);
    }

    protected void VerifyResponse(string resp, string expectedResponse)
    {
      if (resp != expectedResponse)
      {
        throw new Exception("Did not get expected response: " + resp);
      }
    }

    protected string UploadApp(string code)
    {
      var httpWebRequest = (HttpWebRequest)WebRequest.Create(GetUrl(instancePort, "/uploadfile"));
      httpWebRequest.ContentType = "application/json";
      httpWebRequest.Method = "POST";

      using (var streamWriter = new StreamWriter(httpWebRequest.GetRequestStream()))
      {
        string json = "{\"Filename\":\"run.py\"," +
          "\"Content\":\"" + code + "\", " +
          "\"Encoding\":\"base64\"}";

        streamWriter.Write(json);
        streamWriter.Flush();
        streamWriter.Close();
      }

      var httpResponse = httpWebRequest.GetResponse();

      using (var streamReader = new StreamReader(httpResponse.GetResponseStream()))
      {
        var result = streamReader.ReadToEnd();

        return result;
      }
    }

    protected string RunApp()
    {
      var httpWebRequest = (HttpWebRequest)WebRequest.Create(GetUrl(instancePort, "/run"));
      httpWebRequest.ContentType = "application/json";
      httpWebRequest.Method = "POST";

      using (var streamWriter = new StreamWriter(httpWebRequest.GetRequestStream()))
      {
        string json = "{\"Filename\":\"run.py\"}";
        streamWriter.Write(json);
        streamWriter.Flush();
        streamWriter.Close();
      }

      var httpResponse = httpWebRequest.GetResponse();

      using (var streamReader = new StreamReader(httpResponse.GetResponseStream()))
      {
        var result = streamReader.ReadToEnd();

        return result;
      }
    }

    protected void ExitContainer(int port)
    {
      var httpWebRequest = (HttpWebRequest)WebRequest.Create(GetUrl(port, "/exit"));
      httpWebRequest.ContentType = "application/json";
      httpWebRequest.Method = "POST";

      try { httpWebRequest.GetResponse(); } catch { } // container exits and does not send a response.
    }

    protected void ResetStdout(string resp)
    {
      List<string> stdout = GetStdout();
      stdout.Clear();
      var ret = (JArray)JsonConvert.DeserializeObject(resp);
      stdout.AddRange(ret.Select(t => t.ToString().Trim()));
    }
  }
}
注意代码中的“cruft”注释。借口 #138:这是个演示!这段大型代码中重要的部分是:
- 有一个所有会话使用的端口的概念,由
globalUsedPorts管理。 - 每个会话都知道 Docker 容器以及为每个容器分配的端口,这些端口存储在会话变量
usedPorts中。 - 因此,
GetOrCreateContainerPort会获取一个已创建容器的端口,或者从全局池中分配一个端口,创建一个端口映射的容器,并告诉 Python HTTP 服务器使用该端口。 - 可以使用
CreateContainer和DeleteContainerPort创建其他容器。 - 删除容器端口的副作用是也指示 Python HTTP 服务器退出,从而终止该容器。分配的端口将从会话池和全局池中移除。
- 在无状态环境中(好吧,使用
Session容器绝非无状态,但我们假装,不是吗?)还需要管理的另一件事是缓冲区(List<string>),其中放置了 STDOUT 数据。理想情况下,我们应该使用一个简单的后端数据存储,而不是会话变量来包含所有这些数据。想象一下 Python 脚本生成大量输出会发生什么!stdout 缓冲区以一种不明显的方式存储在会话中:字典键是端口号,每个键的值是 stdout 缓冲区。它快速且粗糙。 - 到第 149 行,我们正在做一些更有趣的事情。
WaitForDockerImage是一个重要的方法,因为它确保在上传 Python 脚本并尝试运行它之前,Python HTTP 服务器已启动并正在运行。- 这伴随着
VerifyResponse,它确保我们从 Python HTTP 服务器获得预期的响应。
- 最后,我们有一些方法可以实际与 Python HTTP 服务器通信。
UploadApp就是这样做的 -- 它上传用户在 Ace 编辑器中输入的 Python 脚本 -- 在这里我们期望“代码”已经是 base64 编码的。RunApp就是这样做的 -- 它告诉 Python HTTP 服务器运行我们上传的脚本。ExitContainer再次执行我们之前测试过的操作 -- 它指示 Python HTTP 服务器终止。
- 由于在脚本运行之前发送了各种“垃圾”(例如 Flask 输出),
ResetStdout会清除当前缓冲区,并将 Python HTTP 服务器的响应重新格式化为逐行分隔的字符串。
因此,有很多工作要做来管理端口(在会话和全局范围内),以及创建/销毁容器,并通过正确的端口与正确的 Docker 实例通信。
持久化容器端口的酷之处在于,Docker 容器会一直存在,直到实例被销毁(在 UI 上由您操作),因此一旦容器创建,运行其他脚本的响应时间就会更快。
创建一个新实例(Docker 容器)
这利用了基类中的代码。
public class CreateNewInstance : DockerManagement
{
  public CreateNewInstance(Session session)
  {
    this.session = session;
  }

  public override void Execute(string requestData)
  {
    PythonCode pcode = JsonConvert.DeserializeObject<PythonCode>(requestData);
    int instanceNumber = pcode.InstanceNumber - 1;
    var sessionPorts = GetSessionDockerInstancePorts() ?? new List<int>(new int[instanceNumber + 1]);
    int port = CreateContainer();
    UpdateSessionPort(sessionPorts, instanceNumber, port);
    SaveSessionDockerInstancePorts(sessionPorts); // Update with any new ports created in this session.
  }

  public override byte[] GetResponseData(HttpListenerContext context)
  {
    return Encoding.UTF8.GetBytes("{\"status\":\"ok\"}");
  }
}
删除一个实例(Docker 容器)
同样,这利用了基类中的代码(我可能应该将基类实现为一个辅助函数!)。
public class DeleteInstance : DockerManagement
{
  public DeleteInstance(Session session)
  {
    this.session = session;
  }

  public override void Execute(string requestData)
  {
    PythonCode pcode = JsonConvert.DeserializeObject<PythonCode>(requestData);
    int instanceNumber = pcode.InstanceNumber - 1;
    var sessionPorts = GetSessionDockerInstancePorts();
    DeleteContainerPort(ref sessionPorts, instanceNumber);
    SaveSessionDockerInstancePorts(sessionPorts); // Update with any new ports created in this session.
  }

  public override byte[] GetResponseData(HttpListenerContext context)
  {
    return Encoding.UTF8.GetBytes("{\"status\":\"ok\"}");
  }
}
一个有趣的例子
现在我们完成了实现,我们可以运行一个有趣的例子在我们的 FiddleDock 中。这段 Python 代码抓取网站 www.onthisday.com,提取“人物专访”部分,并告诉您在您输入的 URL 路径中的同一天和月份出生的人物。这是 Python 代码 -- 它非常简洁。
import requests
from lxml import html
from lxml.cssselect import CSSSelector
from lxml import etree

page = requests.get("http://www.onthisday.com/birthdays/september/11")
tree = html.fromstring(page.content)
sel = CSSSelector('.section--person-of-interest')
pois = sel(tree)

for poi in pois:
  print(poi.xpath("div/div/div[1]/p")[0].text_content())
但是简洁不应该欺骗您 -- 除了使用几个包之外,弄清楚如何做到这一点花了很长时间!结果就是本文开头截图中的那个。
结论
这显然是一个深入学习的经验。虽然目标很简单,但我惊讶地发现没有现成的实现。如前所述,我的实现不是最好的,但它演示了与 Docker 容器通信的各种技术。希望您喜欢这个!