
使用 .NET Core 2.0 构建 AWS Serverless API
5.00/5 (2投票s)
如何使用适用于 Visual Studio 的 AWS SDK,在 .NET Core C# 中创建 AWS Serverless API(API Gateway + Lambda 函数)
引言
走向 Serverless 是下一个趋势。云计算的概念已经出现,并抽象了底层基础设施的概念。但仍然存在虚拟基础设施的概念。资源变得像数据库实例、虚拟机等,具有特定的内存、计算和存储量。最重要的是,它们有特定的操作系统。我的意思是它们是可扩展和可复制的,但您必须为它们创建一个完整的资源单元(实例/虚拟机)。并且您将按月为消耗的所有实例小时付费。即使 80% 的时间,您的最少实例数量都处于空闲状态。所以,您只是为不需要的东西支付了数千美元。于是 AWS Serverless 应运而生。
AWS serverless 简单来说是其两项突破性服务——API Gateway 和 Lambda 的组合。简而言之,API Gateway 是一项服务,为您提供干净的 API 阶段以进行开发或生产环境,并允许您添加不同的 HTTP 资源(GET、POST、PUT 等)、不同的路径(将附加到 URL)并允许您指定请求和响应模板(例如请求/响应的 JSON 格式)。另一方面,Lambda 是一项允许您在跨平台环境中编写函数来执行任务的服务。它目前支持 Python、NodeJs、Java、.NET Core 等语言。今天,我们将使用 .NET Core 开发我们的 serverless API。
20,000 英尺概览
好了,闲话少说。让我告诉你这篇文章的重要性。嗯,在过去 3 年里,我是一名专业的 .NET 开发人员,在尝试使用 .NET Core 开发 serverless API 时,我遇到了很多问题,找不到一篇好的在线文章。由于这项技术相对较新(在 2016 年 AWS re:invent 上发布),我认为创建一个关于如何使用 .NET 开发 AWS Serverless API 的文章对感兴趣的人来说是个好主意。
对于本文,我假设我的读者已经熟悉
- AWS 的基本概念
- IAM、API Gateway 和 Lambda
- .NET、C# 和 Visual Studio(2015/2017)的实际操作知识
如果您想对 AWS 有基本了解,我将在下面提供链接。
- AWS 概念基础知识:A Cloud guru 提供的 AWS 免费入门课程
- AWS serverless 概念:Savjee 的这个 YouTube 播放列表
您可以参阅任何在线教程来掌握 .NET Framework、C# 和 Visual Studio。我通过阅读不同的在线教程自学了所有这些,相信我,这很有趣。虽然,我将为您介绍 AWS SDK,并且我绝对会详细介绍如何为 Visual Studio 2017 配置它(您可以使用相同的过程为 VS-2015 配置它)。
那么 Visual Studio AWS SDK 是什么?
嗯,AWS SDK 是为 Visual Studio 创建的一个工具,旨在简化您在 Visual Studio 中进行 AWS 开发的过程。它允许您将自己的 AWS 用户配置到 Visual Studio 中,并直接在 Visual Studio 环境中监控和操作不同类型的资源。它与适用于 Visual Studio 的 Azure SDK 非常相似。

它还附带不同的项目模板,用于创建不同类型的 AWS 应用程序。这在接下来的部分中将非常方便。

如何配置和连接 AWS SDK?
我假设您至少在您的系统上安装了 Visual Studio。如果没有,请先安装 Visual Studio 2015 / 2016。现在获取 AWS 的免费 1 年订阅。现在,请按照以下步骤通过安装和配置 AWS SDK 来设置您的环境。
- 从这个 链接 下载适用于 Visual Studio 的 AWS SDK。
- 现在打开您的 Visual Studio IDE。现在它应该已经配置了 AWS SDK。
- 现在登录 AWS Console。通过浏览器访问http://console.aws.amazon.com,并使用您的 AWS 根凭证登录。
- 现在转到“Security, Identity & Compliance”下的 Identity and Access Management (IAM),然后单击 **Add User**。
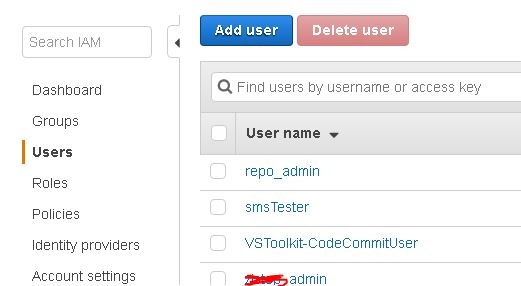
- 现在输入一个用户名,然后选中 **Programmatic access** 选项。然后单击 **Next**。

- 现在,在设置权限时,选择“Attach existing policies directly”选项,然后从下面的列表中选择“AdministratorAccess”。请记住,选择此“AdministratorAccess”可能非常危险,我建议您根据您的需求选择适当的策略,并在执行此操作之前仔细阅读策略声明。现在再次单击 next,审查所有内容,然后创建用户。
- 现在下载包含凭证的.csv 文件。

- 现在打开 Visual Studio 并打开 AWS Explorer 窗口,然后选择您偏好的区域并单击添加用户。

现在浏览您在步骤 7 中下载的.csv 文件。然后添加用户。您可以在 AWS Explorer 中看到您 AWS 账户中的所有资源。

好的,您已经准备就绪。让我们开始编码吧。耶!
动手实践
除非您亲自动手并进入 AWS Serverless 开发领域,否则前面的部分对您来说毫无价值。所以请系好安全带,因为事情会变得有点疯狂。
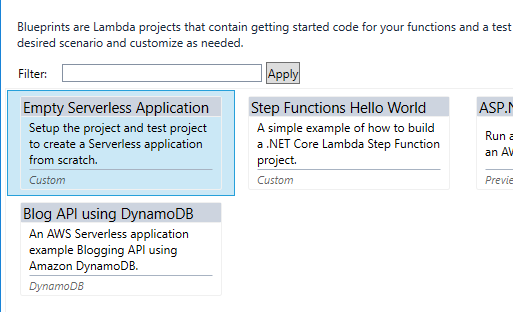
现在,您已经打开了 Visual Studio,请转到 **File** -> **New** -> **Project**。在 **Visual C#** 下的窗口中,选择 **AWS Lambda**。现在您将看到以下模板

现在从列表中选择第 3 个(即“AWS Serverless Application”)。然后选择“Empty Serverless Application”作为项目蓝图。
项目创建完成后,您将看到以下文件
- aws-lambda-tools-defaults.json
- Function.cs
- serverless.template

现在构建项目,然后单击“Publish to AWS Lambda”。您将看到以下对话框窗口

通过键入堆栈名称来创建一个新的“Stack”,同时创建一个新的“S3 bucket”(存储桶名称在 AWS 平台中是唯一的)。此外,请务必选中“Save settings for future deployment”以减少未来的麻烦。然后单击“Publish”按钮。
部署完成后,您将获得一个 URL。

现在尝试对该 URL 执行一个 get 操作。只需将其复制粘贴到浏览器中,然后按 **Enter**。您将看到以下文本

这是因为此模板已实现一个默认的 get 函数。
现在,让我们深入研究代码,好吗?
首先,我应该提醒您,AWS Serverless 开始支持 .NET Core 2.0,此演示项目也一样。
让我们检查“serverless.template”文件以获取更多详细信息。
{
  "AWSTemplateFormatVersion" : "2010-09-09",
  "Transform" : "AWS::Serverless-2016-10-31",
  "Description" : "An AWS Serverless Application.",

  "Resources" : {

    "Get" : {
      "Type" : "AWS::Serverless::Function",
      "Properties": {
        "Handler": "ServerLessTest::ServerLessTest.Functions::Get",
        "Runtime": "dotnetcore2.0",
        "CodeUri": "",
        "MemorySize": 256,
        "Timeout": 30,
        "Role": null,
        "Policies": [ "AWSLambdaBasicExecutionRole" ],
        "Events": {
          "PutResource": {
            "Type": "Api",
            "Properties": {
              "Path": "/",
              "Method": "GET"
            }
          }
        }
      }
    }
  },

  "Outputs" : {
  }
}
此文件包含不同函数的详细信息。如上所示,所有属性,如:MemorySize、APIHandler(C# 函数)、Policies、Path(路由)、HTTP 方法都在这里进行了说明。
现在,让我们看一下“Functions.cs”文件。
// Assembly attribute to enable the Lambda function's JSON input to be converted into a .NET class.
[assembly: LambdaSerializer(typeof(Amazon.Lambda.Serialization.Json.JsonSerializer))]

............
............
............


/// <summary>
/// A Lambda function to respond to HTTP Get methods from API Gateway
/// </summary>
/// <param name="request"></param>
/// <returns>The list of blogs</returns>
public APIGatewayProxyResponse Get(APIGatewayProxyRequest request, ILambdaContext context)
{
    context.Logger.LogLine("Get Request\n");

    var response = new APIGatewayProxyResponse
    {
        StatusCode = (int)HttpStatusCode.OK,
        Body = "Hello AWS Serverless",
        Headers = new Dictionary<string, string> { { "Content-Type", "text/plain" } }
    };

    return response;
}
如您所见,此类定义了“Get()”函数,该函数被设置为默认 API 的“GET”调用的处理程序,它将文本“Hello AWS Serverless”作为文本内容类型返回。
更新代码
现在,让我们更进一步。让我们修改此函数,使其能够接受和返回 JSON 对象。请与我一起执行以下步骤。
步骤 1
让我们向此项目添加两个简单的模型类,名为“TestReqModel”和“TestRespModel”。
TestRequestModel.cs
using System;
using System.Collections.Generic;
using System.Text;

namespace ServerLessTest
{
    class TestReqModel
    {
        public string Name { get; set; }

        public string Surname { get; set; }
    }
}
TestRespModel.cs
using System;
using System.Collections.Generic;
using System.Text;

namespace ServerLessTest
{
    class TestRespModel
    {
        public string Fullname { get; set; }
    }
}
现在将代码(Functions.cs)更新为以下内容
using System;
using System.Collections.Generic;
using System.Linq;
using System.Net;
using System.Threading.Tasks;
using Amazon.Lambda.Core;
using Amazon.Lambda.APIGatewayEvents;
using Newtonsoft.Json;

// Assembly attribute to enable the Lambda function's JSON input to be converted into a .NET class.
[assembly: LambdaSerializer(typeof(Amazon.Lambda.Serialization.Json.JsonSerializer))]

namespace ServerLessTest
{
    public class Functions
    {
        /// <summary>
        /// Default constructor that Lambda will invoke.
        /// </summary>
        public Functions()
        {
        }

        /// <summary>
        /// A Lambda function to respond to HTTP Get methods from API Gateway
        /// </summary>
        /// <param name="request"></param>
        /// <returns>The list of blogs</returns>
        public APIGatewayProxyResponse Post(APIGatewayProxyRequest request, ILambdaContext context)
        {
            context.Logger.LogLine("Get Request\n");
            //De-serialize the request object from the Json request body
            TestReqModel req = JsonConvert.DeserializeObject<TestReqModel>(request?.Body);
            TestRespModel res = new TestRespModel();
            if (req != null)
            {
                res.Fullname = req.Name + " " + req.Surname;
            }
            var response = new APIGatewayProxyResponse
            {
                StatusCode = (int)HttpStatusCode.OK,
                Body = JsonConvert.SerializeObject(res),
                Headers = new Dictionary<string,
                string> { { "Content-Type", "application/json" } }
            };

            return response;
        }
    }
}
请注意,为了进行序列化和反序列化,我使用了“Newtonsoft.Json”包。
并且由于我已经将 Http 方法从 GET 更改为 POST,因此请相应地更新“serverless.template”文件。
{
  "AWSTemplateFormatVersion" : "2010-09-09",
  "Transform" : "AWS::Serverless-2016-10-31",
  "Description" : "An AWS Serverless Application.",

  "Resources" : {

    "Post" : {
      "Type" : "AWS::Serverless::Function",
      "Properties": {
        "Handler": "ServerLessTest::ServerLessTest.Functions::Post",
        "Runtime": "dotnetcore2.0",
        "CodeUri": "",
        "MemorySize": 256,
        "Timeout": 30,
        "Role": null,
        "Policies": [ "AWSLambdaBasicExecutionRole" ],
        "Events": {
          "PutResource": {
            "Type": "Api",
            "Properties": {
              "Path": "/",
              "Method": "POST"
            }
          }
        }
      }
    }

  },

  "Outputs" : {
  }
}
好了,您都准备好了。只需重新构建,然后再次将**项目发布到 AWS Lambda**。现在您之前的所有发布设置都应该自动恢复(这要归功于“aws-lambda-tools-defaults.json”文件)。
现在,这个 serverless API 可以进行测试了。我使用 Postman 进行测试,但您可以使用您选择的工具。

如您所见,这个 serverless API 正在接受和返回自定义 JSON 数据。
摘要
在本文中,我们探讨了使用 Visual Studio 2017 的 AWS-Serverless 模板将 .NET Core 2.0 API 创建并部署到 AWS 的方法。请注意,如果您在 .NET Core 1.0 中创建 API,项目结构将不同。我还没有使用 DynamoDB、S3、SQS 等其他 AWS 功能。请随时查看文档以探索更多内容。我将尝试发布更多此类文章,并包含基本的 DynamoDB、S3 功能。
如果您有任何建议/问题,请告诉我。谢谢!