
ASP.NET Core 和 Angular4 使用 WEB API 入门
4.90/5 (6投票s)
在本文中,我们将介绍如何开始使用 ASP.NET Core 和 Web API。
引言
在本文中,我们将介绍如何开始使用 ASP.NET Core 和 Web API。

必备组件
请确保您已在计算机上安装了所有先决条件。如果没有,请逐一下载并安装所有软件。
- 首先,请通过此 链接 下载并安装 Visual Studio 2017。
- 下载并安装 .NET Core 1.0.1。
- 下载并安装 Node.js v4.0 或更高版本。我已安装 V6.11.2(下载 链接)。
首先下载并安装 Visual Studio 2017。

根据您的需求选择并在计算机上安装 Visual Studio 2017。如果您已安装 Visual Studio 2017,则跳过此部分。

安装完成后,您可以打开 Visual Studio 2017 来创建您的第一个 ASP.NET Core 和 Angular4 应用程序。

Using the Code
创建数据库和表
我们将使用我们的 SQL Server 数据库来构建 WEB API 和 EF。首先,我们创建一个名为 StudentsDB 的数据库和一个名为 StudentMaster 的表。以下是创建数据库表和在表中插入示例记录的 SQL 脚本。在您的本地 SQL Server 中运行以下查询,以创建将在我们的项目中使用的数据库和表。
USE MASTER
GO

-- 1) Check for the Database Exists .If the database is exist then drop and create new DB
IF EXISTS (SELECT [name] FROM sys.databases WHERE [name] = 'StudentsDB' )
DROP DATABASE StudentsDB
GO

CREATE DATABASE StudentsDB
GO

USE StudentsDB
GO

-- 1) //////////// StudentMasters

IF EXISTS ( SELECT [name] FROM sys.tables WHERE [name] = 'StudentMasters' )
DROP TABLE StudentMasters
GO

CREATE TABLE [dbo].[StudentMasters](
        [StdID] INT IDENTITY PRIMARY KEY,
        [StdName] [varchar](100) NOT NULL,
        [Email]  [varchar](100) NOT NULL,
        [Phone]  [varchar](20) NOT NULL,
        [Address]  [varchar](200) NOT NULL
)

-- insert sample data to Student Master table
INSERT INTO [StudentMasters]   ([StdName],[Email],[Phone],[Address])
     VALUES ('Shanu','syedshanumcain@gmail.com','01030550007','Madurai,India')

INSERT INTO [StudentMasters]   ([StdName],[Email],[Phone],[Address])
     VALUES ('Afraz','Afraz@afrazmail.com','01030550006','Madurai,India')

INSERT INTO [StudentMasters]   ([StdName],[Email],[Phone],[Address])
     VALUES ('Afreen','Afreen@afreenmail.com','01030550005','Madurai,India')


     select * from [StudentMasters]
现在是时候创建我们的第一个 ASP.NET Core 和 Angular4 应用程序了。
步骤 1 - 创建 ASP.NET Core 空项目
在安装完上述所有先决条件后,在桌面上单击 开始 >> 程序 >> Visual Studio 2017 >> Visual Studio 2017。单击 新建 >> 项目。选择 Web >> ASP.NET Core Angular 2 Starter。输入您的项目名称,然后单击 确定。

选择 空项目 并单击 确定。如果您已安装 ASP.NET Core 2.0,则可以选择 ASP.NET Core 2.0。

创建 ASP.NET Core Angular 2 应用程序后,请等待几秒钟。您将看到空项目已成功创建。

步骤 2 – 启用 MVC 和 StaticFiles
由于我们创建的是空项目,现在我们需要启用我们的项目以使用 WEB API,并且还需要运行 html 文件来显示 Angular 结果,因此我们需要启用 StaticFiles。为此,请右键单击您的项目并单击编辑您的 project.csproj。

我们可以看到我们的 csproj 文件将被打开进行编辑。
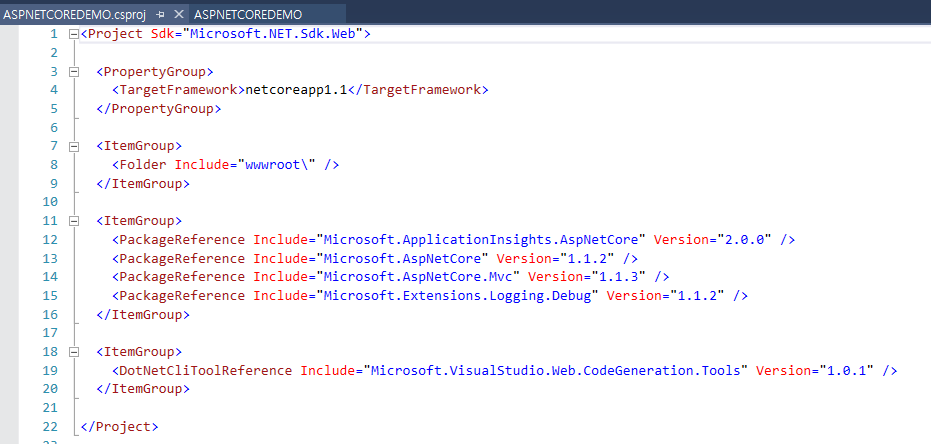
现在,为此 2 段代码添加以下代码,以启用 MVC 和 StaticFile 包到我们的项目。
<PackageReference Include="Microsoft.AspNetCore.Mvc" Version="1.1.2" />
    <PackageReference Include="Microsoft.AspNetCore.StaticFiles" Version="1.1.1" />
现在,您的代码部分看起来将如下所示

保存 csproj 文件。保存后,所有依赖项都将安装到我们的项目中,以使用 WEB API。
步骤 3 - 处理数据库连接
添加连接字符串
要添加与 SQL 连接的连接字符串,请打开“appsettings.json”文件。是的,这是一个 JSON 文件,默认情况下此文件看起来像下图。

在此 appsettings.json 文件中,添加我们的连接字符串
"ConnectionStrings": {
    "DefaultConnection": "Server=YOURDBSERVER;Database=StudentsDB;
     user id=SQLID;password=SQLPWD;Trusted_Connection=True;MultipleActiveResultSets=true;"
  },
注意:请根据您的本地连接更改 SQL 连接字符串。

下一步是创建一个名为“Data”的文件夹,以创建我们的模型和 DBContext 及 Model 类。

为 Student 创建 Model 类
我们可以通过在 Data 文件夹中添加一个新类文件来创建模型。右键单击 Data 文件夹,然后单击 添加>单击类。输入类名,例如 StudentMasters,然后单击 添加。

现在,在此类中,我们首先创建属性变量,添加 student。我们将在 WEB API 控制器中使用它。
using System;
using System.Collections.Generic;
using System.Linq;
using System.Threading.Tasks;
using System.ComponentModel.DataAnnotations;

namespace Angular2ASPCORE.Data
{
    public class StudentMasters
    {
  [Key]
  public int StdID { get; set; }

  [Required]
  [Display(Name = "Name")]
  public string StdName { get; set; }

  [Required]
  [Display(Name = "Email")]
  public string Email { get; set; }

  [Required]
  [Display(Name = "Phone")]
  public string Phone { get; set; }

  public string Address { get; set; }
 }
}
创建 Database Context
DBContext 是用于建立数据库连接的 Entity Framework 类。
我们可以通过在 Data 文件夹中添加一个新类文件来创建 DBContext 类。右键单击 Data 文件夹,然后单击 添加>单击类。输入类名,例如 ASPNETCOREContext,然后单击 添加。

在此类中,我们继承 DbContext 并为我们的 students 表创建了 Dbset。
 public class ASPNETCOREContext : DbContext
 {
  public ASPNETCOREContext(DbContextOptions<ASPNETCOREContext> options)
   : base(options)
  {
  }

  public DbSet<StudentMasters> StudentMasters { get; set; }
 }
步骤 4 - 编辑 Startup.cs 文件
打开 Startup.cs 文件
现在,在 Startup.cs 文件中,我们需要将 MVC DbContext 添加到 Service,并设置默认打开的 HTML 页面,如下所示:
public void ConfigureServices(IServiceCollection services)
        {
   services.AddMvc();

services.AddDbContext<ASPNETCOREContext>(options =>
      options.UseSqlServer(Configuration.GetConnectionString("ASPNETCOREContext")));
  }

        // This method gets called by the runtime.
        // Use this method to configure the HTTP request pipeline.
        public void Configure(IApplicationBuilder app, IHostingEnvironment env,
                              ILoggerFactory loggerFactory)
        {
   app.Use(async (context, next) => {
    await next();
    if (context.Response.StatusCode == 404 &&
     !Path.HasExtension(context.Request.Path.Value) &&
     !context.Request.Path.Value.StartsWith("/api/"))
    {
     context.Request.Path = “index.html";
     await next();
    }
   });
   app.UseMvcWithDefaultRoute();
   app.UseDefaultFiles();
   app.UseStaticFiles();
  }
步骤 5 - 创建 Web API
要创建我们的 WEB API 控制器,请右键单击项目文件夹。单击 添加,然后单击 新建项。

选择 ASP.NET Core >选择 Web API 控制器类,然后单击 添加。

众所周知,Web API 是构建浏览器和移动设备 HTTP 服务的简单易行的方法。
Web API 具有以下四种方法:Get/Post/Put 和 Delete。
- `Get` 用于请求数据(`Select`)
- `Post` 用于创建数据(`Insert`)
- `Put` 用于更新数据。
- `Delete` 用于删除数据。
在此演示中,我们仅使用 Get 方法,因此我们可以删除控制器类中的所有其他方法 PUT/POST 和 Delete。在 Get 方法中,我们返回 string 值,如下所示:
Get 方法(选择操作)
Get 方法用于从我们选择的数据库请求单个项目或项目列表。在这里,我们将从 StudentMasters 表中获取所有 student 信息。
 [Produces("application/json")]
 [Route("api/StudentMastersAPI")]
 public class StudentMastersAPIController : Controller
    {
  private readonly ASPNETCOREContext _context;

  public StudentMastersAPIController(ASPNETCOREContext context)
  {
   _context = context;
  }

  // GET: api/StudentMastersAPI
  [HttpGet]
  public IEnumerable<StudentMasters> GetStudentMasters()
  {
   return _context.StudentMasters;
  }
 }
}
要测试 Get 方法,我们可以运行我们的项目并复制 get 方法的 API 路径。在这里,我们可以看到 get 的 API 路径是 api/StudentMastersAPI。
运行程序并粘贴上述 API 路径以测试我们的输出。

步骤 6 - 处理 Angular
现在让我们开始处理 Angular 部分。
首先,我们需要将 Angular CLI 安装到我们的项目中。
Angular CLI
Angular cli 是一个命令行界面,用于使用 nodejs 风格(commonJs)模块来构建和创建 Angular 应用程序。参考链接
要将 Angular CLI 安装到我们的项目中,请打开 Visual Studio 命令提示符并切换到项目文件夹路径。
我们需要切换到我们的项目文件夹路径。如果您不确定项目路径,请单击 项目 并查看属性以检查项目路径。

复制项目文件夹路径。在这里,我们可以看到我的项目在 G: 驱动器上,所以先切换到 G: 驱动器,然后切换到我们的项目文件夹。

现在将 Angular CLI 安装到您的项目中。要安装它,请键入以下命令并运行它。
npm install @angular/cli --global

等待几秒钟,Angular CLI 将安装到您的项目中。

现在是时候在我们的项目中构建一个 Angular 应用程序了。运行以下命令并等待几秒钟,您将看到所有 Angular 文件都将添加到我们的项目中。
ng new ASPNETCOREDEMO --skip-install
请注意,您需要在上述命令的 new 关键字后面添加您的项目名称。在这里,我的项目名称是 ASPNETCOREDEMO。运行上述命令。

等待几秒钟,您将看到如下成功消息:

在我们的项目中,您会看到一个与我们的项目名称相同的新文件夹已被创建。

打开文件夹,您将看到所有 Angular 文件都已在文件夹内创建。

将所有文件移动到主项目。
将所有文件移动到主项目后,删除空文件夹。
步骤 7 - 处理 Angular 文件
处理 Angular 模块
.angular-cli.json
打开 angular-cli.json 文件并将 “outDir” 从 dist 更改为 wwwroot。

将 dist 更改为 wwwroot,以添加所有 Angular 生成的 html 和依赖项脚本文件,用于构建和更新以显示结果。

由于我们需要在 Angular 应用程序中显示 Web API 结果,因此我们需要在 app.module 文件中导入 HTTPmodule。
打开 app.module 文件

更改为以下代码:
import { BrowserModule } from @angular/platform-browser;
import { NgModule } from @angular/core';

import { AppComponent } from './app.component';
import { FormsModule } from @angular/forms;
import { HttpModule } from @angular/http;
@NgModule({
  declarations: [
    AppComponent
  ],
  imports: [
      BrowserModule,
      FormsModule,
      HttpModule
  ],
  providers: [],
  bootstrap: [AppComponent]
})
export class AppModule { }
处理 Angular 组件
现在我们需要处理我们的 Angular 组件,以便与 Web API 连接并获取 JSON 结果以绑定到我们的 HTML 文件。
打开 Angular 组件文件并添加以下代码:
import { Component, OnInit } from @angular/core;
import { Http } from @angular/http
@Component({
  selector: 'app-root',
  templateUrl: './app.component.html',
  styleUrls: ['./app.component.css']
})
export class AppComponent implements OnInit {
    constructor(private _httpService: Http) { }
    title: string = "SHANU";
    apiValues: string[] = [];
    ngOnInit() {
        this._httpService.get('/api/StudentMastersAPI/').subscribe(result => {
            this.studentdetails = result.json() as string[];
        });
    }
}
处理 HTML FILE
现在我们进入编码部分的最后阶段,设计我们的 HTML 并将 Angular 的结果绑定到您的 app.component.html 文件。
编辑 html 文件并更改为以下代码:
<h1><span style="color:#285783">Welcome to {{title}} Angular and ASP.NET Core  Demo
</span></h1>

<hr />

<table class='table' style="background-color:#FFFFFF; border:2px #6D7B8D;
padding:5px;width:99%;table-layout:fixed;" cellpadding="2"
cellspacing="2" *ngIf="studentdetails">
  <tr>
    <td width="180" align="center"><strong>STD ID</strong></td>
    <td width="180" align="center"><strong>Name</strong></td>
    <td width="180" align="center"><strong>Email</strong></td>
    <td width="180" align="center"><strong>Phone</strong></td>
    <td width="180" align="center"><strong>Address</strong></td>
  </tr>
  <tbody *ngFor="let std of studentdetails">
    <tr>
      <td align="center" style="border: solid 1px #659EC7; padding: 5px;table-layout:fixed;">
        <span style="color:#9F000F">{{std.stdID}}</span>

      </td>

      <td align="center" style="border: solid 1px #659EC7; padding: 5px;table-layout:fixed;">
        <span style="color:#9F000F">{{std.stdName}}</span>

      </td>

      <td align="center" style="border: solid 1px #659EC7; padding: 5px;table-layout:fixed;">
        <span style="color:#9F000F">{{std.email}}</span>

      </td>

      <td align="center" style="border: solid 1px #659EC7; padding: 5px;table-layout:fixed;">
        <span style="color:#9F000F">{{std.phone}}</span>

      </td>

      <td align="center" style="border: solid 1px #659EC7; padding: 5px;table-layout:fixed;">
        <span style="color:#9F000F">{{std.address}}</span>

      </td>
    </tr>
  </tbody>
</table>
步骤 8 - 构建和运行
首先,我们需要将所有 Angular 依赖项安装到我们的应用程序中。要安装,请在命令提示符中输入以下命令并运行。
npm install

等待 npm install 完成。

构建应用程序
输入以下命令来构建应用程序:
ng build
等待几秒钟直到构建完成。

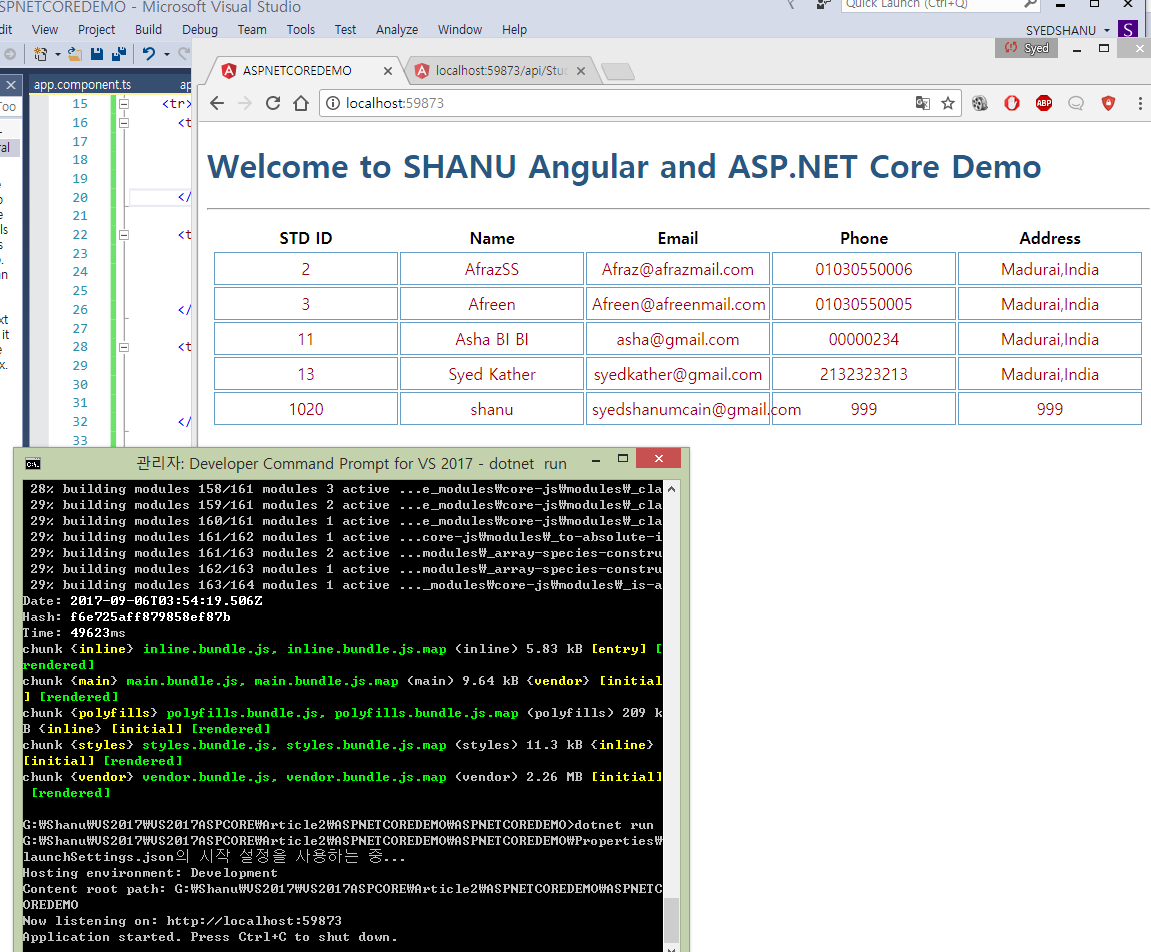
运行应用程序
输入以下命令并按 Enter 键来运行应用程序。
dotnet run
我们可以看到运行应用程序的 localhost 地址。在浏览器中输入地址以查看我们正在运行并显示结果的 Angular 应用程序。
关注点
首先,在您的 SQL Server 中创建数据库和表。您可以运行本文中的 SQL 脚本来创建 StudentsDB 数据库和 StudentMasters 表,并且不要忘记从“appsettings.json”中更改连接字符串。构建并运行应用程序以查看结果。
历史
- 2017 年 9 月 6 日:初始版本(ASPNETCOREDEMO1.zip)