
使用 F# 进行托管 DirectX
4.80/5 (4投票s)
一篇说明如何在 F# 应用程序中引用 DirectX 库的文章。
在 F# 应用程序中引用 DirectX 库
尽管 WPF 比 Windows Forms 拥有更强大的图形引擎,但商业游戏软件的开发是通过 DirectX 或在某些情况下通过 OpenGL 完成的。 Microsoft 从 .NET Framework 提供了一个到 DirectX 的高级接口:Managed DirectX。 即使这是一个高级接口,使用 Managed DirectX 的程序也包含大量的“样板”代码,这些代码是让任何东西工作所必需的。 本文将重点介绍编写 F# 代码以从 Managed DirectX 可重用库中进行绘制。 使用 Visual Studio 时,通常通过突出显示代码并按 Alt-Enter 将代码发送到 F# 交互式环境来测试 F# 代码。 包含这些 DLL 的目录是 C:\Windows\Microsoft.NET\DirectX for Managed Code\1.0.2902.0 。 因此,如果我们使用 F#,一种据称具有重要未来的函数式编程语言,我们可以通过以下方式将库加载到包含中
#I @"C:\WINDOWS\Microsoft.NET\DirectX for Managed Code\1.0.2902.0"#I @"C:\WINDOWS\Microsoft.NET\DirectX for Managed Code\1.0.2903.0"#I @"C:\WINDOWS\Microsoft.NET\DirectX for Managed Code\1.0.2904.0"#I @"C:\WINDOWS\Microsoft.NET\DirectX for Managed Code\1.0.2907.0"
这些行指定包含路径,相当于 F# 编译器的 -I 开关。 现在指定了这些路径,我们将引用适当的 DLL
#r @"Microsoft.DirectX.dll"#r @"Microsoft.DirectX.Direct3D.dll"#r @"Microsoft.DirectX.Direct3Dx.dll"
这些指定 DLL 引用,相当于 -r 命令行选项。 与任何 Visual Studio 托管代码解决方案容器一样,我们还将右键单击引用,浏览到包含这些 DLL 的文件夹,并将它们添加到引用部分。 我们将要检查的程序是用户交互式的,通过鼠标点击来执行图形显示位置的一些基本调整。 这种形状集合将用于展示运动来描绘动画,但通常不以这种方式记录。 但是如何管理源代码文件来执行包含上述引用 DLL 规范的 F# 文件呢? 我们使用 load 命令
#load @"BindAsLegacyV2Runtime.fs"#load @"dxlib.fs"
这两个文件包含在解决方案中,以便在执行 Script.fsx 文件时加载到交互式环境中。 通常,一次突出显示一行或一块来构建可执行文件是没有意义的,但这样做会导致非凡的 DirectX 风格的图形显示。
此示例包含一个脚本,该脚本首先指导用户设置一个支持 DirectX 的窗口,该窗口适合渲染 3D 函数。 然后向用户展示如何绘制和动画几个不同复杂度的函数。 最后,提供物理例程,允许用户模拟对象在绘制曲线的表面上滑动。 一些有用的实用函数在脚本文件之外的模块中提供,这些函数有助于设置窗口、执行一些矩阵计算以及处理顶点着色。
加载图像后,您将看到转换整个场景的移动。 使用您的鼠标和鼠标左键来检查这些效果。 执行此代码需要使用 Visual Studio 2008 或 2010 以及最新的 DirectX SDK。 让我们检查一下 Script.fsx 文件(回想一下,为了执行它,您需要突出显示代码,按 Alt-Enter 将其发送到交互式环境,它将编译)
#load @"BindAsLegacyV2Runtime.fs"
// adjust these as needed for your latest installed version of ManagedDirectX
#I @"C:\WINDOWS\Microsoft.NET\DirectX for Managed Code\1.0.2902.0"
#I @"C:\WINDOWS\Microsoft.NET\DirectX for Managed Code\1.0.2903.0"
#I @"C:\WINDOWS\Microsoft.NET\DirectX for Managed Code\1.0.2904.0"
#I @"C:\WINDOWS\Microsoft.NET\DirectX for Managed Code\1.0.2907.0"
#r @"Microsoft.DirectX.dll"
#r @"Microsoft.DirectX.Direct3D.dll"
#r @"Microsoft.DirectX.Direct3Dx.dll"
#load @"dxlib.fs"
open System
open System.Drawing
open System.Windows.Forms
open Microsoft.DirectX
open Microsoft.DirectX.Direct3D
open Microsoft.FSharp.Control.CommonExtensions
open Sample.DirectX
open Sample.DirectX.MathOps
open Sample.DirectX.VectorOps
let form = new SmoothForm(Visible = true, TopMost = true,
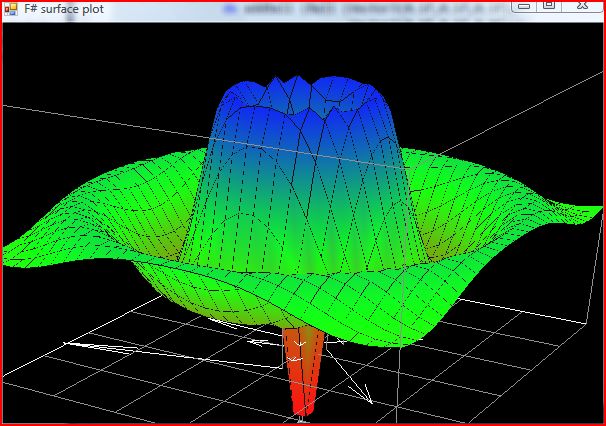
Text = "F# surface plot",
ClientSize = Size(600,400),
FormBorderStyle=FormBorderStyle.FixedSingle)
let renderer = new DirectXRenderer(form)
renderer.DrawScene.Add(fun _ -> renderer.DrawCubeAxis())
renderer.DrawScene.Add(fun _ -> renderer.SetupLights())
let mutable view =
{ YawPitchRoll = Matrix.RotationYawPitchRoll(0.0f,0.0f,0.0f);
Focus = scale 0.5f (X1 + Y1 + Z1);
Zoom = 4.0 }
renderer.DrawScene.Add(fun _ -> renderer.SetView(view))
let mouseTrack = MouseTracker(form)
mouseTrack.Add(fun (a,b) ->
let view2 =
let dx = b.X - a.X
let dy = b.Y - a.Y
match b.Button, Form.ModifierKeys with
| MouseButtons.Left, Keys.Shift -> view.AdjustZoom(dx,dy)
| MouseButtons.Left, _ -> view.AdjustYawPitchRoll(dx,dy)
| _ -> view.AdjustFocus(dx,dy)
view <- view2
)
let mutable ff = (fun (t:float32) x y -> x * (1.0f - y))
/// Z-range
let mutable range = (0.0f,1.0f)
/// XY-mesh
let mutable mesh = BaseMesh.Grid(20,20)
//mesh
// Scale w.r.t. range ...
let scalef (min,max) (z:float32) = (z-min) / (max-min)
// Get the function and scale it
let theFunction t x y = ff t x y |> scalef range
renderer.DrawScene.Add(fun t -> renderer.DrawSurface mesh (theFunction t))
//----------------------------------------------------------------------------
// PART 2 - change the function
ff <- (fun t x y -> sqr (x - 0.5f) * sqr (y - 0.5f) * 16.0f)
ff <- (fun t x y -> 0.5f * sin(x * 4.5f + t / 2.0f) * cos(y * 8.0f) * x + 0.5f)
range <- (-1.0f,1.0f)
range <- (0.0f,1.0f)
let ripple t x y =
let x,y = x - 0.5f,y - 0.5f
let r = sqrt (x*x + y*y)
exp(-5.0f * r) * sin(6.0f * pi * r + t) + 0.5f
ff <- ripple
mesh <- BaseMesh.Grid (50,50)
mesh <- BaseMesh.Grid (20,20)
let surfacePoint f x y = Vector3(x,y,f x y)
let surfaceNormal f x y =
let dx,dy = 0.01f,0.01f
let pA = surfacePoint f x y
let pA_dx = surfacePoint f (x+dx) y - pA
let pA_dy = surfacePoint f x (y+dy) - pA
normalize (cross pA_dx pA_dy)
let gravity = Vector3(0.0f,0.0f,-9.81f)
// A ball is a pair of position/velocity vectors
type ball = Ball of Vector3 * Vector3
let radiusA = 0.010f
let radiusB = 0.005f
let moveBall f timeDelta (Ball (position,velocity)) =
let nHat = surfaceNormal f position.X position.Y
let acc = planeProject nHat gravity // acceleration in plane
let velocity = planeProject nHat velocity // velocity in plane
// Compute the new position
let position = position + Vector3.Scale(velocity,timeDelta) // iterate
let velocity = velocity + Vector3.Scale(acc ,timeDelta) // iterate
// Handle the bounce!
let bounce (p,v) =
if (p < 0.0f + radiusA) then (2.0f * (0.0f + radiusA) - p,-v)
elif (p > 1.0f - radiusA) then (2.0f * (1.0f - radiusA) - p,-v)
else (p,v)
let px,vx = bounce (position.X,velocity.X) // bounce X edges
let py,vy = bounce (position.Y,velocity.Y) // bounce Y edges
let position = surfacePoint f px py // keep to surface
let velocity = Vector3 (vx,vy,velocity.Z)
let velocity = planeProject nHat velocity // velocity in plane
Ball (position,velocity)
let drawBall t (Ball (p,v)) =
let n = surfaceNormal (theFunction t) p.X p.Y
// position XY-projection
let p0 = Vector3(p.X,p.Y,0.0f)
// unit velocity XY-projection
let pV = Vector3(v.X,v.Y,0.0f)
// and it's XY-perpendicular
let pVxZ = Vector3.Cross(pV,Z1)
// vertical line
renderer.DrawLines (Array.map (Vertex.Colored Color.Gray) [| p0;p |])
// velocity arrow on floor
renderer.DrawPlaneArrow Z1 p0 pV
// normal arrow at point
renderer.DrawPlaneArrow (cross n X1) p (scale 0.8f n)
renderer.Device.Transform.World <-
(let m = Matrix.LookAtLH(p + scale radiusB n,p+n,X1)
Matrix.Invert(m))
// Now draw the mesh
using (Mesh .Torus(renderer.Device,radiusB,radiusA,20,20)) (fun mesh ->
mesh.ComputeNormals()
mesh.DrawSubset(0))
renderer.Device.Transform.World <- Matrix.Identity
let mutable active = [] : ball list
let addBall ball = active <- (ball :: active)
let drawBalls t = active |> List.iter(drawBall t)
let mutable timeDelta = 0.008f
let moveBalls t =
let active' = active |> List.map (moveBall (theFunction t) timeDelta)
active <- active'
//timeDelta <- 0.014f
renderer.DrawScene.Add(fun t -> moveBalls t)
renderer.DrawScene.Add(fun t -> drawBalls t)
let bowl t x y =
let f phi u = ((1.0f + cos(2.0f * pi * u + phi )) / 2.0f)
f t x * f 0.0f y + 1.0f
range <- (0.0f,2.0f)
ff <- (fun t -> bowl 0.0f)
// Second, add a ball
addBall (Ball (Vector3(0.1f,0.1f,0.1f),
Vector3(0.6f,0.5f,0.0f)))
// Add a ball train.
Async.Start
(async { for i in 0 .. 6 do
do addBall (Ball (Vector3(0.1f,0.1f,0.1f),
Vector3(0.6f,0.5f,0.0f)))
do! Async.Sleep(100) })
// Now move the floor!
let mutable rate = 0.25f
ff <- (fun t x y -> bowl (rate * t) x y)
rate <- 1.0f
rate <- 2.0f
ff <- ripple
range <- (0.0f,1.0f)
mesh <- BaseMesh.Grid (30,30)
#if COMPILED
[<stathread>]
do Application.Run(form)
do Application.Exit()
#endif
从数学上讲,一个表面在感兴趣区域的每个 X 和 Y 坐标上绘制一个函数。 对于每个 X 和 Y 值,一个简单的表面最多可以有一个值。 通常,您可以通过 X-Z 平面中矩形网格上方的点的 Y 坐标来定义一个简单的表面。 该表面是通过使用直线连接相邻点形成的。 因此,请确保安装了 DirectX SDK。 之后,下载源文件 zip 文件,将其解压缩并将文件提取到 Visual Studio 2010 文件夹的 Projects 目录中的新创建的文件夹中。 双击解决方案文件以让 Visual Studio 启动并加载这些文件。 请记住右键单击解决方案资源管理器中的“引用”选项卡并添加适当的 DLL。 本文中包含的引用信息来自 F# 语言的主要研究员 Don Syme 的博客和站点。
历史
- 2010 年 10 月 24 日:首次发布