
在 Angular 5 应用中生成你的第一个组件和模块
5.00/5 (2投票s)
如何在 Angular 5 应用中生成你的第一个组件和模块
目录
引言
这篇文章是 开发 Angular 5 应用 系列课程的延续。如果你还没有看过之前的文章,我强烈建议你这样做。你可以在下面找到之前文章的链接。在我们之前的文章中,我们讨论了 Angular 5 的更新、项目概述以及如何在 Angular 5 中设置你的第一个应用。在这篇文章中,我们将创建一些组件和模块,例如路由、导航、注册表单等。因此,在阅读完本文后,你将拥有一个启用导航和路由的注册应用程序。我希望你喜欢这篇文章。
开发 Angular 5 应用系列
这些是本系列的上一篇文章。请继续阅读。
背景
正如我所提到的,在这里我们将创建一个 Angular 5 应用程序,其中包含注册表单、导航、路由等。
让我们开发我们的应用
我们将分步创建我们的应用程序,以便你可以轻松跟上。不再多说,让我们开始编码。
创建你的第一个组件
正如我们在之前的文章中讨论过的,组件是一组组合的功能,在我们的例子中,我们将创建一个名为 Registration 的组件,其目的是为 Registration 服务所有代码。
你可以通过两种方式创建你的组件
- 手动创建一个名为 registration.component.ts 的文件,如果你选择这种方法,你将必须自己将此组件注册到 app.module.ts 中,并且还要创建模板。
- 使用 NPM 命令提示符中的命令,这是一种简单的方法,因为它为我们完成了所有后台工作。
我将选择第二种方法。要使用命令提示符创建组件,你必须运行以下命令
ng generate component {component name }
D:\SVenu\FullStackDevelopment\Angular\Angular5\ng5>ng g component registration
运行命令后,将发生以下过程
- 创建 src/app/registration/registration.component.html
- 创建 src/app/registration/registration.component.spec.ts
- 创建 src/app/registration/registration.component.ts
- 创建 src/app/registration/registration.component.scss
- 更新 src/app/app.module.ts (501 字节)
现在让我们回到我们的代码文件夹,看看文件。你可以在 app/registration 文件夹中看到你的新文件。这是我们的 registration.component.ts 文件如下所示
import { Component, OnInit } from '@angular/core';

@Component({
  selector: 'app-registration',
  templateUrl: './registration.component.html',
  styleUrls: ['./registration.component.scss']
})
export class RegistrationComponent implements OnInit {
  constructor() { }
  ngOnInit() {
  }
}
如果你查看代码,该命令已经生成了我们开始所需的所有代码。相同的组件将被导入并添加到我们 app.module.ts 中 @NgModule 的 declarations 中。请继续查看。
import { BrowserModule } from '@angular/platform-browser';
import { NgModule } from '@angular/core';

import { AppComponent } from './app.component';
import { RegistrationComponent } from './registration/registration.component';


@NgModule({
  declarations: [
    AppComponent,
    RegistrationComponent
  ],
  imports: [
    BrowserModule
  ],
  providers: [],
  bootstrap: [AppComponent]
})
export class AppModule { }
创建注册表单
既然我们已经创建了组件,让我们用所需的文本框和按钮来编辑我们的组件。转到你的 registration.component.html 文件并按如下方式编辑内容
<p>
  <input type="text" placeholder="First Name" />
  <input type="text" placeholder="Last Name" />
  <input type="email" placeholder="Email" />
  <input type="password" placeholder="Password" />
  <input type="password" placeholder="Confirm Passwrod" />
  <br/>
  <button>Register</button>
</p>
为我们的新组件创建路由
现在我们的注册页面已更新,但我们还没有为它创建路由,对吧?让我们现在创建它并测试我们的注册页面。
要创建路由,你需要做一些更改。
确保你的 src/index.html 文件中有一个 base 元素
<base href="/">
现在转到你的 app.module.ts 文件并在那里导入 RouterModule
import { RouterModule, Routes } from '@angular/router';
创建我们的路由数组
const myRoots: Routes = [
  { path: 'register', component: RegistrationComponent }
];
在这里,path 是路由名称,component 是该 path 指向的组件。
在 imports 中配置路由
创建路由数组后,是时候使用 RouterModule.forRoot 来配置它了。
@NgModule({
  declarations: [
    AppComponent,
    RegistrationComponent
  ],
  imports: [
    BrowserModule,
    AppRoutingModule,
    RouterModule.forRoot(myRoots)
  ],
  providers: [],
  bootstrap: [AppComponent]
})
设置我们的 router outlet
我们已经成功配置了路由,现在我们需要设置这些页面/组件要在何处显示。为此,请转到你的 app.component.html 并添加 router-outlet。因此,路由组件的内容将在 router-outlet 标签后显示。
<!--The content below is only a placeholder and can be replaced.-->
<div style="text-align:center">
  <h1>
    Welcome to {{title}}!
  </h1>

</div>
<router-outlet></router-outlet>
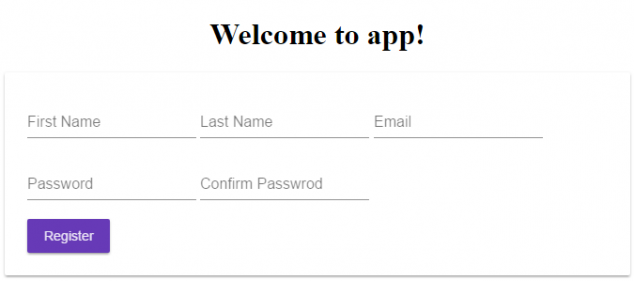
现在,如果你通过访问 https://:4200/register 路由来运行我们的应用程序,你将看到我们的注册页面,如下所示

这个注册表单是不是太基础了?让我们现在就对它进行样式化吧?
使用 Material Design 样式化注册页面
在我们开始任何事情之前,我们需要将 angular-material 安装到我们的项目中。这样我们就可以使用其中可用的样式。
npm install --save @angular/material @angular/cdk
万一你遇到如下错误
D:\SVenu\FullStackDevelopment\Angular\Angular5\ng5>npm install
--save @angular/material @angular/cdk
npm ERR! path D:\SVenu\FullStackDevelopment\Angular\Angular5\ng5\
node_modules\fsevents\node_modules\dashdash\node_modules
npm ERR! code EPERM
npm ERR! errno -4048
npm ERR! syscall scandir
npm ERR! Error: EPERM: operation not permitted, scandir
'D:\SVenu\FullStackDevelopment\Angular\Angular5\ng5\
node_modules\fsevents\node_modules\dashdash\node_modules'
npm ERR! { Error: EPERM: operation not permitted, scandir
'D:\SVenu\FullStackDevelopment\Angular\Angular5\ng5\
node_modules\fsevents\node_modules\dashdash\node_modules'
npm ERR! stack: 'Error: EPERM: operation not permitted, scandir
\'D:\\SVenu\\FullStackDevelopment\\Angular\\Angular5\\ng5\\
node_modules\\fsevents\\node_modules\\dashdash\\node_modules\'',
npm ERR! errno: -4048,
npm ERR! code: 'EPERM',
npm ERR! syscall: 'scandir',
npm ERR! path: 'D:\\SVenu\\FullStackDevelopment\\Angular\\Angular5\\ng5\\
node_modules\\fsevents\\node_modules\\dashdash\\node_modules' }
npm ERR!
npm ERR! Please try running this command again as root/Administrator.
在再次执行上述命令之前,你应该尝试运行以下命令。
cmd.exe npm
你也可能需要安装动画
npm install --save @angular/animations
安装完成后,我们需要在 app.module.ts 文件中导入一些模块,如下所示
import { MatButtonModule, MatCardModule, MatInputModule,
         MatSnackBarModule, MatToolbarModule }
from '@angular/material';
现在将这些组件添加到 @NgModule 的 imports 列表中。
@NgModule({
  declarations: [
    AppComponent,
    RegistrationComponent
  ],
  imports: [
    BrowserModule,
    AppRoutingModule,
    MatButtonModule, MatCardModule, MatInputModule, MatSnackBarModule, MatToolbarModule,
    RouterModule.forRoot(myRoots)
  ],
  providers: [],
  bootstrap: [AppComponent]
})
让我们回到我们的 registration.component.html 文件并做一些设计更改。
<mat-card>
  <mat-input-container>
    <input matInput type="text" placeholder="First Name" />
  </mat-input-container>
  <mat-input-container>
    <input matInput type="text" placeholder="Last Name" />
  </mat-input-container>
  <mat-input-container>
    <input matInput type="email" placeholder="Email" />
  </mat-input-container>
  <mat-input-container>
    <input matInput type="password" placeholder="Password" />
  </mat-input-container>
  <mat-input-container>
    <input matInput type="password" placeholder="Confirm Passwrod" />
  </mat-input-container>
  <br />
  <button mat-raised-button color="primary">Register</button>
</mat-card>
我们还需要在 Style.scss 文件中包含一个 Material CSS
@import '~@angular/material/prebuilt-themes/deeppurple-amber.css';
现在让我们运行我们的应用程序,看看我们的注册页面。
太棒了,我们做到了!
创建 Home 和 Navigation 组件
我们知道如何使用 generate 命令创建新组件,对吧?让我们为 Home 和 Navigation 创建一个新组件。
ng g component home
ng g component nav
正如我们使用命令创建组件一样,它们也会自动导入到我们的 app.module.ts 中,所以我们不用担心。
现在让我们编辑我们的 nav 组件,并为导航按钮使用 Material Design。
<mat-toolbar color="primary">
  <button mat-button routerLink="/">Home</button>
  <button mat-button routerLink="/register">Register</button>
</mat-toolbar>
在这里,routerLink 属性指定了我们需要重定向到的路由。我们还没有完成,我们需要在 app.component.html 页面中使用此组件来查看此导航。
<!--The content below is only a placeholder and can be replaced.-->
<div style="text-align:center">
  <h1>
    Welcome to {{title}}!
  </h1>
  <app-nav></app-nav>
</div>
<router-outlet></router-outlet>
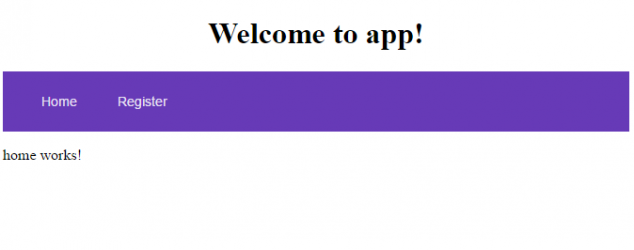
同时,为我们的 HomeComponent 添加新路由。所以转到你的 app.module.ts 并按如下方式编辑你的路由
const myRoots: Routes = [
  { path: '', component: HomeComponent },
  { path: 'register', component: RegistrationComponent }
];
现在让我们试试,我相信你会看到如下输出
今天就到这里。在我们的下一篇文章中,我们将开始进行一些验证并设置双向数据绑定,以便可以将模型值传递给服务器。
结论
非常感谢您的阅读! 我是否遗漏了您认为需要的东西?您是否觉得这篇文章有用?我希望您喜欢这篇文章。请分享您宝贵的建议和反馈。
现在轮到你了。你有什么想法?
没有评论的博客不是博客,但请尽量保持主题。如果你有一个与此文章无关的问题,最好将其发布在 C# Corner、Code Project、Stack Overflow、ASP.NET Forum 上,而不是在此处发表评论。请在下面的评论部分提出你的问题,如果我可以,我一定会尽力帮助你。