
Azure Service Fabric 演示
5.00/5 (31投票s)
Azure Service Fabric 演示 + IOC、日志记录、加密
引言
在本文中,我们将逐步介绍如何使用 Azure“Service Fabric”。在我看来,这是 Azure 平台产品中最引人入胜的功能之一。
我们还将了解如何使用依赖注入和适当日志记录等最佳实践,以及如何在部署到本质上是公共云时确保敏感数据的安全。
什么是 Azure Service Fabric
那么在我们深入了解本文的功能和实现方式之前,什么是“Service Fabric”呢?
引用官方文档(它们总是说得很清楚,无需重写已有的优秀解释)
Azure Service Fabric 概述
Azure Service Fabric 是一个分布式系统平台,可轻松打包、部署和管理可扩展、可靠的微服务和容器。Service Fabric 还解决了开发和管理云原生应用程序中的重大挑战。开发人员和管理员可以避免复杂的底层结构问题,专注于实现可扩展、可靠和可管理的关键任务、高要求工作负载。Service Fabric 代表了构建和管理在容器中运行的企业级、一级、云规模应用程序的下一代平台。
此短视频介绍了 Service Fabric 和微服务

由微服务组成的应用程序
Service Fabric 使您能够构建和管理由微服务组成的可扩展、可靠的应用程序,这些微服务以高密度运行在共享的机器池(称为集群)上。它提供了一个复杂、轻量级的运行时,用于构建在容器中运行的分布式、可扩展、无状态且美观的微服务。它还提供了全面的应用程序管理功能,用于配置、部署、监控、升级/修补和删除已部署的应用程序,包括容器化服务。
Service Fabric 目前为许多 Microsoft 服务提供支持,包括 Azure SQL 数据库、Azure Cosmos DB、Cortana、Microsoft Power BI、Microsoft Intune、Azure Event Hubs、Azure IoT Hub、Dynamics 365、Skype for Business 以及许多核心 Azure 服务。
Service Fabric 专为创建云原生服务而量身定制,这些服务可以根据需要从小规模开始,并增长到由数百或数千台机器组成的大规模。
当今的互联网规模服务由微服务构建。微服务的示例包括协议网关、用户配置文件、购物车、库存处理、队列和缓存。Service Fabric 是一个微服务平台,它为每个微服务(或容器)提供一个唯一的名称,可以是无状态的或有状态的。
Service Fabric 为由这些微服务组成的应用程序提供全面的运行时和生命周期管理功能。它将微服务托管在部署并激活到 Service Fabric 集群中的容器内。
从虚拟机到容器的转变使得密度提高了数量级。同样,从容器到这些容器中的微服务的转变使得密度又提高了数量级。例如,一个 Azure SQL 数据库的单个集群包含数百台机器,运行着数万个容器,总共托管着数十万个数据库。每个数据库都是一个 Service Fabric 有状态微服务。
有关微服务方法的更多信息,请阅读《为什么要使用微服务方法来构建应用程序?》
任意操作系统,任意云
Service Fabric 无处不在。您可以在许多环境中创建 Service Fabric 集群,包括 Azure 或本地、Windows Server 或 Linux。您甚至可以在其他公共云上创建集群。此外,SDK 中的开发环境与生产环境相同,不涉及模拟器。换句话说,在本地开发集群上运行的代码可以部署到其他环境中的集群。
摘自 https://docs.microsoft.com/zh-cn/azure/service-fabric/service-fabric-overview,截至 2017 年 11 月 27 日
我的观点
那么上面是官方微软文档的说法,但我是怎么想的呢?
嗯,是的,它确实做到了以上所有,但最初促使我了解和使用 Service Fabric 的原因(我从未后悔过这个决定)是它还提供了这些功能
- 有一个集群的概念,它由多个节点组成(您在创建时选择)。因此没有单点故障。通常集群不是偶数
- 无状态/有状态/Actor 同时运行在同一 Fabric 集群节点中(如果您使用过早期的 Azure 云服务,您就会知道这是一个巨大的胜利)
- 自修复系统,我通过配置文件指定我的意图,其中我会说我想要 3 个这个实例,5 个那个实例,Service Fabric 将负责所有配置和维护,以确保我的要求得到满足。
- 有一个漂亮的基于网络的仪表板,免费提供,显示集群/健康状况/统计数据等等
- 除了几个特殊方法,它感觉与创建 WebApi 或 Windows 服务之类的东西相同,相当熟悉。我们稍后会看到更多。
- 我可以通过 PowerShell 按需扩展服务,也可以通过我编写的一个使用
FabricClient.NET 对象与集群通信的简单 .NET 类来扩展服务
代码在哪里?
我的代码在我的 Github 仓库中: https://github.com/sachabarber/MinimalAzureServiceFabricIOCSerilog
必备组件
您需要安装以下组件才能运行本文附带的代码
- .NET 4.6.2 开发人员包
- Azure Service Fabric 2.6(或更高版本)SDK
- Visual Studio 2017
本文将向我展示什么?
本文希望让您初步了解 Azure Service Fabric 的可能性,并向您展示如何执行常见的最佳实践,例如
- 依赖注入以促进更好的测试
- 引入更好的日志系统,而不是依赖新的 Azure Service Fabric 模板提供的系统
- 整体介绍 Fabric
- 向您展示如何保护敏感信息(例如连接字符串,毕竟它是一个公共云)
让我们开始吧
Azure Service Fabric 产品的剖析
我们已经谈论了一些 Service Fabric。但是我们可以在 Service Fabric 上运行哪些类型的东西呢?
这实际上是多种多样的。例如,当我们使用 Visual Studio 创建一个新的 Service Fabric 应用程序时,我们会看到这样的内容。

点击查看大图
虽然我不会深入探讨所有这些不同类型的服务,但我会为它们中的每一个提供一句话的概要
- 无状态服务:是不需要维护任何状态的服务,因此这可能是一种按请求处理的事情,或者是一种将为每条消息创建新的处理管道之类的东西
- 有状态服务:是我们确实需要存储状态的服务。这通过 ServiceFabric 中的 ReliableDictionary 完成
- Actor 服务:用于微小的离散功能块,它们之间发送消息。想象成数千个 Actor 都做着非常小的任务,互相发送消息
- 来宾可执行文件:允许您打包几乎任何东西(exe、node 应用程序等),并让它在 fabric 上运行
- 容器:将在 fabric 上运行的容器
- ASP Core:可以是 Web API 类型应用程序或有状态 HTTP 应用程序
对于本文,我们将只研究“无状态服务”,因为这些技术也适用于上面所示的其他类型的服务。
创建新的 Service Fabric 应用程序时,您会看到类似这样的内容

这里有两件截然不同的事情
应用程序
实际应用程序包含几个非常重要的东西,即
- ApplicationManifest.xml:它精确地告诉 Fabric 要部署哪些服务,它们的类型以及每种服务的数量。这是部署整个服务集的要求。这可能是一个或多个服务
- 应用程序参数文件:运行指定服务所需的参数
- 发布配置文件:描述部署位置的发布配置文件
服务
每个独立的服务都是一个独立的项目。它有自己的配置、ServiceManifest.xml 文件。我们稍后会详细介绍。现在重要的是要理解每个服务都有自己的项目。
一个全新的服务的主要代码看起来非常相似。但我们稍后也会详细讨论这一点。
using System;
using System.Collections.Generic;
using System.Fabric;
using System.Linq;
using System.Threading;
using System.Threading.Tasks;
using Microsoft.ServiceFabric.Data.Collections;
using Microsoft.ServiceFabric.Services.Communication.Runtime;
using Microsoft.ServiceFabric.Services.Runtime;

namespace Stateful1
{
    /// <summary>
    /// An instance of this class is created for each service
    /// replica by the Service Fabric runtime.
    /// </summary>
    internal sealed class Stateful1 : StatefulService
    {
        public Stateful1(StatefulServiceContext context)
            : base(context)
        { }

        /// <summary>
        /// Optional override to create listeners (e.g., HTTP, Service Remoting, WCF, etc.)
		/// for this service replica to handle client or user requests.
        /// </summary>
        /// <remarks>
        /// For more information on service communication,
        /// see https://aka.ms/servicefabricservicecommunication
        /// </remarks>
        /// <returns>A collection of listeners.</returns>
        protected override IEnumerable<ServiceReplicaListener> CreateServiceReplicaListeners()
        {
            return new ServiceReplicaListener[0];
        }

        /// <summary>
        /// This is the main entry point for your service replica.
        /// This method executes when this replica of your service becomes primary and has write status.
        /// </summary>
        /// <param name="cancellationToken">Canceled when Service Fabric needs to
        ///	shut down this service replica.</param>
        protected override async Task RunAsync(CancellationToken cancellationToken)
        {
            // TODO: Replace the following sample code with your own logic
            //       or remove this RunAsync override if it's not needed in your service.

            ...
        }
    }
}
如上所述,您可能有一个或多个服务。但一开始您只会有一个。要添加另一个服务,请右键单击应用程序项目,然后选择添加。这在下面的屏幕截图中显示。

点击查看大图
意图
服务结构的工作方式有点像 Kubernetes 等工具,您描述您想要运行什么以及它们的数量,然后结构会处理其余部分。这是通过 ApplicationManifest.xml 文件完成的
Application
应用程序有一个非常重要的文件来处理意图 ApplicationManifest.xml。此文件可能如下所示,它将部署意图传递给结构。它包含有关要部署哪些服务、它们的版本、每种服务的数量、覆盖的参数、要使用的证书等信息。
这是一个非常重要的文件,需要理解
<?xml version="1.0" encoding="utf-8"?>
<ApplicationManifest ApplicationTypeName="Application1Type"
                     ApplicationTypeVersion="1.0.0"
                     xmlns="http://schemas.microsoft.com/2011/01/fabric"
                     xmlns:xsd="http://www.w3.org/2001/XMLSchema"
                     xmlns:xsi="http://www.w3.org/2001/XMLSchema-instance">
  <Parameters>
    <Parameter Name="Stateful1_MinReplicaSetSize" DefaultValue="3" />
    <Parameter Name="Stateful1_PartitionCount" DefaultValue="1" />
    <Parameter Name="Stateful1_TargetReplicaSetSize" DefaultValue="3" />
    <Parameter Name="Stateless1_InstanceCount" DefaultValue="-1" />
  </Parameters>
  <!-- Import the ServiceManifest from the ServicePackage. The ServiceManifestName and ServiceManifestVersion
       should match the Name and Version attributes of the ServiceManifest element defined in the
       ServiceManifest.xml file. -->
  <ServiceManifestImport>
    <ServiceManifestRef ServiceManifestName="Stateful1Pkg" ServiceManifestVersion="1.0.0" />
    <ConfigOverrides />
  </ServiceManifestImport>
  <ServiceManifestImport>
    <ServiceManifestRef ServiceManifestName="Stateless1Pkg" ServiceManifestVersion="1.0.0" />
    <ConfigOverrides />
  </ServiceManifestImport>
  <DefaultServices>
    <!-- The section below creates instances of service types, when an instance of this
         application type is created. You can also create one or more instances of service type using the
         ServiceFabric PowerShell module.

         The attribute ServiceTypeName below must match the name defined in the imported ServiceManifest.xml file. -->
    <Service Name="Stateful1">
      <StatefulService ServiceTypeName="Stateful1Type"
                       TargetReplicaSetSize="[Stateful1_TargetReplicaSetSize]"
                       MinReplicaSetSize="[Stateful1_MinReplicaSetSize]">
        <UniformInt64Partition PartitionCount="[Stateful1_PartitionCount]"
                               LowKey="-9223372036854775808" HighKey="9223372036854775807" />
      </StatefulService>
    </Service>
    <Service Name="Stateless1">
      <StatelessService ServiceTypeName="Stateless1Type"
                        InstanceCount="[Stateless1_InstanceCount]">
        <SingletonPartition />
      </StatelessService>
    </Service>
  </DefaultServices>
</ApplicationManifest>
Service
上面我们提到,从基础结构的角度来看,每个服务都有两个重要的事情,它包含关于主入口类是什么以及该服务有哪些端点的信息。
ServiceManifest.xml 可能看起来像这样,它描述了如何启动该服务
<?xml version="1.0" encoding="utf-8"?>
<ServiceManifest Name="Stateful1Pkg"
                 Version="1.0.0"
                 xmlns="http://schemas.microsoft.com/2011/01/fabric"
                 xmlns:xsd="http://www.w3.org/2001/XMLSchema"
                 xmlns:xsi="http://www.w3.org/2001/XMLSchema-instance">
  <ServiceTypes>
    <!-- This is the name of your ServiceType.
         This name must match the string used in RegisterServiceType call in Program.cs. -->
    <StatefulServiceType ServiceTypeName="Stateful1Type" HasPersistedState="true" />
  </ServiceTypes>

  <!-- Code package is your service executable. -->
  <CodePackage Name="Code" Version="1.0.0">
    <EntryPoint>
      <ExeHost>
        <Program>Stateful1.exe</Program>
      </ExeHost>
    </EntryPoint>
  </CodePackage>

  <!-- Config package is the contents of the Config directoy under PackageRoot that contains an
       independently-updateable and versioned set of custom configuration settings for your service. -->
  <ConfigPackage Name="Config" Version="1.0.0" />

  <Resources>
    <Endpoints>
      <!-- This endpoint is used by the communication listener to obtain the port on which to
           listen. Please note that if your service is partitioned, this port is shared with
           replicas of different partitions that are placed in your code. -->
      <Endpoint Name="ServiceEndpoint" />

      <!-- This endpoint is used by the replicator for replicating the state of your service.
           This endpoint is configured through a ReplicatorSettings config section in the Settings.xml
           file under the ConfigPackage. -->
      <Endpoint Name="ReplicatorEndpoint" />
    </Endpoints>
  </Resources>
</ServiceManifest>
Settings.xml 可能看起来像这样,它描述了该服务期望哪些参数
<?xml version="1.0" encoding="utf-8" ?>
<Settings xmlns:xsd="http://www.w3.org/2001/XMLSchema"
  xmlns:xsi="http://www.w3.org/2001/XMLSchema-instance"
  xmlns="http://schemas.microsoft.com/2011/01/fabric">
  <!-- This is used by the StateManager's replicator. -->
  <Section Name="ReplicatorConfig">
    <Parameter Name="ReplicatorEndpoint" Value="ReplicatorEndpoint" />
  </Section>
  <!-- This is used for securing StateManager's replication traffic. -->
  <Section Name="ReplicatorSecurityConfig" />

  <!-- Add your custom configuration sections and parameters here. -->
  <!--
  <Section Name="MyConfigSection">
    <Parameter Name="MyParameter" Value="Value1" />
  </Section>
  -->
</Settings>
稍后详细介绍
服务间通信
所以服务结构也允许你向外部世界开放端口。现在,这可能不是你完全需要做的事情,例如你的服务可以通过轮询数据库表、读取队列或通过总线发送消息来获取工作,但如果你确实需要暴露一个端口,那是在这个方法中完成的。你可以在这里阅读更多信息: https://aka.ms/servicefabricservicecommunication
protected override IEnumerable<ServiceReplicaListener> CreateServiceReplicaListeners()
为了更好地理解这个方法,你可以创建一个 ASP .Net Core service fabric 示例,它会为你填充这个方法,这样你就可以更好地理解它。对于这个演示中的代码,它并不相关。
我应该把代码放在哪里做事情?
所以你现在可能想知道我自己的代码放在哪里?这是一个简单的问题。你只需填写这个方法。你必须遵守 CancellationToken,如果你不这样做,平台将以最戏剧性的方式关闭你的服务。遵守 CancellationToken 是你优雅关闭的唯一机会。
protected override async Task RunAsync(CancellationToken cancellationToken)
正确配置的重要性
要运行 Service Fabric,您必须确保它以 x64 作为平台运行。本文附带的代码示例如下所示

点击查看大图
部署/发布配置文件
Service Fabric 建立在之前 Azure 成功的基础上,发布配置文件就是其中一项成功。这是一个简单的概念,我们将配置文件与部署相匹配,该部署通过一些专用配置指定了该部署所需的要求。
这是一个发布配置文件的示例
<?xml version="1.0" encoding="utf-8"?>
<PublishProfile xmlns="http://schemas.microsoft.com/2015/05/fabrictools">
  <ClusterConnectionParameters ConnectionEndpoint="XXXXXXXX.westus.cloudapp.azure.com:19000" />
  <ApplicationParameterFile Path="..\ApplicationParameters\Cloud.xml" />
  <CopyPackageParameters CompressPackage="true" />
</PublishProfile>
这里只是指向相关的集群终结点,并指定了另一个用于参数的文件
这是额外的参数文件
<?xml version="1.0" encoding="utf-8"?>
<Application xmlns:xsd="http://www.w3.org/2001/XMLSchema"
             xmlns:xsi="http://www.w3.org/2001/XMLSchema-instance"
             Name="fabric:/SimpleStatelessServiceFabricDemo"
             xmlns="http://schemas.microsoft.com/2011/01/fabric">
  <Parameters>
    <Parameter Name="Stateless1_InstanceCount" Value="-1" />
    <Parameter Name="simpleStatelessServiceFabricDemo:EnvironmentName"
               Value="Cloud" />
    <Parameter Name="simpleStatelessServiceFabricDemo:serilog:write-to:Seq.restrictedToMinimumLevel"
               Value="Information" />
    <Parameter Name="simpleStatelessServiceFabricDemo:serilog:write-to:Seq.serverUrl"
               Value="https://:5341" />
    <Parameter Name="simpleStatelessServiceFabricDemo:UseServiceFabricEnhancements"
               Value="true" />
    <Parameter Name="simpleStatelessServiceFabricDemo:SomeSafeKey"
               Value="fdfdfdd" />
    <Parameter Name="simpleStatelessServiceFabricDemo:CertThumbPrint"
               Value="ad0665f13101c6258cbfae6e091c3f3155fe50d0" />
  </Parameters>
</Application>
因此,我们通常会为要发布到的每个环境准备 1 个发布配置文件和 1 个参数文件。Visual Studio 附带的用于构建 Azure Service Fabric 应用程序的标准模板将允许您在发布时指定要发布的发布配置文件。
注意
您必须先执行“打包”步骤,然后才能“发布”,这将创建正确的发布结构。这可以通过右键单击主项目(包含“ApplicationManifest.xml”的项目)来完成

如果在本地运行,则无需发布。但是,如果您希望发布到实际集群,则可以通过 Visual Studio 进行。在这种情况下,步骤如下:
- 打包代码
- 发布,此时系统将提示您选择要使用的发布配置文件
集群管理器
正如我在本文介绍部分所述,Azure Service Fabric 附带一个相当不错的集群管理器(不得不说它似乎从 DataStax Cassandra 集群管理器借鉴了很多灵感)。如果您在本地从 Visual Studio 运行集群,则可以通过门户或系统托盘图标访问此集群管理器。
通过集群管理器可以执行以下操作:
- 删除应用程序
- 取消预配类型
- 启动节点
- 停止节点(用于测试故障代码很有用)
- 查看部署了哪些工件
- 检查特定部署所使用的配置
正如我所说,如果是在本地运行,您可以通过系统托盘图标访问它,否则只需从 Azure 门户获取 URL

右键单击该图标,然后选择“管理本地集群”以查看 Fabric 浏览器。该浏览器可在以下形式的 URL 访问(从您自己的设置或 Azure 门户获取正确的 URL):
http://[您的主机在此处]:19080/Explorer/Index.htm

点击查看大图
演示代码
那么演示代码到底做了什么?
好的,既然我们已经介绍了 Fabric 的基本概念,并查看了新项目可能是什么样子以及我们有哪些方法,现在是时候将注意力转向本文的主要部分了,即演示如何完成所有这些常规操作,例如
- 不向外界暴露端口的无状态服务。如果您需要,则需要阅读上面“服务间通信”主题中建议的资料
- 正确的 IOC / 依赖注入
- 日志记录
- 保护连接字符串中的敏感密码
本文的其余部分将涵盖这些方面
引入 IOC
不管喜欢与否,IOC/DI 在提供良好的关注点分离方面确实发挥了作用,并允许更多的可测试、可插拔代码。为此,将 IOC/DI 应用到您自己的服务结构服务中是一个好主意。
但是怎么做呢,我该用哪个容器呢,有这么多。
没错,容器有很多,我找了一些对 Service Fabric 支持良好的容器,然后从中选出了我用得最多的那个,对我来说是 Autofac (https://autofac.org/)
Service Fabric 支持不是 Autofac 主代码库的一部分,但可以在这里找到: https://github.com/autofac/Autofac.ServiceFabric,使用说明在这里: https://alexmg.com/posts/introducing-the-autofac-integration-for-service-fabric
您可能可以将此处找到的代码: https://github.com/autofac/Autofac.ServiceFabric 应用到您喜欢的容器,但对我来说,我很高兴只使用 Autofac,所以让我们看看如何使用它。
所以它首先包含这两个 Nuget 包(这些将引入您需要的其他传递依赖项)
<package id="Autofac" version="4.6.2" targetFramework="net461" />
<package id="Autofac.ServiceFabric" version="1.0.0" targetFramework="net462" />
完成之后,您需要构建 Autofac 容器,并注册您想要的类型,同时使用 RegisterServiceFabricSupport() 扩展方法
这是一个注册无状态服务以及此演示代码中无状态服务所依赖的其他一些类的示例
using System;
using System.Collections.Generic;
using System.Linq;
using System.Text;
using System.Threading.Tasks;
using Autofac;
using Autofac.Integration.ServiceFabric;
using Serilog;
using Stateless1.Serilog.ServiceFabric;

namespace Stateless1
{
    public class ContainerOperations
    {
        private static readonly Lazy<IContainer> _containerSingleton =
        	new Lazy<IContainer>(CreateContainer);

        public static bool UseAzureWireup { get; set; }


        public static IContainer Container => _containerSingleton.Value;

        private static IContainer CreateContainer()
        {
            var builder = new ContainerBuilder();
            builder.RegisterModule(new GlobalAutofacModule());
            if (UseAzureWireup)
            {
                builder.RegisterServiceFabricSupport();
                // This needs to match the name of gthe type in
                //PackageRoot\ServiceManifest.xml AND ApplicationPackageRoot\ApplicationManifest
                builder.RegisterStatelessService<Stateless1>("Stateless1Type");
            }
            return builder.Build();

        }
    }


    public class GlobalAutofacModule : Module
    {
        protected override void Load(ContainerBuilder builder)
        {
            builder.Register<ILogger>(container => Program.LoggerSingleton.Value);

            builder.RegisterType<ServiceLoggerFactory>()
                .SingleInstance();

            builder.RegisterType<ServiceConfiguration>()
                .AsSelf()
                .SingleInstance();

            builder.Register(c => Log.Logger)
                .As<ILogger>()
                .SingleInstance();
        }
    }
}
注意:在使用 Autofac 注册服务时,使用 ApplicationPackageRoot\ApplicationManifest 中的服务名称非常重要,这允许 Autofac 构建的动态代理找到要创建的服务的正确类型/版本
这是此演示服务中需要满足依赖项的相关代码
using System;
using System.Collections.Generic;
using System.Fabric;
using System.Linq;
using System.Threading;
using System.Threading.Tasks;
using Microsoft.ServiceFabric.Services.Communication.Runtime;
using Microsoft.ServiceFabric.Services.Runtime;
using Serilog;
using Stateless1.Extensions;
using Stateless1.Serilog.ServiceFabric;

namespace Stateless1
{
    public class Stateless1 : StatelessService, IDisposable
    {
        private readonly ServiceConfiguration _configuration;
        private ILogger _log;

        public Stateless1(
            StatelessServiceContext context,
            ServiceLoggerFactory serviceLoggerFactory,
            ServiceConfiguration configuration
        ) : base(context)
        {
			.....
			.....
			.....
			.....
        }
    }
}
此 Autofac 示例用法的最后一步是 Program(主入口点)类的代码,如下所示
using System;
using System.Diagnostics;
using System.Fabric;
using System.Threading;
using System.Threading.Tasks;
using Autofac;
using Microsoft.ServiceFabric.Services.Runtime;
using Serilog;
using Serilog.Events;
using Stateless1.Extensions;

namespace Stateless1
{
    internal static class Program
    {

        private static ILogger _log = null;
        internal static readonly Lazy<ILogger> LoggerSingleton =
        	new Lazy<ILogger>(ConfigureLogging);

        /// <summary>
        /// This is the entry point of the service host process.
        /// </summary>
        private static void Main()
        {
            _log = LoggerSingleton.Value;

            try
            {
                ContainerOperations.UseAzureWireup = true;

                using (var _container = ContainerOperations.Container)
                {
                    LogAutofacRegistrations(_container);

                    _log.Information("Starting {AppName} v{AppVersion} application", AppName, AppVersion);


                    // The ServiceManifest.XML file defines one or more service type names.
                    // Registering a service maps a service type name to a .NET type.
                    // When Service Fabric creates an instance of this service type,
                    // an instance of the class is created in this host process.

                    // Prevents this host process from terminating so services keep running.
                    Thread.Sleep(Timeout.Infinite);
                }
            }
            catch (Exception ex)
            {
                ServiceEventSource.Current.ServiceHostInitializationFailed(ex.ToString());
                _log.Fatal(ex, $"Error starting {typeof(Stateless1).Name} Service");
                throw;
            }
        }


        private static void LogAutofacRegistrations(IContainer container)
        {
            foreach (var registration in container.ComponentRegistry.Registrations)
            {
                foreach (var service in registration.Services)
                {
                    _log.Debug("Autofac: {dependency} resolves to {implementation}, {lifetime}, {sharing}, {ownership}",
                        service, registration.Activator.LimitType, registration.Lifetime,
                        registration.Sharing, registration.Ownership);
                }
            }
        }
    }
}
可以看出(或者更确切地说,看不出),上面的代码从不直接创建新的服务。这与在 Visual Studio 中创建新的 Service Fabric 应用程序时获得的“开箱即用”模板代码形成鲜明对比。那么,我们所需的服务是如何启动的呢?
嗯,就像我上面说的,您在 Autofac 模块中注册所需服务的行使用了来自 Application/ApplicationManifest.xml 的特殊字符串值。因此 Autofac 负责启动这些实例,这使部署保持正常。
这就是 Autofac 的 IOC 方面的一切。就像我说的,如果你有其他喜欢的 IOC 容器,你可能需要看看它是否支持 Service Fabric,如果不支持,你可能需要在这里深入研究一下: https://github.com/autofac/Autofac.ServiceFabric,看看你是否可以对你选择的容器应用相同的技术
更好的日志记录:Serilog/Seq
啊,日志记录,现在你能说什么,你需要能够记录东西对吧。开箱即用的 Service Fabric 模板带有一个诊断写入器(我已将其保留在本文的演示代码中,以便您可以看到),名为“ServiceEventSource”,它会在 Windows 事件日志中显示日志消息。这足够了,但对我来说有点粗糙。
有很多日志记录选择,但我确实喜欢 Serilog/Seq 组合。我喜欢 Serilog,因为它有很多接收器,并且喜欢 enricher 的概念,它是一个完全结构化的文本记录器,非常棒。我喜欢 Seq,因为它为我提供了一个漂亮的、可搜索的 Web 前端,只需一行额外的代码即可。
以下是 Seq 的实际操作示例

点击查看大图
那么,我们需要设置什么?
好的,您需要从这些 Nuget 包开始
<package id="Serilog" version="2.6.0-dev-00925" targetFramework="net462" />
<package id="Serilog.Enrichers.Environment" version="2.1.3-dev-00736" targetFramework="net462" />
<package id="Serilog.Enrichers.Process" version="2.0.1" targetFramework="net462" />
<package id="Serilog.Formatting.Compact" version="1.0.1-dev-00922" targetFramework="net462" />
<package id="Serilog.Settings.AppSettings" version="2.1.2" targetFramework="net462" />
<package id="Serilog.Sinks.ColoredConsole" version="3.0.1" targetFramework="net462" />
<package id="Serilog.Sinks.Console" version="3.0.1" targetFramework="net462" />
<package id="Serilog.Sinks.File" version="4.0.0" targetFramework="net462" />
<package id="Serilog.Sinks.PeriodicBatching" version="2.1.1" targetFramework="net462" />
<package id="Serilog.Sinks.RollingFile" version="3.3.1-dev-00771" targetFramework="net462" />
<package id="Serilog.Sinks.Seq" version="4.0.0-dev-00150" targetFramework="net462" />
既然我们正在使用一个节点集群(回想一下 Service Fabric 是一个虚拟机集群),那么如果能将事情发生的节点包含在我们的日志消息中,是不是很好呢?我认为是。我们如何做到这一点
增强器
Seq 允许您通过称为“Enrichers”的东西提供运行时日志记录属性(参见 https://github.com/serilog/serilog/wiki/Enrichment)。我们可以使用这些来添加我们想要的额外日志值,让我们看看如何操作
它从这个简单的辅助类开始
using System;
using System.Collections.Generic;
using System.Fabric;
using System.Linq;
using System.Runtime.Remoting.Contexts;
using System.Text;
using System.Threading.Tasks;
using Serilog.Core;
using Serilog.Events;

namespace Stateless1.Serilog.ServiceFabric
{
    public class ServiceEnricher<T> : ServiceFabricEnricher<T> where T : ServiceContext
    {
        private LogEventProperty _serviceName;
        private LogEventProperty _partitionId;
        private LogEventProperty _applicationName;

        public ServiceEnricher(T context) : base(context)
        {
        }

        public override void Enrich(LogEvent logEvent, ILogEventPropertyFactory propertyFactory)
        {
            base.Enrich(logEvent, propertyFactory);

            if (_serviceName == null) _serviceName =
                    propertyFactory.CreateProperty("ServiceName", Context.ServiceName);

            if (_partitionId == null) _partitionId =
                    propertyFactory.CreateProperty("PartitionId", Context.PartitionId);

            if (_applicationName == null) _applicationName =
                    propertyFactory.CreateProperty("ApplicationName",
                        Context.CodePackageActivationContext.ApplicationName);

            logEvent.AddPropertyIfAbsent(_serviceName);
            logEvent.AddPropertyIfAbsent(_partitionId);
            logEvent.AddPropertyIfAbsent(_applicationName);
        }
    }
}
我们使用服务结构 ServiceContext 对象为我们提供额外的服务值以进行日志记录。
好的,接下来是另一个辅助类,但这次它为我们提供了要记录的“节点”信息。
using System;
using System.Collections.Generic;
using System.Fabric;
using System.Linq;
using System.Text;
using System.Threading.Tasks;
using Serilog.Core;
using Serilog.Events;

namespace Stateless1.Serilog.ServiceFabric
{
    public class ServiceFabricEnricher<T> : ILogEventEnricher where T : ServiceContext
    {
        protected T Context { get; }
        private LogEventProperty _nodeName;

        public ServiceFabricEnricher(T context)
        {
            Context = context;
        }

        public virtual void Enrich(LogEvent logEvent, ILogEventPropertyFactory propertyFactory)
        {
            if (_nodeName == null)
            {
                _nodeName = propertyFactory.CreateProperty("NodeName",
                    Context.NodeContext.NodeName);
            }
            logEvent.AddPropertyIfAbsent(_nodeName);
        }
    }
}
然后我们需要一个自定义的日志记录器工厂
using System;
using System.Collections.Generic;
using System.Fabric;
using System.Linq;
using System.Text;
using System.Threading;
using System.Threading.Tasks;
using Microsoft.ServiceFabric.Services.Runtime;
using Serilog;

namespace Stateless1.Serilog.ServiceFabric
{
    public class ServiceLoggerFactory
    {
        private ILogger _logger;
        private int _hasBeenEnriched;

        public ServiceLoggerFactory(ILogger logger)
        {
            _logger = logger;
        }

        public ILogger EnrichLoggerForStatelessServiceContext(StatelessService service)
        {
            if (Interlocked.Exchange(ref _hasBeenEnriched, 1) == 0)
            {
                _logger = _logger?.ForContext(new[]
                    {
                        new ServiceEnricher<StatelessServiceContext<(service.Context)
                    }
                );
            }
            return _logger;
        }

        public ILogger GetEnrichedLogger()
        {
            return _logger;
        }
    }
}
然后我们需要将其应用于实际服务,使它们使用增强器。我们**必须**只在服务本身中应用增强器,因为它们**是**拥有服务/节点信息的东西,因为服务**是**在 Service Fabric 集群上运行的东西。在其他任何地方应用增强器都将无效。这项工作可以在服务构造函数代码中完成
using System;
using System.Collections.Generic;
using System.Fabric;
using System.Linq;
using System.Threading;
using System.Threading.Tasks;
using Microsoft.ServiceFabric.Services.Communication.Runtime;
using Microsoft.ServiceFabric.Services.Runtime;
using Serilog;
using Stateless1.Extensions;
using Stateless1.Serilog.ServiceFabric;

namespace Stateless1
{
    public class Stateless1 : StatelessService, IDisposable
    {
        private readonly ServiceConfiguration _configuration;
        private ILogger _log;

        public Stateless1(
            StatelessServiceContext context,
            ServiceLoggerFactory serviceLoggerFactory,
            ServiceConfiguration configuration
        ) : base(context)
        {
            if (configuration == null)
            {
                throw new ArgumentNullException(nameof(configuration));
            }


            _configuration = configuration;

			//ENRICH
            _log = serviceLoggerFactory.EnrichLoggerForStatelessServiceContext(this);

            _log.Information("Stateless1 constructed ok");
        }
    }
}
最后要做的是配置日志记录。这是 Serilog 的标准操作。这可以在 Program(主入口点)代码中完成。
using System;
using System.Diagnostics;
using System.Fabric;
using System.Threading;
using System.Threading.Tasks;
using Autofac;
using Microsoft.ServiceFabric.Services.Runtime;
using Serilog;
using Serilog.Events;
using Stateless1.Extensions;

namespace Stateless1
{
    internal static class Program
    {

        private static ILogger _log = null;
        internal static readonly Lazy<ILogger> LoggerSingleton = new Lazy<ILogger>(ConfigureLogging);

        /// <summary>
        /// This is the entry point of the service host process.
        /// </summary>
        private static void Main()
        {

            _log = LoggerSingleton.Value;

            .....
			.....
			.....
			.....
        }


        private static ILogger ConfigureLogging()
        {
            AppDomain.CurrentDomain.ProcessExit += (sender, args) => Log.CloseAndFlush();

            var configPackage = FabricRuntime.GetActivationContext().GetConfigurationPackageObject("Config");
            var environmentName = GetSetting(configPackage, "appSettings",
				"simpleStatelessServiceFabricDemo:EnvironmentName");
            var seqRestrictedToMinimumLevel = GetSetting(configPackage,
				"appSettings", "simpleStatelessServiceFabricDemo:serilog:write-to:Seq.restrictedToMinimumLevel");
            var seqServerUrl = GetSetting(configPackage,
				"appSettings", "simpleStatelessServiceFabricDemo:serilog:write-to:Seq.serverUrl");
            var seqLogEventLevel = LogEventLevel.Verbose;
            Enum.TryParse(seqRestrictedToMinimumLevel, true, out seqLogEventLevel);

            var loggerConfiguration = new LoggerConfiguration()
                .WriteTo.Seq(seqServerUrl, restrictedToMinimumLevel: seqLogEventLevel)
                .Enrich.WithProperty("AppName", Program.AppName)
                .Enrich.WithProperty("AppVersion", Program.AppVersion)
                .Enrich.WithProperty("EnvName", environmentName);


            if (Environment.UserInteractive)
            {
                loggerConfiguration.WriteTo.ColoredConsole();
            }

            return Log.Logger = loggerConfiguration.CreateLogger();
        }


        private static string GetSetting(ConfigurationPackage configurationPackage, string section, string parameterName)
        {
            var param = configurationPackage.Settings.Sections[section].Parameters[parameterName];
            return param.IsEncrypted ? param.DecryptValue().ConvertToUnsecureString() : param.Value;
        }

        public static readonly string AppName = typeof(Program).Assembly.GetName().Name;
        public static readonly string AppVersion = typeof(Program).Assembly.GetInformationalVersion();
    }
}
现在里面有一些很酷的代码,用于从 Service Fabric 配置文件的许多层中获取值。我们将在下面深入探讨这个问题。
现在只需了解,您可能希望在开发环境中设置为“Verbose”,在生产环境中设置为“Error”,正如本文开头所说的,这将由不同的“发布配置文件”/“参数文件”处理。我们接下来会看看这个,但是为了从这些文件中获取内容,我们需要使用 Service Fabric 配置系统,这就是为什么上面的代码看起来有点怪异。它本质上是从正确的配置位置拉取值以匹配指定的环境,但正如我所说,稍后会详细介绍。
了解新的配置系统
上面我们已经看到了其中的几个部分,我们已经看到 Azure Service Fabric 中的每个服务都可以有自己的 settings.xml 文件,并且这些服务归一个总体应用程序所有,该应用程序有自己的 ApplicationManifest.xml 文件。那么服务的参数是如何工作的呢,我们能否向它们提供参数呢?嗯,是的,我们可以。
希望下图能说明工作流程

让我们从上到下看这些,如上所述,它始于您选择发布配置文件,我们上面看过了,但这里还是一个,以提醒您
<?xml version="1.0" encoding="utf-8"?>
<PublishProfile xmlns="http://schemas.microsoft.com/2015/05/fabrictools">
  <ClusterConnectionParameters ConnectionEndpoint=""XXXXX.canadacentral.cloudapp.azure.com:19000 />
  <ApplicationParameterFile Path="..\ApplicationParameters\Cloud.xml" />
  <CopyPackageParameters CompressPackage="true" />
</PublishProfile>
这指定要使用的参数文件。在本例中为 ApplicationParameters\Cloud.xml,它看起来像这样
<?xml version="1.0" encoding="utf-8"?>
<Application xmlns:xsd="http://www.w3.org/2001/XMLSchema"
	xmlns:xsi="http://www.w3.org/2001/XMLSchema-instance"
	Name="fabric:/SimpleStatelessServiceFabricDemo"
	xmlns="http://schemas.microsoft.com/2011/01/fabric">
  <Parameters>
    <Parameter Name="Stateless1_InstanceCount" Value="-1" />
    <Parameter Name="simpleStatelessServiceFabricDemo:EnvironmentName"
               Value="Cloud" />
    <Parameter Name="simpleStatelessServiceFabricDemo:serilog:write-to:Seq.restrictedToMinimumLevel"
               Value="Information" />
    <Parameter Name="simpleStatelessServiceFabricDemo:serilog:write-to:Seq.serverUrl"
               Value="https://:5341" />
    <Parameter Name="simpleStatelessServiceFabricDemo:UseServiceFabricEnhancements"
               Value="true" />
    <Parameter Name="simpleStatelessServiceFabricDemo:SomeSafeKey"
               Value="fdfdfdd" />
    <Parameter Name="simpleStatelessServiceFabricDemo:CertThumbPrint"
               Value="ad0665f13101c6258cbfae6e091c3f3155fe50d0" />
  </Parameters>
</Application>
看看它是如何简单地提供参数的。这些参数将随后馈送到主 ApplicationManifest.xml。现在让我们看看
<?xml version="1.0" encoding="utf-8"?>
<ApplicationManifest xmlns:xsd="http://www.w3.org/2001/XMLSchema"
	xmlns:xsi="http://www.w3.org/2001/XMLSchema-instance"
	ApplicationTypeName="SimpleStatelessServiceFabricDemoType" A
	pplicationTypeVersion="1.0.0"
	xmlns="http://schemas.microsoft.com/2011/01/fabric">

  <Parameters>
    <Parameter Name="Stateless1_InstanceCount"
		DefaultValue="-1" />
    <Parameter Name="simpleStatelessServiceFabricDemo:EnvironmentName"
		DefaultValue="dev90" />
    <Parameter Name="simpleStatelessServiceFabricDemo:serilog:write-to:Seq.restrictedToMinimumLevel"
		DefaultValue="" />
    <Parameter Name="simpleStatelessServiceFabricDemo:serilog:write-to:Seq.serverUrl"
		DefaultValue="" />
    <Parameter Name="simpleStatelessServiceFabricDemo:UseServiceFabricEnhancements"
		DefaultValue="false" />
    <Parameter Name="simpleStatelessServiceFabricDemo:SomeSafeKey"
		DefaultValue="" />
    <Parameter Name="simpleStatelessServiceFabricDemo:CertThumbPrint"
		DefaultValue="" />
  </Parameters>

  <!-- Import the ServiceManifest from the ServicePackage. The ServiceManifestName and ServiceManifestVersion
       should match the Name and Version attributes of the ServiceManifest element defined in the
       ServiceManifest.xml file. -->
  <ServiceManifestImport>
    <ServiceManifestRef ServiceManifestName="Stateless1Pkg" ServiceManifestVersion="1.0.0" />
    <ConfigOverrides>
      <ConfigOverride Name="Config">
        <Settings>
          <Section Name="appSettings">
            <Parameter Name="simpleStatelessServiceFabricDemo:EnvironmentName"
				Value="[simpleStatelessServiceFabricDemo:EnvironmentName]" />
            <Parameter Name="simpleStatelessServiceFabricDemo:serilog:write-to:Seq.restrictedToMinimumLevel"
				Value="[simpleStatelessServiceFabricDemo:serilog:write-to:Seq.restrictedToMinimumLevel]" />
            <Parameter Name="simpleStatelessServiceFabricDemo:serilog:write-to:Seq.serverUrl"
				Value="[simpleStatelessServiceFabricDemo:serilog:write-to:Seq.serverUrl]" />
            <Parameter Name="simpleStatelessServiceFabricDemo:UseServiceFabricEnhancements"
				Value="[simpleStatelessServiceFabricDemo:UseServiceFabricEnhancements]" />
          </Section>
          <Section Name="encryptedSettings">
            <Parameter Name="simpleStatelessServiceFabricDemo:SomeSafeKey"
                       Value="[simpleStatelessServiceFabricDemo:SomeSafeKey]"
                       IsEncrypted="true" />
          </Section>
        </Settings>
      </ConfigOverride>
    </ConfigOverrides>
  </ServiceManifestImport>
  ....
  ....
  ....
  ....

</ApplicationManifest>
这里有几点需要注意
- 我们这里有一个参数部分
- 我们通过使用这行代码
ServiceManifestName="Stateless1Pkg" ServiceManifestVersion="1.0.0"从实际的服务文件中导入内容 - 我们覆盖了较低级别服务的参数。如果此应用程序中有多个服务,我们预计会看到多个这样的导入/覆盖部分(如果每个服务都需要参数的话)
- 参数实际上用作覆盖的替换。其语法简单地是方括号中的参数名称,例如
[simpleStatelessServiceFabricDemo:SomeSafeKey]
好的,既然我们已经了解了参数如何传入并在顶层被覆盖,我们差不多完成了,只需要检查最底层(实际服务)最初是如何声明参数的。这是通过每个服务中的 Settings.xml 文件完成的。这是演示应用程序的文件
<?xml version="1.0" encoding="utf-8" ?>
<Settings xmlns:xsd="http://www.w3.org/2001/XMLSchema"
          xmlns:xsi="http://www.w3.org/2001/XMLSchema-instance"
          xmlns="http://schemas.microsoft.com/2011/01/fabric">
  <!-- Add your custom configuration sections and parameters here -->
  <Section Name="appSettings">
    <Parameter Name="simpleStatelessServiceFabricDemo:EnvironmentName"
               Value="" MustOverride="true"
               IsEncrypted="false"/>
    <Parameter Name="simpleStatelessServiceFabricDemo:serilog:write-to:Seq.restrictedToMinimumLevel"
               Value="" MustOverride="true"
               IsEncrypted="false"/>
    <Parameter Name="simpleStatelessServiceFabricDemo:serilog:write-to:Seq.serverUrl"
               Value=""
               MustOverride="true"
               IsEncrypted="false"/>
    <Parameter Name="simpleStatelessServiceFabricDemo:UseServiceFabricEnhancements"
               Value=""
               MustOverride="true"
               IsEncrypted="false"/>
  </Section>
  <Section Name="encryptedSettings">
    <Parameter Name="simpleStatelessServiceFabricDemo:SomeSafeKey"
               Value=""
               MustOverride="false"
               IsEncrypted="true"/>
  </Section>
</Settings>
这就是新配置系统如何协同工作。
让我们确保这些细节的安全
好的,我们已经看到我们可以有加密/非加密参数。加密连接字符串可能是一个好主意(在我看来)。本文是必读的,因为这是我们接下来要做的事情
https://docs.microsoft.com/zh-cn/azure/service-fabric/service-fabric-application-secret-management
基本思路是,我们使用加密证书来加密我们的敏感数据,并让 Service Fabric 知道我们使用的证书。这意味着告诉它要尝试查找哪个证书,并告诉它哪些参数已加密。证书通常在 Azure KeyVault 中创建,然后必须安装在集群中的所有节点上(如果要在参数使用 `IsEncrypted="true"` 运行服务,也包括您的开发虚拟机)。对于我的开发工作,我经常将参数更改为 `IsEncrypted="false"`,然后在提交之前再改回来。但这取决于您。
此图显示了基本思想

点击查看大图
创建自签名证书
数据加密证书严格用于加密和解密服务的 Settings.xml 中的配置值,不用于身份验证或加密文本签名。证书必须满足以下要求:
- 证书必须包含私钥。
- 证书必须为密钥交换而创建,可导出为个人信息交换 (.pfx) 文件。
- 证书密钥用法必须包含数据加密 (10),并且不应包含服务器身份验证或客户端身份验证。
您可以创建自签名证书进行测试,但对于正式的生产发布,您应该使用 KeyVault/PowerShell 在门户中创建证书,然后将其下载为 .pfx 文件并安装到**本地计算机存储**中。
现在,让我们创建一个新的密码证书进行测试。这可以通过以下 PowerShell 命令完成
New-SelfSignedCertificate -Type DocumentEncryptionCert -KeyUsage DataEncipherment -Subject mydataenciphermentcert -Provider 'Microsoft Enhanced Cryptographic Provider v1.0'
如果您在 PowerShell 中运行此命令,它将在您的**本地计算机存储**中安装一个新证书。如下所示

为了确认已安装,您可以打开**本地计算机存储**。
要执行此操作(我使用的是 Windows 10,因此说明可能会有所不同)
点击 Windows 图标

然后开始输入“cert”,您将看到以下内容
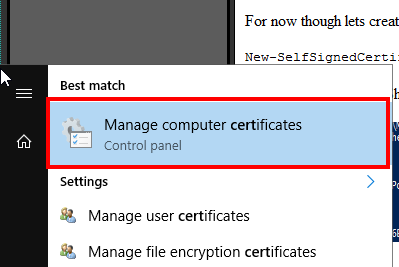
点击它,然后导航到以下位置,您应该会看到一个新证书,其创建时间与上面运行 PowerShell 命令的时间相同

点击查看大图
Powershell 的重要性(当前/最新版本)
我们工作中曾遇到一个问题,我们使用 PowerShell 创建加密证书,但总是收到一些奇怪的“ACL 证书”异常。事实证明,这是由于使用了旧版本的 Azure PowerShell 加密模块。因此,请确保您使用的是最新模块
安装自签名证书
好的,假设您为生产设置或非试验环境做了这些事情,并且您拥有 .pfx 文件(记住类型必须是“DocumentEncryptionCert”),您需要将其安装到**本地计算机存储**中。操作如下。请记住,在正确的环境中(非自签名证书)应该受到密码保护。

使用自签名证书
既然我们已经看到了上面描述的漂亮的全新配置系统,我们如何确保我们的连接字符串安全可靠呢?有几个步骤可以实现这一点。
步骤 1:获取证书指纹
最简单的方法是从 **Azure KeyVault 门户边栏选项卡**获取指纹(您应该这样做)。但是,如果证书已安装到本地计算机存储中,您可以按如下方式获取指纹

从指纹区域复制值。此对话框有一个 bug,指纹的开头存在一个隐藏字符。最好的方法是复制文本并将其粘贴到 PowerShell 窗口中,然后删除特殊字符和空格,然后妥善保管最终字符串
![]()
因此,对于本示例,最终指纹值将为 b92961f2fd7ad32d8f3b1a83b216e79f296857af
步骤 2:在 ApplicationManifest.xml 中使用证书指纹
您现在需要使用上面步骤 1 中的指纹将其添加到 ApplicationManifest.xml(请记住,此证书需要在集群中的所有节点虚拟机上可用)
<?xml version="1.0" encoding="utf-8"?>
<ApplicationManifest xmlns:xsd="http://www.w3.org/2001/XMLSchema" xmlns:xsi="http://www.w3.org/2001/XMLSchema-instance" ApplicationTypeName="SimpleStatelessServiceFabricDemoType" ApplicationTypeVersion="1.0.0" xmlns="http://schemas.microsoft.com/2011/01/fabric">
  .....
  .....
  .....

  <Principals>
    <Users>
      <User Name="SfUser" AccountType="NetworkService" />
    </Users>
  </Principals>
  <Policies>
    <SecurityAccessPolicies>
      <SecurityAccessPolicy ResourceRef="EnvCipherCert" PrincipalRef="SfUser" ResourceType="Certificate" />
    </SecurityAccessPolicies>
  </Policies>
  <Certificates>
    <SecretsCertificate X509FindValue="[simpleStatelessServiceFabricDemo:CertThumbPrint]" Name="EnvCipherCert" X509FindType="FindByThumbprint" />
  </Certificates>
</ApplicationManifest>
现在请确保您已更新相关的参数文件。以下是我用指纹更新的一个示例

为此使用参数文件而不是硬编码在 ApplicationManifest.xml 中的优点是,如果您愿意,可以为每个环境使用不同的参数文件。
步骤 3:确保要使用的参数已加密
好的,现在我们需要确保您要加密的参数确实被指定为 IsEncrypted="true"。我们在 ApplicationManifest.xml 和 Setting.xml 中都这样做,ApplicationManifest.xml 参数会覆盖 Setting.xml 中的参数。
ApplicationManifest.xml

示例服务 Settings.xml

步骤 4:加密值
现在我们需要使用已使用的证书加密这些值。我在代码中提供了一个小的 PowerShell 脚本 Encrypt-Secret.ps1,您只需像这样从 PowerShell 调用它
.\Encrypt-Secret.ps1 "b92961f2fd7ad32d8f3b1a83b216e79f296857af" "I want this text encrypted"
结果将是这样的

现在复制 `

步骤 5:解密值
好的,现在我们只需要解密这些值。我们该怎么做?
这是我想出的。我正在使用一个 ServiceConfiguration 类,它看起来像这样,用于存储我的所有设置。所以我需要在启动时用未加密的值更新它。
这是我的 ServiceConfiguration 属性包类的样子
using System;
using System.Collections.Generic;
using System.Configuration;
using System.Linq;
using System.Text;
using System.Threading.Tasks;

namespace Stateless1
{
    public class ServiceConfiguration
    {
        public ServiceConfiguration()
        {
            SomeDummyValue = ConfigurationManager.AppSettings["SomeDummyValue"];
            SomeSafeKey = ConfigurationManager.AppSettings["SomeSafeKey"];
        }


        public string SomeDummyValue { get; set; }
        public string SomeSafeKey { get; set; }
    }
}
所以剩下的就是获取未加密的值放入这个辅助类。我是这样做的
namespace Stateless1
{
    public class Stateless1 : StatelessService, IDisposable
    {
        private readonly ServiceConfiguration _configuration;
        private ILogger _log;

        public Stateless1(
            StatelessServiceContext context,
            ServiceLoggerFactory serviceLoggerFactory,
            ServiceConfiguration configuration
        ) : base(context)
        {
            if (configuration == null)
            {
                throw new ArgumentNullException(nameof(configuration));
            }


            _configuration = configuration;
            _log = serviceLoggerFactory.EnrichLoggerForStatelessServiceContext(this);

            EnhanceConfigurationForServiceFabric(context, configuration);

            _log.Information("Stateless1 constructed ok");
        }

        private void EnhanceConfigurationForServiceFabric(StatelessServiceContext context, ServiceConfiguration configuration)
        {
            try
            {
                var configPackage = context.CodePackageActivationContext.GetConfigurationPackageObject("Config");
                var appSettings = configPackage.Settings.Sections["appSettings"];
                var useServiceFabricEnhancements = bool.Parse(appSettings.Parameters["simpleStatelessServiceFabricDemo:UseServiceFabricEnhancements"].Value);
                var environmentName = appSettings.Parameters["simpleStatelessServiceFabricDemo:EnvironmentName"].Value;

                if (useServiceFabricEnhancements)
                {
                    UpdateEncryptedValue(configPackage, "simpleStatelessServiceFabricDemo:SomeSafeKey",
                    	(someSafeKey) => configuration.SomeSafeKey = someSafeKey);
                }
                else
                {
                    _log.Information("Stateless1 configuration set-up using default Environment='{EnvironmentName}", environmentName);
                }
            }
            catch (Exception ex)
            {
                _log.Error(ex, "Failed to contruct Stateless1");
                throw;
            }
        }


        private void UpdateEncryptedValue(ConfigurationPackage configurationPackage,
        	string connectString, Action<String> updateServiceConfigurationAction)
        {
            var param = configurationPackage.Settings.Sections["encryptedSettings"].Parameters[connectString];
            updateServiceConfigurationAction(param.IsEncrypted
                ? param.DecryptValue().ConvertToUnsecureString()
                : param.Value);
        }
    }
}
那么真实集群呢?
是的,到目前为止我们一直在谈论测试本地集群,也就是在您自己的机器上运行的集群。因此,对于真正的集群,您需要远程访问构成真实集群的实际节点(在门户/PowerShell 中创建),并按照上述步骤在这些虚拟机上安装证书。
结论
我们大量使用了 Azure Service Fabric,到目前为止它还没有让我们失望。我们主要用它来处理不怎么相互作用的孤立微服务,所以我们实际上不需要打开任何端口。然而,它的扩展性以及可以通过 C# FabricClient 和 PowerShell 按需扩展的能力非常棒。