
在 C# 中实现 Diffie-Hellman
4.88/5 (21投票s)
让我们看一下 Diffie-Hellman 密钥交换,以便在公共通道上安全地发送私有信息。
引言
让我们创建一个具有两个方法的加密类 - 加密和解密。这两个方法将允许您与对方交换公钥,并使用私钥解密秘密消息。秘密消息将使用标准的 AES 加密进行加密。
目录
- 词汇表
- Diffie-Hellman 的可视化
- 使用代码
- 步骤 01 - 创建类库
- 步骤 02 - 添加字段
- 步骤 03 - 添加构造函数
- 步骤 04 - 暴露公钥和 IV
- 步骤 05 - 创建加密方法
- 步骤 06 - 创建解密方法
- 步骤 07 - 释放非托管资源
- 步骤 08 - 创建测试类
- 结束语
词汇表
AES (高级加密标准) - 最初称为 "Rijndael",是美国国家标准与技术研究院 (NIST) 于 2001 年制定的电子数据加密规范。AES 所描述的算法是一种对称密钥算法,意味着加密和解密数据使用相同的密钥。
CNG (下一代加密) - 一个加密开发平台,允许开发人员在与加密相关的应用程序中创建、更新和使用自定义加密算法。
Diffie-Hellman - 一种通过公共通道安全交换加密密钥的方法,也是 Ralph Merkle 最初构想并以 Whitfield Diffie 和 Martin Hellman 命名的第一个公钥协议之一。
IV (Initialization Vector) - 一个任意数字,可以与密钥一起用于数据加密。这个数字也称为 nonce,在任何会话中仅使用一次。(我们将使用对方的 IV 和公钥来解密秘密消息。)
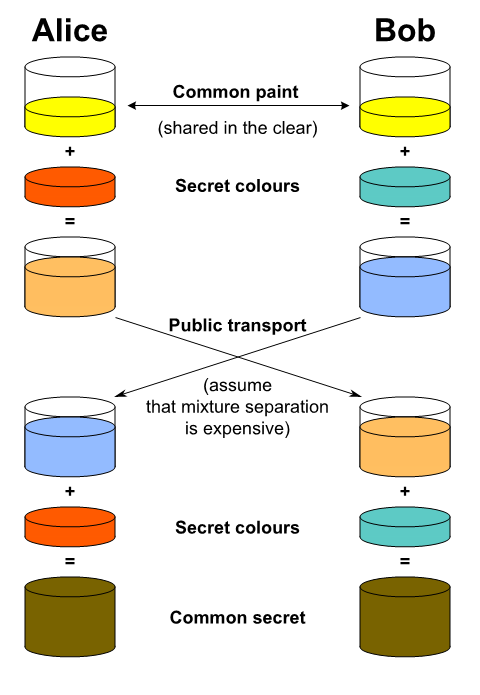
Diffie-Hellman 的可视化
Using the Code
步骤 01 - 创建类库
打开 Visual Studio,然后转到 "文件 > 新建 > 项目",并选择 "类库"。
为您的项目命名 (例如,SecureKeyExchange) 并单击 "确定"。
创建项目后,将 "Class1.cs" 文件重命名为 "DiffieHellman.cs"。
步骤 02 - 添加字段
我们需要添加三个字段;一个包含 `Aes` 类的引用,第二个字段用于存储 `ECDiffieHellmanCng` 类的引用,最后一个字段用于存储我们的公钥。
`Aes` 引用将用于加密/解密消息。`ECDiffieHellmanCng` 引用将用于在双方之间创建派生密钥。
将以下三个字段添加到您的类中
    private Aes aes = null;
    private ECDiffieHellmanCng diffieHellman = null;

    private readonly byte[] publicKey;
步骤 03 - 添加构造函数
现在我们的构造函数应该初始化这些字段
    public DiffieHellman()
    {
        this.aes = new AesCryptoServiceProvider();

        this.diffieHellman = new ECDiffieHellmanCng
        {
            KeyDerivationFunction = ECDiffieHellmanKeyDerivationFunction.Hash,
            HashAlgorithm = CngAlgorithm.Sha256
        };

        // This is the public key we will send to the other party
        this.publicKey = this.diffieHellman.PublicKey.ToByteArray();
    }
初始化 `ECDiffieHellmanCng` 实例后,我们可以将 `publicKey` 字段设置为 `ECDiffieHellmanCng` 实例的 `PublicKey`。我们将与秘密消息一起将此公钥发送给对方。
步骤 04 - 暴露公钥和 IV
让我们通过属性公开我们的公钥和 IV。分别添加以下属性
    public byte[] PublicKey
    {
        get
        {
            return this.publicKey;
        }
    }

    public byte[] IV
    {
        get
        {
            return this.aes.IV;
        }
    }
这些属性将发送给对方,以便他们使用自己的私钥解密秘密消息。
步骤 05 - 创建加密方法
我们将创建一个方法,该方法接受对方的公钥以及要加密的秘密消息。
我们将使用对方的公钥来生成一个派生密钥 (请参见上文的绘画类比中的 "公共秘密"),该密钥将用于加密消息。添加 `Encrypt` 函数
    public byte[] Encrypt(byte[] publicKey, string secretMessage)
    {
        byte[] encryptedMessage;
        var key = CngKey.Import(publicKey, CngKeyBlobFormat.EccPublicBlob);
        var derivedKey = this.diffieHellman.DeriveKeyMaterial(key); // "Common secret"

        this.aes.Key = derivedKey;

        using (var cipherText = new MemoryStream())
        {
            using (var encryptor = this.aes.CreateEncryptor())
            {
                using (var cryptoStream = new CryptoStream(cipherText, encryptor, CryptoStreamMode.Write))
                {
                    byte[] ciphertextMessage = Encoding.UTF8.GetBytes(secretMessage);
                    cryptoStream.Write(ciphertextMessage, 0, ciphertextMessage.Length);
                }
            }

            encryptedMessage = cipherText.ToArray();
        }

        return encryptedMessage;
    }
现在消息已加密,我们可以将其发送给对方。但首先,我们需要添加一个函数来解密此秘密消息。
步骤 06 - 创建解密方法
我们的 `Decrypt` 函数将接受 3 个参数:对方的公钥和 IV,以及秘密消息。让我们添加该函数
    public string Decrypt(byte[] publicKey, byte[] encryptedMessage, byte[] iv)
    {
        string decryptedMessage;
        var key = CngKey.Import(publicKey, CngKeyBlobFormat.EccPublicBlob);
        var derivedKey = this.diffieHellman.DeriveKeyMaterial(key);

        this.aes.Key = derivedKey;
        this.aes.IV = iv;

        using (var plainText = new MemoryStream())
        {
            using (var decryptor = this.aes.CreateDecryptor())
            {
                using (var cryptoStream = new CryptoStream(plainText, decryptor, CryptoStreamMode.Write))
                {
                    cryptoStream.Write(encryptedMessage, 0, encryptedMessage.Length);
                }
            }

            decryptedMessage = Encoding.UTF8.GetString(plainText.ToArray());
        }

        return decryptedMessage;
    }
现在我们可以解密秘密消息了。
步骤 07 - 释放非托管资源
我们仍然需要添加的最后一段代码是实现 `IDisposable` 接口以清理我们的非托管资源。
让我们将接口添加到我们的 `DiffieHellman` 类中
public class DiffieHellman : IDisposable
并添加实现
    public void Dispose()
    {
        Dispose(true);
        GC.SuppressFinalize(this);
    }

    protected virtual void Dispose(bool disposing)
    {
        if (disposing)
        {
            if (this.aes != null)
                this.aes.Dispose();

            if (this.diffieHellman != null)
                this.diffieHellman.Dispose();
        }
    }
我们的类已完成。现在我们需要创建一个测试类来测试我们的功能。
步骤 08 - 创建测试类
右键单击解决方案,然后选择 "添加 > 新建项目 > 单元测试项目" 并为您的项目命名 (例如 "SecureKeyExchange.Tests")。将您的 "UnitTest1.cs" 重命名为 "DiffieHellmanTests.cs" 并添加对 "SecureKeyExchange" 项目的引用。要执行此操作,请右键单击测试项目下的 "引用" 节点,然后选择 "添加引用 > 项目 > 选择项目 > 确定"。
将以下测试方法添加到我们的测试类中
    [TestMethod]
    public void Encrypt_Decrypt()
    {
        string text = "Hello World!";

        using (var bob = new DiffieHellman())
        {
            using (var alice = new DiffieHellman())
            {
                // Bob uses Alice's public key to encrypt his message.
                byte[] secretMessage = bob.Encrypt(alice.PublicKey, text);

                // Alice uses Bob's public key and IV to decrypt the secret message.
                string decryptedMessage = alice.Decrypt(bob.PublicKey, secretMessage, bob.IV);
            }
        }
    }
现在我们可以添加一个断点并调试我们的测试 (按 Ctrl+R,Ctrl+A) 来查看结果

结束语
Diffie-Hellman 密钥交换使我们能够在公共通道上发送秘密信息。在我的下一篇文章中,我们将探讨如何将其实现到实际场景中。