
ASP.NET Core 结合 Dapper 和 VS 2017 使用 JWT 身份验证 WEB API 并在 Angular2 客户端应用程序中使用
5.00/5 (4投票s)
ASP.NET Core 使用 JWT 身份验证 WEB API 并在 Angular2 客户端应用程序中使用,并进行适当的项目结构设置。
引言
我试图在 web API 中实现 JWT 身份验证。我想在我的 Angular 2 客户端应用程序中使用 Web API。但是在互联网上搜索时,我没有找到任何针对我的问题且具有**项目架构设置**的正确解决方案。最后,我终于找到了解决此问题的实际步骤,这可以帮助您节省大量时间来检查此解决方案中的内容。因此,以下是详细说明。
源代码链接:https://github.com/rajeshdas85/JwtAuthentication
- ASP.NET Core 中带有 JWT 身份验证的项目解决方案的 Web API
- Angular2/4 用于客户端应用程序
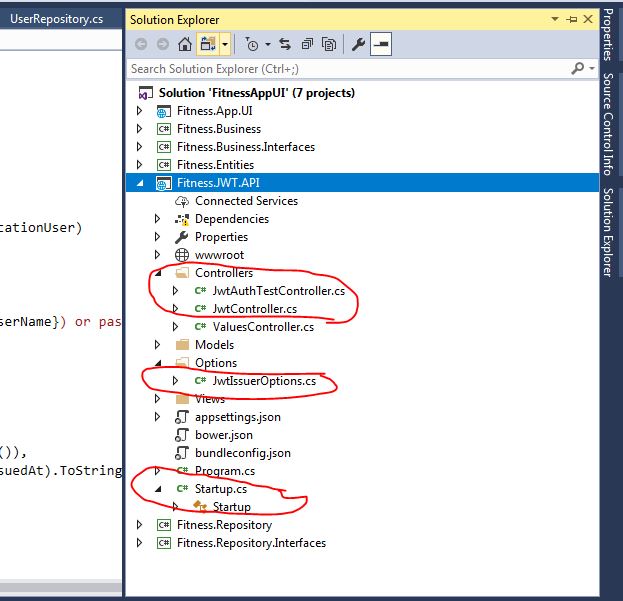
请参阅下面的项目结构

背景
步骤 1
创建 ASP.NET Core Web API 项目
- 打开“Visual Studio 2017” -> 转到“文件”菜单 -> 新建 -> 项目
- 选择项目模板。

- 右键单击解决方案资源管理器 -> 添加 -> 新建项目 -> 类库。

Fitness.JWT.API 项目说明
我想解释一下项目源代码中突出显示的部分,以启用 Jwt 身份验证。
Using the Code
startup.cs
配置 secretkey,允许**跨域**并应用 使用策略身份验证。
//
 public IConfigurationRoot Configuration { get; }
        //SecretKey  for Authentication
        private const string SecretKey = "ABCneedtogetthisfromenvironmentXYZ";
        private readonly SymmetricSecurityKey _signingKey =
              new SymmetricSecurityKey(Encoding.ASCII.GetBytes(SecretKey));
        // This method gets called by the runtime. Use this method to add services to the container.
        public void ConfigureServices(IServiceCollection services)
        {
            // Add framework services.
            // services.AddMvc();
            // Add framework services.
            // Add framework services.
            services.AddCors(options =>
            {
                options.AddPolicy("CorsPolicy",//Allow Cross origin
                    builder => builder.AllowAnyOrigin()
                    .AllowAnyMethod()
                    .AllowAnyHeader()
                    .AllowCredentials());
            });

            services.AddOptions();

            // Make authentication compulsory across the board (i.e. shut
            // down EVERYTHING unless explicitly opened up).
            services.AddMvc(config =>
            {
                var policy = new AuthorizationPolicyBuilder()
                                 .RequireAuthenticatedUser()
                                 .Build();
                config.Filters.Add(new AuthorizeFilter(policy));
            });

            // Use policy auth.
            services.AddAuthorization(options =>
            {
                options.AddPolicy("FitnessJWT",
                                  policy => policy.RequireClaim("FitnessJWT", "FitnessUser"));
            });

            // Get options from app settings
            var jwtAppSettingOptions = Configuration.GetSection(nameof(JwtIssuerOptions));

            // Configure JwtIssuerOptions
            services.Configure<JwtIssuerOptions>(options =>
            {
                options.Issuer = jwtAppSettingOptions[nameof(JwtIssuerOptions.Issuer)];
                options.Audience = jwtAppSettingOptions[nameof(JwtIssuerOptions.Audience)];
                options.SigningCredentials = new SigningCredentials
                                    (_signingKey, SecurityAlgorithms.HmacSha256);
            });
        }
//
JwtIssuerOptions.cs
此类文件负责在服务器中创建 Auth 唯一票证。
    //
      public class JwtIssuerOptions
    {
        /// <summary>
        /// "iss" (Issuer) Claim
        /// </summary>
        /// <remarks>The "iss" (issuer) claim identifies the principal that issued the
        ///   JWT.  The processing of this claim is generally application specific.
        ///   The "iss" value is a case-sensitive string containing a StringOrURI
        ///   value.  Use of this claim is OPTIONAL.</remarks>
        public string Issuer { get; set; }

        /// <summary>
        /// "sub" (Subject) Claim
        /// </summary>
        /// <remarks> The "sub" (subject) claim identifies the principal that is the
        ///   subject of the JWT.  The claims in a JWT are normally statements
        ///   about the subject.  The subject value MUST either be scoped to be
        ///   locally unique in the context of the issuer or be globally unique.
        ///   The processing of this claim is generally application specific.  The
        ///   "sub" value is a case-sensitive string containing a StringOrURI
        ///   value.  Use of this claim is OPTIONAL.</remarks>
        public string Subject { get; set; }

        /// <summary>
        /// "aud" (Audience) Claim
        /// </summary>
        /// <remarks>The "aud" (audience) claim identifies the recipients that the JWT is
        ///   intended for.  Each principal intended to process the JWT MUST
        ///   identify itself with a value in the audience claim.  If the principal
        ///   processing the claim does not identify itself with a value in the
        ///   "aud" claim when this claim is present, then the JWT MUST be
        ///   rejected.  In the general case, the "aud" value is an array of case-
        ///   sensitive strings, each containing a StringOrURI value.  In the
        ///   special case when the JWT has one audience, the "aud" value MAY be a
        ///   single case-sensitive string containing a StringOrURI value.  The
        ///   interpretation of audience values is generally application specific.
        ///   Use of this claim is OPTIONAL.</remarks>
        public string Audience { get; set; }

        /// <summary>
        /// "nbf" (Not Before) Claim (default is UTC NOW)
        /// </summary>
        /// <remarks>The "nbf" (not before) claim identifies the time before which the JWT
        ///   MUST NOT be accepted for processing.  The processing of the "nbf"
        ///   claim requires that the current date/time MUST be after or equal to
        ///   the not-before date/time listed in the "nbf" claim.  Implementers MAY
        ///   provide for some small leeway, usually no more than a few minutes, to
        ///   account for clock skew.  Its value MUST be a number containing a
        ///   NumericDate value.  Use of this claim is OPTIONAL.</remarks>
        public DateTime NotBefore => DateTime.UtcNow;

        /// <summary>
        /// "iat" (Issued At) Claim (default is UTC NOW)
        /// </summary>
        /// <remarks>The "iat" (issued at) claim identifies the time at which the JWT was
        ///   issued.  This claim can be used to determine the age of the JWT.  Its
        ///   value MUST be a number containing a NumericDate value.  Use of this
        ///   claim is OPTIONAL.</remarks>
        public DateTime IssuedAt => DateTime.UtcNow;

        /// <summary>
        /// Set the timespan the token will be valid for (default is 3 min/180 seconds)
        /// </summary>
        public TimeSpan ValidFor { get; set; } = TimeSpan.FromMinutes(1);

        /// <summary>
        /// "exp" (Expiration Time) Claim (returns IssuedAt + ValidFor)
        /// </summary>
        /// <remarks>The "exp" (expiration time) claim identifies the expiration time on
        ///   or after which the JWT MUST NOT be accepted for processing.  The
        ///   processing of the "exp" claim requires that the current date/time
        ///   MUST be before the expiration date/time listed in the "exp" claim.
        ///   Implementers MAY provide for some small leeway, usually no more than
        ///   a few minutes, to account for clock skew.  Its value MUST be a number
        ///   containing a NumericDate value.  Use of this claim is OPTIONAL.</remarks>
        public DateTime Expiration => IssuedAt.Add(ValidFor);

        /// <summary>
        /// "jti" (JWT ID) Claim (default ID is a GUID)
        /// </summary>
        /// <remarks>The "jti" (JWT ID) claim provides a unique identifier for the JWT.
        ///   The identifier value MUST be assigned in a manner that ensures that
        ///   there is a negligible probability that the same value will be
        ///   accidentally assigned to a different data object; if the application
        ///   uses multiple issuers, collisions MUST be prevented among values
        ///   produced by different issuers as well.  The "jti" claim can be used
        ///   to prevent the JWT from being replayed.  The "jti" value is a case-
        ///   sensitive string.  Use of this claim is OPTIONAL.</remarks>
        public Func<Task<string>> JtiGenerator =>
          () => Task.FromResult(Guid.NewGuid().ToString());

        /// <summary>
        /// The signing key to use when generating tokens.
        /// </summary>
        public SigningCredentials SigningCredentials { get; set; }
    }
    //
JwtController.cs
它是匿名用户将登录的控制器,它创建 JWT 安全令牌并对其进行编码,然后将其作为带有策略的响应发送回客户端。
identity.FindFirst("FitnessJWT")
请参见下面的代码
 [HttpPost]
        [AllowAnonymous]
        public async Task<IActionResult> Get([FromBody] ApplicationUser applicationUser)
        {
            var identity = await GetClaimsIdentity(applicationUser);
            if (identity == null)
            {
                _logger.LogInformation($"Invalid username ({applicationUser.UserName})
                                       or password ({applicationUser.Password})");
                return BadRequest("Invalid credentials");
            }

            var claims = new[]
            {
        new Claim(JwtRegisteredClaimNames.Sub, applicationUser.UserName),
        new Claim(JwtRegisteredClaimNames.Jti, await _jwtOptions.JtiGenerator()),
        new Claim(JwtRegisteredClaimNames.Iat,
            ToUnixEpochDate(_jwtOptions.IssuedAt).ToString(), ClaimValueTypes.Integer64),
        identity.FindFirst("FitnessJWT")
      };

            // Create the JWT security token and encode it.
            var jwt = new JwtSecurityToken(
                issuer: _jwtOptions.Issuer,
                audience: _jwtOptions.Audience,
                claims: claims,
                notBefore: _jwtOptions.NotBefore,
                expires: _jwtOptions.Expiration,
                signingCredentials: _jwtOptions.SigningCredentials);

            var encodedJwt = new JwtSecurityTokenHandler().WriteToken(jwt);

            // Serialize and return the response
            var response = new
            {
                access_token = encodedJwt,
                expires_in = (int)_jwtOptions.ValidFor.TotalSeconds,
                State=1,
                expire_datetime= _jwtOptions.IssuedAt
            };

            var json = JsonConvert.SerializeObject(response, _serializerSettings);
            return new OkObjectResult(json);
        }
JwtAuthTestController.cs
在此控制器中,我定义了策略 [Authorize(Policy = "FitnessJWT")] ,因此当用户请求该控制器时,它必须与策略和密钥匹配,然后响应才会返回给客户端。
  [HttpGet("[action]")]
        [Authorize(Policy = "FitnessJWT")]
        public IActionResult WeatherForecasts()
        {
            var rng = new Random();

            List<WeatherForecast> lstWeatherForeCast = new List<WeatherForecast>();
            for (int i = 0; i < 5; i++)
            {
                WeatherForecast obj = new WeatherForecast();
                obj.DateFormatted = DateTime.Now.AddDays(i).ToString("d");
                obj.TemperatureC = rng.Next(-20, 55);
                obj.Summary = Summaries[rng.Next(Summaries.Length)];
                lstWeatherForeCast.Add(obj);
            }

            var response = new
            {
                access_token = lstWeatherForeCast,
                State = 1
            };

            var json = JsonConvert.SerializeObject(response, _serializerSettings);
            return new OkObjectResult(json);
        }
步骤 2:Angular2/4 用于客户端应用程序
我想添加一个。我不太关注 UI 部分,但是我尝试从 Angualar2/4 应用程序实现 JWT 身份验证。
Fitness.App.UI 解决方案
login.component.ts
使用 typescript 传递用户名和密码的登录模块
import { Component } from '@angular/core';
import { Router } from '@angular/router';
import { AuthService } from "../../../app/services/auth.service";
import { LoginModel } from "../../model/login.model";
@Component({
    selector: 'Fitness-Login',
    templateUrl: './login.component.html',
    styleUrls: ['./login.component.css'],
    providers: [AuthService]
})
export class LoginComponent {
    loginModel = new LoginModel();
    constructor(private router: Router, private authService: AuthService) {
    }
    login() {
        this.authService.login(this.loginModel.userName, this.loginModel.password)
            .then(result => {
                if (result.State == 1) {
                    this.router.navigate(["/nav-menu"]);
                }
                else {
                    alert(result.access_token);
                }
            });
    }
}
auth.service.ts
身份验证服务,用于验证凭据并将重定向到主页。
    login(userName: string, password: string): Promise<ResponseResult> {
        let data = {
            "userName": userName,
            "password": password
        }
        let headers = new Headers({ 'Content-Type': 'application/json' });
        let applicationUser = JSON.stringify(data);
        let options = new RequestOptions({ headers: headers });

        if (this.checkLogin()) {
            return this.authPost(this.localUrl + '/api/Jwt', applicationUser, options);
        }
        else {
            return this.http.post(this.localUrl + '/api/Jwt', applicationUser, options).toPromise()
                .then(
                response => {
                    let result = response.json() as ResponseResult;
                    if (result.State == 1) {
                        let json = result.access_token as any;
                        localStorage.setItem(this.tokeyKey, json);
                        localStorage.setItem(this.tokeyExpKey, result.expire_datetime);
                        this.sg['isUserExist'] = true;
                    }
                    return result;
                }
                )
                .catch(this.handleError);
        }
    }
app.module.client.ts
{ provide: 'ORIGIN_URL', useValue: 'https://:57323' },JWT WEB API 上的路径。
您需要根据机器 URL 更改本地主机 API。
  @NgModule({
    bootstrap: sharedConfig.bootstrap,
    declarations: sharedConfig.declarations,
    imports: [
        BrowserModule,
        FormsModule,
        HttpModule,
        ...sharedConfig.imports
    ],
    providers: [
        //{ provide: 'ORIGIN_URL', useValue: location.origin },
        { provide: 'ORIGIN_URL', useValue: 'https://:57323' },
        AuthService, AuthGuard, SimpleGlobal
    ]
})
export class AppModule {
}
要运行该应用程序,您需要将项目设置为如下
使用多个启动项目运行解决方案。
然后在浏览器中的两个选项卡中,客户端应用程序和 web API 服务都将启动。

应用程序上的输出如下


用户名:Test 和密码:Test
然后,它将重定向到导航菜单页面,如下所示

关注点
在撰写此博客时,我感到非常愉快。
历史
如果需要任何改进,请更新代码。