
一个非常简单的 Uber 式应用程序,使用大量技术编写而成
5.00/5 (26投票s)
简单的 Uber 类型应用程序,使用 Akka/React/TypeScript/Scala/Play/Kafka/MongoDb/Rx
- 引言
- 代码在哪里?
- 演示视频
- 必备组件
- 我该如何运行所有这些东西?
- 已知问题
- 一些基础知识
- 应用程序
- 结论
引言
这篇文章是我在通勤火车上花了 6 个多月时间所做工作的总结。我已经在该项目主页的博客上写了很多博文,您可以在此处阅读: https://sachabarbs.wordpress.com/2017/05/01/madcap-idea/
那里有 13 篇博文,但我认为最好也有这样一篇整体文章,涵盖所有内容,因为博文更多的是我经历的事件顺序,详细介绍了我在过程中遇到的各个部分。
例如,这些是博文:
- MADCAP IDEA PART 1:网站客户端部分的开始
- MADCAP IDEA PART 2:为网站前端客户端添加 DI/IOC
- MADCAP IDEA PART 3:引入 Play 后端 + 一些基本流处理
- MADCAP IDEA PART 4:原型屏幕
- MADCAP IDEA PART 5:添加 React-Router
- MADCAP IDEA PART 6:静态屏幕设计
- MADCAP IDEA PART 7:注册/登录后端
- MADCAP IDEA PART 8:中间步骤,用于交互式 Kafka Stream KTable 查询的 REST API
- MADCAP IDEA PART 9:Kafka Streams 交互式查询
- MADCAP IDEA PART 10:Play Framework 响应式 Kafka Producer
- MADCAP IDEA PART 11:完成 View Rating 页面
- MADCAP IDEA PART 12:让 Create Job 端到端工作
- MADCAP IDEA PART 13:让 View Job 端到端工作
特别感谢
我想特别感谢一位非常特别的人,Peter O'Hanlon,他是 CodeProject 的传奇人物,也是一个很棒的人。我请他审阅这篇庞大的文章,Pete 立即答应了,并抽出时间完成了这项工作,尽管他是一个顾家的人,经营着自己的生意,并且有自己的很棒的想法。
谢谢 Pete,我敬佩你。
那么,我到底在说什么?
本质上,我想写一个非常(请原谅双关语)但又极其简单的 Uber 式应用程序。该应用程序具有以下功能要求:
- 应该有一个客户可以使用的 Web 界面。客户可以是司机或需要送货的接载客户。
- 应该有一个接载客户可以使用的 Web 界面,该界面在一个地图上显示接载客户的位置,由接载客户选择。
- 接载客户可以请求接载工作,在这种情况下,该地区的司机将竞标该工作。
- 接载客户的位置应该在地图上对司机可见。
- 司机可以竞标接载客户的工作,并且竞标司机(们)的位置应该对接载客户可见。
- 接载客户是否接受竞标司机取决于接载客户。
- 一旦接载客户接受了司机,接载客户将只能看到被分配司机(们)的当前地图位置。
- 当接载客户对已由司机接载感到满意时,接载客户可以给司机评分 1-10,司机也可以给接载客户评分 1-10。
- 只有当接载客户将工作标记为完成后,评分才可用。
- 司机或接载客户应始终能够查看他们以前的评分。
虽然这对很多人来说可能听起来是小菜一碟(如果我只使用简单的 CRUD 操作,我自己也这么认为),但我只想指出,这个应用程序旨在作为一次学习经历,所以我不会使用简单的 SignalR Hub 和几个数据库表。
我使用了一套与常规完全不同的技术来编写这个项目。其中一些技术选择可以轻松扩展到每秒数十万次请求(Kafka 会为此提供支持)。
涉及的技术
- WebPack
- React
- React Router
- PowerShell
- TypeScript
- Babel.js
- Akka
- Scala
- Play (Scala Http Stack)
- MongoDB
- SBT
- Kafka
- Kafka Streams
他们说一图胜千言,所以这里有一张不错的图来开始

现在在我们继续之前,请允许我承认 www.codeproject.com 主要偏向于 Microsoft 技术,而这段代码主要是 Scala/TypeScript。但是,我认为一路仍有很多东西可以学习,所以不要让它不是 .NET/C/C++ 的事实吓倒您。
代码在哪里?
这部分的代码在这里: https://github.com/sachabarber/MadCapIdea
演示视频

点击图片播放视频
必备组件
如引言部分所示,这个演示有很多活动部件,自然,也有不少依赖项。我确实尝试为您在 Docker 中运行它,但发现我仍然需要创建外部脚本来协调所有这些。最后,我只是按照我将要指定的方式下载东西,然后提供一个 PowerShell 脚本来运行大部分内容,除了 2 个 Scala 项目。
这是运行此代码所需的所有东西的列表。
所有这些都是在 Windows 上开发的,所以这些说明都关于如何在 Windows 上让东西正常工作。
- MongoDB: https://mongodb.ac.cn/dr/fastdl.mongodb.org/win32/mongodb-win32-x86_64-2008plus-ssl-3.4.6-signed.msi/download
- Confluent Platform 3.3.0 Open Source: http://packages.confluent.io/archive/3.3/confluent-oss-3.3.0-2.11.zip
- SBT
- Java 8 SDK
- Webpack
- Node.Js
- NPM
- IntelliJ IDEA v17.0 community
- PowerShell
下载所有这些后,您需要做几件事才能在 Windows 上正常运行。
- 下载上面的依赖项(记下您下载的位置,因为您以后会用到)(Keep a note of where you downloaded them as you will need them here and later)
- 将官方的 YOUR extract location\confluent-3.3.0\bin\windows BAT 文件替换为此处找到的文件: https://github.com/renukaradhya/confluentplatform/tree/master/bin/windows
- 修改 YOUR extract location\confluent-3.3.0\etc\kafka\zookeeper.properties 文件,将 dataDir 更改为类似 dataDir=c:/temp/zookeeper
- 修改 YOUR extract location\confluent-3.3.0\etc\kafka\server.properties 文件,取消注释行 delete.topic.enable=true
- 修改 YOUR extract location\confluent-3.3.0\etc\kafka\server.properties 文件,将 log.dirs 更改为 log.dirs=c:/temp/kafka-logs
您需要在下一节中记住其中一些路径,所以请注意,您以后可能需要编辑 PowerShell 脚本以包含一些新路径。
我该如何运行所有这些东西?
这个应用程序有很多活动部件,它们都需要运行才能协同工作。
1. 更新 node.js 依赖项
确保您已安装 Node.Js,并确保也安装了 NPM,同时确保 webpack 已全局安装。
打开命令行,切换到 MadCapIdea\PlayBackEndApi\FrontEndWebSite\ 文件夹并运行 npm install
- 现在从同一文件夹运行
webpack
2. Kafka/Zookeeper 等等
您可以运行以下 powershell 脚本来启动所有先决条件(假设您已下载所有这些)。
- 打开 PowerShell 命令行,切换到
PowerShellProject\PowerShellProject\文件夹并运行.\RunPipeline.ps1。 请确保将顶部路径修改为匹配您自己的安装路径
3. Play 应用程序
- 在 IntelliJ IDEA 中打开 SBT/Scala 项目(您需要在机器上安装 SBT 插件和 Java8)。
- 打开此文件夹
MadCapIdea\PlayBackEndApi并运行它。您可能需要创建一个运行配置。
4. Kafka Streams 应用程序
- 在 IntelliJ IDEA 中打开 SBT/Scala 项目(您需要在机器上安装 SBT 插件和 Java8)。
- 打开此文件夹
MadCapIdea\KafkaStreams并运行它。您可能需要创建一个指向此主类的运行配置:RatingStreamProcessingApp
5. React
- 打开浏览器,导航到
https://:9000,并注册一些用户(乘客/司机)。
我通常会遵循以下步骤:
- 打开一个标签页,以我创建的乘客身份登录。
- 转到“创建工作”页面,点击地图,然后按“创建工作”按钮。
- 打开一个新的标签页,以新司机身份登录,然后转到“查看工作”页面。
- 在第一个标签页(乘客)上,点击地图以将乘客位置推送到司机。
- 在第二个标签页(司机)上,点击地图以将司机位置推送到乘客。
- 为额外的司机重复最后 4 个步骤。
- 在客户端标签页上,选择司机接受,然后点击接受按钮。
- 从客户端标签页完成工作,给司机评分。
- 从配对的司机标签页完成工作,给乘客评分。
- 转到“查看评分”页面,应该可以看到评分。
已知问题
以下是已知问题:
- 一旦司机和乘客配对,来自双方的位置更新将不再反映。我相信这归结为
ViewJob.tsx文件中一个需要更新的 JavaScript 方法。 - 在 ViewJob 页面上,我最初希望乘客能够通过点击驱动程序覆盖的 GoogleMap 组件中的按钮来接受驱动程序。但是,无论我尝试什么,这仍然会触发 MapClick 事件,从而改变乘客的位置。因此,我不得不求助于一种奇怪的下拉选择方式供乘客接受司机。这很糟糕,但没关系。
所以这些就是问题所在。我刚刚完成了漫长的旅程(我一直在断断续续地写了 6 个月的火车通勤,同时也不太在意,只是盯着太空发呆),并且很高兴完成了我计划做的事情的 99%。我只是觉得,你知道吗,现在的应用程序展示了我计划做的一切,所以一两个已知问题对我来说没问题。
一些基础知识
在我们深入研究应用程序的实际代码(代码量相当大)之前,我认为最好先回顾一下构成整个应用程序的各个构建块。接下来的几个部分将介绍这些内容。这是一个很长的清单,演示应用程序利用了所有这些以及一些额外的部分,我认为它们不够重要,不值得单独开辟章节。当我们逐步了解实际演示应用程序的代码时,我们将了解更多关于每个部分的信息,这更多的是在查看具体用法之前的各种部分的概述。
什么是 Kafka?
概述
Apache Kafka 是由 Apache Software Foundation 开发的开源流处理平台,使用 Scala 和 Java 编写。该项目旨在提供一个统一的高吞吐量、低延迟的平台来处理实时数据流。其存储层本质上是一个“设计为分布式事务日志的大规模可扩展发布/订阅消息队列”,这使其对于企业基础设施处理流数据非常有价值。此外,Kafka 通过 Kafka Connect 连接到外部系统(用于数据导入/导出),并提供 Kafka Streams,一个 Java 流处理库。
设计深受事务日志的影响。
Apache Kafka 架构
Kafka 存储来自任意数量的称为“生产者”的进程的消息。数据因此可以在不同的“主题”内的不同“分区”中进行分区。在一个分区内,消息被索引并与时间戳一起存储。其他称为“消费者”的进程可以从分区查询消息。Kafka 在一个或多个服务器的集群上运行,并且分区可以在集群节点之间分布式。
与 Apache Storm、Apache HBase 和 Apache Spark 一起使用时,Apache Kafka 可以高效地处理实时数据和流数据。Kafka 作为集群部署在多台服务器上,通过四个 API(即生产者 API、消费者 API、Streams API 和连接器 API)处理其整个发布和订阅消息系统。它以容错方式传输海量消息流的能力使其取代了一些传统的邮件系统,如 JMS、AMQP 等。
Kafka 架构的主要术语是主题、记录和代理。主题由保存不同信息的记录流组成。另一方面,代理负责复制消息。
- 生产者 API - 允许应用程序发布记录流。(本文涵盖)
- 消费者 API - 允许应用程序订阅主题并处理记录流。(本文涵盖)
- Streams API - 此 API 将输入流转换为输出并产生结果。(本文涵盖)
- 连接器 API - 执行可重用的生产者和消费者 API,可以将主题链接到现有应用程序。(本文未涵盖)

Kafka 主题的组成
Offset:分区中的消息每个都被分配了一个(每分区)唯一的顺序 ID,称为“offset”。“offset”由消费者跟踪,每个消费者通过(offset、partition、topic)元组进行跟踪。

消费者组
消费者使用消费者组名称进行标识,发布到主题的每条记录都会被传递给订阅的每个消费者组中的一个消费者实例。消费者实例可以位于不同的进程或不同的机器上。

如果所有消费者实例都具有相同的消费者组,那么记录将在消费者实例之间有效地负载均衡。
如果所有消费者实例都具有不同的消费者组,那么每条记录都将被广播到所有消费者进程。

一个两台服务器的 Kafka 集群,托管四个分区(P0-P3),有两个消费者组。消费者组 A 有两个消费者实例,组 B 有四个。
Kafka 性能
由于其在企业级基础设施中的广泛集成,大规模监控 Kafka 性能已成为一个日益重要的问题。端到端性能监控需要跟踪来自代理、消费者和生产者的指标,此外还需要监控 Kafka 用于协调消费者之间的 ZooKeeper。
https://en.wikipedia.org/wiki/Apache_Kafka 更新于 2018/01/02
什么是 Kafka Streams?
Apache Kafka 的 Streams API,通过 Java 库提供,可用于构建高度可扩展、弹性、容错、分布式应用程序和微服务。最重要的是,Kafka Streams API 允许您创建为您的核心业务提供动力的实时应用程序。它是处理 Kafka 中存储的数据最简单但最强大的技术。它建立在流处理的重要概念之上,例如应用程序状态的高效管理、快速高效的聚合和连接、正确区分事件时间和处理时间,以及对迟到和乱序数据的无缝处理。
Kafka Streams API 的一个独特功能是,您使用它构建的应用程序是普通的 Java 应用程序。这些应用程序可以像任何其他 Java 应用程序一样进行打包、部署和监控——无需安装单独的处理集群或其他特殊的、昂贵的专用基础设施!
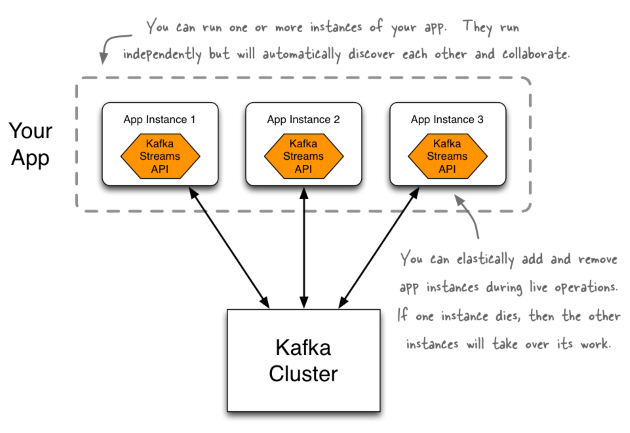
使用 Kafka Streams API 的应用程序是普通的 Java 应用程序。像您对任何其他 Java 应用程序一样打包、部署和监控它。即使如此,您的应用程序也将具有高度的可扩展性、弹性和容错性。
https://docs.confluent.io/current/streams/introduction.html 更新于 2018/01/02
以上是官方文档的说法。以下是我的看法:
Kafka Streams 是 Kafka 之上的一个附加 API,它允许您对传入的消息执行许多聚合和过滤、基于时间的窗口操作,这些操作可以存储到内部键值表示数据库(称为 KTable)中,该数据库使用状态存储(基于RocksDB),或者您可以选择将转换后的流值推送到新的输出主题。
您可以执行复杂的流处理、合并流,还可以存储累积的流状态。
这是一个很棒的工具。
什么是 Play?
Play Framework 是一个基于 Scala 的 MVC(模型-视图-控制器)式 Web 应用程序框架。因此,它具有典型 MVC Web 框架的内置机制(如果您做过任何 ASP MVC .NET,您会发现它非常熟悉)。
因此,我们有了由 Play Framework 覆盖的典型 MVC 关注点:
- 控制器
- Actions
- 路由
- Model binding
- JSON support
- View engine
问题是,我不会在 Play Framework 后端代码中进行任何实际的 HTML 操作,我想使用我到目前为止展示的、之前涵盖的 webpack/typescript/react 启动代码来完成所有这些。相反,我将使用 Play Framework 作为 API 后端,我们将简单地使用各种控制器作为端点来接受/提供 JSON 和事件流数据。所有实际的前端工作/路由都将通过 webpack 和 React 完成。
Play 中仍有一些非常有吸引力的部分是我想要利用的,例如:
- 它是 Scala,这意味着当我集成 Kafka / Kafka Streams 时,它将已准备就绪。
- 它使用 Akka,我一直想用。我也想使用 Akka Streams,Play 也支持它。
- Play 控制器非常适合创建相当简单的 REST API。
- 它可以相对容易地用于提供静态文件(可以将其视为 webpack 生成管道的最终产物)。例如,最小化的 CSS/JS 等等。
因此,希望您能看出,使用 Play Framework 仍然很有意义,即使我们最终只利用它的一半功能。老实说,使用控制器作为 REST API 的想法在 ASP MVC .NET 中一直被采用,无论是通过实际的控制器还是通过 WebApi。
好的,既然我们知道将 Play Framework 用于什么,那么我们来深入了解一下这个帖子的代码。
Play Framework 基础知识
让我们从查看 Play Framework 应用程序的骨架结构开始,它看起来像这样(我使用 IntelliJ IDEA 作为我的 IDE)。

让我们谈谈这些文件夹中的每一个。
app
这个文件夹将包含控制器/视图(我在其中添加了不属于 Play Framework 应用程序要求的 Entities 文件夹)。在 controllers 文件夹中,您会找到控制器,在 views 文件夹中,您会找到视图。对于最终的应用程序,将没有 views 文件夹,我只是在截图保留它以谈论标准 Play Framework 应用程序的样子。
conf
此文件夹包含 Play Framework 应用程序的配置。这将包括特殊的 routes 文件以及我们可能拥有的任何其他应用程序特定配置。
让我们花一点时间看看 Play Framework routes 文件,您可以阅读更多关于它的信息:https://www.playframework.com/documentation/2.5.x/ScalaRouting
routes 文件有自己的 DSL,负责将给定的路由与控制器+控制器操作匹配。与路由匹配的控制器操作最终负责服务 HTTP 请求。我认为 routes 文件中显示的 DSL 如下,可能除了资产相关的路由。
所有资产相关的 HTTP 请求(例如,以 /assets 开头的请求,如 https://:9000/assets/images/favicon.png)实际上将通过一个名为 Assets 的特殊控制器进行路由。您看不到任何关于它的代码,它是 Play Framework 应用程序代码库的一部分。这个特殊的 Assets 内置 Play 控制器负责提供它期望在 public 文件夹中找到的所有静态数据文件。例如,我们的初始请求 https://:9000/assets/images/favicon.png 将被翻译成这个文件(从项目根目录的相对路径) /public/images/favicon.png。正如我所说,这个由特殊的 Assets 内置控制器为您处理。
Assets 相关路由唯一有趣的部分是它在其路由中使用了一个 *file。这实际上归结为 Play Framework 能够匹配多部分路径。就像我们上面看到的例子 https://:9000/assets/images/favicon.png,看看它不仅包含文件名,还包含一个图像目录。Assets 控制器+路由能够很好地处理该路径。
# Routes
# This file defines all application routes (Higher priority routes first)
# ~~~~

# Home page

GET        /                                   controllers.HomeController.index()

GET        /scala/comet/liveClock              controllers.ScalaCometController.streamClock()
GET        /scala/comet/kick                   controllers.ScalaCometController.kickRandomTime()

# Map static resources from the /public folder to the /assets URL path
GET        /assets/*file                       controllers.Assets.at(path="/public", file)
好的,让我们继续查看 Play 应用程序附带的其余标准文件夹。
public
这是您需要放置任何您希望提供的静态内容的地方。显然,视图(如果您使用 Play 的那部分)将在 app/views 文件夹中。正如我所说,我没有使用 Play 的视图方面,所以我的 views 文件夹中不会看到任何视图。我宁愿让 webpack 等工具生成我的路由、网页等。但我确实想提供捆绑包,所以稍后我将向您展示我的 webpack 生成的捆绑包如何融入 Play Framework 生态系统。
target
由于这是一个基于 scala 的项目,我们得到了标准的基于 scala 的文件夹,target 是其中之一,它包含生成的/编译的代码。
SBT
值得指出的是,我的 Play Framework 应用程序是一个基于 SBT 的项目,因此它有一个 SBT 方面,这主要归结为这些文件:
Project [root-build] / plugs.sbt 文件
此文件将 Play 添加为 SBT 项目的插件。
// The Lightbend repository
resolvers += Resolver.typesafeRepo("releases")

// Use the Play sbt plugin for Play projects
addSbtPlugin("com.typesafe.play" % "sbt-plugin" % "2.5.14")
build.sbt
这是项目的核心 SBT 构建文件。这是我们引入所有外部依赖项的地方等等(标准 SBT 内容)。
import play.sbt._
import sbt.Keys._
import sbt._

name := "play-streaming-scala"

version := "1.0-SNAPSHOT"

scalaVersion := "2.11.11"

lazy val root = (project in file(".")).enablePlugins(play.sbt.PlayScala)

javacOptions ++= Seq("-source", "1.8", "-target", "1.8", "-Xlint")

initialize := {
  val _ = initialize.value
  if (sys.props("java.specification.version") != "1.8")
    sys.error("Java 8 is required for this project.")
}
所以我想这涵盖了一个标准 Play Framework 应用程序的基础知识,本文的其余部分将涵盖演示项目的实际代码,我们将深入了解路由/控制器等内容。
什么是 Akka?
Akka 是一个很棒的框架,用于构建分布式容错应用程序。它围绕着 Actor 的概念构建,并且从一开始就考虑了故障。它还支持通过 Actor 的 HTTP,并且开箱即用地支持 Play。Akka 还提供了一些我使用的东西,那就是它的响应式流 API。这类似于 Rx,您可以在其中构建数据流,这些数据流也具有容错性,并且支持背压以确保消费者不会被快速生产者压垮。我以前写过很多关于 Akka 的内容,您可以在这里阅读更多: https://sachabarbs.wordpress.com/akka-series/,我将在其中介绍 Akka 的许多功能。
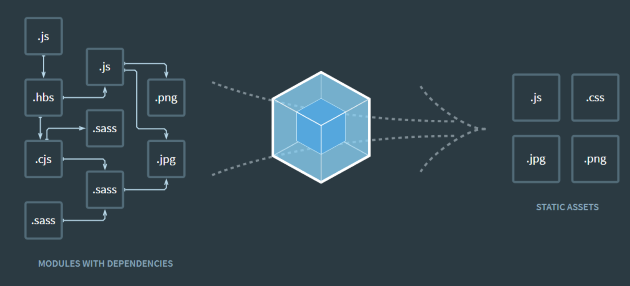
什么是 WebPack?
我们正朝着浏览器将原生支持模块和依赖项的时代迈进,但我们还没有到达那里。多年来,JavaScript 模块管理和相关文件依赖项跟踪方面有许多尝试,例如:
- ASP MVC 捆绑(相当简单,只有捆绑,没有其他功能)
- CommonJs(require 语法,在 JS 文件的工作方式上相当具有侵入性)
- Browserify(同样,在 JS 文件的加载方式及其需要管理依赖项方面相当具有侵入性)
- NPM(不算是模块管理器,更像是用于安装包的 NuGet)
- SystemJS(具有 import/export 语法,但语法比 Webpack 多一些)
- JSPM 使用SystemJS(相当不错,但使用量不如 Webpack)
- 各种任务运行器,如 Grunt/Gulp,可用于构建捆绑包。
所有这些都有其优缺点,但我认为可以公平地说,Webpack 已经成为 JavaScript 的事实标准模块管理器(至少目前是这样),它支持丰富的依赖关系图和捆绑包,还支持诸如
- Transpilers(如 Babel/Typescript/SASS/SCSS/LESS 等)
- Sourcemaps(将您转译的 JS 转换回您编写的代码)
- Minification
- 文件哈希(允许浏览器加载最新的捆绑包,因为它有一个不同的哈希)
这就是 Webpack 的作用,它非常智能地保留依赖关系图和创建的捆绑包,并允许您使用 export 和 import 等来管理您的内部依赖项。
什么是 Babel?
Babel 是一个非常不错的 JavaScript 库,它允许您现在就使用下一代 JavaScript 语法,即使您目标浏览器不支持您正在使用的语法。它通过 Node Packager Manager (NPM) 安装,并且是您转译管道的一部分。对于本文,我们将通过 TypeScript 转译器 -> Babel 转译器推送内容,最终结果是可以发送到浏览器的 JavaScript。
使用 Babel,您将能够执行以下操作,而这些操作的原生浏览器支持可能各不相同,或者根本不支持:

什么是 SASS/SCSS/LESS?
如果您使用过 HTML,您肯定会使用过 CSS。CSS 很好,但它缺少某些东西,例如:
- 变量
- 层级选择器
- Mixins
这是 SASS/SCSS 修复的内容。与 TypeScript 等转译为 JavaScript 一样,SASS/SCSS 会转译为 CSS。
通过使用 SCSS,您现在可以执行类似的操作,请注意变量:
$blue: #3bbfce;
$margin: 16px;

.content_navigation {
  border-color: $blue;
  color: darken($blue, 10%);
}

.border {
  padding: $margin / 2;
  margin: $margin / 2;
  border-color: $blue;
}
什么是 React?
除非您一直隐居,否则您一定会听说/使用/见过React。React 由 Facebook 维护和开发,它是一个用于构建用户界面的 JavaScript 库。它不像 Angular 那样是一个框架,它实际上只是现代 JS UI 库/框架中普遍存在的典型 MVC 拼图中的“视图”部分。它是声明式的、以组件为中心的。普遍认为一个 React 应用程序将由许多小的组件构成。我无法在此为您提供完整的 React 演练,但我们肯定会在下面分析的文章演示代码中看到更多 React 代码/组件。
什么是 TypeScript?
TypeScript 是微软提供的一项服务,旨在为 JavaScript 带来更好的类型和其他有用的构造/语言特性。由于 TypeScript 是 JavaScript 的超集,现有的 JavaScript 程序也是有效的 TypeScript 程序。TypeScript 文件将通过 TypeScript 编译器(或者在 WebPack 的情况下通过 WebPack 加载器)转译为常规的 JavaScript 文件。
TypeScript 带来的一些特性包括:
- Types
- 接口
- Parameter types
- Enums
- Generics
与此匹配的演示文章大量使用了 TypeScript(特别是 TSX,它是 React JSX 文件的 TypeScript 版本),并且还将使用一个不错的控制反转容器,称为Inversify。
应用程序
接下来的几个部分将介绍演示应用程序。我决定采用工作流程的方式来描述应用程序,因此将逐步介绍/讨论每个工作流程,我认为这是最好的方式。
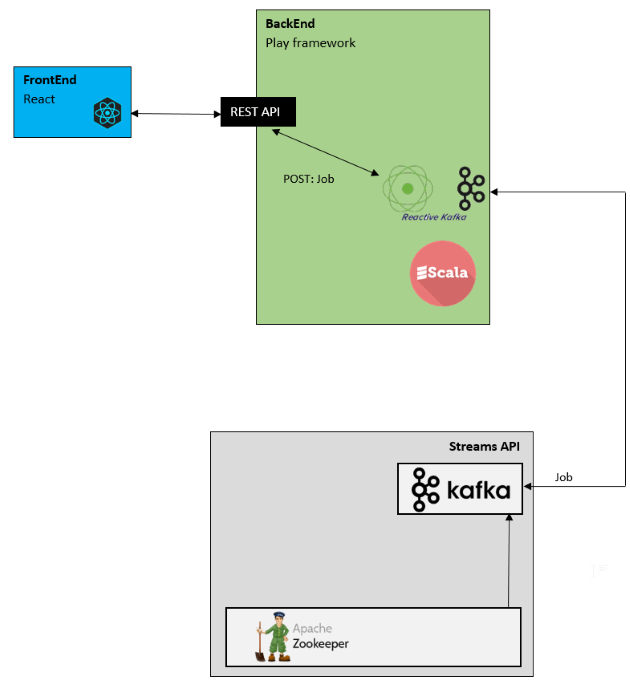
该应用程序有很多活动部件,但大致可以分为以下几个领域:
- Play 后端 API (scala)
- React 前端 (TypeScript)
- Kafka Streams (scala)
我们将逐步了解所有这些部分,但在此之前,让我们先研究一些有助于前端工作启动的工具。
NPM 需求
演示项目使用了许多组件,例如:
- TypeScript
- React
- Babel
- RX
- SCSS
- 各种其他库
因此,我们需要一种方法来拉入所有这些包以供使用,为此以及前端方面,我们使用 NPM,您需要安装它。以下显示了演示应用程序 PlayBackEndApi/FrontEndWebSite/package.json 文件的 NPM 依赖项:
{
  "name": "task1webpackconfig",
  "version": "1.0.0",
  "description": "webpack 2 + TypeScript 2 + Babel example",
  "repository": {
    "type": "git",
    "url": "git+https://github.com/sachabarber/MadCapIdea.git"
  },
  "keywords": [
    "babel",
    "typescript",
    "webpack",
    "bundling",
    "javascript",
    "npm"
  ],
  "author": "sacha barber",
  "homepage": "https://github.com/sachabarber/MadCapIdea#readme",
  "dependencies": {
    "bootstrap": "^3.3.7",
    "inversify": "^4.1.0",
    "jquery": "^3.2.1",
    "lodash": "^4.17.4",
    "react": "^15.5.4",
    "react-bootstrap": "^0.28.1",
    "react-bootstrap-validation": "^0.1.11",
    "react-dom": "^15.5.4",
    "react-google-maps": "^7.0.0",
    "react-measure": "^2.0.2",
    "react-router": "^3.0.5",
    "react-stars": "^2.1.0",
    "reflect-metadata": "^0.1.10",
    "revalidator": "^0.3.1",
    "rx": "^4.1.0",
    "webpack": "^2.5.1",
    "webpack-merge": "^4.1.0"
  },
  "devDependencies": {
    "@types/jquery": "^2.0.43",
    "@types/lodash": "^4.14.63",
    "@types/react": "^15.0.24",
    "@types/react-dom": "^15.5.0",
    "@types/rx": "^4.1.1",
    "awesome-typescript-loader": "^3.1.3",
    "babel-core": "^6.24.1",
    "babel-loader": "^7.0.0",
    "babel-preset-es2015": "^6.24.1",
    "babel-preset-es2015-native-modules": "^6.9.4",
    "babel-preset-react": "^6.24.1",
    "css-loader": "^0.28.1",
    "extract-text-webpack-plugin": "^2.1.0",
    "file-loader": "^0.11.1",
    "html-webpack-plugin": "^2.28.0",
    "node-sass": "^4.5.2",
    "on-build-webpack": "^0.1.0",
    "sass-loader": "^6.0.3",
    "source-map-loader": "^0.2.1",
    "typescript": "^2.3.2",
    "url-loader": "^0.5.8",
    "webpack": "^2.4.1"
  },
  "scripts": {
    "build-dev": "webpack -d --config webpack.develop.js",
    "build-prod": "webpack --config webpack.production.js"
  }
}
Babel 配置
如上所述,演示项目使用Babeljs.io来立即使用未来状态的 JavaScript。因此,我们还需要提供一个小的 Babel 配置文件(PlayBackEndApi/FrontEndWebSite/.babelrc),如下所示,我们选择使用 ES2015/React 预设。
{ "presets": ["es2015","react"] }
TypeScript 配置
该演示还使用了 TypeScript,它也需要一些特定的配置。因此,我们还需要提供一个小的 TypeScript 配置文件(PlayBackEndApi/FrontEndWebSite/tsconfig.json),如下所示,完整的TypeScript选项集也可以在这里找到: https://typescript.net.cn/docs/handbook/tsconfig-json.html
{
  "compilerOptions": {
    "allowSyntheticDefaultImports": true,
    "moduleResolution": "node",
    "outDir": "./dist/",
    "sourceMap": true,
    "noImplicitAny": false,
    "module": "es2015",
    "target": "es5",
    "lib": ["es6", "dom"],
    "jsx": "react",
    "experimentalDecorators": true,
    "emitDecoratorMetadata": true,
    "types" : ["jquery", "lodash", "react", "react-dom", "reflect-metadata"]
  },
    "include": [
        "./src/**/*"
    ]
}
Source map 文件
Source maps 是一种神奇的东西,它允许您用 TypeScript 编写代码,然后可能通过其他转译器(如 Babel)运行,然后是 Webpack,在那里根据您的规则进行捆绑,然后您将 JavaScript 发送到浏览器。这听起来很棒,但您能第一次就写出代码吗?我不能,并且一直需要调试东西。
那么,如果我用 TypeScript 编写了代码,然后这些代码被转换成纯粹的 vanilla JavaScript,我该如何理解浏览器中的东西呢?
这就是 Source Maps 的作用,它们实际上发送了一个聪明的映射,允许您在源代码中设置断点(理想情况下仅在开发阶段发送到浏览器),它将知道如何将该断点转换为浏览器正在使用的转译 vanilla JavaScript 中的正确位置/行。
Webpack 内置了对 Source Maps 的支持(太好了)。
我见过的关于 Source Maps 的最佳写作为此: https://www.html5rocks.com/en/tutorials/developertools/sourcemaps/
应该注意的是,SourceMaps 仅应用于开发阶段,而在生产环境中,您应该/想要压缩您的 JavaScript。
Webpack/Play 如何与此配合使用?
Webpack 有一种称为加载器的概念,用于加载不同类型的文件。例如,您可以使用 TypeScript 加载器,然后通过 Babel 加载器,最终结果将是 vanilla JavaScript。
也许最好看看演示代码的 Webpack 文件,它看起来像这样:
PlayBackEndApi/FrontEndWebSite/webpack.config.js
let _ = require('lodash');
let webpack = require('webpack');
let path = require('path');
let fs = require("fs");
let WebpackOnBuildPlugin = require('on-build-webpack');
let ExtractTextPlugin = require('extract-text-webpack-plugin');
let HtmlWebpackPlugin = require('html-webpack-plugin');

let babelOptions = {
    "presets": ["es2015", "react"]
};

function isVendor(module) {
    return module.context && module.context.indexOf('node_modules') !== -1;
}

let entries = {
    index: './src/index.tsx',
    indexCss: './scss/index.scss'

};

//build it to the Play Framework public folder, which is services by the assets controller
let buildDir = path.resolve(__dirname, '../public/dist');

module.exports = {

    context: __dirname,

    entry: entries,

    output: {
        filename: '[name].bundle.[hash].js',
        path: buildDir,
		//this is to make it play nice with the Play Framework Assets controllers
		//that deals with static data
		publicPath: '/assets/dist'
    },

    // these break for node 5.3+ when building WS stuff
    node: {
        fs: 'empty'
    },

    watch: true,

    devServer: {
        open: true, // to open the local server in browser
        contentBase: __dirname,
    },

    // Enable sourcemaps for debugging webpack's output.
    devtool: "source-map",

    resolve: {
        extensions: [".tsx", ".ts", ".js", ".jsx"],
        modules: [path.resolve(__dirname, "src"), "node_modules"]
    },

    plugins: [

        //The ProvidePlugin makes a module available as a variable in every other
        //module required by webpack
        new webpack.ProvidePlugin({
            $: "jquery",
            jQuery: "jquery",
            "window.jQuery": "jquery"
        }),

        // creates a common vendor js file for libraries in node_modules
        new webpack.optimize.CommonsChunkPlugin({
            names: ['vendor'],
            minChunks: function (module, count) {
                return isVendor(module);
            }
        }),

        // creates a common vendor js file for libraries in node_modules
        new webpack.optimize.CommonsChunkPlugin({
            name: "commons",
            chunks: _.keys(entries),
            minChunks: function (module, count) {
                return !isVendor(module) && count > 1;
            }
        }),


        //will unlink unused files on a build
        //http://stackoverflow.com/questions/40370749/how-to-remove-old-files-from-the-build-dir-when-webpack-watch
        new WebpackOnBuildPlugin(function (stats) {
            const newlyCreatedAssets = stats.compilation.assets;

            const unlinked = [];
            fs.readdir(path.resolve(buildDir), (err, files) => {
                files.forEach(file => {
                    if (file != "fonts") {
                        if (!newlyCreatedAssets[file]) {
                            fs.unlink(path.resolve(buildDir + '\\' + file));
                            unlinked.push(file);
                        }
                    }
                });
                if (unlinked.length > 0) {
                    console.log('Removed old assets: ', unlinked);
                }
            })
        }),

        //scss/sass files extracted to common css bundle
        new ExtractTextPlugin({
            filename: '[name].bundle.[hash].css',
            allChunks: true,
        }),

        new HtmlWebpackPlugin({
            filename: 'index.html',
            template: 'template.html',
        })
    ],

    module: {
        rules: [
            // All files with a '.ts' or '.tsx' extension will be handled by 'awesome-typescript-loader' 1st
            // then 'babel-loader'
            // NOTE : loaders run right to left (think of them as a cmd line pipe)
            {
                test: /\.ts(x?)$/,
                exclude: /node_modules/,
                use: [
                  {
                      loader: 'babel-loader',
                      options: babelOptions
                  },
                  {
                      loader: 'awesome-typescript-loader'
                  }
                ]
            },


            // All files with a .css extenson will be handled by 'css-loader'
            {
                test: /\.css$/,
                loader: ExtractTextPlugin.extract(['css-loader?importLoaders=1']),
            },

            // All files with a .scss|.sass extenson will be handled by 'sass-loader'
            {
                test: /\.(sass|scss)$/,
                loader: ExtractTextPlugin.extract(['css-loader', 'sass-loader'])
            },


            // All files with a '.js' extension will be handled by 'babel-loader'.
            {
                test: /\.js$/,
                exclude: /node_modules/,
                use: [
                  {
                      loader: 'babel-loader',
                      options: babelOptions
                  }
                ]
            },

            {
                test: /\.png$/,
                loader: "url-loader?limit=100000"
            },

            {
                test: /\.jpg$/,
                loader: "file-loader"
            },

            {
                test: /\.woff(\?.*)?$/,
                loader: 'url-loader?prefix=fonts/&name=fonts/[name].[ext]&limit=10000&mimetype=application/font-woff'
            },

            {
                test: /\.woff2(\?.*)?$/,
                loader: 'url-loader?prefix=fonts/&name=fonts/[name].[ext]&limit=10000&mimetype=application/font-woff2'
            },

            {
                test: /\.ttf(\?.*)?$/,
                loader: 'url-loader?prefix=fonts/&name=fonts/[name].[ext]&limit=10000&mimetype=application/octet-stream'
            },

            {
                test: /\.eot(\?.*)?$/, loader: 'file-loader?prefix=fonts/&name=fonts/[name].[ext]'
            },

            {
                test: /\.svg(\?.*)?$/,
                loader: 'url-loader?prefix=fonts/&name=fonts/[name].[ext]&limit=10000&mimetype=image/svg+xml'
            },

            // All output '.js' files will have any sourcemaps re-processed by 'source-map-loader'.
            {
                enforce: "pre",
                test: /\.js$/,
                loader: "source-map-loader"
            }
        ]
    }
};
特别值得注意的是这一部分:
output: {
        filename: '[name].bundle.[hash].js',
        path: buildDir,
		//this is to make it play nice with the Play Framework Assets controllers
		//that deals with static data
		publicPath: '/assets/dist'
    }
它使用文件名的哈希值,这样浏览器就能立即看到文件的更改,从而重新加载它,而不是缓存旧的 JavaScript。这另一部分是文件生成的位置。由于这个“前端”部分仍然需要由后端托管(本文为Play framework),我们需要确保最终的 JavaScript 位于Play framework能够渲染的位置。对于本文,这意味着静态Play framework路由,它在 PlayBackEndApi 项目中的 PlayBackEndApi/routes 文件中配置如下:
GET /assets/*file controllers.Assets.at(path="/public", file)
PlayBackEndApi/FrontEndWebSite/webpack.develop.js
在此我们可以有一个专门的开发阶段变体(请看我们如何使用基本文件 webpack.config.js 作为基础)文件,看起来像这样:
let commonConfig = require('./webpack.config.js');
let webpack = require('webpack');
let Merge = require('webpack-merge');

module.exports = function (env) {
    return Merge(commonConfig, {})
}
PlayBackEndApi/FrontEndWebSite/webpack.production.js
在此我们可以有一个专门的生产阶段变体(请看我们如何使用基本文件 webpack.config.js 作为基础)文件,看起来像这样,我们进行如下操作以使生成的 JavaScript 适用于生产环境:
- Minify it
- Strip comments
- Strip console.log (some browsers don't have it)
- Don't enable SourceMaps
let commonConfig = require('./webpack.config.js');
let webpack = require('webpack');
let Merge = require('webpack-merge');

module.exports = function (env) {
    return Merge(commonConfig, {
        plugins: [
          new webpack.LoaderOptionsPlugin({
              minimize: true,
              debug: false
          }),
          new webpack.optimize.UglifyJsPlugin({
              // Eliminate comments
              comments: false,
              beautify: false,
              mangle: {
                  screw_ie8: true,
                  keep_fnames: true
              },
              compress: {
                  screw_ie8: true,

                  // remove warnings
                  warnings: false,

                  // Drop console statements
                  drop_console: true
              },
              comments: false,
              sourceMap: false
          })
        ]
    })
}
SPA (单页应用程序)
因此,React 前端实际上是一个单页应用程序 (SPA),因此您可以找到一个单页。那么这个单页在哪里呢?
我们需要回到 webpack.config.js 文件中的一些内容,特别是这些部分:
//build it to the Play Framework public folder, which is services by the assets controller
let buildDir = path.resolve(__dirname, '../public/dist');

output: {
        filename: '[name].bundle.[hash].js',
        path: buildDir,
		//this is to make it play nice with the Play Framework Assets controllers
		//that deals with static data
		publicPath: '/assets/dist'
    },
....
....
....
....
new HtmlWebpackPlugin({
            filename: 'index.html',
            template: 'template.html',
        })
这意味着 Webpack 将尝试使用名为 template.html 的模板生成一个名为 index.html 的文件,并且最终文件将被放置在名为 /assets/dist 的相对路径中,如果您稍微回顾一下,它已经使用 PlayBackEndApi/routes 文件中的以下内容映射到 PlayBackEndApi 项目中:
GET /assets/*file controllers.Assets.at(path="/public", file)
PlayBackEndApi/FrontEndWebSite/template.html
那么 template.html 文件看起来是什么样的?好吧,它是这样的,它还包含了 Google Maps API 的 CDN 引用,因为我们在本文中使用它。
<!DOCTYPE html>
<html>
<head>
    <meta charset="UTF-8" />
    <title>Hello React!</title>
    <script src="https://maps.googleapis.com/maps/api/js?key=AIzaSyBVtreRNA537_WsNSn2_kOiz3Xhm8w6pEo"
            type="text/javascript"></script>
</head>
<body>
    <div>
        <iframe id="comet" src="/job/streamedJob"></iframe>
    </div>
    <div id="root"></div>
    <!-- Main -->
</body>
</html>
PlayBackEndApi/public/dist/index.html
那么在 WebPack 完成其魔法之后,最终文件是什么样的?嗯,它是这样的:
<!DOCTYPE html>
<html>
<head>
    <meta charset="UTF-8" />
    <title>Hello React!</title>
    <script src="https://maps.googleapis.com/maps/api/js?key=AIzaSyBVtreRNA537_WsNSn2_kOiz3Xhm8w6pEo"
            type="text/javascript"></script>
<link href="/assets/dist/vendor.bundle.5c5feaa8663412cf31c5.css" rel="stylesheet">
<link href="/assets/dist/indexCss.bundle.5c5feaa8663412cf31c5.css" rel="stylesheet"></head>
<body>
    <div>
        <iframe id="comet" src="/job/streamedJob"></iframe>
    </div>
    <div id="root"></div>
    <!-- Main -->
<script type="text/javascript" src="/assets/dist/vendor.bundle.5c5feaa8663412cf31c5.js"></script>
<script type="text/javascript" src="/assets/dist/index.bundle.5c5feaa8663412cf31c5.js"></script>
</body>
</html>
看到正确的 CSS 和 JavaScript 文件是如何自动放置在 HEAD/Script 标签中的,我认为这很棒,而且它们的文件名中还包含漂亮的哈希值,以便轻松使浏览器缓存失效。
Play “Home” 路由
这一切都很好,但这个页面是如何提供的呢?诀窍在于这个 Play framework 路由条目:
# Home page
GET   /                                        controllers.HomeController.index()
它有这个服务器端代码来提供路由:
package controllers

import javax.inject.Inject
import play.api.mvc.{Action, Controller}

class HomeController @Inject() (environment: play.api.Environment)
  extends Controller {

  def index() = Action {
    val fullpath = s"${environment.rootPath}\\public\\dist\\index.html"
    val htmlContents = scala.io.Source.fromFile(fullpath).mkString
    Ok(htmlContents).as("text/html")
  }

}
路由
正如我上面所说,这个演示是一个单页应用 (SPA) 类型应用。那么它是如何实现的?这在 PlayBackEndApi/FrontEndWebSite/src/index.tsx 文件中完成,该文件也在 WebPack webpack.config.js 文件中设置为入口点。
let entries = {
    index: './src/index.tsx',
    .....
    .....
    .....
    .....
};

//build it to the Play Framework public folder, which is services by the assets controller
let buildDir = path.resolve(__dirname, '../public/dist');

module.exports = {

    context: __dirname,

    entry: entries,


	.....
	.....
	.....
	.....
	.....

}
PlayBackEndApi/FrontEndWebSite/src/index.tsx
实际的路由工作在这里完成,主要的顶层组件将是:
- 登录
- Register
- Logout
- CreateJob
- ViewJob
- ViewRating
其中一些是条件路由,取决于您是否登录。
import * as React from "react";
import * as ReactDOM from "react-dom";
import 'bootstrap/dist/css/bootstrap.css';
import {
    Nav,
    Navbar,
    NavItem,
    NavDropdown,
    MenuItem,
    Button
} from "react-bootstrap";
import { Router, Route, hashHistory } from 'react-router'
import { Login } from "./Login";
import { Logout } from "./Logout";
import { Register } from "./Register";
import { CreateJob } from "./CreateJob";
import { ViewJob } from "./ViewJob";
import { ViewRating } from "./ViewRating";
import { ContainerOperations } from "./ioc/ContainerOperations";
import { AuthService } from "./services/AuthService";
import { JobService } from "./services/JobService";
import { JobStreamService } from "./services/JobStreamService";
import { PositionService } from "./services/PositionService";
import { TYPES } from "./types";
import Rx from 'rx';

let authService = ContainerOperations.getInstance().container.get<AuthService>(TYPES.AuthService);
let jobService = ContainerOperations.getInstance().container.get<JobService>(TYPES.JobService);
let jobStreamService = ContainerOperations.getInstance().container.get<JobStreamService>(TYPES.JobStreamService);
let positionService = ContainerOperations.getInstance().container.get<PositionService>(TYPES.PositionService);
jobStreamService.init();


export interface MainNavProps {
    authService: AuthService;
    jobService: JobService;
    jobStreamService: JobStreamService;
    positionService: PositionService;

}

export interface MainNavState {
    isLoggedIn: boolean;
}

class MainNav extends React.Component<MainNavProps, MainNavState> {

    private _subscription: any;

    constructor(props: any) {
        super(props);
        console.log(props);
        this.state = {
            isLoggedIn: false
        };
    }

    componentWillMount() {
        this._subscription = this.props.authService.getAuthenticationStream()
            .subscribe(isAuthenticated => {
                this.state = {
                    isLoggedIn: isAuthenticated
                };
                if (this.state.isLoggedIn) {
                    hashHistory.push('/createjob');
                }
                else {
                    hashHistory.push('/');
                }
            });
    }

    componentWillUnmount() {
        this._subscription.dispose();
    }

    render() {
        return (
            this.state.isLoggedIn ?
                <Navbar collapseOnSelect>
                    <Navbar.Header>
                        <Navbar.Brand>
                            <span>Simple Kafka-Uber</span>
                        </Navbar.Brand>
                        <Navbar.Toggle />
                    </Navbar.Header>
                    <Navbar.Collapse>
                        <Nav pullRight>
                            <NavItem eventKey={2} href='#/logout'>Logout</NavItem>
                            <NavItem eventKey={2} href='#/createjob'>Create Job</NavItem>
                            <NavItem eventKey={2} href='#/viewjob'>View Job</NavItem>
                            <NavItem eventKey={2} href='#/viewrating'>View Rating</NavItem>
                        </Nav>
                    </Navbar.Collapse>
                </Navbar> :
                <Navbar pullRight collapseOnSelect>
                    <Navbar.Header>
                        <Navbar.Brand>
                            <span>Simple Kafka-Uber</span>
                        </Navbar.Brand>
                        <Navbar.Toggle />
                    </Navbar.Header>
                    <Navbar.Collapse>
                    </Navbar.Collapse>
                </Navbar>
        )
    }
}

class App extends React.Component<undefined, undefined> {
    render() {
        return (
            <div>
                <div>
                    <MainNav
                        authService={authService}
                        jobService={jobService}
                        jobStreamService={jobStreamService}
                        positionService={positionService}
                    />
                    {this.props.children}
                </div>
            </div>
        )
    }
}


ReactDOM.render((
    <Router history={hashHistory}>
        <Route component={App}>
            <Route
                path="/"
                component={Login}
                authService={authService} />
            <Route
                path="/register"
                component={Register}
                authService={authService} />
            <Route
                path="/logout"
                component={Logout}
                authService={authService}
                jobService={jobService}
                positionService={positionService} />
            <Route
                path="/createjob"
                component={CreateJob}
                authService={authService}
                jobService={jobService}
                positionService={positionService} />
            <Route
                path="/viewjob"
                component={ViewJob}
                authService={authService}
                jobService={jobService}
                jobStreamService={jobStreamService}
                positionService={positionService} />
            <Route
                path="/viewrating"
                component={ViewRating}
                authService={authService} />
        </Route>
    </Router>
), document.getElementById('root'));
这使用了 ReactRouter 版本 3.0.5 来在 SPA 中进行路由,并使用 React-Bootstrap 来渲染 NavBar。
这个 TypeScript 还连接了一个 RxJS 订阅,以确定您是否已登录/退出,这是使用以下可注入服务完成的:PlayBackEndApi/FrontEndWebSite/src/services/AuthService.ts
import { injectable, inject } from "inversify";
import { TYPES } from "../types";
import Rx from 'rx';

@injectable()
export class AuthService {

    private _isAuthenticated: boolean;
    private _authenticatedSubject = new Rx.Subject<boolean>();

    constructor() {

    }

    clearUser = (): void => {
        this._isAuthenticated = false;
        sessionStorage.removeItem('currentUserProfile');
        this._authenticatedSubject.onNext(false);
    }

    storeUser = (currentProfile: any): void => {

        if (currentProfile == null || currentProfile == undefined)
            return;

        this._isAuthenticated = true;
        sessionStorage.setItem('currentUserProfile', JSON.stringify(currentProfile));
        this._authenticatedSubject.onNext(true);
    }

    userName = (): string => {
        var userProfile = JSON.parse(sessionStorage.getItem('currentUserProfile'));
        return userProfile.user.fullName;
    }

    user = (): any => {
        var userProfile = JSON.parse(sessionStorage.getItem('currentUserProfile'));
        return userProfile.user;
    }

    userEmail = (): string => {
        var userProfile = JSON.parse(sessionStorage.getItem('currentUserProfile'));
        return userProfile.user.email;
    }

    isDriver = (): boolean => {
        var userProfile = JSON.parse(sessionStorage.getItem('currentUserProfile'));
        return userProfile.isDriver;
    }

    isAuthenticated = (): boolean => {
        return this._isAuthenticated;
    }

    getAuthenticationStream = (): Rx.Observable<boolean> => {
        return this._authenticatedSubject.asObservable();
    }
}
一些常见的 React / Bootstrap UI 组件
与任何 UI 工作一样,您最终会遇到需要一些核心组件,这些组件会被反复使用。对于演示应用程序,我有这 3 个可重用的 React 组件,它们使用 React/React-Bootstrap:
YesNoDialog
这代表了一个通用的、可重用的 yes/no 对话框,可以触发,这是代码。重要部分是各种 prop 值可以通过父组件的状态值进行控制。
import * as React from "react";
import * as ReactDOM from "react-dom";
import * as _ from "lodash";

import 'bootstrap/dist/css/bootstrap.css';
import
{
    Button,
    Modal
} from "react-bootstrap";


//TODO : Fix this
export interface YesNoDialogProps {
    headerText: string;
    theId: string;
    launchButtonText: string;
    yesCallBack: any;
    noCallBack: any;
}

export interface YesNoDialogState {
    showModal: boolean;
}


export class YesNoDialog extends React.Component<YesNoDialogProps, YesNoDialogState> {

    constructor(props) {
        super(props);
        console.log(this.props);
        //set initial state
        this.state = {
            showModal: false
        };
    }

    _yesClicked = () => {
        this.setState({ showModal: false });
        this.props.yesCallBack();
    }

    _noClicked = () => {
        this.setState({ showModal: false });
        this.props.noCallBack();
    }

    _close = () => {
        this.setState({ showModal: false });
    }

    _open = () => {
        this.setState({ showModal: true });
    }

    render() {
        return (
            <div className="leftFloat">

                <Button
                    id={this.props.theId}
                    type='button'
                    bsSize='small'
                    bsStyle='primary'
                    onClick={this._open}>{this.props.launchButtonText}</Button>

                <Modal show={this.state.showModal} onHide={this._close}>
                    <Modal.Header closeButton>
                        <Modal.Title>{ this.props.headerText }</Modal.Title>
                    </Modal.Header>
                    <Modal.Body>
                        <h4>Are you sure?</h4>
                    </Modal.Body>
                    <Modal.Footer>
                        <Button
                            type='button'
                            bsSize='small'
                            bsStyle='primary'
                            onClick={this._yesClicked}>Yes</Button>
                        <Button
                            type='button'
                            bsSize='small'
                            bsStyle='danger'
                            onClick={this._noClicked}>Cancel</Button>
                    </Modal.Footer>
                </Modal>
            </div>
        );
    }
}
渲染时看起来是这样的:

OkDialog
这代表了一个通用的、可重用的 ok 对话框,可以触发,这是代码。重要部分是各种 prop 值可以通过父组件的状态值进行控制。
import * as React from "react";
import * as ReactDOM from "react-dom";
import * as _ from "lodash";

import 'bootstrap/dist/css/bootstrap.css';
import
{
    Button,
    Modal
} from "react-bootstrap";


//TODO : Fix this
export interface OkDialogProps {
    headerText: string;
    bodyText: string;
    open: boolean;
    okCallBack: any;
}

export interface OkDialogState {
    showModal: boolean;
}


export class OkDialog extends React.Component<OkDialogProps, OkDialogState> {

    constructor(props) {
        super(props);
        console.log(this.props);
        //set initial state
        this.state = {
            showModal: false
        };
    }

    componentDidMount() {
        if (this.props.open === true) {
            this.setState({ showModal: true });
        }
    }

    _okClicked = () => {
        this.setState({ showModal: false });
        this.props.okCallBack();
    }

    _close = () => {
        this.setState({ showModal: false });
        this.props.okCallBack();
    }

    _open = () => {
        this.setState({ showModal: true });
    }

    render() {
        return (
            <div className="leftFloat">

                <Modal show={this.state.showModal} onHide={this._close}>
                    <Modal.Header closeButton>
                        <Modal.Title>{ this.props.headerText }</Modal.Title>
                    </Modal.Header>
                    <Modal.Body>
                        <h4>{this.props.bodyText}</h4>
                    </Modal.Body>
                    <Modal.Footer>
                        <Button
                            type='button'
                            bsSize='small'
                            bsStyle='primary'
                            onClick={this._okClicked}>Ok</Button>
                    </Modal.Footer>
                </Modal>
            </div>
        );
    }
}
渲染时看起来是这样的:
RatingDialog
这代表了一个通用的、可重用的评分控件,评分可以从 1-5 之间。这是代码。重要部分是各种 prop 值可以通过父组件的状态值进行控制。
import * as React from "react";
import * as ReactDOM from "react-dom";
import * as _ from "lodash";

import 'bootstrap/dist/css/bootstrap.css';
import
{
    Button,
    Modal
} from "react-bootstrap";


import ReactStars from 'react-stars';


export interface RatingDialogProps {
    headerText: string;
    theId: string;
    okCallBack: any;
}

export interface RatingDialogState {
    showModal: boolean;
    rating: number;
}


export class RatingDialog extends React.Component<RatingDialogProps, RatingDialogState> {

    constructor(props) {
        super(props);
        console.log(this.props);
        //set initial state
        this.state = {
            showModal: false,
            rating:0
        };
    }

    _close = () => {
        this.setState(
            {
                showModal: false,
                rating:0
            }
        );
    }

    _open = () => {
        this.setState(
            {
                showModal: true,
                rating: 0
            }
        );
    }

    _ratingChanged = (newRating) => {
        console.log(newRating)
        this.setState(
            {
                rating: newRating
            }
        );
    }

    _okClicked = () => {
        this._close();
        this.props.okCallBack();
    }

    render() {
        return (
            <div className="leftFloat">

                <Button
                    id={this.props.theId}
                    type='button'
                    bsSize='small'
                    bsStyle='primary'
                    onClick={this._open}>Complete</Button>

                <Modal show={this.state.showModal} onHide={this._close}>
                    <Modal.Header closeButton>
                        <Modal.Title>{ this.props.headerText }</Modal.Title>
                    </Modal.Header>
                    <Modal.Body>
                        <h4>Give your rating between 1-5</h4>
                        <ReactStars count={5}
                                    onChange={this._ratingChanged}
                                    size={24}
                                    color2={'#ffd700'} />
                    </Modal.Body>
                    <Modal.Footer>
                        <Button
                            type='submit'
                            bsSize='small'
                            bsStyle='primary'
                            onClick={this._okClicked}>Ok</Button>
                    </Modal.Footer>
                </Modal>
            </div>
        );
渲染时看起来是这样的:

对于评分组件,我使用了这个 React 库:https://npmjs.net.cn/package/react-stars
注册工作流程

注册工作流程几乎与上面描述的相同,并使用了上面显示的组件。
有两种类型的注册,我们需要捕获不同的数据:
- 乘客注册
- 司机注册
我们将详细检查乘客注册,而司机注册在性质上与之类似。
乘客注册

注册 React 组件
PlayBackEndApi/FrontEndWebSite/src/PassengerRegistration.tsx 是代表乘客注册组件的 React TSX 的主文件。
import * as React from "react";
import * as ReactDOM from "react-dom";
import { OkDialog } from "./components/OkDialog";
import 'bootstrap/dist/css/bootstrap.css';
import {
    Well,
    Grid,
    Row,
    Col,
    ButtonInput
} from "react-bootstrap";
import { AuthService } from "./services/AuthService";
import { hashHistory } from 'react-router';
import { Form, ValidatedInput } from 'react-bootstrap-validation';
import revalidator from 'revalidator';


let schema = {
    properties: {
        fullName: {
            type: 'string',
            minLength: 8,
            maxLength: 60,
            required: true,
            allowEmpty: false
        },
        email: {
            type: 'string',
            maxLength: 255,
            format: 'email',
            required: true,
            allowEmpty: false
        },
        password: {
            type: 'string',
            minLength: 8,
            maxLength: 60,
            required: true,
            allowEmpty: false
        }
    }
};


export interface PassengerRegistrationProps {
    authService: AuthService;
}


export interface PassengerRegistrationState {
    okDialogOpen: boolean;
    okDialogKey: number;
    okDialogHeaderText: string;
    okDialogBodyText: string;
    wasSuccessful: boolean;
}

export class PassengerRegistration extends React.Component<PassengerRegistrationProps, PassengerRegistrationState> {

    constructor(props: any) {
        super(props);
        this.state = {
            okDialogHeaderText: '',
            okDialogBodyText: '',
            okDialogOpen: false,
            okDialogKey: 0,
            wasSuccessful: false
        };
    }

    render() {
        return (
            <Form className="submittable-form-inner"
                // Supply callbacks to both valid and invalid
                // submit attempts
                validateAll={this.validateForm}
                onInvalidSubmit={this.handleInvalidSubmit}
                onValidSubmit={this.handleValidSubmit}>
                <Grid>
                    <Row className="show-grid">
                        <Col xs={10} md={6}>
                            <h4>Passenger details</h4>
                        </Col>
                    </Row>
                    <Row className="show-grid">
                        <Col xs={10} md={6}>
                            <ValidatedInput type='text'
                                label='FullName'
                                name='fullName'
                                errorHelp='FullName is invalid' />

                        </Col>
                    </Row>
                    <Row className="show-grid">
                        <Col xs={10} md={6}>
                            <ValidatedInput type='text'
                                label='Email'
                                name='email'
                                errorHelp='Email address is invalid' />
                        </Col>
                    </Row>
                    <Row className="show-grid">
                        <Col xs={10} md={6}>
                            <ValidatedInput type='password'
                                label='Password'
                                name='password'
                                errorHelp='Password is invalid' />
                        </Col>
                    </Row>
                    <Row className="show-grid">
                        <Col xs={10} md={6}>
                            <ButtonInput
                                id="registerBtn"
                                type='submit'
                                bsSize='small'
                                bsStyle='primary'
                                value='Register'>Register</ButtonInput>
                        </Col>
                    </Row>
                    <Row className="show-grid">
                        <span>
                            <OkDialog
                                open={this.state.okDialogOpen}
                                okCallBack={this.okDialogCallBack}
                                headerText={this.state.okDialogHeaderText}
                                bodyText={this.state.okDialogBodyText}
                                key={this.state.okDialogKey} />
                        </span>
                    </Row>
                </Grid>
            </Form>
        )
    }

    validateForm = (values) => {
        let res = revalidator.validate(values, schema);

        // If the values passed validation, we return true
        if (res.valid) {
            return true;
        }

        // Otherwise we should return an object containing errors
        // e.g. { email: true, password: true }
        return res.errors.reduce((errors, error) => {
            // Set each property to either true or
            // a string error description
            errors[error.property] = true;

            return errors;
        }, {});
    }

    handleInvalidSubmit = (errors, values) => {
        // Errors is an array containing input names
        // that failed to validate
        this.setState(
            {
                okDialogHeaderText: 'Validation Error',
                okDialogBodyText: 'Form has errors and may not be submitted',
                okDialogOpen: true,
                okDialogKey: Math.random()
            });
    }

    handleValidSubmit = (values) => {
        var passenger = values;
        var self = this;

        $.ajax({
            type: 'POST',
            url: 'registration/save/passenger',
            data: JSON.stringify(passenger),
            contentType: "application/json; charset=utf-8",
            dataType: 'json'
        })
        .done(function (jdata, textStatus, jqXHR) {
            var redactedPassenger = passenger;
            redactedPassenger.password = "";
            console.log("redacted ${redactedPassenger}");
            console.log(redactedPassenger);
            console.log("Auth Service");
            console.log(self.props.authService);
            let userProfile = {
                isDriver: false,
                user: redactedPassenger
            };
            self.setState(
                {
                    wasSuccessful: true,
                    okDialogHeaderText: 'Registration Successful',
                    okDialogBodyText: 'You are now registered',
                    okDialogOpen: true,
                    okDialogKey: Math.random()
                });
            self.props.authService.storeUser(userProfile);
        })
        .fail(function (jqXHR, textStatus, errorThrown) {
            self.setState(
                {
                    okDialogHeaderText: 'Error',
                    okDialogBodyText: jqXHR.responseText,
                    okDialogOpen: true,
                    okDialogKey: Math.random()
                });
        });
    }

    okDialogCallBack = () => {
        this.setState(
            {
                okDialogOpen: false
            });

        if (this.state.wasSuccessful) {
            hashHistory.push('/');
        }
    }
}
这里有几点值得注意:
- 我们使用标准的 POST
- 这会将注册数据作为 JSON 发布到 Play API 后端代码。
- 我们还显示了一个标准的 Bootstrap OkDialog,我们在上一次看到了它,当点击 Ok 按钮时,它将使用 React Router 导航到路由页面。
- 我们使用 react-bootstrap-validation 包进行字段验证。
- 如果注册过程正常,我们将用户数据存储在之前看到的
AuthorisationService.ts中,它又会写入浏览器的sessionStorage。
现在让我们将注意力转向与乘客注册配套的 Play API 后端代码。
JSON 支持
我们需要从 JavaScript 到 Scala 的 JSON 支持开始。这是通过此文件 PlayBackEndApi/app/Entities/PassengerRegistrationEntities.scala 完成的,我们在其中使用 Play framework JSON combinators。
- Reads:允许将 JSON 字符串读取到 Scala 对象。
- Writes:允许将 Scala 对象转换为 JSON 字符串。
- Format:只是 Reads 和 Writes Traits 的混合,可以隐式替换其组件进行隐式转换。
两者的建议是,它们应公开为隐式 vals,您可以在此处阅读更多信息: https://www.playframework.com/documentation/2.6.x/ScalaJsonCombinators
package entities

import play.api.libs.json._
import play.api.libs.functional.syntax._

case class PassengerRegistration(
  fullName: String,
  email: String,
  password: String)

object PassengerRegistration {
  implicit val formatter = Json.format[PassengerRegistration]
}

object PassengerRegistrationJsonFormatters {

  implicit val passengerRegistrationWrites = new Writes[PassengerRegistration] {
    def writes(passengerRegistration: PassengerRegistration) = Json.obj(
      "fullName" -> passengerRegistration.fullName,
      "email" -> passengerRegistration.email,
      "password" -> passengerRegistration.password
    )
  }

  implicit val passengerRegistrationReads: Reads[PassengerRegistration] = (
    (JsPath \ "fullName").read[String] and
      (JsPath \ "email").read[String] and
      (JsPath \ "password").read[String]
    )(PassengerRegistration.apply _)
}
注册路由
一旦我们有了这个,我们就需要关注支持 PassengerRegistration 对象 POST 的实际端点。我们首先需要在 conf/routes 文件中设置路由,如下所示:
# Registration page
POST  /registration/save/passenger             controllers.RegistrationController.savePassengerRegistration()
注册控制器
现在我们已经讨论了 JSON Reads/Writes,并且知道我们需要下载并运行 Mongo(请参阅开头的“如何运行”部分),让我们看看实际的控制器是什么样的?这是 PlayBackEndApi/app/controllers/RegistrationController.scala 中乘客注册部分的完整代码。
package controllers

import javax.inject.Inject
import play.api.mvc.{Action, Controller, Result}
import entities._
import entities.DriverRegistrationJsonFormatters._
import entities.PassengerRegistrationJsonFormatters._
import scala.concurrent.{ExecutionContext, Future}
import play.modules.reactivemongo._
import play.api.Logger
import utils.Errors
import play.api.libs.json._
import reactivemongo.api.ReadPreference
import reactivemongo.play.json._
import collection._

class RegistrationController @Inject()
  (val reactiveMongoApi: ReactiveMongoApi)
  (implicit ec: ExecutionContext)
  extends Controller with MongoController with ReactiveMongoComponents {

  def passRegistrationFuture: Future[JSONCollection] = database.map(_.collection[JSONCollection]("passenger-registrations"))
  def driverRegistrationFuture: Future[JSONCollection] = database.map(_.collection[JSONCollection]("driver-registrations"))


  def savePassengerRegistration = Action.async(parse.json) { request =>
    Json.fromJson[PassengerRegistration](request.body) match {
      case JsSuccess(newPassRegistration, _) =>

        //https://github.com/ReactiveMongo/ReactiveMongo-Extensions/blob/0.10.x/guide/dsl.md
        val query = Json.obj("email" -> Json.obj("$eq" -> newPassRegistration.email))

        dealWithRegistration[PassengerRegistration](
          newPassRegistration,
          passRegistrationFuture,
          query,
          PassengerRegistration.formatter)
      case JsError(errors) =>
        Future.successful(BadRequest("Could not build a PassengerRegistration from the json provided. " +
          Errors.show(errors)))
    }
  }

  private def dealWithRegistration[T](
          incomingRegistration: T,
          jsonCollectionFuture: Future[JSONCollection],
          query: JsObject,
          formatter: OFormat[T])
          (implicit ec: ExecutionContext): Future[Result] = {

    def hasExistingRegistrationFuture = jsonCollectionFuture.flatMap {
        //http://reactivemongo.org/releases/0.11/documentation/advanced-topics/collection-api.html
        _.find(query)
        .cursor[JsObject](ReadPreference.primary)
        .collect[List]()
      }.map(_.length match {
          case 0 => false
          case _ => true
      }
    )

    hasExistingRegistrationFuture.flatMap {
      case false => {
        for {
          registrations <- jsonCollectionFuture
          writeResult <- registrations.insert(incomingRegistration)(formatter,ec)
        } yield {
          Logger.debug(s"Successfully inserted with LastError: $writeResult")
          Ok(Json.obj())
        }
      }
      case true => Future(BadRequest("Registration already exists"))
    }
  }
}
让我们将其分解为几部分:
- 控制器构造函数
- 这需要一个
ReactiveMongoApi(这是满足基类MongoController要求的强制项)。 - 继承自
MongoController,它提供了许多有用的功能。 - 它还继承自
ReactiveMongoComponents,以允许基类MongoController的 cake pattern/self typing 要求,该要求期望一个ReactiveMongoComponents。
- 这需要一个
- 使用
JSONCollection- 有一个
Future[JSONCollection]代表 Mongo 中的乘客集合。这是一个存储 JSON 的集合。使用 reactive Mongo 时,您可以选择使用标准的 BSON 集合还是 JSON。我选择了 JSON。
- 有一个
- 逻辑的核心
- 现在我们已经讨论了控制器构造函数和 Mongo 集合。我们只需要谈谈注册时实际发生的工作。简而言之,它的工作方式如下:
- 传入的 JSON 字符串通过 Play 转换为
PassengerRegistration对象。 - 然后我们创建一个新的 JSON 查询对象来查询 Mongo
JSONCollection,以查看是否已存在注册。 - 如果已存在注册,我们将以
BadRequest输出退出。 - 如果注册不存在,我们将新的注册详细信息插入 Mongo
JSONCollection,然后返回Ok输出。
- 传入的 JSON 字符串通过 Play 转换为
- 现在我们已经讨论了控制器构造函数和 Mongo 集合。我们只需要谈谈注册时实际发生的工作。简而言之,它的工作方式如下:
这就是乘客注册的工作方式。
司机注册
司机注册的工作方式与上述描述几乎相同,只是 JSON 略有不同,但它与乘客注册共享相同的核心逻辑/控制器。
登录工作流程
登录使用了上面显示的组件。
此工作流程与注册非常相似,因此如果您认为您已理解注册概念,请随意跳过此部分。
登录 React 组件
这是 PlayBackEndApi/FrontEndWebSite/src/Login.tsx 文件,是代表登录组件的 React TSX 的主文件。
import * as React from "react";
import * as ReactDOM from "react-dom";
import { OkDialog } from "./components/OkDialog";
import 'bootstrap/dist/css/bootstrap.css';
import {
    Well,
    Grid,
    Row,
    Col,
    ButtonInput
} from "react-bootstrap";
import { Form, ValidatedInput } from 'react-bootstrap-validation';
import revalidator from 'revalidator';
import { AuthService } from "./services/AuthService";

let schema = {
    properties: {
        email: {
            type: 'string',
            maxLength: 255,
            format: 'email',
            required: true,
            allowEmpty: false
        },
        password: {
            type: 'string',
            minLength: 8,
            maxLength: 60,
            required: true,
            allowEmpty: false
        }
    }
};

export interface LoginState {
    okDialogOpen: boolean;
    okDialogKey: number;
    okDialogHeaderText: string;
    okDialogBodyText: string;
}

export class Login extends React.Component<undefined, LoginState> {

    private _authService: AuthService;

    constructor(props: any) {
        super(props);
        console.log(props);
        this._authService = props.route.authService;
        this.state = {
            okDialogHeaderText: '',
            okDialogBodyText: '',
            okDialogOpen: false,
            okDialogKey: 0
        };
    }

    render() {
        return (
            <Well className="outer-well">
                <Form
                    // Supply callbacks to both valid and invalid
                    // submit attempts
                    validateAll={this.validateForm}
                    onInvalidSubmit={this.handleInvalidSubmit}
                    onValidSubmit={this.handleValidSubmit}>
                    <Grid>
                        <Row className="show-grid">
                            <Col xs={10} md={6}>
                                <h4>ENTER YOUR LOGIN DETAILS</h4>
                                <span><h6>Or click <a href="#/register">here</a> to register</h6></span>
                            </Col>
                        </Row>
                        <Row className="show-grid">
                            <Col xs={10} md={6}>
                                <ValidatedInput type='text'
                                    label='Email'
                                    name='email'
                                    errorHelp='Email address is invalid' />

                            </Col>
                        </Row>
                        <Row className="show-grid">
                            <Col xs={10} md={6}>
                                <ValidatedInput type='password'
                                    name='password'
                                    label='Password'
                                    errorHelp='Password is invalid' />

                            </Col>
                        </Row>
                        <Row className="show-grid">
                            <Col xs={10} md={6}>
                                <ValidatedInput
                                    type='checkbox'
                                    name='isDriver'
                                    label='Are you a driver?'
                                />
                            </Col>
                        </Row>
                        <Row className="show-grid">
                            <Col xs={10} md={6}>
                                <ButtonInput
                                    id="loginBtn"
                                    type='submit'
                                    bsSize='small'
                                    bsStyle='primary'
                                    value='Register'>Login</ButtonInput>
                            </Col>
                        </Row>
                        <Row className="show-grid">
                            <span>
                                <OkDialog
                                    open={this.state.okDialogOpen}
                                    okCallBack={this.okDialogCallBack}
                                    headerText={this.state.okDialogHeaderText}
                                    bodyText={this.state.okDialogBodyText}
                                    key={this.state.okDialogKey} />
                            </span>
                        </Row>
                    </Grid>
                </Form>
            </Well>
        )
    }

    validateForm = (values) => {
        let res = revalidator.validate(values, schema);

        // If the values passed validation, we return true
        if (res.valid) {
            return true;
        }

        // Otherwise we should return an object containing errors
        // e.g. { email: true, password: true }
        return res.errors.reduce((errors, error) => {
            // Set each property to either true or
            // a string error description
            errors[error.property] = true;

            return errors;
        }, {});
    }

    handleInvalidSubmit = (errors, values) => {

        console.log(values);

        // Errors is an array containing input names
        // that failed to validate
        this.setState(
            {
                okDialogHeaderText: 'Validation Error',
                okDialogBodyText: 'Form has errors and may not be submitted',
                okDialogOpen: true,
                okDialogKey: Math.random()
            });
    }

    handleValidSubmit = (values) => {
        var logindetails = values;
        var self = this;

        $.ajax({
            type: 'POST',
            url: 'login/validate',
            data: JSON.stringify(logindetails),
            contentType: "application/json; charset=utf-8",
            dataType: 'json'
        })
        .done(function (jdata, textStatus, jqXHR) {

            console.log("result of login");
            console.log(jqXHR.responseText);
            let currentUser = JSON.parse(jqXHR.responseText);
            let userProfile = {
                isDriver: logindetails.isDriver,
                user: currentUser
            };
            self._authService.storeUser(userProfile);

            self.setState(
                {
                    okDialogHeaderText: 'Login Successful',
                    okDialogBodyText: 'You are now logged in',
                    okDialogOpen: true,
                    okDialogKey: Math.random()
                });
        })
        .fail(function (jqXHR, textStatus, errorThrown) {
            self.setState(
                {
                    okDialogHeaderText: 'Error',
                    okDialogBodyText: jqXHR.responseText,
                    okDialogOpen: true,
                    okDialogKey: Math.random()
                });
        });
    }

    okDialogCallBack = () => {
        this.setState(
            {
                okDialogOpen: false
            });
    }
}
这里有几点值得注意:
- 我们使用标准的 POST
- 这将登录数据作为 JSON 发布到 Play API 后端代码。
- 我们使用 react-bootstrap-validation 包进行字段验证。
- 如果登录过程正常,我们将用户数据存储在之前看到的
AuthorisationService.ts中,它又会写入浏览器的sessionStorage。
现在让我们将注意力转向与登录配套的 Play API 后端代码。
JSON 支持
我们需要从 JavaScript 到 Scala 的 JSON 支持开始。这是通过此文件 PlayBackEndApi/app/Entities/LoginEntities.scala 完成的,我们在其中使用 Play framework JSON combinators。
- Reads:允许将 JSON 字符串读取到 Scala 对象。
- Writes:允许将 Scala 对象转换为 JSON 字符串。
- Format:只是 Reads 和 Writes Traits 的混合,可以隐式替换其组件进行隐式转换。
两者的建议是,它们应公开为隐式 vals,您可以在此处阅读更多信息: https://www.playframework.com/documentation/2.6.x/ScalaJsonCombinators
package entities

import play.api.libs.json._
import play.api.libs.functional.syntax._

case class Login(email: String, password: String, isDriver: Boolean)

object Login {
  implicit val formatter = Json.format[Login]
}

object LoginJsonFormatters {

  implicit val loginWrites = new Writes[Login] {
    def writes(login: Login) = Json.obj(
      "email" -> login.email,
      "password" -> login.password,
      "isDriver" -> login.isDriver
    )
  }

  implicit val loginReads: Reads[Login] = (
      (JsPath \ "email").read[String] and
      (JsPath \ "password").read[String] and
      ((JsPath \ "isDriver").read[Boolean])
    )(Login.apply _)
}
登录路由
一旦我们有了这个,我们就需要关注支持 Login 对象 POST 的实际端点。我们首先需要在 conf/routes 文件中设置路由,如下所示:
# Login page
POST  /login/validate                          controllers.LoginController.validateLogin()
登录控制器
现在我们已经讨论了 JSON Reads/Writes,并且知道我们需要下载并运行 Mongo(请参阅开头的“如何运行”部分),让我们看看实际的控制器是什么样的?这是 PlayBackEndApi/app/controllers/LoginController.scala 的完整代码。
package controllers

import javax.inject.Inject
import entities.DriverRegistrationJsonFormatters._
import entities.PassengerRegistrationJsonFormatters._
import entities._
import play.api.Logger
import play.api.libs.json._
import play.api.mvc.{Action, Controller, Result}
import play.modules.reactivemongo._
import reactivemongo.api.ReadPreference
import reactivemongo.play.json._
import reactivemongo.play.json.collection._
import utils.Errors


import scala.concurrent.{ExecutionContext, Future}

class LoginController @Inject()
  (val reactiveMongoApi: ReactiveMongoApi)
  (implicit ec: ExecutionContext)
  extends Controller with MongoController with ReactiveMongoComponents {

  def passRegistrationFuture: Future[JSONCollection] = database.map(_.collection[JSONCollection]("passenger-registrations"))
  def driverRegistrationFuture: Future[JSONCollection] = database.map(_.collection[JSONCollection]("driver-registrations"))


  def validateLogin = Action.async(parse.json) { request =>
    Json.fromJson[Login](request.body) match {
      case JsSuccess(newLoginDetails, _) =>
        newLoginDetails.isDriver match {
          case false => {
            val maybePassengerReg = extractExistingRegistration(
              passRegistrationFuture.flatMap {
                _.find(Json.obj("email" -> Json.obj("$eq" -> newLoginDetails.email))).
                  cursor[JsObject](ReadPreference.primary).
                  collect[List]()
              })
            returnRedactedRegistration[PassengerRegistration](
              maybePassengerReg,
              (reg: PassengerRegistration) => Ok(Json.toJson(reg.copy(password = "")))
            )

          }
          case true => {
            val maybeDriverReg = extractExistingRegistration(
              driverRegistrationFuture.flatMap {
                _.find(Json.obj("email" -> Json.obj("$eq" -> newLoginDetails.email))).
                  cursor[JsObject](ReadPreference.primary).
                  collect[List]()
              })
            returnRedactedRegistration[DriverRegistration](
              maybeDriverReg,
              (reg: DriverRegistration) => Ok(Json.toJson(reg.copy(password = "")))
            )
          }
        }
      case JsError(errors) =>
        Future.successful(BadRequest("Could not build a Login from the json provided. " +
          Errors.show(errors)))
    }
  }

  private def returnRedactedRegistration[T]
  (
    maybeDriverRegFuture: Future[Option[JsObject]],
    redactor : T => Result
  )(implicit reads: Reads[T]): Future[Result] = {
    maybeDriverRegFuture.map {
      case Some(json) => {
        val reg = Json.fromJson[T](json)
        reg match {
          case JsSuccess(reg, _) => {
            redactor(reg)
          }
          case _ => BadRequest("Login already exists")
        }
      }
      case None => BadRequest("Could not find login")
    }
  }

  private def extractExistingRegistration[T]
  (incomingRegistrations: Future[List[T]])
  (implicit writes: Writes[T], ec: ExecutionContext): Future[Option[T]] = {
    incomingRegistrations.map(matchedRegistrations =>
      matchedRegistrations.length match {
        case 0 => None
        case _ => Some(matchedRegistrations(0))
      }
    )
  }
}
这与注册过程性质相似,因此我将不再深入探讨。
CreateJob 工作流程
CreateJob 使用上面显示的组件,并且意图如此工作:

CreateJob React 组件

这是 CreateJob React 组件的代码。
import * as React from "react";
import * as ReactDOM from "react-dom";
import * as _ from "lodash";
import Measure from 'react-measure'
import { OkDialog } from "./components/OkDialog";
import 'bootstrap/dist/css/bootstrap.css';
import {
    Well,
    Grid,
    Row,
    Col,
    ButtonInput,
    ButtonGroup,
    Button
} from "react-bootstrap";
import { AuthService } from "./services/AuthService";
import { JobService } from "./services/JobService";
import { PositionService } from "./services/PositionService";
import { UUIDService } from "./services/UUIDService";
import { Position } from "./domain/Position";
import { hashHistory } from 'react-router';
import { withGoogleMap, GoogleMap, Marker, InfoBox, OverlayView } from "react-google-maps";

const STYLES = {
    overlayView: {
        background: `white`,
        border: `1px solid #ccc`,
        padding: 15,
    },
    icon: {
        marginTop: 5,
        marginBottom: 5,
        marginLeft: 20
    }
}


const GetPixelPositionOffset = (width, height) => {
    return { x: -(width / 2), y: -(height / 2) };
}

const CreateJobGoogleMap = withGoogleMap(props => (
    <GoogleMap
        ref={props.onMapLoad}
        defaultZoom={16}
        defaultCenter={{ lat: 50.8202949, lng: -0.1406958 }}
        onClick={props.onMapClick}>

        <OverlayView
            key='createJobKey'
            mapPaneName={OverlayView.OVERLAY_MOUSE_TARGET}
            position={props.currentPosition}
            getPixelPositionOffset={GetPixelPositionOffset}>
            <div style={STYLES.overlayView}>
                <img style={STYLES.icon}
                    src='/assets/images/passenger.png' />
                <br />
                <Button
                    type='button'
                    bsSize='xsmall'
                    bsStyle='primary'
                    onClick={() => props.onCreateJobClick()}
                    disabled={props.hasIssuedJob}
                    value='Create Job'>Create Job</Button>
            </div>
        </OverlayView>
    </GoogleMap>
));


export interface CreateJobState {
    currentPosition: Position;
    dimensions: {
        width: number,
        height: number
    };
    hasIssuedJob: boolean;
    okDialogOpen: boolean;
    okDialogKey: number;
    okDialogHeaderText: string;
    okDialogBodyText: string;
    wasSuccessful: boolean;
}

export class CreateJob extends React.Component<undefined, CreateJobState> {

    private _authService: AuthService;
    private _jobService: JobService;
    private _positionService: PositionService;

    constructor(props: any) {
        super(props);
        this._jobService = props.route.jobService;
        this._authService = props.route.authService;
        this._positionService = props.route.positionService;
        console.log(this._authService.userName());
        console.log(this._authService.userEmail());
        console.log("CreateJob ctor");
        console.log(this._jobService);

        if (!this._authService.isAuthenticated()) {
            hashHistory.push('/');
        }

        if (this._authService.isDriver()) {
            hashHistory.push('/viewjob');
        }

        this.state = {
            currentPosition: new Position(50.8202949, -0.1406958),
            dimensions: { width: -1, height: -1 },
            hasIssuedJob: this._jobService.hasIssuedJob(),
            okDialogHeaderText: '',
            okDialogBodyText: '',
            okDialogOpen: false,
            okDialogKey: 0,
            wasSuccessful: false
        };
    }

    render() {

        const adjustedwidth = this.state.dimensions.width;

        return (
            <Well className="outer-well">
                <Grid>
                    <Row className="show-grid">
                        <Col xs={10} md={6}>
                            <h4>SET YOUR CURRENT LOCATION</h4>
                            <h6>Click the map to set your current location</h6>
                        </Col>
                    </Row>
                    <Row className="show-grid">
                        <Col xs={10} md={6}>

                            <Measure
                                bounds
                                onResize={(contentRect) => {
                                    this.setState({ dimensions: contentRect.bounds })
                                }}
                            >
                                {({ measureRef }) =>
                                    <div ref={measureRef}>
                                        <CreateJobGoogleMap
                                            containerElement={
                                                <div style={{
                                                    position: 'relative',
                                                    top: 0,
                                                    left: 0,
                                                    right: 0,
                                                    bottom: 0,
                                                    justifyContent: 'flex-end',
                                                    alignItems: 'center',
                                                    width: { adjustedwidth },
                                                    height: 600,
                                                    marginTop: 20,
                                                    marginLeft: 0,
                                                    marginRight: 0,
                                                    marginBottom: 20
                                                }} />
                                            }
                                            mapElement={
                                                <div style={{
                                                    position: 'relative',
                                                    top: 0,
                                                    left: 0,
                                                    right: 0,
                                                    bottom: 0,
                                                    width: { adjustedwidth },
                                                    height: 600,
                                                    marginTop: 20,
                                                    marginLeft: 0,
                                                    marginRight: 0,
                                                    marginBottom: 20
                                                }} />
                                            }
                                            onMapLoad={this.handleMapLoad}
                                            onMapClick={this.handleMapClick}
                                            currentPosition={this.state.currentPosition}
                                            onCreateJobClick={this.handleCreateJobClick}
                                            hasIssuedJob={this.state.hasIssuedJob}
                                        />
                                    </div>
                                }
                            </Measure>
                        </Col>
                    </Row>
                    <Row className="show-grid">
                        <span>
                            <OkDialog
                                open={this.state.okDialogOpen}
                                okCallBack={this.okDialogCallBack}
                                headerText={this.state.okDialogHeaderText}
                                bodyText={this.state.okDialogBodyText}
                                key={this.state.okDialogKey} />
                        </span>
                    </Row>
                </Grid>
            </Well>
        );
    }

    handleCreateJobClick = () => {

        var self = this;
        var currentUser = this._authService.user();

        var newJob = {
            jobUUID: UUIDService.createUUID(),
            clientFullName: currentUser.fullName,
            clientEmail: currentUser.email,
            clientPosition: {
                latitude: self.state.currentPosition.latitude,
                longitude: self.state.currentPosition.longitude
            },
            driverFullName: '',
            driverEmail: '',
            vehicleDescription: '',
            vehicleRegistrationNumber: '',
            isAssigned: false,
            isCompleted: false
        }

        $.ajax({
            type: 'POST',
            url: 'job/submit',
            data: JSON.stringify(newJob),
            contentType: "application/json; charset=utf-8",
            dataType: 'json'
        })
        .done(function (jdata, textStatus, jqXHR) {
            self._jobService.storeUserIssuedJob(newJob);
            const newState = Object.assign({}, self.state, {
                hasIssuedJob: self._jobService.hasIssuedJob()
            });
            self.setState(newState)
            self._positionService.storeUserPosition(self.state.currentPosition);
            hashHistory.push('/viewjob');
        })
        .fail(function (jqXHR, textStatus, errorThrown) {
            const newState = Object.assign({}, self.state, {
                okDialogHeaderText: 'Error',
                okDialogBodyText: jqXHR.responseText,
                okDialogOpen: true,
                okDialogKey: Math.random()
            })
            self.setState(newState)
        });
    }

    okDialogCallBack = () => {
        this.setState(
            {
                okDialogOpen: false
            });
    }

    handleMapLoad = (map) => {
        if (map) {
            console.log(map.getZoom());
        }
    }

    handleMapClick = (event) => {
        const newState = Object.assign({}, this.state, {
            currentPosition: new Position(event.latLng.lat(), event.latLng.lng())
        })
        this.setState(newState)
    }
}
正如您所见,此组件使用了 Google Maps 组件。我选择使用这个: https://tomchentw.github.io/react-google-maps/。
需要注意的一点是,由于我想让地图具有响应性,而我选择的 Google Map 组件需要固定大小,因此我不得不使用另一个 React 库来允许我在运行时测量屏幕,并动态调整 React Google Maps 组件。这个 Measure 包是这个: https://github.com/souporserious/react-measure,它允许您使用 measure 类型组件来装饰/包装您的组件。
像往常一样,我们发送实际的 job JSON payload,但在这样做之前,我们需要允许用户指定他们的位置,以便以后可以检索该位置。
一旦客户设置了他们自己的位置,他们就可以创建一个工作,并推送一个新的工作。如果客户已经有一个正在进行的工作,那么客户无法创建新工作。
为了处理用户的当前位置,我还创建了这个简单的域对象和类:
export class Position {

    //my JSON API prefers nice names
    latitude: number;
    longitude: number;

    //map component wants these abbreviated names
    lat: number;
    lng: number;

    constructor(latitude: number, longitude: number) {
        this.latitude = latitude;
        this.longitude = longitude;

        //keep map happy
        this.lat = latitude;
        this.lng = longitude;
    }

}
import { injectable, inject } from "inversify";
import { Position } from "../domain/Position";
import { PositionMarker } from "../domain/PositionMarker";
import { TYPES } from "../../src/types";
import { AuthService } from "./AuthService";


@injectable()
export class PositionService {

    private _authService: AuthService;

    constructor( @inject(TYPES.AuthService) authService: AuthService) {
        this._authService = authService;
    }

    clearUserJobPositions = (): void => {
        let keyCurrentUserJobPositions = 'currentUserJobPositions_' + this._authService.userEmail();
        sessionStorage.removeItem(keyCurrentUserJobPositions);
    }

    storeUserJobPositions = (jobPositions: Array<PositionMarker>): void => {

        if (jobPositions == null || jobPositions == undefined)
            return;

        let currentUsersJobPositions = {
            currentUser: this._authService.user(),
            jobPositions: jobPositions
        }
        let keyCurrentUserJobPositions = 'currentUserJobPositions_' + this._authService.userEmail();
        sessionStorage.setItem(keyCurrentUserJobPositions, JSON.stringify(currentUsersJobPositions));
    }

    userJobPositions = (): Array<PositionMarker> => {
        let keyCurrentUserJobPositions = 'currentUserJobPositions_' + this._authService.userEmail();
        var currentUserJobPositions = JSON.parse(sessionStorage.getItem(keyCurrentUserJobPositions));
        return currentUserJobPositions.jobPositions;
    }

    hasJobPositions = (): boolean => {
        let keyCurrentUserJobPositions = 'currentUserJobPositions_' + this._authService.userEmail();
        var currentUserJobPositions = JSON.parse(sessionStorage.getItem(keyCurrentUserJobPositions));
        return currentUserJobPositions != null && currentUserJobPositions != undefined;
    }

    clearUserPosition = (): void => {
        let keyCurrentUserPosition = 'currentUserPosition_' + this._authService.userEmail();
        sessionStorage.removeItem(keyCurrentUserPosition);
    }

    storeUserPosition = (position: Position): void => {

        if (position == null || position == undefined)
            return;

        let currentUsersPosition = {
            currentUser: this._authService.user(),
            position: position
        }
        let keyCurrentUserPosition = 'currentUserPosition_' + this._authService.userEmail();
        sessionStorage.setItem(keyCurrentUserPosition, JSON.stringify(currentUsersPosition));
    }

    currentPosition = (): Position => {
        let keyCurrentUserPosition = 'currentUserPosition_' + this._authService.userEmail();
        var currentUsersPosition = JSON.parse(sessionStorage.getItem(keyCurrentUserPosition));
        return currentUsersPosition.position;
    }

    hasPosition = (): boolean => {
        let keyCurrentUserPosition = 'currentUserPosition_' + this._authService.userEmail();
        var currentUsersPosition = JSON.parse(sessionStorage.getItem(keyCurrentUserPosition));
        return currentUsersPosition != null && currentUsersPosition != undefined;
    }
}
JSON Payload
像往常一样,我们通过此路由将此发送到 Play 后端:
POST /job/submit controllers.JobController.submitJob()
JobController
好的,现在我们知道我们有一个可以接受 job JSON 对象的新端点。它如何处理这个 Job JSON 对象?嗯,很简单,它这样做:
- 将 JSON 转换为 Scala 对象。
- 使用 Reactive Kafka publisher 将其通过 Kafka 发送出去。
您可能会问,如果所有我们将要做的事情只是接收一个 Job JSON payload 然后通过 Kafka 发送出去,然后又通过 Kafka 接收回来,为什么还要费心 Kafka 呢?我们想让 Kafka 参与进来的原因是它提供的审计和提交日志功能。我们想要一个事件记录,这就是 Kafka 所提供的:一个不错的只追加日志。
总之,接受工作的这个新端点的代码看起来是这样的:
package controllers

import javax.inject.Inject

import entities.Job
import entities.JobJsonFormatters._
import entities._
import actors.job.{JobConsumerActor, JobProducerActor}
import akka.actor.{ActorSystem, OneForOneStrategy, Props, SupervisorStrategy}
import akka.pattern.{Backoff, BackoffSupervisor}
import akka.stream.scaladsl.{BroadcastHub, Keep, MergeHub}
import akka.stream.{ActorMaterializer, ActorMaterializerSettings, Supervision}
import play.api.http.ContentTypes
import play.api.libs.Comet
import play.api.libs.json._
import play.api.libs.json.Json
import play.api.libs.json.Format
import play.api.libs.json.JsSuccess
import play.api.libs.json.Writes
import play.api.mvc.{Action, Controller}
import utils.Errors
import scala.concurrent.{ExecutionContext, Future}
import scala.util.Random
import scala.concurrent.duration._

class JobController @Inject()
(
  implicit actorSystem: ActorSystem,
  ec: ExecutionContext
) extends Controller
{
  val rand = new Random()

  //Error handling for streams
  //http://doc.akka.io/docs/akka/2.5.2/scala/stream/stream-error.html
  val decider: Supervision.Decider = {
    case _ => Supervision.Restart
  }

  implicit val mat = ActorMaterializer(
    ActorMaterializerSettings(actorSystem).withSupervisionStrategy(decider))

  val (sink, source) =
    MergeHub.source[JsValue](perProducerBufferSize = 16)
      .toMat(BroadcastHub.sink(bufferSize = 256))(Keep.both)
      .run()

  //job producer
  val childJobProducerActorProps = Props(classOf[JobProducerActor],mat,ec)
  val jobProducerSupervisorProps = createBackoffSupervisor(childJobProducerActorProps,
    s"JobProducerActor_${rand.nextInt()}")
  val jobProducerSupervisorActorRef = actorSystem.actorOf(jobProducerSupervisorProps,
    name = "jobProducerSupervisor")

  //job consumer
  val childJobConsumerActorProps = Props(new JobConsumerActor(sink)(mat,ec))
  val jobConsumerSupervisorProps = createBackoffSupervisor(childJobConsumerActorProps,
    s"JobConsumerActor_${rand.nextInt()}")
  val jobConsumerSupervisorActorRef = actorSystem.actorOf(jobConsumerSupervisorProps,
    name = "jobConsumerSupervisor")
  jobConsumerSupervisorActorRef ! Init


  def streamedJob() = Action {
    Ok.chunked(source via Comet.json("parent.jobChanged")).as(ContentTypes.HTML)
  }


  def submitJob = Action.async(parse.json) { request =>
    Json.fromJson[Job](request.body) match {
      case JsSuccess(job, _) => {
        jobProducerSupervisorActorRef ! job
        Future.successful(Ok(Json.toJson(job.copy(clientEmail = job.clientEmail.toUpperCase))))
      }
      case JsError(errors) =>
        Future.successful(BadRequest("Could not build a Job from the json provided. " +
          Errors.show(errors)))
    }
  }


  private def createBackoffSupervisor(childProps:Props, actorChildName: String) : Props = {
    BackoffSupervisor.props(
      Backoff.onStop(
        childProps,
        childName = actorChildName,
        minBackoff = 3.seconds,
        maxBackoff = 30.seconds,
        randomFactor = 0.2
      ).withSupervisorStrategy(
        OneForOneStrategy() {
          case _ => SupervisorStrategy.Restart
        })
    )
  }

}
那段代码有很多内容,让我们来分析一下:
- 我们为 Kafka 生产者/消费者 Actor 创建了一个回退监视器。
- 我们创建了一个能够写入 Comet 帧套接字的流。
- 我们将流的 Sink 端(MergeHub)提供给消费者 Actor,这样当它从 Kafka 读取值时,它将被泵入 Sink,然后通过 Akka 流回到 Web 页面,通过 BroadcastHub 回到 HTML 的永恒帧(最终回到 RxJs Subject)。
将消耗的 Job 推送出永恒框架(Play 后端中的 Comet 功能)
好的,我们刚刚看到了两个 Actor 是如何在回退监视器下创建的,以及消费者(读取 Kafka 的那个)如何能够实际写回 HTML 中的永恒帧,它看起来像这样:
<iframe id="comet" src="/job/streamedJob"></iframe>
Play framework 的实际路由配置如下:
那么工作是如何发送到 Kafka 的呢?
这部分很简单,在这里:
GET /job/streamedJob controllers.JobController.streamedJob()
这是 JobController 中负责将 comet 流暴露给浏览器的相关部分。
val (sink, source) =
    MergeHub.source[JsValue](perProducerBufferSize = 16)
      .toMat(BroadcastHub.sink(bufferSize = 256))(Keep.both)
      .run()

....
....
....
....


def streamedJob() = Action {
    Ok.chunked(source via Comet.json("parent.jobChanged")).as(ContentTypes.HTML)
  }
那么,当我们深入研究当新 Job 到来时会发生什么时,我们可以看到它通过下面的 JobProducerActor。
ackage actors.job

import kafka.topics.JobTopics
import serialization.JSONSerde
import akka.Done
import akka.actor.{Actor, PoisonPill}
import akka.kafka.ProducerSettings
import akka.kafka.scaladsl.Producer
import akka.stream.scaladsl.{Keep, MergeHub, Source}
import akka.stream.{ActorMaterializer, KillSwitches}
import entities.Job
import org.apache.kafka.clients.producer.ProducerRecord
import org.apache.kafka.common.serialization.{ByteArraySerializer, StringSerializer}
import utils.Settings

import scala.concurrent.ExecutionContext
import scala.util.{Failure, Success}


class JobProducerActor(
  implicit materializer: ActorMaterializer,
  ec: ExecutionContext
) extends Actor {

  val jSONSerde = new JSONSerde[Job]
  val jobProducerSettings = ProducerSettings(
    context.system,
    new StringSerializer,
    new ByteArraySerializer)
    .withBootstrapServers(s"${Settings.bootStrapServers}")

  val ((mergeHubSink, killswitch), kafkaSourceFuture) =
    MergeHub.source[Job](perProducerBufferSize = 16)
      .map(job => {
        val jobBytes = jSONSerde.serializer().serialize("", job)
        (job, jobBytes)
      })
      .map { jobWithBytes =>
        val (job, jobBytes) = jobWithBytes
        new ProducerRecord[String, Array[Byte]](
          JobTopics.JOB_SUBMIT_TOPIC, job.clientEmail, jobBytes)
      }
      .viaMat(KillSwitches.single)(Keep.both)
      .toMat(Producer.plainSink(jobProducerSettings))(Keep.both)
      .run()

  kafkaSourceFuture.onComplete {
    case Success(value) => println(s"Got the callback, value = $value")
    case Failure(e) => {
      self ! PoisonPill
    }
  }

  override def postStop(): Unit = {
    super.postStop()
    println(s"JobProducerActor seen 'Done'")
    killswitch.shutdown()
  }

  override def receive: Receive = {
    case (job: Job) => {
      println(s"JobProducerActor seen ${job}")
      Source.single(job).runWith(mergeHubSink)
    }
    case Done => {
      println(s"JobProducerActor seen 'Done'")
      killswitch.shutdown()
      self ! PoisonPill
    }
  }
}
我得说上面那小段代码有很多内容。具体发生了什么?
- 最重要的一点是,我们只是使用 Actor 作为托管响应式 Kafka Akka 流
RunnableGraph的容器,代表了MergeHub> 响应式 Kafka 生产者 Sink 的图。这是完全没问题的,也是正常的。讨论 Akka 流超出了本文的范围,但如果您想了解更多,可以在我之前的一篇文章中阅读更多内容:https://sachabarbs.wordpress.com/2016/12/13/akka-streams/ - 所以我们现在知道这个 Actor 托管一个流,但是流可能会失败,或者 Actor 可能会失败。所以我们希望的是,如果 Actor 失败,流就会停止,如果流失败,Actor 就会停止。为了做到这一点,我们需要做几件事:
- 流失败:由于
RunnableGraph可以返回一个Future[T],我们可以挂钩一个 Success/Failure 回调,并向托管 Actor 发送一个PoisonPill。然后我们上面看到的监视器 Actor 将启动并尝试创建一个新的 Actor 实例。另一件值得注意的是,此 Actor 中托管的流使用了JobController提供的ActorMaterializer,我们为流提供了一个重启监视策略。 - Actor 失败:如果 Actor 本身失败,Akka 框架将调用 postStop() 方法,届时我们希望关闭此 Actor 中的流。那么我们如何关闭托管流呢?请看流设置中间的这行
.viaMat(KillSwitches.single)(Keep.both),这允许我们从流的物化值中获取一个 KillSwitch。一旦我们有了 KillSwitch,我们就可以简单地调用它的 shutDown() 方法。 - 双重保险:我还提供了一种让外部世界关闭此 Actor 及其托管流的方式。这是通过向此 Actor 发送一个
Done消息来实现的。我还没有在这里放置它,但钩子在那里演示了您如何做到这一点。
- 流失败:由于
- 我们可以看到有一个
MergeHub源,它允许外部代码通过 Actor 内的物化 Sink 值将东西推送到MergeHub。 - 我们还可以看到 Actor 看到的
Job对象被推送到该 Actor 通过此 Actor 的物化 SinkMergeHub,然后对其进行一些转换,以获取其原始字节。 - 我们可以看到
RunnableGraph中的最后阶段是响应式 KafkaProducer.plainSink。这将导致一条消息被推送到托管流的 Kafka 主题,从该 Actor 推送Job对象进入流。我认为这就是关于这个 Actor 如何工作的要点。
通过 Kafka 主题消费 Job(使用 Akka Streams / Reactive Kafka)
让我们看看 JobConsumerActor,它接收一个 Akka Stream Sink(来自 JobController 的 MergeHub),并在看到 Kafka 中的新值(在 job-submit-topic 上)时将其推送到该 Sink。然后,它会通过 Akka 流传输,通过 BroadcastHub 输出到 HTML 中的永恒帧。我们可以在此处阅读更多关于 Comet 的信息: https://www.playframework.com/documentation/2.6.x/ScalaComet
这是代码,它看起来可能很吓人,但实际上它只是从 Kafka 主题读取一个值并将其通过 Sink(MergeHub)推送出去,其中 Sink 连接到一个 Play framework 支持的永恒帧。其中永恒帧是打开的,等待通过 Comet 端点发送数据。
package actors.job

import entities.{Job, Init}
import kafka.topics.JobTopics
import serialization.JSONSerde
import akka.{Done, NotUsed}
import akka.actor.{Actor, ActorSystem, PoisonPill}
import akka.kafka.{ConsumerSettings, ProducerSettings, Subscriptions}
import akka.kafka.scaladsl.{Consumer, Producer}
import akka.stream.scaladsl.{Keep, MergeHub, Sink, Source}
import akka.stream.{ActorMaterializer, KillSwitches}
import org.apache.kafka.clients.consumer.ConsumerConfig
import org.apache.kafka.clients.producer.ProducerRecord
import org.apache.kafka.common.serialization.{ByteArrayDeserializer, ByteArraySerializer, StringDeserializer, StringSerializer}
import play.api.libs.json.{JsValue, Json}
import utils.Settings

import scala.concurrent.ExecutionContext
import scala.util.{Failure, Success}


//TODO : This actor shouls take in a way of pushing back to Websocket
class JobConsumerActor
  (val sink:Sink[JsValue, NotUsed])
  (implicit materializer: ActorMaterializer, ec: ExecutionContext
) extends Actor {

  val jSONSerde = new JSONSerde[Job]
  val jobConsumerSettings = ConsumerSettings(
    context.system,new StringDeserializer(),new ByteArrayDeserializer())
    .withBootstrapServers(s"${Settings.bootStrapServers}")
    .withGroupId("group1")
    .withProperty(ConsumerConfig.AUTO_OFFSET_RESET_CONFIG, "earliest")

  val ((_, killswitch), kafkaConsumerFuture) =
    Consumer.committableSource(jobConsumerSettings, Subscriptions.topics(JobTopics.JOB_SUBMIT_TOPIC))
      .mapAsync(1) { msg => {
        val jobBytes = msg.record.value
        val job = jSONSerde.deserializer().deserialize(JobTopics.JOB_SUBMIT_TOPIC,jobBytes)
        self ! job
        msg.committableOffset.commitScaladsl()
      }
      }
      .viaMat(KillSwitches.single)(Keep.both)
      .toMat(Sink.last)(Keep.both)
      .run()


  kafkaConsumerFuture.onComplete {
    case Success(value) => println(s"Got the callback, value = $value")
    case Failure(e) => {
      self ! PoisonPill
    }
  }

  override def postStop(): Unit = {
    super.postStop()
    println(s"JobConsumerActor seen 'Done'")
    killswitch.shutdown()
  }

  override def receive: Receive = {
    case (job: Job) => {
      println(s"JobConsumerActor seen ${job}")
      val finalJsonValue = Json.toJson(job)
      Source.single(finalJsonValue).runWith(sink)
    }
    case Done => {
      println(s"JobConsumerActor seen 'Done'")
      killswitch.shutdown()
      self ! PoisonPill
    }
    case Init => {
      println("JobConsumerActor saw init")
    }
  }
}
在基于 comet 的永恒框架之上拥有一个基于 RxJs 的新 Observable,并确保其正常工作
因此,在管道的末端,我们在浏览器中有一个永恒帧(始终在 Index.html 中可用),我们希望从中获取事件。理想情况下,我们希望将这个相当乏味的事件转换成一个更好的 RxJs Observable,那么我们该怎么做呢?
这很简单,我们使用这个小服务,它能够为我们创建一个新的 Observable 来处理传入的事件,如果您还记得 Play 服务器端代码,它看起来像这样:
Ok.chunked(source via Comet.json("parent.jobChanged")).as(ContentTypes.HTML)
所以,这就是我们将它变成一个漂亮的 RxJS Observable 的方式:
import { injectable, inject } from "inversify";
import { JobEventArgs } from "../domain/JobEventArgs";
import Rx from 'rx';

@injectable()
export class JobStreamService {

    private _jobSourceObservable: Rx.Observable<any>;

    constructor() {

    }

    init = (): void => {

        window['jobChanged'] = function (incomingJsonPayload: any) {
            let evt = new CustomEvent('onJobChanged', new JobEventArgs(incomingJsonPayload));
            window.dispatchEvent(evt);
        }

        this._jobSourceObservable = Rx.Observable.fromEvent(window, 'onJobChanged');
    }

    getJobStream = (): Rx.Observable<any> => {
        return this._jobSourceObservable;
    }
}
其中 JobEventArgs 看起来像这样:
export class JobEventArgs {

    detail: any;

    constructor(detail: any) {
        this.detail = detail;
    }

}
我们可以使用这个服务在其他代码中订阅它,并订阅这个 RxJs Observable。这是一个订阅它的例子。
componentWillMount() {
    this._subscription =
        this._jobStreamService.getJobStream()
        .subscribe(
        jobArgs => {
                console.log('RX saw onJobChanged');
                console.log('RX x = ', jobArgs.detail);
            },
            error => {
                console.log('RX saw ERROR');
                console.log('RX error = ', error);
            },
            () => {
                console.log('RX saw COMPLETE');
            }
        );
}
我们将在本文的下一部分看到更多关于 RX 的内容,但现在您只需要知道有一个可注入的服务,您可以使用它来收听 JobObservable。
最终的图表,帮助您巩固这一部分
上面有很多内容,所以我想最后的图表可能会有所帮助。
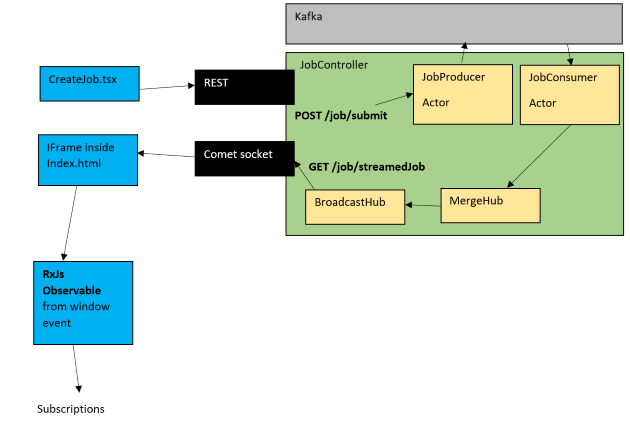
好的,现在是时候喝杯咖啡了,因为尽管接下来的两部分内容建立在我们刚才看到的基础上,但仍有相当多的活动部件需要覆盖,尤其是我们尚未研究的 Kafka Streams / Interactive Queries。所以,去吧,给自己冲一杯浓咖啡。
ViewJob 工作流程
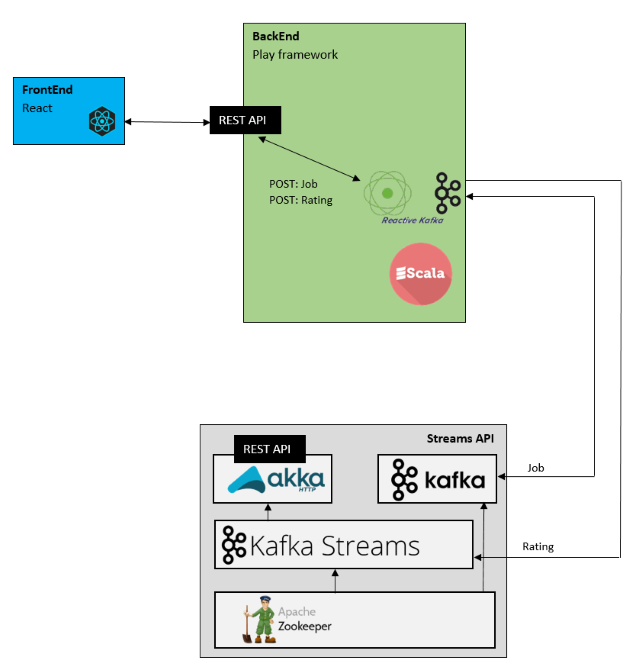
ViewJob 使用上面显示的组件,并且意图如此工作:
ViewJob React 组件

如上所示,这是在乘客打开浏览器会话后,另外两个用户(充当司机)推送了他们的位置,显然这只是一个视图(乘客视图),要完全理解其他用户在他们的浏览器会话中会看到什么,我们将在下面逐步介绍一个场景。
那么 View Job 页面应该做什么?
此页面应执行以下操作:
- 如果乘客发出工作,则任何登录的司机都应看到该工作(前提是该工作尚未分配给司机)。
- 从乘客到司机的(已知乘客的)位置更新应显示新的乘客位置。
- 当司机推送(单个笔记本需要用户点击地图以使自己的位置对他人可见)其新位置时,客户端会看到它并相应地更新司机标记。
- 乘客可以接受司机的作业。
- 司机不能接受乘客的工作。
- 一旦乘客/司机之间配对了工作,如果您是其中一个用户,则只会显示这两个标记。
- 一旦乘客/司机之间配对了工作,并且您不是这些用户之一,那么您仅看到自己的标记。
- 工作可以由乘客或司机独立完成,并且他们能够互相评分。
这个页面相当复杂,并且包含许多辅助方法来执行上述功能,可能太多了,无法显示。所以我只会展示代码的骨架,然后我们将通过一些屏幕截图和一个执行此代码的场景来逐步介绍。
应该注意的是,这个区域是我代码中的 2 个错误/问题所在。正如我一开始所说,我基本上完成了我想在这篇文章中做的事情,它展示了我想要展示的一切。所以,没关系。
import * as React from "react";
import * as ReactDOM from "react-dom";
import * as _ from "lodash";
import Measure from 'react-measure'
import { RatingDialog } from "./components/RatingDialog";
import { YesNoDialog } from "./components/YesNoDialog";
import { OkDialog } from "./components/OkDialog";
import { AcceptList } from "./components/AcceptList";
import 'bootstrap/dist/css/bootstrap.css';
import {
Well,
Grid,
Row,
Col,
ButtonInput,
ButtonGroup,
Button,
Modal,
Popover,
Tooltip,
OverlayTrigger
} from "react-bootstrap";
import { AuthService } from "./services/AuthService";
import { JobService } from "./services/JobService";
import { JobStreamService } from "./services/JobStreamService";
import { PositionService } from "./services/PositionService";
import { Position } from "./domain/Position";
import { PositionMarker } from "./domain/PositionMarker";
import { hashHistory } from 'react-router';
import { withGoogleMap, GoogleMap, Marker, OverlayView } from "react-google-maps";
const STYLES = {
overlayView: {
background: `white`,
border: `1px solid #ccc`,
padding: 15,
}
}
const GetPixelPositionOffset = (width, height) => {
return { x: -(width / 2), y: -(height / 2) };
}
const ViewJobGoogleMap = withGoogleMap(props => (
<GoogleMap
ref={props.onMapLoad}
defaultZoom={16}
defaultCenter={{ lat: 50.8202949, lng: -0.1406958 }}
onClick={props.onMapClick}>
{props.markers.map((marker, index) => (
<OverlayView
key={marker.key}
mapPaneName={OverlayView.OVERLAY_MOUSE_TARGET}
position={marker.position}
getPixelPositionOffset={GetPixelPositionOffset}>
<div style={STYLES.overlayView}>
<img src={marker.icon} />
<strong>{marker.key}</strong>
</div>
</OverlayView>
))}
</GoogleMap>
));
export interface ViewJobState {
markers: Array<PositionMarker>;
okDialogOpen: boolean;
okDialogKey: number;
okDialogHeaderText: string;
okDialogBodyText: string;
dimensions: {
width: number,
height: number
},
currentPosition: Position;
isJobAccepted: boolean;
finalActionHasBeenClicked: boolean;
}
type DoneCallback = (jdata: any, textStatus: any, jqXHR: any) => void
export class ViewJob extends React.Component<undefined, ViewJobState> {
private _authService: AuthService;
private _jobService: JobService;
private _jobStreamService: JobStreamService;
private _positionService: PositionService;
private _subscription: any;
private _currentJobUUID: any;
constructor(props: any) {
super(props);
this._authService = props.route.authService;
this._jobStreamService = props.route.jobStreamService;
this._jobService = props.route.jobService;
this._positionService = props.route.positionService;
if (!this._authService.isAuthenticated()) {
hashHistory.push('/');
}
let savedMarkers: Array<PositionMarker> = new Array<PositionMarker>();
if (this._positionService.hasJobPositions()) {
savedMarkers = this._positionService.userJobPositions();
}
this.state = {
markers: savedMarkers,
okDialogHeaderText: '',
okDialogBodyText: '',
okDialogOpen: false,
okDialogKey: 0,
dimensions: { width: -1, height: -1 },
currentPosition: this._authService.isDriver() ? null :
this._positionService.currentPosition(),
isJobAccepted: false,
finalActionHasBeenClicked: false
};
}
componentWillMount() {
var self = this;
this._subscription =
this._jobStreamService.getJobStream()
.retry()
.where(function (x, idx, obs) {
return self.shouldShowMarkerForJob(x.detail);
})
.subscribe(
jobArgs => {
console.log('RX saw onJobChanged');
console.log('RX x = ', jobArgs.detail);
this._jobService.clearUserIssuedJob();
this._jobService.storeUserIssuedJob(jobArgs.detail);
this.addMarkerForJob(jobArgs.detail);
},
error => {
console.log('RX saw ERROR');
console.log('RX error = ', error);
},
() => {
console.log('RX saw COMPLETE');
}
);
}
componentWillUnmount() {
this._subscription.dispose();
this._positionService.storeUserJobPositions(this.state.markers);
}
render() {
const adjustedwidth = this.state.dimensions.width;
return (
<Well className="outer-well">
<Grid>
<Row className="show-grid">
<Col xs={10} md={6}>
<h4>CURRENT JOB</h4>
</Col>
</Row>
<Row className="show-grid">
<Col xs={10} md={6}>
<AcceptList
markers={_.filter(this.state.markers, { isDriverIcon: true })}
currentUserIsDriver={this._authService.isDriver()}
clickCallback={this.handleMarkerClick}
/>
</Col>
</Row>
<Row className="show-grid">
<Col xs={10} md={6}>
<Measure
bounds
onResize={(contentRect) => {
this.setState({ dimensions: contentRect.bounds })
}}>
{({ measureRef }) =>
<div ref={measureRef}>
<ViewJobGoogleMap
containerElement={
<div style={{
position: 'relative',
top: 0,
left: 0,
right: 0,
bottom: 0,
width: { adjustedwidth },
height: 600,
justifyContent: 'flex-end',
alignItems: 'center',
marginTop: 20,
marginLeft: 0,
marginRight: 0,
marginBottom: 20
}} />
}
mapElement={
<div style={{
position: 'relative',
top: 0,
left: 0,
right: 0,
bottom: 0,
width: { adjustedwidth },
height: 600,
marginTop: 20,
marginLeft: 0,
marginRight: 0,
marginBottom: 20
}} />
}
markers={this.state.markers}
onMapClick={this.handleMapClick}
/>
</div>
}
</Measure>
</Col>
</Row>
{this.state.isJobAccepted === true ?
<Row className="show-grid">
<span>
<RatingDialog
theId="viewJobCompleteBtn"
headerText="Rate your driver/passenger"
okCallBack={this.ratingsDialogOkCallBack}
actionPerformed={this.state.finalActionHasBeenClicked} />
{!(this._authService.isDriver() === true) ?
<YesNoDialog
theId="viewJobCancelBtn"
launchButtonText="Cancel"
actionPerformed={this.state.finalActionHasBeenClicked}
yesCallBack={this.jobCancelledCallBack}
noCallBack={this.jobNotCancelledCallBack}
headerText="Cancel the job" />
:
null
}
<OkDialog
open={this.state.okDialogOpen}
okCallBack={this.okDialogCallBack}
headerText={this.state.okDialogHeaderText}
bodyText={this.state.okDialogBodyText}
key={this.state.okDialogKey} />
</span>
</Row> :
null
}
</Grid>
</Well>
);
}
handleMapClick = (event) => {
....
....
this._positionService.clearUserJobPositions();
this._positionService.storeUserJobPositions(this.state.markers);
this.pushOutJob(newPosition, currentJob);
}
handleMarkerClick = (targetMarker) => {
console.log('button on AcceptList clicked:' + targetMarker.key);
console.log(targetMarker);
let currentJob = this._jobService.currentJob();
let jobForMarker = targetMarker.jobForMarker;
let clientMarker = _.find(this.state.markers, { 'isDriverIcon': false });
if (clientMarker != undefined && clientMarker != null) {
let clientJob = clientMarker.jobForMarker;
clientJob.driverFullName = jobForMarker.driverFullName;
clientJob.driverEmail = jobForMarker.driverEmail;
clientJob.driverPosition = jobForMarker.driverPosition;
clientJob.vehicleDescription = jobForMarker.vehicleDescription;
clientJob.vehicleRegistrationNumber = jobForMarker.vehicleRegistrationNumber;
clientJob.isAssigned = true;
let self = this;
console.log("handleMarkerClick job");
console.log(clientJob);
this.makePOSTRequest('job/submit', clientJob, this,
function (jdata, textStatus, jqXHR) {
console.log("After is accepted");
const newState = Object.assign({}, self.state, {
isJobAccepted: true
})
self.setState(newState);
});
}
}
addMarkerForJob = (jobArgs: any): void => {
console.log("addMarkerForJob");
console.log(this.state);
if (this.state.isJobAccepted || jobArgs.isAssigned) {
this.processAcceptedMarkers(jobArgs);
}
else {
this.processNotAcceptedMarkers(jobArgs);
}
}
processAcceptedMarkers = (jobArgs: any): void => {
....
....
}
processNotAcceptedMarkers = (jobArgs: any): void => {
....
....
}
addClientDetailsToDrivers = (newMarkersList: PositionMarker[]): void => {
....
}
updateStateForMarkers = (newState: any, newMarkersList: PositionMarker[], newPositionForUser: Position, jobArgs:any): void => {
//Update the list of position markers in the PositionService
this._positionService.clearUserJobPositions();
this._positionService.storeUserJobPositions(newMarkersList);
//Update the position in the PositionService
if (newPositionForUser != undefined && newPositionForUser != null) {
this._positionService.clearUserPosition();
this._positionService.storeUserPosition(newPositionForUser);
}
this._jobService.clearUserIssuedJob();
this._jobService.storeUserIssuedJob(jobArgs);
//update the state
this.setState(newState);
}
updateMatchedUserMarker = (jobEmailToCheck: string, newMarkersList: PositionMarker[],
jobPosition: Position, jobForMarker:any): void => {
if (jobEmailToCheck != undefined && jobEmailToCheck != null) {
let matchedMarker = _.find(this.state.markers, { 'email': jobEmailToCheck });
if (matchedMarker != null) {
//update its position
matchedMarker.position = jobPosition;
matchedMarker.jobForMarker = jobForMarker;
}
}
}
updateStateForNewMarker = (newMarkersList:PositionMarker[], position: Position): any => {
if (position != null) {
return Object.assign({}, this.state, {
currentPosition: position,
markers: newMarkersList
})
}
else {
return Object.assign({}, this.state, {
markers: newMarkersList
})
}
}
updateStateForAcceptedMarker = (newMarkersList: PositionMarker[], position: Position): any => {
if (position != null) {
return Object.assign({}, this.state, {
currentPosition: position,
markers: newMarkersList,
isJobAccepted: true
})
}
else {
return Object.assign({}, this.state, {
markers: newMarkersList,
isJobAccepted: true
})
}
}
shouldShowMarkerForJob = (jobArgs: any): boolean => {
let isDriver = this._authService.isDriver();
let currentJob = this._jobService.currentJob();
let hasJob = currentJob != undefined && currentJob != null;
//case 1 - No job exists, to allow driver to add their mark initially
if (!hasJob && isDriver)
return true;
//case 2 - Job exists and is unassigned and if there is no other active
// job for this client/ driver
if (hasJob && !currentJob.isAssigned)
return true;
//case 3 - If the job isAssigned and its for the current logged in client/driver
if (hasJob && currentJob.isAssigned) {
if (currentJob.clientEmail == jobArgs.clientEmail) {
return true;
}
if (currentJob.driverEmail == jobArgs.driverEmail) {
return true;
}
}
return false;
}
pushOutJob = (newPosition: Position, jobForMarker : any): void => {
....
....
....
var newJob = {
jobUUID: this._currentJobUUID != undefined && this._currentJobUUID != '' ?
this._currentJobUUID : '',
clientFullName: localClientFullName,
clientEmail: localClientEmail,
clientPosition: localClientPosition,
driverFullName: localDriverFullName,
driverEmail: localDriverEmail,
driverPosition: localDriverPosition,
vehicleDescription: isDriver ?
this._authService.user().vehicleDescription : '',
vehicleRegistrationNumber: isDriver ?
this._authService.user().vehicleRegistrationNumber : '',
isAssigned: localIsAssigned,
isCompleted: false
}
console.log("handlpushOutJob job");
console.log(newJob);
this.makePOSTRequest('job/submit', newJob, self,
function (jdata, textStatus, jqXHR) {
self._jobService.clearUserIssuedJob();
self._jobService.storeUserIssuedJob(newJob);
});
}
createDriverMarker = (
driver: any,
event: any): PositionMarker => {
....
}
ratingsDialogOkCallBack = (theRatingScore: number) => {
console.log('RATINGS OK CLICKED');
//POST rating data
}
makePOSTRequest = (route: string, jsonData: any, context: ViewJob, doneCallback: DoneCallback) => {
//Post job data
}
....
....
}
一些亮点:
- 我们使用 RX.Js 来监听新的事件,这些事件直接通过 Comet 永恒帧传输,服务器端的 Play scala 代码会在其上推送消息。
- 司机接受方面有一些有趣的事情,我最初想让它成为地图上驱动程序标记上的一个按钮。但是,这导致了地图的一个问题,即点击覆盖层(Z-Order 更高,不应发生)时会触发 Map 事件。这是 React Google Map 组件的一个特性。我找不到满意的修复方法(我确实尝试过 form event mouseEnter/mouseLeave,但效果并不好,所以我选择将司机接受放在地图之外,从而完全避免了这个问题)。
运行时是什么样的?
下面展示了一些运行场景的截图。
为了运行到这一点,我通常会遵循以下步骤:
- 打开一个标签页,以我创建的乘客身份登录。
- 去创建工作页面,点击地图,然后按创建工作按钮。
- 打开一个新的标签页,以新司机身份登录,然后转到查看工作页面。
- 在第一个标签页(乘客)上,点击地图以将乘客位置推送到司机。
- 在第二个标签页(司机)上,点击地图以将司机位置推送到乘客。
- 为额外的司机重复最后 4 个步骤。
- 在客户端标签页上,选择司机接受,然后点击接受按钮。
- 从客户端标签页完成工作,给司机评分。
- 从配对的司机标签页完成工作,给乘客评分。
- 去查看评分页面,应该可以看到评分。
像这样的应用程序面临的挑战之一是它是一个流应用程序。这意味着当客户端推送一个新工作时,可能没有人正在收听该工作。司机甚至可能根本没有登录,或者稍后登录,所以他们有效地订阅延迟了。对于这个应用程序,处理这个问题有点超出了范围。要解决这个问题,您需要确保位置更新(对于给定用户浏览器会话(即标签页)点击地图)被推送到其他用户浏览器会话,其中标记当前未显示。
在一个真实的应用程序中,我们可能会选择以下一项来永久修复这个问题:
- 存储一些信息,当一个新用户加入时,获取某个地理区域内的所有未分配的乘客/司机。
- 存储最后 N 个乘客/司机位置,并在新登录时推送这些(不能保证这些在同一地理区域,可能与当前用户完全无关/没有实际意义)。
总之,正如我所说,这超出了这个演示项目的范围,但我希望它确实能让您了解为什么您需要手动推送位置更新。
这为您提供了一个运行时的示例(尚未接受)
这是以下设置的外观
- 1 名乘客(Sacha Barber)
- 2 名司机(司机 1 / 司机 2)
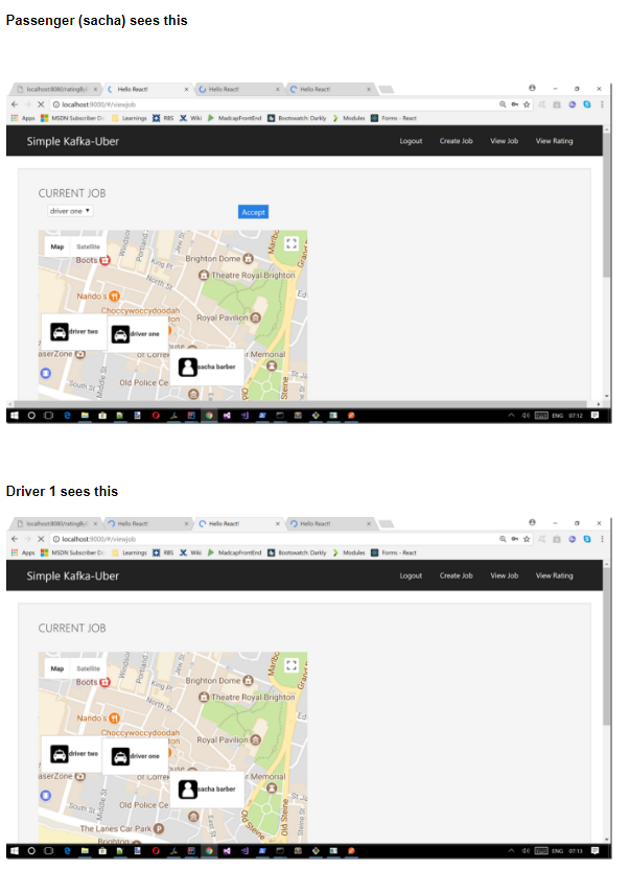

现在我们来看看当我们接受其中一名司机时会发生什么。在此示例中,我选择了司机 1
这为您提供了一个运行时的示例(乘客/司机 1 接受工作后)
工作接受后,情况如下


ViewRating 工作流程

评分流程是本文中更复杂的方面之一。想法如下
- 工作结束时,乘客可以对司机的工作进行评分
- 工作结束时,司机可以对乘客的工作进行评分
- 这些评分应该被存储/聚合并通过 REST API 公开给客户端/司机,以便他们能够查看他们随时间累积的评分
想法很简单,对吧,但这部分将使用 Kafka Streams
逐步介绍 Kafka Streams 处理节点以及流的双重性
在开始之前,我想包含一些摘录自官方 Kafka 文档的内容: http://docs.confluent.io/current/streams/concepts.html#duality-of-streams-and-tables 讨论了 KStream 和 KTable 对象(它们是 Kafka streams 中的流和表对象)
在实践中实现流处理用例时,您通常需要流和数据库。一个非常常见的用例是电子商务应用程序,它使用数据库表中的最新客户信息来丰富传入的客户交易流。换句话说,流无处不在,但数据库也无处不在。
因此,任何流处理技术都必须为流和表提供一流的支持。Kafka Streams API 通过其核心抽象流和表提供此类功能,我们将在稍后讨论。现在,一个有趣的观察是流和表之间实际上存在密切的关系,即所谓的流-表对偶性。Kafka 在许多方面利用了这种对偶性:例如,使您的应用程序具有弹性,支持容错有状态处理,或对您的应用程序的最新处理结果运行交互式查询。而且,除了其内部使用之外,Kafka Streams API 还允许开发人员在其自己的应用程序中利用这种对偶性。
表的简单形式是键值对的集合,也称为映射或关联数组。这样的表可能如下所示

流-表对偶性描述了流和表之间的密切关系。
- 流即表:流可以被认为是表的更改日志,其中流中的每个数据记录都捕获了表的某个状态更改。因此,流是伪装的表,通过从头到尾重放更改日志来重建表,可以轻松地将其转换为真实的表。类似地,聚合流中的数据记录将返回一个表。例如,我们可以从页面浏览事件的输入流中计算每个用户的总页面浏览量,结果将是一个表,表的键是用户,值是相应的页面浏览量计数。
- 表即流:表可以被认为是流中每个键的最新值的某个时间点的快照(流的数据记录是键值对)。因此,表是伪装的流,通过迭代表中每个键值对,可以轻松地将其转换为真实的流。
让我们用一个例子来说明这一点。设想一个跟踪每个用户总页面浏览量的表(下图的第一列)。随着时间的推移,每当处理新的页面浏览事件时,表的该状态就会相应更新。这里,状态在不同时间点和表的不同修订版之间发生变化,可以表示为更改日志流(第二列)。

由于流-表对偶性,相同的流可以用来重建原始表(第三列)

相同的机制用于,例如,通过更改数据捕获 (CDC) 来复制数据库,以及在 Kafka Streams 中,跨机器复制其所谓的状态存储以实现容错。流-表对偶性对于实际的流处理应用程序来说是一个非常重要的概念,以至于 Kafka Streams 通过 KStream 和 KTable 抽象明确地对其进行了建模,我们将在下一节中进行介绍。
我强烈建议您阅读上面官方文档的这一部分,因为如果您想深入研究 Kafka Streams,它将非常有帮助。
无论如何,考虑到所有这些,它与我们试图解决的用例有什么关系?假设我们有一个 Kafka 发布者,它推送 Rating 对象,并且如前所述,我们希望能够跨所有处理器节点查询这些对象。因此,我们现在应该知道这将涉及一个 KStream 和某种形式的聚合到一个最终的 KTable(其中将使用状态存储)。
最简单的方法可能是从代码开始,这看起来是最终应用程序的 Rating 部分的主要流处理代码。
MadCapIdea/blob/develop/KafkaStreams/src/main/scala/Processing/Ratings/RatingStreamProcessingApp.scala
import java.util.concurrent.TimeUnit
import org.apache.kafka.common.serialization._
import org.apache.kafka.streams._
import org.apache.kafka.streams.kstream._
import entities.Rating
import serialization.JSONSerde
import topics.RatingsTopics
import utils.Settings
import stores.StateStores
import org.apache.kafka.streams.state.HostInfo
import scala.concurrent.ExecutionContext
import scala.concurrent.duration._


package processing.ratings {

  import org.apache.kafka.streams.errors.BrokerNotFoundException
  import utils.Retry

  class RatingByEmailInitializer extends Initializer[List[Rating]] {
    override def apply(): List[Rating] = List[Rating]()
  }

  class RatingByEmailAggregator extends Aggregator[String, Rating, List[Rating]] {
    override def apply(aggKey: String, value: Rating, aggregate: List[Rating]) = {
      value :: aggregate
    }
  }


  object RatingStreamProcessingApp extends App {

    implicit val ec = ExecutionContext.global

    run()

    private def run(): Unit = {

      val restEndpoint: HostInfo = new HostInfo(Settings.restApiDefaultHostName, Settings.restApiDefaultPort)
      System.out.println(s"Connecting to Kafka cluster via bootstrap servers ${Settings.bootStrapServers}")
      System.out.println(s"REST endpoint at http://${restEndpoint.host}:${restEndpoint.port}")

      val maybeStreams =
        Retry.whileSeeingExpectedException[KafkaStreams,BrokerNotFoundException](10.seconds)(createStreams)

      maybeStreams match {
        case Some(streams) => {
          val restService = new RatingRestService(streams, restEndpoint)
          restService.start()

          Runtime.getRuntime.addShutdownHook(new Thread(() => {
            streams.close(10, TimeUnit.SECONDS)
            restService.stop
          }))
        }
        case None => {
          println("Quiting due to no streams available/unknown expcetion")
        }
      }

      //return unit
      ()
    }

    def createStreams() : KafkaStreams = {
      val stringSerde = Serdes.String
      val ratingSerde = new JSONSerde[Rating]
      val listRatingSerde = new JSONSerde[List[Rating]]
      val builder: KStreamBuilder = new KStreamBuilder
      val ratings = builder.stream(stringSerde, ratingSerde, RatingsTopics.RATING_SUBMIT_TOPIC)

      //aggrgate by (user email -> their ratings)
      val ratingTable = ratings.groupByKey(stringSerde, ratingSerde)
        .aggregate(
          new RatingByEmailInitializer(),
          new RatingByEmailAggregator(),
          listRatingSerde,
          StateStores.RATINGS_BY_EMAIL_STORE
        )

      //useful debugging aid, print KTable contents
      ratingTable.toStream.print()

      val streams: KafkaStreams = new KafkaStreams(builder, Settings.createRatingStreamsProperties)

      // Always (and unconditionally) clean local state prior to starting the processing topology.
      // We opt for this unconditional call here because this will make it easier for you to
      // play around with the example when resetting the application for doing a re-run
      // (via the Application Reset Tool,
      // http://docs.confluent.io/current/streams/developer-guide.html#application-reset-tool).
      //
      // The drawback of cleaning up local state prior is that your app must rebuilt its local
      // state from scratch, which will take time and will require reading all the state-relevant
      // data from the Kafka cluster over the network.
      // Thus in a production scenario you typically do not want to clean up always as we do
      // here but rather only when it is truly needed, i.e., only under certain conditions
      // (e.g., the presence of a command line flag for your app).
      // See `ApplicationResetExample.java` for a production-like example.
      streams.cleanUp();
      streams.start()
      streams
    }
  }

}
请记住,我们的目标是获取用户(基于他们的电子邮件地址)的 Rating,并将与他们相关的所有 Rating 存储在一个序列/列表中,以便可以一次性检索它们,基于一个键,其中键将是用户的电子邮件,值将是这个 Rating 对象的列表。我认为,有了官方 Kafka 文档的正式讨论和我实际的 Rating 需求,上面的内容应该会相当清楚。
逐步介绍 Kafka Streams 交互式查询
所以,现在我们已经了解了数据是如何产生的,以及如何转换的(好吧,实际上我没有做太多转换,除了简单的映射,但相信我,您可以做到),以及我们如何将 KStream 的结果聚合到 KTable(及其状态存储),接下来我们将看看如何使用 Kafka 交互式查询来查询状态存储。
一个重要的概念是,如果您为原始主题使用了多个分区,状态可能会分布在 n 个处理器节点上。对于这个项目,我只选择了使用 1 个分区,但我编写了代码来支持 n 个分区。
因此,我们假设每个节点都可以读取不同的数据段,或者每个节点必须读取 n 个分区(实际上并没有节点和分区的映射,这是 2 个非常重要的章节,弹性伸缩您的应用程序和并行模型),我们需要每个节点公开一个 REST API 以允许读取其自身的本地状态存储。通过读取所有状态存储,我们可以获得跨所有分区的已持久化数据的总体视图。我强烈建议您阅读官方文档的这一部分: http://docs.confluent.io/current/streams/developer-guide.html#querying-remote-state-stores-for-the-entire-application
这张图也是从官方文档中“借鉴”来的

我认为这张图很好地展示了 3 个独立的处理器节点,每个节点可能都有一些状态。只有通过汇集所有这些节点的数据,我们才能看到整个数据集。
Kafka 通过流的元数据允许这一点,我们可以使用公开的元数据来帮助我们收集状态存储数据。为此,我们首先需要一个 MetadataService,对我来说,它是这样的:
package processing.ratings

import org.apache.kafka.streams.KafkaStreams
import org.apache.kafka.streams.state.StreamsMetadata
import java.util.stream.Collectors
import entities.HostStoreInfo
import org.apache.kafka.common.serialization.Serializer
import org.apache.kafka.connect.errors.NotFoundException
import scala.collection.JavaConverters._


/**
  * Looks up StreamsMetadata from KafkaStreams
  */
class MetadataService(val streams: KafkaStreams) {


   /**
    * Get the metadata for all of the instances of this Kafka Streams application
    *
    * @return List of { @link HostStoreInfo}
    */
  def streamsMetadata() : List[HostStoreInfo] = {

    // Get metadata for all of the instances of this Kafka Streams application
    val metadata = streams.allMetadata
    return mapInstancesToHostStoreInfo(metadata)
  }


  /**
    * Get the metadata for all instances of this Kafka Streams application that currently
    * has the provided store.
    *
    * @param store The store to locate
    * @return List of { @link HostStoreInfo}
    */
  def streamsMetadataForStore(store: String) : List[HostStoreInfo] = {

    // Get metadata for all of the instances of this Kafka Streams application hosting the store
    val metadata = streams.allMetadataForStore(store)
    return mapInstancesToHostStoreInfo(metadata)
  }


  /**
    * Find the metadata for the instance of this Kafka Streams Application that has the given
    * store and would have the given key if it exists.
    *
    * @param store Store to find
    * @param key   The key to find
    * @return { @link HostStoreInfo}
    */
  def streamsMetadataForStoreAndKey[T](store: String, key: T, serializer: Serializer[T]) : HostStoreInfo = {
    // Get metadata for the instances of this Kafka Streams application hosting the store and
    // potentially the value for key
    val metadata = streams.metadataForKey(store, key, serializer)
    if (metadata == null)
      throw new NotFoundException(
        s"No metadata could be found for store : ${store}, and key type : ${key.getClass.getName}")

    HostStoreInfo(metadata.host, metadata.port, metadata.stateStoreNames.asScala.toList)
  }


  def mapInstancesToHostStoreInfo(metadatas : java.util.Collection[StreamsMetadata]) : List[HostStoreInfo] = {

    metadatas.stream.map[HostStoreInfo](metadata =>
      HostStoreInfo(
        metadata.host(),
        metadata.port,
        metadata.stateStoreNames.asScala.toList))
      .collect(Collectors.toList())
      .asScala.toList
  }

}
此元数据服务用于获取状态存储信息,然后我们可以使用这些信息来提取我们想要的状态数据(实际上是一个键值存储)。
接下来我们需要做的是公开一个 REST API 以允许我们获取状态。让我们现在看看它
package processing.ratings

import org.apache.kafka.streams.KafkaStreams
import org.apache.kafka.streams.state.HostInfo
import akka.actor.ActorSystem
import akka.http.scaladsl.Http
import akka.http.scaladsl.model._
import akka.http.scaladsl.server.Directives._
import akka.stream.ActorMaterializer
import akka.http.scaladsl.marshallers.sprayjson.SprayJsonSupport._
import spray.json.DefaultJsonProtocol._
import entities.AkkaHttpEntitiesJsonFormats._
import entities._
import stores.StateStores
import akka.http.scaladsl.marshalling.ToResponseMarshallable
import org.apache.kafka.common.serialization.Serdes
import scala.concurrent.{Await, ExecutionContext, Future}
import akka.http.scaladsl.unmarshalling.Unmarshal
import spray.json._
import scala.util.{Failure, Success}
import org.apache.kafka.streams.state.QueryableStoreTypes
import scala.concurrent.duration._


object RestService {
  val DEFAULT_REST_ENDPOINT_HOSTNAME  = "localhost"
}


class RatingRestService(val streams: KafkaStreams, val hostInfo: HostInfo) {

  val metadataService = new MetadataService(streams)
  var bindingFuture: Future[Http.ServerBinding] = null

  implicit val system = ActorSystem("rating-system")
  implicit val materializer = ActorMaterializer()
  implicit val executionContext = system.dispatcher


  def start() : Unit = {
    val emailRegexPattern =  """\w+""".r
    val storeNameRegexPattern =  """\w+""".r

    val route =
      path("ratingByEmail") {
        get {
          parameters('email.as[String]) { (email) =>
            try {

              val host = metadataService.streamsMetadataForStoreAndKey[String](
                StateStores.RATINGS_BY_EMAIL_STORE,
                email,
                Serdes.String().serializer()
              )

              var future:Future[List[Rating]] = null

              //store is hosted on another process, REST Call
              if(!thisHost(host))
                future = fetchRemoteRatingByEmail(host, email)
              else
                future = fetchLocalRatingByEmail(email)

              val ratings = Await.result(future, 20 seconds)
              complete(ratings)
            }
            catch {
              case (ex: Exception) => {
                val finalList:List[Rating] = scala.collection.immutable.List[Rating]()
                complete(finalList)
              }
            }
          }
        }
      } ~
      path("instances") {
        get {
          complete(ToResponseMarshallable.apply(metadataService.streamsMetadata))
        }
      }~
      path("instances" / storeNameRegexPattern) { storeName =>
        get {
          complete(ToResponseMarshallable.apply(metadataService.streamsMetadataForStore(storeName)))
        }
      }

    bindingFuture = Http().bindAndHandle(route, hostInfo.host, hostInfo.port)
    println(s"Server online at http://${hostInfo.host}:${hostInfo.port}/\n")

    Runtime.getRuntime.addShutdownHook(new Thread(() => {
      bindingFuture
        .flatMap(_.unbind()) // trigger unbinding from the port
        .onComplete(_ => system.terminate()) // and shutdown when done
    }))
  }


  def fetchRemoteRatingByEmail(host:HostStoreInfo, email: String) : Future[List[Rating]] = {

    val requestPath = s"http://${hostInfo.host}:${hostInfo.port}/ratingByEmail?email=${email}"
    println(s"Client attempting to fetch from online at ${requestPath}")

    val responseFuture: Future[List[Rating]] = {
      Http().singleRequest(HttpRequest(uri = requestPath))
        .flatMap(response => Unmarshal(response.entity).to[List[Rating]])
    }

    responseFuture
  }

  def fetchLocalRatingByEmail(email: String) : Future[List[Rating]] = {

    val ec = ExecutionContext.global

    println(s"client fetchLocalRatingByEmail email=${email}")

    val host = metadataService.streamsMetadataForStoreAndKey[String](
      StateStores.RATINGS_BY_EMAIL_STORE,
      email,
      Serdes.String().serializer()
    )

    val f = StateStores.waitUntilStoreIsQueryable(
      StateStores.RATINGS_BY_EMAIL_STORE,
      QueryableStoreTypes.keyValueStore[String,List[Rating]](),
      streams
    ).map(_.get(email))(ec)

    val mapped = f.map(rating => {
      if (rating == null)
        List[Rating]()
      else
        rating
    })

    mapped
  }

  def stop() : Unit = {
    bindingFuture
      .flatMap(_.unbind()) // trigger unbinding from the port
      .onComplete(_ => system.terminate()) // and shutdown when done
  }

  def thisHost(hostStoreInfo: HostStoreInfo) : Boolean = {
    hostStoreInfo.host.equals(hostInfo.host()) &&
      hostStoreInfo.port == hostInfo.port
  }
}
有了最后一个类,我们就可以运行应用程序并通过 URL https://:8080/ratingByEmail?email=sacha@here.com 来查询它(Kafka 存储的键是sacha@here.com,值可以是空列表或 List[Ranking] 对象,以 JSON 格式表示,结果如下,在运行生产者并使用 Chrome(或其他您选择的 REST 工具)获取结果后显示)

REST Endpoint Facade
所以我们刚刚创建了一个 Akka Http REST 端点来提供通过 Kafka 流处理评分主题推送的组合 Rating。但是,我们有这个 Play 框架 API,我们将其用于所有其他 REST 端点。所以我选择在 Play 后端创建一个外观端点,它将简单地调用现有的 Akka Http 端点。在我看来,将所有流量保持在一个地方是一件好事。所以让我们看看这段 Play 代码
我们显然需要一个新的路由,如下所示:我们显然需要一个新的路由,如下所示
GET /rating/byemail controllers.RatingController.ratingByEmail()
控制器操作
为了提供这个新路由,我们需要在 RatingController 中添加一个新的 Action。如下所示
package controllers

import javax.inject.Inject
import entities.RatingJsonFormatters._
import entities._
import actors.rating.RatingProducerActor
import akka.actor.{ActorSystem, OneForOneStrategy, Props, SupervisorStrategy}
import akka.pattern.{Backoff, BackoffSupervisor}
import akka.stream.{ActorMaterializer, ActorMaterializerSettings, Supervision}
import play.api.libs.json._
import play.api.libs.json.Json
import play.api.libs.json.Format
import play.api.libs.json.JsSuccess
import play.api.libs.json.Writes
import play.api.libs.ws._
import play.api.mvc.{Action, Controller}
import utils.{Errors, Settings}
import scala.concurrent.{ExecutionContext, Future}
import scala.util.Random
import scala.concurrent.duration._

class RatingController @Inject()
(
  implicit actorSystem: ActorSystem,
  ec: ExecutionContext,
  ws: WSClient
) extends Controller
{

  //Error handling for streams
  //http://doc.akka.io/docs/akka/2.5.2/scala/stream/stream-error.html
  val decider: Supervision.Decider = {
    case _ => Supervision.Restart
  }

  implicit val mat = ActorMaterializer(
    ActorMaterializerSettings(actorSystem).withSupervisionStrategy(decider))
  val childRatingActorProps = Props(classOf[RatingProducerActor],mat,ec)
  val rand = new Random()
  val ratingSupervisorProps = BackoffSupervisor.props(
    Backoff.onStop(
      childRatingActorProps,
      childName = s"RatingProducerActor_${rand.nextInt()}",
      minBackoff = 3.seconds,
      maxBackoff = 30.seconds,
      randomFactor = 0.2
    ).withSupervisorStrategy(
      OneForOneStrategy() {
        case _ => SupervisorStrategy.Restart
      })
  )

  val ratingSupervisorActorRef = actorSystem.actorOf(ratingSupervisorProps, name = "ratingSupervisor")

  def submitNewRating = Action.async(parse.json) { request =>
    Json.fromJson[Rating](request.body) match {
      case JsSuccess(newRating, _) => {
        ratingSupervisorActorRef ! newRating
        Future.successful(Ok(Json.toJson(newRating.copy(toEmail = newRating.toEmail.toUpperCase))))
      }
      case JsError(errors) =>
        Future.successful(BadRequest("Could not build a Rating from the json provided. " +
          Errors.show(errors)))
    }
  }


  def ratingByEmail = Action.async { request =>
    val email = request.getQueryString("email")
    email match {
      case Some(emailAddress) => {
        val url = s"http://${Settings.ratingRestApiHostName}:${Settings.ratingRestApiPort}/ratingByEmail?email=${emailAddress}"
        ws.url(url).get().map {
          response => (response.json).validate[List[Rating]]
        }.map(x => Ok(Json.toJson(x.get)))
      }
      case None => {
        Future.successful(BadRequest(
          "ratingByEmail endpoint MUST be supplied with a non empty 'email' query string value"))
      }
    }
  }
}
这里需要注意的主要一点是
- 我们使用 Play ws(Web 服务)库向现有的 Akka Http 端点发出 GET 请求。从而创建了我们的外观。
- 我们仍然使用 Future 来使其异步运行
用于评分的 React 前端
这是 View Rating React 页面的最终结果。我认为一切都相当不言自明。我猜唯一值得注意的地方是,我们使用 lodash _.sumBy(..) 来对该用户的 Ratings 进行求和以创建整体评分。其余的是标准的 jQuery/React 东西。
import * as React from "react";
import * as ReactDOM from "react-dom";
import * as _ from "lodash";
import { OkDialog } from "./components/OkDialog";
import 'bootstrap/dist/css/bootstrap.css';
import
{
    Well,
    Grid,
    Row,
    Col,
    Label,
    ButtonInput
} from "react-bootstrap";

import { AuthService } from "./services/AuthService";

import { hashHistory  } from 'react-router';


class Rating {
    fromEmail: string
    toEmail: string
    score: number

    constructor(fromEmail, toEmail, score) {
        this.fromEmail = fromEmail;
        this.toEmail = toEmail;
        this.score = score;
    }
}


export interface ViewRatingState {
    ratings: Array<Rating>;
    overallRating: number;
    okDialogOpen: boolean;
    okDialogKey: number;
    okDialogHeaderText: string;
    okDialogBodyText: string;
    wasSuccessful: boolean;
}


export class ViewRating extends React.Component<undefined, ViewRatingState> {

    private _authService: AuthService;

    constructor(props: any) {
        super(props);
        this._authService = props.route.authService;
        if (!this._authService.isAuthenticated()) {
            hashHistory.push('/');
        }
        this.state = {
            overallRating: 0,
            ratings: Array(),
            okDialogHeaderText: '',
            okDialogBodyText: '',
            okDialogOpen: false,
            okDialogKey: 0,
            wasSuccessful: false
        };
    }


    loadRatingsFromServer = () => {

        var self = this;
        var currentUserEmail = this._authService.userEmail();

        $.ajax({
            type: 'GET',
            url: 'rating/byemail?email=' + currentUserEmail,
            contentType: "application/json; charset=utf-8",
            dataType: 'json'
        })
        .done(function (jdata, textStatus, jqXHR) {

            console.log("result of GET rating/byemail");
            console.log(jqXHR.responseText);
            let ratingsObtained = JSON.parse(jqXHR.responseText);
            self.setState(
                {
                    overallRating: _.sumBy(ratingsObtained, 'score'),
                    ratings: ratingsObtained
                });
        })
        .fail(function (jqXHR, textStatus, errorThrown) {
            self.setState(
                {
                    okDialogHeaderText: 'Error',
                    okDialogBodyText: 'Could not load Ratings',
                    okDialogOpen: true,
                    okDialogKey: Math.random()
                });
        });

    }

    componentDidMount() {
        this.loadRatingsFromServer();
    }

    render() {

        var rowComponents = this.generateRows();

        return (
            <Well className="outer-well">
                    <Grid>
                        <Row className="show-grid">
                            <Col xs={6} md={6}>
                                <div>
                                <h4>YOUR OVERALL RATING <Label>{this.state.overallRating}</Label></h4>
                                </div>
                            </Col>
                        </Row>
                        <Row className="show-grid">
                            <Col xs={10} md={6}>
                                <h6>The finer details of your ratings are shown below</h6>
                            </Col>
                        </Row>
                        <Row className="show-grid">
                            <Col xs={10} md={6}>
                                <div className="table-responsive">
                                    <table className="table table-striped table-bordered table-condensed factTable">
                                        <thead>
                                            <tr>
                                                <th>Rated By</th>
                                                <th>Rating Given</th>
                                            </tr>
                                        </thead>
                                        <tbody>
                                            {rowComponents}
                                        </tbody>
                                    </table>
                                </div>
                            </Col>
                        </Row>
                        <Row className="show-grid">
                            <span>
                                <OkDialog
                                    open= {this.state.okDialogOpen}
                                    okCallBack= {this._okDialogCallBack}
                                    headerText={this.state.okDialogHeaderText}
                                    bodyText={this.state.okDialogBodyText}
                                    key={this.state.okDialogKey}/>
                            </span>
                        </Row>
                    </Grid>
            </Well>
        )
    }

    _okDialogCallBack = () => {
        this.setState(
            {
                okDialogOpen: false
            });
    }

    generateRows = () => {
        return this.state.ratings.map(function (item) {
            return  <tr key={item.fromEmail}>
                        <td>{item.fromEmail}</td>
                        <td>{item.score}</td>
                    </tr>;

        });
    }
}
结论
这无疑是一项艰巨的任务,我真的很高兴我完成了它,我在编写这个过程中度过了非常愉快的时光,并且它是一个伟大的自我提升项目。我推荐这种类型的事情作为一种很好的时间利用方式。继续吧,找一个你的宠物项目