
Fluent NHibernate 的基本设置
4.75/5 (4投票s)
为 ASP.NET 项目设置 NHibernate 和 Fluent 映射
引言
什么是 ORM 和 NHibernate?
ORM(对象关系映射)是一种工具,它提供了一种机制,可以将数据库表映射到面向对象类的对象,反之亦然。这使您可以利用对象范式查询和操作数据库中的数据。NHibernate 是为 C# 开发的开源 ORM。下图显示了 ORM 的抽象/高级概述。
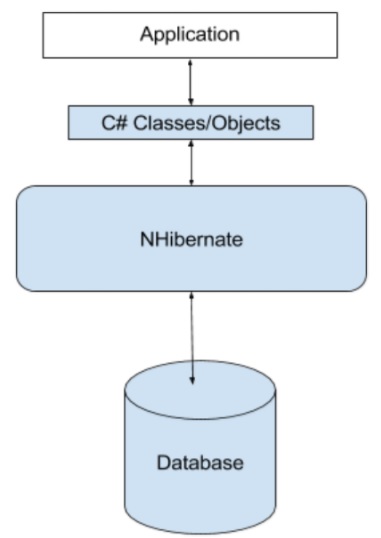
它是一个用您的语言编写的库,封装了操作数据所需的代码,因此您不再使用 SQL,而是直接使用您的语言的对象。
本文将提供您使用 NHibernate 获取和修改 SQL 数据库中的数据所需的一切。
步骤 1:创建数据库和表
首先,您需要在本地 SQL DB 中创建一个名为“NHibernateDemo”的数据库。然后执行以下 SQL 脚本以创建名为“Customer”的表并在其中填充一些数据。
-- create a table name Customer
CREATE TABLE Customer(
    Id int IDENTITY(1,1) NOT NULL Primary Key,
    Name varchar(50) NULL,
    Email varchar(50) Null
    )

-- Populate some rows

Insert into Customer
values('Adam Hanter', 'a.hanter@abc.com'),
      ('Mark Moris', 'm.moris@abc.com')
步骤 2:使用 Visual Studio 创建控制台应用程序(.NET Framework)
打开 Visual Studio,然后转到文件 -> 新建 -> 项目
这将打开以下对话框,然后选择控制台应用程序并命名您的项目并保存它。

在创建项目时,需要安装 Nhibernate 和 Fluent。这些都可以使用 Nuget 包轻松完成。
右键单击您的解决方案/项目,然后管理解决方案的 Nuget 包。
在搜索框中,输入 NHibernate,然后安装它。对 FluentNHibernate 执行相同的操作。
添加 NHibernate 和 Fluent 库后,您的项目就可以使用其功能了。
步骤 3:创建您的实体/类
public class Customer
    {
        public virtual int Id {get; set;}
        public virtual string Name {get; set;}
        public virtual string Email{get; set;}
    }
请记住将 virtual 关键字添加到您的属性中,NHibernate 会在运行时使用它来创建代理以允许延迟加载和其他内容。
步骤 4:创建映射(实体到数据库表)
现在您必须为之前创建的每个实体/类创建一个映射实体,它代表 NHibernate 的核心。实体发生的任何未来更改都应更改映射。
public class CustomerMapping : ClassMap<Customer>
    {
        public CustomerMapping()
        {
            Id(x => x.Id).GeneratedBy.Native();
            Map(x => x.Name);
            Map(x => x.Email);
        }
    }
Native() 用于支持 SQL Server 自动生成的键。
步骤 5:创建 NHibernate 配置
    class NHibernateHelper
    {
        private const string CurrentSessionKey = "nhibernate.current_session";
        private static readonly ISessionFactory _sessionFactory;
        static NHibernateHelper()
        {
            _sessionFactory = FluentConfigure();
        }
        public static ISession GetCurrentSession()
        {
            return _sessionFactory.OpenSession();
        }
        public static void CloseSession()
        {
            _sessionFactory.Close();
        }
        public static void CloseSessionFactory()
        {
            if (_sessionFactory != null)
            {
                _sessionFactory.Close();
            }
        }

        public static ISessionFactory FluentConfigure()
        {
            return Fluently.Configure()
                //which database
                .Database(
                    MsSqlConfiguration.MsSql2012
                        .ConnectionString(
                            cs => cs.FromConnectionStringWithKey
                                  ("DBConnection")) //connection string from app.config
                                                    //.ShowSql()
                        )
                //2nd level cache
                .Cache(
                    c => c.UseQueryCache()
                        .UseSecondLevelCache()
                        .ProviderClass<NHibernate.Cache.HashtableCacheProvider>())
                //find/set the mappings
                //.Mappings(m => m.FluentMappings.AddFromAssemblyOf<CustomerMapping>())
                .Mappings(m => m.FluentMappings.AddFromAssembly(Assembly.GetExecutingAssembly()))
                .BuildSessionFactory();
        }
    }
在 App.config 文件中添加以下部分。
<hibernate-configuration xmlns="urn:nhibernate-configuration-2.2">
    <session-factory>
      <property name="dialect">NHibernate.Dialect.MsSql2012Dialect</property>
      <property name="connection.connection_string">
        Server=.;initial catalog=NHibernateDemo;Integrated Security=True
      </property>
      <mapping assembly="NhibernateDemo1" />
    </session-factory>
  </hibernate-configuration>
  <connectionStrings>
    <add name="DBConnection" connectionString="Server=.;Database=NHibernateDemo;
     Integrated Security=True;" providerName="System.Data.SqlClient" />
  </connectionStrings>
步骤 6:读取和写入数据库表
class Program
    {
        static void Main(string[] args)
        {
            DisplayAllCustomers();

            //Add new Customer
            AddNewCustomer();
            Console.WriteLine("After adding new customer..");
            DisplayAllCustomers();

            Console.WriteLine("Press Enter to exit..");
            Console.ReadLine();
        }

        static void AddNewCustomer()
        {
            Customer cus = new Customer()
            {
                Name = "New Customer",
                Email = "n.customer@abc.com"
            };

            ISession session = NHibernateHelper.GetCurrentSession();
            try
            {
                using (ITransaction tx = session.BeginTransaction())
                {
                    session.Save(cus);
                    tx.Commit();
                }
            }
            finally
            {
                NHibernateHelper.CloseSession();
            }
        }
        static void DisplayAllCustomers()
        {
            ISession session = NHibernateHelper.GetCurrentSession();
            try
            {
                using (ITransaction tx = session.BeginTransaction())
                {
                    var customers = from customer in session.Query<Customer>()
                        select customer;

                    foreach (var f in customers)
                    {
                        Console.WriteLine("{0} {1} {2}", f.Id, f.Name, f.Email);
                    }
                    tx.Commit();
                }
            }
            finally
            {
                NHibernateHelper.CloseSession();
            }
        }
    }
希望本文能为您提供 Fluent NHibernate 的基础知识。在我的下一篇文章中,我将更多地讨论表之间的关系以及如何在映射中映射它们。我还会讨论存储库模式和工作单元模式以及如何将它们与 NHibernate 一起使用。