
创建和使用内容提供者
4.41/5 (6投票s)
如何使用内容提供程序而不是集合类(例如 ArrayList)来存储数据
引言
多年前(大约是 Froyo 时代),我开发的第一批 Android 应用之一是遍历手机联系人,以列表格式显示他们的生日、年龄、距离下次生日的天数以及其他一些零碎信息。从那以后,它一直运行得非常完美。虽然我尽量每周至少打开一次应用程序检查即将到来的生日,但我开始意识到,如果我不用主动去检查,应用程序会更有帮助。当生日到来时,它应该自己通知我。我一直有这个想法很多年了。最近,我决定对此采取行动。
鉴于自该应用创建以来,Android 已经发布了许多版本,我知道我需要使用更新的 SDK、更智能的逻辑,甚至可能更现代的 UI 来更新它。我的一些主要目标是:1) 使用通知栏通知我任何即将到来的生日(我还想添加纪念日),2) 创建一个在后台运行的服务活动,在设备开机时重新启动自身,3) 使用 RecyclerView 和 CardView 来显示事件信息,而不是 ListView。
所有这些新东西!过去,每当我需要显示一个列表时,我都会使用 ArrayAdapter 来持有某种集合(然后将其绑定到 ListView)。在那些情况下,这效果很好,但它可能并不总是最佳解决方案。因此,我设定了一个次要目标,看看是否可以利用内容提供程序来存储事件信息。这样,后台运行的服务就可以在应用运行时或不运行时更新内容数据库。然后,当应用启动时,它将简单地显示内容数据库中的内容。
背景
回想我开始编码的 80 年代,一直到今天,当我想要了解某个特定函数集或 API 如何工作时,我都会编造一个问题,然后使用这些函数和 API 来解决问题。这种方法对我来说效果非常好。对于这次应用更新,我对通知、服务活动、RecyclerView 或创建内容提供程序没有任何经验。因此,我暂时推迟了对上述应用程序的任何更新,而是开始单独学习它们。
我最终创建了几个测试应用来练习这些功能,但其中一个在共享方面比其他应用稍微有用一些。在编程界,众所周知,“Hello, world!” 程序通常用于说明编程语言的基本语法,因此通常是人们在新语言上手写的第一批程序。我忍不住想,温度/天气应用程序的地位与此相同,因为在 App Store 或 Google Play 上似乎不乏此类应用。
虽然我肯定不是想发明任何新东西,但我确实对使用与天气相关的数据作为我测试应用的输入感兴趣。我已经是 Weather Underground 的会员,他们有一个非常易于使用的 API(它本质上是基于 URL 的),所以对我来说,这是自然的选择。我决定使用 forecast 命令,没有任何其他原因,仅仅是因为它提供了足够的信息(四天)来测试我的应用程序。
代码
由于这个测试应用是创建和使用内容提供程序的练习,我决定让 JSON 内容驱动底层数据库的布局。在 JSON 文件的顶部附近有一个数组:txt_forecast/forecastday。它包含 8 个项,四天预报中的每一天有两项。对于每一对,一个是对当天的预报摘要,另一个是对夜晚的预报摘要。紧接着是另一个数组:simpleforecast/forecastday。它包含 4 个项,对应于预报中的每一天。对于每一项,它包含更详细的预报信息。这适合包含两个表的数据库:一个包含 8 行,包含摘要信息;另一个包含 4 行,包含详细信息。这两个表将具有 2-1 的关系,如下所示:
| 第 1 天 | 夜晚 1 | 第 2 天 | 夜晚 2 | 第 3 天 | 夜晚 3 | 第 4 天 | 夜晚 4 |
| 第 1 天详细信息 | 第 2 天详细信息 | 第 3 天详细信息 | 第 4 天详细信息 | ||||
网上有几十个其他网站详细介绍了如何创建内容提供程序,所以我不会深入到那个层面。我只会介绍在这个测试应用中所做的,主要是包含第二个表。
SQLiteOpenHelper
扩展 ContentProvider 类需要覆盖几个方法,以及扩展 SQLiteOpenHelper 类。对于后者,整个 ForecastDatabaseHelper(这是一个内部类)看起来像这样:
private class ForecastDatabaseHelper extends SQLiteOpenHelper
{
    private static final String DATABASE_NAME = "forecasts.db";
    private static final int DATABASE_VERSION = 1;
    private static final String FORECASTS_TABLE = "forecasts";
    private static final String DETAILS_TABLE = "details";

    private static final String FORECASTS_TABLE_CREATE =
        "CREATE TABLE " + FORECASTS_TABLE + " ("
        + KEY_ID + " INTEGER PRIMARY KEY AUTOINCREMENT, "
        + KEY_PERIOD + " INTEGER, "
        + KEY_ICON + " BLOB, "
        + KEY_TITLE + " TEXT, "
        + KEY_FORECAST + " TEXT, "
        + KEY_DETAIL + " INTEGER);"; // maps to KEY_PERIOD in the DETAILS_TABLE table

    private static final String DETAILS_TABLE_CREATE =
        "CREATE TABLE " + DETAILS_TABLE + " ("
        + KEY_ID + " INTEGER PRIMARY KEY AUTOINCREMENT, "
        + KEY_PERIOD + " INTEGER, "
        + KEY_DATE + " TEXT, "
        + KEY_HIGHTEMP + " TEXT, "
        + KEY_LOWTEMP + " TEXT, "
        + KEY_CONDITIONS + " TEXT, "
        + KEY_ICON + " BLOB, "
        + KEY_PRECIP + " TEXT, "
        + KEY_SNOW + " TEXT, "
        + KEY_WIND + " TEXT, "
        + KEY_HUMIDITY + " TEXT);";

    //========================================================

    public ForecastDatabaseHelper( Context context, String name, SQLiteDatabase.CursorFactory factory, int version )
    {
        super(context, name, factory, version);
    }

    //========================================================

    @Override
    public void onCreate( SQLiteDatabase db )
    {
        db.execSQL(FORECASTS_TABLE_CREATE);
        db.execSQL(DETAILS_TABLE_CREATE);
    }

    //========================================================

    @Override
    public void onUpgrade( SQLiteDatabase db, int oldVersion, int newVersion )
    {
        db.execSQL("DROP TABLE IF EXISTS " + FORECASTS_TABLE);
        db.execSQL("DROP TABLE IF EXISTS " + DETAILS_TABLE);
        onCreate(db);
    }
}
由于数据库类是私有的,关于它外观的细节不会暴露给内容提供程序的用户。这一点稍后会更加明显。
ForecastProvider
处理内容提供程序意味着大多数(如果不是全部)事务都围绕 URI 进行。因此,我们必须发布 URI,因为它将通过内容解析器从测试应用内部用于访问内容提供程序。这看起来像这样:
public static final Uri FORECASTS_CONTENT_URI = Uri.parse("content://com.example.forecastprovider/forecasts");
public static final Uri DETAILS_CONTENT_URI   = Uri.parse("content://com.example.forecastprovider/details");
现在,在主活动中,当我们与任何一个表交互时,我们通过将其中一个 Uri 对象传递给内容解析器方法来实现。
在提供程序的 onCreate() 方法中,我们只需要创建一个 ForecastDatabaseHelper 实例,如下所示:
@Override
public boolean onCreate()
{
    try
    {
        dbHelper = new ForecastDatabaseHelper(getContext(),
                                              ForecastDatabaseHelper.DATABASE_NAME,
                                              null,
                                              ForecastDatabaseHelper.DATABASE_VERSION);
    }
    catch(Exception e)
    {
        Log.e(TAG, "Error creating provider: " + e.getMessage());
    }

    return true;
}
在数据库上执行的四个常见操作是查询、插入、删除和更新。对于查询,我们首先请求数据库的只读版本。然后,我们需要根据 URI(可以是所有内容或单个行)解码请求。处理此解码的 UriMatcher 对象创建并填充如下:
private static UriMatcher uriMatcher = null;

static
{
    // allocate the URI object, where a URI ending in 'forecasts' will correspond to a request
    // for all forecasts, and 'forecasts/[rowId]' will represent a single forecast row
    // the same for details
    uriMatcher = new UriMatcher(UriMatcher.NO_MATCH);
    uriMatcher.addURI("com.example.forecastprovider", "forecasts", FORECASTS);
    uriMatcher.addURI("com.example.forecastprovider", "forecasts/#", FORECASTS_ID);
    uriMatcher.addURI("com.example.forecastprovider", "details", DETAILS);
    uriMatcher.addURI("com.example.forecastprovider", "details/#", DETAILS_ID);
}
解码后,我们将 selection、projection 和 sort order 参数应用于数据库,最后返回一个 Cursor。我们重写的 query() 方法如下:
@Nullable
@Override
public Cursor query( @NonNull Uri uri, @Nullable String[] projection, @Nullable String selection, @Nullable String[] selectionArgs, @Nullable String sortOrder )
{
    SQLiteDatabase database = dbHelper.getReadableDatabase();

    SQLiteQueryBuilder qb = new SQLiteQueryBuilder();

    Cursor c = null;
    String orderBy = sortOrder;

    int nUriType = uriMatcher.match(uri);
    if (nUriType == FORECASTS || nUriType == FORECASTS_ID)
    {
        qb.setTables(ForecastDatabaseHelper.FORECASTS_TABLE);

        if (nUriType == FORECASTS_ID)
            qb.appendWhere(KEY_ID + "=" + uri.getPathSegments().get(1));

        if (TextUtils.isEmpty(sortOrder))
            orderBy = KEY_PERIOD;
    }
    else if (nUriType == DETAILS || nUriType == DETAILS_ID)
    {
        qb.setTables(ForecastDatabaseHelper.DETAILS_TABLE);

        if (nUriType == DETAILS_ID)
            qb.appendWhere(KEY_ID + "=" + uri.getPathSegments().get(1));

        if (TextUtils.isEmpty(sortOrder))
            orderBy = KEY_PERIOD;
    }

    // apply the query to the underlying database
    c = qb.query(database, projection, selection, selectionArgs, null, null, orderBy);

    // register the context's ContentResolver to be notified if the cursor result set changes
    c.setNotificationUri(getContext().getContentResolver(), uri);

    return c;
}
对于插入、删除和更新事务,这主要是将内容提供程序请求映射到数据库等效项的练习。每个方法首先尝试解码 URI 以确定要修改哪个表。之后,会调用匹配的数据库方法。这看起来像这样:
@Nullable
@Override
public Uri insert( @NonNull Uri uri, @Nullable ContentValues values )
{
    SQLiteDatabase database = dbHelper.getWritableDatabase();
    Uri _uri = null;

    switch(uriMatcher.match(uri))
    {
        case FORECASTS:
        {
            // database.insert() will return the row number if successful
            long lRowId = database.insert(ForecastDatabaseHelper.FORECASTS_TABLE, null, values);
            if (lRowId > -1)
            {
                // on success, return a URI to the newly inserted row
                _uri = ContentUris.withAppendedId(FORECASTS_CONTENT_URI, lRowId);
            }

            break;
        }

        case DETAILS:
        {
            // database.insert() will return the row number if successful
            long lRowId = database.insert(ForecastDatabaseHelper.DETAILS_TABLE, null, values);
            if (lRowId > -1)
            {
                // on success, return a URI to the newly inserted row
                _uri = ContentUris.withAppendedId(DETAILS_CONTENT_URI, lRowId);
            }

            break;
        }

        default:
            throw new SQLException("Failed to insert forecast_row into " + uri);
    }

    getContext().getContentResolver().notifyChange(_uri, null);
    return _uri;
}

//============================================================

@Override
public int delete( @NonNull Uri uri, @Nullable String selection, @Nullable String[] selectionArgs )
{
    SQLiteDatabase database = dbHelper.getWritableDatabase();

    switch(uriMatcher.match(uri))
    {
        case FORECASTS:
            database.delete(ForecastDatabaseHelper.FORECASTS_TABLE, selection, selectionArgs);
            break;

        case DETAILS:
            database.delete(ForecastDatabaseHelper.DETAILS_TABLE, selection, selectionArgs);
            break;
    }

    getContext().getContentResolver().notifyChange(uri, null);
    return 0;
}

//============================================================

@Override
public int update( @NonNull Uri uri, @Nullable ContentValues values, @Nullable String selection, @Nullable String[] selectionArgs )
{
    SQLiteDatabase database = dbHelper.getWritableDatabase();
    int nCount = 0;
    String strSegment;

    switch(uriMatcher.match(uri))
    {
        case FORECASTS:
            nCount = database.update(ForecastDatabaseHelper.FORECASTS_TABLE,
                                     values,
                                     selection,
                                     selectionArgs);
            break;

        case FORECASTS_ID:
            strSegment = uri.getPathSegments().get(1);
            nCount = database.update(ForecastDatabaseHelper.FORECASTS_TABLE, values,
                                     KEY_ID + "=" + strSegment + (! TextUtils.isEmpty(selection) ? " AND (" + selection + ')' : ""),
                                     selectionArgs);
            break;

        case DETAILS:
            nCount = database.update(ForecastDatabaseHelper.DETAILS_TABLE,
                                     values,
                                     selection,
                                     selectionArgs);
            break;

        case DETAILS_ID:
            strSegment = uri.getPathSegments().get(1);
            nCount = database.update(ForecastDatabaseHelper.DETAILS_TABLE, values,
                                     KEY_ID + "=" + strSegment + (! TextUtils.isEmpty(selection) ? " AND (" + selection + ')' : ""),
                                     selectionArgs);
            break;

        default:
            throw new IllegalArgumentException("Unknown URI: " + uri);
    }

    getContext().getContentResolver().notifyChange(uri, null);
    return nCount;
}
这就是内容提供程序及其底层数据库的核心。它需要在清单中注册,通过在 application 标签内创建一个 provider 节点来实现,如下所示:
<provider android:name=".ForecastProvider" android:authorities="com.example.forecast.provider"/>
让我们看看上述部分如何在应用的主体中使用。我们不会直接将预报项目添加到 ListView,而是将它们添加到内容提供程序 ForecastProvider 中,然后由它通过 CursorAdapter 填充关联的 ListView。
JSON,JSON,你为什么是 JSON
从 Weather Underground 网站下载 JSON 文件非常简单。它基本上只是意味着打开一个 HTTP 连接,读取该连接的流,然后解析返回值,在本例中是一个 BufferedReader 对象。执行此操作的代码如下所示:
StringBuilder builder = new StringBuilder("");
...
URL url = new URL(Utility.getWundergroundUrl(strZIP));
HttpURLConnection connection = (HttpURLConnection) url.openConnection();
if (connection.getResponseCode() == HttpURLConnection.HTTP_OK)
{
    String strLine;

    BufferedReader reader = new BufferedReader(new InputStreamReader(connection.getInputStream()));
    while ((strLine = reader.readLine()) != null)
        builder.append(strLine);

    reader.close();
    connection.disconnect();
}
现在 StringBuilder 对象中包含已下载 JSON 文件的内容,我们可以通过提取所有感兴趣的部分来完成此过程。JSON 是一个被广泛宣传的主题,所以我不会在这里详细介绍,我只会展示我从预报数据中提取的部分。对于这个,我们只对 txt_forecast/forecastday 数组感兴趣,如下所示:
ContentResolver cr = getContentResolver();
String strUnit = prefs.getString("UNIT", "0");

JSONObject object = new JSONObject(builder.toString());
JSONArray array = object.getJSONObject("forecast").getJSONObject("txt_forecast").getJSONArray("forecastday");

for (int x = 0; x < array.length(); x++)
{
    JSONObject obj = array.getJSONObject(x);

    ForecastInfo info = new ForecastInfo();
    info.m_nPeriod    = obj.getInt("period");             // should be 0-7
    info.m_icon       = getIconBytes(obj.getString("icon_url"));
    info.m_strTitle   = obj.getString("title");
    info.m_nDetail    = (int) (info.m_nPeriod / 2.0) + 1; // should be 1-4

    if (strUnit.equals("1"))
        info.m_strForecast = obj.getString("fcttext_metric");
    else // if (strUnit.equals("0"))
        info.m_strForecast = obj.getString("fcttext");

    addNewForecast(cr, info);
}
这里有几点需要注意:1) 由于数组中只有 8 个预报项目,因此 period 成员应该是一个 0-7 范围内的数字,2) forecasts 表中的 icon 字段是 BLOB 类型,因此我们需要将 Bitmap 数据转换为字节数组进行存储,3) 由于 forecasts 表中每 4 行 details 表中有 2 行,因此 detail 成员用于保存这种“映射”。
填充 ForecastInfo 对象后,我们继续向 forecasts 表添加新行。这看起来像这样:
try
{
    ContentValues values = new ContentValues();
    values.put(ForecastProvider.KEY_PERIOD,   forecastInfo.m_nPeriod);
    values.put(ForecastProvider.KEY_ICON,     forecastInfo.m_icon);
    values.put(ForecastProvider.KEY_TITLE,    forecastInfo.m_strTitle);
    values.put(ForecastProvider.KEY_FORECAST, forecastInfo.m_strForecast);
    values.put(ForecastProvider.KEY_DETAIL,   forecastInfo.m_nDetail);

    String where = ForecastProvider.KEY_PERIOD + " = " + forecastInfo.m_nPeriod;

    // since the 'forecast' action always gives today plus 3 more days, and those change every day, our database will always have just 8 rows in it
    // it's like an 8-item window that is always moving forward, with older days falling off and newer days coming on
    Cursor query = cr.query(ForecastProvider.FORECASTS_CONTENT_URI, null, where, null, null);
    if (query != null)
    {
        // if this object's period does not exist, add it, else update it
        if (query.getCount() == 0)
            cr.insert(ForecastProvider.FORECASTS_CONTENT_URI, values);
        else
            cr.update(ForecastProvider.FORECASTS_CONTENT_URI, values, where, null);

        query.close();
    }
}
catch(Exception e)
{
    Log.e("Test2", "Error adding ForecastInfo object: " + e.getMessage());
}
如前所述,我们不是直接添加到数据库表中,而是通过 ContentResolver 来完成,它使用 URI 来知道要修改哪个表。底层 ContentProvider 负责直接与数据库通信。
ForecastDetails 数据以几乎相同的方式处理。唯一可预见的变化将是**公制**和**英制**数字的区别。由于 JSON 文件同时包含这两种,所以我们不需要进行任何转换。我使用这个应用程序几周后,发现我想知道给定日期预报的实际“感觉上”的温度。Weather Underground 的 **forecast** 命令不提供此信息,所以我不得不添加一些代码来进行各种转换,因为风寒公式需要空气温度和风速都采用英制单位(分别为华氏度和英里/小时)。这看起来像这样:
JSONArray array = object.getJSONObject("forecast").getJSONObject("simpleforecast").getJSONArray("forecastday");

for (int x = 0; x < array.length(); x++)
{
    JSONObject obj = array.getJSONObject(x);
    JSONObject o = obj.getJSONObject("date");

    ForecastDetails details = new ForecastDetails();
    details.m_nPeriod       = obj.getInt("period");
    details.m_strDate       = String.format(Locale.getDefault(), "%s, %s %s, %s", o.getString("weekday"), o.getString("monthname"), o.getString("day"), o.getString("year"));
    details.m_strConditions = obj.getString("conditions");
    details.m_icon          = getIconBytes(obj.getString("icon_url"));
    details.m_strHumidity   = obj.getString("avehumidity") + " %";

    if (strUnit.equals("1"))
    {
        Celsius celsiusHigh = new Celsius(obj.getJSONObject("high").getString("celsius"));
        Celsius celsiusLow  = new Celsius(obj.getJSONObject("low").getString("celsius"));
        WindKph windKph     = new WindKph(obj.getJSONObject("avewind").getString("kph"));

        details.m_strHighTemp = String.format(Locale.getDefault(), "%.0f\u2103 (%.0f\u2103)", celsiusHigh.dTemperature, celsiusHigh.getWindChill(windKph));
        details.m_strLowTemp  = String.format(Locale.getDefault(), "%.0f\u2103 (%.0f\u2103)", celsiusLow.dTemperature, celsiusLow.getWindChill(windKph));
        details.m_strPrecip   = obj.getJSONObject("qpf_allday").getString("mm") + " mm";
        details.m_strSnow     = obj.getJSONObject("snow_allday").getString("cm") + " cm";
        details.m_strWind     = windKph.nSpeed + " kph from the " + obj.getJSONObject("avewind").getString("dir");
    }
    else // if (strUnit.equals("0"))
    {
        Fahrenheit fahrenheitHigh = new Fahrenheit(obj.getJSONObject("high").getString("fahrenheit"));
        Fahrenheit fahrenheitLow  = new Fahrenheit(obj.getJSONObject("low").getString("fahrenheit"));
        WindMph windMph           = new WindMph(obj.getJSONObject("avewind").getString("mph"));

        details.m_strHighTemp = String.format(Locale.getDefault(), "%.0f\u2109 (%.0f\u2109)", fahrenheitHigh.dTemperature, fahrenheitHigh.getWindChill(windMph));
        details.m_strLowTemp  = String.format(Locale.getDefault(), "%.0f\u2109 (%.0f\u2109)", fahrenheitLow.dTemperature, fahrenheitLow.getWindChill(windMph));
        details.m_strPrecip   = obj.getJSONObject("qpf_allday").getString("in") + " in.";
        details.m_strSnow     = obj.getJSONObject("snow_allday").getString("in") + " in.";
        details.m_strWind     = windMph.nSpeed + " mph from the " + obj.getJSONObject("avewind").getString("dir");
    }

    addNewDetail(cr, details);
}
您可以在可下载的代码中找到 Temperature 和 Wind 类的详细信息。
之前我提到过,我有时会使用 ArrayAdapter 来持有数据集合(例如 ArrayList)。然后将该适配器与 ListView 关联。当集合中的数据发生变化时,通过调用适配器的 notifyDataSetChanged() 方法来通知 ListView 需要刷新自身。当处理 ContentProvider、SimpleCursorAdapter 和 CursorLoader 对象时,情况会发生变化。虽然涉及的代码量更多,但如果您的项目设计可以证明需要将数据存储在内容提供程序而不是数组中,那么优点将大于缺点。
应用程序
我为这个应用程序使用了两个不同的 SimpleCursorAdapter 对象:一个用于预报的主列表,另一个用于详细信息对话框。它们各自使用不同的查询从内容提供程序的数据库中提取数据。您可以在可下载的代码中看到这些查询。值得一提的是,这两个适配器都利用 setNewValue() 方法来设置 ImageView 的图标。默认情况下,setNewValue() 处理 TextView 和 ImageView 视图。如前所述,Bitmap 没有存储在任一表的 BLOB 列中,而是存储构成 Bitmap 的字节数组。为了处理这个问题,我们只需要检查当前正在处理的视图。如果它是一个 ImageView 视图,我们就介入,如下所示:
public boolean setViewValue( View view, Cursor cursor, int columnIndex )
{
    if (view.getId() == R.id.image)
    {
        try
        {
            byte[] icon = cursor.getBlob(columnIndex);

            ImageView image = (ImageView) view;
            image.setImageBitmap(Utility.getImage(icon));

            return true;
        }
        catch (Exception e)
        {
            Log.e("Test2", e.getMessage());
        }
    }

    return false; // handle things normally
}
虽然本文的重点不是应用程序本身,而是我如何实现它的旅程,但完成产品的图片总是锦上添花。我是一个非常视觉化的人,所以这四张图片至少值 4000 字!
首次启动应用时,它不知道您要监视哪个邮政编码,因此会显示一个 Snackbar 来告知您。点击 **设置** 按钮将带您进入“偏好设置”屏幕,您可以在其中提供邮政编码或选择监视当前位置。

一旦确定了位置(无论是通过特定的邮政编码还是当前位置),就会显示该区域的 4 天预报。
 | 点击其中一天的预报将弹出一个对话框,显示有关该日期预报的更多详细信息。 | 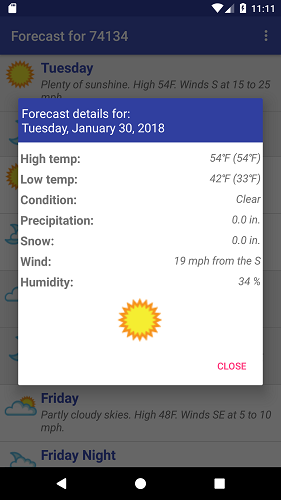 |
“偏好设置”屏幕允许您更改正在监视的位置、使用的测量单位(即英制或公制)以及关于分组日期的着色方案。关于最后一点,如果每个项目都能区分开来,即使是轻微的区分,列表也总是更容易在视觉上处理。我通常会在适配器的 getView() 方法中添加几行代码,根据行是奇数还是偶数来交替颜色。在这个应用程序中,我更进一步,还提供了交替日期颜色的选项。这样,它就可以在视觉上将周一的所有项目组合在一起,周二的所有项目组合在一起,等等。
在可下载的代码中,您可能会注意到我调用了 registerOnSharedPreferenceChangeListener() 来接收偏好设置所做的任何更改的通知。但是,在处理该通知的 handler 中,我没有做任何事情,只是记录了新的邮政编码(在检测到新位置时使用)。我之所以不在此处请求新的预报,是因为当 SettingsActivity 被关闭时,MainActivity 会被重新创建,并且其 onResume() 方法会调用 retrieveForecasts()。
值得一提的是,通过启用 **使用当前位置** 复选框,应用程序会随着您的位置变化而更新。这可能很有益,但代价是电池消耗略有增加。

当前位置是通过 FusedLocationProviderClient 对象获得的,并扩展了 LocationCallback 类。创建对象并请求位置更新如下所示:
FusedLocationProviderClient mFusedLocationClient = LocationServices.getFusedLocationProviderClient(this);
...
LocationRequest locationRequest = new LocationRequest();
locationRequest.setInterval(1200000);      // 20 minutes
locationRequest.setFastestInterval(15000); // 15 seconds
locationRequest.setPriority(LocationRequest.PRIORITY_LOW_POWER);
...
MyLocationCallback mLocationCallback = new MyLocationCallback();
mFusedLocationClient.requestLocationUpdates(locationRequest, mLocationCallback, null /* Looper */);
由于该应用程序的要求是基于 邮政编码 的,因此我不需要极高的精度,所以在 AndroidManifest.xml 文件中请求的权限是 ACCESS_COARSE_LOCATION,并且位置请求的优先级设置为低,即“城市”级别。一旦检测到新位置,结果就会发送到 callback 的 onLocationResult() 方法。从 LocationResult 参数中,我们可以对纬度和经度进行反向地理编码以获取邮政编码,如下所示:
public void onLocationResult( LocationResult locationResult )
{
    try
    {
        Location loc = locationResult.getLastLocation();
        if (loc != null)
        {
            double lat = loc.getLatitude();
            double lng = loc.getLongitude();

            Geocoder geoCoder = new Geocoder(MainActivity.this, Locale.getDefault());
            List<Address> addresses = geoCoder.getFromLocation(lat, lng, 1);
            if (addresses != null && ! addresses.isEmpty())
            {
                // only bother updating the preference and retrieving forecasts if the ZIP code changed
                String strNewZIP = addresses.get(0).getPostalCode();
                if (! strNewZIP.equals(m_strZIP))
                {
                    m_strZIP = strNewZIP;

                    SharedPreferences.Editor editor = prefs.edit();
                    editor.putString("ZIP", m_strZIP);
                    editor.commit();

                    // a different location has been detected so retrieve the forecast for it
                    retrieveForecasts();
                }
            }
        }
    }
    catch (Exception e)
    {
        Log.e("Test2", "  Error getting ZIP Code from location: " + e.getMessage());
    }
}
结语
就移动应用程序而言,这款应用程序非常基础,没有多余的功能或额外的花哨。它完成了我学习创建和使用内容提供程序的目的。我现在可以利用在这里学到的知识,结合那些其他的测试应用,继续我之前提到的生日/纪念日应用程序的工作。敬请期待——它可能很快就会出现在您附近的影院。
尽情享用!