
上下文数据浏览器
5.00/5 (7投票s)
创建上下文与数据之间双向关系的一种方法——使用 C# 的声明式强类型关系上下文系统
引言
ZDNet 的完整引述: http://www.zdnet.com/article/the-enterprise-technologies-to-watch-in-2017/
上下文计算。随着对按需提供信息以提高生产力和协作性的日益增长的需求,通常在用户明确提出之前就提供所需信息,这已经成为一项大生意。苹果、英特尔和诺基亚等成熟的行业巨头已经或正在开发/提供上下文感知 API,同时,众多初创公司也在竞相争夺早期市场。上下文计算预计将每年增长 30%,到 2023 年市场规模将达到惊人的 1250 亿美元,这主要归功于其在消费类移动设备和智能代理中的广泛应用。

简而言之
面向对象编程和关系数据库为我们思考数据及其上下文的方式创造了一种特定的心智模型——它们都围绕着“上下文拥有数据”这一理念。在 OOP 中,一个类拥有字段,因此我们认为类是数据的上下文。在 RDBMS 中,一个表拥有列,同样,我们的思维方式也是围绕着“表是数据的上下文,列也是”这一理念。无论是处理字段还是记录列,这些实体都会被简化为原生类型——字符串、整数、日期时间结构等。此时,数据就失去了它所属上下文的概念!此外,思考“上下文拥有数据”虽然在技术上是正确的,但实际上可能与我们作为人类的思考方式截然相反。对我们来说,如果没有理解数据的上下文,数据几乎是毫无意义的。奇怪的是,我们在创建编程语言和数据库时忽略了这一点——相反,类和表,尽管可能以某种上下文命名,但实际上只不过是容器。
上下文数据通过保留定义上下文的信息来恢复数据对其自身上下文的认知。这在上下文和数据之间创建了一种双向关系。上下文知道它“包含”哪些数据,而数据知道它“属于”哪个上下文。在本文中,我将探讨创建这种双向关系的一种方法——使用 C# 的声明式强类型关系上下文系统。文章探讨了数据类型和上下文关系(“拥有”、“是”、“相关”)等各种兴趣点。此外,还讨论了此类系统存在的问题,例如在不同的物理根级别上下文中引用子上下文。
目录
引言
这是一个概念性文章,源自我另一篇关于上下文和意义的文章,我仍在撰写中。基本思想是保留与数据关联的上下文。在本文中,我将描述一种高度声明式的方法,并演示如何创建、管理和搜索上下文数据。这里的目标是研究如何处理上下文数据,并探讨该概念的一些优点和缺点。令我惊讶的是,我为寻找处理上下文数据的实现所做的少量研究几乎一无所获,除了几篇指出在分析数据和处理“大数据”时上下文的重要性。我确实找到了一些(请参阅文末的进一步阅读),表明该领域仍处于学术研究阶段。
您可能感兴趣的视频
一个简短但有价值的视频(即使它相当抽象): https://www.youtube.com/watch?v=A68qFLmkA24
一个非常有趣的视频: https://www.youtube.com/watch?v=rWDIkfpbTmQ
关于示例和数据隔离
在接下来的讨论中,每个示例都实现为自己的命名空间,并且可以通过指定的 URL 进行渲染,例如:https:///renderContext?ContextName=MeaningExplorer.Examples.Example8.EmployeeContext。当然,这些都是本地主机 URL,所以您需要构建并运行应用程序才能玩转这些示例。您可以在“Examples”文件夹中找到示例(是不是很棒)。每个示例为了提供与其他示例的隔离,都有自己的命名空间。由于上下文值与由其命名空间限定的类类型相关联,因此在一个示例中输入的值在另一个示例中不可用!
关于下载
代码库利用了我自己的基于语义发布/订阅的 Web 服务器架构,您可以在我的一系列文章中阅读到它,《克利夫顿方法》。不幸的是,该系列文章没有讨论实际的 Web 服务器实现,它本质上是一组再次用语义发布/订阅实现的微服务。由于我利用了大量核心库,因此源代码并未在此包含,仅包含 DLL。但是,您可以从 https://github.com/cliftonm/clifton 获取我的核心库。
本文的源代码也可以在 GitHub 上找到: https://github.com/cliftonm/ContextualComputing。
关于演示
由于演示实现了一个迷你服务器,您可能需要以“管理员身份运行”方式启动 Visual Studio。
此外,从演示的主页,您可以直接链接到本文讨论的示例,还可以查看上下文值字典。

什么是上下文数据?
我们从一些 Google 搜索结果开始
上下文数据用于提供有关数据片段的更多信息和上下文,以便更好地分析它们。1
如果大数据没有与其更年轻、更智能的兄弟——上下文——配对,其价值将非常有限。例如,在查看非结构化数据时,我们可能会遇到数字 �31�,却不知道这个数字的含义,无论是月份的天数、过去一周股票上涨的金额,还是今天售出的商品数量。裸露的数字 �31� 可能意味着任何事情,如果没有解释谁陈述了数据、这是什么类型的数据、何时何地陈述的、陈述时世界上还发生了什么等等的上下文层,就无法确定。显然,数据和知识不是一回事。2
上面的例子很有趣,因为它指出了值“31”没有上下文。我想更进一步说,在许多情况下,容器(无论是原生类型还是类)也没有上下文。对我来说,这是一个重要的考虑因素,原因很简单:如果容器没有上下文,那么容器持有的值怎么会有上下文呢?诚然,对于支持反射的语言,可以通过检查类型系统来推断上下文,但通过这种方法,上下文取决于对象模型,而不是明确声明的上下文类型系统。
值、容器和上下文
当我们谈论上下文数据时,我们实际上在处理三个不同的概念:“值”、“值的容器”以及“容器的上下文”。

这里有一个例子,其中容器和容器中的值完全没有上下文
string foo;
这里有一个例子,其中两个容器由于被外部容器包装而具有隐含的上下文
class PersonName
{
  public string FirstName {get; set;}
  public string LastName {get; set;}
}
这是“弱”上下文,因为当我们这样做时
Person person = new Person() {FirstName="Marc", LastName="Clifton"};
string firstName = person.FirstName;
将“容器”firstName 赋值会完全丢失它所存在的上下文——它是一个 PersonName 的一部分。
上下文图会是什么样子?
如果我们想保留上述示例中的上下文,我们可以创建一个领域特定语言(DSL)来声明性地表达上述类模型。由于 DSL 以 C# 语法表示,一种实现方式如下所示:
class FirstName : IValueEntity { }
class LastName : IValueEntity { }

public class PersonNameContext : Context
{
  public PersonNameContext()
  {
    Declare<FirstName>().OneAndOnlyOne();
    Declare<LastName>().OneAndOnlyOne();
  }
}
请注意几点
- 名字和姓氏的字段被声明为空类以建立强命名类型。甚至没有提供实际的基础数据类型!
- 我们使用一个空接口
IValueEntity来表达该类型是值类型的概念。 - 具体的上下文
PersonName源自一个通用的Context类。我们这样做是为了让构造函数可以调用Context基类中的Declare方法。 - 我们还可以指定实体在上下文中的基数。这里,名字和姓氏只能出现一次。其他基数包括:
一或多零或一零或多精确最小值最大值
- 由于 DSL 不使用属性元数据,因此必须实例化声明才能进行解析。这种方法有利有弊。它不是真正的语法,但也不需要使用反射来构建上下文图。相反,会实例化具体的上下文,它们维护自己的上下文图。这(也许)有助于简化解析器的实现。这里的重点不是过于纠结于实现,而只是将其视为一种可能的方法。
解析上下文
解析上下文涉及将上下文及其字段进行逻辑分组。我稍后会详细解释,但现在,让我们看看解析器的结果输出:
URL:https:///renderContext?ContextName=MeaningExplorer.Examples.Example1.PersonNameContext

这里,解析器确定有一个名为“PersonName”的单个上下文组,它与任何其他上下文没有关系(稍后讨论)。该组包含“FirstName”和“LastName”字段。
渲染上下文
我们也足够了解这个上下文,可以在浏览器中渲染它。

我们甚至可以为编辑框添加一个标题,让我们查看字段的上下文。

这是直观检查复杂上下文的有用方法。
原型上下文渲染器
上下文 HTML 是以编程方式创建的,我为此准备了一个原型实现。在自动渲染上下文时有很多选项,在下面的代码中没有探讨。尽管如此,代码提供了对解析器功能、上下文、字段和基数如何管理以及 HTML class 和 id 属性(以及自定义属性)如何创建以持久化值更改的早期预览。还添加了许多 StringBuilder 的扩展方法,以方便创建 HTML 的流畅风格。这是纯 JavaScript——不使用 jQuery、Bootstrap 或 MVVM 框架。有些注释跑题了,但可能很有趣。
protected string CreatePage(Parser parser)
{
StringBuilder sb = new StringBuilder();
sb.StartHtml();
sb.StartHead().Script("/js/wireUpValueChangeNotifier.js").EndHead();
sb.StartBody();
foreach(var group in parser.Groups)
{
// Bizarre alternatives:
//(group.ContextPath.Count() == 0 ? new Action(()=>sb.StartDiv()) :
// new Action(()=>sb.StartInlineDiv()))();
//var throwAway = group.ContextPath.Count() == 0 ? sb.StartDiv() : sb.StartInlineDiv();
// Topmost contexts are always on a new row.
if (group.ContextPath.Count() == 0)
{
sb.StartDiv();
}
else
{
sb.StartInlineDiv();
}
if (group.Relationship.GetType() != typeof(NullRelationship))
{
if (group.Relationship.Maximum < 5)
{
for (int i = 0; i<group.Relationship.Maximum; i++)
{
sb.StartDiv();
CreateFieldset(sb, group, i);
sb.EndDiv();
}
}
else
{
// TODO: Some arbitrary cutoff would change the fieldset
// to use a grid instead of discrete text input's.
// CreateGrid(sb, group);
CreateFieldset(sb, group);
}
}
else
{
CreateFieldset(sb, group);
}
sb.EndDiv();
sb.Append("\r\n");
}
sb.StartScript().Javascript("(function() {wireUpValueChangeNotifier();})();").EndScript();
sb.EndBody().EndHtml();
return sb.ToString();
}
protected void CreateFieldset(StringBuilder sb, Group group, int recNum = 0)
{
sb.StartFieldSet().Legend(group.Name);
sb.StartTable();
foreach (var field in group.Fields)
{
field.CreateInstance();
sb.StartRow();
sb.StartColumn().
AppendLabel(field.Label + ":").
NextColumn().
AppendTextInput().
Class("contextualValue").
ID(String.Join(".", field.ContextPath.Select(p => p.InstanceId))).
CustomAttribute("contextPath", String.Join("|",
field.ContextPath.Select(p=>p.Type.AssemblyQualifiedName))).
CustomAttribute("recordNumber", recNum.ToString()).
// Not as pretty as a real tooltip, but works well.
// Also see: https://w3schools.org.cn/howto/howto_css_tooltip.asp
CustomAttribute("title", String.Join("
",
field.ContextPath.Select(p => p.Type.Name))).
// CustomAttribute("title", String.Join("
",
field.ContextPath.Select(p => p.InstanceId))).
EndColumn();
sb.EndRow();
}
sb.EndTable();
sb.EndFieldSet();
sb.Append("\r\n");
}
字段值更改通知
支持的 JavaScript 会在字段失去焦点时将任何更改 POST 回去。
function wireUpValueChangeNotifier() {
  var docInputs = document.getElementsByClassName("contextualValue");
  for (var i = 0; i < docInputs.length; i++) {
    var id = docInputs[i].id;
    (function closure(id) {
      var docInput = document.getElementById(id);
      docInput.onchange = function () {
      updateField(id);
    };
   })(id);
 }
}

function updateField(id) {
  var docInput = document.getElementById(id);
  var val = docInput.value;
  var contextPath = docInput.getAttribute("contextPath");
  var recordNumber = docInput.getAttribute("recordNumber");
  console.log(val + " " + contextPath + "[" + recordNumber + "]");
  post("/updateField",
 {value: val, id: id, typePath : contextPath, recordNumber : recordNumber})
}

function post(url, data) {
  return fetch(url, { method: "POST", body: JSON.stringify(data) });
}
上下文数据与其他上下文的关系
与面向对象编程 (OOP) 一样,上下文可以具有包含关系(上面“拥有”的示例)和抽象。与 C# 等某些 OOP 语言不同,可以支持多个抽象(即多重继承)。此外,上下文可以具有一对多和多对多的关系,而 OOP 不提供原生语法表达式,但我们可以使用声明式 DSL 轻松表达它们。
上下文可以包含上下文
URL:https:///renderContext?ContextName=MeaningExplorer.Examples.Example2.PersonContext
上下文的一个基本概念是它们是分层的——一个上下文可以包含另一个上下文。例如,“Person”上下文包含(拥有)“PersonName”上下文。
public class PersonContext : Context
{
  public PersonContext()
  {
    Declare<PersonNameContext>().OneAndOnlyOne();
  }
}
注意上下文图如何变化
以前
现在

还请注意,“Person”上下文的渲染在视觉上没有太大变化。但是,字段的上下文图现在由三个级别组成:
- 根上下文 (
PersonContext) - 子上下文 (
PersonNameContext) - 字段上下文 (
FirstName和LastName)

上下文抽象
抽象是一个棘手的领域——抽象常常被用作创建一组子类之间通用属性和行为的便捷方式。这些为程序员便利而创建的“逻辑”抽象在 OOP 中非常有用。然而,上下文抽象需要更加“纯粹”——它必须代表一个真正有意义的抽象,而不仅仅是一个方便的抽象。OOP 抽象过于随意:子类可以选择哪些属性和方法有价值,哪些方法被重写,甚至哪些方法不再合适,调用它们会导致异常!上下文抽象必须经过非常仔细的思考。首先,我们必须认识到上下文抽象导致继承的是上下文的属性(或质量),而不是行为。
在机器人成为员工之前,我们可以说一个员工继承了一个人的所有属性——一个employee是一种person。我们可以在 DSL 中这样表示:
class EmployeeContext : Context
{
  public EmployeeContext()
  {
    AddAbstraction<EmployeeContext, PersonContext>("Employee Name");
  }
}
URL:https:///renderContext?ContextName=MeaningExplorer.Examples.Example3.EmployeeContext
注意它是如何渲染的

让我们向父上下文添加一个employee ID 以进一步探讨这一点:
class EmployeeId : IValueEntity { }

class EmployeeContext : Context
{
  public EmployeeContext()
  {
    Declare<EmployeeId>().OneAndOnlyOne();
    AddAbstraction<EmployeeContext, PersonContext>("Employee Name");
  }
}
URL:https:///renderContext?ContextName=MeaningExplorer.Examples.Example4.EmployeeContext

解析器正在做的是:

它创建了两个分组,一个用于根上下文“EmployeeContext”,另一个用于抽象“PersonContext”。有时我们想要这种行为(特别是如果抽象具有相同的字段),有时我们宁愿将抽象合并到子类字段组中。我们可以这样指定合并:
class EmployeeContext : Context
{
  public EmployeeContext()
  {
    Declare<EmployeeId>().OneAndOnlyOne();
    AddAbstraction<EmployeeContext, PersonContext>("Employee Name").Coalesce();
  }
}
注意附加的 Coalesce 方法调用。
URL:https:///renderContext?ContextName=MeaningExplorer.Examples.Example5.EmployeeContext
结果现在更接近我们想要的。

这里重要的是,尽管抽象已被合并到同一组中,但上下文路径仍然相同。


在后台,抽象的钻取方式在抽象被合并时会略有改变。
protected void DrillIntoAbstraction(Stack<ContextPath> contextPath,
IContext context, Group group, AbstractionDeclaration abstraction)
{
  LogEntityType(abstraction.SuperType);
  LogRelationship(abstraction.SubType, abstraction.SuperType);

  if (abstraction.SuperType.HasBaseClass<Context>())
  {
    Log?.Invoke("Abstraction: Drilling into " + abstraction.SuperType.Name);
    // Create the context so we can explore its declarations of entities,
    // relationships, abstractions, and semantic types (native types.)
    IContext superContext = (IContext)Activator.CreateInstance(abstraction.SuperType);
    var rootEntities = superContext.RootEntities;

    if (rootEntities.Count() > 0)
    {
      Group group2 = group;

      if (!abstraction.ShouldCoalesceAbstraction)
      {
        group2 = CreateGroup(abstraction.SuperType,
                RelationshipDeclaration.NullRelationship, contextPath, abstraction.Label);
        groups.Add(group2);
      }

      foreach (var root in rootEntities)
      {
        contextPath.Push(new ContextPath
                       (ContextPath.ContextPathType.Abstraction, abstraction.SuperType));
        CreateFields(contextPath, superContext, group2);
        PopulateGroupFields(contextPath, superContext, group2, root);
        contextPath.Pop();
      }
    }
  }
}
上下文关系 - 一个简单的例子
抽象是一种通用的关系,它最少地传达了子上下文是超上下文的更专业化版本的意思。有时,我们希望在两个上下文之间建立明确的关系。在此示例中,“Employee”上下文和“Person”上下文之间的关系被声明为显式关系,而不是抽象:
class PersonNameRelationship : IRelationship { }

class EmployeeContext : Context
{
  public EmployeeContext()
  {
    Declare<EmployeeId>().OneAndOnlyOne();
    Declare<PersonNameRelationship, EmployeeContext,
           PersonContext>("Person Name").Exactly(1).Coalesce();
  }
}
注意实现了IRelationship的类型的声明。它没有内容,这只是一个类型声明(这在函数式编程语言中会更自然)。
URL:https:///renderContext?ContextName=MeaningExplorer.Examples.Example6.EmployeeContext
物理上,结果是相同的。

但请注意上下文路径如何改变。
以前
现在

上下文关系 - 一个更有趣的例子
以上面的“Employee”示例为例,让我们改为创建一个与“紧急联系人”的关系,要求提供至少一个但最多两个紧急联系人:
class EmergencyContactRelationship : IRelationship { }

class EmployeeContext : Context
{
  public EmployeeContext()
  {
    Declare<EmployeeId>().OneAndOnlyOne();
    AddAbstraction<EmployeeContext, PersonContext>("Employee Name").Coalesce();
    Declare<EmergencyContactRelationship, EmployeeContext, PersonContext>
          ("Emergency Contact").Min(1).Max(2);
  }
}
URL:https:///renderContext?ContextName=MeaningExplorer.Examples.Example7.EmployeeContext
请注意,我们在这里声明了EmergencyContactRelationship类型在EmployeeContext和PersonContext之间的关系。我们没有显式创建“EmergencyContextPerson”容器——这些人是紧急联系人是“隐含的”,这是因为上下文关系。渲染时(让我们在标记必需字段时玩得开心):

请注意,当我们悬停在姓氏字段上时,我们看到字段值通过关系与紧急联系人相关联。或者,您也可以这样做:
URL:https:///renderContext?ContextName=MeaningExplorer.Examples.Example8.EmployeeContext
class EmergencyContactContext : Context
{
  public EmergencyContactContext()
  {
    AddAbstraction<EmergencyContactContext, PersonContext>("Contact Name").Coalesce();
  }
}

class EmployeeContext : Context
{
  public EmployeeContext()
  {
    Declare<EmployeeId>().OneAndOnlyOne();
    AddAbstraction<EmployeeContext, PersonContext>("Employee Name").Coalesce();
    Declare<EmergencyContactRelationship, EmployeeContext,
   EmergencyContactContext>("Emergency Contact").Min(1).Max(2);
  }
}
请注意,我们现在有了紧急联系人的具体上下文。视觉上,字段的渲染方式相同,只是上下文路径条目又增加了一个:

抽象和关系声明的位置很重要
每个上下文管理自己的抽象和关系。即使一个上下文本身没有声明抽象或关系,包含它的(超)上下文也可以这样做。在此示例中,EmergencyContactContext 已重命名为 EmergencyContact,因为它不再是上下文,而是声明为一个简单的实体而不是上下文。包含的 EmployeeContext 在实体上声明了抽象:
class EmergencyContact : IEntity { }

class EmployeeContext : Context
{
  public EmployeeContext()
  {
    Declare<EmployeeId>().OneAndOnlyOne();
    Declare<EmergencyContactRelationship,
    EmployeeContext, EmergencyContact>("Emergency Contact").Min(1).Max(2);
    AddAbstraction<EmployeeContext, PersonContext>("Employee Name").Coalesce();
    AddAbstraction<EmergencyContact, PersonContext>("Contact Name").Coalesce();
  }
}
虽然最终渲染对用户来说看起来完全相同,但上下文路径与第一个示例相似:
URL:https:///renderContext?ContextName=MeaningExplorer.Examples.Example9.EmployeeContext

这里重要的是,EmergencyContext 本身不声明任何抽象或关系——超上下文 EmployeeContext 为实体(也可以是另一个上下文)添加了额外的上下文。因此,虽然您可以在超上下文的声明中扩展子上下文,但只有在超上下文需要额外的上下文含义时才应该这样做。否则,子上下文应该声明关系/抽象。所以,这说明了您应该不做什么。
“或”和“和”关系
我们可以使用 Or 和 And 链式方法将上下文链接在一起。这些运算符应用于左操作数,这意味着:
a or b or c and d and e
评估为:
(a or b) or (a or c) and (a and d and e)
这可能更好地表达为:
- a、d 和 e 是必需的。
- b 和 c 是可选的且非排他的。
好吧,为了这个疯狂的计划,请“枪毙”我吧。重构以实现真正的表达式求值肯定还需要很多工作,但对于原型来说,它现在已经足够了。
例如,雇主为员工购买的人寿保险可能将一个人或一家非营利性企业或两者都列为受益人:
Declare<Beneficiary, EmployeeContext, PersonContext>("Beneficiary").Or<BusinessContext>();
这些声明:
class BusinessName : IValueEntity { }

public class BusinessContext : Context
{
  public BusinessContext()
  {
    Declare<BusinessName>().OneAndOnlyOne();
  }
}

public class EmployeeContractContext : Context
{
  public EmployeeContractContext()
  {
    Label = "Employee Contract";
    Declare<EmployeeContext>("Employee").OneAndOnlyOne();
    Declare<EmergencyContactRelationship,
    EmployeeContext, PersonContext>("Emergency Contact").Min(1).Max(2);
    Declare<Beneficiary, EmployeeContext, PersonContext>("Beneficiary").Or<BusinessContext>();
  }
}
渲染如下:
URL:https:///renderContext?ContextName=MeaningExplorer.Examples.Example10.EmployeeContractContext

验证上下文关系
关系(包括抽象)是可以验证的。例如,这个上下文声明了不属于其上下文的实体的抽象:
public class EmployeeContractContext : Context
{
  public EmployeeContractContext()
  {
    Label = "Employee Contract";
    Declare<EmployeeContext>("Employee").OneAndOnlyOne();

    AddAbstraction<Spouse, PersonContext>("Spouse Name");
    AddAbstraction<Child, PersonContext>("Child Name");
  }
}
这里,上下文声明了Spouse和Child两个上下文的抽象,这两个上下文从未作为实体或关系声明给EmployeeContractContext。浏览器显示此错误:

持久化上下文数据
读者须知 - 本节将变得更具交互性,我将展示为支持附加行为而进行的 कोड 更改。
上下文数据的一个特点是,上下文易于扩展,特别是在运行时,而不会破坏现有行为。向您版本的上下文添加关系或抽象不会破坏其他人使用该上下文的方式。由于上下文的动态性,关系数据库不适用,因为必须不断修改模式。诚然,关系数据库可以用作上下文数据的“元数据库”,但具体的上下文结构肯定不能编码到关系数据库的模式中。NoSQL 数据库可能更合适,因为它通常是无模式的。但最终,上下文数据实际上非常扁平。虽然将上下文表示为层次结构很有用,但实际的上下文数据本质上是扁平的键值对关系:
unique context path : value
“唯一上下文路径”是通过为路径中的每个实体分配 GUID 来确定的。当实体(子上下文和字段级实体)根据实体的基数重复时,形成树结构,每个分支都有一个唯一的 ID。
ContextValue 类
键值对由 ContextValue 类管理。
public class ContextValue
{
  public Guid InstanceId { get; protected set; }
  public string Value { get; protected set; }
  public int RecordNumber { get; protected set; }

  public IReadOnlyList<Guid> InstancePath { get { return instancePath; } }
  public IReadOnlyList<Type> TypePath { get { return typePath; } }

  protected List<Guid> instancePath = new List<Guid>();
  protected List<Type> typePath = new List<Type>();

  public ContextValue(string value, List<Guid> instancePath,
                     List<Type> typePath, int recordNumber = 0)
  {
    InstanceId = instancePath.Last();
    Value = value;
    RecordNumber = recordNumber;
    this.instancePath = instancePath;
    this.typePath = typePath;
  }
}
请注意,我们正在跟踪“记录号”。对于基数 > 1 且有多个子实体的上下文,我们需要记录号来确保子实体在上下文路径中保持其一致性。
创建 ContextValue
ContextValue 可以直接从解析器创建(来自单元测试):
var cvFirstName = searchParser.CreateValue<PersonNameContext, FirstName>("Marc");
var cvLastName = searchParser.CreateValue<PersonNameContext, LastName>("Clifton");
或在 ContextValueDictionary 中创建并持久化(也来自单元测试):
ContextValueDictionary cvd = new ContextValueDictionary();
cvd.CreateValue<EmployeeName, PersonNameContext, FirstName>(parser1, "Marc");
cvd.CreateValue<EmployeeName, PersonNameContext, LastName>(parser1, "Clifton");
当在字典中持久化时,上下文树会按实例 ID 遍历,并在此过程中添加缺失的分支:
public void AddOrUpdate(ContextValue cv)
{
  // Walk the instance/path, creating new nodes in the context tree as required.

  Assert.That(cv.TypePath.Count == cv.InstancePath.Count,
  "type path and instance path should have the same number of entries.");
  ContextNode node = tree;

  for (int i = 0; i < cv.TypePath.Count; i++)
  {
    // Walk the tree.
    var (id, type) = (cv.InstancePath[i], cv.TypePath[i]);

    if (node.TryGetValue(id, out ContextNode childNode))
    {
      node = childNode;
    }
    else
    {
      childNode = new ContextNode(id, type);
      node.AddChild(childNode);
      node = childNode;

      // Since we're creating a node, add it to the flat tree view.
      if (!flatView.TryGetValue(type, out List<ContextNode> nodes))
      {
        flatView[type] = new List<ContextNode>();
      }

      flatView[type].Add(childNode);
    }
  }

  // The last entry in the tree gets the actual context value.
  node.ContextValue = cv;
}
对于创建的每个节点,都会创建一个映射实体类型到节点的条目(这是一个一对多关系),用于快速识别该类型的所有节点。这有助于优化搜索——而不是遍历整个树来查找不同级别树中的所有匹配实体类型,只需快速查找实体类型即可获得该类型的树中的所有节点。我们稍后将在搜索中使用此功能。
持久化上下文值的示例
上面单元测试代码片段演示了如何在特定上下文中持久化值,使用已知路径。让我们来看一个更有趣的例子:从浏览器输入的上下文实例中持久化值。如果我们检查简单上下文中的输入框:
URL:https:///renderContext?ContextName=MeaningExplorer.Examples.Example5.EmployeeContext
我们看到在创建 HTML 时提供了一些属性——这是EmployeeID输入框的属性:
<input type="text" class='contextualValue'
id='acec08ef-0bd3-47de-8bc6-c2281fa291ee.
490895ca-c62e-4654-9d3e-41efe482e437'
contextPath='MeaningExplorer.EmployeeContext, MeaningExplorer,
Version=1.0.0.0, Culture=neutral, PublicKeyToken=null|
MeaningExplorer.EmployeeId, MeaningExplorer,
Version=1.0.0.0, Culture=neutral, PublicKeyToken=null'
recordNumber='0'
title='EmployeeContext
EmployeeId'>
请注意点“.”字符,它分隔 GUID,以及管道“|”字符,它分隔上下文路径类型。
当输入值时,input 元素的 onchange 会触发一个 POST,该 POST 被路由到(请参阅 《克利夫顿方法,第四部分》 以讨论语义处理、膜等)。
public void Process(ISemanticProcessor proc, IMembrane membrane, UpdateField msg)
{
  ContextValueDictionary cvd = CreateOrGetContextValueDictionary(proc, msg.Context);
  var instancePath = msg.ID.Split(".").Select(Guid.Parse).ToList();
  var typePath = msg.TypePath.Split("|").ToList();
  var cv = new ContextValue(msg.Value, instancePath, typePath.Select
          (t=>Type.GetType(t)).ToList(), msg.RecordNumber);
  cvd.AddOrUpdate(cv);
  JsonResponse(proc, msg, new OKResponse());
}
我们将 post-back 修改为执行一个 GET,该 GET 返回用于渲染字典为树状图以及扁平的“实体类型:上下文节点列表”集合的 HTML。
function updateField(id) {
  var docInput = document.getElementById(id);
  var val = docInput.value;
  var contextPath = docInput.getAttribute("contextPath");
  var recordNumber = docInput.getAttribute("recordNumber");
  console.log(val + " " + contextPath + "[" + recordNumber + "]");
  post("/updateField", { value: val, id: id, typePath: contextPath,
                        recordNumber: recordNumber }, getDictionaryHtml);
}

// We don't care about the /updateField json response.
function getDictionaryHtml() {
  get("/dictionaryTreeHtml", onDictionaryTreeHtml);
  get("/dictionaryNodesHtml", onDictionaryNodesHtml);
}

function onDictionaryTreeHtml(json) {
  updateHtml("dictionary", json.html);
}

function onDictionaryNodesHtml(json) {
  updateHtml("nodes", json.html);
}

function updateHtml(tag, b64html) {
  var html = atob(b64html);
  var el = document.getElementById(tag);
  el.innerHTML = html;
}

function get(url, callback) {
  return fetch(url, { method: "GET" }).then(function (response) {
    return response.json();
  }).then(function (jsonData) {
    callback(jsonData);
  });
}

function post(url, data, callback) {
  return fetch(url, { method: "POST",
              body: JSON.stringify(data) }).then(function (response) {
    return response.json();
  }).then(function (jsonData) {
    callback(jsonData);
  });
}
如果您好奇,我在页面渲染逻辑中添加了以下内容:
sb.StartParagraph().Append("<b>Dictionary:</b>").EndParagraph();
sb.StartParagraph().StartDiv().ID("dictionary").EndDiv().EndParagraph();

sb.StartParagraph().Append("<b>Type Nodes:</b>").EndParagraph();
sb.StartParagraph().StartDiv().ID("nodes").EndDiv().EndParagraph();
现在让我们看看当我们在表单中填入一些数据时会发生什么。首先,我添加一个 ID:

然后是我的名字:

最后是我的姓氏:

如果我更改此上下文的值,我们会看到现有的上下文值已更新:

所有这些渲染(虽然非常基础)都是由两个路由处理程序和一些辅助方法创建的。
/// <summary>
/// Returns HTML rendering the current state of the dictionary tree.
/// </summary>
public void Process(ISemanticProcessor proc, IMembrane membrane, GetDictionaryTreeHtml msg)
{
ContextValueDictionary cvd = CreateOrGetContextValueDictionary(proc, msg.Context);
StringBuilder sb = new StringBuilder();
NavigateChildren(sb, cvd.Root.Children, 0);
JsonResponse(proc, msg, new { Status = "OK", html = sb.ToString().ToBase64String() });
}
/// <summary>
/// Returns HTML rendering the current state of the dictionary nodes.
/// </summary>
public void Process(ISemanticProcessor proc, IMembrane membrane, GetDictionaryNodesHtml msg)
{
ContextValueDictionary cvd = CreateOrGetContextValueDictionary(proc, msg.Context);
StringBuilder sb = new StringBuilder();
foreach (var kvp in cvd.FlatView)
{
sb.Append(kvp.Key.Name + " : <br>");
foreach (var node in kvp.Value)
{
sb.Append("  ");
RenderNodeValue(sb, node);
sb.Append("<br>");
}
}
JsonResponse(proc, msg, new { Status = "OK", html = sb.ToString().ToBase64String() });
}
protected void NavigateChildren(StringBuilder sb, IReadOnlyList<ContextNode> nodes, int level)
{
foreach (var node in nodes)
{
sb.Append(String.Concat(Enumerable.Repeat(" ", level * 2)));
RenderNodeType(sb, node);
RenderNodeValue(sb, node);
sb.Append("<br>");
NavigateChildren(sb, node.Children, level + 1);
}
}
protected void RenderNodeType(StringBuilder sb, ContextNode node)
{
sb.Append(node.Type.Name);
}
protected void RenderNodeValue(StringBuilder sb, ContextNode node)
{
if (node.ContextValue != null)
{
sb.Append(" = " + node.ContextValue.Value);
}
}
从浏览器创建新上下文
添加一个“新建”按钮来创建新上下文会很有用。我们将在字典输出之前渲染它:
sb.StartButton().ID("newContext").Class("margintop10").Append("New Context").EndButton();
有趣(或奇怪)的是,我们不需要告诉服务器我们创建了一个新上下文。相反,JavaScript 可以处理清除输入文本框并将新的 GUID 分配给实例路径。顺便说一句,这不会触发 onchange 事件(该事件名称起得很糟糕),因为 onchange 仅在用户离开控件时触发。一个小的更改是我需要添加一个单独的“上下文值 ID”属性 cvid,以使元素 ID 与上下文值 ID 分开,以便事件处理程序使用最新的上下文值 ID。这需要对服务器端渲染进行更改:
CustomAttribute("cvid", String.Join(".", field.ContextPath.Select(p => p.InstanceId))).
以及对 updateField JavaScript 函数进行微调:
function updateField(id) {
  var docInput = document.getElementById(id);
  var val = docInput.value;
  var contextPath = docInput.getAttribute("contextPath");
  var recordNumber = docInput.getAttribute("recordNumber");
  var cvid = docInput.getAttribute("cvid");
  console.log(val + " " + contextPath + "[" + recordNumber + "]");
  post("/updateField", { value: val, id: cvid,
  typePath: contextPath, recordNumber: recordNumber }, getDictionaryHtml);
}
这里有一个额外的复杂性。任何通用的基上下文路径,例如包含FirstName和LastName值实体的PersonContext,都需要具有相同的基 ID。如果我们不这样做,子上下文中的每个值实体都会获得一个全新的上下文路径,这会导致创建多个根级别上下文。这不是我们想要的。要解决此问题,我们需要获取所有唯一 ID 的集合,将它们映射到替换 ID,并根据它们的原值更新路径中的每个 ID,使用新的映射 GUID。这听起来比实际要复杂。我真的很怀念 C# 的 LINQ。
这是处理字段清除和新上下文 ID 分配的 JavaScript:
function wireUpEvents() {
  document.getElementById("newContext").onclick = function () { newContext(); };
}

function newContext() {
  clearInputs();
  createNewGuids();
}

function clearInputs() {
  forEachContextualValue(function (id) { document.getElementById(id).value = ""; });
}

function createNewGuids() {
  var uniqueIds = getUniqueIds();
  var idMap = mapToNewIds(uniqueIds);
  assignNewIds(idMap);
}

function getUniqueIds() {
  var uniqueIds = [];

  // Other ways this might be accomplished but I'm too lazy to work out the nuances of
  // adding an array of values uniquely to a master array.
  // <a href="https://stackoverflow.com/questions/1960473/
  // get-all-unique-values-in-an-array-remove-duplicates">
  // https://stackoverflow.com/questions/1960473/get-all-unique-values-in-an-array-
  // remove-duplicates</a>
  forEachContextualValue(function (id) {
    var ids = id.split(".");
    for (var i = 0; i < ids.length; i++) {
      var id = ids[i];
      if (!uniqueIds.includes(id)) {
        uniqueIds.push(id);
      }
    }
  });

  return uniqueIds;
}

function mapToNewIds(uniqueIds) {
  var idMap = {};

  for (var i = 0; i < uniqueIds.length; i++) {
    idMap[uniqueIds[i]] = uuidv4();
  }

  return idMap;
}

function assignNewIds(idMap) {
  forEachContextualValue(function (id) {
    var oldIds = id.split(".");
    var newIds=[];

    for (var i = 0; i < oldIds.length; i++) {
      newIds.push(idMap[oldIds[i]]);
    }

    newId = newIds.join(".");
    document.getElementById(id).setAttribute("cvid", newId);
  });
}
现在,让我们为两个不同的“employees”创建几个上下文(0001/Marc/Clifton 和 0002/Ian/Clifton)。完成后,上下文值字典和扁平化的类型节点集合看起来是这样的:

这里,我们看到有两个根级别的 EmployeeContext 实例,并且上下文值类型对不同的上下文有不同的实例。
搜索上下文数据
现在是乐趣所在,也是处理上下文数据真正出彩的地方:搜索!搜索的一个显著区别是搜索结果本身提供了上下文。这意味着您实际上是在搜索整个数据库以查找与给定实例匹配的值的特定上下文模式。结果是匹配特定子上下文数据值的不同上下文。之所以如此巧妙,是因为您可以在子上下文中执行搜索,并获得所有上下文中的匹配项,甚至是不同根类型的上下文。为了说明这一点,我将声明一个AddressBookContext,我们将使用它与现有的EmployeeContext一起使用,以显示如何通过搜索人的姓名找到EmployeeContext和AddressBookContext中的上下文实例。在此过程中,我们还将添加显示现有上下文值的功能,以便我们能够看到搜索结果。
我们可以使用以下两个 URL 进行测试:
- Employee 上下文的 URL: https:///renderContext?ContextName=MeaningExplorer.Examples.Example12.EmployeeContext
- Address Book 上下文的 URL: https:///renderContext?ContextName=MeaningExplorer.Examples.Example12.AddressBookContext
员工和通讯录上下文
通讯录上下文重用了PersonContext。我还添加了一个非常简单的ContactContext,以后可以扩展其功能,但目前,AddressBookContext 的声明如下:
class PhoneNumber : IValueEntity { }
class EmailAddress : IValueEntity { }

public class PhoneContext : Context
{
  public PhoneContext()
  {
    Declare<PhoneNumber>("Phone");
  }
}

public class EmailContext : Context
{
  public EmailContext()
  {
    Declare<EmailAddress>("Email");
  }
}

public class ContactContext : Context
{
  public ContactContext()
  {
    Declare<PhoneContext>();
    Declare<EmailContext>();
  }
}

public class AddressBookContext : Context
{
  public AddressBookContext()
  {
    Label = "Address Book";
    Declare<PersonContext>();
    Declare<ContactContext>();
  }
}
这渲染为:

我们一直在使用一个用于渲染上下文的路由,让我们简要看一下路由处理程序:
public void Process(ISemanticProcessor proc, IMembrane membrane, RenderContext msg)
{
  try
  {
    Type t = Type.GetType(msg.ContextName);
    Clifton.Meaning.IContext context = (Clifton.Meaning.IContext)Activator.CreateInstance(t);
    Parser parser = new Parser();
    parser.Log = logMsg => Console.WriteLine(logMsg);
    parser.Parse(context);
    string html;

    if (parser.AreDeclarationsValid)
    {
      ShowGroups(parser.Groups);
      html = Renderer.CreatePage(parser, msg.IsSearch ?
            Renderer.Mode.Search : Renderer.Mode.NewRecord);
    }
    else
    {
      html = "<p>Context declarations are not valid. Missing entities:</p>" +
      String.Join("<br>", parser.MissingDeclarations.Select(pt => pt.Name));
    }

    proc.ProcessInstance<WebServerMembrane, HtmlResponse>(r =>
    {
      r.Context = msg.Context;
      r.Html = html;
    });
  }
  catch (Exception ex)
  {
    proc.ProcessInstance<WebServerMembrane, HtmlResponse>(r =>
    {
      r.Context = msg.Context;
      r.Html = ex.Message + "<br>" + ex.StackTrace.Replace("\r\n", "<br>");
    });
  }
}
虽然是基础的,但它有效。这里有几个例子:
URL: https:///renderContext?ContextName=MeaningExplorer.Examples.Example12.PersonContext

URL: https:///renderContext?ContextName=MeaningExplorer.Examples.Example12.ContactContext

请注意,在这些示例中,我们正在渲染子上下文,这正是我们想要为搜索执行的操作。搜索的唯一区别是我们不希望用户输入创建条目到上下文字典中。对于搜索,我们将传递参数 isSearch=true。当我们使用此选项时,请注意字典不会更新,并且我们有一个“搜索上下文”按钮而不是“新建上下文”按钮:
URL: https:///renderContext?ContextName=MeaningExplorer.Examples.Example12.PersonContext?&isSearch=true

当点击搜索按钮时,将执行此 JavaScript:
function searchContext() {
  var searchList = [];

  forEachContextualValue("contextualValueSearch", function (id) {
    var docInput = document.getElementById(id);
    var val = docInput.value;

    if (val != "") {
      var contextPath = docInput.getAttribute("contextPath");
      var cvid = docInput.getAttribute("cvid");
      searchList.push({ value: val, id: cvid, typePath: contextPath });
    }
  });

  if (searchList.length > 0) {
    post("/searchContext", { searchFields: searchList }, onShowResults);
  }}
}
数据被反序列化成这个服务器端结构:
public class SearchField
{
  public string Value { get; set; }
  public string ID { get; set; }
  public string TypePath { get; set; }
}

public class SearchContext : SemanticRoute
{
  public List<SearchField> SearchFields { get; set; }
}
并由这个路由处理程序处理:
public void Process(ISemanticProcessor proc, IMembrane membrane, SearchContext msg)
{
  List<ContextValue> cvSearch = new List<ContextValue>();

  foreach (var search in msg.SearchFields)
  {
    var instancePath = search.ID.Split(".").Select(Guid.Parse).ToList();
    var typePath = search.TypePath.Split("|").ToList();
    var cv = new ContextValue(search.Value, instancePath,
                             typePath.Select(t => Type.GetType(t)).ToList());
    cvSearch.Add(cv);
  }

  ContextValueDictionary cvd = CreateOrGetContextValueDictionary(proc, msg.Context);
  List<ContextNode> matches = cvd.Search(cvSearch);

  var results = GetMatchPaths(matches);
  var html = Render(results);

  JsonResponse(proc, msg, new { Status = "OK", html = html.ToString().ToBase64String() });
}
此路由处理程序从填入的数据构建 ContextValue 实例并执行字典的 Search 方法。同样,我们将让服务器渲染实际的 HTML。为了说明搜索结果,我将在 employee 上下文和通讯录上下文中创建一个具有相同名称(Marc Clifton)的条目,然后搜索“Marc”。结果正如预期(因为我首先为此编写了单元测试)是:

我们看到,在姓氏与“Clifton”匹配的两个上下文中都返回了结果。我也可以提供“Marc”和“Clifton”作为名字和姓氏,因为搜索算法会匹配包含这些字段的上下文中的所有字段。顺便说一句,此实现只是初步的,不处理比 span 上下文更复杂的搜索。如果我们查看上下文字典,您可以看到我实际输入的各个上下文中的内容:

如果您假设输入姓氏“Clifton”应该得到三个搜索结果,那您就对了,事实也确实如此:

搜索算法识别通用父类型(如前所述,此原型算法只处理一个通用父类型),然后匹配该上下文的所有字段值与搜索值,返回所有匹配的上下文路径:
public List<ContextNode> Search(List<ContextValue> contextValuesToSearch)
{
  // For now the parent type of each value must be the same, as the values (for now)
  // cannot span group containers.
  // What we could do is collect all the unique parent group containers
  // and find matches for those containers. The parent group
  // must then be common for the super-parent to qualify the shared container.
  // This gets complicated when the matches are found
  // at different levels of the tree.

  Assert.That(contextValuesToSearch.Count > 0,
             "At least one ContextValue instance must be passed in to Search.");
  int pathItems = contextValuesToSearch[0].InstancePath.Count;
  Assert.That(contextValuesToSearch.All(cv => cv.InstancePath.Count == pathItems),
             "Context values must have the same path length for now.");

  var parentTypes = contextValuesToSearch.Select(cv => cv.TypePath.Reverse().Skip(1).
                   Take(1).First()).DistinctBy(cv=>cv.AssemblyQualifiedName);

  Assert.That(parentTypes.Count() == 1,
             "Expected all context values to have the same field-parent.");

  // Get the parent type shared by the fields.
  Type parentType = parentTypes.Single();

  // Find this parent type in the dictionary of context values.
  // We can find this parent type anywhere in the tree of any context value type path.

  List<ContextNode> matches = new List<ContextNode>();

  if (flatView.TryGetValue(parentType, out List<ContextNode> nodesOfParentType))
  {
    // Now compare the values in children of the context who's parent types match.
    foreach (var parentNode in nodesOfParentType)
    {
      bool match = true;

      foreach (var cv in contextValuesToSearch)
      {
        var childMatch = parentNode.Children.SingleOrDefault
                        (c => c.Type == cv.TypePath.Last());

        if (childMatch != null)
        {
          Assert.That(childMatch.ContextValue != null,
                     "Expected a ContextValue assigned to the last path entry.");
          match = childMatch.ContextValue.Value == cv.Value;
        }

        if (!match)
        {
          break;
        }
      }

      if (match)
      {
        matches.Add(parentNode);
      }
    }
  }

  return matches;
}
查看搜索结果
搜索结果提供了指向匹配上下文级别的一个 GUID 上下文实例路径。任何子上下文都包含在匹配中,父上下文中的任何字段也包含在内。我们将向每个搜索结果添加一个按钮来查看完整的上下文,该按钮将调用一个 POST 方法,传递搜索结果 GUID 路径:
protected StringBuilder Render(IEnumerable<ContextNodePath> results)
{
  StringBuilder sb = new StringBuilder();
  sb.StartTable();

  foreach (var result in results)
  {
    sb.StartRow().
    StartColumn().
    Append(result.Path.First().Type.Name).
    EndColumn().
    StartColumn().Append("\r\n").
    StartButton().
    CustomAttribute("onclick", "post(\"/viewContext\",
   {instancePath : \"" + String.Join(".", result.Path.Select(p => p.InstanceId)) + "\"},
   onShowSelectedSearchItem)").
    Append("View").
    EndButton().Append("\r\n").
    EndColumn().
    EndRow();
  }

  sb.EndTable();

return sb;
}
当我们点击查看按钮时,将执行以下路由处理程序:
public void Process(ISemanticProcessor proc, IMembrane membrane, ViewContext msg)
{
  var instancePath = msg.InstancePath.Split(".").Select(s=>Guid.Parse(s)).ToList();
  ContextValueDictionary cvd = CreateOrGetContextValueDictionary(proc, msg.Context);
  var (parser, context) = cvd.CreateContext(instancePath);
  string html = Renderer.CreatePage(parser, Renderer.Mode.View);
  JsonResponse(proc, msg, new { Status = "OK", html = html.ToString().ToBase64String() });
}
这是点击不同查看按钮后浏览器界面的示例:


这应该能很好地说明上下文数据与关系数据库有何不同。重申一下,上下文数据保留了数据的关系层次结构。这使我们可以轻松地显示子上下文存在的所有上下文,并让用户选择所需的上下文。在传统的关系数据库中,上下文包含在模式中,需要单独的查询才能找到单个子上下文实例的所有上下文。通常,用户首先必须决定,“我想在通讯录中查找姓名”或“我想在员工数据库中查找姓名”。上下文数据颠倒了这种模型,让用户最后选择上下文框架。显示子数据集存在的所有上下文可能很有用(也可能不那么有用)。
幕后花絮 - 构建上下文实例
有趣的是(至少对我而言),构建上下文实例非常简单,只需将匹配上下文的实例 ID 设置到解析器创建的逻辑上下文路径中(我们接下来将看到这种方法存在一个缺陷)。目前,这段代码是原型的,但功能齐全,如 TODO 所指出的,还有更多工作要做:
public (Parser, Context) CreateContext(List<Guid> instancePath)
{
  // The interesting thing here is, we only need the root instance ID
  // to find the root of the context.
  // Everything else gets parsed based on what the dictionary has,
  // which fills in the entire context
  // even though the search was done one a sub-context.
  // TODO: record numbers
  // TODO: Be able to specify that we want to return a sub-context, not just the root context.
  // TODO: *** Remove the entire path information from the View button ID,
  // as all we need is the root level instance ID ***.
  ContextNode dictNode = tree.Children.Single(c => c.InstanceId == instancePath[0]);
  Type rootType = dictNode.Type;
  Parser parser = new Parser();
  var context = (Context)Activator.CreateInstance(rootType);
  parser.Parse(context);

  foreach (FieldContextPath fieldContextPath in parser.FieldContextPaths.Where
         (p => p.Path[0].Type == rootType))
  {
    ContextNode workingDictNode = dictNode;
    fieldContextPath.Field.ContextPath[0].UpdateInstanceId(workingDictNode.InstanceId);

    Process(fieldContextPath, 1, workingDictNode);
  }

  return (parser, context);
}

protected void Process
 (FieldContextPath fieldContextPath, int level, ContextNode workingDictNode)
{
  foreach (ContextNode childDictNode in workingDictNode.Children)
  {
    if (childDictNode.Type == fieldContextPath.Field.ContextPath[level].Type)
    {
      fieldContextPath.Field.ContextPath[level].UpdateInstanceId(childDictNode.InstanceId);
      // Irrelevant if null, the only time childDictNode.ContextValue is not null
      // is when childDictNode.Type is IValueEntity.
      fieldContextPath.Field.ContextValue = childDictNode.ContextValue;

      Process(fieldContextPath, level + 1, childDictNode);
    }
  }
}
然后可以将其传递给渲染器,渲染器在“view”模式下渲染时会设置字段值:
CustomAttribute("value", mode==Mode.View ? (field.ContextValue?.Value ?? "") : "").
这里一个重要的点是实例 ID 设置为匹配上下文树中的上下文实例——这意味着我们可以编辑这些值,并让适当的实例更新,而不是创建新的上下文实例。
一个有趣的产物
https:///renderContext?ContextName=MeaningExplorer.Examples.Example14.ChildContext&isSearch=true
搜索“Elisabeth”时,您会得到“母上下文”,因为实际搜索的是ChildContext子上下文的PersonNameContext。我们需要限定搜索,通过包含一个指向被搜索上下文的直接向上路径?
多行上下文
到目前为止的所有示例都是单行上下文。实际上,我们需要解决一个可以处理多行数据的上下文。一个简单的例子是父子关系,声明如下:
public class ParentChildRelationship : IRelationship { }

public class ChildContext : Context
{
  public ChildContext()
  {
    Declare<PersonContext>().OneAndOnlyOne();
  }
}

public class ParentContext : Context
{
  public ParentContext()
  {
    Declare<PersonContext>().OneAndOnlyOne();
    Declare<ParentChildRelationship, ParentContext, ChildContext>().Max(5).AsGrid();
  }
}
请注意,我使用AsGrid作为渲染器的指导,表示我想要一个网格。Max限制严格是为了演示目的,以防止创建过大的输入区域。
URL: https:///renderContext?ContextName=MeaningExplorer.Examples.Example13.ParentContext

在上一节中,我提到了在逻辑上下文路径中设置物理实例 ID 时存在一个问题。这对于单条记录没问题,但更通用的解决方案要求渲染字段的实例 ID 必须来自物理上下文值字典。渲染算法的一个微小调整可以处理这一点,无论我们是处理单条记录还是多条记录的上下文,如下面的代码片段所示,它是渲染器的一部分:
// In view mode, the context path to the field [context path - 1]
// should match a dictionary entry,
// then we need to acquire the instance ID for the record number
// and type of the actual ContextValue.
// If there is no record number entry, the value is assigned to "".
if (cvd.TryGetContext(field, recNum, out ContextNode cn))
{
  instanceIdList = instanceIdList.Take(instanceIdList.Count - 1).ToList();
  instanceIdList.Add(cn.InstanceId);
  fieldValue = cn.ContextValue.Value;
}
else
{
  fieldValue = "";
}
这确保了上下文的多个记录集显示其正确的值,如下面在搜索一些预填充数据后的演示:
URL:https:///renderContext?ContextName=MeaningExplorer.Examples.Example13.ParentContext&isSearch=true
上下文关系中的缺陷
缺陷在于,至少在我对上下文关系的实现中,每个值实例都有一个唯一的上下文。这意味着旨在跨上下文共享的上下文值实际上是分离的。让我们探讨一些分离的情况。
自上而下的分离
一种良好的自顶向下上下文关系示例是,我们有父和母上下文,它们与一个或多个孩子有关系。我们可以声明单独的父和母上下文,为了简单起见,我们限制只有一个孩子:
public class ParentChildRelationship : IRelationship { }

public class ChildContext : Context
{
  public ChildContext()
  {
    Declare<PersonContext>().OneAndOnlyOne();
  }
}

public class FatherContext : Context
{
  public FatherContext()
  {
    Declare<PersonContext>().OneAndOnlyOne();
    Declare<ParentChildRelationship, FatherContext, ChildContext>().OneAndOnlyOne();
  }
}

public class MotherContext : Context
{
  public MotherContext()
  {
    Declare<PersonContext>().OneAndOnlyOne();
    Declare<ParentChildRelationship, MotherContext, ChildContext>().OneAndOnlyOne();
  }
}
在父/母上下文中为我的父母创建值后:
- URL: https:///renderContext?ContextName=MeaningExplorer.Examples.Example14.FatherContext
- URL: https:///renderContext?ContextName=MeaningExplorer.Examples.Example14.MotherContext
我可以用我的名字搜索,结果如下:
URL: https:///renderContext?ContextName=MeaningExplorer.Examples.Example14.PersonContext&isSearch=true

这似乎很合理,因为我们可以查看母亲和父亲的上下文。即使搜索我的姓氏,这也有效:


这可能出乎意料,因为字典包含姓氏“Clifton”的四个单独的上下文路径:

渲染结果时,会发生一些“魔法”——按唯一根上下文 ID 过滤结果:
List<ContextNode> matches = cvd.Search(cvSearch).DistinctBy(cn => cn.InstanceId).ToList();
然而,总体问题仍然存在——每个父母都有一个独立的子实例,尽管孩子是同一个孩子。当我们搜索“Clifton”时,算法找到四个出现:
- 父亲的上下文(相同的姓氏)
- 母亲的上下文(相同的姓氏)
- 父亲孩子的上下文,姓氏相同
- 母亲孩子的上下文,姓氏相同
并过滤掉 3 和 4,因为它们与 1 和 2 具有相同的上下文根 ID。尽管如此,我们仍有两个孩子的实例,因此我们拥有公共父上下文的子上下文是分离的。
自下而上的分离
我们可以通过自下而上的声明来解决这个问题。这种声明形式在 UI 中不一定直观,并且仍然会导致子上下文分离的相同问题:
public class ChildParentRelationship : IRelationship { }

public class ChildContext : Context
{
  public ChildContext()
  {
    Declare<PersonContext>().OneAndOnlyOne();
    Declare<ChildParentRelationship, ChildContext, FatherContext>().OneAndOnlyOne();
    Declare<ChildParentRelationship, ChildContext, MotherContext>().OneAndOnlyOne();
  }
}

public class FatherContext : Context
{
  public FatherContext()
  {
    Declare<PersonContext>().OneAndOnlyOne();
  }
}

public class MotherContext : Context
{
  public MotherContext()
  {
    Declare<PersonContext>().OneAndOnlyOne();
  }
}
URL: https:///renderContext?ContextName=MeaningExplorer.Examples.Example15.ChildContext
乍一看,这看起来是正确的:

确实,当我们执行搜索时,我们得到了预期的单个上下文(我们可以填充):
URL: https:///renderContext?ContextName=MeaningExplorer.Examples.Example15.PersonContext&isSearch=true

请记住,由于我们只显示不同的根级别上下文的结果,因此只返回一个搜索结果!而且因为上下文是双向的,我们可以从根实例填充上下文以显示上下文中的所有数据:

虽然看起来是正确的,但在自下而上的声明中,我们将父亲和母亲记录与应该引用同一记录的其他上下文分离开了。例如,如果父亲与另一个母亲育有孩子,则无法将父亲与这两种情况下的同一个实例关联起来。这实际上与前面讨论的自顶向下分离是同一个问题,但由于上下文图的自下而上性质,它可能更隐蔽。
递归关联
递归上下文是另一个问题。假设我们声明一个人与母亲和父亲有关系。但当然,妈妈和爸爸也是人:
public class PersonContext : Context
{
  public PersonContext()
  {
    Declare<PersonNameContext>().OneAndOnlyOne();
    Declare<PersonFatherRelationship, PersonContext, FatherContext>().OneAndOnlyOne();
    Declare<PersonMotherRelationship, PersonContext, MotherContext>().OneAndOnlyOne();
  }
}

public class FatherContext : Context
{
  public FatherContext()
  {
    Declare<PersonContext>().OneAndOnlyOne();
  }
}

public class MotherContext : Context
{
  public MotherContext()
  {
    Declare<PersonContext>().OneAndOnlyOne();
  }}
}
我本以为这会造成堆栈溢出,但事实并非如此。为什么?因为父-人关系和母-人关系是在PersonContext中声明的,而不是在FatherContext或MotherContext中,所以这些子上下文不会递归。我们可以在跟踪日志中看到这一点:

然而,如果我们精确地声明一个人与父亲和母亲有关系,并且父亲和母亲与一个人上下文有关系,我们就会得到无限递归:
public class PersonFatherRelationship : IRelationship { }
public class PersonMotherRelationship : IRelationship { }
public class FatherPersonRelationship : IRelationship { }
public class MotherPersonRelationship : IRelationship { }

public class PersonContext : Context
{
  public PersonContext()
  {
    Declare<PersonNameContext>().OneAndOnlyOne();
    Declare<PersonFatherRelationship, PersonContext, FatherContext>().OneAndOnlyOne();
    Declare<PersonMotherRelationship, PersonContext, MotherContext>().OneAndOnlyOne();
  }
}

public class FatherContext : Context
{
  public FatherContext()
  {
    Declare<FatherPersonRelationship, FatherContext, PersonContext>().OneAndOnlyOne();
  }
}

public class MotherContext : Context
{
  public MotherContext()
  {
    Declare<MotherPersonRelationship, MotherContext, PersonContext>().OneAndOnlyOne();
  }
}
当然,这是过度的——我们可以简单地说,一个父上下文与一个父上下文有关系,或者更一般地在单元测试中表达:
public class RecursiveRelationship : IRelationship { }

public class RecursiveContext : Context
{
  public RecursiveContext()
  {
    Declare<RecursiveRelationship, RecursiveContext, RecursiveContext>();
  }
}

[TestMethod, ExpectedException(typeof(ContextException))]
public void RecursiveContextTest()
{
  parser.Parse(new RecursiveContext());
}
正如单元测试所示,我们希望解析器能够检测到这种情况,这很容易做到,只需检查我们是否已经在某个超上下文中遇到过完全相同的上下文:
protected Group GenerateMasterGroups(Stack<ContextPath> contextPath,
 List<Group> groups, Group group, IContext context, RelationshipDeclaration relationship)
{
  if (contextPath.Any(c => c.Type == context.GetType()))
  {
    throw new ContextException("Context " + context.GetType().Name + " is recursive.");
  }
  ...
}
URL: https:///renderContext?ContextName=MeaningExplorer.Examples.Example16.PersonContext

我们遇到这些分离的两个原因
在传统的关系模型中,我们不会遇到这个问题,原因有两个:
- 关系模型不是双向的。
- 关系模型通过唯一键关联相关项。
让我们进一步探讨。
上下文是双向的
与关系模型不同,上下文是双向的——给定根上下文,可以确定与根上下文关联的所有子上下文。反之,给定一个子上下文,可以导航层次结构以确定所有超上下文,直到根上下文(包括根上下文),子上下文与之相关。在关系模型中,连接分离上下文的是 JOIN 语句。
在关系模型中,自顶向下的模型往往不直观,并且需要通过多对多关系。这种实体关系模型相当不典型:

技术上,尽管它通过 FatherChildRelationship 表表达了孩子有父亲、父亲有孩子这一概念。上面的模型有很多缺陷,因为需要一个多对多单独的关系表:
- 父亲可以没有孩子。
- 孩子可以没有父亲。
- 孩子可以有一个以上的父亲。
更传统的关系模型将是自下而上的:

在这里,虽然 Father 记录可以存在而没有 Child 记录,但 Child 记录需要 Father 记录,并且每个唯一的 Child 记录只能有一个 Father 记录。但我们注意到,“Father”表(一个上下文)实际上并不知道它在另一个上下文(“Child”表)中被引用,至少没有通过检查实体关系图中的外键约束。当然,这在我自顶向下的子上下文声明中也是真实的:
public class ChildContext : Context
{
  public ChildContext()
  {
    Declare<PersonContext>().OneAndOnlyOne();
  }
}
这里的关键词是“声明”。总结一下,上下文实例和实体模型记录实例的区别是:
- 上下文可以从上到下或从下到上导航。
- 如果我在上下文中查询 Father 实例,我会得到所有相关的子上下文。如果我在关系模型中查询 Father 表,我只会得到 Father 记录,除非我显式地与 Child 表连接。
- 如果我在上下文中查询 Child 实例,同样,我会得到所有相关的,但这次是超上下文。如果我在关系模型中查询 Child 表,我只会得到 Child 记录,除非我显式地与 Father 表连接。
缺乏唯一键
到目前为止,我提供的上下文示例都缺少唯一键(或“唯一标识符”,如果您愿意)。唯一键有效地表明记录的内容(或更传统地说,“记录实例”)在引用该记录的所有实体中都是相同的,通过其唯一键。问题是用户通常需要自己确定记录内容是否唯一。事实上,我们的用户界面是专门定制的,以便我们可以假设用户在单个上下文中工作:!例如,在输入父母的孩子时,用户界面假定(用户也假定)我们正处于指示父母的孩子上下文中。如果我们正在输入孩子并想添加他们的父母,用户界面(和用户)假定我们处于某个特定孩子的上下文中,因此我们输入的父母特定于该孩子。因此,您可以通过用户界面看到,我们人为地为关系模型创建了上下文,该模型没有足够的信息来单独描述上下文。
解决分离上下文问题
为了解决分离上下文的问题,我们需要一种机制来声明,而不是在层次结构中的某个级别创建一个不同的上下文实例,而是引用一个现有的上下文实例。在内部,我们必须能够将此引用与现有的上下文图关联起来。这通常在 UI 中暴露,方法是提供一种查找现有记录并识别要用作引用的记录的方法。例如,显示实例 ID GUID 路径的点分隔的开头部分:
URL: https:///dictionary?showInstanceIds=true

我们希望两个ChildContext的实例 ID 都引用同一个ChildContext。我们不需要创建一个单独的ChildContext(尽管我们可以)——相反,我们应该能够查找所有子上下文,以便用户可以选择正确的上下文。当然,这本身也有缺点,因为人们通常会按上下文过滤子上下文,因此过滤参数可能是“Thomas Clifton 的孩子”。我们必须重新审视过滤才能实现这一点,但目前,我们先保持简单,因为实现上下文引用本身就足够复杂了!
在上张截图中,让我们假设先创建了父子上下文。孩子上下文的公共部分是f01d375b。在母子上下文中,我们想使用这个 ID,所以母子上下文 ID 不再是 a05e17ed.e4d8e9ca,而是我们希望它是 a05e17ed.f01d375b,以及ChildContext子上下文第二级的所有后续 ID。明白了吗?
从用户界面的角度来看,我们需要两样东西:
- 一种方法来定义查找的每一行应显示什么。
- 一种查找现有上下文的方法。
如果我们想保持声明式的方法,让我们尝试一些相当简单的事情,那就是声明查找如何渲染——再次,我们追求的是最小的实用性。我们在要暴露查找的上下文(在这种情况下是 ChildContext)中声明查找如何渲染:
public class ChildContext : Context
{
  public ChildContext()
  {
    Declare<PersonContext>().OneAndOnlyOne();
    Lookup<FirstName>().And(" ").And<LastName>();
  }
}
URL: https:///renderContext?ContextName=MeaningExplorer.Examples.Example17.FatherContext
假设存在一些ChildContext实例,那么任何引用ChildContext的上下文在页面上渲染出来的内容是这样的:

重申一下,这是一个非常简化的查找——没有过滤,所以列出了所有ChildContext实例。对于那些对填充查找的后台实现感兴趣的人,这里是如何做的(阅读注释!):
/// <summary>
/// Adds a "select" section with lookup items that are rendered by the
/// lookup rendering declaration for a particular context, returning the
/// lookup items that were created.
/// </summary>
private static List<LookupItem> RenderOptionalLookup
(StringBuilder sb, Parser parser, Group group, ContextValueDictionary cvd)
{
  List<LookupItem> lookupItems = new List<LookupItem>();
  var groupContextType = group.ContextType;
  int lookupId = 0;

  // If there's an associated lookup, query the dictionary
  // for instances of this context (no filtering for now!)
  // and render the values as declared by the lookup.
  // If no dictionary is provided, lookups are not possible.
  if (cvd != null && parser.HasLookup(groupContextType))
  {
    Lookup lookup = parser.GetLookup(groupContextType);
    IReadOnlyList<ContextNode> contextNodes = cvd.GetContextNodes(groupContextType);

    if (contextNodes.Count > 0)
    {
      // 1. Iterate each context node.
      // 2. Navigate the children until we get concrete (not null) ContextValue's.
      // 3. Get the distinct record numbers of these.
      // 4. Itereate the record numbers
      // 5. Render the lookup for that context node and record number.
      // 6. For each actual IValueEntity (contained in a LookupEntity)
      //    acquire the ContextValue and add
      // an entry in the lookupItems collection,
      // which will serve as dictionary for how a selected item
      // populates its associated input control.
      List<(string, int)> lookups = new List<(string, int)>();

      foreach (var cn in contextNodes) // 1
      {
        IReadOnlyList<ContextValue> contextValues = cvd.GetContextValues(cn); // 2
        var recnums = contextValues.Select(cv => cv.RecordNumber).Distinct(); // 3

        foreach (var recnum in recnums) // 4
        {
          string record = lookup.Render(cn, cvd, recnum, contextValues); // 5
          lookups.Add((record, lookupId));

          // 6
          var lookupEntities = lookup.GetLookupEntities();

          foreach (var lookupEntity in lookupEntities)
          {
            var contextValue = contextValues.SingleOrDefault
           (cv => cv.Type == lookupEntity.ValueEntity && cv.RecordNumber == recnum);

            if (contextValue != null)
            {
              // The full instance ID path is path, up to the lookup sub-context, in
              // which this sub-context is contained. However, we don't have this value yet!
              // It is either generated (new context) or assigned (existing context)
              // so we need to defer this until we know the instance ID path we're using.
              lookupItems.Add(new LookupItem(contextValue, groupContextType, lookupId));
            }
          }
        }
      }

      sb.Append("Lookup: ");
      sb.StartSelect().OnChange("populateFromLookup(this)");
      // Placeholder so user has to actively select a lookup
      // because otherwise the first item
      // appears selected, and clicking on the option doesn't trigger the event.
      sb.Option("Choose item:");
      // lk is a tuple (lookup text, lookup ID)
      lookups.ForEach(lk => sb.Option(lk.Item1, lk.Item2.ToString()));
      sb.EndSelect();
    }
  }

  return lookupItems;
}
渲染过程中还需要一些魔法:上下文实例路径的最终连接,如果使用,它将替换创建新上下文时的输入控件的实例 ID 路径。鉴于我们没有查看现有上下文:
if (mode != Mode.View)
{
  // Here we want to bind the field's context path type list,
  // up to the path that contains the context value,
  // with ID's for the path types, creating ID's if the path type doesn't exist.
  // This ensures that all data instances
  // exist within a single root context.
  instanceIdList = parser.CreateInstancePath(field.ContextPath.Select(cp => cp.Type));
  LookupItemLateBinding(field, lookupItems, instanceIdList);
}

private static void LookupItemLateBinding(Field field, List<LookupItem> lookupItems,
       List<Guid> instanceIdList)
{
  // Late binding of lookupItem's FullContextInstancePath:
  foreach (var lookupItem in lookupItems.Where
         (li => li.ContextValue.Type == field.ContextPath.Last().Type))
  {
    // Find where in the entire path for this field the lookup value sub-context starts.
    int idx = field.ContextPath.IndexOf(cp => cp.Type == lookupItem.ContextType);

    // The full context instance ID path starts with these base ID's...
    lookupItem.NewContextInstancePath.AddRange(instanceIdList.Take(idx));

    // ...and finishes with the context ID's for the lookup.
    lookupItem.NewContextInstancePath.AddRange
              (lookupItem.OriginalContextInstancePath.Skip(idx));
  }
}
注释应该足以解释超级上下文 ID 被保留,但其余上下文路径引用现有实例的概念(这是个有趣的句子!)。
接下来,为了让浏览器中的选择事件知道该做什么,我们必须为 JavaScript 提供一种处理选择事件的方法:
- 这是我们选择的查找。
- 这些是用于渲染查找的字段。
- 这些是渲染字段映射到的输入控件。
- 现在
- 更新该输入控件的“
cvid”string。 - 设置输入控件的值。
- 通知服务器值更改。
- 更新该输入控件的“
简单吧?
让我们确保我们有所有组件。首先,查找字典在 UI 渲染结束时在 JavaScript 中设置(在浏览器中查看源代码时,添加了 CRLF 和 JSON 缩进格式以提高可读性):
sb.EndDiv();

string jsonLookupDict = JsonConvert.SerializeObject(lookupDictionary, Formatting.Indented);

sb.Append(CRLF);
sb.StartScript().Append(CRLF).
Javascript("(function() {wireUpValueChangeNotifier(); wireUpEvents();})();").
Append(CRLF).
Javascript("lookupDictionary = " + jsonLookupDict + ";").
Append(CRLF).
EndScript().
Append(CRLF);
sb.EndBody().EndHtml();
输入单个父子关系后,我们看到:
lookupDictionary = [
{
  "OriginalContextInstancePath": [
    "f9b77125-d1d9-45ae-b157-3ac95603d5c0",
    "daf84e46-3389-46d2-a3b9-3c3cd992022f",
    "cb9d73ae-18e2-4383-9667-da3885dfd777",
    "6cc6d70a-cba1-4a75-8802-a389df2327d3",
    "7ce2dc9c-1aa3-4b07-8551-11e7eafa73f1"
  ],
  "NewContextInstancePath": [
    "f9b77125-d1d9-45ae-b157-3ac95603d5c0",
    "89638c69-0f38-4a5e-b95a-d171958a37be",
    "118a4256-bd4b-48ba-9545-16d53888a374",
    "08307f5e-f194-4b6a-9d70-0c0fdc7f8657",
    "0abe703b-b79a-4d70-87c5-619042bdfef7"
  ],
  "Value": "Marc",
  "LookupId": 0
},
{
  "OriginalContextInstancePath": [
    "f9b77125-d1d9-45ae-b157-3ac95603d5c0",
    "daf84e46-3389-46d2-a3b9-3c3cd992022f",
    "cb9d73ae-18e2-4383-9667-da3885dfd777",
    "6cc6d70a-cba1-4a75-8802-a389df2327d3",
    "60c0815d-e9e7-43d1-aaf5-e8f4a1dfc7a5"
  ],
  "NewContextInstancePath": [
    "f9b77125-d1d9-45ae-b157-3ac95603d5c0",
    "89638c69-0f38-4a5e-b95a-d171958a37be",
    "118a4256-bd4b-48ba-9545-16d53888a374",
    "08307f5e-f194-4b6a-9d70-0c0fdc7f8657",
    "5c5e4d8b-25be-4d66-b525-b3b5a981d916"
  ],
  "Value": "Clifton",
  "LookupId": 0
}
];
接下来,我们观察下拉列表是如何渲染的:
![]()
选项值是 JSON 中的 LookupId。我们还注意到 OriginalContextInstancePath 是指向现有记录的实例 ID 路径(GUID 已缩短为第一个段):
最后,对于ChildContext名字输入框,请注意 ID,它与 NewContextInstancePath(新的是因为它被创建为新上下文)匹配:
<input type="text" class="contextualValue requiredValue"
  id="f9b77125-d1d9-45ae-b157-3ac95603d5c0.daf84e46-3389-46d2-a3b9-3c3cd992022f.
     cb9d73ae-18e2-4383-9667-da3885dfd777.6cc6d70a-cba1-4a75-8802-a389df2327d3.
     7ce2dc9c-1aa3-4b07-8551-11e7eafa73f1"
  ...
>
现在我们可以关联为新上下文设置的 ID:f9b77125...、daf84e46... 等,与 LookupID 0 的 OriginalContextPath 相关联,并确定两件事:
- 新的上下文路径——请注意,如何保留超级上下文 ID 路径(在此情况下只有一个超级上下文),但其余的上下文路径引用现有实例。
- 要设置到输入控件的值。
我们现在拥有实现 JavaScript 的所有组件,该 JavaScript 更新 cvid 值和输入控件的值:
function populateFromLookup(lookup) {
  // Ignore "Choose Item:"
  if (lookup.selectedIndex != 0) {
    var lookupId = lookup[lookup.selectedIndex].value;
    var records = findLookupRecords(lookupId);
    updateInputControls(records);
    sendFieldChanges(records);
  }
}

// Find all records in the lookupDictionary for the given lookup ID.
function findLookupRecords(lookupId) {
  var lookupRecords = [];

  for (var idx = 0; idx < lookupDictionary.length; idx++) {
    record = lookupDictionary[idx];
    if (record.LookupId == lookupId) {
      lookupRecords.push(record);
    }
  }

  return lookupRecords;
}

// For each record, find the input control whose ID matches the original instance path ID
// and update the value and "cvid" attribute.
function updateInputControls(records) {
  for (var idx = 0; idx < records.length; idx++) {
    var record = records[idx];
    var originalId = record.OriginalContextInstancePath.join(".");
    var docInput = document.getElementById(originalId);
    docInput.value = record.Value;
    docInput.setAttribute("cvid", record.NewContextInstancePath.join("."));
  }
}

// Inform the server of the lookup selection.
function sendFieldChanges(records) {
  for (var idx = 0; idx < records.length; idx++) {
    var record = records[idx];
    var originalId = record.OriginalContextInstancePath.join(".");
    sendFieldChange(originalId, "/updateField");
  }
}
到目前为止,在 ContextValueDictionary 中,我们一直假设任何“添加”操作都是针对一个全新的上下文图。现在情况不再如此,因为我们正在引用现有的子上下文。这需要对 AddOrUpdate 方法进行微调。另请注意,我发现此操作必须是同步的——当用户在浏览器控件中输入值时,它之前是有效的,因为用户输入速度很慢。但是,当浏览器更新查找上下文中的所有相关值时,这些操作是异步发生的。
public void AddOrUpdate(ContextValue cv)
{
  // We have to process this synchronously!
  // If async, we might get simultaneous requests
  // (particularly from the browser's async PUT calls) to add a value.
  // While we're constructing the dictionary entry for one context path,
  // another request might come in before we've
  // created all the nodes for the first call.
  lock (this)
  {
    // Walk the instance/path, creating new nodes in the context tree as required.

    Assert.That(cv.TypePath.Count == cv.InstancePath.Count,
               "type path and instance path should have the same number of entries.");
    ContextNode node = tree;

    for (int i = 0; i < cv.TypePath.Count; i++)
    {
      // Walk the tree.
      var (id, type) = (cv.InstancePath[i], cv.TypePath[i]);

      if (node.Children.TryGetSingle(c => c.InstanceId == id, out ContextNode childNode))
      {
        node = childNode;
      }
      else
      {
        // Are we referencing an existing sub-context?
        if (flatView.TryGetValue(type, out List<ContextNode> nodes))
        {
          // The instance path of the node must match all the
          // remaining instance paths in the context
          // we're adding/updating!
          bool foundExistingSubContext = false;

          foreach (var fvnode in nodes)
          {
            foreach (var fvnodepath in fvnode.InstancePaths())
            {
              if (cv.InstancePath.Skip(i).SequenceEqual(fvnodepath))
              {
                // This node get's a child referencing the existing sub-context node.
                node.AddChild(fvnode);
                node = fvnode;
                foundExistingSubContext = true;
                break;
              }
            }

            if (foundExistingSubContext)
            {
              break;
            }
          }

          if (!foundExistingSubContext)
          {
            node = CreateNode(i, id, cv, node, type);
          }
        }
        else
        {
          node = CreateNode(i, id, cv, node, type);
        }
      }
    }

    // The last entry in the tree gets the actual context value.
    // We've either added this node to the tree
    // or updating an existing node.
    node.ContextValue = cv;
  }
}
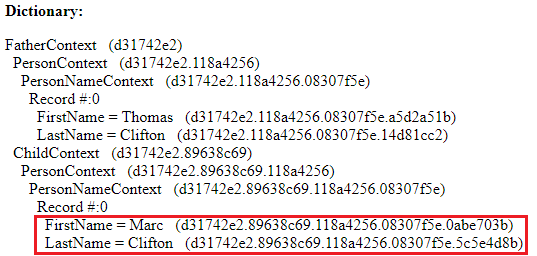
选择“母亲”上下文的现有孩子后:
URL: https:///renderContext?ContextName=MeaningExplorer.Examples.Example17.MotherContext

我们注意到字典现在引用了在“父亲”上下文中创建的孩子:

顺便说一句,重要的是要注意,根级别上下文不能有查找。因此,“father”和“mother”作为根上下文,永远不能被其他“father”或“mother”上下文引用。要实现这一点,这两个上下文需要被包装在一个超上下文中。
重新审视搜索
搜索现在已损坏,因为它还没有处理引用来自不同超上下文的子上下文的上下文。再次,上下文路径被假定为唯一的。有了共享子上下文,我们需要找到所有共享此子上下文的其他根上下文。我们将此调用添加到 Search 方法的末尾:
MatchWithContextsReferencingSubContext(matches);
实现
protected void MatchWithContextsReferencingSubContext(List<ContextNode> matches)
{
// For each match, see if there are other super-contexts
// that reference this same matching context.
// If so, these should be added to the list of matches.
// TODO: Would this be easier if we change ContextNode.Parent
// from a singleton to a List<ContextNode> ?
// Clone, otherwise we may end up modifying the list of known matches.
foreach (ContextNode match in matches.ToList())
{
List<Guid> matchParentPath = match.GetParentInstancePath();
// We only want root contexts.
foreach (var nodes in flatView.Values.Where
(n=>n.Last().Parent.InstanceId == Guid.Empty))
{
ContextNode lastNode = nodes.Last();
foreach (var childNodeIdPath in lastNode.ChildInstancePaths())
{
// We attempt to find a node where any sub-context ID equals the match last ID,
// as this gives us at least
// one context node in which we know that there is another reference.
// This, incidentally, is the common context type that we're searching on.
if (childNodeIdPath.Any(id => id == match.InstanceId))
{
// The root instance ID for this match should be different than any existing match.
if (!matches.Any(m => m.GetParentInstancePath().First() == nodes.First().InstanceId))
{
// Add this other context, that is referencing the context we matched on.
matches.Add(lastNode);
}
}
}
}
}
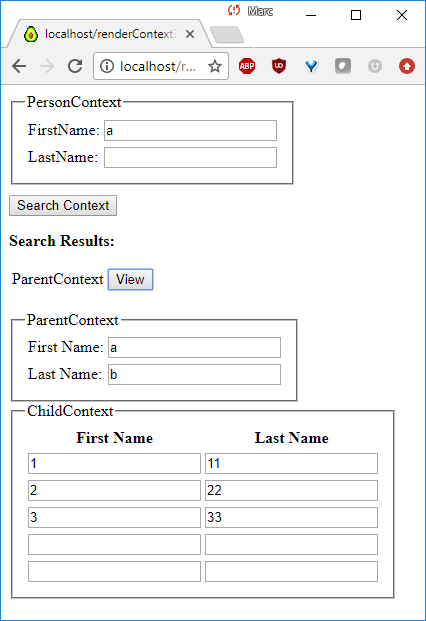
}
我们得到预期的结果(搜索共享子上下文时找到父上下文和母上下文):
URL: https:///renderContext?ContextName=MeaningExplorer.Examples.Example17.PersonContext&isSearch=true


结论
构建这个原型比我预期的要困难得多。部分原因在于概念本身相当陌生——我们认为上下文拥有数据,而不是相反,数据拥有上下文。我经历了各种各样的弯路,删除了很多最终是死胡同的代码。复杂性的一部分可能源于架构本身——使用命令式代码来声明性地定义上下文,以及我所采取的特定方法,即上下文可以具有“has a”关系、一对多关系和抽象。此外,在浏览器中构建演示 UI 意味着引入我的 Web 服务器的代码库并使用 JavaScript。也就是说,通过在浏览器中渲染 UI 而不是操作 WinForm 控件,可以获得很大的灵活性。即使付出了这么多努力,这个原型仍然不完整!
此外,您可能会找到的关于“上下文计算”的许多链接都提到了“大数据”中数据的上下文,特别是用于挖掘数据以进行情感分析和实时反馈(例如,“我附近有什么提供基于我以前去过的餐厅的食物的餐厅?”)。确定上下文在语义分析中也很重要。如果我说“我要买一个苹果”,这意味着我要去杂货店还是苹果电脑商店?上下文计算显然适用于其他新兴技术,例如(当然)人工智能。然而,上下文在基于代理的计算中也至关重要——除非代理知道数据的上下文,否则一堆数据就没有特别的意义。因此,在某种非常真实的意义上,上下文计算正在推动数据管理领域的发展,使数据不再是静态的事实和数字的集合,而是更加“鲜活”——数据现在可以触发由其上下文确定的具体活动。
分布式计算和上下文数据
在分布式计算环境中,每个节点将拥有不同的数据集合,并且很可能拥有不同的数据上下文。当一个节点请求整个系统搜索特定的上下文值匹配项时,各个分布式节点可能会返回请求节点不知道的上下文的命中。虽然它可以查询该节点以获取其上下文定义,但关键在于上下文作为数据值的一部分包含在内,以便请求者可以确定如何处理新上下文。这就是基础,正如文章开头链接所描述的,对于 Big Data 来说,它是更年轻、更智能的兄弟。
延伸阅读
- 上下文工具包:辅助上下文感知应用程序的开发
- 走向上下文感知的关系模型
关于上面的链接,我想提请您注意这个特别重要的陈述:
尽管关系模型原则上可以用于表示上下文依赖信息,但上下文本身不能在数据库级别处理,而必须通过应用程序逻辑来处理。在 CR 模型中,上下文被视为一等公民,添加到数据库级别,从而能够以统一的方式处理上下文以及定义上下文感知结构和操作。 - 上下文感知偏好数据库系统
在 GitHub 上发现
没多少!
https://github.com/levand/contextual
该库提供了地图和向量的上下文数据结构,这些结构跟踪它们自己的上下文,从某个任意的根。
未来工作
- 分层上下文搜索——修复此问题
Assert.That(contextValuesToSearch.All(cv => cv.InstancePath.Count == pathItems),
           "Context values must have the same path length for now.");
在
ContextValueDictionary的Search方法中。 - 上下文查找过滤
如果组应该只在它们有不同的子上下文时才被允许合并(并且最好有不同的字段标签)。当然,合并的组具有相同的子组(如父组和母组)将导致查找 ID 重映射失败,因为无法区分父组和母组。我想是这样。
- 更新结果上下文的能力,特别是关于上下文引用的注意事项。
- 一个真实的应用程序用例,带有真实的应用程序 UI!
- 解决递归上下文问题。
- 性能测试。
- 确定一个合理的上下文数据存储机制。
- 其他,可能不那么复杂的实现。
单元测试
到目前为止,有 48 个单元测试,相当全面。


参考文献
- https://www.techopedia.com/definition/31778/contextual-data
- https://www.wired.com/insights/2013/04/with-big-data-context-is-a-big-issue/
历史
- 2018 年 3 月 1 日:初始版本