
在 .NET 客户端中消耗 OData WCF 数据服务
5.00/5 (3投票s)
在 .NET 客户端中消耗 WCF 数据服务。MSAL OAuth 2.0
目录
引言
我之前的 文章 演示了如何构建 WCF OData Web 服务。本文演示了如何在 .NET 客户端应用程序中消耗该服务。
首先,您应该添加数据服务客户端 nuget 包。
PM> Install-Package Microsoft.Data.Services.Client
使用 Visual Studio 2017,Microsoft 已移除对 OData 服务引用的支持,也就是说,它无法通过“添加服务引用”屏幕解析服务元数据。

Visual Studio 2017 也将无法更新您在早期版本 Visual Studio 中添加的任何现有服务引用,也就是说,当您右键单击 WCF OData Web 服务的现有服务引用并单击“更新”时,您将看到以下消息。

因此,要在 Visual Studio 2017 中添加服务引用,您需要采取以下途径之一。
已连接服务
首先,您需要从“工具”->“扩展和更新”菜单中安装 OData Connected Service 扩展。

右键单击您的项目,然后选择“添加已连接的服务”。

从选项列表中选择“OData Connected Service”。请注意,此选项是由 OData Connected Service 扩展添加的。

输入您的服务终结点。通过查看我关于创建 Web 服务的上一篇 文章,此 URL 应该很明显。此外,您还想为您的服务起一个友好的名称。单击“下一步”。

如果此时出现无法访问的错误,那仅仅是因为 Web 服务中的身份验证阻止了扩展下载元数据。您将不得不暂时移除 Web 服务中的任何身份验证。
输入要生成的类的文件名,然后单击“完成”。

如果您收到一条错误消息,显示“Value cannot be null.\r\nParameter name: path1”,那么您需要下载 Microsoft WCF ToolKit 并进行安装。然后转到注册表并找到以下项:[HKEY_LOCAL_MACHINE\SOFTWARE\WOW6432Node\Microsoft\Microsoft WCF Data Services]。创建“VS 2010 Tooling”或“VS 2012 Tooling”(如果不存在,则使用“5.6”)的副本,并将其命名为“VS 2014 Tooling”。然后重试。
有关该扩展的更多信息以及这些错误的更多信息,请 在此处 找到。
当扩展完成时,它将在“已连接的服务”节点下创建一个包。右键单击该包会显示“更新 OData Connected Service”选项,如果您对数据服务所服务的实体进行了更改,则需要执行此操作。
DataSvcUtil
生成服务引用的另一个选项是使用数据服务实用工具命令行程序。
从提升的命令提示符,导航到“C:\Windows\Microsoft.NET\{OSArchitecture}\{Framework Version}”,其中 {OSArchitecture} 取决于您的操作系统/CPU 体系结构,而 {Framework Version} 是 .NET 的版本。
例如:C:\Windows\Microsoft.NET\Framework64\v4.0.30319
然后运行以下命令来创建 MyDataService.cs 文件,其中包含所有 OData 绑定。您需要将此生成的代码文件添加到您的客户端应用程序。{URI} 应替换为服务终结点。
datasvcutil /language:Csharp /out:C:\temp\MyDataService.cs /uri:{URI}
您可能可以将命令行构建到 Visual Studio 解决方案的生成后命令中。然而,不幸的是,与已连接服务扩展类似,datasvsutil.exe 无法从已认证的终结点下载。
数据上下文
通过 nugget 添加 WCF Data Services Client(通过已连接服务扩展可能会自动添加此项)。
PM> Install-Package Microsoft.Data.Services.Client. </font>
您可以通过以下方式初始化一个用于查询和 CRUD 操作的上下文对象。ModelName 和 EntityCollectionName 会因您在数据服务中命名的内容而异。如果您按照我关于创建 Web 服务的 文章 进行操作,应该很容易发现这些需要是什么。服务终结点与您与已连接服务扩展或 datsvcutil.exe 使用的 URL 相同。
var context = new {ModelName}.{EntityCollectionName}(new Uri("{serviceendpoint}");
基本身份验证
context.Credentials = new NetworkCredential("username", "password");
OAuth 身份验证 MSAL
在您的 Azure 门户中搜索应用注册

单击“添加”按钮并输入您的客户端应用程序的详细信息。应用程序类型应为“原生”。重定向 URI 当前可以是任何值,但您将在下一步更改它。

应用程序注册后,您将能够看到 Azure 分配的应用程序 ID。记下此 GUID,因为您需要在多个地方输入它。RedirectURI 当前可以是任何值,但您将在下一步更改它。
要更改 redirectURI,请单击“设置”,然后单击“重定向 URI”。根据以下示例更新 URI,将 {Application ID} 部分替换为您的应用程序 ID GUID(在我的屏幕截图中明显被涂黑),例如:msal14bc971b-0afd-4de5-9006-b2db00d2c0a2://auth。

接下来在 RedirectURIs 下方,单击“必需的权限”,最后单击“添加”按钮。
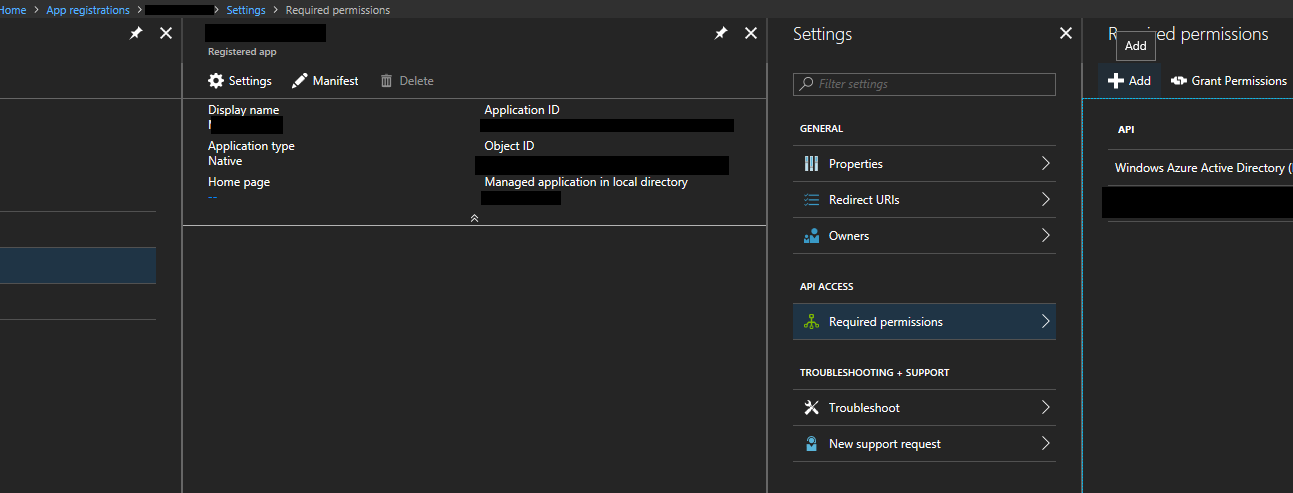
对于 API 选择,搜索您的数据服务应用程序的名称,该应用程序也应在同一租户的 Azure 门户中注册。请参阅我关于创建 WCF 数据服务的 文章 以获取更多详细信息。

在选择了 API 后,选择允许访问/用户身份模拟的权限。

添加 Microsoft.Identity.Client nuget 包。
PM> Install-Package Microsoft.Identity.Client
这是使用 msal 客户端进行身份验证并将访问令牌包含在 dataservice 标头中以用于您的 data-service 的代码。
- 将 {原生客户端的应用程序 ID} 替换为您的原生客户端应用程序 ID GUID,例如:
14bc971b-0afd-4de5-9006-b2db00d2c0a2。 - 将 {租户名称} 替换为您注册应用程序的租户名称,例如:
mytenant.onmicrosoft.com。 - 将 {数据服务应用 ID URI} 替换为
dataservice应用程序的应用 ID uri/登录 URL,可以在dataservice应用注册的属性中找到(请参阅我关于创建 WCF 数据服务的 文章),例如:https://mydataservice.azurewebsites.net。
string clientId = "{Application ID of native Client}";
string[] applicationScopes = new string[] { "{DataService App ID URI}/user_impersonation" };
string authority = "https://login.microsoftonline.com/{tenant name}/";
string redirectUri = "msal{Application ID of native Client}://auth"</span>

Var msaClient = new PublicClientApplication(clientId,Authority)
{
 RedirectUri = redirectUri
};

//Try to get the cached token first, if cached token is null then use interactive login.
Var authResponse= await msaClient.AcquireTokenSilentAsync
                  (applicationScopes, msaClient.Users.FirstOrDefault()) ??
await msaClient.AcquireTokenAsync(applicationScopes,null);

//Attach handling to add auth header.
                    context.SendingRequest2 += (s, e) =>

                    {
                        //Add the OAuth 2.0 header.
                        e.RequestMessage.SetHeader
                            ("Authorization", authResponse.CreateAuthorizationHeader());
                    };
Xamarin.Forms 重定向 URI
为了使 iOS 和 Android 中的工作正常,并在获取令牌后返回到您的应用程序,您必须修改原生项目以理解 redirectUri 方案。
对于 Android,您需要编辑 Android_Project/Properties/AndroidManifest.xml。

在 application 标签中添加以下 BrowserTabActivity,将 {原生客户端的应用程序 ID} 替换为正确的 GUID,例如:msal14bc971b-0afd-4de5-9006-b2db00d2c0a。
<?xml version="1.0" encoding="utf-8"?>
<manifest xmlns:android="http://schemas.android.com/apk/res/android"....>
 <application ....>
    <activity android:name="microsoft.identity.client.BrowserTabActivity">
      <intent-filter>
        <action android:name="android.intent.action.VIEW" />
        <category android:name="android.intent.category.DEFAULT" />
        <category android:name="android.intent.category.BROWSABLE" />
        <data android:scheme="msal{Application ID of native client}" android:host="auth" />
      </intent-filter>
    </activity>
    ...
 </application>
</manifest>
对于 iOS,您需要编辑 info.plist 文件

右键单击 info.plist,选择“打开方式”,然后选择“iOS Manifest Editor”。

在“高级”选项卡中,单击“添加 URL 类型”并添加一个类似以下的条目,将 {原生客户端的应用程序 ID} 替换为正确的 GUID,例如:msal14bc971b-0afd-4de5-9006-b2db00d2c0a。

CRUD
以下示例摘自 此处。
Add
// Create the DataServiceContext using the service URI.
NorthwindEntities context = new NorthwindEntities(svcUri);
// Create the new product.
Product newProduct =
    Product.CreateProduct(0, "White Tea - loose", false);
// Set property values.
newProduct.QuantityPerUnit = "120gm bags";
newProduct.ReorderLevel = 5;
newProduct.UnitPrice = 5.2M;
try
{
    // Add the new product to the Products entity set.
    context.AddToProducts(newProduct);

    // Send the insert to the data service.
    DataServiceResponse response = context.SaveChanges();

    // Enumerate the returned responses.
    foreach (ChangeOperationResponse change in response)
    {
        // Get the descriptor for the entity.
        EntityDescriptor descriptor = change.Descriptor as EntityDescriptor;

        if (descriptor != null)
        {
            Product addedProduct = descriptor.Entity as Product;

            if (addedProduct != null)
            {
                Console.WriteLine("New product added with ID {0}.",
                    addedProduct.ProductID);
            }
        }
    }
}catch (DataServiceRequestException ex)
{
    throw new ApplicationException(
        "An error occurred when saving changes.", ex);
}
更新
string customerId = "ALFKI";
// Create the DataServiceContext using the service URI.
NorthwindEntities context = new NorthwindEntities(svcUri);
// Get a customer to modify using the supplied
// ID.var customerToChange = (from customer in context.Customers
                        where customer.CustomerID == customerId
                        select customer).Single();
 // Change some property values.
customerToChange.CompanyName = "Alfreds Futterkiste";
customerToChange.ContactName = "Maria Anders";
customerToChange.ContactTitle = "Sales Representative";
try
{
    // Mark the customer as updated.
    context.UpdateObject(customerToChange);

    // Send the update to the data service.
    context.SaveChanges();
}catch (DataServiceRequestException  ex)
{
    throw new ApplicationException(
        "An error occurred when saving changes.", ex);
}
删除
// Create the DataServiceContext using the service URI.
NorthwindEntities context = new NorthwindEntities(svcUri);
try
{
    // Get the product to delete, by product ID.
    var deletedProduct = (from product in context.Products
                          where product.ProductID == productID
                          select product).Single();

    // Mark the product for deletion.
    context.DeleteObject(deletedProduct);

    // Send the delete to the data service.
    context.SaveChanges();
}// Handle the error that occurs when the delete operation fails,
 // which can happen when there are entities with existing
 // relationships to the product being deleted.catch (DataServiceRequestException ex)
{
    throw new ApplicationException(
        "An error occurred when saving changes.", ex);
}
历史
- 版本 1