
ASP.NET WEB API 中的日志记录、异常处理和版本控制
4.93/5 (22投票s)
以有助于维护日志的方式记录 API 的每个请求和响应
引言
在本文中,我们将学习如何记录 API 的每个请求和响应,以方便维护日志。接下来,我们将处理所有 API 异常,以便在发生错误时,能够及时存储错误并进行修复。最后一部分是 API 的版本控制。
- 异常处理
- 日志记录
- 版本控制
这些都是开发生产 API 时关键的组成部分。

图标由 Freepik 设计,来自 www.flaticon.com,根据 CC 3.0 BY 许可

1. 异常处理
首先,我们创建一个简单的 Web API 应用程序“WebDemoAPI”。

创建简单的 Web API 解决方案后,您将获得一个默认的 Home 控制器和 Values API 控制器。让我们先运行应用程序并调用 get 请求。
注意:您可以使用任何 REST 客户端发送请求进行此演示,我将使用 POSTMAN REST 客户端。
URL: https://:50664/api/values
发送 Get 请求

向 API 发送请求后,我们收到了响应。
现在,让我们修改 Get 方法,在此处,我将抛出一个异常。
    public class ValuesController : ApiController
    {
        // GET api/values
        public IEnumerable<string> Get()
        {
            throw new NotImplementedException("");
            //return new string[] { "value1", "value2" };
        }
       }
现在,如果我们向 Values API 的 get 请求发送请求,响应中将抛出错误。
异常处理前的响应

现在我们看到了错误,让我们看看如何全局处理这个错误。
使用 ExceptionHandler 类处理 API 异常

为了处理异常,我们将创建一个名为“GlobalExceptionHandler”的类,它将继承自“ExceptionHandler” 抽象类。在该类中,我们将实现 Handle 方法。在此之前,我们将创建一个“CustomHandler”文件夹。在该文件夹中,我们将添加“GlobalExceptionHandler”类。

using System;
using System.Collections.Generic;
using System.Linq;
using System.Net;
using System.Net.Http;
using System.Threading;
using System.Threading.Tasks;
using System.Web;
using System.Web.Http;
using System.Web.Http.ExceptionHandling;

namespace WebDemoAPI.CustomHandler
{
    public class GlobalExceptionHandler : ExceptionHandler
    {
        public override void Handle(ExceptionHandlerContext context)
        {
            var result = new HttpResponseMessage(HttpStatusCode.InternalServerError)
            {
                Content = new StringContent("Internal Server Error Occurred"),
                ReasonPhrase = "Exception"
            };

            context.Result = new ErrorMessageResult(context.Request, result);
        }

        public class ErrorMessageResult : IHttpActionResult
        {
            private HttpRequestMessage _request;
            private readonly HttpResponseMessage _httpResponseMessage;

            public ErrorMessageResult
            (HttpRequestMessage request, HttpResponseMessage httpResponseMessage)
            {
                _request = request;
                _httpResponseMessage = httpResponseMessage;
            }

            public Task<HttpResponseMessage>
                   ExecuteAsync(CancellationToken cancellationToken)
            {
                return Task.FromResult(_httpResponseMessage);
            }
        }
    }
}
现在我们已经实现了 ExceptionHandler 类中的 Handle 方法。
在此之前,我们先创建一个 HttpResponseMessage。为此,我们将添加一个名为“ErrorMessageResult”的类,它将继承自“IHttpActionResult”接口。该类将有一个参数化构造函数,该构造函数接受两个参数
HttpRequestMessageHttpResponseMessage
我们作为参数传入的 HttpResponseMessage 将由 ExecuteAsync 用于创建 HttpResponseMessage。
然后,我们将此 HttpResponseMessage 分配给“context.Result”。
处理完异常后,接下来我们需要注册此处理程序。
注册异常处理程序
我们将在 WebApiConfig 类中注册“GlobalExceptionHandler”,以便任何 Web API 异常都可以全局处理。
//Registering GlobalExceptionHandler
config.Services.Replace(typeof(IExceptionHandler), new GlobalExceptionHandler());
using System;
using System.Collections.Generic;
using System.Linq;
using System.Web.Http;
using System.Web.Http.ExceptionHandling;
using WebDemoAPI.CustomHandler;

namespace WebDemoAPI
{
    public static class WebApiConfig
    {
        public static void Register(HttpConfiguration config)
        {
            // Web API configuration and services
            // Web API routes
            config.MapHttpAttributeRoutes();
            //Registering GlobalExceptionHandler
            config.Services.Replace(typeof(IExceptionHandler), new GlobalExceptionHandler());
            config.Routes.MapHttpRoute(
                name: "DefaultApi",
                routeTemplate: "api/{controller}/{id}",
                defaults: new { id = RouteParameter.Optional }
            );
        }
    }
}
现在,让我们运行此应用程序并检查是否已处理异常。
抛出异常的快照

抛出异常后,我们现在向消费者显示合适的错误消息,而不是错误堆栈跟踪。
异常处理后的响应

现在我们已经处理了异常,但尚未记录异常。
异常日志记录

在本节中,我们将异常存储到数据库中。为此,让我们先看看我们将要存储它的表的结构。
API_Error

查看表结构后,我写了一个简单的存储过程来将此异常存储到表中。
现在我们已经完成了数据库部分,接下来,让我们添加类和方法来将异常写入数据库。
APIError 类
    public class ApiError
    {
        public string Message { get; set; }
        public string RequestMethod { get; set; }
        public string RequestUri { get; set; }
        public DateTime TimeUtc { get; set; }
    }
注意:存储过程和表脚本可供下载。
SqlErrorLogging 类
在本节中,我们将错误写入数据库。在该类中,我们有一个 InsertErrorLog 方法,该方法将 ApiError 类作为输入参数。
    public class SqlErrorLogging
    {
        public void InsertErrorLog(ApiError apiError)
        {
            try
            {
                using (var sqlConnection = new SqlConnection
                (ConfigurationManager.ConnectionStrings
                ["APILoggingConnection"].ConnectionString))
                {
                    sqlConnection.Open();
                    var cmd =
                        new SqlCommand("API_ErrorLogging", connection: sqlConnection)
                        {
                            CommandType = CommandType.StoredProcedure
                        };
                    cmd.Parameters.AddWithValue("@TimeUtc", apiError.TimeUtc);
                    cmd.Parameters.AddWithValue("@RequestUri", apiError.RequestUri);
                    cmd.Parameters.AddWithValue("@Message", apiError.Message);
                    cmd.Parameters.AddWithValue("@RequestMethod", apiError.RequestMethod);

                   cmd.ExecuteNonQuery();
                }
            }
            catch (Exception)
            {
                throw;
            }
        }
    }
添加类和方法后,接下来我们将添加名为“UnhandledExceptionLogger”的类,它将继承自“ExceptionLogger” 抽象类。
UnhandledExceptionLogger 类
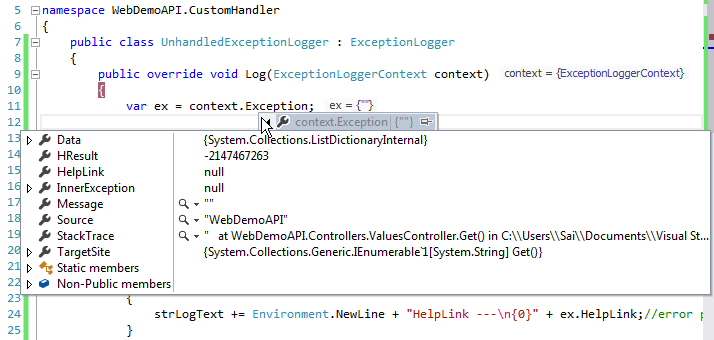
我们将添加一个名为“UnhandledExceptionLogger”的类,它将继承自“ExceptionLogger” 抽象类。在该类中,我们将重写“Log”方法。在此方法中,我们将获取发生的异常,从该异常中提取 Source、StackTrace、TargetSite 等信息,并将其分配给 ApiError 类以存储在数据库中。
using System;
using System.Web.Http.ExceptionHandling;
using WebDemoAPI.Models;

namespace WebDemoAPI.CustomHandler
{
    public class UnhandledExceptionLogger : ExceptionLogger
    {
        public override void Log(ExceptionLoggerContext context)
        {
            var ex = context.Exception;

           string strLogText = "";
            strLogText += Environment.NewLine + "Source ---\n{0}" + ex.Source;
            strLogText += Environment.NewLine + "StackTrace ---\n{0}" + ex.StackTrace;
            strLogText += Environment.NewLine + "TargetSite ---\n{0}" + ex.TargetSite;

            if (ex.InnerException != null)
            {
                strLogText += Environment.NewLine +
                "Inner Exception is {0}" + ex.InnerException;//error prone
            }
            if (ex.HelpLink != null)
            {
                strLogText += Environment.NewLine + "HelpLink ---\n{0}" +
                              ex.HelpLink;//error prone
            }

            var requestedURi = (string)context.Request.RequestUri.AbsoluteUri;
            var requestMethod = context.Request.Method.ToString();
            var timeUtc = DateTime.Now;

            SqlErrorLogging sqlErrorLogging = new SqlErrorLogging();
            ApiError apiError = new ApiError()
            {
                Message = strLogText,
                RequestUri = requestedURi,
                RequestMethod = requestMethod,
                TimeUtc = DateTime.Now
            };
            sqlErrorLogging.InsertErrorLog(apiError);
        }
    }
}
创建“UnhandledExceptionLogger”类并将错误写入数据库后,接下来我们将在 WebApiConfig 类中全局注册此类。
//Registering UnhandledExceptionLogger
config.Services.Replace(typeof(IExceptionLogger), new UnhandledExceptionLogger());
在 WebApiConfig 类中注册 UnhandledExceptionLogger
using System.Web.Http;
using System.Web.Http.ExceptionHandling;
using WebDemoAPI.CustomHandler;

namespace WebDemoAPI
{
    public static class WebApiConfig
    {
        public static void Register(HttpConfiguration config)
        {
            // Web API configuration and services
            // Web API routes
            config.MapHttpAttributeRoutes();
            //Registering GlobalExceptionHandler
            config.Services.Replace(typeof(IExceptionHandler), new GlobalExceptionHandler());
            //Registering UnhandledExceptionLogger
            config.Services.Replace(typeof(IExceptionLogger), new UnhandledExceptionLogger());
            config.Routes.MapHttpRoute(
                name: "DefaultApi",
                routeTemplate: "api/{controller}/{id}",
                defaults: new { id = RouteParameter.Optional }
            );
        }
    }
}
注册 UnhandledExceptionLogger 类后,现在让我们运行应用程序,看看它是否将发生的异常存储在数据库中。
在获得错误后,我们对其进行了处理,并向用户显示了合适的错误消息,同时还将错误记录到了数据库中。
处理异常并记录异常后的响应

存储异常

在处理和记录异常后,接下来我们将记录 Web API 的每个请求和响应。
2. 请求和响应日志记录

在本节中,我们将记录 WEB API 的每个请求和响应。
为此,我们将继承一个 抽象类“DelegatingHandler”并重写 SendAsync 方法。

如果您查看下表,您将清楚地了解我们从请求和响应中将哪些数据存储到了数据库中。
让我们首先创建一个“API_Log”表,其中我们将存储此请求和响应。
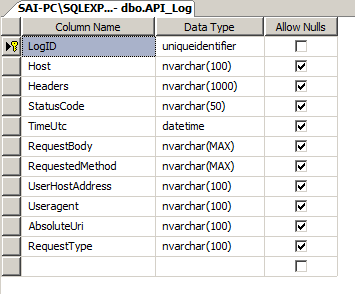
创建表后,我们创建了一个简单的存储过程,用于将 Log 插入 API_Log 表。此存储过程可供下载。
接下来,我们将添加“ApiLog”类,以便将数据传递给存储过程。
namespace WebDemoAPI.Models
{
    public class ApiLog
    {
        public string Host { get; set; }
        public string Headers { get; set; }
        public string StatusCode { get; set; }
        public string RequestBody { get; set; }
        public string RequestedMethod { get; set; }
        public string UserHostAddress { get; set; }
        public string Useragent { get; set; }
        public string AbsoluteUri { get; set; }
        public string RequestType { get; set; }
    }
}
添加 ApiLog 类后,接下来我们将 添加一个 ApiLogging 类。在该类中,我们将添加 InsertLog 方法,该方法接受 ApiLog 类作为参数,并将 ApiLog 类数据映射到 SQL 参数以将数据插入数据库。
    public class ApiLogging
    {
        public void InsertLog(ApiLog apiLog)
        {
            try
            {
                using (var sqlConnection = new SqlConnection
                (ConfigurationManager.ConnectionStrings
                ["APILoggingConnection"].ConnectionString))
                {
                    sqlConnection.Open();
                    var cmd =
                        new SqlCommand("API_Logging", connection: sqlConnection)
                        {
                            CommandType = CommandType.StoredProcedure
                        };
                    cmd.Parameters.AddWithValue("@Host", apiLog.Host);
                    cmd.Parameters.AddWithValue("@Headers", apiLog.Headers);
                    cmd.Parameters.AddWithValue("@StatusCode", apiLog.StatusCode);
                    cmd.Parameters.AddWithValue("@RequestBody", apiLog.RequestBody);
                    cmd.Parameters.AddWithValue("@RequestedMethod", apiLog.RequestedMethod);
                    cmd.Parameters.AddWithValue("@UserHostAddress", apiLog.UserHostAddress);
                    cmd.Parameters.AddWithValue("@Useragent", apiLog.Useragent);
                    cmd.Parameters.AddWithValue("@AbsoluteUri", apiLog.AbsoluteUri);
                    cmd.Parameters.AddWithValue("@RequestType", apiLog.RequestType);
                    cmd.ExecuteNonQuery();
                }
            }
            catch (Exception)
            {
                throw;
            }
        }
    }
完成 ApiLogging 类的添加后,接下来我们将编写此过程的主体,即添加自定义处理程序。
创建自定义处理程序
我们将添加一个名为“RequestResponseHandler”的类,然后继承 DelegatingHandler 抽象类并 重写 SendAsync 方法。
    public class RequestResponseHandler : DelegatingHandler
    {
        protected override async Task<HttpResponseMessage>
                           SendAsync(HttpRequestMessage request,
            CancellationToken cancellationToken)
        {
        }
    }
在实现 SendAsync 方法之前,我写了一个简单的类 MessageLogging,它有两个方法:IncomingMessageAsync 和 OutgoingMessageAsync。我创建这些方法只是为了分配请求类型并单独调用这两个方法。
public class MessageLogging
{
    public void IncomingMessageAsync(ApiLog apiLog)
    {
        apiLog.RequestType = "Request";
        var sqlErrorLogging = new ApiLogging();
        sqlErrorLogging.InsertLog(apiLog);
    }

    public void OutgoingMessageAsync(ApiLog apiLog)
    {
        apiLog.RequestType = "Response";
        var sqlErrorLogging = new ApiLogging();
        sqlErrorLogging.InsertLog(apiLog);
    }
}
现在,添加 MessageLogging 类后,接下来我们将从 DelegatingHandler abstract 类实现 SendAsync 方法。
    public class RequestResponseHandler: DelegatingHandler
    {
        protected override async Task<HttpResponseMessage>
            SendAsync(HttpRequestMessage request,
            CancellationToken cancellationToken)
        {
            var requestedMethod = request.Method;
            var userHostAddress = HttpContext.Current != null ?
                HttpContext.Current.Request.UserHostAddress : "0.0.0.0";
            var useragent = request.Headers.UserAgent.ToString();
            var requestMessage = await request.Content.ReadAsByteArrayAsync();
            var uriAccessed = request.RequestUri.AbsoluteUri;

            var responseHeadersString = new StringBuilder();
            foreach (var header in request.Headers)
            {
                responseHeadersString.Append($"{header.Key}:
                {String.Join(", ", header.Value)}{Environment.NewLine}");
            }

            var messageLoggingHandler = new MessageLogging();

            var requestLog = new ApiLog()
            {
                Headers = responseHeadersString.ToString(),
                AbsoluteUri = uriAccessed,
                Host = userHostAddress,
                RequestBody = Encoding.UTF8.GetString(requestMessage),
                UserHostAddress = userHostAddress,
                Useragent = useragent,
                RequestedMethod = requestedMethod.ToString(),
                StatusCode = string.Empty
            };

            messageLoggingHandler.IncomingMessageAsync(requestLog);

            var response = await base.SendAsync(request, cancellationToken);

            byte[] responseMessage;
            if (response.IsSuccessStatusCode)
                responseMessage = await response.Content.ReadAsByteArrayAsync();
            else
                responseMessage = Encoding.UTF8.GetBytes(response.ReasonPhrase);

            var responseLog = new ApiLog()
            {
                Headers = responseHeadersString.ToString(),
                AbsoluteUri = uriAccessed,
                Host = userHostAddress,
                RequestBody = Encoding.UTF8.GetString(responseMessage),
                UserHostAddress = userHostAddress,
                Useragent = useragent,
                RequestedMethod = requestedMethod.ToString(),
                StatusCode = string.Empty
            };

            messageLoggingHandler.OutgoingMessageAsync(responseLog);
            return response;
        }
    }
让我们来理解一下我们在 SendAsync 方法中写了什么。
请求方法
var requestedMethod = request.Method;
我们存储 request 方法,无论是 POST PUT DELETE 还是 GET。

主机地址
var userHostAddress = HttpContext.Current != null ?
                      HttpContext.Current.Request.UserHostAddress : "0.0.0.0";
我们获取请求来自的 IP 地址。

UserAgent
var useragent = request.Headers.UserAgent.ToString();
UserAgent 提供有关浏览器的原始字符串。

请求主体
var requestMessage = await request.Content.ReadAsByteArrayAsync();

绝对 URI
var uriAccessed = request.RequestUri.AbsoluteUri;

Headers
var responseHeadersString = new StringBuilder();
foreach (var header in request.Headers)
{
    responseHeadersString.Append($"{header.Key}: {String.Join(", ", header.Value)}
                                {Environment.NewLine}");
}
将值分配给 ApiLog 类
 var messageLoggingHandler = new MessageLogging();

 var requestLog = new ApiLog()
 {
     Headers = responseHeadersString.ToString(),
     AbsoluteUri = uriAccessed,
     Host = userHostAddress,
     RequestBody = Encoding.UTF8.GetString(requestMessage),
     UserHostAddress = userHostAddress,
     Useragent = useragent,
     RequestedMethod = requestedMethod.ToString(),
     StatusCode = string.Empty
 };
传入请求日志记录
messageLoggingHandler.IncomingMessageAsync(requestLog);
传出响应日志记录
messageLoggingHandler.OutgoingMessageAsync(responseLog);
注册 RequestResponseHandler
using System.Web.Http;
using System.Web.Http.ExceptionHandling;
using WebDemoAPI.CustomHandler;

namespace WebDemoAPI
{
    public static class WebApiConfig
    {
        public static void Register(HttpConfiguration config)
        {
            // Web API configuration and services

            // Web API routes
            config.MapHttpAttributeRoutes();

            //Registering GlobalExceptionHandler
            config.Services.Replace(typeof(IExceptionHandler), new GlobalExceptionHandler());

            //Registering UnhandledExceptionLogger
            config.Services.Replace(typeof(IExceptionLogger), new UnhandledExceptionLogger());

            //Registering RequestResponseHandler
            config.MessageHandlers.Add(new RequestResponseHandler());

            config.Routes.MapHttpRoute(
                name: "DefaultApi",
                routeTemplate: "api/{controller}/{id}",
                defaults: new { id = RouteParameter.Optional }
            );
        }
    }
}
现在我们对这个过程的工作原理有了概念。让我们运行应用程序,看看它是否有效。
访问 Values API 控制器

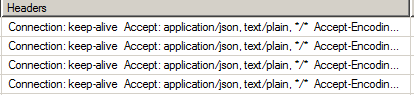
Web API 请求和响应日志记录

3. 版本控制

图标由 Freepik 设计,来自 www.flaticon.com,根据 CC 3.0 BY 许可
这是 Web API 开发中最重要的部分。随着我们不断改进应用程序,我们会不断对其进行修改。如果我们对已投入生产且有许多用户正在使用的 API 进行更改,这将破坏现有的工作应用程序。解决方案是为您的 API 进行版本控制,这样使用您的 API 的旧用户将不受任何影响。
让我们开始用简单的步骤在 ASP.NET Web API 中实现版本控制。
首先,我们将“Microsoft.AspNet.WebApi.Versioning”NuGet 包添加到应用程序中。

安装 NuGet 包后,接下来,我们将在 WebApiConfig.cs 文件中注册 AddApiVersioning 方法。
ApiVersioningOptions 类允许您在向应用程序添加 API 版本控制时配置、自定义和扩展默认行为。

引用自:https://github.com/Microsoft/aspnet-api-versioning/wiki/API-Versioning-Options
AddApiVersioning 方法的代码片段
config.AddApiVersioning(o =>
    {
        o.ReportApiVersions = true;
        o.AssumeDefaultVersionWhenUnspecified = true;
        o.DefaultApiVersion = new ApiVersion(2, 0);
        o.ApiVersionReader = new HeaderApiVersionReader("version");
        o.ApiVersionSelector = new CurrentImplementationApiVersionSelector(o);
    }
);
WebApiConfig 的完整代码片段
在本节中,我们将注释掉默认路由,并启用基于属性的路由。
    public static class WebApiConfig
    {
        public static void Register(HttpConfiguration config)
        {
            config.AddApiVersioning(o =>
                {
                    o.ReportApiVersions = true;
                    o.AssumeDefaultVersionWhenUnspecified = true;
                    o.DefaultApiVersion = new ApiVersion(2, 0);
                    o.ApiVersionReader = new HeaderApiVersionReader("version");
                    o.ApiVersionSelector = new CurrentImplementationApiVersionSelector(o);
                }
            );
            // Web API configuration and services

            // Web API routes
            config.MapHttpAttributeRoutes();

            //Registering GlobalExceptionHandler
            config.Services.Replace(typeof(IExceptionHandler), new GlobalExceptionHandler());

            //Registering UnhandledExceptionLogger
            config.Services.Replace(typeof(IExceptionLogger), new UnhandledExceptionLogger());

            //Registering RequestResponseHandler
            config.MessageHandlers.Add(new RequestResponseHandler());

            //config.Routes.MapHttpRoute(
            //    name: "DefaultApi",
            //    routeTemplate: "api/{controller}/{id}",
            //    defaults: new { id = RouteParameter.Optional }
            //);
        }
    }
完成注册方法后,接下来我们将添加另一个名为“Values2Controller”的 API 控制器。
添加 Values2Controller API 控制器
如果您看到,我们添加了一个名为 Values2 的 API 控制器,并在控制器名称中添加了版本。添加版本不是必需的,但名称必须是唯一的且易于理解。
    public class Values2Controller : ApiController
    {
        // GET: api/Values2
        public IEnumerable<string> Get()
        {
            return new string[] { "value1", "value2" };
        }

        // GET: api/Values2/5
        public string Get(int id)
        {
            return "value";
        }

        // POST: api/Values2
        public void Post([FromBody]string value){}

        // PUT: api/Values2/5
        public void Put(int id, [FromBody]string value) {}

        // DELETE: api/Values2/5
        public void Delete(int id) {}
    }
添加 Values2 API 控制器后,接下来我们将向两个 API 控制器(旧的和新的)添加路由属性。
向 Values API 控制器添加 ApiVersion 属性和 Route 属性
[ApiVersion("1.0")]
[Route("api/values")]
public class ValuesController : ApiController
{
    // GET api/values
    public IEnumerable<string> Get()
    {
        //throw new NotImplementedException("");
        return new string[] { "value1", "value2" };
    }

    // GET api/values/5
    public string Get(int id) {  return "value";}

    // POST api/values
    public void Post([FromBody]string value){}

    // PUT api/values/5
    public void Put(int id, [FromBody]string value){}

    // DELETE api/values/5
    public void Delete(int id) {}
}
向 Values2 API 控制器添加 ApiVersion 属性和 Route 属性
    [ApiVersion("2.0")]
    [Route("api/values")]
    public class Values2Controller : ApiController
    {
        // GET api/Values2
        public IEnumerable<string> Get()
        {
            //throw new NotImplementedException("");
            return new string[] { "version2", " version2" };
        }

        // GET api/Values2/5
        public string Get(int id){return "value";}

        // POST api/Values2
        public void Post([FromBody]string value) { }

        // PUT api/Values2/5
        public void Put(int id, [FromBody]string value) { }

        // DELETE api/Values2/5
        public void Delete(int id) { }
    }
添加路由和版本属性后,保存并运行应用程序。
现在,要调用 API,我们需要从标头传递 API 版本,标头的名称是“version”。
我们将把标头名称“version”和值 1.0 传递给调用 Values 控制器。
请求 Values API
完成调用 1.0 版本 Values API 后,接下来,以同样的方式,我们将使用 2.0 版本标头调用 values2 API。
我们将把标头名称“version”和值 2.0 传递给调用 Values2 控制器。

访问具有 2.0 版本标头的 values 控制器 (values2controller) 后,我们收到了预期的有效响应。
结论
在本文中,我们学习了如何“处理异常”、“记录异常”,还学习了如何记录 Web API 的每个传入和传出请求和响应,以及如何对 Web API 进行版本控制,以避免破坏现有的有效 API。所有这些内容我们都以循序渐进、详细的方式学习,以便可以直接集成到实际项目中。
谢谢!希望您喜欢我的文章。
历史
- 2018 年 7 月 3 日:初始版本