
Mule 项目的有效构建流水线
5.00/5 (1投票)
为增强开发和部署体验,Mule 开发中使用的不同活动的工具以及应遵循的最佳实践
引言
Mule 是市场上流行的中间件之一。它使用 Java 构建,并支持使用相同的应用程序代码进行本地部署和基于云的部署。Mule 应用程序的开发、测试和部署可以以自动化和高效的方式进行,这将使拥有多个开发人员的大型项目能够更轻松地进行更新和部署。我们现在将探讨用于不同活动的工具以及 Mule 开发中应遵循的最佳实践,以增强开发和部署体验。
建议在 Mule 项目的不同阶段使用以下工具
- 使用 Maven 构建项目
- 使用 Maven 存储库进行依赖管理
- 使用 Git 进行源代码管理
- 使用 Nexus 存储库进行共享依赖管理
- 使用 Jenkins 进行持续集成/部署
- 使用 Mule 单元测试进行自动化测试
我们将探讨以上各项,以及如何将它们用于 Mule 项目。
使用 Maven 构建项目
应在开发应用程序的计算机上安装 Maven。应在 Anypoint Studio 中指定 Maven 目录。
转到 Windows -> Preferences。在 Anypoint Studio -> Maven 下,设置以下属性
Maven Installation home directory。其他属性保持不变。请参阅下图。

当我们构建新项目时,需要勾选“Use Maven”并指定 Group Id、Artifact Id 和 Version,这些信息将添加到 POM 文件中。

使用 Maven 存储库进行依赖管理
POM 文件中的 `repositories` 元素指定了 Maven 下载远程构件供当前项目使用的方式和位置。有关 POM 文件结构的更多信息,请参阅此链接。我们在构建项目时指定需要从中下载依赖项的存储库。请参阅下面的依赖项和存储库结构。
<dependencies>
            <!-- Xml configuration -->
            <dependency>
            <groupId>com.mulesoft.muleesb</groupId>
                  <artifactId>mule-core-ee</artifactId>
                  <version>${mule.version}</version>
                  <scope>provided</scope>
            </dependency>
   <repositories>
          <repository>
            <id>Central</id>
            <name>Central</name>
            <url>http://repo1.maven.org/maven2/</url>
            <layout>default</layout>
        </repository>
        <repository>
            <id>mulesoft-releases</id>
            <name>MuleSoft Releases Repository</name>
            <url>http://repository.mulesoft.org/releases/</url>
            <layout>default</layout>
        </repository>
    </repositories>
使用 Git 进行源代码管理
Mule 项目存储在 GitHub 存储库中,我们可以为 Anypoint Studio 使用 egit 插件。这可用于将代码同步到 GitHub。

有关安装 Git 插件、将 Studio 项目保存到 Git 以及将 Git 项目导入 Studio 的说明,请参阅此链接。
使用 Nexus 存储库进行共享依赖管理
Nexus 是一个存储库管理器,充当“拦截”由 mvn deploy 上传的构件的暂存存储库。Nexus 可与 Maven 在以下情况下结合使用:
- 维护和引用 Maven 应用程序使用的库
- 将 Maven 项目库上传到 Nexus 以供其他应用程序引用
维护和引用 Maven 应用程序使用的库
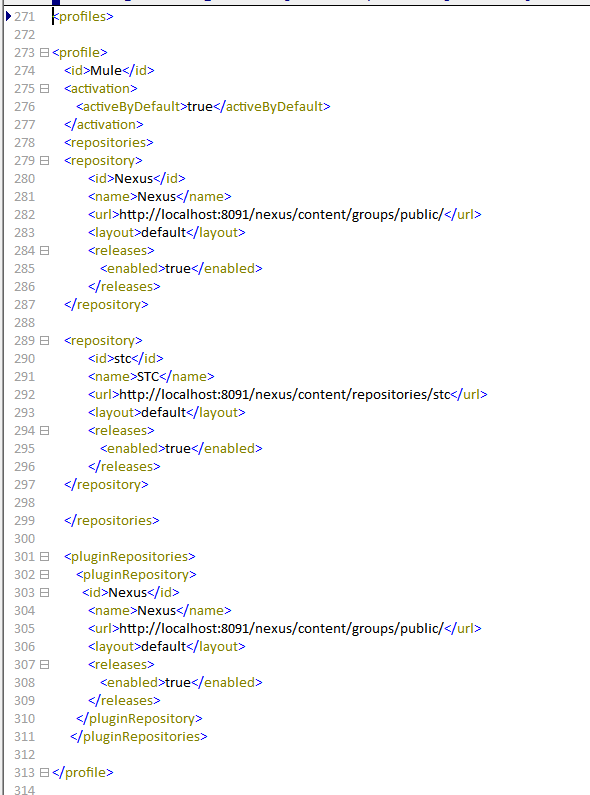
对于引用 Nexus 存储库的 Maven 应用程序,必须在 `Settings.xml` 文件中按如下方式添加 Nexus 存储库。我们添加了两个存储库,`nexus` 和 `stc`,将从中下载构件。
应将依赖的 jar 添加到 Nexus 存储库,然后在项目 POM 文件中的依赖项中指定。如果这样做,在构建时,依赖的 jar 将从 Nexus 存储库下载,项目将成功构建。

Maven 构建成功完成后,您可以在以下位置找到依赖项 jar
C:\Users\<username>\.m2\repository\com\microsoft\sqlserver\sqljdbc4\4.0\....jar
将 Maven 项目库上传到 Nexus 以供其他应用程序引用
Distribution Management 管理在整个构建过程中生成的构件和支持文件的分发。`repositories` 元素在 POM 中指定了 Maven 下载远程构件供当前项目使用的位置和方式,而 `distributionManagement` 指定了该项目在部署到远程存储库时将(如何)到达该远程存储库。如果未定义 `snapshotRepository`,则 `repository` 元素将用于快照分发。有关更多详细信息,请参阅此处。
<code><?xml version="1.0" encoding="UTF-8"?>
<project xmlns="http://maven.apache.org/POM/4.0.0"
 xmlns:xsi="http://www.w3.org/2001/XMLSchema-instance"
 xsi:schemaLocation="http://maven.apache.org/POM/4.0.0
 https://maven.apache.org/xsd/maven-4.0.0.xsd">
   ...
   <distributionManagement>
      <repository>
         <uniqueVersion>false</uniqueVersion>
         <id>nexus</id>
         <name>Nexus Repository</name>
         <url>https://:8091/nexus/content/repositories/nexus</url>
         <layout>default</layout>
      </repository>
      <snapshotRepository>
         <uniqueVersion>true</uniqueVersion>
         <id>propSnap</id>
         <name>Propellors Snapshots</name>
         <url>sftp://propellers.net/maven</url>
         <layout>legacy</layout>
      </snapshotRepository>
      ...
   </distributionManagement>
   ...
</project>
</code>
上述 POM 文件设置将导致项目在每次构建期间部署到 Nexus 存储库。
使用 Jenkins 进行持续集成/部署
Jenkins 可用于执行从 Git 的自动化构建,这需要安装“Git Plugin”。还需要安装如下的 Maven 相关插件,这将使我们能够创建 Maven 项目,以便在构建过程中执行 Maven 命令。

转到 Manage Jenkins -> Global tool configuration
在 JDK 部分,取消选中“Install automatically”复选框,并设置 `JAVA_HOME`(您的 jdk 位置)。
在 Git 部分,选中“Install automatically”。
在 Maven 部分,单击 maven installations。单击 add MAVEN,取消选中“Install automatically”复选框,并设置 maven home。(例如:D:\maven\apache-maven-3.5.2)
在 `POM.xml` 中,在 `plugins` 元素内的现有 `plugin` 元素之后添加此插件元素。这对于 Cloudhub 部署是必需的。
<plugin>
                <groupId>org.mule.tools.maven</groupId>
                <artifactId>mule-maven-plugin</artifactId>
                <version>2.0</version>
                <configuration>
                    <deploymentType>cloudhub</deploymentType>
                    <muleVersion>3.8.4</muleVersion>
                    <!-- <username>${anypoint.username}</username>
                    <password>${anypoint.password}</password> -->
                    <redeploy>true</redeploy>
                    <!-- <environment>${anypoint.environment}</environment> -->
                    <workerType>Micro</workerType>
                </configuration>
                <executions>
                    <execution>
                        <id>deploy</id>
                        <phase>deploy</phase>
                        <goals>
                            <goal>deploy</goal>
                        </goals>
                    </execution>
                </executions>
 </plugin>
要构建和部署 Mule 项目,请在 Goals & Options 中输入以下 Maven 命令
-X -Dmaven.repo.local="Path\to\your\local\maven\repository"
--settings "Path\to\the\settings.xml\in\your\local\maven\repository"
package mule:deploy -Danypoint.username=anypoint_username
-Danypoint.password=anypoint_password -Danypoint.environment=Sandbox
您的本地 Maven 存储库通常位于 C:\Users\YourName。
例如
-X -Dmaven.repo.local="C:\Users\<username>\.m2\repository"
--settings "C:\Users\<username>\.m2\settings.xml" package mule:deploy
-Danypoint.username=jenkins1 -Danypoint.password=<password> -Danypoint.environment=Sandbox
现在,通过“Build Now”构建 Jenkins 项目,它将从 Git 获取 Mule 源代码,进行构建,并将其部署到 Cloud hub。
使用 Mule 单元测试进行自动化测试
MUnit 是一个 Mule 应用程序测试框架,使我们能够为 Mule 集成和 API 构建自动化测试。MUnit 已与 Anypoint Studio 集成。在通过 Help -> Install New Software… 安装 MUnit 后,即可使用它。
要创建测试用例,我们需要为流程创建 Munit 测试套件,并将 Munit 库添加到类路径。有关 MUnit 的更多信息,请参阅此文档。
<?xml version="1.0" encoding="UTF-8"?>
<mule xmlns="http://www.mulesoft.org/schema/mule/core"
xmlns:doc="http://www.mulesoft.org/schema/mule/documentation"
xmlns:munit="http://www.mulesoft.org/schema/mule/munit"
xmlns:spring="http://www.springframework.org/schema/beans"
xmlns:core="http://www.mulesoft.org/schema/mule/core"
xmlns:xsi="http://www.w3.org/2001/XMLSchema-instance"
xsi:schemaLocation="http://www.mulesoft.org/schema/mule/munit
http://www.mulesoft.org/schema/mule/munit/current/mule-munit.xsd
http://www.springframework.org/schema/beans
http://www.springframework.org/schema/beans/spring-beans-current.xsd
http://www.mulesoft.org/schema/mule/core http://www.mulesoft.org/schema/mule/core/current/mule.xsd">
    <munit:config name="munit" doc:name="MUnit configuration"/>
    <spring:beans>
        <spring:import resource="classpath:message-demo-filter.xml"/>
    </spring:beans>
    <munit:test name="message-demo-filter-test-suite-message-demo-filterFlowTest" description="Test">
        <set-payload value="#['The cat is brown and clever']" doc:name="Set Payload"/>
        <flow-ref name="message-demo-filterFlow" doc:name="Flow-ref to message-demo-filterFlow"/>
        <munit:assert-payload-equals message=
            "Output message is not matching expected value #[payload]"
             expectedValue="#[payload]" doc:name="Assert Payload"/>
    </munit:test>
</mule>
构建 Jenkins 项目时也可以执行测试用例。
结论
我们已经了解了在 Mule 应用程序开发的不同阶段用于执行的各种工具。这将有助于为 Mule 应用程序构建 CI/CD 架构和构建流程。