Flutter 入门:教程 3 导航
Flutter 导航:让我们实现页面间的切换
引言
在本文中,我将讨论 Flutter 导航。导航或页面间的移动是任何应用程序的重要业务需求,例如,几乎所有应用程序都需要一个登录页面或选项页面,其中可以根据用户输入设置各种选项。
简单来说,这意味着离开一个页面并加载一个新页面。根据代码,页面可能会保留在内存中,或者只是从堆栈中删除。因此,开发人员/架构师在开发应用程序时,应谨慎考虑哪些内容应该保留在内存中,哪些不应该。
背景
如果您恰好阅读了我之前的文章 Flutter 入门教程:第 2 篇 - StateFulWidget,我们将在此基础上进行开发。让我总结一下我在这篇文章中所做的:我提供了一个 `TextField`,它类似于 C# 中的 `TextBox`,在按下 **保存** 按钮后,它会被添加到列表中,而列表也显示在同一页面上。
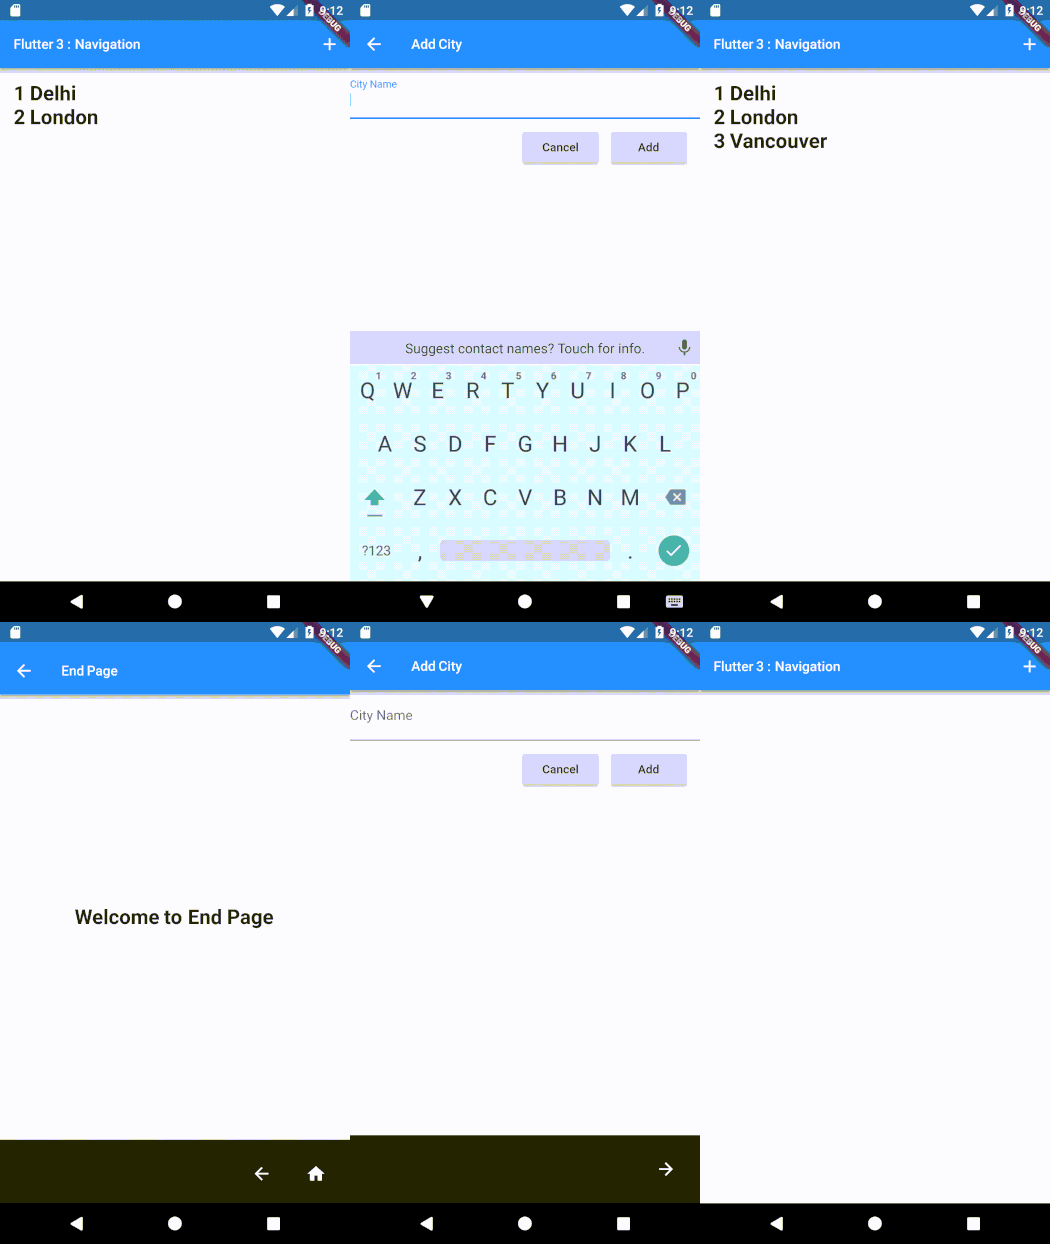
现在,我们将销毁该应用程序,并从中创建两个页面:一个页面显示已添加的城市列表,另一个页面提供添加城市。那么,应用程序完成后,最终结果将是这样的。
添加城市新 UI 设计 |
 |
| 在这里,如上所述,表单部分将移至 `AddDataPage` 文件,而 `ListView`(用于显示用户添加的数据列表)将成为主页的一部分。我用黄色方框标记了两个新添加的部分:一个用于调用 `AddDataPage`,另一个用于返回 `HomePage`。 |
教程目标
如本文开头所述,我将基于我之前的文章来构建一个应用程序。我将创建一个包含两个页面的应用程序,最后,我将添加更多页面来演示如何移除多个页面。
- 将包含两个页面
- 第 1 页:`HomePage` 将包含 `ListView`,其中显示用户输入的所有城市。
- 第 2 页:`AddDataPage` 将包含 `TextField`,您可以在其中向列表添加数据(它包含 `TextField`、`取消` 和 `添加 RaisedButton`)。
- 任务 #1:基本导航,当我们使用已知的页面对象在页面之间导航时。
- 任务 #2:使用 `Navigation` 对象发送数据。
- 任务 #3:使用命名路由进行导航,而不是使用页面对象。
- 奖励任务 #4:将添加一个额外的页面来展示导航堆栈,以及页面如何在导航之间保持。
总而言之,应用程序将包含两个页面:一个页面显示用户输入的所有文本,另一个页面提供用于输入数据的表单。
Using the Code
- 让我们开始在 **Android Studio** 中创建一个新的 Flutter 项目,将其命名为 `Flutter3_navigation`。如果您不知道如何创建 Flutter 项目,请点击这里阅读。
- 在 *lib* 目录下创建一个名为 `pages` 的包,并添加两个 DART 文件。
- `adddatapage.dart`:添加继承自 `StatelessWidget` 的 `AddDataPage` 类。
- `homepage.dart`:添加继承自 `StatefulWidget` 的 `HomePage` 类(如果您不了解 `StatefulWidget`,请点击这里阅读),同时添加继承自 `State
` 的 `_HomePageState`。
- 删除 `main.dart`(移动应用程序的入口点)中的所有代码,并替换为以下代码。
import 'package:flutter/material.dart';
import 'package:flutter3_navigation/pages/homepage.dart';

void main() => runApp(new MyApp());

class MyApp extends StatelessWidget {
  // This widget is the root of your application.
  @override
  Widget build(BuildContext context) {
    return new MaterialApp(
      title: 'Flutter Demo',
      theme: new ThemeData(
        primarySwatch: Colors.blue
      ),
      home: new HomePage(title: 'Flutter 3 : Navigation'),
    );
  }
}
代码解释
- 在这里,`MyApp` 是我们移动应用程序的入口类,我们返回一个 `MaterialApp` 对象。这将为我们的应用程序提供一个骨架。
- 我将 `home` 对象设置为 `HomePage` 对象,这意味着当应用程序开始运行时,它将加载 `HomePage`。
- 将以下代码放入 `HomePage.dart`,已添加以下控件。
import 'package:flutter/material.dart'; import 'package:flutter3_navigation/pages/adddatapage.dart'; class HomePage extends StatefulWidget { final String title; HomePage({Key key, this.title}) : super(key: key); @override _HomePageState createState() => new _HomePageState(); } class _HomePageState extends State<HomePage> { @override Widget build(BuildContext context) { return new Scaffold( appBar: new AppBar( title: new Text( widget.title, style: new TextStyle(fontSize: 16.0), ), actions: <Widget>[ new IconButton( icon: new Icon(Icons.add), onPressed: () { print("Add button clicked"); }) ], ), ); }}- 在这里,我们创建了 `Scaffold` 页面,并在其中创建了 `AppBar`。
- 这里是 `AppBar` 的一个新添加项:我添加了一个带有 `Icons.add` 显示的 `IconButton`。这是导航到 `AddDataPage` 的占位符,目前我们还没有做任何事情。

- 现在,在我展示 `AddDataPage.dart` 的代码之前,让我先简要介绍一下 `Navigator` 类。我们通常使用以下函数(定义摘自 Flutter 网站)。
- `Navigator.push` - 将给定的路由推送到最紧密地包含给定上下文的导航器上。
- `Navigator.pop` - 从最紧密地包含给定上下文的导航器中弹出最顶层的路由。
- `Navigator.pushNamed` - 将命名路由推送到最紧密地包含给定上下文的导航器上。我们将在任务 #3 中使用它。
- `Navigator.pushNamedAndRemoveUntil` - 将具有给定名称的路由推送到最紧密地包含给定上下文的导航器上,然后移除所有之前的路由,直到 `predicate` 返回 `true`。我们将在任务 #4 中使用它。
- 现在,在 `HomePage.dart` 文件中添加函数 `void _onAddCityButtonPressed(BuildContext context)`,并从 `Add IconButton` 调用它。
void _onAddCityButtonPressed(BuildContext context)  {
  Navigator.push(
      context,
      MaterialPageRoute(builder: (context) => AddDataPage())
  ) }
代码解释
- 如第 5 步所述,我使用 `Navigator.push` 将新页面推送到堆栈上。在这里,我们需要使用当前的 `BuildContext`,并在用户点击 `AppBar` 中的 `+ 按钮` 时推送 `AddDataPage`。
- 现在轮到 `AddDataPage.dart` 了。添加以下代码。
import 'package:flutter/material.dart';

class AddDataPage extends StatelessWidget {
  final TextEditingController _CityNameController = new TextEditingController();

  @override
  Widget build(BuildContext context) {

    return new Scaffold(
        appBar: new AppBar(
          title: new Text(
            "Add City",
            style: new TextStyle(fontSize: 16.0),
          ),
        ),
        body: new SafeArea(
          child: new Container(
            child: new Column(children: <Widget>[
              new TextField(
                decoration: new InputDecoration(
                  labelText: "City Name",
                ),
                controller: _CityNameController,
              ),
              new ButtonBar(
                alignment: MainAxisAlignment.end,
                children: <Widget>[
                  new RaisedButton(
                    onPressed: () {
                      Navigator.pop(context);
                    },
                    child: new Text("Cancel"),
                  ),
                  new RaisedButton(
                    onPressed: () {
                      Navigator.pop(context,_CityNameController.text);
                    },
                    child: new Text("Add"),
                  )
                ],
              )
            ]),
          ),
        ));
  }
}
代码解释
- 在这个页面中,我添加了一个 `TextField`、一个 `ButtonBar`,其中包含两个按钮:`取消`(将弹出当前页面)和 `添加`(将返回 `TextField` 中输入的任何数据)。
- 要返回数据并在页面卸载时返回,可以使用第二个参数,并附带您想返回的任何数据。在本例中是 `CityName`。

- 现在我们正在发送数据,但我们还没有编写代码来捕获从其他页面发送过来的任何内容。答案在于 `Future` 类,它是一种对象,可以跟踪未来将要到达的对象,并允许您捕获其链接的函数。我将使用 Dart 语言中的 `async function` 和 `Future` 来撰写一篇完整的文章。它类似于 `Angular` 中的 `Observable/ Promises`。以下是我们如何捕获 `AddDataPage` 发送给 `HomePage` 的 `CityName`。这是修改后的函数。
void _onAddCityButtonPressed(BuildContext context)  {
  Navigator.push(
      context,
      MaterialPageRoute(builder: (context) => AddDataPage())
  )
  .then((Object result){
    print("result from addpage ${result.toString()}");
  });
}
代码解释
- `then` 函数是 `Future` 类的一部分,该函数将成为您导航到的页面的锚点,并为您带来从那里发送的任何数据。
- 有多种方法可以实现这一点(收集数据),我只展示了一种方法,因为在让您了解 Dart 中 `async` 如何工作之前,详细介绍这些方法没有意义。
- 现在我修改了代码,在 `HomePage` 中包含了 `ListView`,并添加了从 `AddDataPage` 收到的数据。以下代码的所有解释都在我之前的文章 这里 中。
final List<Text> _lstCities = new List<Text>();

  Widget _getListViewFromBuilder() {
    return ListView.builder(
      itemCount: _lstCities.length,
      shrinkWrap: true,
      padding: const EdgeInsets.all(16.0),
      itemBuilder: getListItems,
    );
  }

// Call back function, will called for each item in the
  Widget getListItems(BuildContext context, int index) {
    return _lstCities[index];
  }

  // this function would called when add city button pressed

  void _onAddCityButtonPressed(BuildContext context) {
    Navigator
        .push(context, MaterialPageRoute(builder: (context) => AddDataPage()))
        .then((Object result) {
      if (result == null) return;
      setState(() {
        _lstCities.add(new Text(
          "${_lstCities.length + 1} ${result.toString()}",
          textAlign: TextAlign.justify,
          style: new TextStyle(fontWeight: FontWeight.bold,fontSize: 24.0),
        ));
      });
    });
  }
至此,我们完成了 **任务 #2**。
- 现在上面代码的问题是路由是固定的,即,因为我们通过提供要加载页面的新对象来导航,如果我们要动态路由并避免项目之间页面的引用(您需要在提供页面对象之前 `import` 类文件),这会产生问题。
- 现在您必须修改 `Main.dart` 以进行以下更改,`home` 属性需要被注释掉,因为我们现在完全依赖路由。
//home: new HomePage(title: 'Flutter 3 : Navigation'),
routes: {
  '/' : (BuildContext build)=> new HomePage(title: 'Flutter 3 : Navigation'),
  '/adddata':(BuildContext build)=> new AddDataPage(),
},
  initialRoute: "/"
代码解释
- 在这里,我注释掉了 `home` 属性,因为我们不再使用它了。
- 添加 `routes` 属性,它是一个 `String` 作为键,`WidgetBuilder` 作为值的映射,因为将来我们需要 `string` 键来标识我们需要创建的路由。
- 现在,在 `HomePage` 中,不要使用 `Navigator.push`,而是使用 `Navigator.pushNamed`。
/* Task # 1 and 2 Navigator .push(context, MaterialPageRoute(builder: (context) => AddDataPage())) */ /* Task 3 and 4 */ Navigator.pushNamed(context,'/adddata' ) .then((Object result) { - 在上面,由于我们想导航到 `AddDataPage`,我们使用它的 `String` 键来导航。
- 现在是奖励部分,我们将添加一个名为 `EndPage` 的新页面,并在 `AddDataPage` 和 `EndPage` 中都包含底部栏。
- `AddDataPage` 的底部栏将包含一个前进到结束的导航,它将使用 `Navigator.pushNamed` 来到达 `EndPage`。
- `EndPage` 的底部栏将有一个主页按钮,该按钮使用 `pushNamedAndRemoveUntil` 导航到主页,还有一个后退按钮导航到 `HomePage`。
- 现在修改后的 `AddDataPage` 看起来是这样,在页面容器内部添加 `bottomNavigationBar` 和新函数 `_getBottomNavigationBarWidget()`。
bottomNavigationBar: _getbottomNavigationBarWidget(context),
新函数需要添加到类的底部,不要忘记在 `main.dart` 中为 `EndPage` 添加路由定义,如 **步骤 11** 中所述。
Widget _getbottomNavigationBarWidget(BuildContext context) {
  return Container(
    color: Colors.black87,

    child: new ButtonBar(
      mainAxisSize: MainAxisSize.max,
      alignment: MainAxisAlignment.end,
      children: <Widget>[
        new IconButton(icon: new Icon
        (Icons.arrow_forward,size: 24.0,color: Colors.white,), onPressed: (){
           Navigator.pushNamed(context, "/endpage");
        })
      ],
    ),
  );
}
在这里,我们在 `bottombar` 中添加了一个 `IconButton`,按下按钮时,我们将导航到 `endpage`。

- 在 `pages` 文件夹中添加一个名为 `endpage.dart` 的新 dart 文件,并向其中添加 `EndPage` 类。由于我们不在此类中管理任何状态,因此可以安全地将其派生自 `StatelessWidget`,代码如下。
import 'package:flutter/material.dart';

class EndPage extends StatelessWidget {

  @override
  Widget build(BuildContext context) {

    return new Scaffold(
      appBar: new AppBar(
        title: new Text(
          "End Page",
          style: new TextStyle(fontSize: 16.0),
        ),
      ),
      body: new Center(
        child: new Text("Welcome to End Page",
        style: new TextStyle(fontSize: 24.0,fontWeight: FontWeight.bold),),
      ),
      bottomNavigationBar: _getbottomNavigationBarWidget(context),
    );
  }

  Widget _getbottomNavigationBarWidget(BuildContext context) {
    return Container(
      color: Colors.black87,

      child: new ButtonBar(
        mainAxisSize: MainAxisSize.max,
        alignment: MainAxisAlignment.end,
        children: <Widget>[
          new IconButton(icon: new Icon
          (Icons.arrow_back,size: 24.0,color: Colors.white,), onPressed: (){
            Navigator.pop(context);
          }),
          new IconButton(icon: new Icon
          (Icons.home,size: 24.0,color: Colors.white,), onPressed: (){

            Navigator.pushNamedAndRemoveUntil(context, "/",
                      (Route<dynamic> route){ return false;});
          })
        ],
      ),
    );
  }
}
在这里,我们在 `BottomNavigationBar` 中有两个按钮。按下 **后退** 按钮时,我们弹出当前页面并移至 `AddDataPage`。按下 **主页** 按钮时,我们移除所有页面直到显示 `HomePage`。

至此,我们完成了 **任务 #4**。
- 这是最终输出的 GIF 文件。

虽然还有很多事情要做,比如页面过渡时的动画等。希望我在本文中涵盖了所有基本操作。请随时提出任何问题或评论。
关注点
请阅读这些文章。它们可能会为您指明方向。
- Flutter — 你可能喜欢它的 5 个理由
- Flutter 的革命性之处
- 为什么 Flutter 使用 Dart
- Github: https://github.com/thatsalok/FlutterExample/tree/master/flutter3_navigation
Flutter 教程
Dart 教程
历史
- 2018 年 7 月 12 日:初版
