
Android 编程示例:创建机场时刻表模拟器应用程序
5.00/5 (21投票s)
在本文中,我们将通过创建一个响应式机场时刻表模拟器应用程序的示例,来讨论高级 Android 应用程序开发。
引言
在本文中,我们将演示如何使用 Android Studio 和 Java 编程语言从“零开始”创建一个实现高级响应式用户界面功能的示例 Android 应用程序。本文讨论的应用程序将实现机场航班时刻表模拟的功能。在开发生命周期中,我们将实现一个 Android 应用程序的响应式用户界面,用于渲染“到达”和“离开”航班的列表,并提供在实时模式下动态生成和更新航班信息的 [功能](https://www.google.com/search?q=functionality)。
我们将重点关注 Java 语言的几个编程方面,并深入研究允许我们交付高级 Android 应用程序的多种编程技术,包括从头开始创建响应式**应用程序抽屉**和**导航栏**应用程序的方面,提供我们自己的**自定义视图**和**布局**,例如**带有操作按钮的自定义搜索视图栏**,覆盖通用**应用程序操作栏**的默认功能,维护**标签式布局**,渲染**RecyclerView**(与**ListView**或**GridView**不同,它允许为应用程序渲染的数据列表中的项创建自定义外观),创建带有多个嵌套**Fragment**的各种布局,使用**底部导航视图**等。
除了应用程序的界面相关主题外,我们还将了解如何使用 Java 编写高效的代码来实现生成和操作数据内容的功能,以及如何提供操作数据代码与应用程序用户界面之间的交互。
具体来说,我们将实现一个机场航班时刻表模拟器的功能,该模拟器会生成随机航班数据集,并通过在实时模式下过滤航班、动态更新正在渲染的航班列表来操作这些数据,从而模拟航班的到达和离开时间线。为此,我们将使用并讨论诸如使用 Android 应用程序的后台任务、使用计时器等主题。
背景
先决条件(开始之前...)
在我们开始讨论之前,让我们花一点时间仔细看看构建和运行我们的第一个 Android 应用程序所需的所有开发工具和库。
由于我们将使用 Java 编程语言来部署我们的第一个 Android 应用程序,因此我们必须安装 Java SE。为此,我们需要从 http://www.java.com/ 下载并安装 Java 标准版(SE)平台。反过来,Java SE 平台包含了在 PC 上构建和运行 Java 代码所需的所有库和模块。
成功安装 Java SE 平台后,我们还需要正确安装 IDE 和创建 Android 应用程序项目以及构建运行我们应用程序代码所需的特定库。有各种各样的 IDE、编程语言和库,例如 Microsoft Visual Studio / C#.NET Xamarin 或由 Android 开发社区支持的 Android Studio,可以有效地用于创建和部署 Android 应用程序。
在本文中,为了提高 Android 应用程序开发生命周期的效率、平台兼容性以及简化开发流程,我们将特别使用 Android Studio 和 Java 编程语言来实现此目的。
因此,在完成上一步配置并安装 Java SE 平台后,在开发计算机上下载并安装 Android Studio (https://developer.android.com.cn/studio/) 是必需的,并且强烈推荐。
正如我们可能已经注意到的,安装好的 Android Studio 包含许多开发工具,包括 IDE、Java SDK 和 NDK 库、Android 系统模拟器、Gradle/Maven——Java 编译器用于“make”的实用程序,这使得编译和链接 Java 代码更加容易。
反过来,Android Studio 的 IDE 是一个高效且响应迅速的工具,用于轻松创建和编辑 Android 应用程序的资源和 Java 代码,实现应用程序的基本功能。
除了高效便捷的 IDE 外,Android Studio 套件还包含开发各种目标(手机、平板电脑、可穿戴设备、Android TV...)的 Android 应用程序所需的 Java SDK 库。具体来说,Android Studio IDE 允许通过 SDK 管理器(它是 Android Studio 的一部分)下载和安装各种 Android 系统版本的 SDK,或者,可以选择,通过定期使用 Java SDK 发行版中的原生 SDK 管理器。
对于正在创建的应用程序的编译和链接,Android Studio 套件还包含上面提到的 Gradle/Maven ‘make’ 实用程序。在我们创建第一个 Android 应用程序项目时,Gradle 组件会被下载并配置为与 Android Studio 的 IDE 一起使用。每次构建和运行 Android 应用程序项目时,Gradle 实用程序都会执行编译和链接相关的任务,例如创建包含已构建 Android 应用程序的 apk 包,该应用程序可以立即在模拟器或 Android 设备上运行。在开发生命周期中,自从项目创建和配置以来,我们可以使用多个 Gradle 实用程序版本,就像本文项目创建部分所讨论的那样。
为了能够在调试开发阶段运行应用程序,Android Studio 还包含一个 Android 设备模拟器,支持各种 Android 系统版本,可从 Google 和 Android 开发社区网站通过 Android Studio 的模拟器管理器下载。在模拟器上运行应用程序与在目标 Android 设备上运行应用程序非常相似。
在本文的下一部分,我们将演示如何在已安装的 Android Studio 环境中创建我们的第一个 Android 应用程序项目。
创建你的第一个 Android 应用程序项目
在成功满足了上面讨论的所有安装和配置要求后,我们要做的第一件事就是运行 Android Studio 并创建一个将实现我们机场航班时刻表模拟 Android 应用程序功能的项目。为此,我们将使用 Android Studio 的主对话框,选择“Start a new Android Studio project”选项。

在此之后,Android 项目创建对话框将出现在屏幕上。

在这里,在此对话框中,我们必须指定应用程序名称(在此例中为 `AirportApp`)、公司域名(例如 `epsilon.com`)以正确配置应用程序包、项目位置,特别是包名,在我们的例子中是 `com.epsilon.airportapp`。在我们提供了创建项目所需的所有信息后,单击此对话框底部的“Next”按钮。
在此步骤之后,我们必须正确选择和指定我们应用程序的目标设备,包括适当的设备类型(`phone` 或 `tablet`)、最小 SDK 及其版本,以及 Android 系统发布版本。

成功选择目标设备和应用程序将部署的 Android 发布版本后,我们还必须选择应用程序的活动类型。活动通常是一个 Java 类,负责应用程序主窗口的创建、事件处理以及完成其他用户交互特定的任务。实际上,扩展通用 Activity 类或其派生类的 Java 类是任何现有 Android 应用程序的主要类。

在这种特殊情况下,我们将从选择一个空活动作为我们机场时刻表模拟器应用程序的主活动开始我们的第一个 Android 应用程序开发生命周期。之后,我们将自定义和增强默认的空活动,以提供执行机场时刻表模拟任务所需的功能。
Android 应用程序创建阶段的最后一步是配置基于活动的 Java 类别名,生成特定的活动布局,以及配置应用程序的向后兼容性库。为此,我们必须继续进行下一个配置对话框。
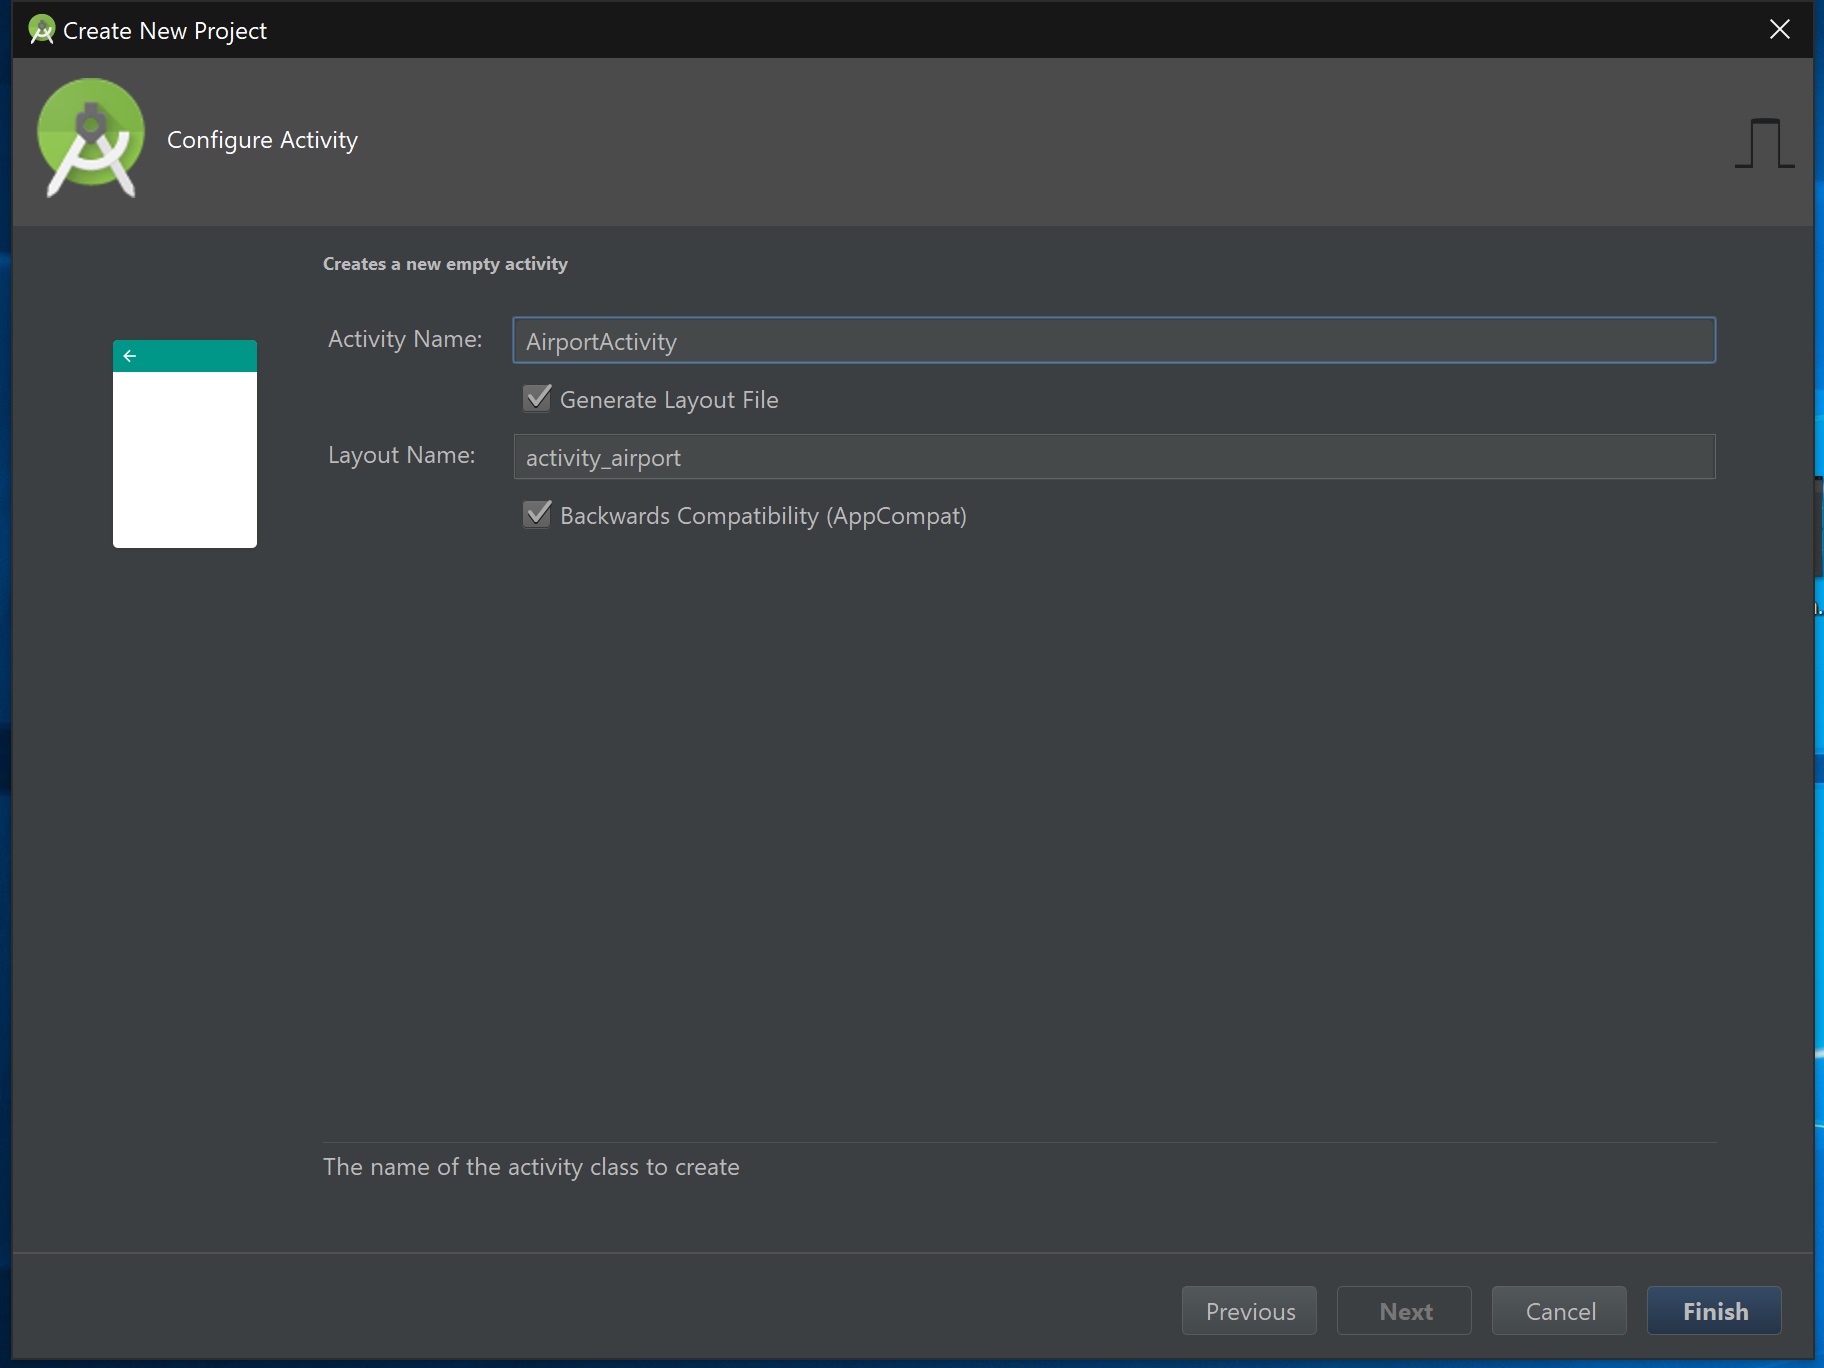
在最后一步,我们必须指定应用程序基于活动的 Java 类名,该类名将对应于要生成的特定活动布局 xml 文件名。此外,我们必须指定是否希望为旧版 Android 提供应用程序的向后兼容性。
由于我们已经配置了应用程序的活动,在最后阶段,特定的项目将被生成,并且 Android Studio 的 IDE 主窗口将被打开。

在本文的下一部分,我们将简要介绍 Android Studio 创建的 Android 应用程序项目结构。
Android 应用程序项目结构
此时,让我们仔细看看位于 Android Studio IDE 主窗口左上角的应用程序解决方案树,该窗口在应用程序项目创建后打开。通常,解决方案树显示正在创建的项目的内容,该内容精确地对应于保存在特定位置(例如,“D:\AirportApp”)的项目目录结构。
AndroidManifest.xml
“manifests”文件夹是出现在应用程序解决方案树顶部的第一个文件夹。它基本上只包含一个文件“AndroidManifest.xml”。该文件主要以 XML 格式包含运行所创建的应用程序所需的所有配置数据。AndroidManifest.xml 文件具有以下结构,对于所有 Android 应用程序都完全相同。
<?xml version="1.0" encoding="utf-8"?>
<manifest xmlns:android="http://schemas.android.com/apk/res/android"
  package="com.epsilon.arthurvratz.airportapp">
  <application
     android:allowBackup="true"
     android:icon="@mipmap/ic_launcher"
     android:label="@string/app_name"
     android:roundIcon="@mipmap/ic_launcher_round"
     android:supportsRtl="true"
     android:theme="@style/AppTheme.NoActionBar">
     <activity android:name=".AirportActivity"
        android:theme="@style/AppTheme.NoActionBar"
        android:windowSoftInputMode="stateHidden"
        android:configChanges="orientation|screenSize|keyboard|keyboardHidden">
        <intent-filter>
           <action android:name="android.intent.action.MAIN" />
           <category android:name="android.intent.category.LAUNCHER" />
        </intent-filter>
     </activity>
  </application>
</manifest>
AndroidManifest.xml 文件的第二行包含 manifest 标签,其属性提供命名空间和应用程序的包名信息。它还包含一个嵌套的 application 标签,该标签具有定义应用程序标签、文本方向和应用程序图标的属性。应用程序标签的属性指定的图标和标签基本上显示在应用程序的主窗口中。此外,应用程序标签包含一个定义默认应用程序主题的属性(例如,android:theme="@style/AppTheme")。可选地,我们可能需要修改现有属性或向应用程序标签添加更多属性,以提供应用程序主窗口的自定义外观和行为。例如,我们可能希望更改 android:theme 属性的值,以便我们的应用程序可以覆盖默认的通用主题并使用其自己的应用程序操作栏实现。为此,我们需要将该标签的值更改为 android:theme="@style/AppTheme.NoActionBar"。
通常,application 标签有许多嵌套标签,例如 activity 标签,用于提供应用程序主活动的一组配置属性。默认情况下,activity 标签只有一个属性,用于定义应用程序主活动的名称(例如,android:name=".AirportActivity")。要修改应用程序主活动的配置参数,我们可能需要向该标签添加更多属性。
android:theme="@style/AppTheme.NoActionBar"
android:windowSoftInputMode="stateHidden"
android:configChanges="orientation|screenSize|keyboard|keyboardHidden">
在这种特殊情况下,我们向上面列出的我们机场时刻表模拟应用程序的主 activity 标签添加了以下配置属性。第一个属性是我们之前在上面的 application 标签中指定的属性的副本。以下属性用于指定在运行的应用程序中将不显示默认的通用应用程序操作栏。第二个属性 android:windowSoftInputMode="stateHidden" 用于指定在应用程序启动时不会自动显示软输入法。最后一个属性 android:configChanges="orientation|screenSize|keyboard|keyboardHidden" 提供了应用程序覆盖的配置更改列表。这意味着以下更改将由应用程序处理,而不是由 Android 系统处理。具体来说,应用程序将处理屏幕旋转,并根据当前屏幕方向(例如,`portrait` 或 `landscape`)渲染适当的界面布局变体。
应用程序标签还包含许多最内层嵌套标签,如 intent-filter、action 和 category。intent-filter 标签内的 action 和 category intent 标签指定了应用程序的主要入口点。特别是,这些标签指定当前的 `'.AirportActivity'` 是应用程序的主活动。
<intent-filter>
   <action android:name="android.intent.action.MAIN" />
   <category android:name="android.intent.category.LAUNCHER" />
</intent-filter>
Gradle Scripts
现在,让我们看看位于我们应用程序解决方案树底部的“Gradle Scripts”同级项。该文件夹包含配置 Gradle “make” 实用程序所需的所有脚本文件,该实用程序在上一节中已提及,包括用于项目“AirportApp”或“app”模块的两个“build.gradle”文件。第一个 build.gradle 文件内容如下。
// Top-level build file where you can add configuration options
// common to all sub-projects/modules.

buildscript {

    repositories {
        google()
        jcenter()
    }
    dependencies {
        classpath 'com.android.tools.build:gradle:3.1.3'


        // NOTE: Do not place your application dependencies here; they belong
        // in the individual module build.gradle files
    }
}

allprojects {
    repositories {
        google()
        jcenter()
    }
}

task clean(type: Delete) {
    delete rootProject.buildDir
}
此文件是非 XML 文件,包含 Gradle 存储库的基本配置,包括其构建版本(例如,'com.android.tools.build:gradle:3.1.3')。在项目配置期间,此文件的内容通常保持不变。
然而,第二个 build.gradle 文件特别值得关注。第二个 build.gradle 文件基本上包含应用程序项目模块依赖项的定义。例如。
apply plugin: 'com.android.application'

android {
    compileSdkVersion 28
    defaultConfig {
        applicationId "com.epsilon.arthurvratz.airportapp"
        minSdkVersion 24
        targetSdkVersion 28
        versionCode 1
        versionName "1.0"
        testInstrumentationRunner "android.support.test.runner.AndroidJUnitRunner"
    }
    buildTypes {
        release {
            minifyEnabled false
            proguardFiles getDefaultProguardFile('proguard-android.txt'), 'proguard-rules.pro'
        }
    }
}

dependencies {
    implementation fileTree(dir: 'libs', include: ['*.jar'])
    implementation 'com.android.support:appcompat-v7:28.0.0-alpha3'
    implementation 'com.android.support:support-v4:28.0.0-alpha3'
    implementation 'com.android.support:support-v13:28.0.0-alpha3'
    implementation 'com.android.support:design:28.0.0-alpha3'
    implementation 'com.android.support:recyclerview-v7:28.0.0-alpha3'
    implementation 'com.android.support.constraint:constraint-layout:1.1.2'
    testImplementation 'junit:junit:4.12'
    androidTestImplementation 'com.android.support.test:runner:1.0.2'
    androidTestImplementation 'com.android.support.test.espresso:espresso-core:3.0.2'
    implementation 'org.jetbrains:annotations-java5:15.0'
}
为了能够使用 Android 支持库,如 v.4、v.7、v.13 以及 RecyclerView 和 ConstraintLayout,我们必须将以下行添加到此文件的 dependencies 部分。
    implementation 'com.android.support:appcompat-v7:28.0.0-alpha3'
    implementation 'com.android.support:support-v4:28.0.0-alpha3'
    implementation 'com.android.support:support-v13:28.0.0-alpha3'
    implementation 'com.android.support:design:28.0.0-alpha3'
    implementation 'com.android.support:recyclerview-v7:28.0.0-alpha3'
    implementation 'com.android.support.constraint:constraint-layout:1.1.2'
反过来,‘gradle-wrapper.properties’ 和 ‘local.properties’ 文件也特别值得关注。
gradle-wrapper.properties
#Thu Jul 26 06:49:16 EEST 2018
distributionBase=GRADLE_USER_HOME
distributionPath=wrapper/dists
zipStoreBase=GRADLE_USER_HOME
zipStorePath=wrapper/dists
distributionUrl=https\://services.gradle.org/distributions/gradle-4.4-all.zip
local.properties
## This file must *NOT* be checked into Version Control Systems,
# as it contains information specific to your local configuration.
#
# Location of the SDK. This is only used by Gradle.
# For customization when using a Version Control System, please read the
# header note.
#Thu Jul 26 15:02:12 EEST 2018
sdk.dir=C\:\\AndroidSDK
在这些文件中,我们可以指定 Gradle 实用程序版本或 Android SDK 位置的绝对路径。为此,我们必须修改这些文件的以下行。
distributionUrl=https\://services.gradle.org/distributions/gradle-4.9-all.zip
sdk.dir=C\:\\Android\AndroidStudio\SDK
注意:如果您将 Gradle 版本更改为 > gradle-4.6-all.zip,那么您还需要在“File” > “Settings” > “Build, Execution, Deployment” > “Compiler”中禁用“Configure on demand”选项。
应用程序活动和布局文件
在精确完成所有应用程序项目配置步骤后,让我们看看我们未来应用程序的活动 Java 实现文件和主应用程序的布局 xml 文件。主应用程序的布局文件位于“res/layout”文件夹下,名为“activity_airport.xml”。该文件最初包含“android.support.constraint.ConstraintLayout”标签,这是空应用程序的默认布局。
要修改主应用程序的布局并添加我们的 Android 应用程序的界面组件,如其他内联布局或控件(即“视图”),我们必须使用 Android Studio 的布局设计器或手动编辑此布局文件。

为了能够在 Android Studio 的设计器中编辑布局,您还必须修改位于应用程序项目“res/values”文件夹下的“styles.xml”文件。
<resources>

    <!-- Base application theme. -->
    <style name="AppTheme" parent="Base.Theme.AppCompat.Light.DarkActionBar">
        <!-- Customize your theme here. -->
        <item name="colorPrimary">@color/colorPrimary</item>
        <item name="colorPrimaryDark">@color/colorPrimaryDark</item>
        <item name="colorAccent">@color/colorAccent</item>
    </style>

</resources>
具体来说,您必须将“style”标签的“parent”属性值从 parent="Theme.AppCompat.Light.DarkActionBar" 更改为 parent="Base.Theme.AppCompat.Light.DarkActionBar"。
以下布局是默认的空应用程序布局,将在本文讨论的应用程序开发生命周期中进行更改。可选地,我们可以通过手动编辑“activity_airport.xml”布局文件来添加对应用程序布局内容的更改。
<?xml version="1.0" encoding="utf-8"?>
<android.support.constraint.ConstraintLayout xmlns:
 android="http://schemas.android.com/apk/res/android"
    xmlns:app="http://schemas.android.com/apk/res-auto"
    xmlns:tools="http://schemas.android.com/tools"
    android:layout_width="match_parent"
    android:layout_height="match_parent"
    tools:context=".AirportActivity">

    <TextView
        android:layout_width="wrap_content"
        android:layout_height="19dp"
        android:text="Hello World!"
        app:layout_constraintBottom_toBottomOf="parent"
        app:layout_constraintLeft_toLeftOf="parent"
        app:layout_constraintRight_toRightOf="parent"
        app:layout_constraintTop_toTopOf="parent" />

</android.support.constraint.ConstraintLayout>
接下来,我们将在本文的后续部分之一中提供有关如何使用约束布局来构建响应式应用程序界面的详细指南。
此时,我们要讨论的最后一个方面是应用程序的主活动实现文件“com.epsilon.airportapp/AirportActivity.java”。
package com.epsilon.airportapp;

import android.support.v7.app.AppCompatActivity;
import android.os.Bundle;

public class AirportActivity extends AppCompatActivity {

    @Override
    protected void onCreate(Bundle savedInstanceState) {
        super.onCreate(savedInstanceState);
        setContentView(R.layout.activity_airport);
    }
}
此文件包含在第一个“com.epsilon.airportapp”文件夹中,并包含扩展通用“AppCompatActivity”类的“AirportActivity” Java 类的声明。最初,AirportActivity 类只包含一个重写的方法“OnCreate”,该方法实现将应用程序布局作为正在创建的应用程序的主内容视图进行渲染的功能。以下方法实现了调用父类中的“onCreate”方法或接受主应用程序布局资源 ID“R.layout.activity_airport”并为应用程序主布局提供基本渲染功能的 setContentView 方法。将来,我们将修改“AirportActivity”类并添加执行机场航班时刻表模拟所需的其他功能。
应用程序主布局蓝图
此时,我们的主要目标是创建机场时刻表模拟应用程序主布局设计的一个草图。更具体地说,主应用程序布局将具有以下外观。

正如您从上图看到的,整个主机场应用程序的布局由顶部的`'SearchView'`的高级变体组成,`'TabLayout'`,其中将渲染到达和离开航班的两个列表。每个标签将渲染一个`'RecyclerView'`来显示航班列表,`'BottomNavigationView'`允许导航到“昨天”、“现在”和“明天”将发生的航班列表。`'TabLayout'`和`'RecyclerView'`由特定的片段布局渲染,这些布局在切换应用程序抽屉导航菜单项或选择特定标签后显示。
主应用程序的布局主要基于“DrawerLayout”模式,这意味着当用户切换应用程序主窗口左上角的[操作栏](https://www.google.com/search?q=action+bar)按钮时,将渲染应用程序抽屉。应用程序抽屉通常可能包含基于'NavigationView' 的抽屉[标题](https://www.google.com/search?q=header),应用程序主菜单等。
在此之前,让我们回想一下,这不是项目创建向导生成的标准应用程序布局。接下来,我们将讨论如何以编程方式实现机场应用程序的自定义布局。
设计应用程序主布局
现在,我们已经完成了机场应用程序的主布局蓝图,现在是时候创建和编辑一个或多个应用程序布局文件了。我们要修改的第一个文件是“activity_airport.xml”。由于我们的机场应用程序旨在拥有应用程序抽屉,因此我们选择“DrawerLayout”作为主应用程序的布局类型。
<?xml version="1.0" encoding="utf-8"?>
<!-- Use DrawerLayout as root container for activity -->
<android.support.v4.widget.DrawerLayout xmlns:
 android="http://schemas.android.com/apk/res/android"
    xmlns:app="http://schemas.android.com/apk/res-auto"
    android:id="@+id/airport_drawer_layout"
    android:layout_width="match_parent"
    android:layout_height="match_parent"
    android:fitsSystemWindows="true">

    <include layout="@layout/content_frame"
        android:layout_width="match_parent"
        android:layout_height="wrap_content"/>

    <android.support.design.widget.NavigationView
        android:id="@+id/airport_navigation_view"
        android:layout_width="wrap_content"
        android:layout_height="match_parent"
        android:layout_gravity="start"
        android:fitsSystemWindows="true"
        app:menu="@menu/main_menu"
        app:headerLayout="@layout/nav_header_frame"/>

</android.support.v4.widget.DrawerLayout>
在这种情况下,我们将“android.support.v4.widget.DrawerLayout”用作 activity_airport.xml 文件中的根标签。之后,我们还需要创建两个嵌套标签,例如“include”标签,它将包含另一个布局部分(包含在单独的文件“content_frame.xml”中),或者“android.support.design.widget.NavigationView”标签,它声明了机场应用程序的抽屉布局。不幸的是,由于使用了抽屉布局,我们无法使用 Android Studio 的布局设计器修改上图所示的布局,但我们可以使用 Android Studio 的 IDE 文本编辑器手动编辑此布局。
应用程序主布局的包含片段存储在 content frame 文件中,外观如下。
<?xml version="1.0" encoding="utf-8"?>
<android.support.constraint.ConstraintLayout
    xmlns:android="http://schemas.android.com/apk/res/android"
    xmlns:app="http://schemas.android.com/apk/res-auto"
    xmlns:tools="http://schemas.android.com/tools"
    android:layout_width="match_parent"
    android:layout_height="match_parent">

    <LinearLayout
        android:id="@+id/search_bar"
        android:layout_width="match_parent"
        android:layout_height="wrap_content"
        app:layout_constraintBottom_toTopOf="@+id/airport_fragment_container"
        app:layout_constraintEnd_toEndOf="parent"
        app:layout_constraintHorizontal_bias="1.0"
        app:layout_constraintStart_toStartOf="parent"
        app:layout_constraintTop_toTopOf="parent"
        app:layout_constraintVertical_bias="0.02"
        android:focusable="true"
        android:focusableInTouchMode="true">

        <requestFocus />

        <android.support.v7.widget.SearchView
            android:id="@+id/searchable"
            android:layout_width="match_parent"
            android:layout_height="wrap_content"/>

    </LinearLayout>

    <FrameLayout
        android:id="@+id/airport_fragment_container"
        android:layout_width="match_parent"
        android:layout_height="0dp"
        android:layout_marginEnd="8dp"
        android:layout_marginStart="8dp"
        app:layout_constraintBottom_toTopOf="@+id/flights_navigation"
        app:layout_constraintEnd_toEndOf="parent"
        app:layout_constraintHorizontal_bias="0.0"
        app:layout_constraintStart_toStartOf="parent"
        app:layout_constraintTop_toBottomOf="@+id/search_bar">

    </FrameLayout>

    <android.support.design.widget.BottomNavigationView
        android:id="@+id/flights_navigation"
        android:layout_width="match_parent"
        android:layout_height="wrap_content"
        app:layout_constraintBottom_toBottomOf="parent"
        app:layout_constraintEnd_toEndOf="parent"
        app:layout_constraintHorizontal_bias="1.0"
        app:layout_constraintStart_toStartOf="parent"
        app:layout_constraintTop_toBottomOf="@+id/airport_fragment_container"
        app:menu="@menu/flights_navigation"
        android:theme="@style/AppTheme"/>
</android.support.constraint.ConstraintLayout>
在此文件中,我们通常使用“android.support.constraint.ConstraintLayout”标签作为此布局的根标签。该标签包含许多内联标签,包括包含`'android.support.v7.widget.SearchView'`标签的`'LinearLayout'`,`FrameLayout`,它实际上声明了一个将通过编程方式替换为特定片段的框架,该片段渲染`'RecyclerView'`,显示航班列表,`'BottomNavigationView'`渲染按时间过滤航班的选项。由于我们使用约束布局作为整个内容框架的根,因此所有嵌套视图和布局都必须正确约束。与以前的布局不同,内容框架布局可以成功地用 Android Studio 的布局设计器进行编辑。这就是为什么我们有一个选项可以选择编辑特定的内容框架文件或使用布局设计器来为以下布局内的所有视图提供特定的约束。
在这种情况下,连接内容框架中视图的最佳方法是将特定属性(如“app:layout_constraintTop_toBottomOf”)添加到每个视图标签,如上方的源代码所示。在此代码片段中,我们通过从最顶部的“LinearLayout”视图标签开始,向每个视图标签添加垂直和水平布局约束属性,以垂直方向将它们全部链接起来。
此时,让我们回到定义我们应用程序抽屉布局的代码片段。在“DrawerLayout”标签内声明的另一个视图是“android.support.design.widget.NavigationView”。该视图基本上用于渲染应用程序抽屉及其菜单,如上面蓝图所示。使用导航视图通常需要我们创建一个另一个应用程序抽屉布局和特定的菜单来声明应用程序抽屉菜单的[项](https://www.google.com/search?q=items)。
要创建这些布局,我们基本上需要创建项目“/res”文件夹中的一个子文件夹,并创建名为“main_menu.xml”的特定菜单布局资源文件。
<?xml version="1.0" encoding="utf-8"?>
<menu xmlns:android="http://schemas.android.com/apk/res/android" >
    <group android:checkableBehavior="single">
        <item
            android:id="@+id/flights"
            android:icon="@drawable/ic_flight_black_24dp"
            android:title="@string/flights" />
        <item
            android:id="@+id/about"
            android:icon="@drawable/ic_star_black_24dp"
            android:title="@string/about" />
    </group>
</menu>
在此文件中,我们必须声明“menu”标签,并在其中创建“group”项。在这种情况下,以下布局包含两个菜单项的组,用于“flights”或“about”菜单选项,显示在应用程序抽屉的标题下方。
另一个布局文件“nav_header_frame.xml”包含用户切换时在应用程序抽屉中渲染的布局。
<?xml version="1.0" encoding="utf-8"?>
<LinearLayout xmlns:android="http://schemas.android.com/apk/res/android"
    xmlns:app="http://schemas.android.com/apk/res-auto"
    xmlns:tools="http://schemas.android.com/tools"
    android:layout_width="match_parent"
    android:layout_height="240dp"
    android:background="@drawable/airport_nav_header"
    android:gravity="bottom"
    android:orientation="vertical"
    android:padding="16dp"
    android:theme="@style/ThemeOverlay.AppCompat.Dark">

    <ImageView
        android:id="@+id/imageView"
        android:layout_width="103dp"
        android:layout_height="99dp"
        app:srcCompat="@mipmap/ic_launcher_round" />

    <Space
        android:layout_width="352dp"
        android:layout_height="10dp" />

    <TextView
        android:id="@+id/airport_app_title"
        android:layout_width="match_parent"
        android:layout_height="wrap_content"
        android:fontFamily="Verdana"
        android:text="@string/nav_header"
        android:textColor="@android:color/background_light"
        android:textIsSelectable="false"
        android:textSize="30sp" />

    <TextView
        android:id="@+id/airport_app_author"
        android:layout_width="match_parent"
        android:layout_height="wrap_content"
        android:text="@string/airport_app_author" />

</LinearLayout>
为了创建应用程序抽屉布局,我们将使用特定的“LinearLayout”标签。线性布局与“CostraintLayout”等其他布局不同,它只允许垂直方向上的视图定位,并且不需要设置视图之间的任何约束。
为了定义适当的抽屉布局,我们必须将以下视图标签放在线性布局中,以及提供应用程序抽屉标题的背景图像。为此,我们指定了以下线性布局属性:“android:background="@drawable/airport_nav_header"”。通常,我们创建的线性布局将包含以下内联视图。
- “
ImageView” - 用于显示机场应用程序的图标。 - “
Space” - 在线性布局中的特定视图之间创建间隙。 - “
TextView” - 用于打印机场应用程序的标题或作者详细信息。
最后,由“NavigationView”渲染的应用程序抽屉布局及其蓝图将具有以下外观。

在本文的下一部分,我们将了解如何实现主机场应用程序活动的功能。
创建自定义 SearchView 和操作按钮
SearchView 是机场时刻表模拟器应用程序出现在主应用程序窗口顶部的第一个控件。此时,让我们回到“content_frame.xml”的代码片段。声明搜索视图的“android.support.v7.widget.SearchView”标签位于该布局文件所有其他视图之前,并被“LinearLayout”包裹。
    <LinearLayout
        android:id="@+id/search_bar"
        android:layout_width="match_parent"
        android:layout_height="wrap_content"
        app:layout_constraintBottom_toTopOf="@+id/airport_fragment_container"
        app:layout_constraintEnd_toEndOf="parent"
        app:layout_constraintHorizontal_bias="1.0"
        app:layout_constraintStart_toStartOf="parent"
        app:layout_constraintTop_toTopOf="parent"
        app:layout_constraintVertical_bias="0.02"
        android:focusable="true"
        android:focusableInTouchMode="true">

        <requestFocus />

        <android.support.v7.widget.SearchView
            android:id="@+id/searchable"
            android:layout_width="match_parent"
            android:layout_height="wrap_content"/>

    </LinearLayout>
我们使用线性布局来确保搜索视图在应用程序启动后不会获得焦点。
由于我们在内容框架中声明了“SearchView”标签,因此我们此时的目标是通过实现 Java 代码来提供功能和行为(例如,使搜索视图响应),该代码将实例化并处理我们搜索视图的事件。
正如我们可能已经知道的,在此项目中,我们将不使用通用的搜索视图和应用程序栏,而是创建我们自己的自定义搜索视图,它结合了通用搜索视图和应用程序操作栏的基本功能。
要创建带有操作按钮的自定义搜索视图,我们需要创建一个新的 Java 类,并将其命名为“SearchableWithButtonView”,它扩展通用“View”类。
public class SearchableWithButtonView extends View {
         // SearchView basic functionality implementation java-code goes here...
}
在此类中,我们需要实现以下方法。setupSearchableWithButton() 是我们必须实现以提供自定义搜索视图特定外观和行为的第一个方法。
    public void setupSearchableWithButton() {

        // Set background color of the search view
        ((ViewGroup)m_SearchView.findViewById
                    (android.support.v7.appcompat.R.id.search_mag_icon).
                getParent()).setBackgroundColor(Color.parseColor("#ffffff"));

        // Set default custom search of the search view button icon
        // and look of the custom search view
        this.setDefaultSearchIcon(); this.setupIconifiedByDefault();

        // Set default search hint displayed in the search view's edit text view
        m_SearchView.setQueryHint("TYPE HERE...");

        // Set default query text and remove focus from the search view
        m_SearchView.setQuery("", false); getRootView().requestFocus();

        // Instantiate the search view object and
        // set default action button click event listener
        m_SearchView.findViewById(android.support.v7.appcompat.R.id.search_mag_icon).
                setOnClickListener(new SearchableViewListener());

        // Instantiate the search view object
        ViewGroup llSearchView = ((ViewGroup)m_SearchView.findViewById(
                android.support.v7.appcompat.R.id.search_mag_icon).getParent());

        // Instantiate object of the text editable inside the search view
        EditText searchEditText = llSearchView.findViewById(
                android.support.v7.appcompat.R.id.search_src_text);

        // Remove the search view text editable default selection
        searchEditText.setSelected(false);

        // Set text editable click event listener
        searchEditText.setOnClickListener(new SearchableViewListener());

        // Set text editable onTextChange listener
        searchEditText.addTextChangedListener(new SearchableViewListener());
    }
在此方法中,我们通过修改背景颜色、搜索视图按钮图标、移除应用程序启动时搜索视图的默认选择和焦点,以及设置各种搜索视图事件(如点击作为应用程序主操作按钮的搜索视图按钮、文本编辑和文本可编辑视图点击等)的[处理程序](https://www.google.com/search?q=handlers)(即监听器)来更改通用搜索视图的外观和行为。
这些事件处理程序实现为SearchableWithButtonView在其中声明的子类。
   public class SearchableViewListener
            implements OnClickListener, TextWatcher {
        @Override
        public void onClick(View view) {

            // Check if the custom search view button was clicked
            if (android.support.v7.appcompat.R.
                    id.search_mag_icon == view.getId()) {

                // If so, perform a check if the default action bar icon was set
                if (!isDefaultIcon) {

                    // If not, set the default icon by invoking setDefaultSearchIcon() method
                    setDefaultSearchIcon();

                    // Terminate the onClick handler method execution
                    return;
                }

                // Invoke onClick(...) method from the main app's activity class
                m_ClickListener.onClick(view);
            }

            // Otherwise, set navigation-back search icon
            else setNavBackSearchIcon();
        }

        @Override
        public void beforeTextChanged(CharSequence charSequence, int i, int i1, int i2) {

            // Invoke the beforeTextChange(...) method from app's activity class
            // (e.g. its parent)
            m_TextWatcherListener.beforeTextChanged(charSequence, i, i1, i2);
        }

        @Override
        public void onTextChanged(CharSequence charSequence, int i, int i1, int i2) {
            // Set navigation-back icon and invoke the onTextChanged(...) method
            // from app's activity class (e.g. its parent)
            setNavBackSearchIcon();
            m_TextWatcherListener.onTextChanged(charSequence, i, i1, i2);
        }

        @Override
        public void afterTextChanged(Editable editable) {

            // Perform a check if the editable string is empty
            if (editable.toString().isEmpty())

                // If so, set default search view icon
                setDefaultSearchIcon();

            // Invoke the afterTextChanged(...) method from its parent
            m_TextWatcherListener.afterTextChanged(editable);
        }
    }
此外,“SearchableWithButtonView”类还具有以下方法。
以下方法将自定义搜索视图的外观更改为未统一。
   private void setupIconifiedByDefault() {
        // Disable the iconfied mode to make the search view
        // fill the entire area horizontally
        m_SearchView.setIconified(false);
        m_SearchView.setIconifiedByDefault(false);
    }
以下方法将通用搜索视图的默认图标替换为应用程序操作栏按钮的自定义图标。
    private void setDefaultSearchIcon() {
        // Replace the default search view icon with the action button icon
        this.isDefaultIcon = true;
        this.replaceSearchIcon(R.drawable.ic_dehaze_white_24dp);
    }
以下方法将默认的操作栏按钮图标替换为导航后退图标。
    private void setNavBackSearchIcon() {
        // Check if the default icon was set
        if (this.isDefaultIcon == true) {
            // If so, replace search view icon with navigation-back icon
            this.isDefaultIcon = false;
            this.replaceSearchIcon(R.drawable.ic_arrow_back_black_24dp);
            // Run the search view icon animation
            this.setupAnimation();
        }
    }
以下方法将默认搜索视图按钮图标替换为从应用程序资源中检索到的图标。
    private void replaceSearchIcon(int resDefaultIcon) {
        // Instantiate search view button icon object and set the custom icon
        // by calling setImageDrawable method that accepts the icon object retrieved
        // from the app's resources by calling the context's getDrawable(...) method
        ((ImageView)m_SearchView.findViewById
         (android.support.v7.appcompat.R.id.search_mag_icon)).
                setImageDrawable(m_Context.getDrawable(resDefaultIcon));
        // Start animating icon
        this.setupAnimation();
    }
此方法用于设置搜索视图图标的动画。
    private void setupAnimation() {

        // Instantiate search view icon object
        final ImageView searchIconView = m_SearchView.findViewById(
                android.support.v7.appcompat.R.id.search_mag_icon);

        // Compute the icon's width and height values
        int searchIconWidth = searchIconView.getWidth();
        int searchIconHeight = searchIconView.getHeight();

        // Instantiate RotateAnimation class object and specify the rotation params
        RotateAnimation searchIconAnimation = new RotateAnimation(0f, 360f,
                searchIconWidth / 2, searchIconHeight / 2);
        // Set animation interpolator
        searchIconAnimation.setInterpolator(new LinearInterpolator());
        // Set animation repeat count
        searchIconAnimation.setRepeatCount(Animation.INFINITE);
        // Set animation duration
        searchIconAnimation.setDuration(700);

        // Start animating the icon
        searchIconView.startAnimation(searchIconAnimation);

        // Perform a delay for 700ms after the icon animation ends
        new Handler().postDelayed(new Runnable() {
            @Override
            public void run() {
                searchIconView.setAnimation(null);
            }
        }, 700);
    }
使用以下方法,我们覆盖了 findViewById(...) 方法的基本功能,以便与搜索视图对象一起使用。
    // Override the default findViewById method to be used to Instantiate
    // search view object
    private SearchView findSearchViewById(int resId) {
        return ((Activity)m_Context).findViewById(resId);
    }
通过调用这两个方法,我们设置了主应用程序类中使用的点击事件监听器和文本更改事件监听器。
    public void setSearchButtonClickListener(@Nullable OnClickListener clickListener) {
        // Set click listener class object of its parent
        m_ClickListener = clickListener;
    }
    public void setTextWatchListener(@Nullable TextWatcher textWatchListener) {
        // Set text change watcher listener class object of its parent
        m_TextWatcherListener = textWatchListener;
    }
现在,既然我们已经实现了自定义搜索视图和操作按钮,是时候将它的功能添加到主应用程序活动中了,如下所示。
    @Override
    protected void onCreate(Bundle savedInstanceState) {
        super.onCreate(savedInstanceState);
        setContentView(R.layout.activity_airport);

        // Instantiating the drawer layout object
        m_DrawerLayout = findViewById(R.id.airport_drawer_layout);
        // Instantiating the navigation view object
        m_navigationView = findViewById(R.id.airport_navigation_view);

        // Instantiating our custom search view object
        m_searchableWithButtonView =
                new SearchableWithButtonView(AirportActivity.this, R.id.searchable);

        // Setting up our custom search view
        m_searchableWithButtonView.setupSearchableWithButton();
        // Adding the text change watcher listener
        m_searchableWithButtonView.setTextWatchListener(new SearchableWithButtonListener());
        // Adding the search view action button click event listener
        m_searchableWithButtonView.setSearchButtonClickListener
                                   (new SearchableWithButtonListener());

        // Setup app's drawer menu click event listener
        m_navigationView.setNavigationItemSelectedListener(m_NavigationBarListener);

        // ...
在重写的 onCreate 方法中,我们通常执行抽屉布局和导航视图对象的实例化,设置我们的自定义搜索视图,并添加特定的事件处理程序。为了处理各种搜索视图的事件,我们必须声明一个子类“SearchableWithButtonListener”,它实现“View.OnClickListener”或“TextWatcher”事件处理通用类。
public class SearchableWithButtonListener implements View.OnClickListener, TextWatcher
    {
        @Override
        public void beforeTextChanged(CharSequence charSequence, int i, int i1, int i2) {
        }

        @Override
        public void onTextChanged(CharSequence charSequence, int i, int i1, int i2) {
        }

        @Override
        public void afterTextChanged(Editable editable) {

        }

        @Override
        public void onClick(View view) {
            // Perform a check if the app's drawer open
            if (!m_DrawerLayout.isDrawerOpen(GravityCompat.START))
                // If not, open the app's drawer
                m_DrawerLayout.openDrawer(GravityCompat.START);
        }
    }
此类的[方法](https://www.google.com/search?q=methods)中实现的功能将在本文的后续部分之一中讨论。在这种情况下,我们将只讨论该类中 onClick(...) 方法的一个实现。以下方法通过调用 DrawerLayout.openDrawer(...) 方法来实现应用程序抽屉打开功能。
正如我们已经讨论过的,在处理自定义操作栏点击事件时触发 openDrawer(...) 方法后,应用程序抽屉会打开并显示应用程序的主菜单。此时,我们还必须通过调用 'm_navigationView.setNavigationItemSelectedListener(m_NavigationBarListener)' 方法来提供菜单项点击事件处理,该方法接受监听器类的对象作为其唯一参数。以下代码实现了重写的导航菜单项点击事件监听器类。
    private class NavigationBarListener implements
            NavigationView.OnNavigationItemSelectedListener
    {
        // This method handles the navigation menu item click events
        public boolean onNavigationItemSelected(MenuItem menuItem) {
            // set item as selected to persist highlight
            menuItem.setChecked(true);

            //...

            if (m_DrawerLayout.isDrawerOpen(GravityCompat.START))
                m_DrawerLayout.closeDrawers();

            return true;
        }
    }
创建标签式应用程序布局
正如我们已经讨论过的,机场应用程序旨在响应用户输入,并根据用户切换应用程序抽屉导航菜单或标签的哪个选项来显示各种内容。具体来说,在应用程序抽屉导航菜单中切换“flights”菜单项后,它通常会渲染标签式布局。每个标签基本上显示由 RecyclerView 渲染的航班列表。为了实现这一点,我们将使用Fragments。Fragment是应用程序布局中动态创建和渲染的部分,包含其他布局或视图,或两者都包含。
在这种情况下,我们到目前为止需要做的是创建特定的片段布局和我们自己的 Java 类来实现内容渲染功能。正如我们已经讨论过的,“arrivals”和“departures”这两个标签将出现在应用程序主窗口中。在每个标签中,我们将渲染一个“RecyclerView”,显示航班计划列表。为了提供标签式布局功能,我们将使用渲染在“LinearLayout”中的“TabbedLayout”,它是“FlightsFragment”的根布局,当用户在应用程序抽屉导航菜单中切换第一个菜单项“flights”时显示。flights片段布局在“res/layout/ fragment_flights.xml”文件中实现。
<?xml version="1.0" encoding="utf-8"?>
<LinearLayout xmlns:android="http://schemas.android.com/apk/res/android"
    xmlns:tools="http://schemas.android.com/tools"
    xmlns:app="http://schemas.android.com/apk/res-auto"
    android:id="@+id/flights_fragment"
    android:layout_width="match_parent"
    android:layout_height="match_parent"
    android:orientation="vertical"
    tools:context=".FlightsFragment">

    <android.support.design.widget.TabLayout
        android:id="@+id/flights_destination_tabs"
        android:layout_width="match_parent"
        android:layout_height="wrap_content"
        app:tabMaxWidth="0dp"
        app:tabMode="fixed"
        app:tabGravity="fill">

    <android.support.design.widget.TabItem
        android:id="@+id/arrivals_tab"
        android:layout_width="wrap_content"
        android:layout_height="wrap_content"
        android:icon="@drawable/ic_flight_land_black_24dp"
        android:text="@string/arrivals_tab" />

    <android.support.design.widget.TabItem
        android:id="@+id/departures_tab"
        android:layout_width="wrap_content"
        android:layout_height="wrap_content"
        android:icon="@drawable/ic_flight_takeoff_black_24dp"
        android:text="@string/departures_tab" />

    </android.support.design.widget.TabLayout>

    <android.support.v4.view.ViewPager
        android:id="@+id/flights_destination_pager"
        android:layout_width="wrap_content"
        android:layout_height="wrap_content"/>

    <requestFocus/>
</LinearLayout>
在 flights 片段线性布局内部,我们声明了两个标签:“android.support.design.widget.TabLayout”和“android.support.v4.view.ViewPager”。第一个标签基本上定义了包含“arrivals”或“departures”航班渲染两个标签的标签式布局,这些标签出现在主应用程序窗口的搜索视图下方。通过声明第二个标签“ViewPager”,我们提供了在整个屏幕渲染航班之间滑动的[功能](https://www.google.com/search?q=functionality)。
由于标签式布局和视图分页器被渲染为片段,我们必须创建一个单独的 Java 类“FlightsFragment”,它扩展了通用的“android.support.v4.app.Fragment”类。
FlightsFragmentImpl.java
package com.epsilon.arthurvratz.airportapp;

import android.net.Uri;
import android.support.v7.widget.LinearLayoutManager;
import android.support.v7.widget.RecyclerView;

import java.util.ArrayList;

public class FlightsFragmentImpl extends android.support.v4.app.Fragment implements
        ArrivalsFragment.OnFragmentInteractionListener,
        DeparturesFragment.OnFragmentInteractionListener
{
        public RecyclerView m_RecyclerView;
        public RecyclerView.Adapter m_RecyclerAdapter;
        public RecyclerView.LayoutManager m_LayoutManager;

        public void setupFlightsRecyclerView
          (RecyclerView recyclerView, ArrayList<AirportDataModel> dataSet)
        {
            // Setting the recycler view object
            m_RecyclerView = recyclerView;

            // Setting the recycler view has a fixed size
            m_RecyclerView.setHasFixedSize(true);

            // Instantiating the linear layout manager object
            m_LayoutManager = new LinearLayoutManager(getContext());

            // Setting up the recycler view's layout manager
            m_RecyclerView.setLayoutManager(m_LayoutManager);

            // Instantiating the flights recycler view's adapter object
            // and adding the flights dataset to the flights recycler view's adapter
            m_RecyclerAdapter = new FlightsRecyclerAdapter(dataSet, getContext());

            // Setting up the flights recycler view's adapter object</span>
            m_RecyclerView.setAdapter(m_RecyclerAdapter);
    }

    @Override
    public void onFragmentInteraction(Uri uri) {

    }
}
FlightsFragment.java
package com.epsilon.arthurvratz.airportapp;

import android.content.Context;
import android.net.Uri;
import android.os.Bundle;
import android.support.design.widget.TabLayout;
import android.support.v4.view.ViewPager;
import android.view.LayoutInflater;
import android.view.View;
import android.view.ViewGroup;

public class FlightsFragment extends FlightsFragmentImpl
{
    private TabLayout m_TabLayout;
    private ViewPager m_ViewPager;

    final private TabSelectedListener
            m_TabSelListener = new TabSelectedListener();

    public ArrivalsFragment m_ArrivalsFragment;
    public DeparturesFragment m_DeparturesFragment;

    private class TabSelectedListener implements TabLayout.OnTabSelectedListener
    {
        @Override
        public void onTabSelected(TabLayout.Tab tab) {
            m_ViewPager.setCurrentItem(tab.getPosition());
        }

        @Override
        public void onTabUnselected(TabLayout.Tab tab) {

        }

        @Override
        public void onTabReselected(TabLayout.Tab tab) {

        }
    }

    private OnFragmentInteractionListener mListener;

    public FlightsFragment() {
        // Required empty public constructor
    }

    public static FlightsFragment newInstance() {
        return new FlightsFragment();
    }

    @Override
    public void onCreate(Bundle savedInstanceState) {
        super.onCreate(savedInstanceState);
    }

    @Override
    public View onCreateView(LayoutInflater inflater, ViewGroup container,
                Bundle savedInstanceState) {

        // Inflating the flights fragment view's object
        View FlightsFragmentView =
                    inflater.inflate(R.layout.fragment_flights, container, false);

        // Instantiating the tab layout object
        m_TabLayout = FlightsFragmentView.findViewById(R.id.flights_destination_tabs);

        // Instantiating view pager object
        m_ViewPager = FlightsFragmentView.findViewById(R.id.flights_destination_pager);

        // Instantiating the tab layout's pager adapter
        FlightsDestPagerAdapter pagerAdapter = new FlightsDestPagerAdapter(
              getChildFragmentManager(), m_TabLayout.getTabCount());

        // Instantiating the arrivals fragment object
        m_ArrivalsFragment = ArrivalsFragment.newInstance();

        // Instantiating the departures fragment object
        m_DeparturesFragment = DeparturesFragment.newInstance();

        // Adding the arrivals and departure fragment objects to the view pager adapter
        pagerAdapter.add(m_ArrivalsFragment);
        pagerAdapter.add(m_DeparturesFragment);

        // Setting up the view pager adapter
        m_ViewPager.setAdapter(pagerAdapter);

        // Adding the generic page sliding event listener
        m_ViewPager.addOnPageChangeListener(
                new TabLayout.TabLayoutOnPageChangeListener(m_TabLayout));
        m_TabLayout.addOnTabSelectedListener(m_TabSelListener);

        return FlightsFragmentView;
    }

    public void onButtonPressed(Uri uri) {
        if (mListener != null) {
            mListener.onFragmentInteraction(uri);
        }
    }

    @Override
    public void onAttach(Context context) {
        super.onAttach(context);
        if (context instanceof OnFragmentInteractionListener) {
            mListener = (OnFragmentInteractionListener) context;
        } else {
            throw new RuntimeException(context.toString()
                    + " must implement OnFragmentInteractionListener");
        }
    }

    @Override
    public void onDetach() {
        super.onDetach();
        mListener = null;
    }

    @Override
    public void onFragmentInteraction(Uri uri) {

    }

    public interface OnFragmentInteractionListener {
        // TODO: Update argument type and name
        void onFragmentInteraction(Uri uri);
    }
}
为了实现flights片段的功能,我们实际定义了两个 Java 类。第一个类“FlightsFragmentImpl”扩展了通用的“android.support.v4.app.Fragment”并实现了“ArrivalsFragment”和“DepartureFragment”类(下面讨论)的“OnFragmentInteractionListener”功能。该类只实现一个方法“setupFlightsRecyclerView(...)”,该方法接受两个参数,分别是RecyclerView对象或数据集`ArrayList`对象(稍后在本文中讨论)。该方法的主要目的是设置用于保存 RecyclerView 中显示的数据的 RecyclerView 适配器。
另一个类“FlightsFragment”扩展了“FlightsFragmentImpl”的功能,并在“OnCreateView”重写方法中提供了动态设置标签布局和视图分页器的基本功能,方法是将特定的 arrivals 和 departures 片段对象添加到视图分页器适配器中。“FlightsDestPagerAdapter” Java 类实现了视图分页器适配器的基本功能。
package com.epsilon.arthurvratz.airportapp;

import android.support.v4.app.Fragment;
import android.support.v4.app.FragmentManager;
import android.support.v4.app.FragmentPagerAdapter;

import java.util.ArrayList;

public class FlightsDestPagerAdapter extends FragmentPagerAdapter {

    private ArrayList<Fragment> m_Fragments = new ArrayList<Fragment>();

    public FlightsDestPagerAdapter(FragmentManager FragmentMgr, int NumberOfTabs) {
        super(FragmentMgr);
    }

    public void add(Fragment fragment)
    {
        m_Fragments.add(fragment);
    }

    @Override
    public Fragment getItem(int position) {
        return m_Fragments.get(position);
    }

    @Override
    public int getCount() {
        return m_Fragments.size();
    }
}
该类的实现主要基于使用“ArrayList<Fragment>”功能来存储通用“Fragment”类对象的数组。
最后,为了渲染flights片段,我们必须在“AirportActivity.NavigationBarListener”类的“onNavigationItemSelected(...)”方法中进行重写。该方法基本上用于处理来自应用程序抽屉导航菜单的事件,并具有以下实现。
    private class NavigationBarListener implements
            NavigationView.OnNavigationItemSelectedListener
    {
        public boolean onNavigationItemSelected(MenuItem menuItem) {
            // set item as selected to persist highlight
            menuItem.setChecked(true);

            // Instantiate the fragment manager transaction coordinator object
            m_FragmentTran = m_FragmentMgr.beginTransaction();

            // Perform a check if the flights menu item was selected
            if (menuItem.getItemId() == .Rid.flights)

                // If so, replace the airport_fragment_container frame layout
                // with specific flight fragment by using its object.
                m_FragmentTran.replace(R.id.airport_fragment_container,
                    FlightsFragment.newInstance());

            else if (menuItem.getItemId() == R.id.about) {}

            m_FragmentTran.addToBackStack(null); m_FragmentTran.commit();

            // Check if the app's drawer is still open
            if (m_DrawerLayout.isDrawerOpen(GravityCompat.START))

                // If so, close the app's drawer
                m_DrawerLayout.closeDrawers();

            return true;
        }

        public void setupInitialFragment()
        {
            if (m_FragmentMgr == null)

                // Instantiate the support fragment manager object
                m_FragmentMgr = getSupportFragmentManager();

                // Begin fragments transaction
                m_FragmentTran = m_FragmentMgr.beginTransaction();

                // Add the default flights fragment object and commit transaction
                m_FragmentTran.add(R.id.airport_fragment_container,
                      FlightsFragment.newInstance()).commit();
        }
    }
该类还实现了一个名为“setupInitialFragment(...)”的方法,该方法用于在应用程序主活动代码中调用时设置初始片段,在重写的“OnCreate(...)”方法中,当主应用程序活动被实例化时。
    protected void onCreate(Bundle savedInstanceState) {
        super.onCreate(savedInstanceState);
        setContentView(R.layout.activity_airport);

        //m_ActionToolBar = findViewById(R.id.airport_actionbar);
        m_DrawerLayout = findViewById(R.id.airport_drawer_layout);
        m_navigationView = findViewById(R.id.airport_navigation_view);
        m_flightsNavigationView = findViewById(R.id.flights_navigation);

        //setSupportActionBar(m_ActionToolBar);
        //this.setupActionBar(R.drawable.ic_dehaze_white_24dp);

        m_searchableWithButtonView =
                new SearchableWithButtonView(AirportActivity.this, R.id.searchable);

        m_searchableWithButtonView.setupSearchableWithButton();
        m_searchableWithButtonView.setTextWatchListener(new SearchableWithButtonListener());
        m_searchableWithButtonView.setSearchButtonClickListener
                                      (new SearchableWithButtonListener());

        m_navigationView.setNavigationItemSelectedListener(m_NavigationBarListener);

        m_flightsNavigationView.setSelectedItemId(R.id.flights_now);
        // Setting up initial fragment to be rendered in the main app's window
        m_NavigationBarListener.setupInitialFragment(); this.hideSoftInputKeyboard();

        //...
}
在本文的下一部分,我们将讨论如何在 flights 片段中渲染 RecyclerView,显示“arrival”或“departure”航班的列表。
在 RecyclerView 中渲染航班
渲染 RecyclerView 中的航班列表是我们将在本文中讨论的最后一个机场应用程序 GUI 主题。正如我们已经知道的,我们的机场应用程序显示两个航班列表(“arrival”或“departure”),并且以编程方式以类似的方式进行。要渲染航班列表,我们所要做的就是创建两个片段,它们将渲染 arrival 航班或 departure 航班的 RecyclerView。
fragment_arrivals.xml
<?xml version="1.0" encoding="utf-8"?>
<LinearLayout xmlns:android="http://schemas.android.com/apk/res/android"
    xmlns:tools="http://schemas.android.com/tools"
    android:id="@+id/arrivals_fragment"
    android:layout_width="match_parent"
    android:layout_height="match_parent"
    android:layout_gravity="center_vertical|center_horizontal"
    tools:context=".ArrivalsFragment">

    <android.support.v7.widget.RecyclerView
        android:id="@+id/arrivals_recycler_view"
        android:scrollbars="vertical"
        android:layout_width="match_parent"
        android:layout_height="match_parent"/>
</LinearLayout>
fragment_departures.xml
<?xml version="1.0" encoding="utf-8"?>
<LinearLayout xmlns:android="http://schemas.android.com/apk/res/android"
    xmlns:tools="http://schemas.android.com/tools"
    android:id="@+id/departures_fragment"
    android:layout_width="match_parent"
    android:layout_height="match_parent"
    android:layout_gravity="center_vertical|center_horizontal"
    tools:context=".DeparturesFragment">

    <android.support.v7.widget.RecyclerView
        android:id="@+id/departures_recycler_view"
        android:scrollbars="vertical"
        android:layout_width="match_parent"
        android:layout_height="match_parent"/>
</LinearLayout>
我们还创建了两个 Java 类,分别是“ArrivalsFragment”和“DeparturesFragment”,它们实现了上面列出的这些片段的功能。
ArrivalsFragment.java
package com.epsilon.arthurvratz.airportapp;

import android.content.Context;
import android.net.Uri;
import android.os.Bundle;
import android.support.v7.widget.RecyclerView;
import android.view.LayoutInflater;
import android.view.View;
import android.view.ViewGroup;

import java.util.ArrayList;

public class ArrivalsFragment extends android.support.v4.app.Fragment {

    public  RecyclerView m_ArrivalsRecyclerView;

    public ArrayList<AirportDataModel> m_ArrivalsDataSet;

    public FlightsFragment m_FlightsFragment;

    private OnFragmentInteractionListener mListener;

    public ArrivalsFragment() {

        // Instantiate the airport app's data model and generate set of random flights
        m_ArrivalsDataSet = new AirportDataModel().InitModel(20);
    }

    public static ArrivalsFragment newInstance() {
        return new ArrivalsFragment();
    }

    @Override
    public void onCreate(Bundle savedInstanceState) {
        super.onCreate(savedInstanceState);
    }

    @Override
    public View onCreateView(LayoutInflater inflater, ViewGroup container,
            Bundle savedInstanceState) {
        // Inflate the flights fragment layout
        View ArrivalsView =
             inflater.inflate(R.layout.fragment_arrivals, container, false);

        // Get flights fragment layout object
        m_FlightsFragment =
                (FlightsFragment) this.getParentFragment();

        // Instantiate arrivals recycler view object
        m_ArrivalsRecyclerView =
                ArrivalsView.findViewById(R.id.arrivals_recycler_view);

        // Invoke setupFlightsRecyclerView method,
        // which is the member of flight fragment class
        m_FlightsFragment.setupFlightsRecyclerView(m_ArrivalsRecyclerView, m_ArrivalsDataSet);

        return ArrivalsView;
    }

    // TODO: Rename method, update argument and hook method into UI event
    public void onButtonPressed(Uri uri) {
        if (mListener != null) {
            mListener.onFragmentInteraction(uri);
        }
    }

    @Override
    public void onAttach(Context context) {
        super.onAttach(context);
        if (context instanceof OnFragmentInteractionListener) {
            mListener = (OnFragmentInteractionListener) context;
        } else {
            throw new RuntimeException(context.toString()
                    + " must implement OnFragmentInteractionListener");
        }
    }

    @Override
    public void onDetach() {
        super.onDetach();
        mListener = null;
    }

    public interface OnFragmentInteractionListener {
        // TODO: Update argument type and name
        void onFragmentInteraction(Uri uri);
    }
}
DeparturesFragment.java
package com.epsilon.arthurvratz.airportapp;

import android.content.Context;
import android.net.Uri;
import android.os.Bundle;
import android.support.v7.widget.RecyclerView;
import android.view.LayoutInflater;
import android.view.View;
import android.view.ViewGroup;

import java.util.ArrayList;

public class DeparturesFragment extends android.support.v4.app.Fragment {

    public  RecyclerView m_DeparturesRecyclerView;

    public ArrayList<AirportDataModel> m_DeparturesDataSet;

    public FlightsFragment m_FlightsFragment;

    private OnFragmentInteractionListener mListener;

    public DeparturesFragment() {
        // Instantiate the airport app's data model and generate set of random flights
        m_DeparturesDataSet = new AirportDataModel().InitModel(20);
    }

    public static DeparturesFragment newInstance() {
        return new DeparturesFragment();
    }

    @Override
    public void onCreate(Bundle savedInstanceState) {
        super.onCreate(savedInstanceState);
    }

    @Override
    public View onCreateView(LayoutInflater inflater, ViewGroup container,
                             Bundle savedInstanceState) {

        // Inflate the flights fragment layout
        View DeparturesView =
               inflater.inflate(R.layout.fragment_arrivals, container, false);

	// Get flights fragment layout object
        m_FlightsFragment =
                (FlightsFragment) this.getParentFragment();

	// Instantiate departures recycler view object
        m_DeparturesRecyclerView =
                DeparturesView.findViewById(R.id.arrivals_recycler_view);

	// Instantiate arrivals recycler view object
        m_FlightsFragment.setupFlightsRecyclerView
               (m_DeparturesRecyclerView, m_DeparturesDataSet);

        return DeparturesView;
    }

    // TODO: Rename method, update argument and hook method into UI event
    public void onButtonPressed(Uri uri) {
        if (mListener != null) {
            mListener.onFragmentInteraction(uri);
        }
    }

    @Override
    public void onAttach(Context context) {
        super.onAttach(context);
        if (context instanceof OnFragmentInteractionListener) {
            mListener = (OnFragmentInteractionListener) context;
        } else {
            throw new RuntimeException(context.toString()
                    + " must implement OnFragmentInteractionListener");
        }
    }

    @Override
    public void onDetach() {
        super.onDetach();
        mListener = null;
    }

    public interface OnFragmentInteractionListener {
        // TODO: Update argument type and name
        void onFragmentInteraction(Uri uri);
    }
}
在这两个 Java 类中,我们通过[膨胀](https://www.google.com/search?q=inflating) flights 片段布局对象来重写 onCreateView(...) 方法的功能,以调用“FlightFragmentImpl”类的 setupFlightsRecyclerView(...) 方法。
        public void setupFlightsRecyclerView
             (RecyclerView recyclerView, ArrayList<AirportDataModel> dataSet)
        {
            m_RecyclerView = recyclerView;

            m_RecyclerView.setHasFixedSize(true);

            m_LayoutManager = new LinearLayoutManager(getContext());
            m_RecyclerView.setLayoutManager(m_LayoutManager);

            m_RecyclerAdapter = new FlightsRecyclerAdapter(dataSet, getContext());

            m_RecyclerView.setAdapter(m_RecyclerAdapter);
        }
使用 RecyclerView 渲染航班列表的另一个重要方面是实现 RecyclerView 适配器。由于 arrival 航班或 departure 航班的两个 RecyclerView 以类似的方式执行数据渲染,因此我们只需要为两个特定的 RecyclerView 实现一个单一的 flights RecyclerView 适配器。
此外,我们必须为每个航班项创建一个布局,显示航班特定信息,如时间、目的地、航空公司代码、航空公司标志和国旗。
flights_item.xml
<?xml version="1.0" encoding="utf-8"?>
<android.support.constraint.ConstraintLayout
  xmlns:android="http://schemas.android.com/apk/res/android"
    xmlns:app="http://schemas.android.com/apk/res-auto"
    xmlns:tools="http://schemas.android.com/tools"
    android:layout_width="match_parent"
    android:layout_height="wrap_content">

    <TextView
        android:id="@+id/flight_time"
        android:layout_width="51dp"
        android:layout_height="18dp"
        android:layout_marginBottom="8dp"
        android:layout_marginTop="24dp"
        android:text="3:07pm"
        android:textAppearance="@style/TextAppearance.AppCompat.Button"
        app:layout_constraintBottom_toBottomOf="parent"
        app:layout_constraintEnd_toStartOf="@+id/airlines_logo"
        app:layout_constraintStart_toStartOf="parent"
        app:layout_constraintTop_toTopOf="parent"
        app:layout_constraintVertical_bias="0.0" />

    <ImageView
        android:id="@+id/airlines_logo"
        android:layout_width="55dp"
        android:layout_height="48dp"
        android:layout_marginBottom="8dp"
        android:layout_marginTop="8dp"
        app:layout_constraintBottom_toBottomOf="parent"
        app:layout_constraintEnd_toStartOf="@+id/flight_code"
        app:layout_constraintStart_toEndOf="@+id/flight_time"
        app:layout_constraintTop_toTopOf="parent"
        app:srcCompat="@color/text_color_secondary" />

    <TextView
        android:id="@+id/flight_code"
        android:layout_width="59dp"
        android:layout_height="wrap_content"
        android:layout_marginBottom="8dp"
        android:layout_marginTop="24dp"
        android:text="TextView"
        app:layout_constraintBottom_toBottomOf="parent"
        app:layout_constraintEnd_toStartOf="@+id/flight_destination"
        app:layout_constraintStart_toEndOf="@+id/airlines_logo"
        app:layout_constraintTop_toTopOf="parent"
        app:layout_constraintVertical_bias="0.0" />

    <TextView
        android:id="@+id/flight_destination"
        android:layout_width="68dp"
        android:layout_height="wrap_content"
        android:layout_marginBottom="8dp"
        android:layout_marginTop="24dp"
        android:text="TextView"
        android:textAppearance="@style/TextAppearance.AppCompat.Body2"
        app:layout_constraintBottom_toBottomOf="parent"
        app:layout_constraintEnd_toStartOf="@+id/country_flag"
        app:layout_constraintStart_toEndOf="@+id/flight_code"
        app:layout_constraintTop_toTopOf="parent"
        app:layout_constraintVertical_bias="0.0" />

    <ImageView
        android:id="@+id/country_flag"
        android:layout_width="51dp"
        android:layout_height="42dp"
        android:layout_marginBottom="8dp"
        android:layout_marginTop="8dp"
        app:layout_constraintBottom_toBottomOf="parent"
        app:layout_constraintEnd_toStartOf="@+id/flight_status"
        app:layout_constraintStart_toEndOf="@+id/flight_destination"
        app:layout_constraintTop_toTopOf="parent"
        app:srcCompat="@android:color/black" />

    <TextView
        android:id="@+id/flight_status"
        android:layout_width="wrap_content"
        android:layout_height="20dp"
        android:layout_marginBottom="8dp"
        android:layout_marginTop="24dp"
        android:text="TextView"
        app:layout_constraintBottom_toBottomOf="parent"
        app:layout_constraintEnd_toEndOf="parent"
        app:layout_constraintStart_toEndOf="@+id/country_flag"
        app:layout_constraintTop_toTopOf="parent"
        app:layout_constraintVertical_bias="0.0" />

</android.support.constraint.ConstraintLayout>
FlightsRecyclerAdapter.java
package com.epsilon.arthurvratz.airportapp;

import android.content.Context;
import android.support.v7.widget.RecyclerView;
import android.view.LayoutInflater;
import android.view.View;
import android.view.ViewGroup;
import android.view.animation.Animation;
import android.widget.ImageView;
import android.widget.TextView;

import java.text.SimpleDateFormat;
import java.util.ArrayList;

public class FlightsRecyclerAdapter
  extends RecyclerView.Adapter<FlightsRecyclerAdapter.ViewHolder> {
    // Provide a reference to the views for each data item
    // Complex data items may need more than one view per item, and
    // you provide access to all the views for a data item in a view holder
    private ArrayList<AirportDataModel> m_DataModel;
    private Context m_context;

    public static class ViewHolder extends RecyclerView.ViewHolder {
        // each data item is just a string in this case
        public TextView m_TimeView;
        public TextView m_FlightCodeView;
        public TextView m_DestView;
        public TextView m_StatusView;
        public ImageView m_AirlinesLogoView;
        public ImageView m_CountryFlagView;
        public ViewHolder(View v) {
            super(v);

            // Instantiate each view object in the flights_item layout
            m_TimeView = v.findViewById(R.id.flight_time);
            m_FlightCodeView = v.findViewById(R.id.flight_code);
            m_DestView = v.findViewById(R.id.flight_destination);
            m_StatusView = v.findViewById(R.id.flight_status);

            m_AirlinesLogoView = v.findViewById(R.id.airlines_logo);
            m_CountryFlagView = v.findViewById(R.id.country_flag);
        }
    }

    // Provide a suitable constructor (depends on the kind of dataset)
    public FlightsRecyclerAdapter(ArrayList<AirportDataModel> m_dataModel, Context context) {
        m_DataModel = m_dataModel; m_context = context;
    }

    // Create new views (invoked by the layout manager)
    @Override
    public FlightsRecyclerAdapter.ViewHolder onCreateViewHolder(ViewGroup parent,
                                                   int viewType) {
        // create a new view
        View v = LayoutInflater.from(parent.getContext())
                .inflate(R.layout.flights_item, parent, false);

        ViewHolder vh = new ViewHolder(v);
        return vh;
    }

    // Replace the contents of a view (invoked by the layout manager)
    @Override
    public void onBindViewHolder(ViewHolder holder, int position) {
        // Retrieve specific data for each item rendered in the flights recycler view
        // and display these values in the specific views in the flights_item layout
        holder.m_TimeView.setText(new SimpleDateFormat("HH:mm")
                    .format(m_DataModel.get(position).m_Time));

        holder.m_StatusView.setText(m_DataModel.get(position).m_Status);
        holder.m_DestView.setText(m_DataModel.get(position).m_Destination);
        holder.m_FlightCodeView.setText(m_DataModel.get(position).m_Airlines.m_Flight);

        Context airlines_logo_context = holder.m_AirlinesLogoView.getContext();
        String airlines_logo = m_DataModel.get(position).m_Airlines.m_logoResId;
        holder.m_AirlinesLogoView.setImageResource(this.getResourceIdFromString
                                                  (airlines_logo_context, airlines_logo));

        Context flag_context = holder.m_CountryFlagView.getContext();
        String flag = "flag" + m_DataModel.get(position).m_DestResId;
        holder.m_CountryFlagView.setImageResource
                 (this.getResourceIdFromString(flag_context, flag));

        // Launching animation of each view in the flights_item layout
        setAnimation(holder.m_TimeView, position);
        setAnimation(holder.m_StatusView, position);
        setAnimation(holder.m_DestView, position);
        setAnimation(holder.m_FlightCodeView, position);
        setAnimation(holder.m_AirlinesLogoView, position);
        setAnimation(holder.m_CountryFlagView, position);
}

    public void setAnimation(View view, int pos)
    {
        // Instantinating the animation object
        Animation flightAnimation = android.view.animation.
                AnimationUtils.loadAnimation(m_context, R.anim.fade_interpolator);

        // Set animation duration
        flightAnimation.setDuration(700);

        // Starting the animation
        view.startAnimation(flightAnimation);
    }

    // Return the size of your dataset (invoked by the layout manager)
    @Override
    public int getItemCount() {
        return m_DataModel.size();
    }

    public int getResourceIdFromString(Context context, String resource)
    {
        return context.getResources().getIdentifier(resource,
                "drawable", context.getPackageName());
    }
}
“FlightsRecyclerViewAdapter”是扩展通用“RecyclerView.Adapter<FlightsRecyclerAdapter.ViewHolder>”的专用类功能的 Java 类。它实现了将数据绑定到 RecyclerView 所需的基本功能。具体来说,它实现了一个子 Java 类“ViewHolder”,负责通过实例化 flights_item 布局中的每个视图来渲染每个航班项。为了渲染特定项,应用程序会调用 onBindViewHolder(...) 重写方法,以编程方式设置要由 flights_item 布局中的各种视图显示的值。
添加航班时刻表模拟功能
正如我们在本文开头已经讨论过的,除了用于渲染特定航班数据的用户界面之外,我们还必须实现负责生成航班数据和时间线模拟的功能。在整个应用程序中,我们使用了一种模式,该模式在其他编程语言和框架中经常使用,类似于模型-视图-控制器。具体来说,在这种特殊情况下,我们将数据模型与执行实际航班数据集操作的某个数据控制器相结合。
AirportDataModel.java
package com.epsilon.arthurvratz.airportapp;

import java.util.ArrayList;
import java.util.Random;

public class AirportDataModel {

    long m_Time;
    String m_Status;
    String m_Destination;
    String m_DestResId;
    Airlines m_Airlines;

    public class Airlines
    {
        public Airlines(String logoResId, String flight)
        {
            this.m_Flight = flight;
            this.m_logoResId = logoResId;
        }

        public String m_logoResId;
        public String m_Flight;
    }

    public AirportDataModel() { }

    public AirportDataModel(long curr_time, String status, String dest,
                            String destResId, Airlines airlines)
    {
        this.m_Airlines = airlines;
        this.m_Status = status;
        this.m_Destination = dest;
        this.m_Time = curr_time;
        this.m_DestResId = destResId;
    }

    public AirportDataModel getRandomFlight() {

        Random rand_obj = new Random();

        // Instantiate airport flights destination data class object
        AirportFlightsDestData flightsData = new AirportFlightsDestData();

        // Generate random destination city index
        int flight_rnd_index = rand_obj.nextInt(
                flightsData.m_DestCities.size() - 1);

        // Get a string value of a destination city by its random index
        String destCity = flightsData.m_DestCities.get(flight_rnd_index);

        // Get specific country flag resource id associated with the name of the city
        String destResId = flightsData.getFlagResourceByDestCity(destCity);

        // Generate letters in the flight code
        char airline_code_let1 = (char) (rand_obj.nextInt('Z' - 'A') + 'A');
        char airline_code_let2 = (char) (rand_obj.nextInt('Z' - 'A') + 'A');

        String airline_code = "\0";

        // Append letters to the airline_code string value
        airline_code += new StringBuilder().append(airline_code_let1).toString();
        airline_code += new StringBuilder().append(airline_code_let2).toString();

        String flight_code = "\0";

        // Generate four digits of the flight code
        flight_code += new StringBuilder().append(rand_obj.nextInt(9)).toString();
        flight_code += new StringBuilder().append(rand_obj.nextInt(9)).toString();
        flight_code += new StringBuilder().append(rand_obj.nextInt(9)).toString();
        flight_code += new StringBuilder().append(rand_obj.nextInt(9)).toString();

        // Construct a string containing the full airline code

        flight_code = airline_code + " " + flight_code;

        // Instantiate and construct airlines data object
        Airlines airlines = new Airlines(flightsData.m_airlinesResName.get(rand_obj.nextInt(
                flightsData.m_airlinesResName.size() - 1)), flight_code);

        // Get random status string value
        String flight_status = flightsData.m_Status.get(
                rand_obj.nextInt(flightsData.m_Status.size() - 1));

        // Generate a random flight time
        int time_hours_sign = rand_obj.nextInt(2);

        // Generate an hours offset from the current system time
        int time_hours_offset = rand_obj.nextInt(48);

        // Get the current system time
        long currTimeMillis = System.currentTimeMillis();

        // Determine the random flight time in ms
        if (time_hours_sign > 0)
            currTimeMillis += time_hours_offset * 3.6e+6;
        else currTimeMillis -= time_hours_offset * 3.6e+6;

        // Instantiate and return flight item data object based on the
        // data previously generated
        return new AirportDataModel(currTimeMillis,
                flight_status, destCity, destResId, airlines);
    }

    public ArrayList<AirportDataModel> InitModel(int numOfItems)
    {
        // Init model by generated a list of random flight items
        ArrayList<AirportDataModel> newDataModel = new ArrayList<>();
        for (int index = 0; index < numOfItems; index++) {
            newDataModel.add(this.getRandomFlight());
        }

        return newDataModel;
    }

    public ArrayList<AirportDataModel> Simulate(ArrayList<AirportDataModel> dataSet)
    {
        // Get current system time in ms
        long currTimeMillis = System.currentTimeMillis();

        // Get a random current time being simulated
        currTimeMillis += new Random().nextInt(48) * 3.6e+6;

        // Perform a linear search to filter out all flights that already have taken place
        for (int index = 0; index < dataSet.size(); index++) {
            AirportDataModel item = dataSet.get(index);
            if (item.m_Time <= currTimeMillis) {

                // Remove current flight item
                dataSet.remove(item);

                // Generate and add new flight item
                dataSet.add(new Random().nextInt(dataSet.size()), getRandomFlight());
            }
        }

        return dataSet;
    }

    public ArrayList<AirportDataModel> filterByTime(
            ArrayList<AirportDataModel> dataSet, long time_start, long time_end) {
        ArrayList<AirportDataModel> targetDataSet = new ArrayList<>();

        // Perform a linear search to filter out flights which time belongs to a given range
        for (int index = 0; index < dataSet.size(); index++) {
            AirportDataModel item = dataSet.get(index);
            if (item.m_Time > time_start && item.m_Time < time_end)
                targetDataSet.add(item);
        }

        return targetDataSet;
    }
}
在此类中,我们实现了生成和操作航班数据所需的所有方法。我们需要做的第一件事是实现一个 getRandomFlight(...) 方法来生成随机航班数据。该方法基本上依赖于使用静态声明的数据。为此,我们创建了另一个类,该类也定义和操作航班特定的数据。
AirportFlightsDestData.java
package com.epsilon.arthurvratz.airportapp;

import java.util.Arrays;
import java.util.List;

public class AirportFlightsDestData
{
    public class CountryCityRel
    {
        public CountryCityRel(int countryId, int[] cityIds)
        {
            this.m_cityIds = cityIds;
            this.m_countryId = countryId;
        }

        private int m_countryId;
        private int[] m_cityIds;
    }

    public String getFlagResourceByDestCity(String destCity)
    {
        int countryId = -1;

        // Performing a linear search to find the dest city index
        for (int index = 0; index < m_DestCities.size(); index++) {
            if (m_DestCities.get(index) == destCity) {

                // Performing a linear search to find the dest country and return country-id
                for (int country = 0; country < m_CountryCityRelTable.size(); country++) {
                    int[] cityIds = m_CountryCityRelTable.get(country).m_cityIds;
                    for (int city = 0; city < cityIds.length && cityIds != null; city++)
                        countryId = (cityIds[city] == index) ?
                                m_CountryCityRelTable.get(country).m_countryId : countryId;
                }
            }
        }

        return m_countryResName.get(countryId);
    }

    public List<String> m_DestCities = Arrays.asList(
            "Atlanta", "Beijing", "Dubai", "Tokyo", "Los Angeles", "Chicago",
            "London", "Hong Kong",
            "Shanghai", "Paris", "Amsterdam", "Dallas", "Guangdong",
            "Frankfurt", "Istanbul", "Delhi", "Tangerang",
            "Changi", "Incheon", "Denver", "New York", "San Francisco",
            "Madrid", "Las Vegas", "Barcelona", "Mumbai", "Toronto");

    public List<String> m_countryResName = Arrays.asList(
        "peoplesrepublicofchina", "unitedstates",
        "unitedarabemirates", "japan", "unitedkingdom",
        "hongkong", "france", "netherlands", "germany", "turkey", "india", "indonesia",
        "singapore", "southkorea", "spain", "canada");

    public List<String> m_airlinesResName = Arrays.asList(
            "aa2", "aeromexico", "airberlin", "aircanada",
            "airfrance2", "airindia2", "airmadagascar",
            "airphillipines", "airtran",
            "alaskaairlines3", "alitalia", "austrian2", "avianca1",
            "ba2", "brusselsairlines2",
            "cathaypacific21", "china_airlines", "continental",
            "croatia2", "dagonair", "delta3", "elal2",
            "emirates_logo2", "ethiopianairlines4",
            "garudaindonesia", "hawaiian2", "iberia2",
            "icelandair", "jal2", "klm2", "korean",
            "lan2", "lot2", "lufthansa4", "malaysia",
            "midweat", "newzealand", "nwa1", "oceanic",
            "qantas2", "sabena2", "singaporeairlines",
            "southafricanairways2", "southwest2",
            "spirit", "srilankan", "swiss", "swissair3",
            "tap", "tarom", "thai4", "turkish",
            "united", "varig", "vietnamairlines", "virgin4", "wideroe1");

    public List<CountryCityRel> m_CountryCityRelTable =
            Arrays.asList(new CountryCityRel(0, new int[] { 1, 8, 12, }),
                          new CountryCityRel(1, new int[] { 0, 4, 5, 11, 19, 20, 21,23 }),
                          new CountryCityRel(2, new int[] { 2 }),
                          new CountryCityRel(3, new int[] { 3 }),
                          new CountryCityRel(4, new int[] { 6 }),
                          new CountryCityRel(5, new int[] { 7 }),
                          new CountryCityRel(6, new int[] { 9 }),
                          new CountryCityRel(7, new int[] { 10 }),
                          new CountryCityRel(8, new int[] { 13 }),
                          new CountryCityRel(9, new int[] { 14 }),
                          new CountryCityRel(10, new int[] { 15, 22, 25 }),
                          new CountryCityRel(11, new int[] { 16 }),
                          new CountryCityRel(12, new int[] { 17 }),
                          new CountryCityRel(13, new int[] { 18 }),
                          new CountryCityRel(14, new int[] { 21, 24 }),
                          new CountryCityRel(15, new int[] { 26 }));

    public List<String> m_Status =
           Arrays.asList("Check-In", "Canceled", "Expected", "Delayed");
}
该类包含一组声明的通用“List”对象,并进行了静态初始化,用于存储有关航班目的地城市的数据,以及包含航空公司标志和国家国旗的资源名称列表。此外,该类还声明了 `getFlagResourceByDestCity` 方法,用于通过目的地城市名称检索特定资源名称的数据。
在机场数据模型类中,我们必须声明特定的数据字段变量来存储每个航班的数据。
    long m_Time;
    String m_Status;
    String m_Destination;
    String m_DestResId;
    Airlines m_Airlines;

    public class Airlines
    {
        public Airlines(String logoResId, String flight)
        {
            this.m_Flight = flight;
            this.m_logoResId = logoResId;
        }

        public String m_logoResId;
        public String m_Flight;
    }
此外,在此类中,我们实现了以下方法,包括 getRandomFlight(...)、InitModel(...)、Simulate(...) 和 filterByTime(...)。正如我们已经讨论过的,getRandomFlight 方法用于为随机航班生成随机数据,该数据稍后将被添加到航班列表中。为此,我们在 ArrivalsFragment 和 DeparturesFragment 类的构造函数中调用 InitModel 方法,以便每个构造函数都实例化机场数据模型类对象,调用此方法,并接收其自身的航班列表的数组列表对象的副本。
    public ArrivalsFragment() {
        m_ArrivalsDataSet = new AirportDataModel().InitModel(20);
    }
为了在航班时刻表模拟过程中提供航班动态更新列表,我们必须为应用程序的活动类重写默认的 onResume 方法,如下所示。
    @Override
    protected void onResume() {
        super.onResume();
        this.findViewById(R.id.search_bar).requestFocus();

        startSimulation();
    }
在此方法中,我们调用另一个 Simulate(...) 方法来启动模拟过程。
  public void Simulate() {
        simTask = new TimerTask() {
            @Override
            public void run() {
                handler.post(new Runnable() {
                    @Override
                    public void run() {

                       // Instantiate flights fragment object
                       FlightsFragment flightsFragment = (FlightsFragment)
                           m_FragmentMgr.findFragmentById(R.id.airport_fragment_container);

                        m_flightsNavigationView.setSelectedItemId(R.id.flights_now);

                        ArrayList<AirportDataModel> dataSet = null;
                        RecyclerView recyclerView = null;

                        // Determine the currently selected tab
                        TabLayout tabLayout = findViewById(R.id.flights_destination_tabs);

                        if (tabLayout.getTabAt(0).isSelected()) {
                            dataSet = flightsFragment.m_ArrivalsFragment.m_ArrivalsDataSet;
                            recyclerView =
                             flightsFragment.m_ArrivalsFragment.m_ArrivalsRecyclerView;
                        }

                        else if (tabLayout.getTabAt(1).isSelected()) {
                            dataSet = flightsFragment.m_DeparturesFragment.m_DeparturesDataSet;
                            recyclerView =
                              flightsFragment.m_DeparturesFragment.m_DeparturesRecyclerView;
                        }

                        // Invoking airport data model's Simulate method
                        m_AirportDataModel.Simulate(dataSet);

                        // Instantinating the new object for FlightsRecyclerAdapter class and
                        // pass the dataset object as
                        // one of the adapter's constructor parameters

                        FlightsRecyclerAdapter recyclerAdapter
                                = new FlightsRecyclerAdapter(dataSet, getBaseContext());

                        // For the current recycler view object setting the new adapter
                        recyclerView.setAdapter(recyclerAdapter);

                        // Updating the data bound to the new recycler adapter
                        recyclerAdapter.notifyDataSetChanged();
                        recyclerAdapter.notifyItemRangeChanged(0, dataSet.size());
                    }
                });
            }
        };
    }
在上面列出的此方法中,我们创建了一个由计时器实例生成的计时器任务线程。
    private void startSimulation()
    {
        this.Simulate(); new Timer().schedule(simTask, 50, 10000);
    }
每次系统计时器按预定时间运行时,都会调用 run(...) 方法。在此方法中,我们调用上面列出的机场数据模型的 Simulate(...) 方法。该方法确定系统时间,并过滤掉所有时间值小于当前系统时间的航班项。之后,我们创建先前讨论过的 RecyclerView 控制器的一个新实例,并将新的航班列表作为其构造函数的参数传递给它。之后,我们最终调用适配器的 notifyDataSetChange(...) 和 notifyItemRangeChanged(...) 方法来使正在更新的数据无效并反映其在 RecyclerView 中的更改。
添加自定义搜索视图功能
正如我们在上面已经讨论过的,我们的机场应用程序实现了渲染在应用程序主窗口顶部的搜索视图,用于通过部分匹配来执行航班数据的索引搜索。此时,我们要做的就是为该自定义搜索视图添加搜索功能。为此,我们在主应用程序活动类的可搜索带按钮侦听器中实现 onTextChanged 方法。
   public class SearchableWithButtonListener implements View.OnClickListener, TextWatcher
    {
        @Override
        public void beforeTextChanged(CharSequence charSequence, int i, int i1, int i2) {
        }

        @Override
        public void onTextChanged(CharSequence charSequence, int i, int i1, int i2) {
            // Instantiating the flights fragment object
            FlightsFragment flightsFragment = (FlightsFragment)
                    m_FragmentMgr.findFragmentById(R.id.airport_fragment_container);

            RecyclerView flightsRecyclerView = null;
            ArrayList<AirportDataModel> DataSet, oldDataSet = null;

            // Determining the currently select tab
            TabLayout tabLayout = findViewById(R.id.flights_destination_tabs);

            if (tabLayout.getTabAt(0).isSelected()) {
                // Instantiating the currently active recycler view's object
                flightsRecyclerView =
                       flightsFragment.m_ArrivalsFragment.m_ArrivalsRecyclerView;

                // Retrieving a list of arrival flights
                oldDataSet = flightsFragment.m_ArrivalsFragment.m_ArrivalsDataSet;
            }

            else if (tabLayout.getTabAt(1).isSelected()) {
                // Instantiating the currently active recycler view's object
                flightsRecyclerView =
                   flightsFragment.m_DeparturesFragment.m_DeparturesRecyclerView;

                            // Retrieving a list of departure flights</span>
                oldDataSet = flightsFragment.m_DeparturesFragment.m_DeparturesDataSet;
            }

            // Perform a check if the string is not empty
            if (!charSequence.toString().isEmpty()) {
                // If so instantiate the flights indexed search object
                // and invoke doSearch method
                // to obtain the list flights which data matches by the partial match
                DataSet = new FlightsIndexedSearch().
                       doSearch(charSequence.toString(), oldDataSet);

                if (DataSet.size() == 0) {
                    DataSet = oldDataSet;
                }
            }

            else DataSet = oldDataSet;

            // Instantiate the new adapter object and
            // pass the new filtered dataset as argument
            FlightsRecyclerAdapter recyclerAdapter
                   = new FlightsRecyclerAdapter(DataSet, getBaseContext());

            // Setting up the new recycler view's adapter
            flightsRecyclerView.setAdapter(recyclerAdapter);

            // Reflect changes in recycler view
            recyclerAdapter.notifyDataSetChanged();

            recyclerAdapter.notifyItemRangeChanged(0, DataSet.size());
        }

        @Override
        public void afterTextChanged(Editable editable) {

        }

        @Override
        public void onClick(View view) {
            if (!m_DrawerLayout.isDrawerOpen(GravityCompat.START))
                m_DrawerLayout.openDrawer(GravityCompat.START);
        }
    }
当用户在搜索视图中输入文本时,将调用重写的事件处理方法 onTextChanged。在此方法中,我们确定当前活动的 RecyclerView 并执行 doSearch 方法以获取通过部分匹配过滤的航班项列表。之后,我们实例化一个新的适配器并将获取的数据集传递给该适配器。最后,我们在当前活动的 RecyclerView 中使此数据无效。下面提供的代码片段包含 doSearch 方法的实现。
package com.epsilon.arthurvratz.airportapp;

import java.util.ArrayList;
import java.util.regex.Pattern;

public class FlightsIndexedSearch {

    public ArrayList<AirportDataModel> doSearch(String text,
               ArrayList<AirportDataModel> dataSet) {

        // Instantinating the empty flights array list object
        ArrayList<AirportDataModel> targetDataset = new ArrayList<>();

        // Performing a linear search to find all flight items which data values
        // match the specific pattern
        for (int index = 0; index < dataSet.size(); index++) {
            AirportDataModel currItem = dataSet.get(index);

            // Applying search pattern to the flight destination string value
            boolean dest = Pattern.compile(".*" + text + ".*",
                    Pattern.CASE_INSENSITIVE).matcher(currItem.m_Destination).matches();

            // Applying search pattern to the airlines flight code string value
            boolean flight = Pattern.compile(".*" + text + ".*",
                    Pattern.CASE_INSENSITIVE).matcher(currItem.m_Airlines.m_Flight).matches();

            // Applying search pattern to the flight status string value
            boolean status = Pattern.compile(".*" + text + ".*",
                    Pattern.CASE_INSENSITIVE).matcher(currItem.m_Status).matches();

            // If one of these values matches the pattern add the current item to the
            // target dataset
            if (dest != false || flight != false || status != false) {
                targetDataset.add(currItem);
            }
        }

        return targetDataset;
    }
}
添加底部导航栏功能
底部导航栏的功能与用于执行航班索引搜索的功能非常相似。为了提供此功能,我们必须在主应用程序活动类中设置导航项选定监听器。
    m_flightsNavigationView.setOnNavigationItemSelectedListener(
                new BottomNavigationView.OnNavigationItemSelectedListener() {
            @Override
            public boolean onNavigationItemSelected(@NonNull MenuItem menuItem) {
                FlightsFragment flightsFragment = (FlightsFragment)
                        m_FragmentMgr.findFragmentById(R.id.airport_fragment_container);

                RecyclerView recyclerView = null;
                ArrayList<AirportDataModel> dataSet = null;
                FlightsRecyclerAdapter recyclerAdapter = null;

                // Determining the currently selected tab
                TabLayout tabLayout = findViewById(R.id.flights_destination_tabs);

                if (tabLayout.getTabAt(0).isSelected()) {

                    // Getting the currently active recycler view object
                    recyclerView = flightsFragment.m_ArrivalsFragment.m_ArrivalsRecyclerView;

                    // Getting the dataset of the currently active recycle view
                    // (e.g. arrival flights dataset)
                    dataSet = flightsFragment.m_ArrivalsFragment.m_ArrivalsDataSet;
                }

                else if (tabLayout.getTabAt(1).isSelected()) {
                    // Getting the currently active recycler view object
                    recyclerView =
                        flightsFragment.m_DeparturesFragment.m_DeparturesRecyclerView;

                    // Getting the dataset of the currently active recycle view
                    // (e.g. departure flights dataset
                    dataSet = flightsFragment.m_DeparturesFragment.m_DeparturesDataSet;
                }

                // Get current system time value
                long curr_time = System.currentTimeMillis();

                if (menuItem.getItemId() == R.id.flights_prev)
                {
                    // Instantinating the new recycler adapter object
                    // and pass the filtered list of previous flights items
                    // returned by the filterByTime method
                    recyclerAdapter = new FlightsRecyclerAdapter
                                (m_AirportDataModel.filterByTime(dataSet,
                                curr_time - (long)3.6e+6 * 48, curr_time), getBaseContext());
                }

                else if (menuItem.getItemId() == R.id.flights_now)
                {
                    // Instantinating the new recycler adapter object and
                    // pass the filtered list of current flights items
                    // returned by the filterByTime method

                    recyclerAdapter = new FlightsRecyclerAdapter
                            (m_AirportDataModel.filterByTime(dataSet,
                            curr_time - (long)3.6e+6 * 24, curr_time +
                            (long)3.6e+6 * 24), getBaseContext());

                else if (menuItem.getItemId() == R.id.flights_next)
                {
                    // Instantinating the new recycler adapter object and
                    // pass the filtered list of next flights items
                    // returned by the filterByTime method

                    recyclerAdapter = new FlightsRecyclerAdapter
                            (m_AirportDataModel.filterByTime(dataSet,
                            curr_time, curr_time + (long)3.6e+6 * 48), getBaseContext());
                }

                // Setting up the new recycler view's adapter
                recyclerView.setAdapter(recyclerAdapter);

                // Reflect changes in recycler view
                recyclerAdapter.notifyDataSetChanged();
                recyclerAdapter.notifyItemRangeChanged(0, dataSet.size());

                return true;
            }
        });
在此方法中,我们首先确定当前活动的 RecyclerView 并获取其对象。之后,我们执行一个检查,看看用户是否切换了特定的底部导航按钮,并通过调用 filterByTime 方法过滤掉所有匹配给定时间线标准的航班。最后,我们创建一个新的 RecyclerView 适配器,并将数据集传递给其构造函数,从而使当前活动的 RecyclerView 无效。
关注点
在本文中,我们讨论了使用各种 Android 和 Java 编程语言技术创建和开发高级 Android 应用程序的几个方面,包括创建自定义视图和布局,提供基于导航抽屉的应用程序,使用 Fragments 和 RecyclerView,实现自定义数据适配器和控制器等。
历史
- 2018 年 8 月 2 日 - 文章的第一个修订版发布...