
如何在 WPF 中制作一个步行机器人 -- 第三部分:发射材料、多边形和故事板
5.00/5 (24投票s)
关于如何使用 C# 代码在 WPF 中制作动画 3D 机器人的系列文章的最后一篇。
引言
本系列文章介绍了如何使用 C# 代码在 WPF 中通过建模和动画形状来创建一个简单的角色。示例中涉及的 XAML 最少。取而代之的是,文章中包含了创建基本形状类的 C# 类,并通过构建这些形状来构成模型。
在前两篇文章中,我们讨论了三角形、矩形、圆形和圆柱体等基本形状。我们还讨论了背部材料以及平面着色和光滑着色。我们还涵盖了一些简单的旋转变换和动画旋转。
在最后一篇文章中,我们将添加一些制作机器人所需的其他形状,并展示如何使用我们之前看到的简单旋转变换来动画我们机器人的手臂和腿。我们还将介绍故事板和发射材料。
故事板将用于让我们的机器人在预定路径上行走。故事板和动画是在 C# 中完成的,而不是在 XAML 中。我们将使用三角形网格、动画、材料和故事板创建一个非常简单的角色,并使用我们在第一部分中涵盖的相同环境、相机和灯光来让他动起来。
机器人所有代码都包含在文章的下载文件中。文章中只会包含代码片段。
此示例是用 Visual Studio 2010 和 4.0 框架创建的。示例的所有源代码都包含在 zip 文件中。您可以运行演示来查看步行机器人场景。
为了让我们的机器人遵循人体比例,我们需要一些稍微更复杂的形状。我们可以用立方体或圆柱体来制作他,但为了获得更优雅的外观,我们将引入一些可以向左或向右倾斜,以及从底部到顶部和从前到后逐渐变细的形状。我们要添加的第一个新类是多边形类。
它只需要一个点列表即可存在
public List<point3d> points;

public WpfPolygon(List<point3d> Points)
{
    points = new List<point3d>();

    foreach (Point3D p in Points)
    {
        Point3D p1 = clonePoint(p);
        points.Add(p1);
    }
}
多边形类用于支持我们的楔形类,这样楔形的前后不必是方形的。
多边形类的全部代码都在 zip 文件中,但我只想介绍一下如何通过将多边形分成三角形来将其添加到网格中。
public void addToMesh(MeshGeometry3D mesh, List<point3d> pointList)
{
    if (pointList.Count == 3)
    {
        WpfTriangle.addTriangleToMesh(pointList[0], pointList[1], pointList[2], mesh);
    }
    else if (pointList.Count == 4)
    {
        WpfTriangle.addTriangleToMesh(pointList[0], pointList[1], pointList[2], mesh);
        WpfTriangle.addTriangleToMesh(pointList[0], pointList[2], pointList[3], mesh);
    }
    else if (pointList.Count > 4)
    {
        Point3D center = GetCenter();

        List<point3d> temp = new List<point3d>();

        foreach (Point3D p in pointList)
        {
            temp.Add(p);
        }

        temp.Add(pointList[0]);

        for (int i = 1; i < temp.Count; i++)
        {
            WpfTriangle.addTriangleToMesh(temp[i], center, temp[i - 1], mesh);
        }
    }
}
这是一种非常简单的对多边形进行三角剖分的方法。如果多边形是三角形,或者有 4 个点,因此由 2 个三角形组成,那么这项工作很简单。对于它有超过 4 个点的通用情况,我们必须找到中心,然后通过将每边的 2 个点与中心点组合来创建三角形。当然,问题是这只适用于多边形完全凸起的情况。如果多边形有任何凹陷部分,此方法将不总是有效。在未来的文章中,我将展示如何使用“耳切法”来三角剖分多边形。但对于这个项目,我们简单的三角剖分方法就足够了。
我们将添加的楔形类允许我们将形状定义为立方体的一部分。对于我们的机器人,我们将采用 Android 类型,模拟人类。人体的比例非常一致。如果您在 Google 上搜索“人体比例”,可以轻松找到解释人体比例的在线图片。为了较好地遵循这些比例,楔形类允许我们通过独立偏移顶部和底部面的所有边来变形立方体。这会产生不为方形的前侧和侧面,因此我们使用多边形来定义楔形的这些部分。
楔形类包含在项目 zip 文件中。这是构造函数
public WpfWedge(WpfCube containingCube,
    // the values below are all expressed as percent of the cube dimensions
    double TopWidth,
    double BottomWidth,
    double TopDepth,
    double BottomDepth,
    double Height,
    double TopOffSet, // % offset from top
    double XAlignmentTop, // % offset to left or right
    double XAlignmentBottom,
    double ZAlignmentTop, // % offset to front or back
    double ZAlignmentBottom
    )
{
    cube = new WpfCube(containingCube);

    front = new WpfPolygon();
    back = new WpfPolygon();

    // save percentages
    topWidthPercent = TopWidth;
    bottomWidthPercent = BottomWidth;
    topDepthPercent = TopDepth;
    bottomDepthPercent = BottomDepth;
    heightPercent = Height;
    topOffSetPercent = TopOffSet;
    xAlignmentTopPercent = XAlignmentTop;
    xAlignmentBottomPercent = XAlignmentBottom;
    zAlignmentTopPercent = ZAlignmentTop;
    zAlignmentBottomPercent = ZAlignmentBottom;

    // convert to actual dimensions based on cube
    TopWidth *= cube.width;
    BottomWidth *= cube.width;
    TopDepth *= cube.depth;
    BottomDepth *= cube.depth;
    Height *= cube.height;
    TopOffSet *= cube.height;
    XAlignmentTop *= cube.width;
    XAlignmentBottom *= cube.width;
    ZAlignmentTop *= cube.depth;
    ZAlignmentBottom *= cube.depth;

    topWidth = TopWidth;
    bottomWidth = BottomWidth;
    topDepth = TopDepth;
    bottomDepth = BottomDepth;
    height = Height;
    topOffSet = TopOffSet;
    xAlignmentTop = XAlignmentTop;
    xAlignmentBottom = XAlignmentBottom;
    zAlignmentTop = ZAlignmentTop;
    zAlignmentBottom = ZAlignmentBottom;

    topCenter = cube.centerTop();
    topCenter.Y -= TopOffSet;
    topCenter.Z += ZAlignmentTop;

    topFront = cube.centerTop();
    topFront.Y -= TopOffSet;
    topFront.Z += ZAlignmentTop;
    topFront.Z += topDepth / 2;
}
请注意,楔形是根据包含的立方体定义的,然后宽度和偏移变化是根据该立方体尺寸的比例来描述的。在我们的例子中,定义是包含整个身体、其宽度、高度和深度的立方体。这使我们能够轻松地将身体部位的相对大小从人体比例图像中转换过来,然后为每个部分创建一个楔形。
我们的一些身体部位,如手臂和手,显然是彼此的镜像,因此为了简化工作,添加了一个方法来创建楔形的镜像。
public WpfWedge mirrorX()
{
    WpfWedge wedge2 = new WpfWedge(cube,
        topWidthPercent,
        bottomWidthPercent,
        topDepthPercent,
        bottomDepthPercent,
        heightPercent,
        topOffSetPercent,
        -xAlignmentTopPercent,
        -xAlignmentBottomPercent,
        zAlignmentTopPercent,
        zAlignmentBottomPercent);

    return wedge2;
}
为了真正将我们的楔形实现为三角形网格,我们需要一个方法来首先从我们的类成员创建楔形,然后另一个方法将该楔形作为一系列三角形添加到网格中。
public void makeWedge()
{
    double xpad = (cube.width - topWidth) / 2;
    double zpad = (cube.depth - topDepth) / 2;

    Point3D p1 = cubeOffset(
        xpad + xAlignmentTop,
        topOffSet,
        (cube.depth - zpad) + zAlignmentTop
        );
    front.addPoint(p1);

    Point3D p2 = cubeOffset(
        (cube.width - xpad) + xAlignmentTop,
        topOffSet,
        (cube.depth - zpad) + zAlignmentTop
        );
    front.addPoint(p2);

    xpad = (cube.width - bottomWidth) / 2;
    zpad = (cube.depth - bottomDepth) / 2;

    Point3D p3 = cubeOffset(
        (cube.width - xpad) + xAlignmentBottom,
        topOffSet + height,
        (cube.depth - zpad) + zAlignmentBottom
        );
    front.addPoint(p3);

    Point3D p4 = cubeOffset(
        xpad + xAlignmentBottom,
        topOffSet + height,
        (cube.depth - zpad) + zAlignmentBottom
        );
    front.addPoint(p4);

    xpad = (cube.width - topWidth) / 2;
    zpad = (cube.depth - topDepth) / 2;

    Point3D p5 = cubeOffset(
        xpad + xAlignmentTop,
        topOffSet,
        zpad + zAlignmentTop
        );
    back.addPoint(p5);

    Point3D p6 = cubeOffset(
        (cube.width - xpad) + xAlignmentTop,
        topOffSet,
        zpad + zAlignmentTop
        );
    back.addPoint(p6);

    xpad = (cube.width - bottomWidth) / 2;
    zpad = (cube.depth - bottomDepth) / 2;

    Point3D p7 = cubeOffset(
        (cube.width - xpad) + xAlignmentBottom,
        topOffSet + height,
        zpad + zAlignmentBottom
        );
    back.addPoint(p7);

    Point3D p8 = cubeOffset(
        xpad + xAlignmentBottom,
        topOffSet + height,
        zpad + zAlignmentBottom
        );
    back.addPoint(p8);
}

public void addToMesh(MeshGeometry3D mesh, bool combineVertices)
{
    if (front.points.Count > 2)
    {
        front.reversePoints();
        back.reversePoints();

        List<point3d> frontPoints = new List<point3d>();
        foreach (Point3D p in front.points)
        {
            frontPoints.Add(p);
        }
        frontPoints.Add(front.points[0]);

        List<point3d> backPoints = new List<point3d>();
        foreach (Point3D p in back.points)
        {
            backPoints.Add(p);
        }
        backPoints.Add(back.points[0]);

        for (int i = 1; i < frontPoints.Count; i++)
        {
            WpfTriangle.addTriangleToMesh(frontPoints[i - 1],
		backPoints[i - 1], frontPoints[i], mesh, combineVertices);
            WpfTriangle.addTriangleToMesh(frontPoints[i],
		backPoints[i - 1], backPoints[i], mesh, combineVertices);
        }
    }

    back.reversePoints();

    front.addToMesh(mesh);
    back.addToMesh(mesh);
}
我们将楔形构建为两个多边形。我们通过将两个多边形的点缝合在一起形成三角形来添加侧面,然后让前后多边形自行添加到网格中。请注意,在几个地方,我们必须颠倒多边形中点的顺序。这种事情有时是必需的,因为 WPF 3D 网格中的缠绕方向。请记住,3D WPF 对象只有一面。因此,在构建实心对象时,每个面的缠绕方向都必须指向对象的外部。这也将确保对象的着色正确。
我们可以用楔形来制作我们整个机器人。相反,我决定只对手使用楔形,而对其他部分使用管状,以提供更圆润的外观。管状是一种方便的形状,类似于圆柱体,但可以有任意数量的圆,而不是像圆柱体那样只有 2 个。它也可以像楔形一样在不同方向上变细。我安排了这样一种方式,即可以通过首先定义一个楔形,然后让楔形创建相同尺寸的管状来构建管状。这是制作管状的楔形类方法。
public WpfTube makeTube(int NSides, bool addBottom, bool addTop)
{
    Point3D p = cube.centerTop();

    p.Y -= topOffSet;
    p.X += xAlignmentTop;
    p.Z += zAlignmentTop;

    WpfCircle top = new WpfCircle(NSides, p, topDepth / 2, topWidth / 2);
    top.RotateZY(p, WpfUtils.radians_from_degrees(90));

    Point3D p2 = cube.centerTop();
    p2.Y -= topOffSet + height;
    p2.X += xAlignmentBottom;
    p2.Z += zAlignmentBottom;

    WpfCircle bottom = new WpfCircle(NSides, p2, bottomDepth / 2, bottomWidth / 2);
    bottom.RotateZY(p2, WpfUtils.radians_from_degrees(90));

    WpfTube tube = new WpfTube(NSides);

    if (addTop)
    {
        tube.closeTop = true;
    }

    tube.addCircle(top);
    tube.addCircle(bottom);

    if (addBottom)
    {
        tube.closeBottom = true;
    }

    return tube;
}
管状类的代码也包含在本文项目的 zip 文件中。这是将管状添加到网格中的代码。
public void addToMesh(MeshGeometry3D mesh, bool combineVertices)
{
    for (int c = 1; c < circles.Count; c++)
    {
        WpfCircle front = circles[c - 1];
        WpfCircle back = circles[c];

        if (front.points.Count > 2)
        {
            List<point3d> frontPoints = new List<point3d>();
            foreach (Point3D p in front.points)
            {
                frontPoints.Add(p);
            }
            frontPoints.Add(front.points[0]);

            List<point3d> backPoints = new List<point3d>();
            foreach (Point3D p in back.points)
            {
                backPoints.Add(p);
            }
            backPoints.Add(back.points[0]);

            for (int i = 1; i < frontPoints.Count; i++)
            {
                WpfTriangle.addTriangleToMesh(frontPoints[i - 1],
		backPoints[i - 1], frontPoints[i], mesh, combineVertices);
                WpfTriangle.addTriangleToMesh(frontPoints[i],
		backPoints[i - 1], backPoints[i], mesh, combineVertices);
            }
        }
    }

    if (closeTop)
    {
        circles[0].addToMesh(mesh, false);
    }

    if (closeBottom)
    {
        circles[circles.Count - 1].addToMesh(mesh, false);
    }
}
我们还想对早期文章中的圆柱体类进行一些更改。我们将使用圆柱体作为机器人眼睛。我们希望眼睛看起来像发光灯,因此我们不希望眼睛上有任何着色。相反,我们想使用发射材料来构建眼睛的网格。因此,我们将此方法添加到圆柱体类中。
public GeometryModel3D CreateModelEmissive(Color color)
{
    MeshGeometry3D mesh = new MeshGeometry3D();

    addToMesh(mesh, true, false);

    Material materialBack = new DiffuseMaterial
		(new SolidColorBrush(System.Windows.Media.Colors.Black));
    Material material = new EmissiveMaterial(new SolidColorBrush(color));
    MaterialGroup materialGroup = new MaterialGroup();
    materialGroup.Children.Add(materialBack);
    materialGroup.Children.Add(material);

    GeometryModel3D model = new GeometryModel3D(mesh, materialGroup);

    return model;
}
请注意,我们为发射圆柱体创建了两种材料——一种黑色漫射材料,然后是所需颜色的发射材料。我们将它们组合成一个材料组,然后将其用作模型的材料。这是必要的,因为 DirectX / WPF 光栅化的工作方式存在一个故障或奇特之处。要查看没有此技巧会发生什么,您可以编辑项目以尝试仅对眼睛使用发射材料。结果是眼睛并非在应该出现时总是可见。为了使模型正确显示,必须在发射材料下方使用黑色材料。
这完成了我们机器人所需的形状类。机器人本身被定义为一个单独的类。代码已包含。这是成员变量和构造函数。
private RotateTransform3D rotateTransform;
private TranslateTransform3D translateTransform;

private Color color = Colors.Silver;

private Point3D hipJoint;
private Point3D kneeJoint;
private Point3D shoulderJointLeft;
private Point3D shoulderJointRight;
private Point3D elbowJoint;

private GeometryModel3D thighModelLeft;
private GeometryModel3D thighModelRight;
private GeometryModel3D legModelLeft;
private GeometryModel3D legModelRight;
private GeometryModel3D footModelLeft;
private GeometryModel3D footModelRight;
private GeometryModel3D bootModelLeft;
private GeometryModel3D bootModelRight;

private GeometryModel3D armLeftModel;
private GeometryModel3D armRightModel;
private GeometryModel3D foreArmLeftModel;
private GeometryModel3D foreArmRightModel;
private GeometryModel3D handLeftModel;
private GeometryModel3D handRightModel;
private GeometryModel3D gauntletLeftModel;
private GeometryModel3D gauntletRightModel;

private Point3D origin;

private double width = 0;
private double height = 0;
private double depth = 0;

private Model3DGroup robotModelGroup;

private Point3D eyePointLeft = new Point3D(0, 0, 0);
private Point3D eyePointRight = new Point3D(0, 0, 0);

public WpfRobotBody()
{
    getDimensions();
    origin = getModelPlace();
    robotModelGroup = createModel(true);
    addMotionTransforms();
    workLegs();
    workArms();
}
请注意,我们的机器人由几个不同的模型组合而成的一个模型组。必须这样完成,以便我们可以单独动画每个腿部和手臂的部件,同时仍然将整个机器人作为一个整体进行动画。您还会注意到我们定义了几个参考点。
private Point3D hipJoint;
private Point3D kneeJoint;
private Point3D shoulderJointLeft;
private Point3D shoulderJointRight;
private Point3D elbowJoint;
当我们在构建机器人模型时,根据我们定义好的比例,这些参考点会被填充,这将允许我们定义旋转变换来动画我们的手臂和腿。
这是构造函数调用以创建机器人模型组的方法。整个机器人由管状组成,除了手是楔形,眼睛是圆柱体。我们调用了我们之前添加的特殊方法来创建用于眼睛的发射材料圆柱体。
public Model3DGroup createModel(bool combineVertices)
{
    int tuberes = 16;

    Model3DGroup modelGroup = new Model3DGroup();

    getDimensions();

    WpfCube cube = new WpfCube(origin, width, height, depth);

    double headHeightPercentage = cube.height / 8; // proportion rule of thumb
    double headWidthPercentage =
	(headHeightPercentage * 2) / 3; // proportion rule of thumb

    headHeightPercentage /= cube.height; // convert to a percent not absolute dimension
    headWidthPercentage /= cube.width; // convert to a percent not absolute dimension

    double footOffset = headHeightPercentage * 7.75;

    double torsoHeight = headHeightPercentage * 2.55;
    double torsoOffset = headHeightPercentage * 1.5;

    WpfWedge head = new WpfWedge(cube,
                   headWidthPercentage, //topWidth,
                   headWidthPercentage * 0.85, //bottomWidth,
                   0.75, //topDepth,
                   0.67, //bottomDepth,
                   headHeightPercentage, //height,
                   0, //offSet, // % offset from top
                   0, //xAlignmentTop, // % offset to left or right
                   0, //xAlignmentBottom,
                   0, //zAlignmentTop, // % offset to front or back
                   0 //zAlignmentBottom
        );

    WpfTube headTube = head.makeTube(tuberes, true, true);

    double eyeDiameter = getHeadHeight() / 10;
    double eyeLength = getHeadHeight() / 25;

    eyePointLeft = clonePoint(origin);
    eyePointLeft.X += width / 2;
    eyePointLeft.Z += depth * 0.9;
    eyePointLeft.Y -= getHeadHeight() / 2;
    eyePointLeft.X -= (getHeadHeight() / 6);

    eyePointRight = clonePoint(origin);
    eyePointRight.X += width / 2;
    eyePointRight.Z += depth * 0.9;
    eyePointRight.Y -= getHeadHeight() / 2;
    eyePointRight.X += (getHeadHeight() / 6);

    Cylinder leftEye = new Cylinder
	(eyePointLeft, 12, eyeDiameter, eyeDiameter, eyeLength);
    modelGroup.Children.Add(leftEye.CreateModelEmissive(Colors.Red));

    Cylinder rightEye = new Cylinder
	(eyePointRight, 12, eyeDiameter, eyeDiameter, eyeLength);
    modelGroup.Children.Add(rightEye.CreateModelEmissive(Colors.Red));

    WpfWedge neck = new WpfWedge(cube,
                   headWidthPercentage * 0.7, //topWidth,
                   headWidthPercentage * 0.7, //bottomWidth,
                   0.45, //topDepth,
                   0.45, //bottomDepth,
                   headHeightPercentage, //height,
                   headHeightPercentage, //offSet, // % offset from top
                   0, //xAlignmentTop, // % offset to left or right
                   0, //xAlignmentBottom,
                   -0.1, //zAlignmentTop, // % offset to front or back
                   -0.1 //zAlignmentBottom
        );
    WpfTube neckTube = neck.makeTube(tuberes, false, false);

    WpfWedge shoulder = new WpfWedge(cube,
                   headWidthPercentage * 0.7, //topWidth,
                   1, //bottomWidth,
                   0.46, //topDepth,
                   0.8, //bottomDepth,
                   headHeightPercentage * 0.23, //height,
                   torsoOffset -
		(headHeightPercentage * 0.22), //offSet, // % offset from top
                   0, //xAlignmentTop, // % offset to left or right
                   0, //xAlignmentBottom,
                   -0.1, //zAlignmentTop, // % offset to front or back
                   0 //zAlignmentBottom
        );
    WpfTube shoulderTube = shoulder.makeTube(tuberes, true, false);

    WpfWedge torso = new WpfWedge(cube,
                   headWidthPercentage * 2.2, //topWidth,
                   headWidthPercentage * 1.85, //bottomWidth,
                   0.8, //topDepth,
                   0.6, //bottomDepth,
                   torsoHeight, //height,
                   torsoOffset, //offSet, // % offset from top
                   0, //xAlignmentTop, // % offset to left or right
                   0, //xAlignmentBottom,
                   0, //zAlignmentTop, // % offset to front or back
                   0 //zAlignmentBottom
        );
    WpfTube torsoTube = torso.makeTube(tuberes, false, true);

    WpfWedge thighLeft = new WpfWedge(cube,
                   headWidthPercentage * 0.96, //topWidth,
                   headWidthPercentage * 0.57, //bottomWidth,
                   0.55, //topDepth,
                   0.5, //bottomDepth,
                   headHeightPercentage * 2.1, //height,
                   headHeightPercentage * 4, //offSet, // % offset from top
                   headWidthPercentage *
			0.44, //xAlignmentTop, // % offset to left or right
                   headWidthPercentage * 0.45, //xAlignmentBottom,
                   0, //zAlignmentTop, // % offset to front or back
                   0 //zAlignmentBottom
        );
    WpfWedge thighRight = thighLeft.mirrorX();
    WpfTube thighRightTube = thighRight.makeTube(tuberes, false, false);
    WpfTube thighLeftTube = thighLeft.makeTube(tuberes, false, false);
    hipJoint = thighLeft.topCenter;

    WpfWedge legLeft = new WpfWedge(cube,
                   headWidthPercentage * 0.57, //topWidth,
                   headWidthPercentage * 0.47, //bottomWidth,
                   0.5, //topDepth,
                   0.45, //bottomDepth,
                   headHeightPercentage * 1.76, //height,
                   headHeightPercentage * 6, //offSet, // % offset from top
                   headWidthPercentage *
			0.45, //xAlignmentTop, // % offset to left or right
                   headWidthPercentage * 0.4, //xAlignmentBottom,
                   0, //zAlignmentTop, // % offset to front or back
                   0.0 //zAlignmentBottom
        );
    WpfWedge legRight = legLeft.mirrorX();
    WpfTube legRightTube = legRight.makeTube(tuberes, false, true);
    WpfTube legLeftTube = legLeft.makeTube(tuberes, false, true);
    kneeJoint = legLeft.topFront;
    WpfWedge footLeft = new WpfWedge(cube,
                   headWidthPercentage * 0.4, //topWidth,
                   headWidthPercentage * 0.42, //bottomWidth,
                   0.35, //topDepth,
                   0.95, //bottomDepth,
                   headHeightPercentage / 3, //height,
                   footOffset, //offSet, // % offset from top
                   headWidthPercentage *
			0.4, //xAlignmentTop, // % offset to left or right
                   headWidthPercentage * 0.4, //xAlignmentBottom,
                   0.0, //zAlignmentTop, // % offset to front or back
                   0.3 //zAlignmentBottom
        );
    WpfWedge footRight = footLeft.mirrorX();
    WpfTube footRightTube = footRight.makeTube(tuberes, false, false);
    WpfTube footLeftTube = footLeft.makeTube(tuberes, false, false);
    ankleJoint = footLeft.topCenter;

    WpfWedge armLeft = new WpfWedge(cube,
                   headWidthPercentage / 2, //topWidth,
                   headWidthPercentage / 2, //bottomWidth,
                   0.5, //topDepth,
                   0.46, //bottomDepth,
                   headHeightPercentage * 1.5, //height,
                   headHeightPercentage * 1.5, //offSet, // % offset from top
                   0.4, //xAlignmentTop, // % offset to left or right
                   0.44, //xAlignmentBottom,
                   0, //zAlignmentTop, // % offset to front or back
                   0 //zAlignmentBottom
        );
    WpfWedge armRight = armLeft.mirrorX();
    WpfTube armRightTube = armRight.makeTube(tuberes, false, true);
    WpfTube armLeftTube = armLeft.makeTube(tuberes, false, true);
    shoulderJointRight = armRight.topCenter;
    shoulderJointLeft = armLeft.topCenter;

    WpfWedge foreArmLeft = new WpfWedge(cube,
                   headWidthPercentage / 2, //topWidth,
                   headWidthPercentage / 4, //bottomWidth,
                   0.46, //topDepth,
                   0.26, //bottomDepth,
                   headHeightPercentage * 1.3, //height,
                   headHeightPercentage * 3, //offSet, // % offset from top
                   0.44, //xAlignmentTop, // % offset to left or right
                   0.43, //xAlignmentBottom,
                   0, //zAlignmentTop, // % offset to front or back
                   0 //zAlignmentBottom
        );
    WpfWedge foreArmRight = foreArmLeft.mirrorX();
    WpfTube foreArmRightTube = foreArmRight.makeTube(tuberes, true, true);
    WpfTube foreArmLeftTube = foreArmLeft.makeTube(tuberes, true, true);
    elbowJoint = foreArmRight.topCenter;

    WpfWedge handLeft = new WpfWedge(cube,
                   headWidthPercentage * 0.2, //topWidth,
                   headWidthPercentage * 0.16, //bottomWidth,
                   0.23, //topDepth,
                   0.21, //bottomDepth,
                   headHeightPercentage * 0.7, //height,
                   headHeightPercentage * 4.3, //offSet, // % offset from top
                   0.43, //xAlignmentTop, // % offset to left or right
                   0.38, //xAlignmentBottom,
                   0, //zAlignmentTop, // % offset to front or back
                   0 //zAlignmentBottom
        );
    handLeft.makeWedge();
    WpfWedge handRight = handLeft.mirrorX();
    handRight.makeWedge();

    modelGroup.Children.Add(headTube.CreateModel(color, combineVertices));
    modelGroup.Children.Add(neckTube.CreateModel(color, combineVertices));
    modelGroup.Children.Add(shoulderTube.CreateModel(color, combineVertices));

    modelGroup.Children.Add(torsoTube.CreateModel(color, combineVertices));

    legModelLeft = legLeftTube.CreateModel(color, combineVertices);
    legModelRight = legRightTube.CreateModel(color, combineVertices);
    modelGroup.Children.Add(legModelLeft);
    modelGroup.Children.Add(legModelRight);

    thighModelLeft = thighLeftTube.CreateModel(color, combineVertices);
    thighModelRight = thighRightTube.CreateModel(color, combineVertices);
    modelGroup.Children.Add(thighModelLeft);
    modelGroup.Children.Add(thighModelRight);

    footModelLeft = footLeftTube.CreateModel(color, combineVertices);
    footModelRight = footRightTube.CreateModel(color, combineVertices);
    modelGroup.Children.Add(footModelLeft);
    modelGroup.Children.Add(footModelRight);

    armLeftModel = armLeftTube.CreateModel(color, combineVertices);
    armRightModel = armRightTube.CreateModel(color, combineVertices);
    modelGroup.Children.Add(armLeftModel);
    modelGroup.Children.Add(armRightModel);

    foreArmLeftModel = foreArmLeftTube.CreateModel(color, combineVertices);
    foreArmRightModel = foreArmRightTube.CreateModel(color, combineVertices);
    modelGroup.Children.Add(foreArmRightModel);
    modelGroup.Children.Add(foreArmLeftModel);

    handLeftModel = handLeft.CreateModel(color, false);
    handRightModel = handRight.CreateModel(color, false);
    modelGroup.Children.Add(handLeftModel);
    modelGroup.Children.Add(handRightModel);

    if (hasBelt)
    {
        double beltPercent = 0.1;

        WpfWedge belt = new WpfWedge(cube,
                       headWidthPercentage * 1.96, //topWidth,
                       headWidthPercentage * 1.96, //bottomWidth,
                       0.68, //topDepth,
                       0.68, //bottomDepth,
                       beltPercent, //height,
                       (torsoOffset + torsoHeight) -
			beltPercent, //offSet, // % offset from top
                       0, //xAlignmentTop, // % offset to left or right
                       0, //xAlignmentBottom,
                       0, //zAlignmentTop, // % offset to front or back
                       0 //zAlignmentBottom
            );
        WpfTube beltTube = belt.makeTube(tuberes, false, true);
        modelGroup.Children.Add(beltTube.CreateModel(color, combineVertices));
    }

    if (hasBoots)
    {
        double bootPercent = 0.15;

        WpfWedge bootLeft = new WpfWedge(cube,
                       headWidthPercentage * 0.7, //topWidth,
                       headWidthPercentage * 0.5, //bottomWidth,
                       0.57, //topDepth,
                       0.5, //bottomDepth,
                       bootPercent, //height,
                       footOffset - bootPercent, //offSet, // % offset from top
                       headWidthPercentage *
			0.5, //xAlignmentTop, // % offset to left or right
                       headWidthPercentage * 0.4, //xAlignmentBottom,
                       0, //zAlignmentTop, // % offset to front or back
                       0 //zAlignmentBottom
            );

        WpfWedge bootRight = bootLeft.mirrorX();
        WpfTube bootRightTube = bootRight.makeTube(tuberes, false, true);
        WpfTube bootLeftTube = bootLeft.makeTube(tuberes, false, true);
        bootModelLeft = bootLeftTube.CreateModel(color, combineVertices);
        bootModelRight = bootRightTube.CreateModel(color, combineVertices);
        modelGroup.Children.Add(bootModelRight);
        modelGroup.Children.Add(bootModelLeft);
    }

    if (hasGauntlets)
    {
        WpfWedge gauntletLeft = new WpfWedge(cube,
                       headWidthPercentage / 2, //topWidth,
                       headWidthPercentage / 2.5, //bottomWidth,
                       0.55, //topDepth,
                       0.32, //bottomDepth,
                       headHeightPercentage * 0.9, //height,
                       headHeightPercentage * 3.4, //offSet, // % offset from top
                       0.43, //xAlignmentTop, // % offset to left or right
                       0.43, //xAlignmentBottom,
                       0, //zAlignmentTop, // % offset to front or back
                       0 //zAlignmentBottom
            );
        WpfWedge gauntletRight = gauntletLeft.mirrorX();
        WpfTube gauntletRightTube = gauntletRight.makeTube(tuberes, false, true);
        WpfTube gauntletLeftTube = gauntletLeft.makeTube(tuberes, false, true);

        gauntletLeftModel = gauntletLeftTube.CreateModel(color, combineVertices);
        gauntletRightModel = gauntletRightTube.CreateModel(color, combineVertices);

        modelGroup.Children.Add(gauntletRightModel);
        modelGroup.Children.Add(gauntletLeftModel);
    }

    return modelGroup;
}
机器人中所有硬编码的数字都是定义他大小的包含立方体的百分比。这意味着如果您更改机器人及其包含立方体的大小,则无需更改这些数字中的任何一个——它们基于我们从 Google 艺术家图像中学到的人体比例。因此,您可以使用相同的类来制作任意大小的机器人。我们将机器人尺寸定义为我们整个场景宽度的一定任意分数。
创建机器人模型后,构造函数会调用一些方法来动画手臂和腿。这是动画腿部的方法。
public void workLegs()
{
    double stepSeconds = 0.4;

    if (legModelLeft != null && legModelRight != null)
    {
        double hipDegree = 10;
        double kneeDegree = -9;

        Transform3DGroup leftKneeTransformGroup = new Transform3DGroup();
        Transform3DGroup rightKneeTransformGroup = new Transform3DGroup();

        AxisAngleRotation3D axisHipRotationLeft =
		new AxisAngleRotation3D(new Vector3D(1, 0, 0), 0.0);
        RotateTransform3D rotateHipTransformLeft =
		new RotateTransform3D(axisHipRotationLeft, hipJoint);

        AxisAngleRotation3D axisHipRotationRight =
		new AxisAngleRotation3D(new Vector3D(1, 0, 0), 0.0);
        RotateTransform3D rotateHipTransformRight =
		new RotateTransform3D(axisHipRotationRight, hipJoint);

        AxisAngleRotation3D axisKneeRotationLeft =
		new AxisAngleRotation3D(new Vector3D(1, 0, 0), 0.0);
        RotateTransform3D rotateKneeTransformLeft =
		new RotateTransform3D(axisKneeRotationLeft, kneeJoint);

        AxisAngleRotation3D axisKneeRotationRight =
		new AxisAngleRotation3D(new Vector3D(1, 0, 0), 0.0);
        RotateTransform3D rotateKneeTransformRight =
		new RotateTransform3D(axisKneeRotationRight, kneeJoint);

        leftKneeTransformGroup.Children.Add(rotateKneeTransformLeft);
        rightKneeTransformGroup.Children.Add(rotateKneeTransformRight);

        leftKneeTransformGroup.Children.Add(rotateHipTransformLeft);
        rightKneeTransformGroup.Children.Add(rotateHipTransformRight);

        thighModelLeft.Transform = rotateHipTransformLeft;
        thighModelRight.Transform = rotateHipTransformRight;

        footModelRight.Transform = rightKneeTransformGroup;
        footModelLeft.Transform = leftKneeTransformGroup;
        legModelRight.Transform = rightKneeTransformGroup;
        legModelLeft.Transform = leftKneeTransformGroup;

        if (bootModelLeft != null && bootModelRight != null)
        {
            bootModelRight.Transform = rightKneeTransformGroup;
            bootModelLeft.Transform = leftKneeTransformGroup;
        }

        DoubleAnimation legAnimationRight =
		new DoubleAnimation(-hipDegree, hipDegree, durationTS(stepSeconds));
        DoubleAnimation legAnimationLeft =
		new DoubleAnimation(hipDegree, -hipDegree, durationTS(stepSeconds));
        legAnimationLeft.RepeatBehavior = RepeatBehavior.Forever;
        legAnimationRight.RepeatBehavior = RepeatBehavior.Forever;

        DoubleAnimation kneeAnimationRight =
		new DoubleAnimation(-kneeDegree, 0, durationTS(stepSeconds));
        DoubleAnimation kneeAnimationLeft =
		new DoubleAnimation(0, -kneeDegree, durationTS(stepSeconds));

        kneeAnimationLeft.RepeatBehavior = RepeatBehavior.Forever;
        kneeAnimationRight.RepeatBehavior = RepeatBehavior.Forever;

        kneeAnimationLeft.AutoReverse = true;
        kneeAnimationRight.AutoReverse = true;
        legAnimationLeft.AutoReverse = true;
        legAnimationRight.AutoReverse = true;

        kneeAnimationLeft.BeginTime = durationTS(0.0);
        kneeAnimationRight.BeginTime = durationTS(0.0);
        legAnimationLeft.BeginTime = durationTS(0.0);
        legAnimationRight.BeginTime = durationTS(0.0);

        axisHipRotationLeft.BeginAnimation
		(AxisAngleRotation3D.AngleProperty, legAnimationLeft);
        axisHipRotationRight.BeginAnimation
		(AxisAngleRotation3D.AngleProperty, legAnimationRight);

        axisKneeRotationLeft.BeginAnimation
		(AxisAngleRotation3D.AngleProperty, kneeAnimationLeft);
        axisKneeRotationRight.BeginAnimation
		(AxisAngleRotation3D.AngleProperty, kneeAnimationRight);
    }
}
这里有几点需要指出。首先,腿部动画是通过创建轴角旋转、从这些旋转创建变换、将变换应用于我们机器人内的模型,然后动画旋转角度来完成的。自动反转属性用于使腿部前后移动。如果将单个臀部的代码分开,更容易看到正在发生什么。
AxisAngleRotation3D axisHipRotationLeft =
	new AxisAngleRotation3D(new Vector3D(1, 0, 0), 0.0);
RotateTransform3D rotateHipTransformLeft =
	new RotateTransform3D(axisHipRotationLeft, hipJoint);
thighModelLeft.Transform = rotateHipTransformLeft;
axisHipRotationLeft.BeginAnimation(AxisAngleRotation3D.AngleProperty, legAnimationLeft);
DoubleAnimation legAnimationLeft =
	new DoubleAnimation(hipDegree, -hipDegree, durationTS(stepSeconds));
axisHipRotationLeft.BeginAnimation(AxisAngleRotation3D.AngleProperty, legAnimationLeft);a
            legAnimationLeft.RepeatBehavior = RepeatBehavior.Forever;
            legAnimationLeft.AutoReverse = true;
小腿的动画稍微复杂一些,因为我们必须相对于大腿移动小腿,但我们还必须将它与整个腿一起移动。所以对于小腿,我们必须将两个变换组合成一个变换组。这是它如何为一条小腿工作。
Transform3DGroup leftKneeTransformGroup = new Transform3DGroup();
AxisAngleRotation3D axisKneeRotationLeft =
	new AxisAngleRotation3D(new Vector3D(1, 0, 0), 0.0);
RotateTransform3D rotateKneeTransformLeft =
	new RotateTransform3D(axisKneeRotationLeft, kneeJoint);
leftKneeTransformGroup.Children.Add(rotateKneeTransformLeft);
leftKneeTransformGroup.Children.Add(rotateHipTransformLeft);
footModelLeft.Transform = leftKneeTransformGroup;
legModelLeft.Transform = leftKneeTransformGroup;
DoubleAnimation kneeAnimationLeft =
	new DoubleAnimation(0, -kneeDegree, durationTS(stepSeconds));
kneeAnimationLeft.RepeatBehavior = RepeatBehavior.Forever;
kneeAnimationLeft.AutoReverse = true;
axisKneeRotationLeft.BeginAnimation(AxisAngleRotation3D.AngleProperty, kneeAnimationLeft);
动画手臂的方法工作方式完全相同。
private void workArms()
{
    double seconds = 0.4;

    if (armLeftModel != null && armRightModel != null)
    {
        double elbowDegree = -16;
        double shoulderDegreeH = 14;

        Transform3DGroup leftHandGroup = new Transform3DGroup();
        Transform3DGroup rightHandGroup = new Transform3DGroup();

        Transform3DGroup leftShoulderGroup = new Transform3DGroup();
        Transform3DGroup rightShoulderGroup = new Transform3DGroup();

        armRightModel.Transform = rightShoulderGroup;
        armLeftModel.Transform = leftShoulderGroup;

        foreArmRightModel.Transform = rightHandGroup;
        foreArmLeftModel.Transform = leftHandGroup;

        handRightModel.Transform = rightHandGroup;
        handLeftModel.Transform = leftHandGroup;

        if (gauntletLeftModel != null && gauntletRightModel != null)
        {
            gauntletLeftModel.Transform = leftHandGroup;
            gauntletRightModel.Transform = rightHandGroup;
        }

        AxisAngleRotation3D axisElbowRotationLeft =
		new AxisAngleRotation3D(new Vector3D(1, 0, 0), elbowDegree);
        RotateTransform3D rotateElbowTransformLeft =
		new RotateTransform3D(axisElbowRotationLeft, elbowJoint);
        AxisAngleRotation3D axisShoulderRotationLeft =
		new AxisAngleRotation3D(new Vector3D(1, 0, 0), shoulderDegreeH);
        RotateTransform3D rotateShoulderTransformLeft =
		new RotateTransform3D(axisShoulderRotationLeft, shoulderJointLeft);

        AxisAngleRotation3D axisElbowRotationRight =
		new AxisAngleRotation3D(new Vector3D(1, 0, 0), elbowDegree);
        RotateTransform3D rotateElbowTransformRight =
		new RotateTransform3D(axisElbowRotationRight, elbowJoint);
        AxisAngleRotation3D axisShoulderRotationRight =
		new AxisAngleRotation3D(new Vector3D(1, 0, 0), shoulderDegreeH);
        RotateTransform3D rotateShoulderTransformRight =
		new RotateTransform3D(axisShoulderRotationRight, shoulderJointLeft);

        leftHandGroup.Children.Add(rotateElbowTransformLeft);
        rightHandGroup.Children.Add(rotateElbowTransformRight);
        leftHandGroup.Children.Add(rotateShoulderTransformLeft);
        rightHandGroup.Children.Add(rotateShoulderTransformRight);

        leftShoulderGroup.Children.Add(rotateShoulderTransformLeft);
        rightShoulderGroup.Children.Add(rotateShoulderTransformRight);

        DoubleAnimation shoulderAnimationRight =
	new DoubleAnimation(shoulderDegreeH, -shoulderDegreeH, durationTS(seconds));
        DoubleAnimation shoulderAnimationLeft =
	new DoubleAnimation(-shoulderDegreeH, shoulderDegreeH, durationTS(seconds));
        shoulderAnimationLeft.RepeatBehavior = RepeatBehavior.Forever;
        shoulderAnimationRight.RepeatBehavior = RepeatBehavior.Forever;

        DoubleAnimation elbowAnimationRight =
		new DoubleAnimation(elbowDegree, 0, durationTS(seconds));
        DoubleAnimation elbowAnimationLeft =
		new DoubleAnimation(0, elbowDegree, durationTS(seconds));
        elbowAnimationLeft.RepeatBehavior = RepeatBehavior.Forever;
        elbowAnimationRight.RepeatBehavior = RepeatBehavior.Forever;

        elbowAnimationLeft.AutoReverse = true;
        elbowAnimationRight.AutoReverse = true;
        shoulderAnimationLeft.AutoReverse = true;
        shoulderAnimationRight.AutoReverse = true;

        elbowAnimationLeft.BeginTime = durationTS(0.0);
        elbowAnimationRight.BeginTime = durationTS(0.0);
        shoulderAnimationLeft.BeginTime = durationTS(0.0);
        shoulderAnimationRight.BeginTime = durationTS(0.0);

        axisShoulderRotationLeft.BeginAnimation
		(AxisAngleRotation3D.AngleProperty, shoulderAnimationLeft);
        axisElbowRotationLeft.BeginAnimation
		(AxisAngleRotation3D.AngleProperty, elbowAnimationLeft);

        axisShoulderRotationRight.BeginAnimation
		(AxisAngleRotation3D.AngleProperty, shoulderAnimationRight);
        axisElbowRotationRight.BeginAnimation
		(AxisAngleRotation3D.AngleProperty, elbowAnimationRight);
    }
}
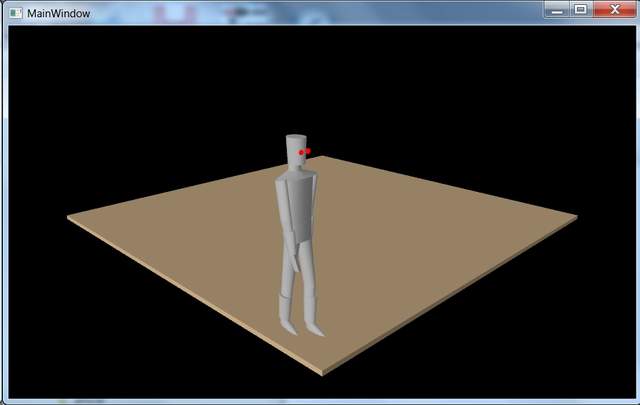
现在是时候将机器人添加到我们的场景中,以及我们上篇文章中创建的地板,并让他走动了。我们可以在我们 `MainWindow.xaml.cs` 模块中的 `Viewport3D_Loaded` 事件中做到这一点。现在事件看起来是这样的。
private void Viewport3D_Loaded(object sender, RoutedEventArgs e)
{
    if (sender is Viewport3D)
    {
        viewport = (Viewport3D)sender;

        robot = new WpfRobotBody();

        double floorThickness = WpfScene.sceneSize / 100;
        GeometryModel3D floorModel = WpfCube.CreateCubeModel(
            new Point3D(-WpfScene.sceneSize / 2,
                        -floorThickness,
                        -WpfScene.sceneSize / 2),
            WpfScene.sceneSize, floorThickness, WpfScene.sceneSize, Colors.Tan);

        Model3DGroup groupScene = new Model3DGroup();

        groupScene.Children.Add(floorModel);

        groupScene.Children.Add(robot.getModelGroup());

        groupScene.Children.Add(leftLight());
        groupScene.Children.Add(new AmbientLight(Colors.Gray));

        viewport.Camera = camera();

        ModelVisual3D visual = new ModelVisual3D();

        visual.Content = groupScene;

        viewport.Children.Add(visual);

        storyboardRobot();
    }
}
我们添加了一个方法来为我们的机器人创建故事板。我们想组合 4 种动作并一遍又一遍地重复它们。机器人将沿着地板的一条边行走,转弯,沿着下一条边行走,直到他回到原点。这四种独立的动画可以通过故事板进行排序。回到机器人类,我们已经在我们想要动画以移动他的机器人模型组中添加了两个变换。
private RotateTransform3D rotateTransform;
private TranslateTransform3D translateTransform;

addTransform(robotModelGroup, translateTransform);

public void addTransform(Model3DGroup model, Transform3D transform)
{
    Transform3DGroup group = new Transform3DGroup();

    if (model.Transform != null && model.Transform != Transform3D.Identity)
    {
        if (model.Transform is Transform3D)
        {
            group.Children.Add(model.Transform);
        }
        else if (model.Transform is Transform3DGroup)
        {
            Transform3DGroup g = (Transform3DGroup)(model.Transform);
            foreach (Transform3D t in g.Children)
            {
                group.Children.Add(t);
            }
        }
    }
    group.Children.Add(transform);
    model.Transform = group;
}
这是创建故事板的代码。
private void storyboardRobot()
{
    double turnDuration = 0.7;
    double totalDuration = 0.0;
    double walkDuration = 3.4;

    NameScope.SetNameScope(this, new NameScope());

    storyBoard = new Storyboard();

    Vector3D vector = new Vector3D(0, 1, 0);

    AxisAngleRotation3D rotation = new AxisAngleRotation3D(vector, 0.0);
    robot.getRotateTransform().Rotation = rotation;

    DoubleAnimation doubleAnimationTurn1 =
	new DoubleAnimation(0.0, 90.0, durationTS(turnDuration));
    DoubleAnimation doubleAnimationTurn2 =
	new DoubleAnimation(90.0, 180.0, durationTS(turnDuration));
    DoubleAnimation doubleAnimationTurn3 =
	new DoubleAnimation(180.0, 270.0, durationTS(turnDuration));
    DoubleAnimation doubleAnimationTurn4 =
	new DoubleAnimation(270.0, 360.0, durationTS(turnDuration));

    RegisterName("TurnRotation", rotation);

    RegisterName("MoveTransform", robot.getTranslateTransform());

    storyBoard.Children.Add(doubleAnimationTurn1);
    storyBoard.Children.Add(doubleAnimationTurn2);
    storyBoard.Children.Add(doubleAnimationTurn3);
    storyBoard.Children.Add(doubleAnimationTurn4);

    Storyboard.SetTargetName(doubleAnimationTurn1, "TurnRotation");
    Storyboard.SetTargetProperty(doubleAnimationTurn1,
	new PropertyPath(AxisAngleRotation3D.AngleProperty));
    Storyboard.SetTargetName(doubleAnimationTurn2, "TurnRotation");
    Storyboard.SetTargetProperty(doubleAnimationTurn2,
	new PropertyPath(AxisAngleRotation3D.AngleProperty));
    Storyboard.SetTargetName(doubleAnimationTurn3, "TurnRotation");
    Storyboard.SetTargetProperty(doubleAnimationTurn3,
	new PropertyPath(AxisAngleRotation3D.AngleProperty));
    Storyboard.SetTargetName(doubleAnimationTurn4, "TurnRotation");
    Storyboard.SetTargetProperty(doubleAnimationTurn4,
	new PropertyPath(AxisAngleRotation3D.AngleProperty));

    double offset = WpfScene.sceneSize * 0.45;

    DoubleAnimation doubleAnimationX1 =
	new DoubleAnimation(-offset, -offset, durationTS(walkDuration));
    DoubleAnimation doubleAnimationZ1 =
	new DoubleAnimation(-offset, offset, durationTS(walkDuration));
    Storyboard.SetTargetName(doubleAnimationX1, "MoveTransform");
    Storyboard.SetTargetProperty(doubleAnimationX1,
	new PropertyPath(TranslateTransform3D.OffsetXProperty));
    Storyboard.SetTargetName(doubleAnimationZ1, "MoveTransform");
    Storyboard.SetTargetProperty(doubleAnimationZ1,
	new PropertyPath(TranslateTransform3D.OffsetZProperty));
    storyBoard.Children.Add(doubleAnimationX1);
    storyBoard.Children.Add(doubleAnimationZ1);

    DoubleAnimation doubleAnimationX2 =
	new DoubleAnimation(-offset, offset, durationTS(walkDuration));
    DoubleAnimation doubleAnimationZ2 =
	new DoubleAnimation(offset, offset, durationTS(walkDuration));
    Storyboard.SetTargetName(doubleAnimationX2, "MoveTransform");
    Storyboard.SetTargetProperty(doubleAnimationX2,
	new PropertyPath(TranslateTransform3D.OffsetXProperty));
    Storyboard.SetTargetName(doubleAnimationZ2, "MoveTransform");
    Storyboard.SetTargetProperty(doubleAnimationZ2,
	new PropertyPath(TranslateTransform3D.OffsetZProperty));
    storyBoard.Children.Add(doubleAnimationX2);
    storyBoard.Children.Add(doubleAnimationZ2);

    DoubleAnimation doubleAnimationX3 =
	new DoubleAnimation(offset, offset, durationTS(walkDuration));
    DoubleAnimation doubleAnimationZ3 =
	new DoubleAnimation(offset, -offset, durationTS(walkDuration));
    Storyboard.SetTargetName(doubleAnimationX3, "MoveTransform");
    Storyboard.SetTargetProperty(doubleAnimationX3,
	new PropertyPath(TranslateTransform3D.OffsetXProperty));
    Storyboard.SetTargetName(doubleAnimationZ3, "MoveTransform");
    Storyboard.SetTargetProperty(doubleAnimationZ3,
	new PropertyPath(TranslateTransform3D.OffsetZProperty));
    storyBoard.Children.Add(doubleAnimationX3);
    storyBoard.Children.Add(doubleAnimationZ3);

    DoubleAnimation doubleAnimationX4 =
	new DoubleAnimation(offset, -offset, durationTS(walkDuration));
    DoubleAnimation doubleAnimationZ4 =
	new DoubleAnimation(-offset, -offset, durationTS(walkDuration));
    Storyboard.SetTargetName(doubleAnimationX4, "MoveTransform");
    Storyboard.SetTargetProperty(doubleAnimationX4,
	new PropertyPath(TranslateTransform3D.OffsetXProperty));
    Storyboard.SetTargetName(doubleAnimationZ4, "MoveTransform");
    Storyboard.SetTargetProperty(doubleAnimationZ4,
	new PropertyPath(TranslateTransform3D.OffsetZProperty));
    storyBoard.Children.Add(doubleAnimationX4);
    storyBoard.Children.Add(doubleAnimationZ4);

    doubleAnimationX1.BeginTime = durationTS(totalDuration);
    doubleAnimationZ1.BeginTime = durationTS(totalDuration);
    totalDuration += walkDuration;

    doubleAnimationTurn1.BeginTime = durationTS(totalDuration);
    totalDuration += turnDuration;

    doubleAnimationX2.BeginTime = durationTS(totalDuration);
    doubleAnimationZ2.BeginTime = durationTS(totalDuration);
    totalDuration += walkDuration;

    doubleAnimationTurn2.BeginTime = durationTS(totalDuration);
    totalDuration += turnDuration;

    doubleAnimationX3.BeginTime = durationTS(totalDuration);
    doubleAnimationZ3.BeginTime = durationTS(totalDuration);
    totalDuration += walkDuration;

    doubleAnimationTurn3.BeginTime = durationTS(totalDuration);
    totalDuration += turnDuration;

    doubleAnimationX4.BeginTime = durationTS(totalDuration);
    doubleAnimationZ4.BeginTime = durationTS(totalDuration);
    totalDuration += walkDuration;

    doubleAnimationTurn4.BeginTime = durationTS(totalDuration);
    totalDuration += turnDuration;

    storyBoard.RepeatBehavior = RepeatBehavior.Forever;

    storyBoard.Begin(this);
}
在 C# 代码中设置故事板有一个技巧。你必须为每个动画设置目标。对于我们机器人手臂和腿部的运动,通过使用 `BeginAnimation` 调用可以轻松地将动画与其目标对象和属性相关联。
axisHipRotationLeft.BeginAnimation(AxisAngleRotation3D.AngleProperty, legAnimationLeft);
这个 `BeginAnimation` 的单个调用足以确定 `legAnimationLeft` 将会作用于 `axisHipRotationLeft` 的 `AxisAngleRotation3D.AngleProperty` 属性。但我们不能在这种情况下调用 `BeginAnimation`,因为我们将所有动画添加到故事板,并且我们希望它们都有不同的开始时间,这样它们就会按特定顺序发生。我们通过进行以下调用来启动整个过程。
storyBoard.RepeatBehavior = RepeatBehavior.Forever;
storyBoard.Begin(this);
因此,为了设置每个动画的目标,我们必须建立一个名称范围,为我们想要动画的每个目标对象注册名称,然后为每个对象调用 `SetTargetName` 和 `SetTargetProperty`。这是它如何为我们的一个动画工作。
NameScope.SetNameScope(this, new NameScope()); // set a name scope
RegisterName("TurnRotation", rotation);
Storyboard.SetTargetName(doubleAnimationTurn1, "TurnRotation");
Storyboard.SetTargetProperty(doubleAnimationTurn1,
	new PropertyPath(AxisAngleRotation3D.AngleProperty));
所以,这就是如何为我们的机器人制作故事板。对于这个动画演示,还有一个最后的难题。我们想添加一个按键来切换到备用相机角度。所以,在我们的窗口中添加一个 `Keyup` 事件,并像这样更改 `camera()` 函数。
private void Window_KeyUp(object sender, KeyEventArgs e)
{
    overheadCamera = !overheadCamera;
    viewport.Camera = camera();
}

public PerspectiveCamera camera()
{
    PerspectiveCamera perspectiveCamera = new PerspectiveCamera();

    if (overheadCamera)
    {
        perspectiveCamera.Position = new Point3D(0,
	WpfScene.sceneSize * 2, WpfScene.sceneSize / 50);
    }
    else
    {
        perspectiveCamera.Position =
	new Point3D(-WpfScene.sceneSize, WpfScene.sceneSize / 2, WpfScene.sceneSize);
    }

    perspectiveCamera.LookDirection = new Vector3D
					(lookat.X - perspectiveCamera.Position.X,
                                               lookat.Y - perspectiveCamera.Position.Y,
                                               lookat.Z - perspectiveCamera.Position.Z);

    perspectiveCamera.FieldOfView = 60;

    return perspectiveCamera;
}
历史
- 2010年11月7日:初始版本