
我如何不崩溃地保持30个Chocolatey包的更新
截至我写此文时,我管理着 Chocolatey.org 上的 29 个包。然而,软件包作者必须做的一件事是,在他们打包的软件发布新版本时,保持他们的包是最新的。没有这一点,软件包就会简单地荒废,Chocolatey 的价值就会下降。
如果你还不知道,我是一个相当重度的 Chocolatey 用户。尤其是在结合 Boxstarter 使用时,可以快速设置新机器,并将我所有的软件安装好,而无需我在整个过程中盯着电脑。
如果你是 *nix 用户,并且还没有接触过 Chocolatey,我强烈建议你了解它;你会(重新)爱上 Windows 的。 
话虽如此,正是包作者社区才让 Chocolatey 真正有价值。开发者要么在他们的发布流程中包含 Chocolatey 包(基于 nuget 规范),要么像我一样热情的用户,为他们了解和/或喜爱的软件构建 Chocolatey 包。
截至我写此文时,我管理着 Chocolatey.org 上的 29 个包。然而,软件包作者必须做的一件事是,在他们打包的软件发布新版本时,保持他们的包是最新的。没有这一点,软件包就会简单地荒废,Chocolatey 的价值就会下降。话虽如此,如果我不得不手动监控所有不同的分发渠道并在软件发布更新时手工处理更新,管理近 30 个包将是一项令人筋疲力尽的任务。那么我是怎么做到的呢?让我告诉你。
第一步:找出触发器
我注意到我管理的包发布软件的方式有几种,我可以对其进行监控。
- GitHub Releases
如果你有一个通过 GitHub 发布软件包,那里有一个 API。然而,它不是一个你可以从中触发的 API,所以你基本上必须轮询它。对我来说,当实现它时,这通常是大约 6 小时一次。
- RSS XML
如果你的软件包发布或发布到有 RSS 源的目的地,那么你在这里非常幸运,因为你可以通过该 RSS 源触发并启动你的流程——非常方便。
- 自定义端点
如果某个应用程序有自己的“检查更新”功能,你可以检查它以了解它是如何工作的,然后将其作为你的包更新过程的一部分来复制。
第二步:实现检查
使用 Microsoft Flow
为什么选择 Flow?有几个原因:
- 它是免费的
- 它只需要一个 Microsoft 帐户(字面意思,别的什么都不需要)
- 它是免费的
一旦你弄清楚应用程序是如何发布更新或检查更新的,就可以编写一个 Flow 来执行此检查了。
- 对于 GitHub Releases 或自定义端点,你将使用 Flow 中的“Recurrence”(周期性)触发器,并将其设置为一个你认为不会让你被端点限制或封禁的间隔。

- 对于 RSS XML,你可以使用“On new Feed Item”(新的 Feed 项)触发器。
由于这更复杂(而且如今更常见),我们将在此处详细介绍自定义端点示例。
设置触发器
- 在左侧单击 **My Flows**(我的流)

- 选择 **New | Create from blank**(新建 | 从空白创建)

- 点击 **Search hundreds of connectors and triggers**(搜索数百个连接器和触发器)

- 在搜索框中,键入 **recurrence**(周期性)并选择出现的 **Schedule**(计划)选项

- 定义你的间隔。我推荐 6 小时,因为很少有 choco 用户期望即时更新,而且这将在每天至少检查/发布几次更新,这通常符合社区的期望。
注意:此计时器在你点击 **Save**(保存)时开始,除非你展开 **Advanced Options**(高级选项)并选择一个时区并定义一个开始时间。所以,如果你想让它在早上 6 点、中午 12 点、晚上 6 点、午夜 12 点开始,请立即定义一个明天的午夜开始时间。

- 添加流的下一步。
当这个启动时,它应该做什么?算法如下:
- 检查应用程序的版本端点并提取最新的可用版本数据
- 下载最新的二进制文件并对其计算 SHA256 哈希(在 Chocolatey 包中使用)
- 查询 Chocolatey 的 API 并提取最新的已发布版本数据
- 比较两个版本号
- 在出现差异时执行操作(我们稍后将对此进行更详细的介绍)
让我们深入了解这些步骤。
查询应用程序的版本端点并提取最新版本数据 + 计算二进制文件的 SHA
这两个步骤最好由 Azure Function 来完成。主要是因为,Flow 无法执行 SHA 计算。
要在(C#)Azure Function 中实现这一点,然后由 Flow 调用,首先创建一个 HTTP 触发的 Azure Function(好消息!你可以在免费 Azure Subscription 中使用 Azure Functions,并且很有可能你永远不会被收费)。在此函数中,命中你软件更新检查的 HTTP 端点。接下来,将二进制文件流式传输到 .NET 的 SHA 库以进行 sha 计算。完成后,将最新版本号加上其 SHA 发送回调用者。对于我最受欢迎的包(Vivaldi),它看起来像这样:
[FunctionName("GetLatestVersion")]
public static async System.Threading.Tasks.Task<IActionResult>
  RunAsync([HttpTrigger(AuthorizationLevel.Function, "get", Route = null)]HttpRequest req,
  TraceWriter log)
{
    string targetUrl = Environment.GetEnvironmentVariable(@"ReleaseVersionCheckUrl");

    var xdocResult = XDocument.Load(await _client.GetStreamAsync(targetUrl));

    var enclosureElement = xdocResult
        .Element(@"rss")
        .Element(@"channel")
        .Element(@"item")
        .Element(@"enclosure");
    var version = enclosureElement.Attributes()
        .Single(a => a.Name.LocalName.Equals(@"version", StringComparison.OrdinalIgnoreCase));
    var x64url = enclosureElement.Attribute(@"url").Value;
    var x86url = x64url.Replace(@".x64", string.Empty).Replace(@"X64", string.Empty);

    // We make use of using(), streams, and GC.Collect() here to make sure
    // our Function keeps its memory footprint low so as not to incur unnecessary usage charges
    // on the consumption plan
    string x64hashString, x86hashString;
    using (var sha = SHA256.Create())
    {
        using (var versionByteStream = await _client.GetStreamAsync(x64url))
        {
            x64hashString = string.Join(string.Empty, sha.ComputeHash(versionByteStream).Select
                                       (b => b.ToString("X2")));
            log.Info($@"64-bit hash: {x64hashString}");
        }
        GC.Collect();

        using (var versionByteStream = await _client.GetStreamAsync(x86url))
        {
            x86hashString = string.Join(string.Empty, sha.ComputeHash(versionByteStream).Select
                                       (b => b.ToString("X2")));
            log.Info($@"32-bit hash: {x86hashString}");
        }
        GC.Collect();
    }
    GC.Collect();

    return new OkObjectResult(new { version = version.Value,
           x86 = new { download = x86url, hash = x86hashString },
           x64 = new { download = x64url, hash = x64hashString } });
}
你通过 `HTTP` 操作和 `GET` 方法将此函数集成到你的 Flow 中。
- 键入 `HTTP` 并选择 `HTTP` 操作

- 添加你的 Azure Function 的 URL

- 一旦你获得了这个响应,就可以将其解析成你之后可以在 Flow 中使用的内容。为此,我们使用 Parse JSON 操作

使用此架构
{
    "type": "object",
    "properties": {
        "version": {
            "type": "string"
        },
        "x86": {
            "type": "object",
            "properties": {
                "download": {
                    "type": "string"
                },
                "hash": {
                    "type": "string"
                }
            }
        },
        "x64": {
            "type": "object",
            "properties": {
                "download": {
                    "type": "string"
                },
                "hash": {
                    "type": "string"
                }
            }
        }
    }
}
查询 Chocolatey 的 API 以获取目标包的最新已发布版本
与调用 Azure Function 获取包目标软件的最新可用版本类似,Chocolatey API 也将使用 `HTTP` 操作并定义要命中的 HTTP 端点。需要注意的几点:
- 你需要在单独的工具中完成此操作,以便可以看到返回的响应
- 如果可能,请以 JSON 格式获取响应(例如:将 `Content-Type` 头定义为 `application/json`,让目标端点知道你希望以 JSON 格式返回数据),因为 Flow 对此处理得更好(至少在免费层级上是这样)。
首先,再次将 `HTTP` 操作添加到你的 Flow 中
Chocolatey 在后台使用 nuget API,该 API 又利用 OData 规范在 HTTP 查询级别执行过滤、搜索等操作。例如,在我 Vivaldi 的实现中,目标 URL 是:
http://chocolatey.org/api/v2/Packages()?$filter=Id%20eq%20'vivaldi'%20and%20not%20IsPrerelease&$orderby=Published%20desc&$top=1.
这会返回所有具有以下条件的包:
id == vivaldi!IsPrerelease按 Published(日期)排序desc- Top 1
这让我得到了 Vivaldi 最新发布到 Chocolate 社区存储库的版本。此外,在此 HTTP 操作上,我将 `Accept` 头设置为 `application/json`,以便 choco 以 JSON 格式返回结果。

一旦你获得了这个响应,就可以将其解析成你之后可以在 Flow 中使用的内容。为此,我们使用 Parse JSON 操作
使用此架构
{
    "type": "object",
    "properties": {
        "d": {
            "type": "array",
            "items": {
                "type": "object",
                "properties": {
                    "__metadata": {
                        "type": "object",
                        "properties": {
                            "uri": {
                                "type": "string"
                            },
                            "type": {
                                "type": "string"
                            },
                            "edit_media": {
                                "type": "string"
                            },
                            "media_src": {
                                "type": "string"
                            },
                            "content_type": {
                                "type": "string"
                            }
                        }
                    },
                    "Id": {
                        "type": "string"
                    },
                    "Version": {
                        "type": "string"
                    },
                    "Title": {
                        "type": "string"
                    },
                    "Summary": {
                        "type": "string"
                    },
                    "Description": {
                        "type": "string"
                    },
                    "Tags": {
                        "type": "string"
                    },
                    "Authors": {
                        "type": "string"
                    },
                    "Copyright": {},
                    "Created": {
                        "type": "string"
                    },
                    "Dependencies": {
                        "type": "string"
                    },
                    "DownloadCount": {
                        "type": "integer"
                    },
                    "VersionDownloadCount": {
                        "type": "integer"
                    },
                    "GalleryDetailsUrl": {
                        "type": "string"
                    },
                    "ReportAbuseUrl": {
                        "type": "string"
                    },
                    "IconUrl": {
                        "type": "string"
                    },
                    "IsLatestVersion": {
                        "type": "boolean"
                    },
                    "IsAbsoluteLatestVersion": {
                        "type": "boolean"
                    },
                    "IsPrerelease": {
                        "type": "boolean"
                    },
                    "Language": {},
                    "LastUpdated": {
                        "type": "string"
                    },
                    "Published": {
                        "type": "string"
                    },
                    "LicenseUrl": {
                        "type": "string"
                    },
                    "RequireLicenseAcceptance": {
                        "type": "boolean"
                    },
                    "PackageHash": {
                        "type": "string"
                    },
                    "PackageHashAlgorithm": {
                        "type": "string"
                    },
                    "PackageSize": {
                        "type": "string"
                    },
                    "ProjectUrl": {
                        "type": "string"
                    },
                    "ReleaseNotes": {
                        "type": "string"
                    },
                    "ProjectSourceUrl": {
                        "type": "string"
                    },
                    "PackageSourceUrl": {
                        "type": "string"
                    },
                    "DocsUrl": {
                        "type": "string"
                    },
                    "MailingListUrl": {
                        "type": "string"
                    },
                    "BugTrackerUrl": {
                        "type": "string"
                    },
                    "IsApproved": {
                        "type": "boolean"
                    },
                    "PackageStatus": {
                        "type": "string"
                    },
                    "PackageSubmittedStatus": {
                        "type": "string"
                    },
                    "PackageTestResultUrl": {
                        "type": "string"
                    },
                    "PackageTestResultStatus": {
                        "type": "string"
                    },
                    "PackageTestResultStatusDate": {
                        "type": "string"
                    },
                    "PackageValidationResultStatus": {
                        "type": "string"
                    },
                    "PackageValidationResultDate": {
                        "type": "string"
                    },
                    "PackageCleanupResultDate": {},
                    "PackageReviewedDate": {
                        "type": "string"
                    },
                    "PackageApprovedDate": {},
                    "PackageReviewer": {
                        "type": "string"
                    },
                    "IsDownloadCacheAvailable": {
                        "type": "boolean"
                    },
                    "DownloadCacheStatus": {
                        "type": "string"
                    },
                    "DownloadCacheDate": {},
                    "DownloadCache": {},
                    "PackageScanStatus": {
                        "type": "string"
                    },
                    "PackageScanResultDate": {
                        "type": "string"
                    }
                },
                "required": [
                    "__metadata",
                    "Id",
                    "Version",
                    "Title",
                    "Summary",
                    "Description",
                    "Tags",
                    "Authors",
                    "Copyright",
                    "Created",
                    "Dependencies",
                    "DownloadCount",
                    "VersionDownloadCount",
                    "GalleryDetailsUrl",
                    "ReportAbuseUrl",
                    "IconUrl",
                    "IsLatestVersion",
                    "IsAbsoluteLatestVersion",
                    "IsPrerelease",
                    "Language",
                    "LastUpdated",
                    "Published",
                    "LicenseUrl",
                    "RequireLicenseAcceptance",
                    "PackageHash",
                    "PackageHashAlgorithm",
                    "PackageSize",
                    "ProjectUrl",
                    "ReleaseNotes",
                    "ProjectSourceUrl",
                    "PackageSourceUrl",
                    "DocsUrl",
                    "MailingListUrl",
                    "BugTrackerUrl",
                    "IsApproved",
                    "PackageStatus",
                    "PackageSubmittedStatus",
                    "PackageTestResultUrl",
                    "PackageTestResultStatus",
                    "PackageTestResultStatusDate",
                    "PackageValidationResultStatus",
                    "PackageValidationResultDate",
                    "PackageCleanupResultDate",
                    "PackageReviewedDate",
                    "PackageApprovedDate",
                    "PackageReviewer",
                    "IsDownloadCacheAvailable",
                    "DownloadCacheStatus",
                    "DownloadCacheDate",
                    "DownloadCache",
                    "PackageScanStatus",
                    "PackageScanResultDate"
                ]
            }
        }
    }
}
与你的自定义 Azure Function 一样,Flow 将使用此架构在你希望在 Flow 的后续操作中使用 Chocolatey 响应的属性(在此情况下是版本)时提供智能提示。
这里需要注意的一点是,根据架构,结果始终是一个数组。但我们只请求了 `TOP 1`,所以我们只需要这个数组中的第一项。不用担心,Flow 提供了强大的“表达式”来完成这样的事情。
在你的流中添加另一个步骤,这次搜索 `compose` 并选择 `Data Operations` 操作

添加后,点击 `Inputs` 文本框,注意弹出的窗口。选择 `Expression` 选项卡,键入 `first` 并选中它。

在 `first()` 函数内,切换回 **Dynamic Content**(动态内容),然后选择你在此之前添加的 **Parse JSON** 步骤

这会添加 Flow 的引用到该步骤的输出作为 `first()` 方法的参数,从而选择JSON 数组中的第一项,正如我们所愿。但是,我们还需要从中获取 `.Version` 属性。没关系,只需在末尾添加即可,如下所示:

然后点击 OK。
比较两个结果
现在我们有了软件的最新可用版本(Azure Function `.version`)以及软件的最新已发布版本(Chocolatey 查询 `.Version`),因此我们需要比较它们。一个工作流协调器如果没有控制块会是什么样子?
这就像在你的流中添加一个 `if` 块一样简单。
- 点击 `+ New step`(+ 新建步骤)并搜索 `condition`,然后选择 `Condition` Control 操作

- 左侧应为 Chocolatey 版本,右侧为可用版本,运算符为**不以...开头**

这是因为 Chocolatey 版本,由于 nuget 包版本化的semver 性质,将总是以匹配的可用版本开头,但可能不总是等于它。
定义好之后,我们就可以在条件语句的“If Yes”(如果是)一侧添加更多逻辑了

第三步:发布新版本
这就是事情变得非常有创意的部分,如果我自己这么说的话。直到最近,这个条件语句的“If Yes”部分只是给我发送一封电子邮件,让我知道有新版本发布了,并包含版本号和相关 SHA 值。然后我需要手动编辑相应软件的 Chocolatey 包,并将其推送上去。
正如你可以想象的那样,这变得非常繁琐。特别是像 Vivaldi 这样的包,它几乎每周都会发布一次发布版或快照版。
所以我开始思考,此刻到底需要做什么?好吧,我的本地工作流程是:
- 克隆/拉取包含 pkg 的 GitHub 仓库
- 在 `install.ps1` 文件中替换 nupkg 的软件版本以及链接
- 在 `install.ps1` 文件中替换 SHA 值
choco packchoco push
然后我意识到。Azure DevOps 现在为开源项目提供免费的构建/发布管道

而这就是一个这样的项目!Azure DevOps 在实际机器上构建。可以运行 PowerShell 脚本的机器。而且,正如我发现的那样,这些机器已经安装了 Chocolatey。所以完全可以实现自动化(剧透:确实可以)。这是我实现它的方式。
3.1 步:准备仓库
我不再是检入一个针对实际版本的 nuspec 文件,以及一个包含真实二进制文件和 SHA 链接的 `chocolateyInstall.ps1` 文件,而是需要使用这些文件的令牌化版本。因此,我的 nuspec 文件变成了这样:
<package xmlns="http://schemas.microsoft.com/packaging/2015/06/nuspec.xsd">
  <metadata>
    <id>vivaldi</id>
    <version>$version$</version>
我的 chocolateyInstall.ps1 文件变成了这样:
$packageArgs = @{
    packageName    = $packageName
    fileType       = 'exe'

    url            = '$32url$' # token to be replaced
    silentArgs     = '--vivaldi-silent --do-not-launch-chrome --vivaldi-update'

    checksum       = '$32sha$' # token to be replaced
    checksumType   = 'sha256'
    url64bit       = '$64url$' # token to be replaced
    checksum64     = '$64sha$' # token to be replaced
    checksumType64 = 'sha256'
}
因为 Chocolatey 的命令行使用 nuget 来执行实际打包,所以我可以向 `choco pack` 传递 `--version
我创建了一个名为 `pack.ps1` 的新文件,它负责查找/替换以及 `choco pack` 命令。我将此文件参数化,以便可以从外部轻松调用它并执行正确的操作。结果如下:
Param(
    # Version # of the build
    [Parameter(Mandatory = $true)]
    [string]
    $version,
    # 32-bit download URL
    [Parameter(Mandatory = $true)]
    [string]
    $url32,
    # 32-bit SHA value
    [Parameter(Mandatory = $true)]
    [string]
    $sha32,
    # 64-bit download URL
    [Parameter(Mandatory = $true)]
    [string]
    $url64,
    # 64-bit SHA256 value
    [Parameter(Mandatory = $true)]
    [string]
    $sha64,
    # output directory
    [Parameter()]
    [string]
    $outputdirectory = '.\')

$installFile = Get-ChildItem .\tools\chocolateyinstall.ps1

$content = Get-Content $installFile
$content = $content -replace [regex]::Escape('$32url$'), $url32
$content = $content -replace [regex]::Escape('$64url$'), $url64
$content = $content -replace [regex]::Escape('$32sha$'), $sha32
$content = $content -replace [regex]::Escape('$64sha$'), $sha64

Set-Content $installFile.PSPath -Value $content

choco pack --version $version --out $outputdirectory
现在我可以从任何地方调用这个脚本,向它提供 Vivaldi 的新版本号以及新的 SHA 值,它将创建一个新的 Chocolatey 包,准备推送到社区存储库。让我们看看下一步如何实现。
3.2 步:创建 Azure DevOps 管道
正如我们已经指出的,Azure DevOps 对开源项目是免费的。将你的 chocolatey 包源代码托管在 GitHub 上(无论如何都推荐),你就准备好了。
构建管道
在 Azure DevOps 中,通过前往 `Pipelines` | `Builds` | `+ New` | `New build pipeline`(管道 | 构建 | + 新建 | 新建构建管道)来创建一个新的构建管道。

配置你的新构建管道,使用你的 GitHub 仓库作为其源,选择正确的分支,然后点击 **Continue**(继续)。

由于我们的流程是高度定制的,请在顶部选择 **Empty job**(空作业)。

Agent pool(代理池)应该是 Hosted 2017 pool,因为这些代理池预装了我们所需的一切(Chocolatey),并且已准备就绪。所以现在只需点击 `Agent job 1`(代理作业 1)任务列表中的 `+`。

我们只需要做两件事:运行 `pack.ps1` 脚本,并将生成的 `.nupkg` 文件放入一个可以(通过发布流程)推送到社区 Feed 的位置。
在任务列表中搜索 **powershell** 并选择 **PowerShell**。点击 **Add**(添加)。

对于此项,选择 **inline**(内联),因为它是一个相当直接的命令,我们需要运行。它应该看起来像这样:

即:`.\pack.ps1 -version $(pkgver) -url32 $(32url) -sha32 $(32sha) -url64 $(64url) -sha64 $(64sha) -outputdirectory "$(Build.ArtifactStagingDirectory)"`
你可能想知道:“`sha` & `url` 变量是从哪里来的?它们将如何被填充?”

我们稍后会讲到。
向此管道添加另一个任务,即 Publish Artifact 任务(搜索 `artifact`)

由于我们将 pack 脚本的 `outputdirectory` 设置为 `ArtifactStagingDirectory`,其默认配置就是我们所需要的。

这将把 pack 脚本的输出(新的 `nupkg` 文件)放入一个可以被其他管道拾取的下拉文件夹。更重要的是一个发布管道,它会将文件推送到 Chocolatey 社区存储库。
配置输入变量
现在我们回头看看在哪里定义了构建过程的这些输入变量。正如你可能猜到的,点击顶部的 **Variables**(变量)选项卡。

在此 **Pipeline variables**(管道变量)部分,添加以下内容:
32sha32url64sha64urlpkgver
并**使它们都可以在队列时间设置**。最终结果应该看起来像这样:

现在这些可以:
- 在排队构建时设置(我们稍后会看到)
- 并由我们构建管道中的任务使用,例如我们的 `pack.ps1` PowerShell 任务。
在 **Save & queue**(保存并排队)按钮中,你现在可以点击 **Save**(保存),我们就完成了。

发布管道
既然我们已经构建了新版本的 `nupkg`,我们需要将其推送到社区存储库。虽然我们可以使用相同的内联 PowerShell 脚本来完成,但将其放在单独的管道中更合适——并且确实有一些优势。
首先,这是关注点的分离。如果 Chocolatey 的发布方式/地点发生任何变化,我们不必冒着弄乱构建方式的风险来适应。我们只需更改我们的发布管道。
其次,Azure DevOps 发布管道允许进行一些很棒的操作。其中最重要的是受控发布和发布审批。这意味着在发布发生之前,你可以向一个人或多个人发送电子邮件,要求他们中的一个人或多个人批准发布,然后才能实际进行。我建议在你新管道的最初几次执行中执行此操作,这样你就可以在完全移除辅助轮子之前进行健全性检查。它会让你在完全放下辅助轮子之前有信心。 
要创建从我们的构建管道触发的发布管道,请转到 **Releases** | **+ New** | **Release pipeline**(发布 | + 新建 | 发布管道)。

同样,由于我们的操作具有自定义性质,请从 **Empty job**(空作业)开始。

在工作流 UI 中,点击 Artifacts(构件)区域中的 **Add an artifact**(添加构件)框。

在这里,只需选择你之前创建的构建管道,一切都会自动连接好。

接下来,通过点击构件框上方的闪电图标将发布配置为持续部署。

然后简单地启用它。

完成此操作后,就可以进入发布任务了。点击 Stage 1(阶段 1)区域中的“**1 job, 0 task**”(1 个作业,0 个任务)链接。

这应该看起来很熟悉,因为它与构建管道任务区域非常相似,所以再次搜索 **powershell** 并选择 PowerShell 任务。

要运行的 PowerShell 同样很简单,所以只需内联定义它。

注意:你可以从Chocolatey 帐户页面获取你的 Chocolatey API 密钥以用于此调用。如果你不想让它始终以明文显示在屏幕上,你可能想将其存储为发布管道中的变量。你可以这样做:

如果你想启用审批,请回到管道中的 **Pre-deployment conditions**(预部署条件)区域。

启用它,然后决定你想让你的 DevOps 团队/组织中的谁批准发布。

第四步:连接点
到目前为止,我们已经:
- 创建了一个 Azure Function 来查找我们软件的新版本并计算 SHA。
- 创建了一个 Microsoft Flow,它检查 Chocolatey 上发布的最新版本,并将其与我们 Azure Function 返回的版本进行比较。
- 配置了我们的包源以接受参数化构建命令。
- 配置了一个 Azure DevOps 构建和发布管道,用于构建我们新软件版本的 `nupkg` 并将其推送到 Chocolatey 社区存储库。
但是等等…我们如何让 Flow 启动构建呢?我们没有检入任何新代码,所以它不能是持续集成触发器…
…朋友,Azure 中的一切都有 API!
从 Microsoft Flow 排队构建
一个简单的 HTTP POST 请求到正确的 API 就搞定了。你可以在这里找到详细信息,或者直接跟着操作(嘿,你已经走到这一步了……)。
4.1.1 步:为你的 Azure DevOps 实例获取 PAT
回到 Azure DevOps,将鼠标悬停在右上角的头像上(如果你还没有给自己设置头像,则为通用头像),然后选择 **Security**(安全)。

你将被带到你帐户的 PAT 区域,点击 **Add**(添加)。

为了最安全,只选择你创建构建管道的组织,并且只授予“Build read”(构建读取)和“Build read & execute”(构建读取和执行)权限。

复制生成的 PAT,并准备在稍后使用。
4.1.2 步:通过 Azure DevOps API 使用 Microsoft Flow 排队构建
正如我们前面看到的,我们可以使用 Flow 中的 **HTTP** 操作进行简单的 HTTP 请求。现在再启动一个来排队 Azure DevOps 的构建。它应该如下所示:

你可以通过复制粘贴你在查看构建管道时浏览器中的 URL 来推断要使用的 URL。
你还需要将你的 PAT 作为 `Authorization` 头,使用 `Basic` 身份验证。我们还要向该端点发布一些 JSON,因此也将 `Content-Type` 头设置为如此。

正文是你告诉它要排队哪个构建定义,以及传递任何必要的队列时间参数(还记得我们定义的变量吗?)。它看起来会是这样:

注意你是如何从先前步骤的响应值中提取值,并将其注入到排队构建的请求正文中的。
差不多就是这样了!此时,你的构建将启动,如果你设置了发布审批者,构建完成后你将收到通知,告知发布正在等待。
但是我们可以做得更好,对吧?比如在构建完成后得到通知?
等待构建完成然后通知
不幸的是,Azure DevOps API 没有其他方法来知道构建何时完成,除了轮询状态。但是,如果你执行上述操作,你会看到我们对 Queue Build 端点的 HTTP POST 请求会返回一个大的有效负载——包括已排队的构建的 ID。我们可以利用这些信息,以及 Microsoft Flow 提供的另一个控制逻辑,来查询构建状态,直到构建完成。
将 Queue Build 调用的响应解析为可用的 JSON。
- 向我们的 Flow 添加一个 **Parse JSON** 操作。

- 其输入应该是 Queue Build HTTP 调用的输出。

- 其架构应为:
{ "type": "object", "properties": { "_links": { "type": "object", "properties": { "self": { "type": "object", "properties": { "href": { "type": "string" } } }, "web": { "type": "object", "properties": { "href": { "type": "string" } } }, "sourceVersionDisplayUri": { "type": "object", "properties": { "href": { "type": "string" } } }, "timeline": { "type": "object", "properties": { "href": { "type": "string" } } }, "badge": { "type": "object", "properties": { "href": { "type": "string" } } } } }, "properties": { "type": "object", "properties": {} }, "tags": { "type": "array" }, "validationResults": { "type": "array" }, "plans": { "type": "array", "items": { "type": "object", "properties": { "planId": { "type": "string" } }, "required": [ "planId" ] } }, "triggerInfo": { "type": "object", "properties": {} }, "id": { "type": "integer" }, "buildNumber": { "type": "string" }, "status": { "type": "string" }, "queueTime": { "type": "string" }, "url": { "type": "string" }, "definition": { "type": "object", "properties": { "drafts": { "type": "array" }, "id": { "type": "integer" }, "name": { "type": "string" }, "url": { "type": "string" }, "uri": { "type": "string" }, "path": { "type": "string" }, "type": { "type": "string" }, "queueStatus": { "type": "string" }, "revision": { "type": "integer" }, "project": { "type": "object", "properties": { "id": { "type": "string" }, "name": { "type": "string" }, "url": { "type": "string" }, "state": { "type": "string" }, "revision": { "type": "integer" }, "visibility": { "type": "string" } } } } }, "project": { "type": "object", "properties": { "id": { "type": "string" }, "name": { "type": "string" }, "url": { "type": "string" }, "state": { "type": "string" }, "revision": { "type": "integer" }, "visibility": { "type": "string" } } }, "uri": { "type": "string" }, "sourceBranch": { "type": "string" }, "queue": { "type": "object", "properties": { "id": { "type": "integer" }, "name": { "type": "string" }, "pool": { "type": "object", "properties": { "id": { "type": "integer" }, "name": { "type": "string" }, "isHosted": { "type": "boolean" } } } } }, "priority": { "type": "string" }, "reason": { "type": "string" }, "requestedFor": { "type": "object", "properties": { "displayName": { "type": "string" }, "url": { "type": "string" }, "_links": { "type": "object", "properties": { "avatar": { "type": "object", "properties": { "href": { "type": "string" } } } } }, "id": { "type": "string" }, "uniqueName": { "type": "string" }, "imageUrl": { "type": "string" }, "descriptor": { "type": "string" } } }, "requestedBy": { "type": "object", "properties": { "displayName": { "type": "string" }, "url": { "type": "string" }, "_links": { "type": "object", "properties": { "avatar": { "type": "object", "properties": { "href": { "type": "string" } } } } }, "id": { "type": "string" }, "uniqueName": { "type": "string" }, "imageUrl": { "type": "string" }, "descriptor": { "type": "string" } } }, "lastChangedDate": { "type": "string" }, "lastChangedBy": { "type": "object", "properties": { "displayName": { "type": "string" }, "url": { "type": "string" }, "_links": { "type": "object", "properties": { "avatar": { "type": "object", "properties": { "href": { "type": "string" } } } } }, "id": { "type": "string" }, "uniqueName": { "type": "string" }, "imageUrl": { "type": "string" }, "descriptor": { "type": "string" } } }, "parameters": { "type": "string" }, "orchestrationPlan": { "type": "object", "properties": { "planId": { "type": "string" } } }, "logs": { "type": "object", "properties": { "id": { "type": "integer" }, "type": { "type": "string" }, "url": { "type": "string" } } }, "repository": { "type": "object", "properties": { "id": { "type": "string" }, "type": { "type": "string" }, "clean": {}, "checkoutSubmodules": { "type": "boolean" } } }, "keepForever": { "type": "boolean" }, "retainedByRelease": { "type": "boolean" }, "triggeredByBuild": {} } }
等待构建状态完成
- 向我们的 Flow 添加一个 **Do Until**(直到)块。

- 添加一个 HTTP 操作来查询构建状态。

注意:`URI` 参数中的 `href` 令牌来自你刚刚添加的 Build Queue 的 Parse JSON 输出;在动态内容区域中选择出现的第一个 `href`。
- 解析构建状态查询的响应。

JSON 架构应为:
{ "type": "object", "properties": { "_links": { "type": "object", "properties": { "self": { "type": "object", "properties": { "href": { "type": "string" } } }, "web": { "type": "object", "properties": { "href": { "type": "string" } } }, "sourceVersionDisplayUri": { "type": "object", "properties": { "href": { "type": "string" } } }, "timeline": { "type": "object", "properties": { "href": { "type": "string" } } }, "badge": { "type": "object", "properties": { "href": { "type": "string" } } } } }, "properties": { "type": "object", "properties": {} }, "tags": { "type": "array" }, "validationResults": { "type": "array" }, "plans": { "type": "array", "items": { "type": "object", "properties": { "planId": { "type": "string" } }, "required": [ "planId" ] } }, "triggerInfo": { "type": "object", "properties": {} }, "id": { "type": "integer" }, "buildNumber": { "type": "string" }, "status": { "type": "string" }, "result": { "type": "string" }, "queueTime": { "type": "string" }, "startTime": { "type": "string" }, "finishTime": { "type": "string" }, "url": { "type": "string" }, "definition": { "type": "object", "properties": { "drafts": { "type": "array" }, "id": { "type": "integer" }, "name": { "type": "string" }, "url": { "type": "string" }, "uri": { "type": "string" }, "path": { "type": "string" }, "type": { "type": "string" }, "queueStatus": { "type": "string" }, "revision": { "type": "integer" }, "project": { "type": "object", "properties": { "id": { "type": "string" }, "name": { "type": "string" }, "url": { "type": "string" }, "state": { "type": "string" }, "revision": { "type": "integer" }, "visibility": { "type": "string" } } } } }, "project": { "type": "object", "properties": { "id": { "type": "string" }, "name": { "type": "string" }, "url": { "type": "string" }, "state": { "type": "string" }, "revision": { "type": "integer" }, "visibility": { "type": "string" } } }, "uri": { "type": "string" }, "sourceBranch": { "type": "string" }, "sourceVersion": { "type": "string" }, "queue": { "type": "object", "properties": { "id": { "type": "integer" }, "name": { "type": "string" }, "pool": { "type": "object", "properties": { "id": { "type": "integer" }, "name": { "type": "string" }, "isHosted": { "type": "boolean" } } } } }, "priority": { "type": "string" }, "reason": { "type": "string" }, "requestedFor": { "type": "object", "properties": { "displayName": { "type": "string" }, "url": { "type": "string" }, "_links": { "type": "object", "properties": { "avatar": { "type": "object", "properties": { "href": { "type": "string" } } } } }, "id": { "type": "string" }, "uniqueName": { "type": "string" }, "imageUrl": { "type": "string" }, "descriptor": { "type": "string" } } }, "requestedBy": { "type": "object", "properties": { "displayName": { "type": "string" }, "url": { "type": "string" }, "_links": { "type": "object", "properties": { "avatar": { "type": "object", "properties": { "href": { "type": "string" } } } } }, "id": { "type": "string" }, "uniqueName": { "type": "string" }, "imageUrl": { "type": "string" }, "descriptor": { "type": "string" } } }, "lastChangedDate": { "type": "string" }, "lastChangedBy": { "type": "object", "properties": { "displayName": { "type": "string" }, "url": { "type": "string" }, "_links": { "type": "object", "properties": { "avatar": { "type": "object", "properties": { "href": { "type": "string" } } } } }, "id": { "type": "string" }, "uniqueName": { "type": "string" }, "imageUrl": { "type": "string" }, "descriptor": { "type": "string" } } }, "parameters": { "type": "string" }, "orchestrationPlan": { "type": "object", "properties": { "planId": { "type": "string" } } }, "logs": { "type": "object", "properties": { "id": { "type": "integer" }, "type": { "type": "string" }, "url": { "type": "string" } } }, "repository": { "type": "object", "properties": { "id": { "type": "string" }, "type": { "type": "string" }, "clean": {}, "checkoutSubmodules": { "type": "boolean" } } }, "keepForever": { "type": "boolean" }, "retainedByRelease": { "type": "boolean" }, "triggeredByBuild": {} } } - 添加一个 `Delay`(延迟)操作,等待 10 秒后再检查一次。

- 使用 `status` 令牌作为 Do Until 循环中的 **Choose a value**(选择一个值)。

此外,将总超时设置为 5 分钟,并将执行次数设置为 31。这确保循环在 5 分钟后退出,要么是因为达到了超时,要么是因为达到了最大执行次数(基于每次之间有 10 秒的延迟)。
完成后通知
- 添加一个新的 Mobile Notification(移动通知)操作。

- 将其配置为发送指向构建状态页面的链接。

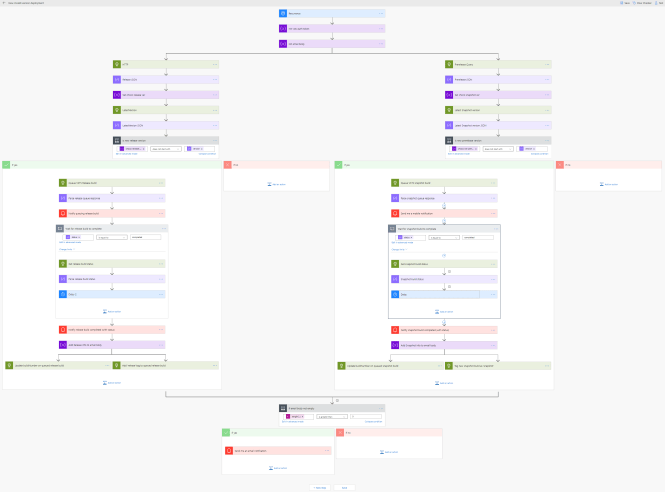
整体图景
我的 Vivaldi MS Flow 实现完成了我在这里介绍的所有内容,但同时处理 Vivaldi 的发布版和快照版。并行执行。是的,Flow 甚至可以并行执行。这是我的 Vivaldi Updater for MS Flow 的顶层视图:
结论
21 世纪的我们拥有强大的开发工具。像微软这样的公司继续投资于越来越高的抽象层,这样我们就可以专注于解决我们的业务问题,而不是那些已经在基础设施、网络等方面被反复解决过无数次的问题。Flow、Functions 和 DevOps 等工具已成为云开发人员的新标配,在使用到极致时,它们提供了令人难以置信的力量、灵活性和生产力。作为额外的奖励,你通常可以免费体验所有这些很棒的功能。
下次当你思考如何自动化某事时,可以看看 MS Flow 或 MS Logic Apps、Functions 和 Azure DevOps,看看它们是否能帮助你专注于更重要的问题,而不是琐碎的细节。这只是我使用这些技术来收回我原本会花在重复性工作上的时间,其中的几十个例子之一。