
[TinyERP: 企业应用程序的 SPA]概述
4.71/5 (9投票s)
TinyERP: 企业应用程序的 SPA
概述
构建企业级应用对我们所有人来说都不是一件容易的事,即使您是一家大型软件公司或专业的软件外包公司。
我们大多有同样的问题。从简单的情况开始,并尝试尽快达到第一个发布版本,而不怎么关心基础设施。只是想,我以后会改进的。太棒了,我们按时交付了!然后,经理要求越来越多的发布版本,这些版本也需要按时交付。是的,没问题,我们可以做到。第一个和第二个版本都按时交付了。
我绝对可以肯定地说,团队和经理为我们感到骄傲,并认为我们做得非常出色。
是的,我们成功地构建了许多其他公司未能构建的企业系统。现在,我们开始为第三个版本开发功能,并坚信团队能够按时交付,并带有承诺的计划、经理的奖金……
好的,时间到了,今天是发布日期,还有大约15%的工作需要完成。(领导说)让我请经理把交付日期推迟“几天”。
好的,没问题,经理说。但是“几天”之后,团队里没有人能说出交付日期,还有大约30%的工作需要完成。怎么了?我们这次发布失败了吗?
经理进行了调查,发现团队像往常一样辛勤工作,但生产力却越来越低,他们看起来很疲惫,大部分时间都花在了修复错误和改进任务上。
在团队会议中,我们发现基础设施不稳定,因此集成新功能通常会产生大量错误,需要更多时间和潜在的问题。所以,团队大部分时间都在与问题作斗争,没有增加多少价值。
构建企业级应用,我们尝试创建“可运行的应用程序”。这还不够。它需要满足企业级应用的一些要求,例如:可维护、可扩展、可伸缩……
我理解这些问题,并创建了这一系列视频“TinyERP: 企业级应用单页应用”。希望这能帮助您解决上述问题。
现在,让我们开始“TinyERP: 企业级应用单页应用”的初探。
TinyERP 遵循客户端-服务器模型。
让我们先从客户端开始
从 Github 克隆源代码:https://github.com/tranthanhtu0vn/TinyERP.git ,并检出 develop 分支。

目前,master 分支上没有源代码,我们还为本系列文章的每个新章节使用“分支模型”。如果您不熟悉“Git & 分支模型”,请参考“GIT & 分支模型”。
如果您在 Visual Studio Code 中打开 client 文件夹,您将看到这样的结构

我将在稍后的文章中详细解释每个文件/文件夹的角色和格式。现在,让我们通过“安装缺失的 node 包”来运行代码。

下载必要的软件包需要一些时间。请记住在运行“npm install”命令之前,先进入“client”文件夹。
源代码是用 typescript 格式编写的,所以我们需要编译并将它们转换为 js,这样浏览器才能理解。

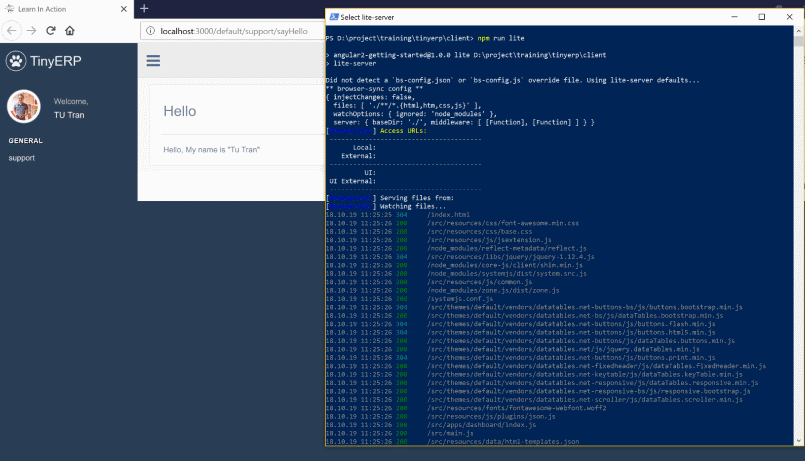
运行应用程序有很多方法,让我们先尝试 lite-server。
在 Node 上运行

在 IIS 上运行

在 Docker 上运行。
在这种情况下,我们需要在生产模式下编译项目并将其添加到 Docker 镜像中。步骤如下:
查看“<root>/client/Dockerfile”,其中包含一些简单的命令。
FROM microsoft/iis
RUN powershell -NoProfile -Command Remove-Item -Recurse C:\inetpub\wwwroot\*
WORKDIR /inetpub/wwwroot
COPY . .
从“<root>/client”目录运行“npm run build”,然后等待几分钟。

检查“<root>/client/dist/”文件夹,这里存放着编译后的源代码。

目前,我们有一个部署脚本的草稿版本供您在开发期间使用。在这个系列的“部署”部分,将会有更多有趣的内容。
编译后的代码中有一些文件,有些文件被打包在一起了。
这里有一些注意事项:
- 删除“<root>/client/dist”中的web.config文件。我们需要安装 url-rewrite 模块才能使用它。现在移除。
- 在运行“
npm run build”命令之前,将“<root>/src/apps/dashboard/config/appConfig.ts”中的development.mode更改为DeploymentMode.PROD。
- 在“<root>/client/dist/index.html”中取消注释 js 脚本引用。

将 Docfile 从“<root>/client”复制到“<root>/client/dist”,然后运行以下命令。如果您想了解更多关于 Docker 的信息,请在“http://coaching.edu.vn”上搜索相应的课程或在“http://tranthanhtu.vn”上阅读文章。

好的,我们已经在本地获得了 TinyERP(客户端)的 Docker 镜像,您可以自行运行和检查。让我们通过以下命令运行镜像:
docker run -d -p 8000:80 --name tinyerp-running tinyerp-docker

好的,现在我们可以部署 TinyERP 并从 Docker 镜像运行了。
这些是纯静态文件(例如:html、css、图片……),因此您可以将其部署到任何 Web 服务器(例如:Apache、Nginx……)。
到目前为止,我们可以编译和运行客户端。对于使用客户端-服务器模型的 SPA(Web 应用程序)来说,这还不够。
TinyERP - API(服务器端)
服务器端很简单,如下所示:
- 创建一个新的
WebApi项目,如果您不知道如何操作,请搜索谷歌。 - 添加一些基本的 nuget 包,例如:
TinyERP.Common、TinyERP.Common.Email、TinyERP.Context。
- 在 web.config/configuration/configSections 中添加新的“
appconfiguration”节。<configSections> <!-- other sections --> <section name="appconfiguration" type="TinyERP.Common.Configurations.Configuration, TinyERP.Common" /> <section name="log4net" type="log4net.Config.Log4NetConfigurationSectionHandler, log4net" /> </configSections> <appconfiguration configSource="config\configuration.debug.config"></appconfiguration> <log4net debug="true"> <appender name="RollingLogFileAppender" type="log4net.Appender.RollingFileAppender"> <file value="logs\\log.txt" /> <appendToFile value="true" /> <rollingStyle value="Size" /> <maxSizeRollBackups value="10" /> <maximumFileSize value="10MB" /> <staticLogFileName value="true" /> <layout type="log4net.Layout.PatternLayout"> <conversionPattern value="%-5p %d %5rms %-22.22c{1} %-18.18M - %m%n" /> </layout> </appender> <root> <level value="DEBUG" /> <appender-ref ref="RollingLogFileAppender" /> </root> </log4net> - 排除不必要的 C# 代码。

- 像下面这样更改您的 Global.asax.cs 文件。
[assembly: Microsoft.Owin.OwinStartup(typeof(TinyERP.Api.WebApiApplication))] namespace TinyERP.Api { using TinyERP.Common.Application; using TinyERP.Common; public class WebApiApplication : BaseWebApiApplication { public WebApiApplication() : base() { } protected override ApplicationType GetApplicationType() { return ApplicationType.WebApi; } protected virtual void Application_Start() { this.application.OnApplicationStarted(); } } } - 让我们尝试创建一个简单的“Controllers/SystemController.cs”控制器。
namespace TinyERP.Api.Controllers { using System.Web.Http; using TinyERP.Common.MVC; using TinyERP.Common.MVC.Attributes; [System.Web.Http.RoutePrefix("api/system")] public class SystemController : BaseApiController { [Route("getMyName")] [HttpPost()] [ResponseWrapper()] public string GetMyName() { return "TU Tran"; } } } - 使用 REST 客户端进行检查,确保它正常工作,并调用
GetMyName方法。
- 好的,太棒了。我可以运行 TinyERP 的客户端和服务器部分。这部分够了吗?
- 答案是:否。
- 我的天啊,这篇文章好长。
- 别担心,只是一个小部分,集成客户端和服务器部分。
- 好的,请开始。
客户端和服务器部分之间的集成
让我们更改“<root>/client/modules/support/pages/sayHello.ts”。
import { Component } from "@angular/core";
import { BasePage } from "@app/common";
import {ISystemService, SystemService} from "../_share/services/systemService";
@Component({
    templateUrl: "src/modules/support/pages/sayHello.html"
})
export class SayHello extends BasePage<any>{
    public myName: string = "Tu Tran local";
    protected onReady(): void {
        let self = this;
        let service: ISystemService = new SystemService();
        service.getMyName().then((name: string) => {
            self.myName = name;
        });
    }
}
有两个新的类/接口(ISystemService 和 SysteService)。让我们在“<root>/client/modules/support/pages/_share/services/”中添加一个新的 systemService.ts 文件。
import {Promise, BaseService, IConnector, IoCNames} from "@app/common";

export interface ISystemService{
    getMyName():Promise;
}
export class SystemService extends BaseService implements ISystemService{
    public getMyName():Promise{
        let uri="https://:56622/api/system/getMyName";
        let connector: IConnector = window.ioc.resolve(IoCNames.IConnector);
        return connector.post(uri);
    }
}
在这段代码中,我们对“https://:56622/api/system/getMyName”URI 使用了硬编码值,请将其替换为您本地 PC 上的相应 URI。
在“<root>/client”目录中运行“npm run tsc”,之后运行“node node_server.js”。我们得到了结果。
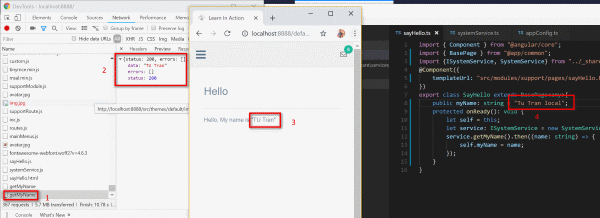
我们可以在图片中看到,浏览器向服务器发送了调用“..../getMyName”(1)的请求,并收到了来自服务器的响应(2),然后将其显示在 UI 上(3),即使本地变量已更改为“TU Tran local”(4)。
所以到目前为止,我们可以编译和运行客户端和服务器,它们也可以集成。
本部分示例代码,请从 https://github.com/tranthanhtu0vn/TinyERP 存储库中检出“feature/overview”分支。
系列中的其他文章
- 概述(本文)
- “管理员工”示例
- “管理员工”第 2 部分(API)
- 跨模块/域通信
- 处理错误/验证
为了学习 Angular2,我认为您应该按照下面的文章列表进行学习(点击链接查看详细页面)。
谢谢阅读,
CodeProject
注意:如果您认为这篇文章很有用,请点赞并与您的朋友分享,我将不胜感激。