
使用 Angular 中的 Azure SignalR 和 Azure Functions 实现实时 IoT 数据
5.00/5 (2投票s)
我们如何使用 Azure SignalR 服务和 Azure Functions 在 Angular 应用程序中显示来自 IoT 设备的实时数据
引言
来自物联网设备的数据需要实时显示,如果做不到这一点,那么显示它就没有意义了。在这篇文章中,我们将了解如何使用 Azure SignalR 服务和 Azure Functions 在 Angular 应用程序中显示来自物联网设备的实时数据。听起来很有趣?因此,数据流可以定义为:物联网设备 -> Azure IoT Hub -> Azure Function -> Azure SignalR Service -> Angular 应用程序。听起来很有趣?那么,我们开始吧。
背景
在我们之前的文章中,我们已经创建了一个Azure Function,它可以在我们的 IoT Hub 收到任何新消息/事件时拉取数据。如果您还没有阅读过,请阅读它。
源代码
请随意在此处从 GitHub Fork 或 Clone 此项目:Realtime-IoT-Device-Data-using-Azure-SignalR-and-Azure-Function-in-Angular
实时物联网数据处理
我们将创建两个解决方案,一个用于 Angular 应用程序,一个用于 Azure Functions。我们还将在 Azure 门户中创建一个新的 Azure Signal R 服务。
Azure SignalR 服务
根据微软的说法,Azure SignalR 服务是一项 Azure 托管的 PaaS 服务,可通过 SignalR 简化实时 Web 应用程序的开发、部署和管理,并提供 Azure 支持的 SLA、缩放、性能和安全性。该服务提供了 API/SDK/CLI/UI,以及丰富的代码示例、模板和演示应用程序。
Azure SignalR 服务核心功能
- 原生 ASP.NET Core SignalR 开发支持
- ASP.NET Core SignalR 后端,以提高性能和稳定性
- 基于 Redis 的主干扩展
- WebSocket、Comet 和 .NET Server-Sent-Event 支持
- 用于服务器广播场景的 REST API 支持
- 用于基于 ARM 模板的 CLI 的资源提供程序支持
- 用于性能和连接监控的仪表板
- 基于令牌的认证模型
现在,让我们登录到 Azure 门户并创建一个新的 Azure Signal R 服务。点击“+创建资源”,然后搜索“SignalR 服务”。创建服务后,转到“密钥”部分并复制连接字符串,我们将在 Azure Function 中使用它。
Azure Functions
正如我们在上一篇文章中讨论的那样,我们将创建一个带有 IoTHubTrigger 的 Azure Function。您可以参考这篇文章以获取有关如何在 Visual Studio 中创建 Azure Function 解决方案的提示。请确保您已安装下图所示的必需程序包。

创建解决方案中的新函数后,就可以添加一些代码了。
using Microsoft.Azure.EventHubs;
using Microsoft.Azure.WebJobs;
using Microsoft.Azure.WebJobs.Extensions.SignalRService;
using Microsoft.Extensions.Logging;
using Newtonsoft.Json;
using System;
using System.Text;
using System.Threading.Tasks;
using IoTHubTrigger = Microsoft.Azure.WebJobs.EventHubTriggerAttribute;

namespace AzureFunction
{
    public static class SignalR
    {
        [FunctionName("SignalR")]
        public static async Task Run(
            [IoTHubTrigger("messages/events",
            Connection = "IoTHubTriggerConnection",
            ConsumerGroup = "ml-iot-platform-func")]EventData message,
            [SignalR(HubName =
            "broadcast")]IAsyncCollector<SignalRMessage> signalRMessages,
            ILogger log)
        {
            var deviceData = JsonConvert.DeserializeObject
            <DeviceData>(Encoding.UTF8.GetString(message.Body.Array));
            deviceData.DeviceId = Convert.ToString
            (message.SystemProperties["iothub-connection-device-id"]);


            log.LogInformation($"C# IoT Hub trigger function p
            rocessed a message: {JsonConvert.SerializeObject(deviceData)}");
            await signalRMessages.AddAsync(new SignalRMessage()
            {
                Target = "notify",
                Arguments = new[] { JsonConvert.SerializeObject(deviceData) }
            });
        }
    }
}
如您所见,我们使用 Microsoft.Azure.WebJobs.EventHubTriggerAttribute 从 IoT Hub 拉取数据。这里的“messages/events”是我们的事件中心名称,Connection 是定义在 local.settings.json 文件中的 IoT Hub 连接字符串,而 ConsumerGroup 是我为 Azure Function 解决方案创建的组。
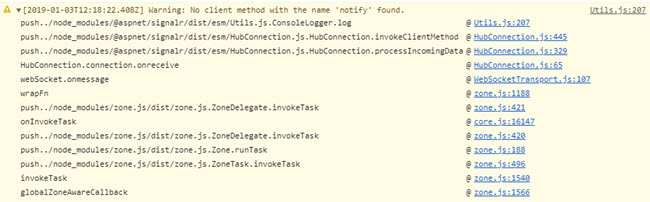
如果您注意到,我们在 SignalR 属性中使用了 HubName“broadcast”,并在 SignalR 消息 Target 属性中使用了“notify”。如果您更改 Target 属性,您可能会在浏览器控制台中收到一条警告:“警告:找不到名为‘notify’的客户端方法。”。@aspnet/signalr 包默认会检查 Target 属性‘notify’。
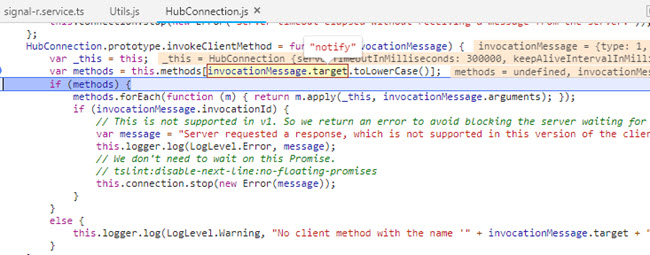
因此,我将 Target 属性保留为‘notify’。默认情况下,消息数据不包含设备 ID 值,因此我们需要从 SystemProperties 中获取它。
var deviceData = JsonConvert.DeserializeObject(Encoding.UTF8.GetString(message.Body.Array));
deviceData.DeviceId = Convert.ToString(message.SystemProperties["iothub-connection-device-id"]);
以下是我的 DeviceData 类。
using Newtonsoft.Json;
using System;

namespace AzureFunction
{
    public class DeviceData
    {
        [JsonProperty("messageId")]
        public string MessageId { get; set; }

        [JsonProperty("deviceId")]
        public string DeviceId { get; set; }

        [JsonProperty("temperature")]
        public string Temperature { get; set; }

        [JsonProperty("humidity")]
        public string Humidity { get; set; }

        [JsonProperty("pressure")]
        public string pressure { get; set; }

        [JsonProperty("pointInfo")]
        public string PointInfo { get; set; }

        [JsonProperty("ioTHub")]
        public string IoTHub { get; set; }

        [JsonProperty("eventEnqueuedUtcTime")]
        public DateTime EventEnqueuedUtcTime { get; set; }

        [JsonProperty("eventProcessedUtcTime")]
        public DateTime EventProcessedUtcTime { get; set; }

        [JsonProperty("partitionId")]
        public string PartitionId { get; set; }
    }
}
当您使用 Angular 应用程序等任何客户端时,重要的是我们需要从服务器获取令牌/连接,以便客户端可以与服务器保持持久连接,从而可以将数据从 SignalR 服务推送到客户端。因此,我们将创建一个新的 Azure Function,它将返回包含 Url 和 AccessToken 的连接信息。
using Microsoft.AspNetCore.Http;
using Microsoft.Azure.WebJobs;
using Microsoft.Azure.WebJobs.Extensions.Http;
using Microsoft.Azure.WebJobs.Extensions.SignalRService;
using Microsoft.Extensions.Logging;

namespace AzureFunction
{
    public static class SignalRConnection
    {
        [FunctionName("SignalRConnection")]
        public static SignalRConnectionInfo Run(
            [HttpTrigger(AuthorizationLevel.Anonymous, "get", Route = null)] HttpRequest req,
            [SignalRConnectionInfo(HubName = "broadcast")] SignalRConnectionInfo info,
            ILogger log) => info;
    }
}
请确保您已在 HttpTrigger 属性中设置了 AuthorizationLevel.Anonymous,并且还使用我们为其他 Azure Function 使用的相同 HubName,即 SignalR。
现在我们可以自定义我们的 local.settings.json 文件了。
{
  "IsEncrypted": false,
  "Values": {
    "AzureWebJobsStorage": "UseDevelopmentStorage=true",
    "FUNCTIONS_WORKER_RUNTIME": "dotnet",
    "AzureSignalRConnectionString": "",
    "MSDEPLOY_RENAME_LOCKED_FILES": 1,
    "IoTHubTriggerConnection": ""
  },
  "Host": {
    "LocalHttpPort": 7071,
    "CORS": "*"
  }
}
请注意,此文件用于本地配置,请在运行应用程序之前记得在此处更改连接字符串。如果您想在 Azure 门户中的 Azure Function 中启用 CORS,您可以按照下图所示的步骤进行。

Angular 客户端
既然我们已经创建了 Azure Functions,现在是时候创建我们的 Angular 客户端了。让我们使用 Angular CLI 创建一个新项目。现在我们可以向应用程序添加一个新包 @aspnet/signalr,它将帮助我们与 Azure SignalR 服务进行通信。
home.component.ts
以下是我的 home.component.ts 文件的代码
import { Component, OnInit, NgZone } from '@angular/core';
import { SignalRService } from 'src/app/services/signal-r.service';
import { StreamData } from 'src/app/models/stream.data';

@Component({
  selector: 'app-home',
  templateUrl: './home.component.html',
  styleUrls: ['./home.component.css']
})
export class HomeComponent implements OnInit {
  streamData: StreamData = new StreamData();

  constructor(private signalRService: SignalRService) {
  }

  ngOnInit() {
    this.signalRService.init();
    this.signalRService.mxChipData.subscribe(data => {
      this.streamData = JSON.parse(data);
      console.log(data);
    });
  }
}
home.component.html
我们使用 Material 卡来显示设备数据,因此我们可以按如下方式定义我们的 home.component.html 文件
<div class="container">
  <div class="row">
    <mat-card class="example-card">
      <mat-card-header>
        <div mat-card-avatar class="example-header-image"></div>
        <mat-card-title>Real Time Values</mat-card-title>
        <mat-card-subtitle>The real time values of humidity, temprature etc...</mat-card-subtitle>
      </mat-card-header>
      <mat-card-content>
        <p>
          <label>DeviceId: </label>
          {{streamData?.deviceId}}
        </p>
        <p>
          <label>Temperature: </label>
          {{streamData?.temperature}}
        </p>
        <p>
          <label>Humidity: </label>
          {{streamData?.humidity}}
        </p>
      </mat-card-content>
    </mat-card>
  </div>
</div>
signal-r.service.ts
现在,我们可以创建一个新的服务来调用我们的 Azure SignalR 服务。
import { Injectable } from '@angular/core';
import { HttpClient } from '@angular/common/http';
import { Observable, Subject } from 'rxjs';
import { SignalRConnection } from '../models/signal-r-connection.model';
import { environment } from '../../environments/environment';
import * as SignalR from '@aspnet/signalr';

@Injectable({
  providedIn: 'root'
})

export class SignalRService {
  mxChipData: Subject<string> = new Subject();
  private hubConnection: SignalR.HubConnection;

  constructor(private http: HttpClient) {
  }

  private getSignalRConnection(): Observable<SignalRConnection> {
    return this.http.get<SignalRConnection>(`${environment.baseUrl}SignalRConnection`);
  }

  init() {
    this.getSignalRConnection().subscribe(con => {
      const options = {
        accessTokenFactory: () => con.accessToken
      };

      this.hubConnection = new SignalR.HubConnectionBuilder()
        .withUrl(con.url, options)
        .configureLogging(SignalR.LogLevel.Information)
        .build();

      this.hubConnection.start().catch(error => console.error(error));

      this.hubConnection.on('notify', data => {
        this.mxChipData.next(data);
      });
    });
  }
}
如您所见,我们在服务中执行了以下操作:
- 通过调用
SignalRConnectionAzure Function 获取包含Url和Access令牌的 SignalR 连接信息。 - 使用
SignalR.HubConnectionBuilder创建 Hub 连接。 - 启动 Hub 连接。
- 连接“
notify”函数,请记住我们在 Azure Function SignalR 中设置了此项。
signal-r-connection.model.ts
export class SignalRConnection {
   url: string;
   accessToken: string;
}
stream.data.ts
export class StreamData {
    messageId: string;
    deviceId: string;
    temperature: string;
    humidity: string;
    pressure: string;
    pointInfo: string;
    ioTHub: string;
    eventEnqueuedUtcTime: string;
    eventProcessedUtcTime: string;
    partitionId: string;
}
输出
现在,让我们运行我们的 Angular 应用程序、Azure Function 和模拟设备。请参考此链接以获取有关模拟设备的信息。如果您还没有配置模拟设备,请随时连接到您的 IoT 设备。

参考文献
结论
哇!现在我们已经学习了
- 如何连接 IoT Hub 和 Azure Function
- Azure Function 中的触发器是什么?
- 如何连接 Azure Function 和 Azure SignalR 服务
- 如何将数据发布到 Azure SignalR 服务
- 如何从 Angular 客户端连接 Azure SignalR 服务
- 如何在 Angular 应用程序中显示来自 IoT 设备的实时数据
您可以在此处阅读我的所有物联网文章。
现在轮到你了。你有什么想法?
非常感谢您的阅读。您认为这篇文章中有什么我遗漏的内容吗?您觉得这篇文章有用吗?请不要忘记分享您的反馈。