
WPF 的数字增减控件
4.00/5 (8投票s)
WPF 的数字增减控件
引言
这篇文章仅仅是关于创建一个简单的 WPF 数字上下控件。该控件支持数据绑定,通过上下键以及上下按钮更改值。
必备组件
- .NET Framework 3.5 或更高版本
- Windows XP, 2003, Vista, 2008
创建控件
该控件由一个文本框和两个按钮组成,这两个按钮可以增加或减少控件中的值。为了创建该控件,我正在使用 VS 2008 SP1。按照下面提供的步骤创建数字上下控件。
添加控件
- 打开 VS 2008,转到 文件->新建项目,选择一种语言并创建一个 Windows 库项目。
- 通过从 WPF 类别中选择用户控件,将一个新的用户控件添加到项目中。
- 将其命名为
NumericUpDownControl。 - 在边框内添加一个网格。主要控件将放置在边框内,只是为了有一个轮廓。
- 在网格中,添加
textbox以及用于上下操作的两个按钮控件。
控件的 XAML 看起来像
<Grid Margin="1">
        <Grid.ColumnDefinitions>
            <ColumnDefinition Width="*" />
            <ColumnDefinition Width="20" />
        </Grid.ColumnDefinitions>

        <TextBox Name="TextBoxValue"
                 TextAlignment="Right"
	 Grid.Column="0"/>
        <StackPanel Orientation="Vertical"
		Grid.Column="1"
		VerticalAlignment="Center">
            <Button x:Name="Increase">
                <Image Source="Images/up.png" Height="3" Width="5"  />
            </Button>
            <Button x:Name="Decrease" >
                <Image Source="Images/down.png" Height="3" Width="5" />
            </Button>
        </StackPanel>
    </Grid>
添加属性和基本事件
这创建了控件的基本外观。让我们向控件添加一些事件处理程序。首先,由于它是一个数字上下控件,因此有必要验证文本输入,并且只允许数字输入。
为了验证输入,我正在对 ‘PreviewTextInput’ 使用 regex 类。当 textbox 获得文本时,该事件被触发,这是检查和验证输入的完美时机。让我们定义正则表达式,然后添加事件处理程序代码。最好在构造函数中定义 Regex,因为它也在其他事件中使用。
private void value_PreviewTextInput(object sender, TextCompositionEventArgs e)
{
    var tb = (TextBox)sender;
    var text = tb.Text.Insert(tb.CaretIndex, e.Text);

    e.Handled = !_numMatch.IsMatch(text);
}
当 PreviewTextInput 被触发时,该事件包含用户刚刚输入的 char ,它仍然不是 Textbox 的 Text 属性的一部分,所以让我们插入新输入的字符,看看它是否符合我们的标准。
但在添加更多事件之前,让我们向控件添加一些基本属性,例如 Maximum, Minimum。将属性添加为依赖属性是一个好习惯,这样我们就可以利用绑定功能。
注意:我们可以使用代码片段“propdp”添加依赖属性。
/// <summary>
/// Maximum value for the Numeric Up Down control
/// </summary>
public int Maximum
{
    get { return (int)GetValue(MaximumProperty); }
    set { SetValue(MaximumProperty, value); }
}

// Using a DependencyProperty as the backing store for Maximum.
// This enables animation, styling, binding, etc...
public static readonly DependencyProperty MaximumProperty =
    DependencyProperty.Register("Maximum", typeof(int),
    typeof(NumericBox), new UIPropertyMetadata(100));

/// <summary>
/// Minimum value of the numeric up down control.
/// </summary>
public int Minimum
{
    get { return (int)GetValue(MinimumProperty); }
    set { SetValue(MinimumProperty, value); }
}

// Using a DependencyProperty as the backing store for Minimum.
// This enables animation, styling, binding, etc...
public static readonly DependencyProperty MinimumProperty =
    DependencyProperty.Register("Minimum", typeof(int),
    typeof(NumericBox), new UIPropertyMetadata(0));
现在让我们添加 Value 属性,它表示数字上下控件的值。我们将像以前的属性一样添加它,只是添加一个额外的参数,即 PropertyChangedCallback,这样我们就可以知道值何时更改,并且我们可以将 Textbox 的 Text 属性设置为当前值。
Value 属性的代码看起来像
public int Value
{
    get
    {
        return (int)GetValue(ValueProperty);
    }
    set
    {
        TextBoxValue.Text = value.ToString();
        SetValue(ValueProperty, value);
    }
}

// Using a DependencyProperty as the backing store for Value.
// This enables animation, styling, binding, etc...
public static readonly DependencyProperty ValueProperty =
    DependencyProperty.Register("Value", typeof(int), typeof(NumericBox),
      new PropertyMetadata(0, new PropertyChangedCallback(OnSomeValuePropertyChanged)));

private static void OnSomeValuePropertyChanged(
DependencyObject target, DependencyPropertyChangedEventArgs e)
{
    NumericBox numericBox = target as NumericBox;
    numericBox.TextBoxValue.Text = e.NewValue.ToString();
}
现在一旦属性就位,我们只需要添加其余的 button 和 TextBox 事件
值更改事件:让我们向 textbox 添加一个 TextChanged 事件,并在事件处理程序中添加以下代码。
private void value_TextChanged(object sender, TextChangedEventArgs e)
        {
            var tb = (TextBox)sender;
            if (!_numMatch.IsMatch(tb.Text)) ResetText(tb);
            Value = Convert.ToInt32(tb.Text);
            if (Value < Minimum) Value = Minimum;
            if (Value > Maximum) Value = Maximum;
            RaiseEvent(new RoutedEventArgs(ValueChangedEvent));
        }
首先验证输入,然后验证 min 和 max 值。之后,将触发 ValueChangedEvent 。用户可以在源控件上注册事件,以在控件中的值更改时收到通知。
 // Value changed
        private static readonly RoutedEvent ValueChangedEvent =
            EventManager.RegisterRoutedEvent("ValueChanged", RoutingStrategy.Bubble,
            typeof(RoutedEventHandler), typeof(NumericBox));

        /// <summary>The ValueChanged event is called when the
        /// TextBoxValue of the control changes.</summary>
        public event RoutedEventHandler ValueChanged
        {
            add { AddHandler(ValueChangedEvent, value); }
            remove { RemoveHandler(ValueChangedEvent, value); }
        }
对于增加和减少按钮,我们所要做的就是增加或减少 ‘Value’ 属性并引发相应的事件,以便父控件上的用户可以注册更改事件。
 private void Increase_Click(object sender, RoutedEventArgs e)
        {
            if (Value < Maximum)
            {
                Value++;
                RaiseEvent(new RoutedEventArgs(IncreaseClickedEvent));
            }}
 //Increase button clicked
        private static readonly RoutedEvent IncreaseClickedEvent =
            EventManager.RegisterRoutedEvent("IncreaseClicked", RoutingStrategy.Bubble,
            typeof(RoutedEventHandler), typeof(NumericBox));

        /// <summary>The IncreaseClicked event is called when the
        /// Increase button clicked</summary>
        public event RoutedEventHandler IncreaseClicked
        {
            add { AddHandler(IncreaseClickedEvent, value); }
            remove { RemoveHandler(IncreaseClickedEvent, value); }
        }
最后润色
基本控件看起来已准备就绪。 只有一个东西缺失,即 Up And Down 键的支持,这是非常需要的。所以我们只需要将该支持添加到控件中。
向 TextBox 添加一个 PreviewKeyDown 事件,处理程序的代码看起来像
/// <summary>
    /// Checking for Up and Down events and updating the value accordingly
    /// </summary>
    /// <param name="sender"></param>
    /// <param name="e"></param>
    private void value_PreviewKeyDown(object sender, KeyEventArgs e)
    {
        if (e.IsDown && e.Key == Key.Up && Value < Maximum)
        {
            Value++;
            RaiseEvent(new RoutedEventArgs(IncreaseClickedEvent));
        }
        else if (e.IsDown && e.Key == Key.Down && Value > Minimum)
        {
            Value--;
            RaiseEvent(new RoutedEventArgs(DecreaseClickedEvent));
        }
    }
Using the Code
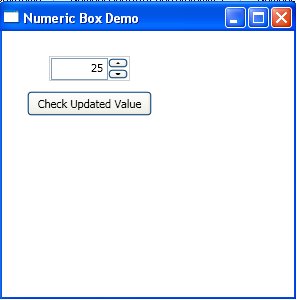
该控件使用起来非常简单。 附加的演示项目显示了一个示例用法,其中控件绑定到一个对象。 您也可以从 codebehind 或 XAML 文件设置该值。
- 该控件支持
Maximum和Minimum值以及返回当前值的value属性。 - 上面提到的所有三个属性都是依赖属性,因此可以绑定到对象。 当您使用 MVVM 或类似的模式时,这真的很有帮助,在该模式中,视图层保持了 UI 代码的清洁。
- 下面显示了一个示例 XAML 用法
<nb:NumericBox Value="{Binding Age,Mode=TwoWay,UpdateSourceTrigger=PropertyChanged}"
    Minimum="5" Maximum="100" Margin="5"/>
C# 代码
p = new Person { Age = 25 };
this.DataContext = p;
结论
这是一个数字上下控件的非常简单的实现。 您可以随意在任何您想使用的地方使用它。 我可能忽略了一些东西或一些问题,但如果您发现任何这些问题,请随时在此处发布它们,以便可以修复这些问题。
历史
- 2010 年 12 月 25 日 - 文章发表