
扩展 Visual Studio 安装项目
4.88/5 (66投票s)
扩展 Visual Studio 安装项目以构建可靠的 Windows Installer (MSI)

引言
我经常听到的关于构建可靠的 Windows Installer (MSI) 的一件事是:Visual Studio 安装项目不够用,我们需要更多,我的第一反应是——等等,VS 安装项目不像 Advanced Installer、InstallShield,但仍然可以做很多额外的事情。
安装项目用于创建 Windows Installer (.msi) 文件,这些文件用于将您的应用程序分发到另一台计算机或 Web 服务器上进行安装。有两种安装项目:
- 标准安装项目创建安装程序,将 Windows 应用程序安装到目标计算机。
- Web 安装项目创建安装程序,将 Web 应用程序安装到 Web 服务器。
在本文中,我将向您展示如何扩展您的 VS 安装项目,并帮助您了解 VS 安装如何让开发人员轻松地在 Visual Studio 中构建可靠的 Windows Installer (MSI)。 (我所有的截图都将取自 Visual Studio 2010)。
- 开始使用 VS 安装项目
- 添加新用户对话框和部署条件
- 在安装过程中运行外部应用程序
入门
打开 Visual Studio,创建一个名为“DemoSetup”的新安装项目。“安装项目”项可以在“其他项目类型”->“设置和部署”->“Visual Studio Installer”下找到。
同时创建一个名为“DemoWpfApplication”的 WPF 应用程序,我们需要一些项目来工作。
在准备好 MSI 进行部署之前,需要完成两件事。
- 在
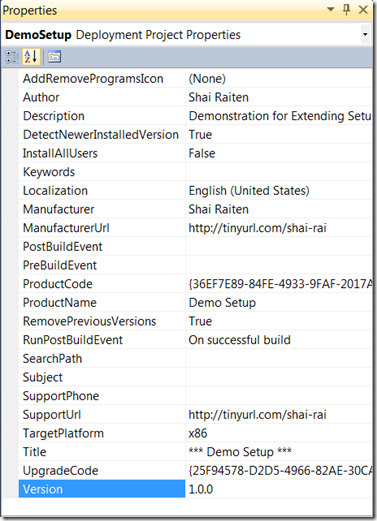
DemoSetup项目中,从DemoWPFApplication添加项目输出——安装程序将自动查找所有相关的依赖项。 - 修改安装项目属性 (见下图)
Version 属性对各种 MSI 都非常重要,以便识别旧安装并用新版本覆盖现有文件。
添加新用户对话框和部署条件
现在,这是用户最常希望改进的地方之一——在安装过程中添加一个额外的对话框,并添加您自己的问题或输入。
在此步骤中,我将展示如何添加条件并添加新的用户对话框,以下是要求:添加以下文件 (Dummy Files)
- Blue.bmp、Red.bmp、 Green.bmp
- License.rtf
- “Readme for 2000.txt”、“Readme for Windows 7.txt”
1. 首先,添加我们的产品许可协议
选择安装项目,然后单击“用户界面编辑器”图标。
这将打开一个视图,显示用户在安装过程中将看到的所有对话框。
单击“添加对话框”并选择“许可协议”。添加此对话框后,查看对话框属性并选择 License.rtf 文件。

2. 按条件进行部署
为“Readme for 2000.txt”和“Readme for Windows 7.txt”添加部署条件,目的是仅为特定的操作系统复制每个文件。
选择“Readme for 2000.txt”以查看其属性,找到 Condition 并添加此命令——
WindowsBuild = 2195 or VersionNT = 500
现在选择“Readme for Windows 7.txt”并在 Condition 属性中添加此内容——
WindowsBuild >= 7100 or VersionNT = 601
(更多信息请参阅 操作系统属性值)
条件将允许您根据用户操作系统复制特定文件。
3. 添加您的用户选择条件
此步骤将向您展示如何添加自己的问题 (使用单选按钮),并允许用户定义喜欢的颜色,然后使用用户选择作为部署条件。
添加一个新的对话框并选择“RadioButton (3 个按钮)”,然后按如下方式填写信息。
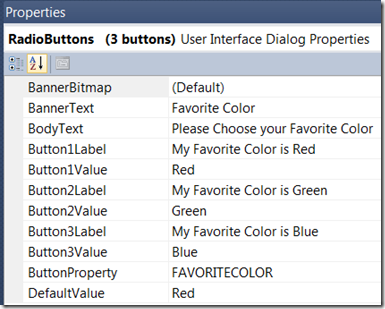
要添加条件,您需要选择以下每个文件:Blue.bmp、Red.bmp、Green.bmp,并在 Condition 属性中添加相应的值,如下所示——FAVORITECOLOR="Blue"、FAVORITECOLOR="Red" 等等。
构建安装项目并运行它,在“Favorite Color”中选择 Green,结果应如下所示:

在安装过程中运行外部应用程序
在此步骤中,我将向您展示如何使用“Installer Class”在实际安装过程之前运行外部应用程序。
创建一个名为“SetupHelper”的新 WPF 应用程序项目,并添加一个名为“MyInstallerHelper”的“Installer Class”类型的附加项。InstallerClass 将允许您覆盖以下事件:
RollbackInstallOnAfterInstallCommitOnAfterRollbackOnAfterUninstallOnBeforeRollbackOnBeforeUninstallOnCommittedOnCommittingUninstallOnBeforeInstall
首先,为“SetupHelper”WPF 应用程序添加代码。我添加了代码来显示当前进程和进程标题,但您可以添加任何您想要的内容。
现在我们需要将“SetupHelper”WPF 应用程序添加到我们的安装项目中。选择安装项目并“添加项目输出”SetupHelper。
选择安装项目,然后单击“自定义操作编辑器”图标。
在“安装”中,添加新的“自定义操作”,从“应用程序文件夹”中选择“SetupHelper (Active) 的主要输出”。
现在选择新的自定义操作,并在“CustomActionData”中添加以下内容——
/Run=SetupHelper.exe /WaitForExit=true
回到 MyInstallerHelper,覆盖 OnBeforeInstall 并将以下代码粘贴到其中,以便获取您在上面自定义操作中编写的 CustomActionData。
protected override void OnBeforeInstall(IDictionary savedState)
{
    try
    {
        base.OnBeforeInstall(savedState);
        FileInfo fileInfo = new FileInfo
		(System.Reflection.Assembly.GetExecutingAssembly().Location);
        //Take custom action data values
        string sProgram = Context.Parameters["Run"];
        sProgram = Path.Combine(fileInfo.DirectoryName, sProgram);
        Trace.WriteLine("Install sProgram= " + sProgram);
        OpenWithStartInfo(sProgram);
    }
    catch (Exception exc)
    {
        Context.LogMessage(exc.ToString());
        throw;
    }
}
OpenWithStartInfo 将运行 SetupHelper 应用程序,并在 SetupHelper 打开时暂停安装过程。
void OpenWithStartInfo(string sProgram)
{
    ProcessStartInfo startInfo = new ProcessStartInfo(sProgram);
    startInfo.WindowStyle = ProcessWindowStyle.Normal;
    string[] ExcludeKeys = new string[] { "run", "WaitForExit" };
    startInfo.Arguments = ContextParametersToCommandArguments(Context, ExcludeKeys);
    Trace.WriteLine("run the program " + sProgram + startInfo.Arguments);
    Process p = Process.Start(startInfo);
    ShowWindow(p.MainWindowHandle, WindowShowStyle.Show); 	//otherwise it is
							//not activated
    SetForegroundWindow(p.MainWindowHandle);
    BringWindowToTop(p.MainWindowHandle); 	// Make sure the user will see
					// the new window above of the setup.
    Trace.WriteLine("the program Responding= " + p.Responding);
    if ((Context.IsParameterTrue("WaitForExit")))
    {
        p.WaitForExit();// Have to hold the setup until the application is closed.
    }
}
ContextParametersToCommandArguments 获取您在自定义操作中添加的 CustomActionData 参数。
public static String ContextParametersToCommandArguments
		(InstallContext context, string[] ExcludeKeys)
{
    ExcludeKeys = ToLower(ExcludeKeys);
    StringBuilder sb = new StringBuilder();
    foreach (DictionaryEntry de in context.Parameters)
    {
        string sKey = (string)de.Key;
        bool bAdd = true;
        if (ExcludeKeys != null)
        {
            bAdd = (Array.IndexOf(ExcludeKeys, sKey.ToLower()) < 0);
        }
        if (bAdd)
        {
            AppendArgument(sb, sKey, (string)de.Value);
        }
    }
    return sb.ToString();
}

public static StringBuilder AppendArgument(StringBuilder sb, String Key, string value)
{
    sb.Append(" /");
    sb.Append(Key);
    //Note that if value is empty string, = sign is expected, e.g."/PORT="
    if (value != null)
    {
        sb.Append("=");
        sb.Append(value);
    }
    return sb;
}

#region "FS library methods"
public static string[] ToLower(string[] Strings)
{
    if (Strings != null)
    {
        for (int i = 0; i < Strings.Length; i++)
        {
            Strings[i] = Strings[i].ToLower();
        }
    }
    return Strings;
}
#endregion //"FS library methods"
#region "showWindow"

// http://pinvoke.net/default.aspx/user32.BringWindowToTop
[DllImport("user32.dll")]
static extern bool BringWindowToTop(IntPtr hWnd);

[DllImport("user32.dll")]
[return: MarshalAs(UnmanagedType.Bool)]
private static extern bool SetForegroundWindow(IntPtr hWnd);

//from http://pinvoke.net/default.aspx/user32.SwitchToThisWindow
[DllImport("user32.dll")]
private static extern bool ShowWindow(IntPtr hWnd, WindowShowStyle nCmdShow);

/// <summary>Enumeration of the different ways of showing a window using
/// ShowWindow</summary>
private enum WindowShowStyle : uint
{
    Hide = 0,
    ShowNormal = 1,
    ShowMinimized = 2,
    ShowMaximized = 3,
    Maximize = 3,
    ShowNormalNoActivate = 4,
    Show = 5,
    Minimize = 6,
    ShowMinNoActivate = 7,
    ShowNoActivate = 8,
    Restore = 9,
    ShowDefault = 10,
    ForceMinimized = 11
}
#endregion
试试看
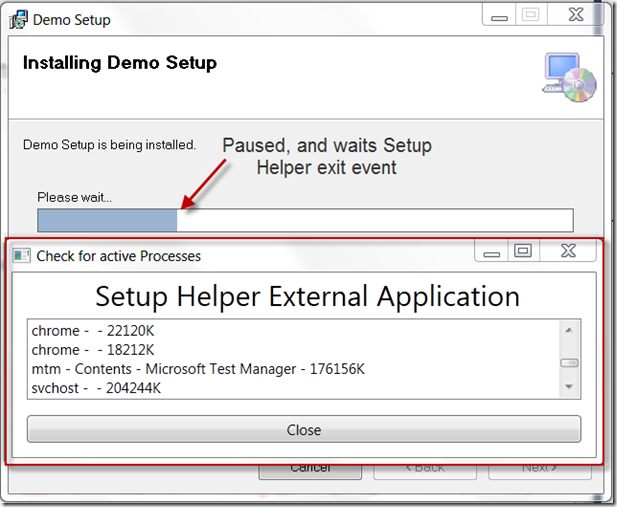
现在运行安装项目,您会发现在安装过程中,您的 Setup Helper 会弹出并阻止安装继续,直到您关闭应用程序。
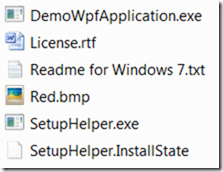
安装完成后,您将看到如下所示的安装输出:
摘要
正如您在本文中所见,Visual Studio 安装项目可以进行大量扩展,这对许多应用程序都很有用。
历史
- 2011 年 1 月 16 日:初始帖子