
PicZoom:用 OpenGL 创建的照片查看器
4.86/5 (64投票s)
PicZoom:用 OpenGL 创建的照片查看器。
目录
- 引言
- 背景
- 使用代码
- 如何捕获桌面截图
- 主要组件
- 4个组件的功能和实现
- 幻灯片播放功能
- 图像文件的拖放
- PicZoom 使用的类
- 主类
- 辅助类
- OpenGL封装类
- 安装程序
- 关注点
- 限制
- 历史
引言
本文讨论了PicZoom应用程序的实现细节(一个具有部分类似Picasa照片查看器功能的照片查看器)。PicZoom是一个基于MFC对话框的应用程序,并使用OpenGL进行绘制。未在显示中使用着色器程序,因此我希望PicZoom无需高端显卡即可运行。由于它需要一定的图形内存来准备所有纹理(背景、图像、按钮等),因此需要显卡来运行PicZoom。 局限性部分解释了PicZoom的图形内存限制。
背景
当我开始学习OpenGL时,我创建了一个简单的应用程序来从文件加载图像并进行简单的旋转和缩放。OpenGL提供了进行一些简单图像操作的API,如缩放、平移、旋转。 Picasa照片查看器是一个简单而出色的图像浏览器工具。在本文中,我只是用OpenGL和MFC模仿Picasa照片查看器的一些功能。我确信此应用程序的性能不如Picasa,但这是一种尝试使用OpenGL和MFC做些事情的尝试。欢迎任何评论和改进建议。


Using the Code
最初,我几乎所有的PicZoom功能都放在一个类CPicZoomDlg中。在单个类中管理所有内容非常困难。因此,我根据不同的功能准备了不同的类。例如,ImageArea类将处理与图像相关的所有操作(绘制、缩放、平移、基于图像的鼠标光标)。然后PicZoomDlg将创建ImageArea、Background等对象的实例,并更轻松地管理它们。我准备了opengl封装类来处理初始化、纹理创建、文本绘制、圆形绘制等。
在启动PicZoom时,它会捕获桌面背景并创建背景的半透明视图。实现细节如下:

如何捕获桌面截图
只需调用::GetDesktopWindow()并获取桌面窗口句柄。然后准备一个内存DC并读取桌面窗口的内容(RGB数据)。GetDIBits()将桌面窗口的RGB缓冲区提供给分配的内存。下面是捕获桌面截图的代码。
bool ScreenCapture::TakeScreenShot()
{
    // Get Desktop window.
    HWND hDesktop = ::GetDesktopWindow();

    // Get temporary Dc for getting data from Desktop.
    CDC dc;
    HDC hdc = ::GetWindowDC(hDesktop);
    dc.Attach(hdc);

    CDC MemoryDC;
    MemoryDC.CreateCompatibleDC(&dc);

    CBitmap BmpObj;
    BmpObj.CreateCompatibleBitmap(&dc, sz.cx, sz.cy);
    CBitmap * oldbm = MemoryDC.SelectObject(&BmpObj);
    // Get data from Desktop to Bitmap.
    MemoryDC.BitBlt(0, 0, sz.cx, sz.cy, &dc, 0, 0, SRCCOPY);

   // Read RGB data of Desktop window Dc.
   int nStatus = ::GetDIBits( MemoryDC.m_hDC, (HBITMAP)BmpObj.m_hObject, 0, sz.cy,
        m_pBuffer, &stBitmapInfo,DIB_RGB_COLORS );
}
上图显示了PicZoom中使用的主要类的划分。PicZoom创建了一个MFC对话框,客户区的绘制由OpenGL处理。
最初,PicZoomDlg创建了PicZoom的4个主要组件(Background、ImageArea、BottomWindows和CloseButton),并将它们添加到名为WindowList的向量中。每当对话框收到WM_PAINT消息时,Draw()命令就会传递给所有4个组件。与Draw()类似,所有鼠标消息也传递给这些组件。
4个组件的功能和实现。
所有这些类(Background、ImageArea、BottomWindows和CloseButton)都继承自GLWindowBase,该基类用于处理不同的窗口(或图像组件)。
1. 背景
此类负责创建一个包含桌面图像的纹理。桌面截图的RGB缓冲区是通过ScreenCapture类获得的。背景图像纹理创建了25%的透明度。这在加载纹理之前使用glPixelTransferf()来实现。glPixelTransferf用于提供红色、绿色、蓝色通道的比例因子。
// Set Pixel Transfer to make semitransparent effect of Desktop.
glPixelTransferf( GL_RED_SCALE, 0.75 );
glPixelTransferf( GL_GREEN_SCALE, 0.75 );
glPixelTransferf( GL_BLUE_SCALE, 0.75 );
// Create Desktop Texture.
if( !m_pImage->Create( m_nWidth, m_nHeight, pbyScreenCapuredData ))
{
    AfxMessageBox(L"Texture Creation failed.");
    return false;
}

glPixelTransferf( GL_RED_SCALE, 1.0 );
glPixelTransferf( GL_GREEN_SCALE, 1.0 );
glPixelTransferf( GL_BLUE_SCALE, 1.0 );Draw()处理程序仅将此纹理绘制到整个屏幕。当从桌面模式切换到对话框模式时,Background实例会从WindowList中删除,并避免绘制背景。bool BackGround::Draw()
{
if( !GLWindowBase::m_bVisible )
{
return true;
}
glMatrixMode( GL_MODELVIEW );
glLoadIdentity();
// Here draws the background image.
m_pImage->Enable();
m_pVertexBuffer->DrawVertexBuffer( GL_POLYGON );
return true;
}
2. ImageArea (图像区域)
当前加载图像文件的显示和所有操作(Zoom(缩放)、Translation(平移)、Rotation(旋转))均在此类中处理。
ImageArea使用RGB数据创建了一个OpenGL纹理。每当用户请求新图像文件时,ImageArea会使用BMPLoader类创建新文件的RGB缓冲区。BMPLoader类使用GdiPlus为*.jpg、*.bmp、*.png和*.tga格式的图像文件创建RGB缓冲区。每当Draw()被调用时,ImageArea将显示此纹理,并进行缩放、平移和旋转。下面将详细介绍缩放、平移和旋转。
2. 1. Zoom (缩放)
缩放功能通过OpenGL的缩放功能轻松实现。在显示纹理之前调用glScalef(),因此纹理将根据当前的缩放因子进行缩放。
当对话框中接收到鼠标滚轮事件时,对话框会将该事件发送给所有组件,因此ImageArea将接收到鼠标滚轮消息。缩放因子是根据当前的滚动值计算的。
bool ImageArea::OnMouseWheel( const int nX_I, const int nY_i,
	const UINT nFlags, const short zDelta )
{
    float fZoomValue = float( zDelta ) / WHEEL_DELTA;

    if( 0 == m_fZoomOffset )
    {
        ::SetTimer( m_hParentWindow, TIMER_ZOOM, 5, 0 );
    }

    // Find out zoom factor based on width of and height of image.
    if( m_nImageWidth > m_nWidth || m_nImageHeight > m_nHeight )
    {
        float fImageToDesktopRatioX = (float)m_nWidth / m_nImageWidth;
        float fImageToDesktopRatioY = (float)m_nHeight / m_nImageHeight;
        float fImageToDesktopRatio =
		min( fImageToDesktopRatioY, fImageToDesktopRatioX );
        fZoomValue = fZoomValue * fImageToDesktopRatio;
    }

    m_fZoomOffset += ( fZoomValue / 100 );
    // Apply Zoom factor 15 times. then first single scroll make 15% zoom.
    m_ZoomTimer.SetMaxElapseTime( 15 );
    return true;
}
在ImageArea::Draw()中,将缩放因子添加到当前缩放因子,然后调用glScalef( m_fZoom, m_fZoom, 1.0 )。缩放不应用于Z顺序,因为不需要。
2. 2. Display of Zoom factor (缩放因子显示)
每当缩放因子改变时,ZoomText类将显示新的缩放值。ZoomText只是绘制一个圆角矩形,并使用OpenGL的文本绘制功能显示当前的缩放因子。FontEngine类用于处理文本绘制。
FontEngine使用所有字符的位图创建一个显示列表。这可以通过OpenGL的wglUseFontBitmaps()函数轻松实现。
bool FontEngine::Create( HDC hDeviceContext_i )
{
    VERIFY(m_pFont->CreateFont(
        15, // nHeight
        7, // nWidth
        0, // nEscapement
        0, // nOrientation
        FW_BOLD, // nWeight
        FALSE, // bItalic
        FALSE, // bUnderline
        0, // cStrikeOut
        ANSI_CHARSET, // nCharSet
        OUT_DEFAULT_PRECIS, // nOutPrecision
        CLIP_DEFAULT_PRECIS, // nClipPrecision
        ANTIALIASED_QUALITY, // nQuality
        DEFAULT_PITCH, // nPitchAndFamily
        L"Arial")); // lpszFacename

    HGDIOBJ hOldFont = ::SelectObject(hDeviceContext_i, m_pFont->m_hObject);

    if( !wglUseFontBitmaps( hDeviceContext_i, 0, 256 * 2, 1000 ))
    {
        return false;
    }

    ::SelectObject( hDeviceContext_i, hOldFont );

    return true;
}

缩放文本显示在对话框的中央,显示当前的缩放因子。此文本以半透明方式显示。显示和隐藏非常流畅,这是通过OpenGL的混合功能实现的。绘制新对象时,新对象和旧对象(已绘制对象)结合起来,使新对象看起来透明。Alpha值从0.0开始,每帧增加0.1,从而获得平滑的外观。隐藏时,Alpha值从1.0减至0.0,从而获得平滑的消失效果。
2. 3. Translation (平移)
LButtonDown和MouseMove消息在ImageArea中进行跟踪,并确定X和Y方向所需的平移。在绘制图像纹理时,ImageArea::Draw()将使用OpenGL的平移函数glTranslatef应用平移。
// Y value is -ve, only because opengl Y coordinate is
//increasing from bottom to top,
// But Y direction mouse movement received in Dialog is decreasing from bottom to top.
glTranslatef( m_fXTranslation, -m_fYTranslation, 0.0 );
2. 4. Rotation (旋转)
旋转功能使用glRotate()函数轻松实现。旋转角度是根据当前的旋转状态计算的。可能的旋转值如下所示:
const float ROTATION_ANGLES[4] =
{ 0.0,// No rotation
  270.0, // First Clockwise
  180.0, // Second Clockwise
  90.0 // 3rd clockwise
};
在ImageArea::Draw()中,将旋转角度应用于Z顺序以实现所需的旋转。
/// Drawing of Image.
bool ImageArea::Draw()
{
    // ....................
    // Apply rotation
    glRotatef( ROTATION_ANGLES[m_nRotate], 0, 0, 1 );

    m_pVertexBuffer->DrawVertexBuffer( GL_QUADS );
   // ...........................
    return true;
}
2. 5. Vertex buffer logic (顶点缓冲区逻辑)
这里我们可以讨论顶点缓冲区逻辑。下图显示了图像的4个角及其对应的顶点坐标。对该顶点缓冲区应用旋转,即可显示旋转后的图像。
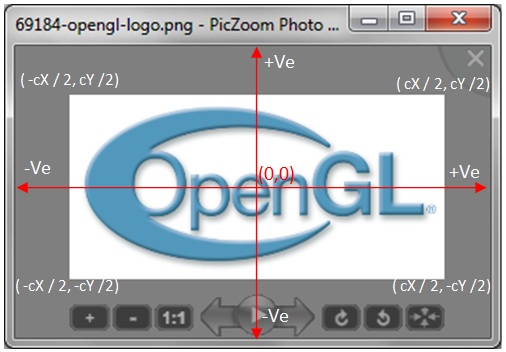
图像使用GLVertexBuffer类显示到屏幕上。GLVertexBuffer是一个用于绘制带有纹理坐标的任何顶点的封装类。调用glInterleavedArrays()将一个对象绘制到屏幕上。在ImageArea类中,使用4个顶点创建GLVertexBuffer对象以将图像绘制到屏幕上。
// Vertex buffer creation logic in ImageArea.
bool ImageArea::SetupWindow()
{
    // Setup Vertex buffer and UnProject.
    int nHalfOfImageY = m_nImageHeight / 2;
    int nHalfOfImageX = m_nImageWidth / 2;
    /*
    0--3
    |  |
    1--2
    */

    m_pVertexBuffer->SetAt( 0, -nHalfOfImageX ,
	nHalfOfImageY, 0.0f, 0.0f,1.0f); // Left Top  corner
    m_pVertexBuffer->SetAt( 1, -nHalfOfImageX ,
	-nHalfOfImageY, 0.0f, 0.0f,0.0f), // Left Bottom
    m_pVertexBuffer->SetAt( 2, nHalfOfImageX,
	-nHalfOfImageY, 0.0f, 1.0f,0.0f); // Right bottom
    m_pVertexBuffer->SetAt( 3, nHalfOfImageX,
	nHalfOfImageY,  0.0f, 1.0f,1.0f); // Right top
 /// ...................
}
3. BottomWindows (底部窗口)
此类负责绘制PicZoom底部显示的按钮以及处理其消息。
PicZoom底部显示9个按钮,用于浏览当前文件夹中的不同图像文件、缩放和旋转图像。
![]()
GLButton设计用于处理与单个按钮相关的所有操作。Bottomwindows创建9个GLButton实例,并将它们保存在列表中,所有命令都传递给按钮列表。
/*
This class handles all operations related to a Button.
The drawing and mouse message handling is handled in this class.
The resource ID of bitmap is provided to this class, and ID of Message
to send to parentWindow( PicZoomDlg) is also provide to this class.
Whenever user press the button, this class will send message to PicZoomDlg.
*/
class GLButton : public GLWindowBase
{
public:

    GLButton( HWND hParentWindow_i );
    virtual ~GLButton();
    virtual void SetRegion( const int nLeft_i, const int nTop_i,
                    const int nWidth_i, const int nHeight_i );
    virtual void SetImage( const int nResourceID_i );
    virtual bool SetupButton();
    virtual void SetLButtonMessage( const int nMessageToParent_i );
    virtual bool OnMouseMove( const int nX_i, const int nY_i, const int nFlags_i );
    virtual bool OnLButtonDown
		( const int nX_i, const int nY_i, const int nFlags_i );
    virtual bool OnLButtonUp
		( const int nX_i, const int nY_i, const int nFlags_i );
    virtual bool IsWithinRegion( const int nX_i, const int nY_i );
    void SetTransparency( const float fTransparency_i );
    virtual bool Draw();
};
GLButton的初始化非常简单。初始化GLButton需要三个项目:资源ID、显示区域和消息ID。位图的资源ID用于创建按钮图像。每个像素的Alpha通道决定了按钮的透明度。当一个像素的alpha值为0.0时,该像素将不会显示在按钮图像中。当用户单击按钮时,将向父窗口(PicZoomDlg)发送消息。
每个按钮的透明行为是通过Alpha混合技术实现的。位图以RGBA格式创建(一个8位通道用于alpha分量)。GLTexture类已修改为创建RGB8、RGBA8纹理。底部窗口所需的位图作为PicZoom的资源添加,然后使用BMPLoader加载这些位图,并使用RGBA数据创建GLTexture。
// The texture and vertex buffer for rendering are setup in this function.
bool GLButton::SetupButton()
{
    // Create Vertex buffer.
    m_pVertexBuffer = new GLVertexBuffer;
    if( 0 == m_pVertexBuffer )
    {
        return false;
    }
    // Create Vertex buffer for rendering Quad image.
    m_pVertexBuffer->CreateQuadVertexBuffer();

    UpdateVertexBuffer();

    // Setup Texture from Bitmap resource ID.
    m_pTexture = new GLTexture;
    int nWidth = 0;
    int nHeight = 0;
    BYTE* pbyARGBImage = 0;
    BMPLoader LoadImage;
    // Load Alpha enabled texture.
    LoadImage.LoadBMP( m_nResourceID, nWidth, nHeight, pbyARGBImage, true );
    // Create RGBA format texture.
    m_pTexture->Create( nWidth, nHeight, pbyARGBImage, GL_RGBA, GL_RGBA8 );
    return (GL_NO_ERROR == glGetError());
}
3. 1. Mouse Over Effect of Button (按钮鼠标悬停效果)
按钮的鼠标悬停效果是以一种巧妙的方式实现的。在显示时,启用了纹理单元(纹理颜色)与当前颜色(glColor)的混合。然后在正常情况下显示按钮时设置较低的颜色(glColor4f(0.75f, 0.75f, 0.75f, 0.75f))。而在显示带有鼠标悬停的按钮时,则应用较高的颜色glColor4f(1.0, 1.0, 1.0, 1.0)。
bool GLButton::Draw()
{
    if( m_bMouseOver )
    {
        // After drawing, pixelstore biasing is changed.
        //glColor4f( 1.0, 1.0, 1.0, 1.0 );
        glColor4f( m_fTransparency, m_fTransparency,
			m_fTransparency, m_fTransparency );
    }
    else
    {
        // After drawing, pixelstore biasing is changed.
        //glColor4f( 0.75, 0.75, 0.75, 1.0 );
        glColor4f( 0.75 * m_fTransparency, 0.75 *
	m_fTransparency, 0.75 * m_fTransparency, 0.75 * m_fTransparency );
    }
    m_pVertexBuffer->DrawVertexBuffer( GL_QUADS );
    return true;
}
3. 2. Displaying functionality of current button (当前按钮功能显示)

上面的截图显示了描述文本的显示行为。GLText用于平滑地显示和隐藏文本。这里也使用了Alpha混合来实现平滑的显示和隐藏。
void GLText::Draw(const int nX_i, const int nY_i)
{
    if( m_StringTimerHide.IsEnabled())
    {
        // Hide old string. Here fColorComponent will decrease
        // after each frame.
        int nRemTime = m_StringTimerHide.GetRemainingTime();
        float fColorComponent = ( nRemTime / 20.0 );
        glEnable( GL_BLEND );
        glBlendFunc( GL_SRC_ALPHA, GL_ONE_MINUS_SRC_ALPHA );
        glColor4f( 1.0, 1.0, 1.0, fColorComponent );
        // Drawing text to screen.
        m_pFontEngine->DrawText( nX_i, nY_i, m_csDisplayString.GetBuffer( 0 ) );
        glDisable( GL_BLEND );
        glColor4f( 1.0, 1.0, 1.0, 1.0 );
        m_StringTimerHide.ElapseTime();
    }
    else
    {
        m_csDisplayString = m_csDisplayStringNew;
        // Show New string. Here fColorComponent will
        // increase during each frame, then reach the maximum value.
        int nRemTime = 20 - m_StringTimerShow.GetRemainingTime();
        float fColorComponent = ( nRemTime / 20.0 );
        glEnable( GL_BLEND );
        glBlendFunc( GL_SRC_ALPHA, GL_ONE_MINUS_SRC_ALPHA );
        glColor4f( 1.0, 1.0, 1.0, fColorComponent );
        // Drawing text to screen.
        m_pFontEngine->DrawText( nX_i, nY_i, m_csDisplayString.GetBuffer( 0 ) );
        glDisable( GL_BLEND );
        glColor4f( 1.0, 1.0, 1.0, 1.0 );
        m_StringTimerShow.ElapseTime();
    }
}
4. CloseButton (关闭按钮)
CloseButton继承自GLButton,以便在CloseButton中实现一些附加功能。关闭按钮的圆形形状是通过将圆外部区域的Alpha通道设置为0.0,内部区域设置为1.0来实现的。鼠标光标的更改也基于圆形区域。
bool CloseButton::IsWithinRegion( const int nX_i, const int nY_i )
{
    if( GLButton::IsWithinRegion( nX_i, nY_i ))
    {
        // Here check the bottom left corner of circle.
        // If mouse move is not within the semi-circle, then return false.
        int nXDiff = nX_i - GLWindowBase::m_nWidth;
        int nYDiff = nY_i;
        int nRadius = sqrt( (float)nXDiff * nXDiff + (float)nYDiff * nYDiff );
        if( nRadius < 45 )
        {
            return true;
        }
    }
    return false;
}
CloseButton还包含一个用于创建半圆平滑边缘的变通方法。当半圆进行纹理映射时,边缘不会平滑。因此,一个GLCircle会绘制一个50%透明的圆。因此,关闭按钮的边缘将是平滑的。
bool CloseButton::Draw()
{
    GLButton::Draw();
    // CloseBoundry draws the outline of circle in 50% transparency.
    m_CloseBoundary.Draw();
    return true;
}
幻灯片播放功能
幻灯片播放功能也通过Alpha混合实现。使用两个图像文件的位图数据创建两个纹理。通过混合第一个和第二个纹理的纹理单元来实现第一个图像到第二个图像的过渡。开始幻灯片播放时,窗口大小会更改为全桌面大小,然后隐藏所有其他窗口(BottomWindows、CloseButton等)。
void SlideShow::Display()
{
   // glColor3f is used to make small amount of texture display.
    // This color factor is multiplied with texel color and get a shading effect.
    glColor4f( fColorFactor, fColorFactor, fColorFactor, fColorFactor );
    m_pTexture1->Enable();
    // Apply zoom1.
    glScalef( m_fZoom1, m_fZoom1, 0.0 );
    m_pVertexBuffer1->DrawVertexBuffer( GL_QUADS );
    glPopMatrix();

    if( nRemTime < 100 )
    {
        glPushMatrix();
        // When transparent display of second texture is required.
        float fTex2Color = 1.0 - fColorFactor;
        glColor4f( fTex2Color, fTex2Color, fTex2Color, fTex2Color );
        m_pTexture2->Enable();
        // Apply Zoom 2.
        glScalef( m_fZoom2, m_fZoom2, 0.0 );
        m_pVertexBuffer2->DrawVertexBuffer( GL_QUADS );
        glPopMatrix();
    }
}
图像文件的拖放
PicZoom支持拖放图像文件(*.bmp、*.jpg、*.gif、*.tga)。拖放功能是通过jibesh的文章实现的(https://codeproject.org.cn/KB/dialog/JibDragDrop.aspx)。
CPicZoomDlg类处理WM_DROPFILES消息,可以通过DragQueryFile()函数检索文件名。下面是处理通过拖放操作加载新图像文件的代码。LoadImage创建一个新的ImageArea实例,并将新文件名提供给该类。ImageArea将在所需的缩放和平移下显示新图像文件。
LRESULT  CPicZoomDlg::OnDropFiles(WPARAM wParam,LPARAM lParam)
{
    TCHAR	szDroppedFile[1024];
    memset( szDroppedFile, 0, sizeof( szDroppedFile ));
    HDROP	hDrop ;
    int nFiles;

    hDrop = (HDROP)wParam;
    nFiles = DragQueryFile(hDrop,		// Structure Identifier
        0,			// -1 to Drop more than one file
        szDroppedFile,// Dropped File Name
        1023 *2 );	// Max char
    // Load new Image file.
    LoadImage( szDroppedFile );
    return 1;
}
PicZoom 使用的类
主类
PicZoom:PicZoom的应用程序类。当一个新的PicZoom实例启动时,它会检查是否已有一个PicZoom正在运行。如果有一个实例正在运行,则向旧实例发送消息,然后退出。PicZoomDlg:CPicZoomDlg对话框类。此类初始化OpenGL,并创建PicZoom的主要组件。在此类中接收的所有消息都路由到m_Windows列表中的GLWindowBase*对象。BackGround:此类处理PicZom中显示的背景图像的绘制。当全屏模式开启时,桌面图像的纹理在此类中创建。在每次绘制时,都会将此纹理绘制到屏幕上。BottomWindows:此类包含PicZoom底部区域的所有窗口。所有GLButton对象都在此类中创建,消息通过此类路由。PicZoomDlg将创建BottomWindows,然后将所有消息发送给此类。ImageArea:此类负责绘制Image。每当加载新图像文件时,ImageArea将处理与单个图像相关的所有操作。Rotate(旋转)、Zoom(缩放)、Translation(平移)均在此类中处理。所有鼠标消息都从PicZoomDlg接收到此类,并处理必要的消息。为Zoom(缩放)、Translate(平移)启动了所需的计时器。ImageArea使用UnProject类来识别鼠标位置是否在图像区域内,并使用ZoomText类来绘制当前的缩放值。CloseButton:此类负责关闭按钮的绘制和消息处理。鼠标消息被路由到此类。当鼠标在此区域单击时,此类将向PicZoomDlg发送WM_QUIT消息。SlideShow:此类负责显示文件夹的幻灯片播放。此类创建两个纹理,并通过Alpha混合创建组合图像。ImageFileFinder类用于查找图像文件。PlayButton:此类是GLButton的派生类。PlayButton是圆形按钮,因此在此类中专门处理鼠标消息。IsWithinRegion()在此类中被重写,以创建PlayButton圆形区域的按钮鼠标悬停效果。为了使边缘平滑,播放按钮的外部区域由2个GLCircle对象绘制。CoordConverter:此类保存当前窗口区域,并将窗口坐标转换为OpenGL坐标。这可用于使用窗口坐标创建顶点缓冲区。NewFilLoader:此类处理加载新图像。当用户单击上下文菜单时,应在旧进程中加载新(JPG或BMP)文件。当PicZoom的一个实例正在运行时,新实例将设置一个事件并在共享内存中写入文件名,然后该内存将用于获取新文件名。UnProject:此类用于从屏幕坐标获取OpenGL顶点坐标,然后确定指定位置是否在Image区域内。ZoomText:此类在PicZoom对话框的中央显示当前的Zoom(缩放)因子。通过Alpha混合实现了平滑的显示和隐藏。CursorManager:此类创建不同的光标,任何其他类都可以使用此类来更改光标。FileExplorer:此类负责处理提供给Dialog类的下一个和上一个文件。每当用户按Next(下一首)或Previous(上一首)时,Dialog类将调用GetNextFileName来检索下一个/上一个文件的名称。更改文件夹时,Dialog调用此类中的SetFilePath。出于性能考虑,此类会创建一个向量并在此向量中保存所有图像文件。此向量是通过一个新线程创建的。GLWindowBase:PicZoom中创建的所有OpenGL窗口的基类。
辅助类
BMPLoader:此类可以从文件或资源加载位图。LoadBMP返回分配的缓冲区,包含宽度和高度。GdiPlus函数用于加载不同格式的图像文件。Timer:此类处理Timer功能。最大时间由SetMaxElapseTime()设置,ElapseTime()会减少时间。ScreenCapture:此类捕获桌面窗口的屏幕截图。GetBuffer提供桌面窗口的RGB数据。PicZoomUtil:此类提供static函数来执行PicZoom所需的一些功能。GetNearestPowerOf2提供整数的最近的2的幂。当OpenGL的non_power_of_two扩展不可用时,此函数用于纹理创建。ImageFileFind:一个CFileFind派生类,它只查找图像文件。CursorManager:此类创建不同的光标,任何其他类都可以使用此类来更改光标。
OpenGL封装类
FontEngine:此类处理PicZoom中所有文本的渲染。创建字体显示列表,并绘制所有文本。所有文本绘制都由此类处理。此类保存所有字符的宽度和高度,以正确地对齐和定位绘制string。GLButton:此类处理与Button相关的所有操作。绘制和鼠标消息处理在此类中进行。位图的资源ID会提供给此类,要发送到parentWindow( PicZoomDlg)的消息ID也会提供给此类。当用户按下按钮时,此类会将消息发送给PicZoomDlg。GLCirle:此类用于绘制圆形或半圆形。起点和终点角度会提供给此类。绘制操作会创建一个混合圆,此类用于为Play按钮和Close按钮创建平滑边缘。GLExtension:此类用于确定GL_ARB_texture_non_power_of_two扩展是否存在。m_bNonPowerOfTwo标志会根据GL_ARB_texture_non_power_of_two扩展的可用性来设置或重置。GLSetup:此类设置OpenGL。创建OpenGL渲染上下文并将其设为当前上下文。GLText:此类仅处理文本的绘制。通过此类可以实现非常平滑的显示和隐藏。GLTexture:此类处理纹理相关的操作。GLVertexBuffer:此类创建一个GL_T2F_V3F类型的顶点集合。SetAt会更新索引的顶点信息。DrawVertexBuffer会将顶点信息传递给GPU。
安装程序
PicZoomInstaller用于修改注册表项,这些项是向Windows资源管理器添加右键菜单所必需的。右键单击文件时,将出现以下上下文菜单。

为在Windows资源管理器中创建上下文菜单,需要进行以下注册表修改。
在HKEY_CLASSES_ROOT\*\Shell\下创建一个新键“OpenWith PicZoom”。
RegistryHandler::RegisterForAllFiles()负责在HKEY_CLASSES_ROOT\*\Shell\中创建“OpenWith PicZoom”条目。
PicZoomInstaller:还实现了其他一些注册表修改,以在“打开方式”列表中创建新的应用程序条目(PicZoom)。

注册表修改是通过试错法确定的。我选择了一个新程序(PicZoom.exe)作为打开BMP文件的默认应用程序。然后我搜索了注册表,找到了在“打开方式”列表中创建应用程序的注册表位置。我不知道其他方法来做到这一点。
为bmp、jpg、png和tga文件创建了“打开方式”列表的注册表项。
// HKEY_CURRENT_USER\Software\Microsoft\Windows\CurrentVersion\Explorer\FileExts\.jpg
// HKEY_CURRENT_USER\Software\Microsoft\Windows\CurrentVersion\Explorer\FileExts\.bmp
// HKEY_CURRENT_USER\Software\Microsoft\Windows\CurrentVersion\Explorer\FileExts\.png
// HKEY_CURRENT_USER\Software\Microsoft\Windows\CurrentVersion\Explorer\FileExts\.tga
RegistryHandler::AddApplicationName()负责在不同图像文件的“打开方式”列表中创建PicZoom。
关注点
在使用GetGlyphOutline()检索字符的宽度和高度时,我得到了一个GDI_ERROR。调试模式工作正常,但发布模式会导致GDI_ERROR。最后,我从一些论坛上找到了原因。提供给的转换矩阵应初始化为单位矩阵。
投影矩阵
由于没有3D相关操作,这里可以使用正交投影。正交投影区域与窗口坐标相同,并且简单地克服了透视投影的-1到+1映射方法。
CPU 使用率
最初,我准备了一个计时器,它以每秒60帧的速度显示图像。这导致PicZoom在没有任何操作的情况下CPU使用率很高:)。这一点都不好。我只是为不同的任务准备了不同的计时器。例如,当缩放开始时,会使用TIMER_ZOOM ID调用::SetTimer()。缩放任务完成后,ImageArea类会销毁此计时器,并避免将图像不必要地绘制到屏幕上。
支持非2的幂纹理
默认情况下,OpenGL纹理的尺寸应满足2的幂。纹理的宽度和高度应该是2的幂。如果您的机器支持GL_ARB_texture_non_power_of_two扩展,则可以避免这种情况。
最初,GLExtension检索GL_ARB_texture_non_power_of_two的状态并更新GLExtension::m_bNonPowerOfTwo。创建纹理时,GLTexture使用此成员并决定纹理尺寸应满足非2的幂。
bool GLTexture::Create(int nWidth, int nHeight, void *pbyData,
	int nFormat_i, int nInternalFormat_i)
{
    // ...............
    // Retrieve Non power of two support and create texture based on it.
    bool bNonPowerTwo  = (GLExtension::GetInstance()).m_bNonPowerOfTwo;;

    if( bNonPowerTwo )
    {
	    glTexImage2D( GL_TEXTURE_2D, 0, nInternalFormat_i, nWidth, nHeight, 0,
		    nFormat_i, GL_UNSIGNED_BYTE, pbyData );
    }
    else
    {
        // if non-power of two is not supported, need to create nearest n^2 texture.
        int nNewWidth = PicZoomUtil::GetNearestPowerOf2( nWidth );
        int nNewHeight = PicZoomUtil::GetNearestPowerOf2( nHeight );

        int nChannelCount = ( GL_RGB8 == nInternalFormat_i ) ? 3 : 4;
        int nSize = nNewWidth * nNewHeight * nChannelCount;
        if( 0 != ( nNewWidth * nChannelCount ) % 4 )
        {
            nSize = nNewHeight * ceil( ( nNewWidth * nChannelCount ) / 4.0f ) * 4.0f;
        }
        BYTE* pbyDataNew = new BYTE[nSize];
        memset( pbyDataNew, 0, nSize );
        // Set black data
        glTexImage2D( GL_TEXTURE_2D, 0, nInternalFormat_i, nNewWidth, nNewHeight, 0,
                      nFormat_i, GL_UNSIGNED_BYTE, pbyDataNew );
        // Update the required area with input data.
        glTexSubImage2D( GL_TEXTURE_2D, 0, 0, 0, nWidth, nHeight, nFormat_i,
                         GL_UNSIGNED_BYTE, pbyData );
        delete[] pbyDataNew;
    }
}
限制
由于所有图像都创建为纹理,因此PicZoom需要一些图形内存。在某些机器上,PicZoom无法启动,背景图像(桌面背景纹理)的准备失败。我检查了具有显卡的机器,其中没有一台出现启动PicZoom的错误。但是一些没有显卡的机器无法启动。启动PicZoom时,如果您的机器没有足够的图形内存来准备纹理,可能会出现类似以下的错误消息。

我在一台没有显卡的机器上检查了纹理创建失败的原因。因为一些带有多个纹理的OpenGL应用程序在这些机器上运行良好。我将这些纹理的宽度和高度更改为更大的值[修改了多纹理应用程序以显示1024大小的位图]。然后我得到了白色的矩形显示,而不是正确的纹理图像。我希望这个问题是由于缺乏图形内存来准备大尺寸纹理造成的。
历史
- 2011年1月16日:初始版本
- 2011年1月24日:添加了
PicZoom使用的类的详细信息 - 2011年2月16日:修改了
InstallPicZoom以处理卸载功能