
创建你自己的运行时可移动 Windows 窗体控件
4.47/5 (48投票s)
一个关于构建用户可以在运行时移动的 Windows 窗体标签控件的教程。
引言
这些问题已经被问过不止一次了:“我怎么才能创建自己的控件?”或者“我怎么才能创建一个可以在运行时移动的标签控件?”这两个问题的答案都非常简单!我将带您一步一步地创建自己的控件,一个不仅在设计时,而且在运行时都可以移动的标签控件。我将向您展示如何使用现有的 Label 控件并在此基础上进行扩展。我还将向您展示如何构建一个应用程序来测试您的新控件,并观察控件的构建过程。但是,在我们深入细节之前,我们需要一些规范。毕竟,如果我们不知道这个新的 MovableLabel 控件应该做什么,我们怎么能给它添加任何代码呢?所以,我们想要什么,更重要的是,我们“需要”这个东西做什么?
一些规范
- 首先,我们希望它具有标准
Label控件提供的所有功能。我们只是增加了通过鼠标在运行时移动它的能力。创建自定义控件的头号规则是,如果已经存在一个控件具备您需要的大部分功能,那就继承它! - 我们需要在鼠标按钮按下并停留在我们的
Label控件上时移动它。 - 我们需要某种指示来表明当鼠标悬停在控件上时,该控件是可移动的。
- 当鼠标按钮被按下时,我们还需要更改鼠标光标,以向用户表明我们正处于“移动”模式。
开始编码
继承自 Label
我们列表上的第一件事是,将标准 Label 控件的所有功能引入到我们的 MovableLabel 控件中。首先创建一个新的 Windows 类库项目,并将其命名为 Movable Controls Library。在解决方案资源管理器中,将 Class1.vb 文件重命名为 MovableLabel.vb。这将允许您创建自己的运行时可移动控件库。您所要做的就是为 Movable Controls Library 项目添加另一个类,以表示您将要创建的每个控件。
现在,由于我们将创建一个 Windows 窗体控件,我们需要导入一些内容。System.Windows.Forms 命名空间为我们提供了对标准 Windows 窗体 Label 控件的访问,以及与 Windows 窗体交互所需的所有小组件。要添加此项,请转到“项目”菜单,然后单击“添加引用...”。确保选择了“.NET”选项卡,然后在列表中向下滚动找到 System.Windows.Forms.dll 文件。双击它以添加引用。
我们从鼠标事件参数中获取的鼠标坐标都将以 Point 结构的形式传递。因此,我们将需要 System.Drawing 命名空间来访问 Point 结构。执行相同的步骤,添加对 System.Drawing.dll 文件的引用。
在完成了这些引用之后,我们只需要稍微修改代码,导入这两个 DLL 文件公开的命名空间,并告诉我们的 MovableLabel 控件它继承自哪个控件类。
Imports System.Windows.Forms
Imports System.Drawing

Public Class MovableLabel
    Inherits System.Windows.Forms.Label

End Class
就这些!现在我们有了一个类,它的功能与标准的 Label 控件完全相同。但是,我们无法这样测试它。如果您尝试按 [F5] 启动项目,您会收到一条错误消息,提示“输出类型为类库的项目无法直接启动...”类库需要有东西来实例化它才能进行测试。我们将不得不向我们的解决方案中添加第二个项目来测试我们的新控件。
创建沙盒
什么是“沙盒”?我将一个小的应用程序称为“沙盒”,用于测试类库或某些其他代码想法的功能。由于我们正在创建一个新的 Windows 窗体控件,我们将需要一个 Windows 窗体应用程序来测试我们的控件。转到“文件”菜单,单击“添加...”,然后单击“新建项目...”。选择“VB.NET Windows 应用程序”,并将其命名为“Movable Controls Sandbox”。这将向我们的解决方案中添加第二个项目。请注意,在解决方案资源管理器中,新项目名称会比我们其他项目名称加粗。这意味着这是启动项目。当您按 [F5] 开始运行代码的调试器时,这个项目将首先启动。如果出于任何原因需要更改启动项目,只需在解决方案资源管理器中右键单击项目名称,然后在弹出的上下文菜单中单击“设置为启动项目”。
沙盒项目需要进行一些修改,以便我们在运行它时知道我们在看什么。在解决方案资源管理器中,找到名为“Form1.vb”的文件并将其重命名为“MainForm.vb”。然后双击新文件名以在设计器中打开窗体。在解决方案资源管理器下方的属性窗格中,找到“外观”部分下的 Text 属性,并将其更改为“Movable Controls Sandbox”。
现在,我们需要将我们的新控件的一个实例放置在窗体上,以便到目前为止可以看到它是否正常工作。如果您还没有这样做,请按 [Ctrl]+[Shift]+B 来生成解决方案。这将检查解决方案中的所有项目是否已编译为可执行代码,并与源代码的最新更改保持同步。它还将把我们的新控件添加到设计器窗口左侧的工具箱中。打开工具箱,找到并展开名为“Movable Controls Library”的部分。其中,您应该会找到 MovableLabel 控件。双击工具箱中的 MovableLabel 控件。设计器应将控件的一个新实例添加到窗体中。将控件移动到窗体大约中间的位置。然后,查看解决方案资源管理器下的属性窗格。请注意,您在普通 Label 控件中找到的所有属性都在这里。我们有一个可以工作的 Label 控件,只是类名不同!
为了以后方便起见,找到 Text 属性并将其更改为“This is a runtime movable label control”。然后,找到属性列表底部附近的 AutoSize 属性,并将其更改为“False”。我们将把控件调整到窗体上一个更大的尺寸,以便单击和拖动。所以抓住我们新控件的一个角柄,将其拖动,直到控件的轮廓大致呈方形,并且您可以在框中阅读完整的文本。现在,通过添加一些颜色并将文本居中,使 MovableLabel 看起来更漂亮一些。
找到 BackColor 属性,在其值框中键入“Green”,然后找到 ForeColor 并将其更改为“White”。将 BorderStyle 更改为 FixedSingle,并将 TextAlign 属性更改为 MiddleCenter。您应该得到一个看起来像这样的结果

现在按 [F5] 运行沙盒应用程序。您会发现我们的 MovableLabel 看起来和感觉都与其他任何 Label 控件一样——静态且无聊!让我们开始为它添加一些新功能!单击窗体上的小“X”来关闭沙盒应用程序并停止调试器。
用户反馈
静态模式
我们的 MovableLabel 需要能够向用户提供某种反馈。由于我们的控件有两种模式:Static(静态)和 Movable(可移动),我们应该向用户提供一些反馈,让他们知道控件处于什么模式。
Static 模式是指控件静止不动,等待鼠标执行我们感兴趣的操作。在这种情况下,Static 模式应监听 MouseDown 事件。此事件的触发将促使控件切换到 Movable 模式。在我们等待此事件发生时,我们应该通过将鼠标指针移到我们的控件上来设置光标,例如指向性手形,以向用户提供我们在 Static 模式下等待的提示。由于我们继承的 Label 控件已经公开了 Cursor 属性,它就可以做到这一点,我们所要做的就是在我们控件的构造函数中设置 Cursor 的值。这样,每一个 MovableLabel 实例都将在添加到窗体的那一刻初始化自己以显示此手形光标。单击编辑器窗口中的“MovableLabel.vb”选项卡,并在 Inherits 行和 End Class 之间添加以下代码。
    Public Sub New()
        ' Call the constructor of the base Label class to properly
        ' initialize our control
        MyBase.New()
        ' Setup the Cursor property so that, by default, when the
        ' mouse passes over our control, the cursor changes to a hand
        Me.Cursor = Cursors.Hand
    End Sub
现在按 [F5] 查看结果。您应该会发现,每当鼠标指针移到 MovableLabel 上方时,光标就会变成手形指针,当鼠标移开控件时,光标又会恢复原状。
此实现方式**不会**剥夺用户在 Static 模式下将 Cursor 属性更改为他们喜欢的任何光标的能力。它只是设置了在设计模式下未使用指定光标时的**默认**光标。试试看。您只需将另一个 MovableLabel 控件拖到窗体上,然后在属性窗格中查看 Cursor 属性。请注意,它不再显示“Default”(默认)。我们继续...
继承背景介绍
那个 MyBase.New() 行是怎么回事?那行在那里是因为我们使用了从 Label 类继承而来的所有代码、属性和方法。Label 类已经变成了我们的奴隶。我们将 Label 类包装在我们自己的代码层中,并通过该代码层来操作 Label。但它仍然是一个单独的类,有其自身的功能规则和功能需求。因此,所有 Windows 窗体控件都有一个 InitializeComponent() 方法,当它们被实例化时会被调用。此调用几乎总是在控件的构造函数或 New 方法中出现。由于 Label 类几乎完成了我们需要完成的所有工作,因此我们必须告诉 Label 正确初始化自身,以便控件的其余部分能够正常工作。我们所做的就是调用我们继承的类,也就是所谓的“基类”的构造函数。在 VB.NET 语法中,MyBase 始终指向我们继承的基类。因此,要调用基类的构造函数,我们使用 MyBase.New()。
可移动模式
这里是真正开始为这个控件添加代码的地方。我们需要添加支持,以便在我们的控件上按下鼠标左键时更改鼠标指针,并在释放鼠标按钮时将其恢复为原来的样子。这可以通过处理 Label 类公开的 MouseDown 和 MouseUp 事件轻松完成。
首先,我们需要在类中添加一个字段,该字段用于跟踪我们 Label 控件当前 Cursor 的值。当 MouseDown 事件触发时,我们将设置此值,然后在 MouseUp 事件触发时用它来恢复 Cursor。在 Inherits 行和 Public Sub New() 行之间添加以下代码。
    ' Used to store the current cursor shape before we start
    ' to move our control
    Private m_CurrentCursor As Cursor
现在我们必须添加代码以在适当的时间更改光标。记住,我们正在控制一个包装好的 Label 类,所以它将通过 MyBase 标识符引发我们看到的所有事件。我们需要在按下鼠标按钮时保存当前的光标状态,更改光标以表示我们已进入 Movable 模式,然后在释放鼠标按钮时将其恢复为我们找到的状态。
要添加 MouseDown 和 MouseUp 事件处理程序,建议从编辑器窗口顶部的两个下拉列表中选择它们。这是为了确保您正确地处理了事件参数签名。如果它们不匹配,您将在编译代码时遇到问题。在左侧的下拉列表中,选择“(MovableLabel Events)”,旁边有一个小闪电图标。这将仅显示我们类可用的事件。在右侧的下拉列表中,选择 MouseDown。这将自动生成一个空的事件处理程序,并为该事件提供适当的参数签名。对 MouseUp 执行相同的操作。用以下代码填充空的处理程序。
    Private Sub MovableLabel_MouseDown( _
                ByVal sender As Object, _
                ByVal e As System.Windows.Forms.MouseEventArgs) _
                Handles MyBase.MouseDown
        ' Check to see if the correct button has been pressed
        If e.Button = Windows.Forms.MouseButtons.Left Then
            ' If so, the save the current cursor and
            m_CurrentCursor = MyBase.Cursor
            ' replace it with our new image that says were in Movable mode
            MyBase.Cursor = Cursors.SizeAll
        End If
    End Sub

    Private Sub MovableLabel_MouseUp( _
                ByVal sender As Object, _
                ByVal e As System.Windows.Forms.MouseEventArgs) _
                Handles MyBase.MouseUp
        ' The button was released, so we're going back to Static mode.
        ' Restore the cursor image to the way we found it when the mouse
        ' button was pressed
        MyBase.Cursor = m_CurrentCursor
    End Sub
按 [F5] 查看您的成果。确保将鼠标按钮按在 MovableLabel 控件上,并观察发生了什么。
跟踪鼠标
好的。现在,我们开始实际让 MovableLabel 移动!我将从一个简短的解释开始,说明我们将如何根据鼠标位置计算标签的新位置。
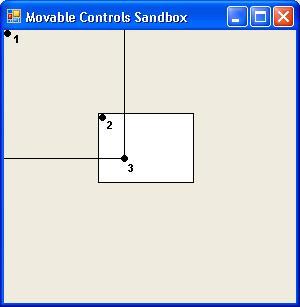
当用户在我们的控件上按下鼠标按钮时,会触发 MouseDown 事件。在 MouseEventArgs 中,我们将获得鼠标相对于我们控件左上角(点 2)的位置(点 3)。由于我们希望鼠标指针在移动过程中保持在控件内的这个位置,因此我们需要存储在这里获取的位置。稍后我们将使用它来维护控件与鼠标位置之间的这种关系。
计算控件位置时,我们需要鼠标相对于我们控件的父容器(在本例中为 MainForm 客户端区域)的位置(点 1)。在我们将要获得的 MouseEventArgs 中,我们仍然会获得鼠标在移动控件内的位置,但这对我们没有用。我们需要将该位置转换为父控件内的点。我们通过调用我们控件的父容器的方法 PointToClient 来实现这一点。Label 类以及任何继承自 Control 的类都公开了一个 Parent 属性,该属性返回一个对持有我们控件的任何控件容器的引用,或者 Parent。PointToClient 方法会将任何相对于其子控件(点 2)内部的点(点 3)转换为相对于其自身左上角(点 1)的相同点。
现在我们有了计算控件新位置所需的两个信息(点 2)。Point2 = (Point3 相对于 Point1) - (Point 3 相对于 Point 2),或者 Point2 = (Point3 相对于 Point1) - (从 MouseDown 事件保存的坐标)。
向代码添加一个 MouseMove 事件处理程序。现在,只要鼠标在我们的控件上并且移动了哪怕一个像素,都会触发此事件,无论鼠标按钮是否按下。我们不希望在 Static 模式下执行任何操作,因此我们需要一个标志在此事件处理程序中检查以查看我们处于什么模式。如果我们处于 Movable 模式,我们需要计算控件的新位置。如果我们处于 Static 模式,我们什么也不做,让事件处理程序终止。所以,让我们将这个标志添加到我们的类字段中。将类代码顶部的字段代码更改为如下所示:
    ' Used to store the current cursor shape when we start
    ' to move the control
    Private m_CurrentCursor As Cursor
    ' Holds the mouse position relative to the inside of
    ' our control when the mouse button goes down
    Private m_CursorOffset As Point
    ' Used by the MoveMove event handler to show that the
    ' setup to move the control has completed
    Private m_Moving As Boolean
已设置移动信号标志,但现在我们需要在适当的地方管理该标志的状态。由于我们的 Movable 模式只能在 MouseDown 事件内进入,因此 m_Moving 标志应在此事件中设置为 True。修改 MouseDown 事件代码,如下所示。我们还将添加在事件触发时保存鼠标在控件内位置的代码。
    Private Sub MovableLabel_MouseDown( _
                ByVal sender As Object, _
                ByVal e As System.Windows.Forms.MouseEventArgs) _
                Handles MyBase.MouseDown
        ' Check to see if the correct button has been pressed
        If e.Button = Windows.Forms.MouseButtons.Left Then
            ' If so, save the current cursor and
            m_CurrentCursor = MyBase.Cursor

            ' replace it with our new image that says were in Movable mode
            MyBase.Cursor = Cursors.SizeAll

            ' Save the location of the mouse pointer relative to the top-left
            ' corner of our control
            m_CursorOffset = e.Location

            ' Set the mode flag to signal the MouseMove event handler that it
            ' needs to now calculate new positions for our control
            m_Moving = True
        End If
    End Sub
修改 MouseUp 事件处理程序,使其如下所示:
    Private Sub MovableLabel_MouseUp( _
                ByVal sender As Object, _
                ByVal e As System.Windows.Forms.MouseEventArgs) _
                Handles MyBase.MouseUp
        ' The button was released, so we're going back to Static mode.
        m_Moving = False

        ' Restore the cursor image to the way we found it when the mouse
        ' button was pressed
        MyBase.Cursor = m_CurrentCursor
    End Sub
快完成了!填充 MouseMove 事件处理程序:
    Private Sub MovableLabel_MouseMove( _
                ByVal sender As Object, _
                ByVal e As System.Windows.Forms.MouseEventArgs) _
                Handles MyBase.MouseMove
        ' Check which mode we're in. If we're supposed to be moving
        ' our control
        If m_Moving Then
            ' get the screen position of the mouse pointer and map it
            ' to the position relative to the top-left corner of our
            ' parent container
            Dim clientPosition As Point = _
                MyBase.Parent.PointToClient
                (System.Windows.Forms.Cursor.Position)

            ' Calculate the new position of our control, maintaining
            ' the relative position stored by the MoveDown event
            Dim adjustedLocation As New Point( _
                clientPosition.X - m_CursorOffset.X, _
                clientPosition.Y - m_CursorOffset.Y)

            ' Set the new position of our control
            MyBase.Location = adjustedLocation
        End If
    End Sub
按 [F5] 运行它,看看您是否能移动您新的 MovableLabel 控件!
未来扩展
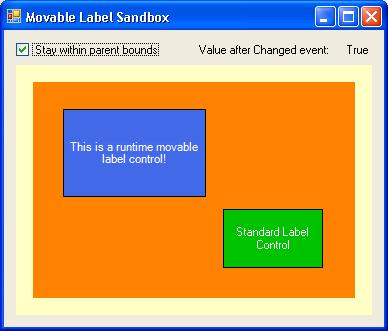
本文构建的代码是文章顶部下载中提供的解决方案的简化版本。下载中的 MovableLabel 类包含大量附加功能,例如:
- 支持停留在父容器的边界内
- 在调整父容器大小时保持边界限制
- 添加一个属性来打开和关闭父容器边界支持
- 公开
ValueChanged事件并维护该事件订阅者列表 - 支持在设计时将控件从一个父容器移动到另一个父容器
- 设计器序列化支持,用于在设计时维护属性值
- 设置新的属性默认值
本文中编写的完整的 MovableControl.vb 文件
Imports System.Windows.Forms
Imports System.Drawing

Public Class MovableLabel
    Inherits System.Windows.Forms.Label

    ' Used to store the current cursor shape when we start
    ' to move the control
    Private m_CurrentCursor As Cursor

    ' Holds the mouse position relative to the inside of
    ' our control when the mouse button goes down
    Private m_CursorOffset As Point

    ' Used by the MoveMove event handler to show that the
    ' setup to move the control has completed
    Private m_Moving As Boolean

    Public Sub New()
        ' Call the constructor of the base Label class to properly
        ' initialize our control
        MyBase.New()
        ' Setup the Cursor property so that, by default, when the
        ' mouse passes over our control, the cursor changes to a hand
        Me.Cursor = Cursors.Hand
    End Sub

    Private Sub MovableLabel_MouseDown( _
                ByVal sender As Object, _
                ByVal e As System.Windows.Forms.MouseEventArgs) _
                Handles MyBase.MouseDown
        ' Check to see if the correct button has been pressed
        If e.Button = Windows.Forms.MouseButtons.Left Then
            ' If so, save the current cursor and
            m_CurrentCursor = MyBase.Cursor

            ' replace it with our new image that says were in Movable mode
            MyBase.Cursor = Cursors.SizeAll

            ' Save the location of the mouse pointer relative to the top-left
            ' corner of our control
            m_CursorOffset = e.Location

            ' Set the mode flag to signal the MouseMove event handler that it
            ' needs to now calculate new positions for our control
            m_Moving = True
        End If
    End Sub

    Private Sub MovableLabel_MouseMove( _
                ByVal sender As Object, _
                ByVal e As System.Windows.Forms.MouseEventArgs) _
                Handles MyBase.MouseMove
        ' Check which mode we're in. If we're supposed to be moving
        ' our control
        If m_Moving Then
            ' get the screen position of the mouse pointer and map it
            ' to the position relative to the top-left corner of our
            ' parent container
            Dim clientPosition As Point = _
                MyBase.Parent.PointToClient
                    (System.Windows.Forms.Cursor.Position)

            ' Calculate the new position of our control, maintaining
            ' the relative position stored by the MoveDown event
            Dim adjustedLocation As New Point( _
                clientPosition.X - m_CursorOffset.X, _
                clientPosition.Y - m_CursorOffset.Y)

            ' Set the new position of our control
            MyBase.Location = adjustedLocation
        End If
    End Sub

    Private Sub MovableLabel_MouseUp( _
                ByVal sender As Object, _
                ByVal e As System.Windows.Forms.MouseEventArgs) _
                Handles MyBase.MouseUp
        ' The button was released, so we're going back to Static mode.
        m_Moving = False

        ' Restore the cursor image to the way we found it when the mouse
        ' button was pressed
        MyBase.Cursor = m_CurrentCursor
    End Sub

End Class
本文专门为 The Code Project 撰写。如果您在任何其他网站上发现本文(部分或全部),这是公然的版权侵犯。请通过 webmaster@codeproject.com 通知 CodeProject 员工。谢谢。